This is a great block. 04 Capital T Variation requires the use of your Wing Clipper I, & Tucker Trimmer I. You’ll be making flying geese, combination units and quarter square triangles. The supply list shows 3 block options. I chose the first 3 color combination because I’m using some Kim Diehl fabric with a cream background for all my BlockBuster’s so I can make them into a cohesive quilt when I’m done. You have 3 size choices. I chose to make mine 12″ blocks with 4″ finished units.

All the instructions you need to make the units required for this block are with your Wing Clipper & Tucker Trimmer. In both there are size charts that tell you what size to cut your starter squares depending on the finished or cut size of your units. When making your block you will want to pay close attention to your color placement.

Remember when making your flying geese, your large square becomes the body and small squares become the small triangles in your geese. I have cut my starter squares to make 4 geese with a blue body and gold wings, and 4 geese with a gold body and blue wings.
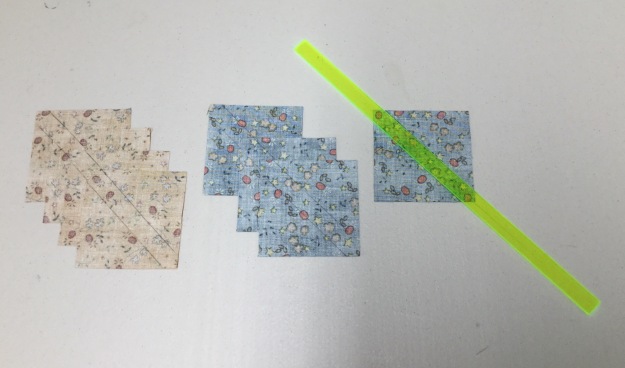
On the backs of my small squares draw 2 diagonal lines using your Magic Wand.

Position two small squares on your large squares right sides together as shown above paying attention to your fabric choices. Nudge your small squares in toward the center just a thread or two (about a 1/16″). This will give more to trim off later.

Stitch using a scant 1/4″ seam allowance.

After stitching, cut apart.

Press toward the small triangles. Remember “what you are pressing toward – always goes on top”!

Position one small squares on the corners of the previously pieced units, nudging the squares away from the edges as before.

Stitch using a scant 1/4″ seam allowance. Cut apart.
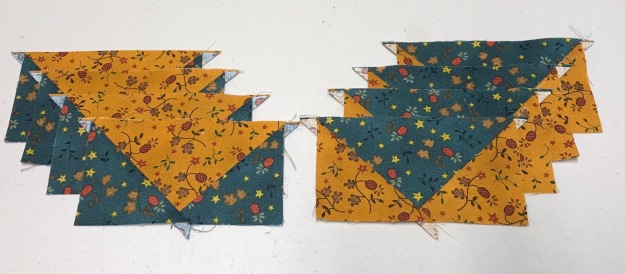
Press toward the small triangles.

Position your flying geese unit pointed toward you (left handers see your Wing Clipper instructions). Align the diagonal lines on your tool with the seams in your unit. As you can see I’m am making a 2″x4″ finished flying geese, so the cut size is 2.5″x 4.5″. Trim the two sides as shown.

Rotate your unit and reposition the Wing Clipper to align the previously trimmed edges and the X at the top with the intersection of the seams and trim again.

Repeat with all your flying geese units. I now have two sets of 2.5″ x 4.5″ flying geese.
Combination Units: after checking my size chart I know my starter squares for 4″ finished units are 5.5″. I cut one gold, one blue and two background squares, all 5.5″.

Combination Units start by making half square triangles.
I grabed my Magic Wand and drew two diagonal lines on the back of one of my gold 5.5″ square. Position the gold square on the blue with right sides together and align the edges. Stitch on both lines using a scant 1/4″ seam allowance. and cut apart.

Press toward the dark triangle. Grab your Magic Wand again and draw two diagonal ines on the back of both Half Square triangles.
Position each half square triangle on a 5.5″ background square, right sides together centering it. Stitch using a scant 1/4″ seam allowance. Cut apart as shown above.
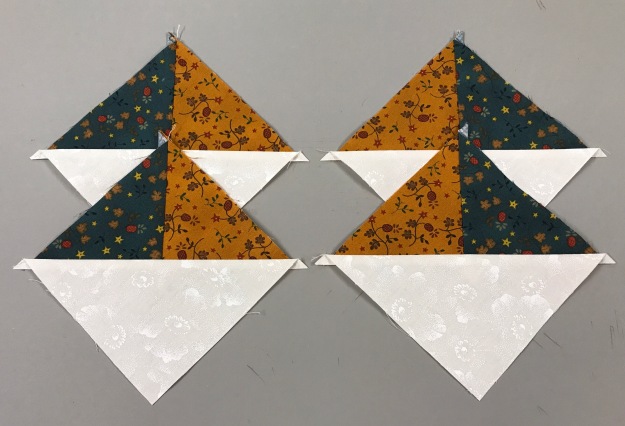
You now have 4 combination units. Note: this process creates units that are “mirror images”.

Position the Tucker Trimmer over the unit, carefully aligning both diagonal lines with the stitched seams as shown and trim.

Rotate the unit and line up the Tucker Trimmer again. This time be sure to position both diagonal lines and the outline of the square to the exact measurement desired and trim again.

Four beautifully trimmed combination units for the corners of our block.
Quarter Square Triangles: Check your size chart. These are 5.5″ starter squares.
On the back of my gold square I have again used my Magic wand to draw to diagonal stitching lines.
Position the gold square over the blue square, right sides together, aligning the edges. Stitch using a scant 1/4″ seam allowance and cut apart.

Press toward the dark triangles. Using your Magic Wand Draw 2 diagonal lines on the back of one half square triangle.

Position the two half square triangles right sides together, making sure the colors are opposite each other (my gold is against the blue and vice versa) carefully nesting the seams as shown above.
Stitch using a scant 1/4″ seam allowance. Cut apart and press swirling the centers as shown above.

Position the Tucker Trimmer over the unit carefully aligning both diagonal lines over the seams lines of the unit. Trim two sides as shown.

Rotate the unit and line up both diagonal lines again along with the outline of the unit to the exact measurement desired and trim. Only one quarter square triangle is needed for this block center.

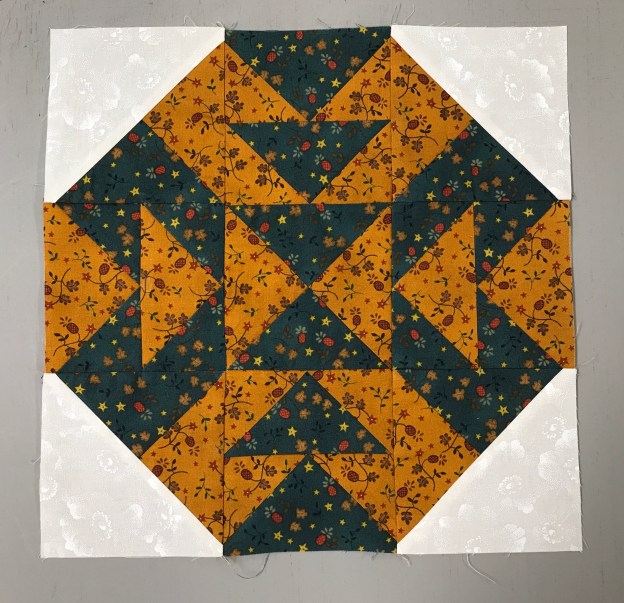
Layout your units as shown above being careful of color placement. Notice the body of my geese follow the colors in the quarter square triangle. And the colors in the combination units are the same as the wings on the geese.

Stitch your geese together in pairs as shown above.

Stitch 3 units into a row as shown above.

This shows how I pressed the block. The outside rows were press toward the combination units, while the center row was press toward the quarter square triangle. This allows the rows to nest nicely.
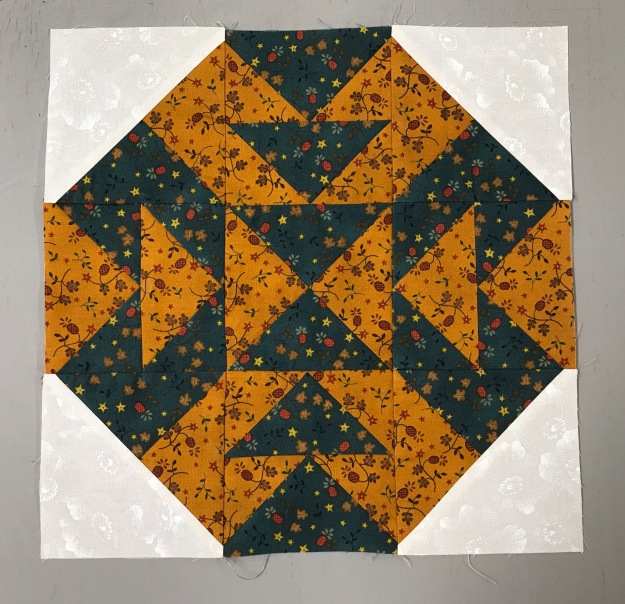
The finished 12″ Capital T Variation block! I love It!


Thanks again for the great help. I will get onto this with your cutting instructions. I haven’t heard of the All-In-One Quilter’s Reference Tool” book. When you round up I’m not sure what you mean. Sorry for all the questions. Thank you.
LikeLike
Instead of 3/8” I would make it a 1/2”. You will trim the excess once it is sewn together. You can see the layout in “A Goose of a Different Feather”.
LikeLike
Great block with easy instructions and pictures. Once blocks are made how are they put together?
LikeLike
Good morning Karen. That it totally up you. I made a quilt using 9 BlockBuster’s called “Scrapodopolous”. You can mix and match 2 and see if there is a secondary pattern, it is all up to you.
LikeLike
Good Morning, or evening here in Australia. I have just finished 4 blocks following your instructions etc and want to make a table topper. If setting on point how will I fill in the gaps so to speak? New to this block and can’t find any layout samples. Thanks.
LikeLike
For 3” finished blocks, for side triangles cut squares 5 1/2” and cut diagonally twice, for corners cut 3” square and cut once diagonally . For 9” finished blocks, side triangles: cut 13 3/8” square – cut twice diagonally, corners: cut 7 1/4” cut once diagonally. For 12” finished blocks: side triangles cut 18 1/4” square, cut twice diagonally, corners: cut 9 3/8” square, cut once diagonally. This information from “All-In-One Quilter’s Reference Tool” book.
LikeLike
Karen, I think I usually round up on those measurements, because as with Deb Tucker Tools you can trim the excess.
LikeLike
Looks like a great block. You give lovely instructions, and your photo’s make it easy to “follow” what you are talking about. 🙂
LikeLike
Thank you Stitching Grandma. That’s the idea, to help you visualize and learn to use your Studio 180 Design tools. I agree, these are great blocks, I’m having fun making them.
LikeLike