
Got some fat quarters? Deb Tucker has many free patterns for you and this one is called Twilight Paths. It uses 14 fat quarters and a background with the Tucker Trimmer I. Twilight paths uses 5″ finished Shaded Four Patch units (5.5″ unfinished). The Shaded Four Patch Technique Sheet shows you haw to make this unit in 21 sizes! This whole quilt is made with Shaded Four Patches!

Download your pattern and let’s go!

Group 1 
Group 2
To get a great scrappy quilt, Deb suggests that you split your fat quarters into two groups. Group 1 along the 22″ side, cut two 3 1/4″ strips and one 6″ strip, sub-cutting into 3 – 6″ x 7″ rectangles. Group 2 along the 22″ side, cut one 3 1/4″ strip and two 6″ strips, sub-cutting each into 3 – 6″ x 7″ rectangles. Cut one more 3 1/3″ strip from leftover from Group 1.

From your assorted dark fat quarters you will need 22 – 3 1/4″ strips, and 64 – 6″ x 7″ rectangles. From your background you will need 22 – 4 1/4″ strips.

Step 1 – Position each 3 1/4″ strip right sides together with a 4 1/4″ wide background strip and stitch lengthwise. Press seams toward the wider strip.
Step 2 – Pair two of the pieced strips right sides together with the narrow strips on opposite sides, so that each narrow strip faces a wide background strip. Sub-cut the strip sets every 3 1/4″ units until you have 128 rectangles.

Pick up each unit the same way when stitching one side.

Step 3 – Keep the two rectangles paired; stitch each pair of cut pieces together along one long side. Note the seams are not supposed to nest.
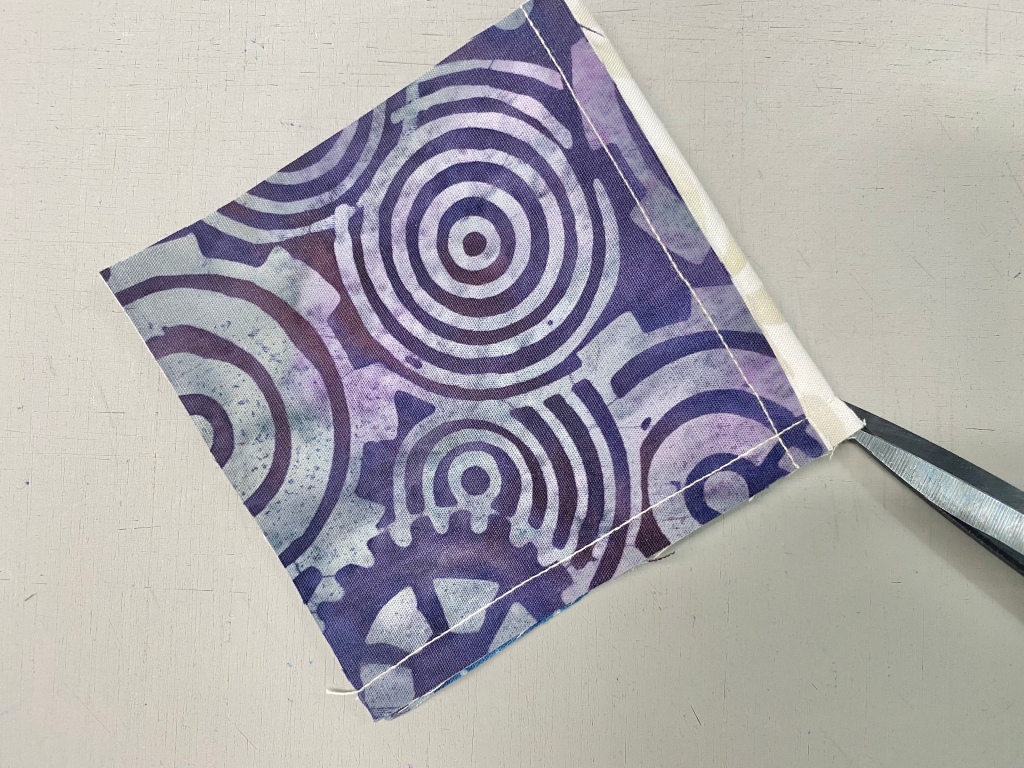
Snip the seam allowance at the half way mark between the two squares all the way to the seam.

Press each half of the seam allowance away from the square as shown above.
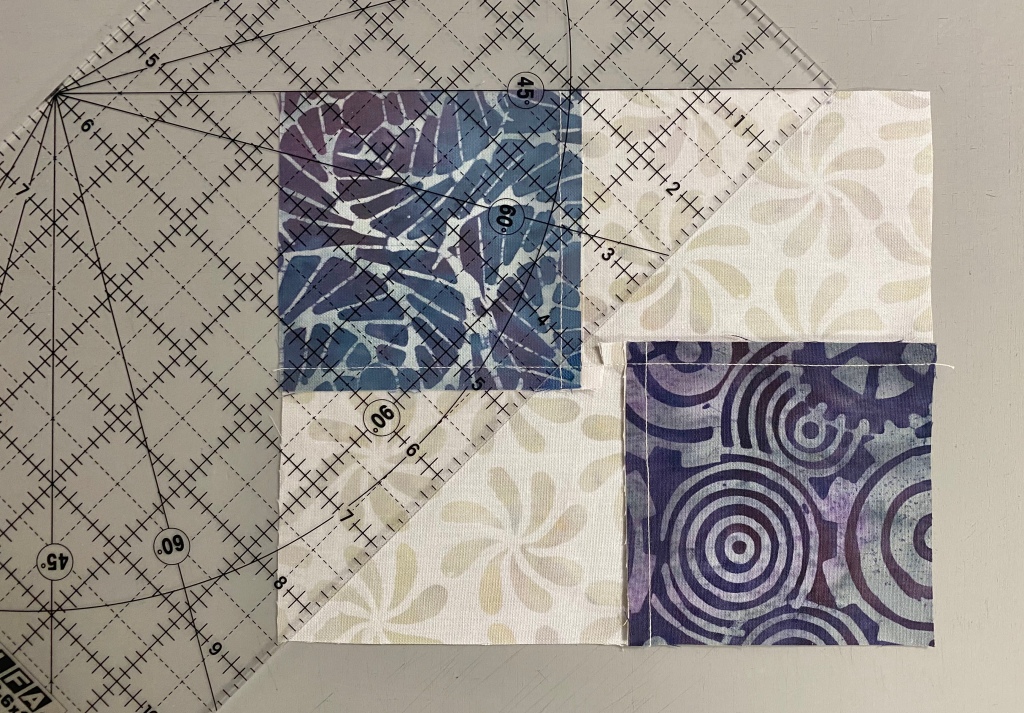
Step 4 – Mark stitching lines. Select a ruler with a 45 degree angle marked on it. Draw a 45 degree sewing line from top to bottom, through the corner of the square where the stitching lines meet. Draw a 2nd line through the corner of the other square.

Step 5 – Center each marked, pieced rectangles right sides together with a 6″ x 7″ rectangle.

Stitch on both lines.


Trim seams 1/4″ from the stitching lines.

Press all seams toward the large triangles.


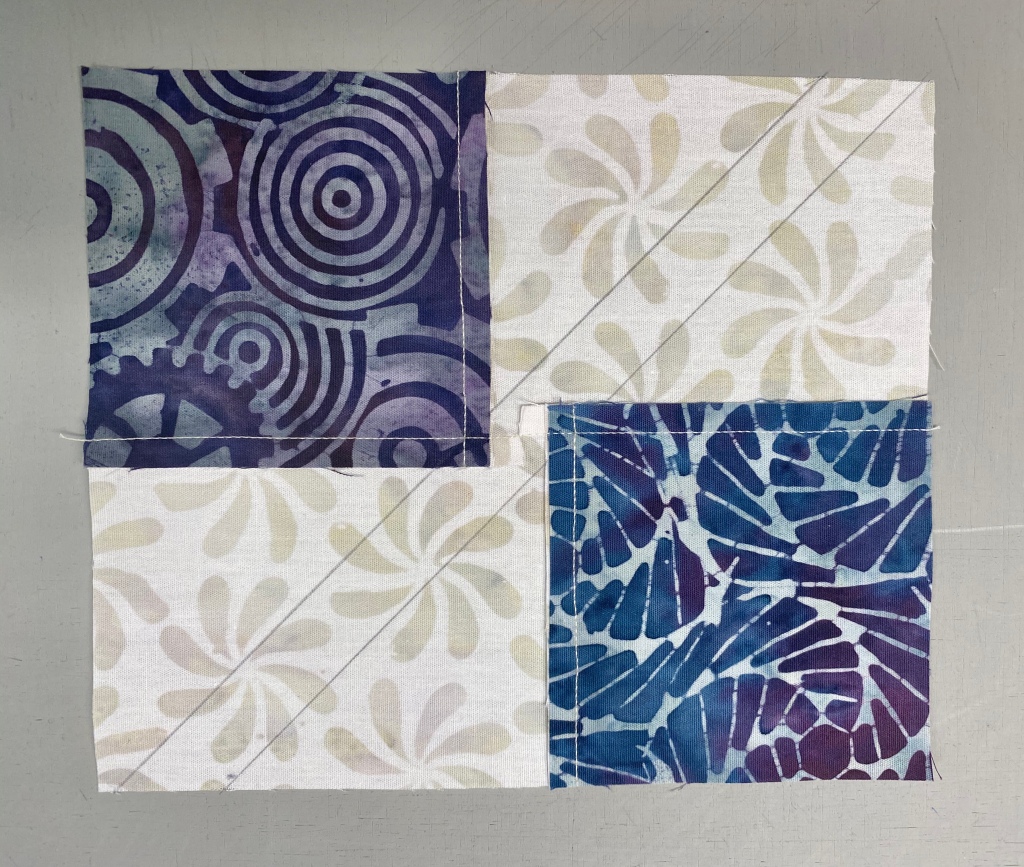
Step 6 – Trim the 128 oversized units with your Tucker Trimmer I to 5 1.2″ x 5 1/2″. Align the 5 1/2″ Sizing Diagonal with the diagonal seam of the unit. Position the common diagonal so it passes through the center of the unit. Trim the two sides.
Step 7 – Rotate the unit and line up the 5 1/2″ cut size lines on the tool with the previously trimmed edges, align the sizing diagonal and the common diagonal as before and trim the other two edges.

Step 8 – Layout 80 units according to the diagram on page 5 to create the quilt center.

Stitch the units into rows and then stitch the rows together. Press all seams open.
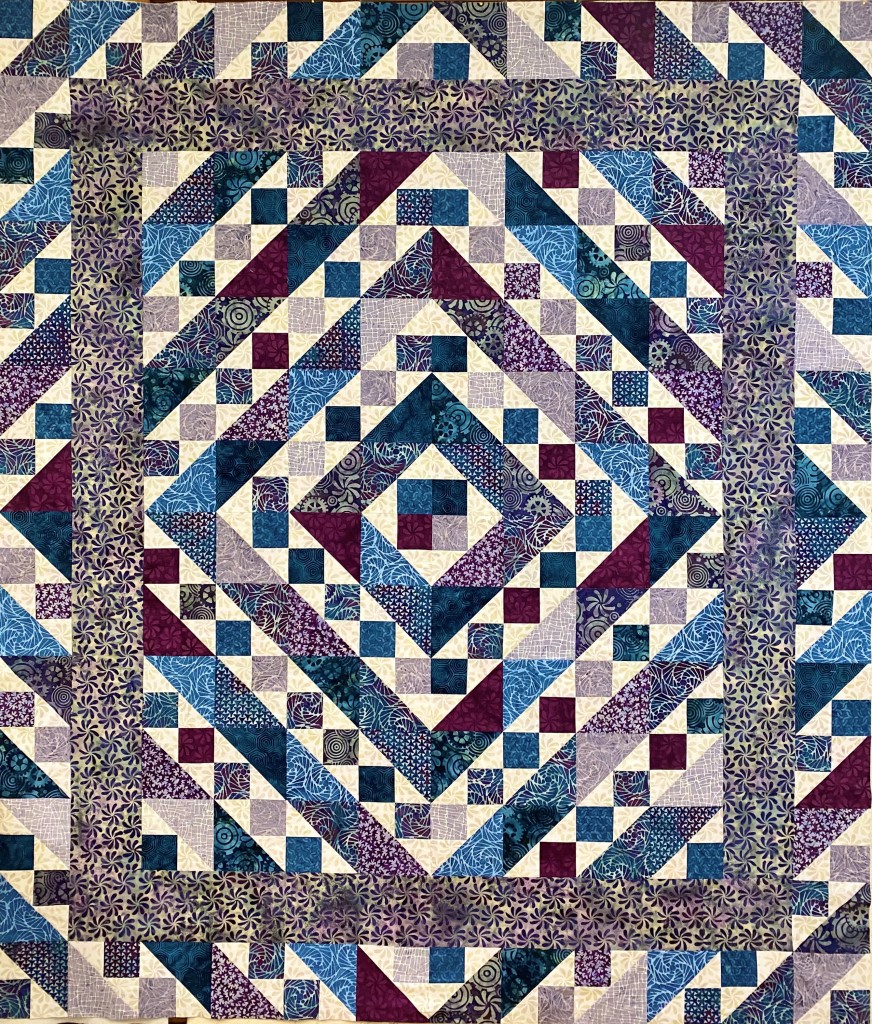
Step 9 – Attach the Inner Border. Stitch the inner border strips to the quilt center.
Step 10 – Assemble the Outer Border. Stitch the remaining units together into 4 border strips containing 12 units each. Make sure you orient the units as shown in the pattern. Press all seams open. Finish as indicated.
My top is not yet quilted. I used Deb Tucker s Steam Engine fabric line by Island Batik in my quilt top. So I guess I will call mine Steam Engine on the Tracks!

This project was supervised by Tucker!
#debtucker #studio180design #IslandBatik #steamengine #aurifilthread #bernina740 #olfa

Great post and quilt. I just made a bunch of shaded four patch blocks using Mary’s Triangle. Her directions say to always place the square on bottom left before marking the sewing line. But I notice in Step 4 your photo shows both orientations, yet all blocks came out looking the same. I wonder what/why the difference? Guess I will experiment!
LikeLike
Where you place the square determines where to place the 45 degree line to draw the stitching lines. If the squares are in the lower right and upper left, the 45 degree line is placed on top of the rectangle. If the squares are in the upper right and lower left, the 45 degree line is placed on the bottom of the rectangle. It all depends on how you pick up the units when stitching them together.
LikeLike
I understand that and have experimented to see what happens when placing a square lower right vs. lower left. I get the same shape, a nice shaded 4P. I was trying to figure out why Sally Schneider’s ruler says ‘always place a square in the lower left.’ I see now she says to work with her piecing directions. I have Deb’s sheet for Shaded4P and demonstrated for my guild last year. such a great unit in so many blocks. Thank you for your quick response older an older post!
LikeLike
I figured out the first I taught it. One student’s unit was different than the rest. I thought my brains would fall out before i figured it out.
LikeLiked by 1 person
Love the Deb Tucker shaded 4 patch method and Tucker trimmer. Just out of curiosity I saved all the waste that was created making them. Not that much and well worth it for perfect blocks!!! All 128 blocks made now just need to put it together. This is all from left over fabric from a previous quilt. Thanks for sharing this pattern! Peg Kubinski
>
LikeLike
I’m so happy you made it. It is a great scrap buster.
LikeLike
Great tutorial and beautiful quilt. Wonder if we could make it mini?
LikeLike
Thank you, Dee I’m sure you could make a mini with no problem!
LikeLike
Wow, that’s a neat way to make those units!
LikeLike
Thanks, One of my favorite techniques!
LikeLike
Great tutorial. One of my many to dos.
LikeLike
Thanks Gail!
LikeLike