![]() The fabrics featured in this post were given to me by Northcott.
The fabrics featured in this post were given to me by Northcott.
I have been chosen to participate in Northcott’s Creative Club. If you have not used Northcott fabrics before you will be pleasantly surprised. Just like their logo says “Cottons that feel like Silk”!
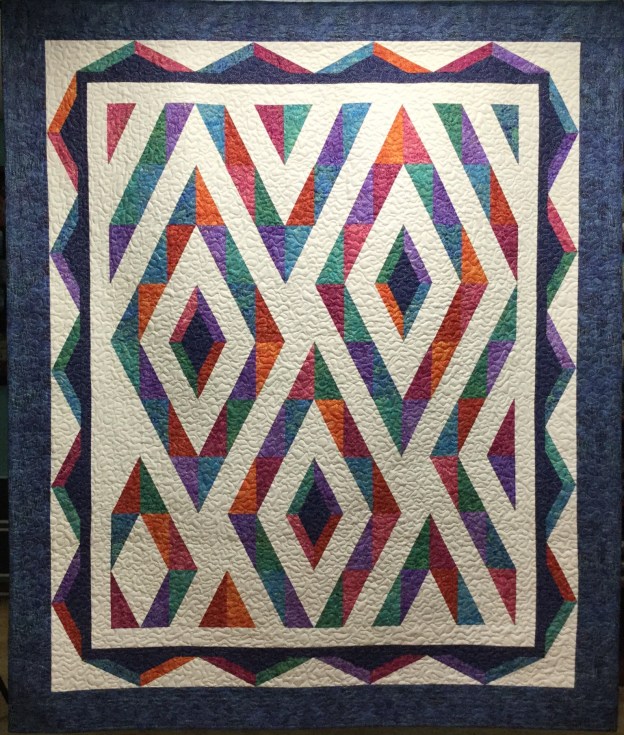
I chose to make Prism, a pattern created by Pam Goggans of Sager Creek Quilts. Prism is a companion pattern for the Studio 180 Design Split Rects Tool.

One of my favorite Disney movies is “Pollyanna”. Remember this scene when they discover “rainbow makers”? I do, and that is the inspiration for my version of Prism.
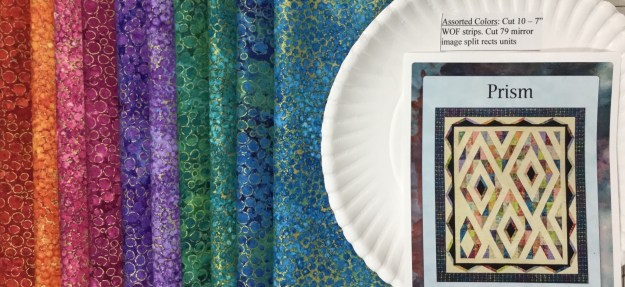
My fabrics are from Artisan Spirit Shimmer By Deborah Edwards Northcott Studio. Aren’t they just yummy, looks like a rainbow to me!


I am a purveyor of paper plates! I use them to stay organized throughout the quilt making process. I cut everything out but the borders (I save that till the end so I can verify my measurements) and place them on their labeled paper plate. I can stack them up in a tub or place them in gallon size storage bags when I’m not working on them.
Split Rects Units


To make mirror image split rects units, lay the fabric strip “right sides together OR wrong sides together. Position the ruler on the strip with the broad black line against the trimmed end of the strip and the desired finished size guide and trim along the slanted edge. For the second cut, rotate the tool one half turn and align the small second trim “nub” line on the long edge of the strip and the “Second Trim” guide along the just-trimmed edge. Trim along the straight edge of the tool.

I am right handed, so my strips are placed horizontally and I cut from left to right. Left hander’s would place their strips vertically. See tool instructions for complete left handed cutting.

Continue to cut all the pieces for the split rects units.


Lay out the pieces as they will be stitched together. Stitch the elongated triangles by placing them right sides together with the long, bias edge of the pieces aligned. Center the two pieces with just a bit of overlap at the ends.


Press the seams either toward the darker fabric or open. As you can see I press mine open.


Align either the “Common Diagonal” or the “Size Diagonal” with the seam you have sewn. These will vary depending on the slant of the seam in your unit. Check to make sure that the fabric unit is completely contained within the trim down lines. For right hander’s trim up the side and across the top.


Rotate the unit and reposition the tool on top. Align the correct “Cut Size” measurement with the trimmed corner and the same diagonal line used in the first trim. Trim the remaining two edges of the unit.

Above I have laid out my trimmed mirror image split rects units.
Double Split Rects Units
After trimming the split rects units to the correct “Cut Size” choose 24 mirror image units to make special Double Split Rects!


According to pattern instructions trim away the excess of the colored triangle. Make sure to position the left leaning units right side up and the right leaning units right side down.


Using the Split Rects Tool, cut triangles from the accent fabric according to pattern instructions.
Lay out the trimmed units and the replacement triangles.


Stitch the dark triangles to the trimmed units. I press my seams open.


Trim as before. Place right leaning unit right side up and left leaning unit wrong side up.


I laid out my units on the design wall, and then I noticed two units were missing! Tucker my Chihuahua decided I had ignored her long enough. This is her way getting my attention. I found the units upstairs by a guilty grinning Tucker!


I stitched the units for the quilt center together and then added the borders. The secret to this quilt is to use your best accurate 1/4″ seam!

I quilted Prism with a meandering stitch. (All that meander are not lost.)

The Northcott Artisan Spirit Shimmer fabric line was perfect for this quilt! I love it!


Even the quilt back is beautiful Northcott fabric!
I used Quilter’s Dream Blend Batting, and I do all my piecing with Aurifil thread!

This quilt is so pretty!
LikeLike
Thank you, I like it too!
LikeLike
Spectacular! I agree that your detailed instructions make it sound very doable
LikeLike
Thank you, it is doable! 😃
LikeLike
This is simply beautiful. The pattern is on my bucket list. I love your detailed step outs and your quilting is just perfect to compliment the design – adds texture and movement! That little Tucker of yours sure is a cutie!
LikeLike
Thank you so very much Karen!
LikeLiked by 1 person