I have had this panel by Artisan Spirit Dreamscapes by Ira Kennedy for Northcott for several years. The Dreamscapes panel measures 13″ x 20″. It came two in a panel, so I ended up with 14.
I partially completed the first set of 7 panels to show how to add the sections to the panel. I save this OBW classes.
I finally decided to complete the 2nd set of panels. I cut the strips 2 3/4″ for 4″ finished hexies. In hind site I wish I would have made them smaller. To add more hexies and enhance the hexies I had, I added stars made with the Quad 60 Technique Sheet and my Star 60 Tool. My Dreamscapes wall hanging measures 35″ x 41″
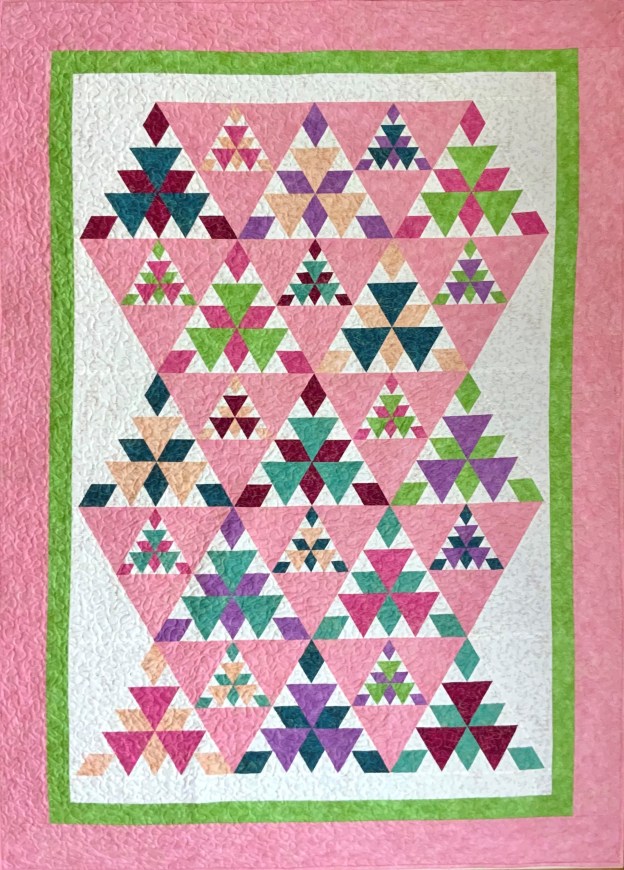
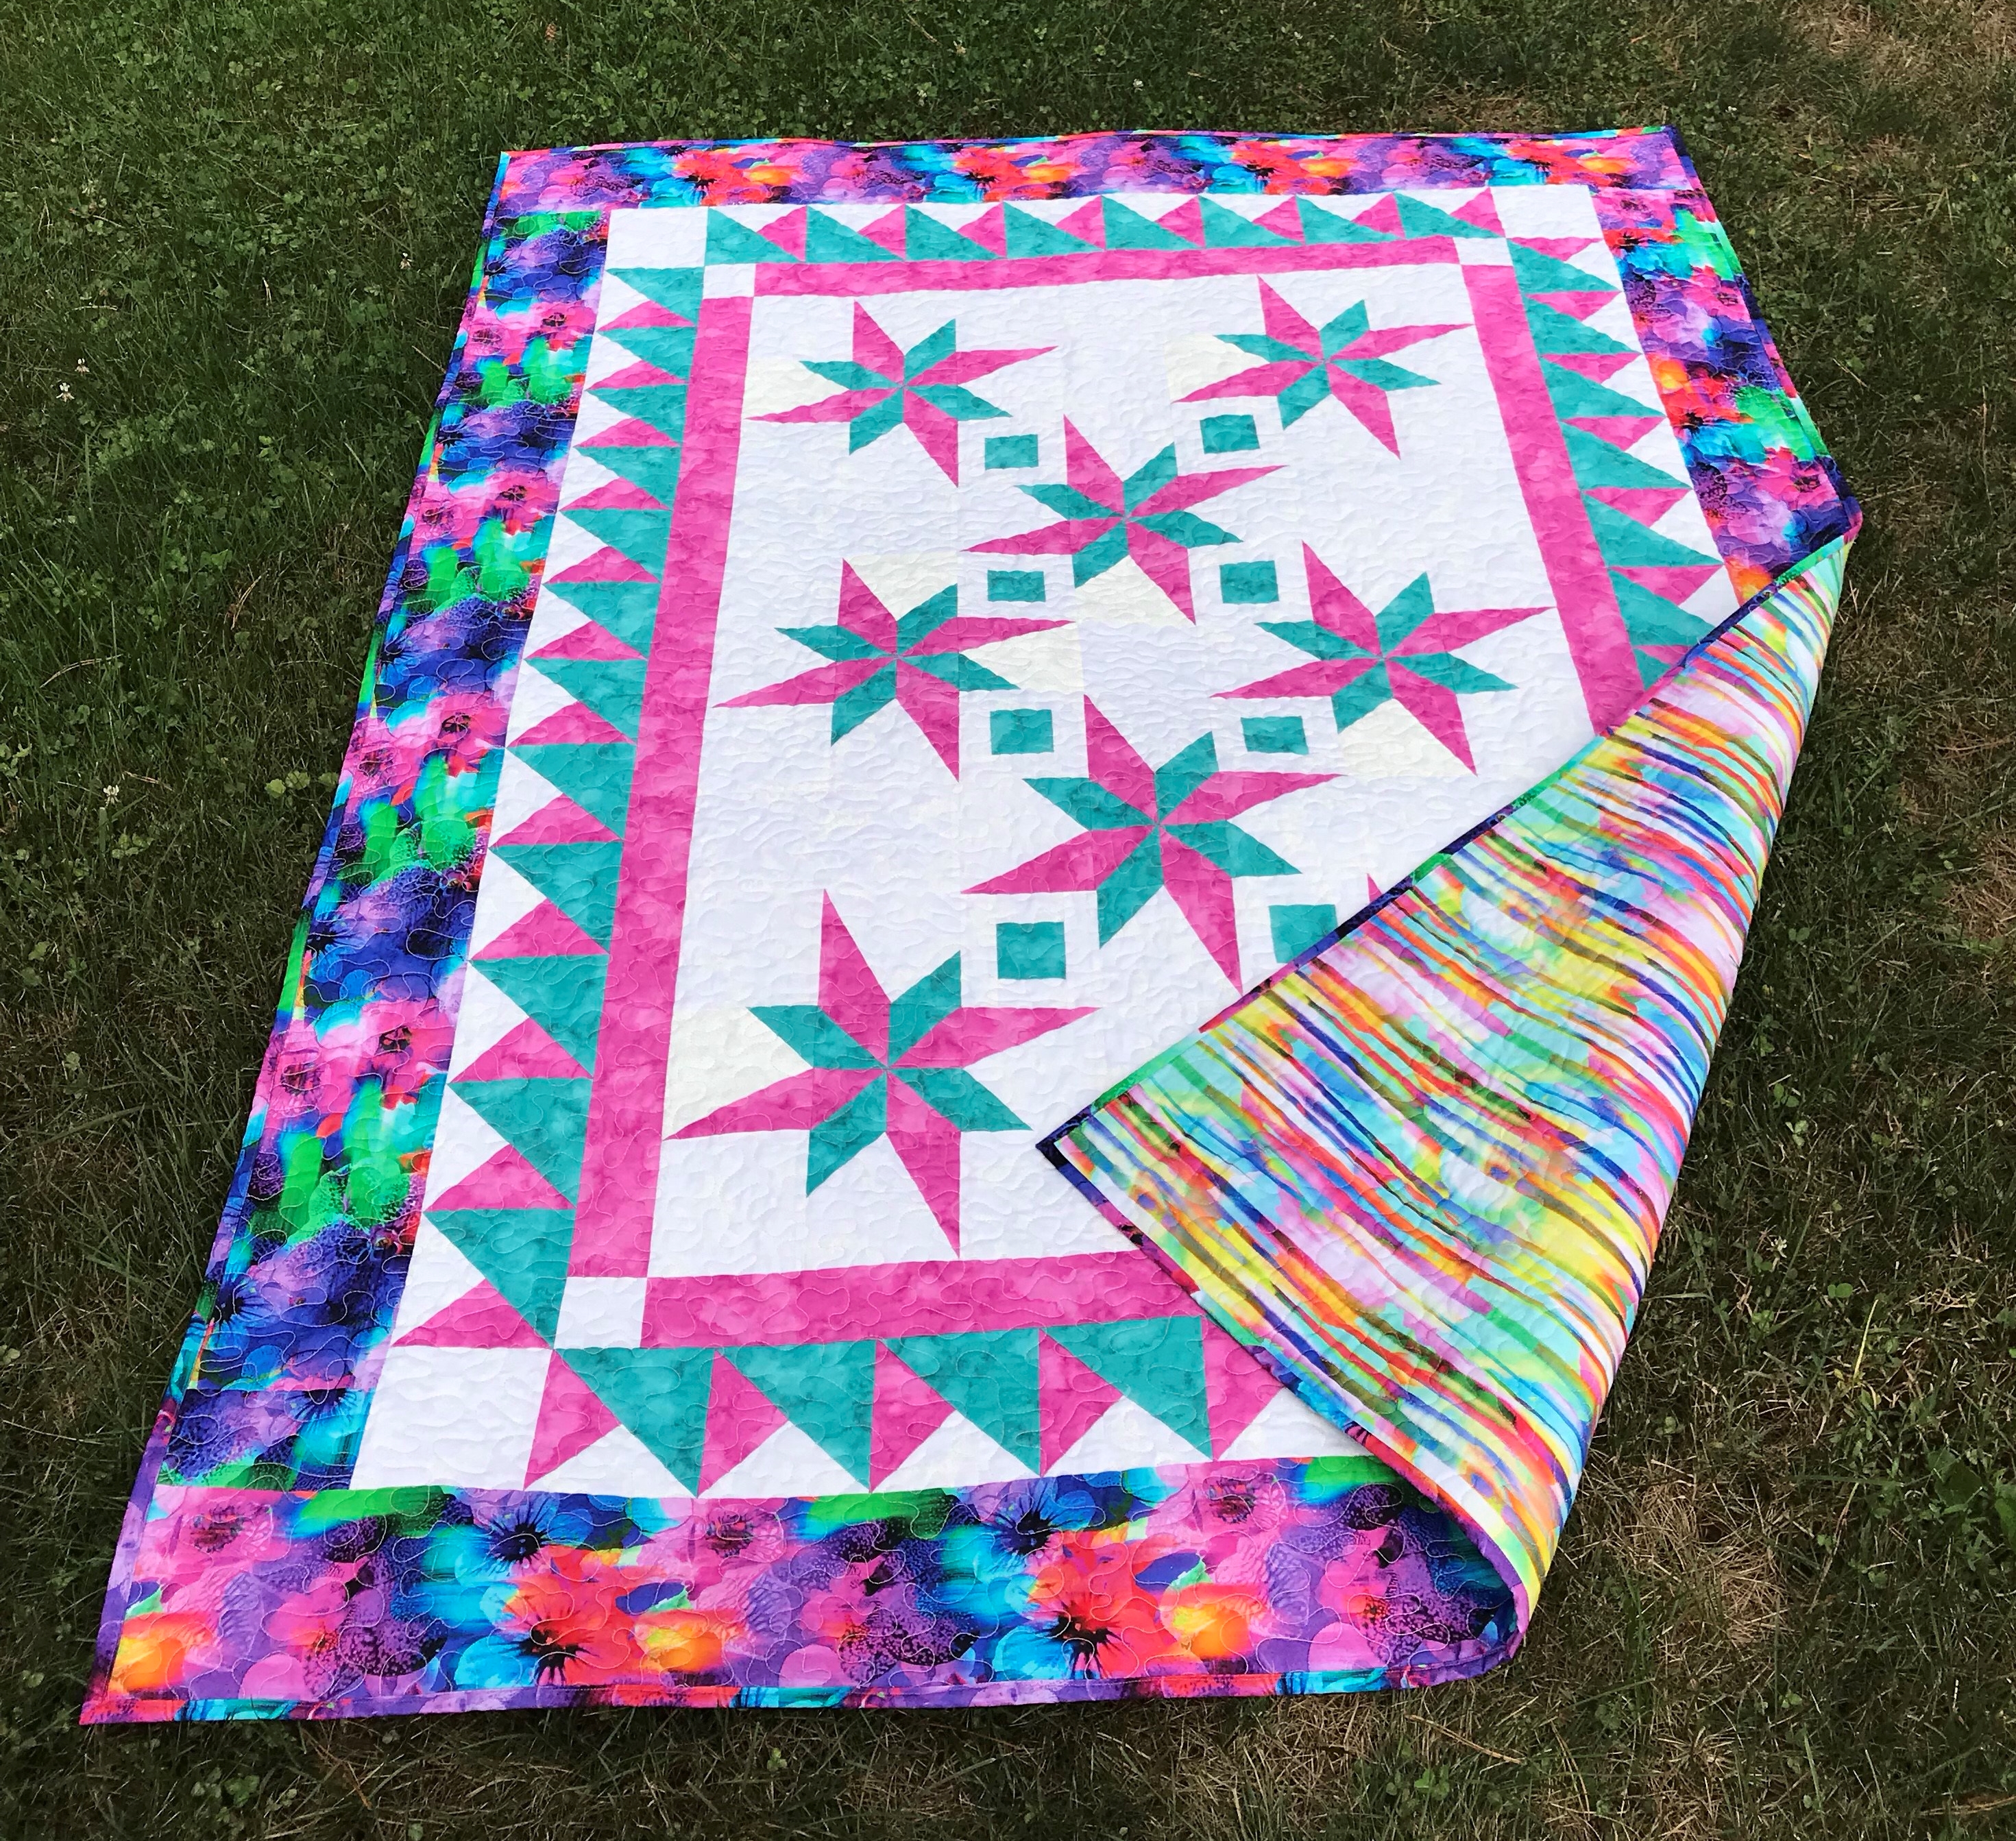
I obviously can’t get enough of 60 degree triangles. I decided to take a break from One Block Wonders to play with my Star 60 Tool and make Radioactive by Deb Tucker.
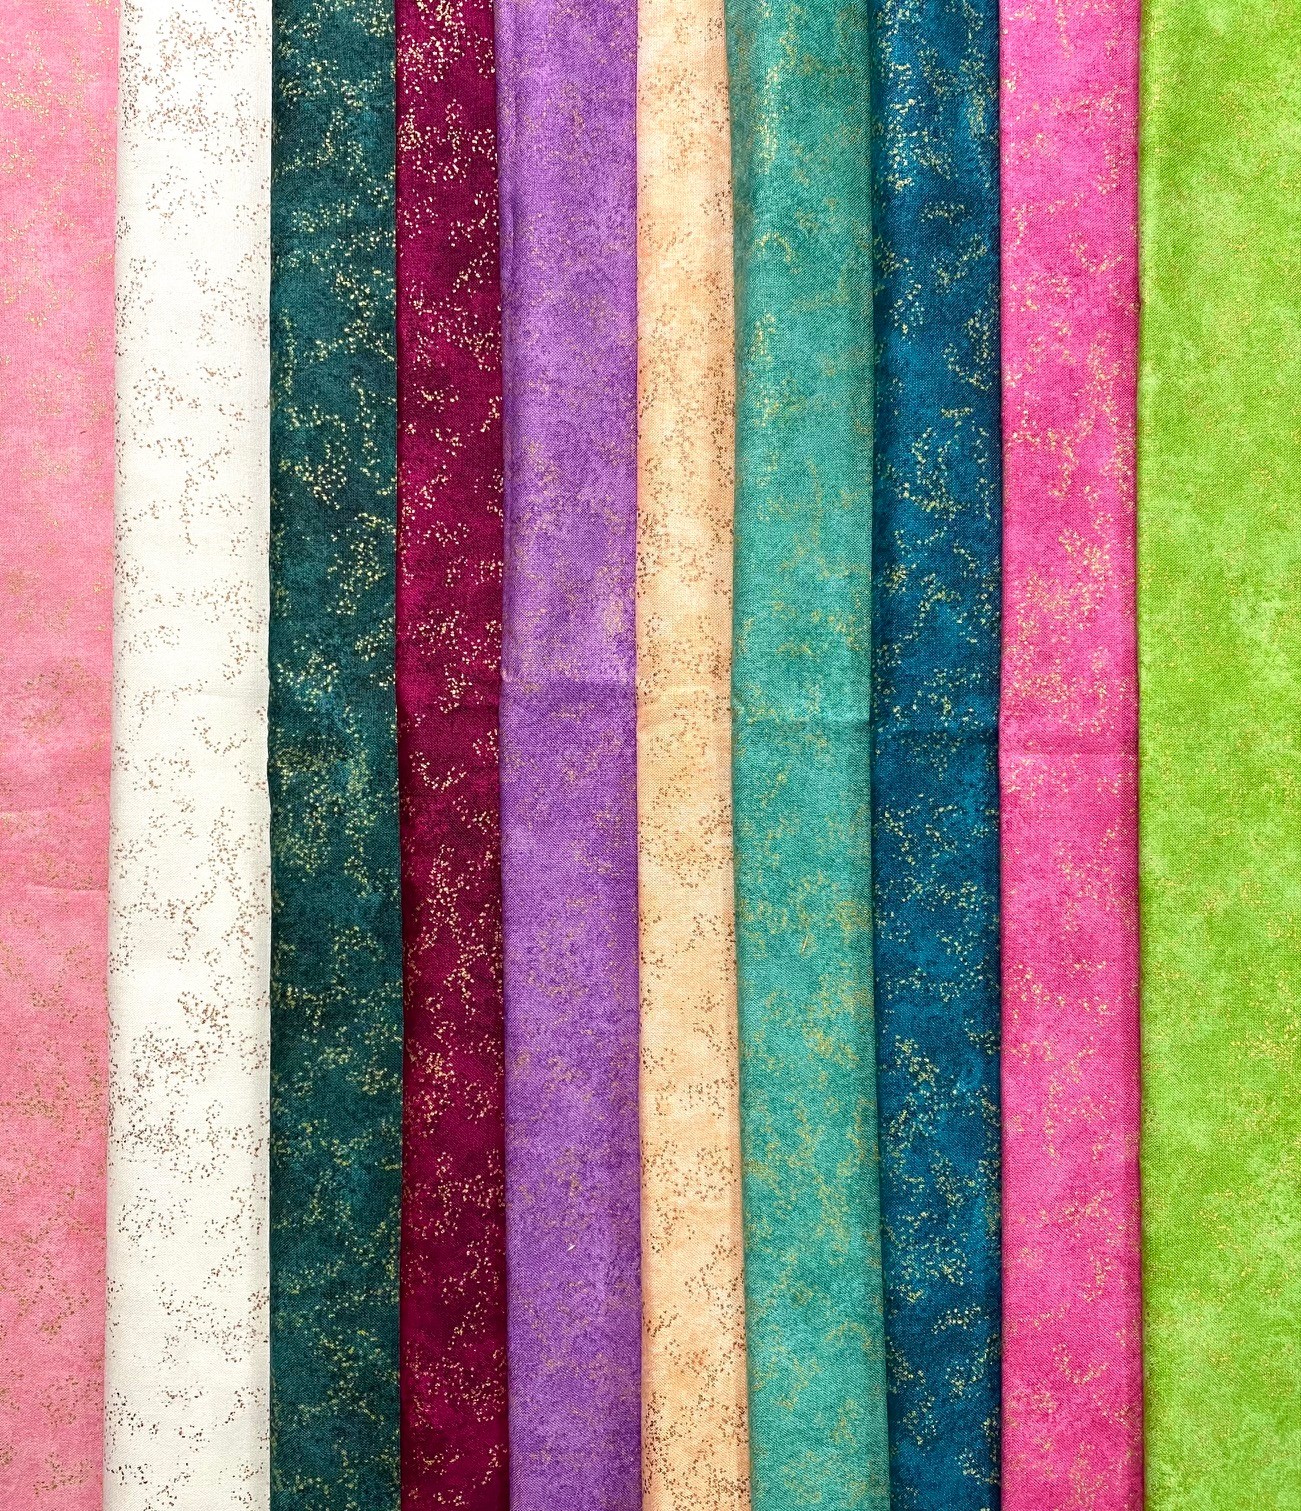
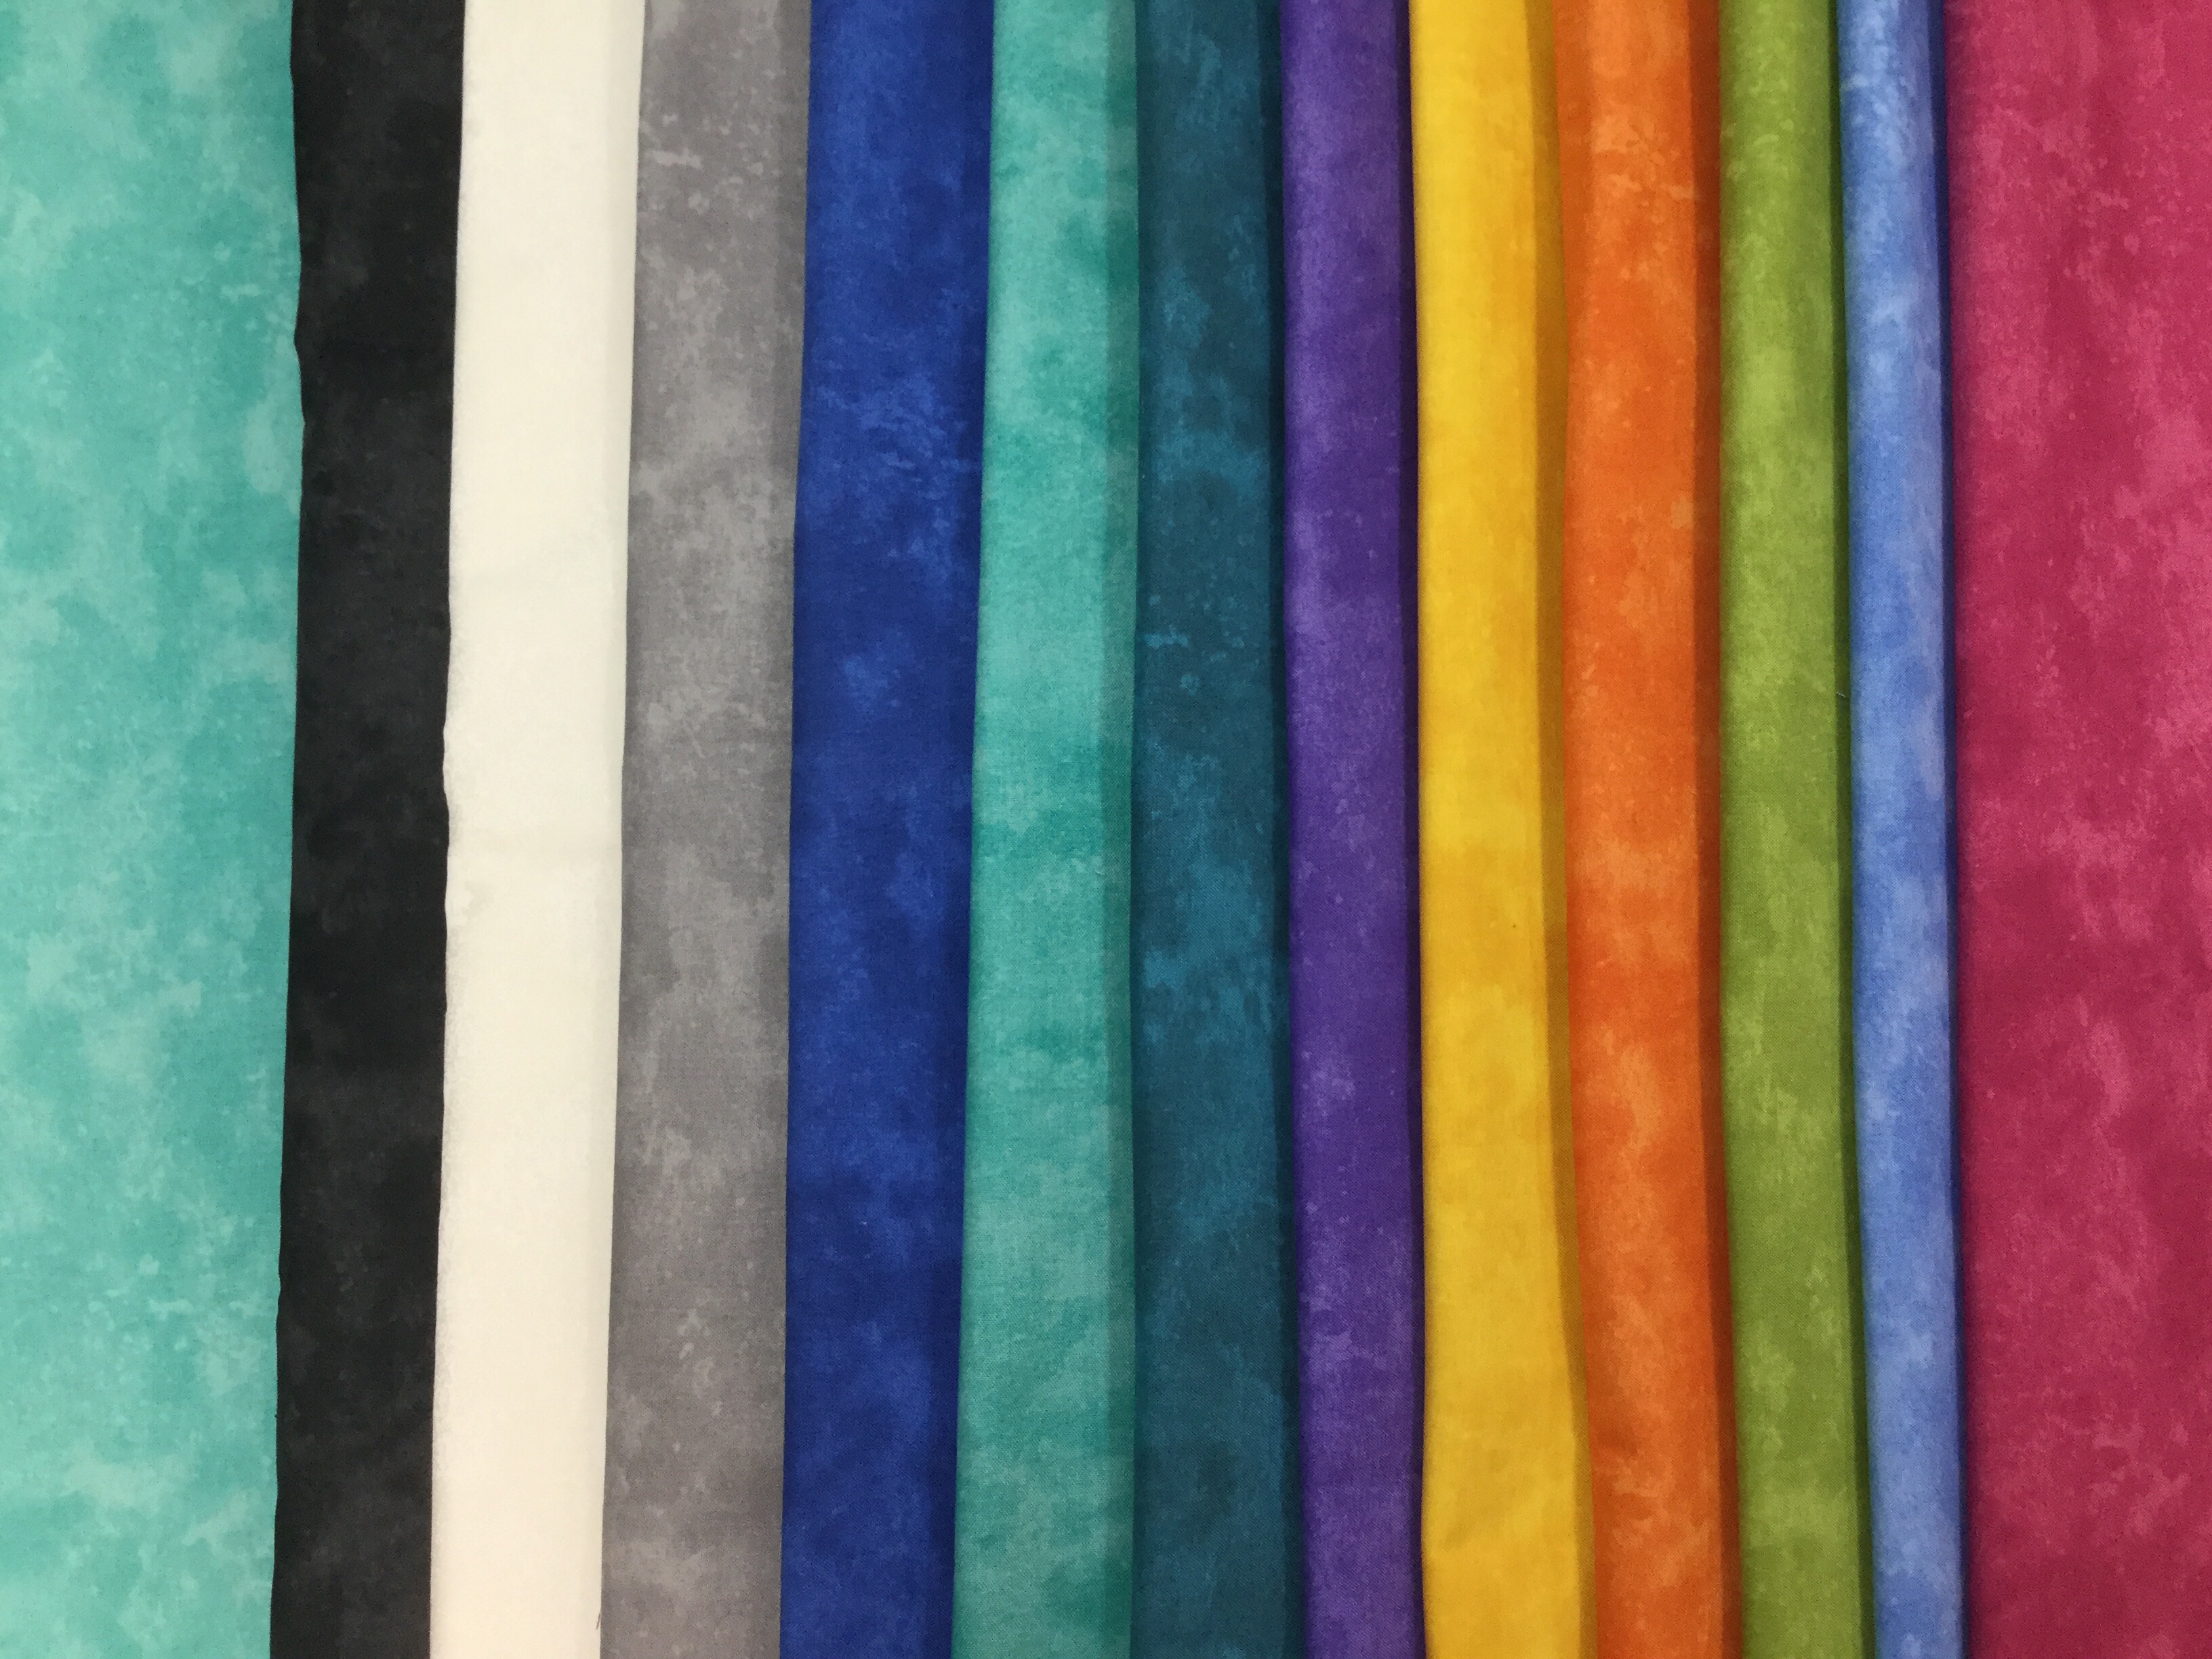
Northcott Fabrics provided me with Shimmer Radiance by Deborah Edwards. These fabrics are so beautiful with a soft luscious hand and saturated colors.
Radioactive uses Star 60 units for 12″ and 6″ triangle blocks. First I cut my side triangles for my 12″ Star 60 units, then the 6″ units.
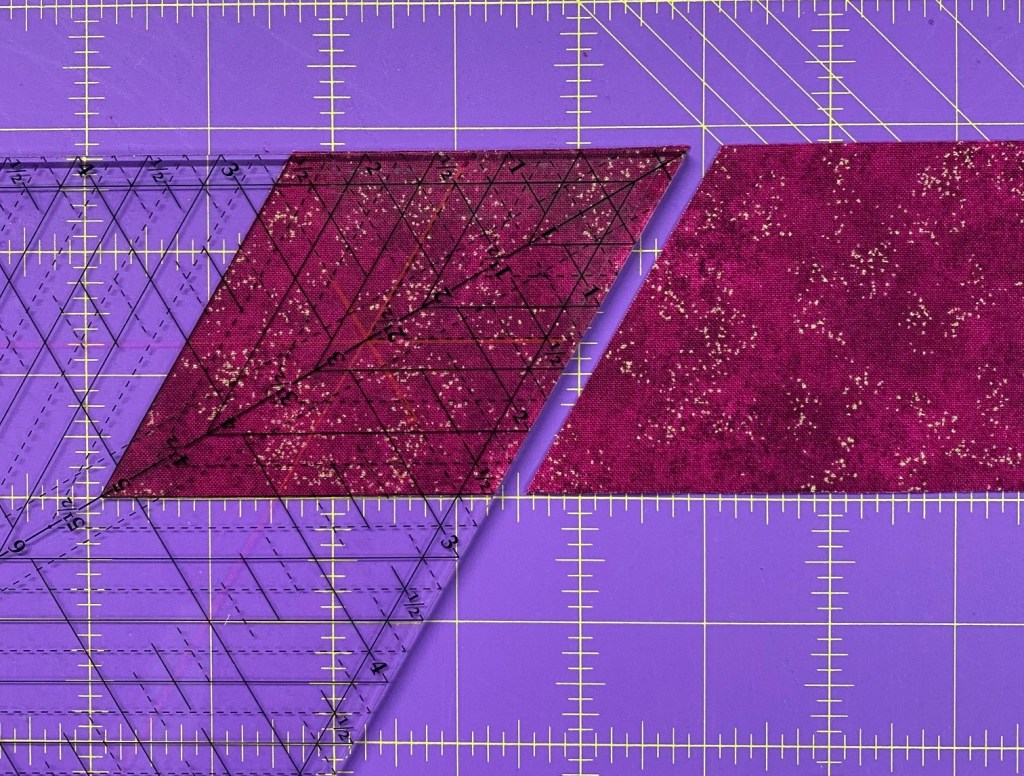
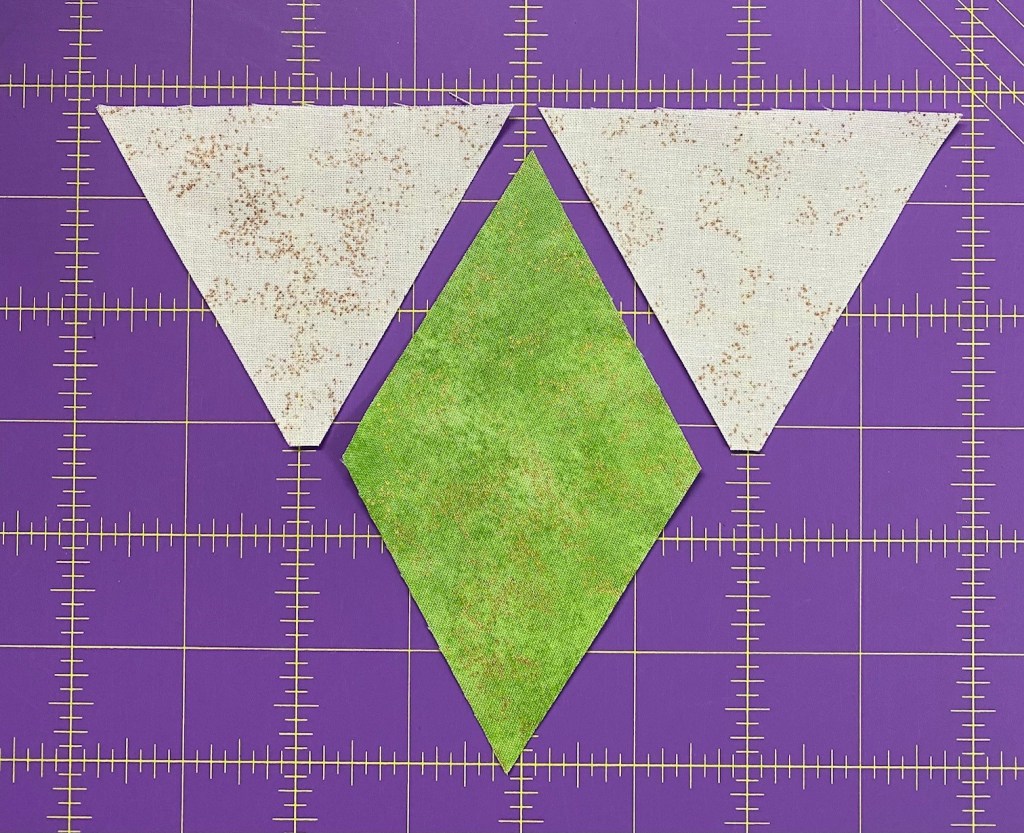
Then I cut my Diamonds using my Star 60 tool.
6′ & 12″ Star Units
Once I have cut my units for both my star 60 units it is time to construct my units.
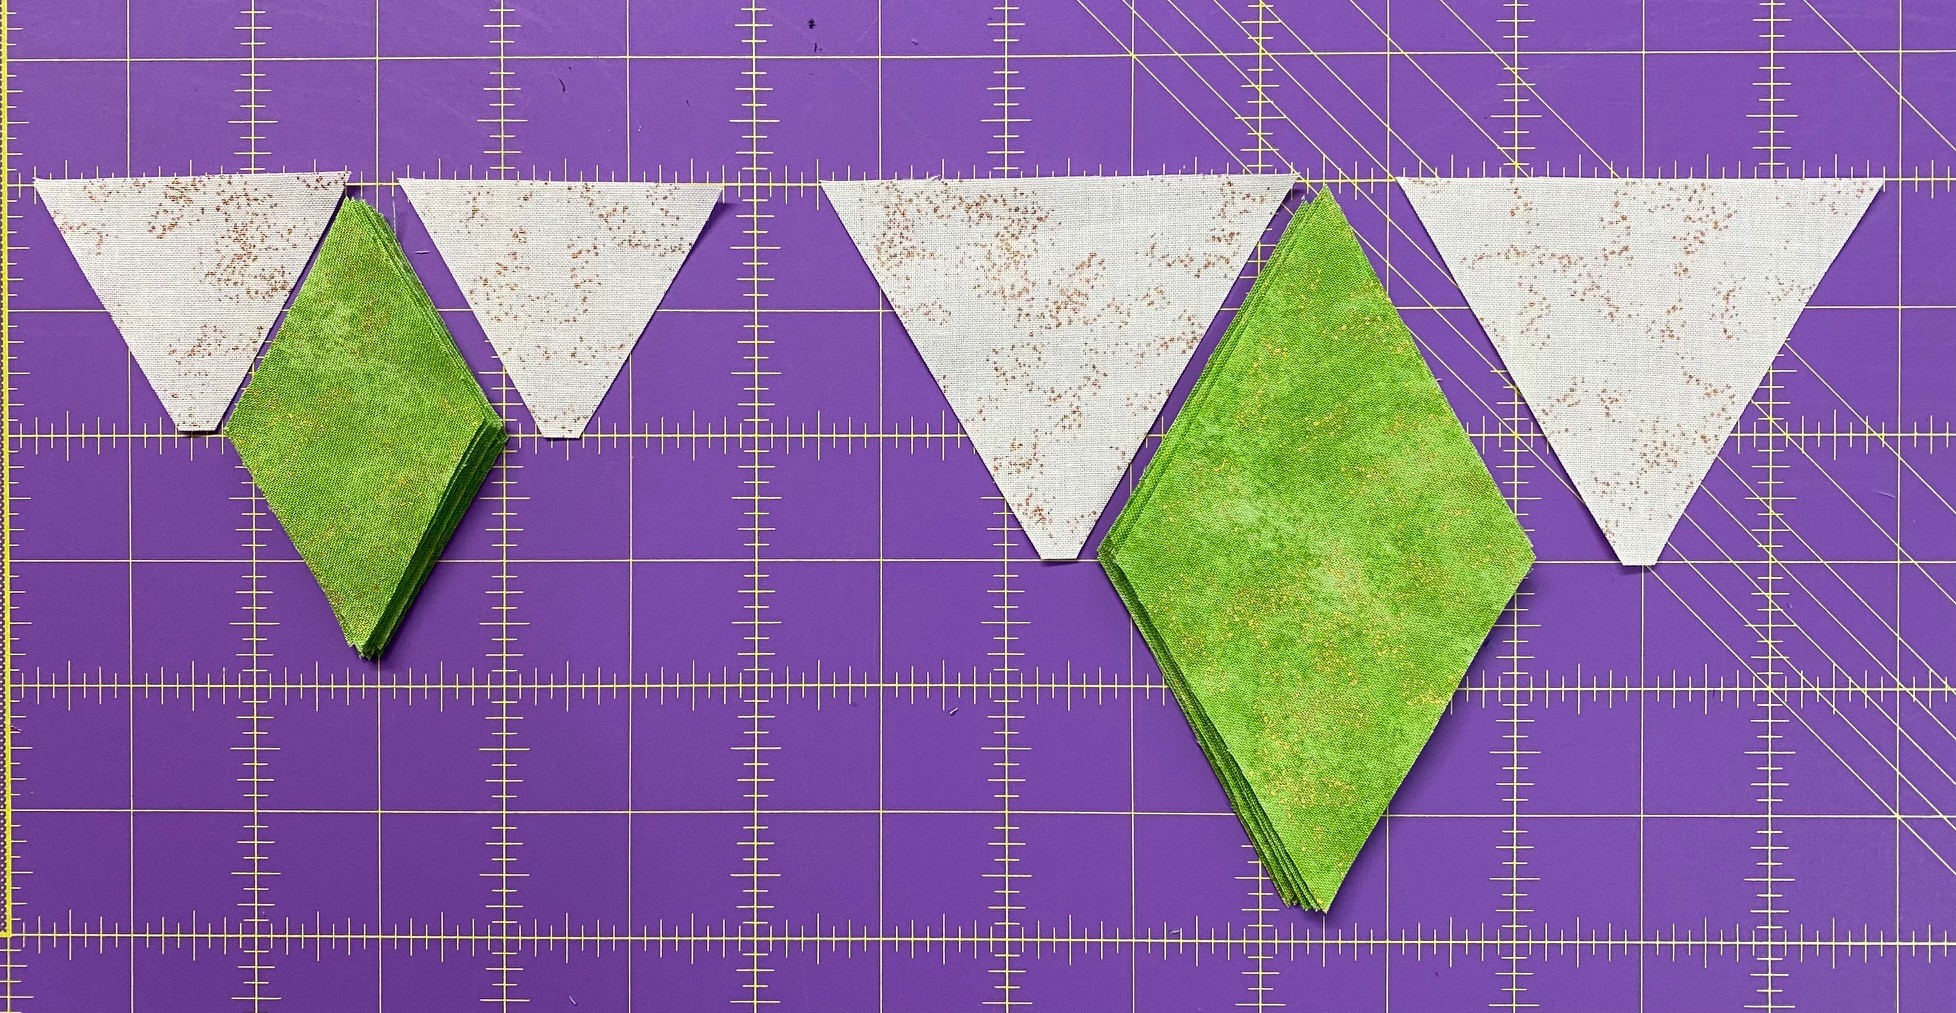
Lay out the bright Diamonds and the background side triangles as shown above. Take a triangle from the right hand side and position it on top of the diamond. Match the flat corner of the triangle with the edge of the diamond as shown; align the raw edges.
With the diamond on top, stitch along the matched edges. Press seams open.
Position a remaining triangle on the other side of the diamond point. Align the flat corner of the triangle with the edge of the diamond. Align the raw edges. With the diamond on top; stitch.
Press seams open. Both the 6″ and the 12″ Star 60 units are constructed the same way.
Block Construction
Choose 6 Star 60 units and 3 companion triangles and layout as shown above.
Note: 3 Star 60 units have the diamonds pointing inward and 3 are pointing outward.
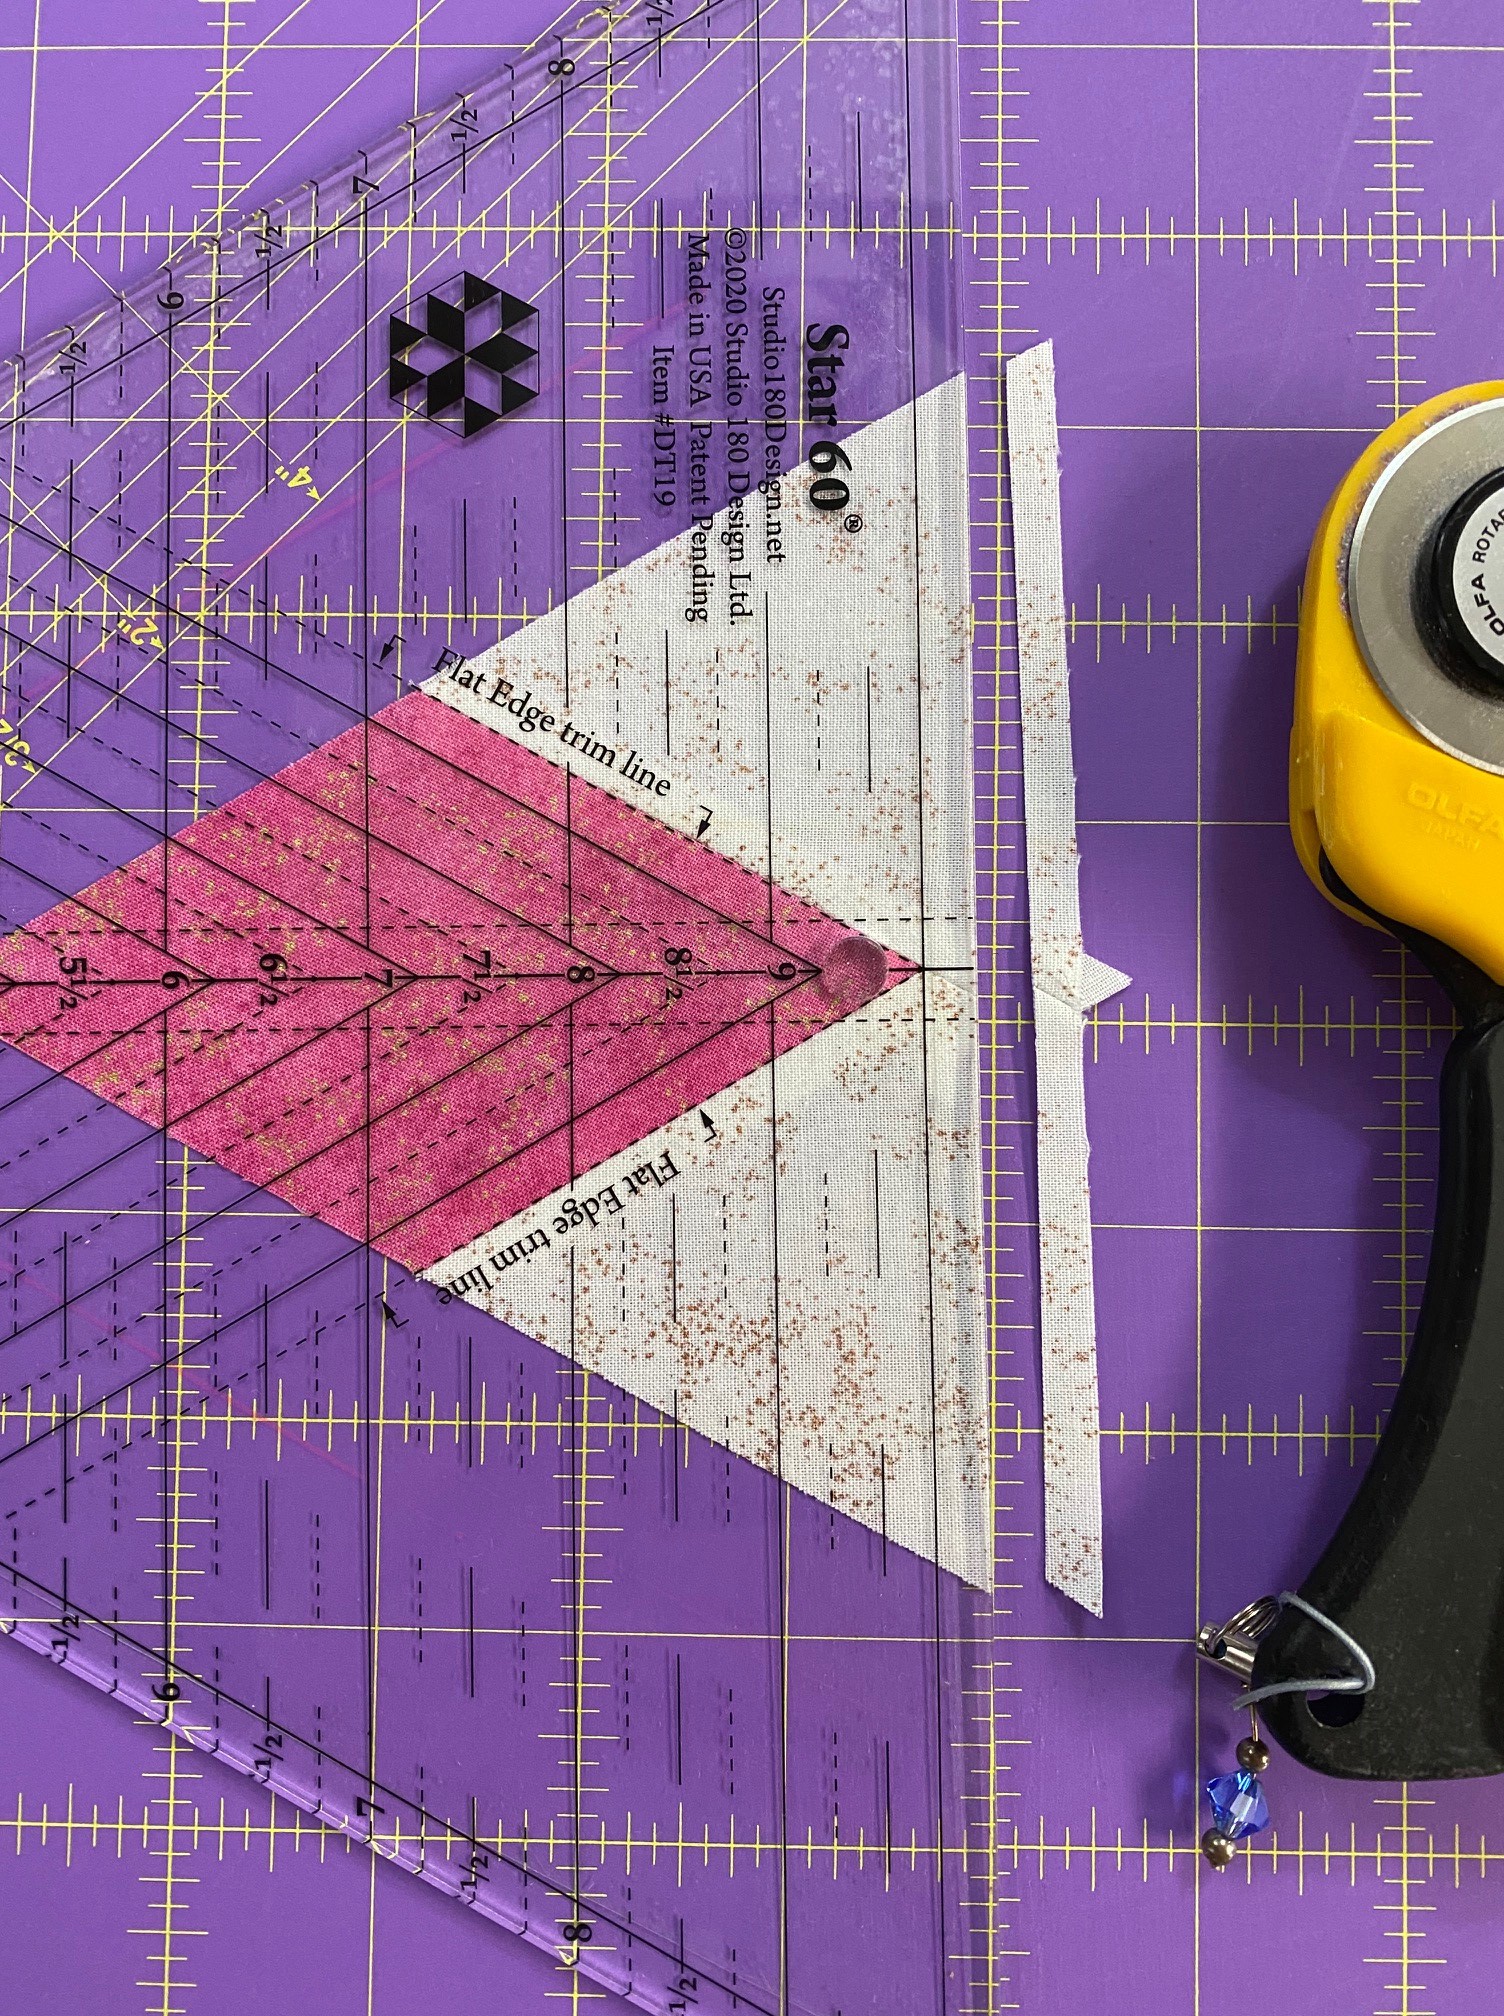
Take the 3 Star 60 units that are pointing outward and position them so the raw edge with both side triangles is either by your right hand if you are right handed or left hand if you are left handed. Locate and align the Flat Edge trim lines on the tool with the seams of the diamond and trim.
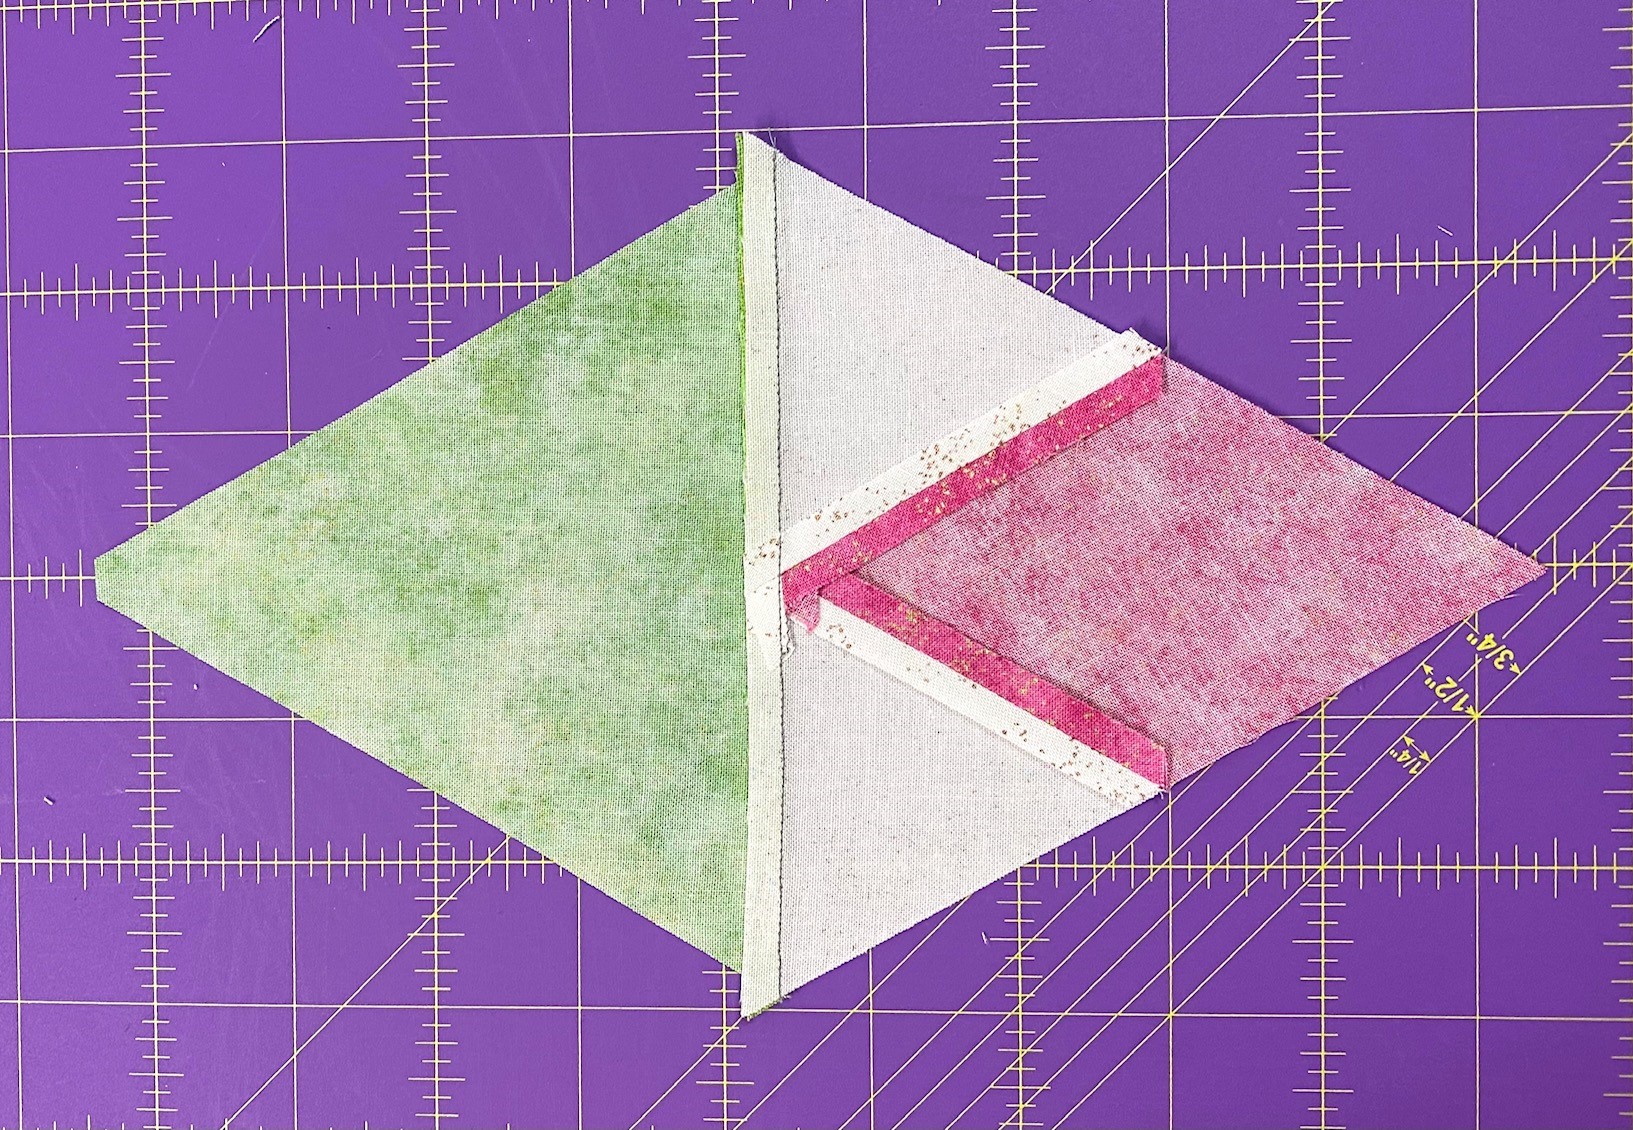
Position and stitch each of the 3 trimmed Star 60 units with a Companion Triangle. Stitch with the Star 60 unit on top.
Press the seam toward the Companion Triangle or open.
Trim the Companion Triangle. Position the unit on the cutting mat so that for right handers the Companion Triangle is in the 2 o’clock position or 10 o’clock for left handers. Align the point of point of the 4″ Diamond Point Guidelines with the point of the diamond in the Star 60 unit and the 4 1/4″ horizontal guideline on the seam. Trim the triangle.
Trim the 3 remaining Star 60 units (they are pointing inward in the layout). Position the pieced unit right side up on the cutting mat. Align the 4″ Diamond Point Guidelines with the sewn seams. Trim along both sides of the tool.
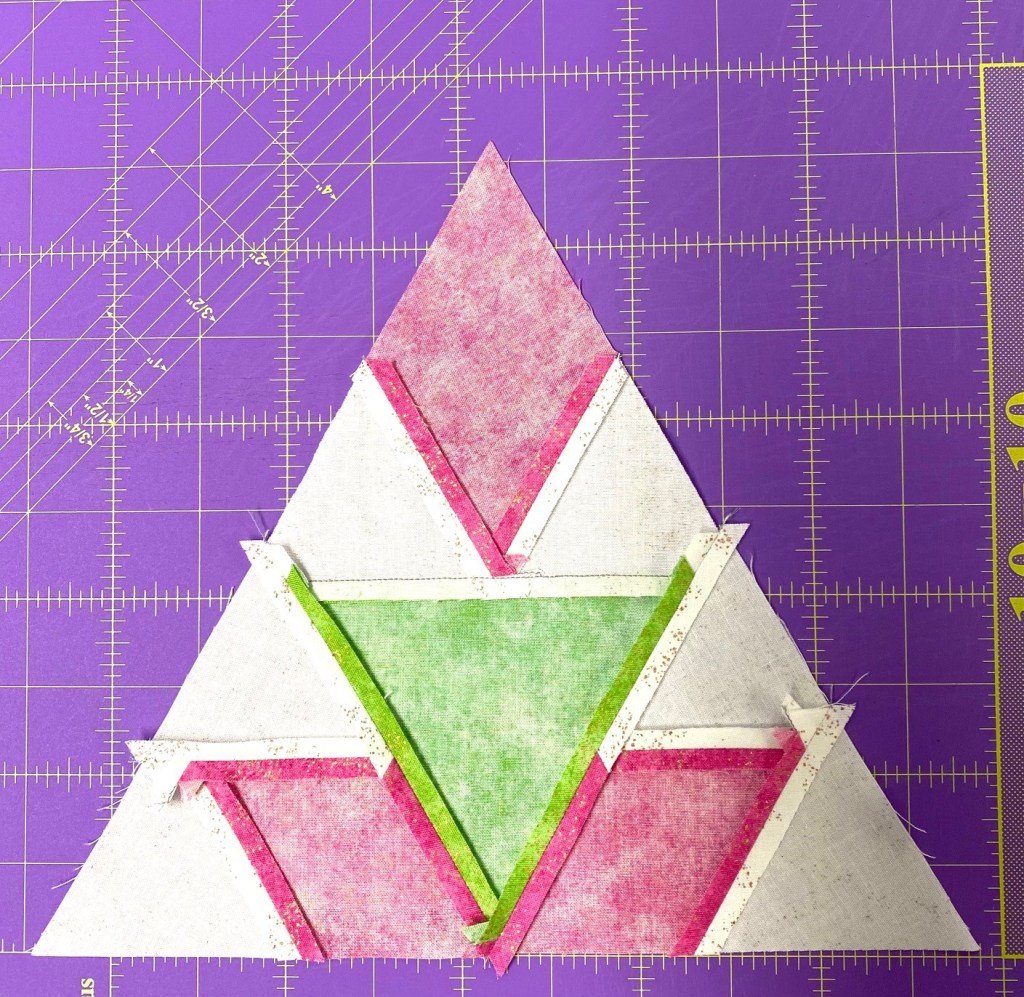
Sew the top 3 units as shown. Press all seams open.
Stitch the remaining 3 units as shown above.
Sew the top and bottom sections together. Match the center intersection and the raw edges. Press seams open.
Trim 1
Trim the 12” blocks. Position the block on the cutting mat so that one point is away from you and a flat side near you. Align the 4” Diamond Point Guidelines with the seams of the Star 60 unit at the top of the block and the 8” Diamond Point Guidelines with the seam of the Companion Triangle. The 4¼”, 6¼”, and 8¼” horizontal guidelines will align with seams as well. Trim on both sides of the tool. Because the tool is smaller than the block, trim to about the halfway point on each side of the tool.
Trim 2
Trim 3
Rotate the block so that the next untrimmed point is pointing up, realign the same guidelines and trim again. Then rotate the block to trim the final point. Realign the guidelines and clean up the last point.
Follow the pattern instructions for trimming the 6″ blocks.
Align and center each accent Companion Triangle with the 6” pieced block. Stitch with an accurate ¼” seam. Press all seams toward the Companion Triangles.
Layout your triangle blocks.
Stitch triangles into rows, then add the setting triangles on both ends.
Radioactive
I made the lap size Radioactive, measuring 55″ X 75″. Thank you Northcott Fabrics for these beautiful fabrics. Finished with Quilter’s Dream Batting.
The fabrics shown in this post were given to me by Northcott Fabrics.
I just couldn’t help my myself. I love trees, and these are my colors!
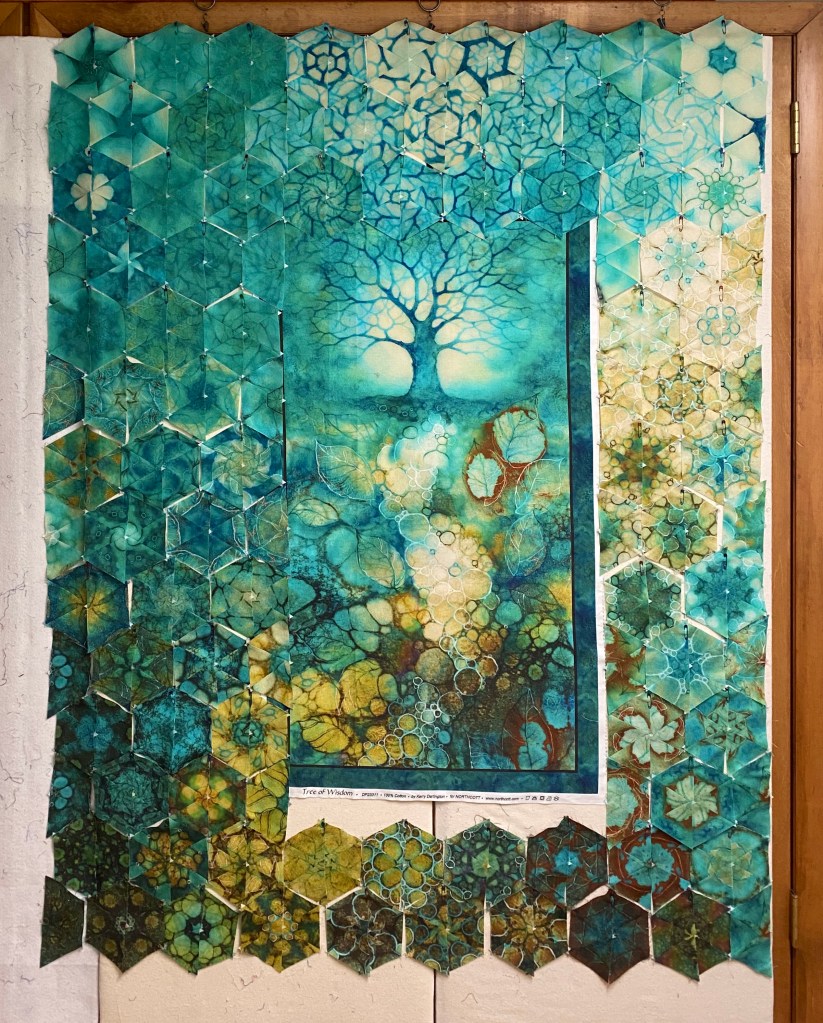
When I saw this panel I just had to make a One Block Wonder (OBW). The Tree of Wisdom fabric line was designed by Kerry Darlington for Northcott Fabrics. Tree of Wisdom can be found at your local quilt shop and at Keepsake Quilting.
When I approach making a OBW using panels, the first thing I want to know is how wide the panel is. This panel is 24″ including the borders. I did not want to include the borders, I prefer the panel to merge with the hexies as seamless as possible.
The strip width you choose to determines the finished hexagon size:
3.75” strip width = 6.0” Finished Hexie
3.50” strip width = 5.5” Finished Hexie
3.25” strip width = 5.0” Finished Hexie
3.00” strip width = 4.5” Finished Hexie
2.75” strip width = 4.0” Finished Hexie
2.50” strip width = 3.5” Finished Hexie
2.25” strip width = 3.0” Finished Hexie
2.0” strip width = 2.5” Finished Hexie
When I measured the panel without the borders it was 20″. Therefore I cut my aligned strips 3.25″ wide for 5″ finished hexagons.
I start designing around the panel until I get a design I like. Because I know my finished hexies will be 5″ wide, I know there will be 4 hexies across the top and the bottom of the panel. That is why the second photo is offset, so I know which row of hexies will be on the right side of the panel.
I stitch my hexies into four goups: the left, right, top & bottom. I never trim my panel until I’m ready to attach the hexie sections.
I started with the top of the panel. I did not want to trim off my points, so I turned the edges under 1/4″ and pressed well, top stitching the hexies to the panel.
I match up the dog ears at the top and stitch the right side leaving a partial seam. This allows me to match up the dog ears of the right section with the bottom section of hexies. I decided not to trim these hexies either, so I Pressed under the edges to prepare for top stitching.
I have now completed the partial seam on the right of the panel and can now match up the dog ears on the left side of the panel at both the top and the bottom.
As you can see, I need to camouflage where the bottom hexies hit the bottom of the panel.
Can you tell where the bottom hexies hit the panel? To find out how I do this, download here:
I love Christmas Tree Quilts. I’m always looking for quilt blocks that look like Christmas Trees.
With this block and the Deck the Halls fabric that Northcott gave me to make this quilt, I have a winner.
What can be easier than Half Square Triangles made with Studio 180 Design’s Tucker Trimmer I & Flying Geese made with the Wing Clipper I!
I love designing with EQ8. Having the option of auditioning the actual fabric I will be using is awesome!
Perfect for cuddling up under in front of a warm fire. You can make this quilt using your Studio 180 Design Tucker Trimmer I & Wing Clipper I tool instructions and these fabric requirements:
The fabrics used to make this quilt were given to me by Northcott Fabrics.
What I love about EQ8 is once you have drawn a block, you can easily rotate it, edit and change the color. Rockets Red Glare came about as I was playing with Studio 180 Design’s BlockBuster 12 Double Trek . This block is made with the Corner Beam , Tucker Trimmer I tools and the Sliver Technique Sheet.
This is the Original BlockBuster 12 Double Trek Block and the quilt layout I first came up with. It seemed there was too much empty space.
I added a Half Square Triangle in two corners of the block.
I think that made a great difference. I downloaded Northcott Essence Fabric into my EQ8 software to see how it would look…very patriotic, hence the name “Rockets Red Glare”.
Northcott fabrics as always represent high quality. The fabrics I chose to complete my quilt are from the Essence line and are absolutely beautiful.
The fabrics featured in this post were given to me by Northcott Fabrics.
A Storm at Sea quilt has been on my “need to make list” for a long time. I especially love the kind that use graduating colors. Lucky for me, fellow Studio 180 Design Certified Instructor Michelle Hiatt created her pattern “Calm Seas“. This fabulous pattern offers you a choice of 3 sizes; Throw, Double or King. I chose to make the Throw size (62″ x 72”). Calm Seas is a companion pattern for Studio 180 Design’s Large Square/Squared, Diamond Rects & V Block Tools.
I chose to use the fabulous fabrics from Northcott’s Canvas line. I needed 12 graduating colors in 2 different values each. Canvas is richly textured and has a depth of color that is gorgeous!
Definitely use your best organizational skills when making this pattern. Michelle has made it much easier for us to conquer a storm at sea.
If you know me…you know I use paper plates to keep myself organized. I snipped a piece of each fabric and pasted it to the paper plate, writing down all pertinent info to keep my brains from falling out.
I was very fortunate to spend a few days at Bridle Creek Bed & Breakfast for an annual mini quilt retreat with friends. I managed to get all my diamond rects, large square/squared and small square/squared units done!
Following the pattern instructions, I laid out my units in the proper color order to achieve this beautiful flow.
I numbered my rows and pinned them together to begin stitching them together,
A little precision pinning goes a long way when it comes to nice crisp points.
After four days of hard work I finished the top. Thanks to Michelle’s pattern Calm Seas & Deb Tucker’s Studio 180 Design tools I have checked another awesome quilt off my bucket list!
The fabrics featured in this post were given to me by Northcott Fabrics.
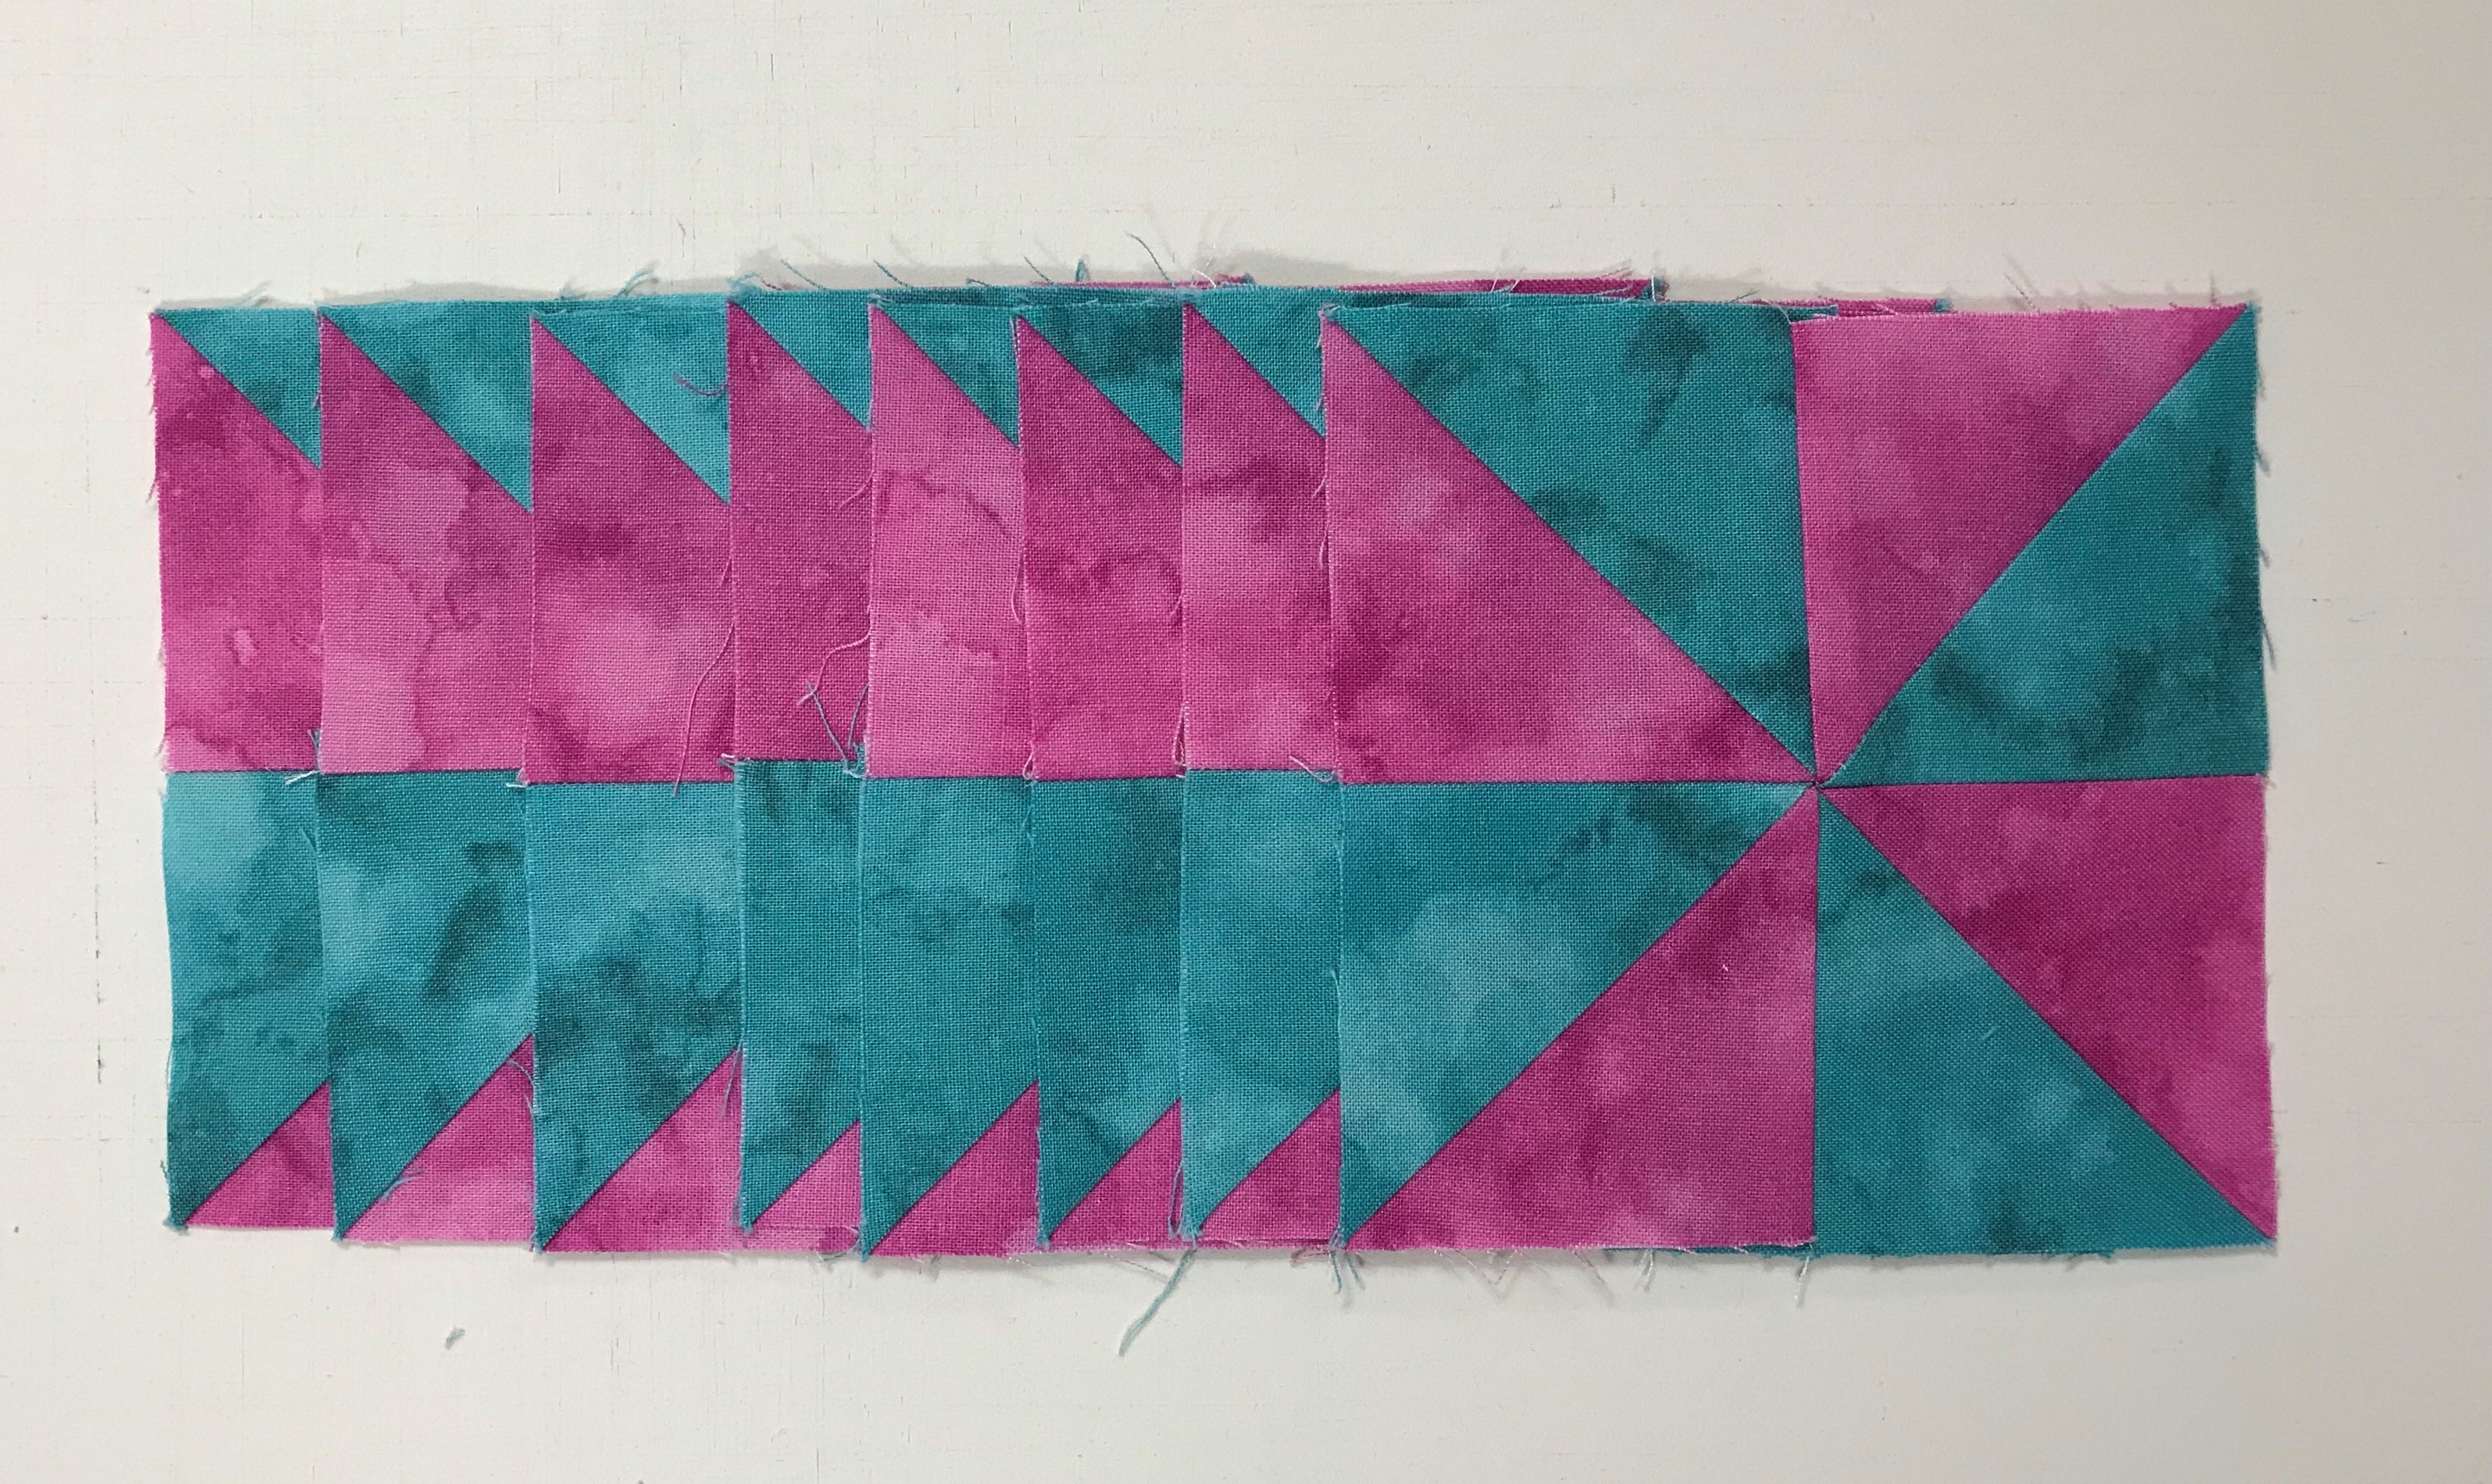
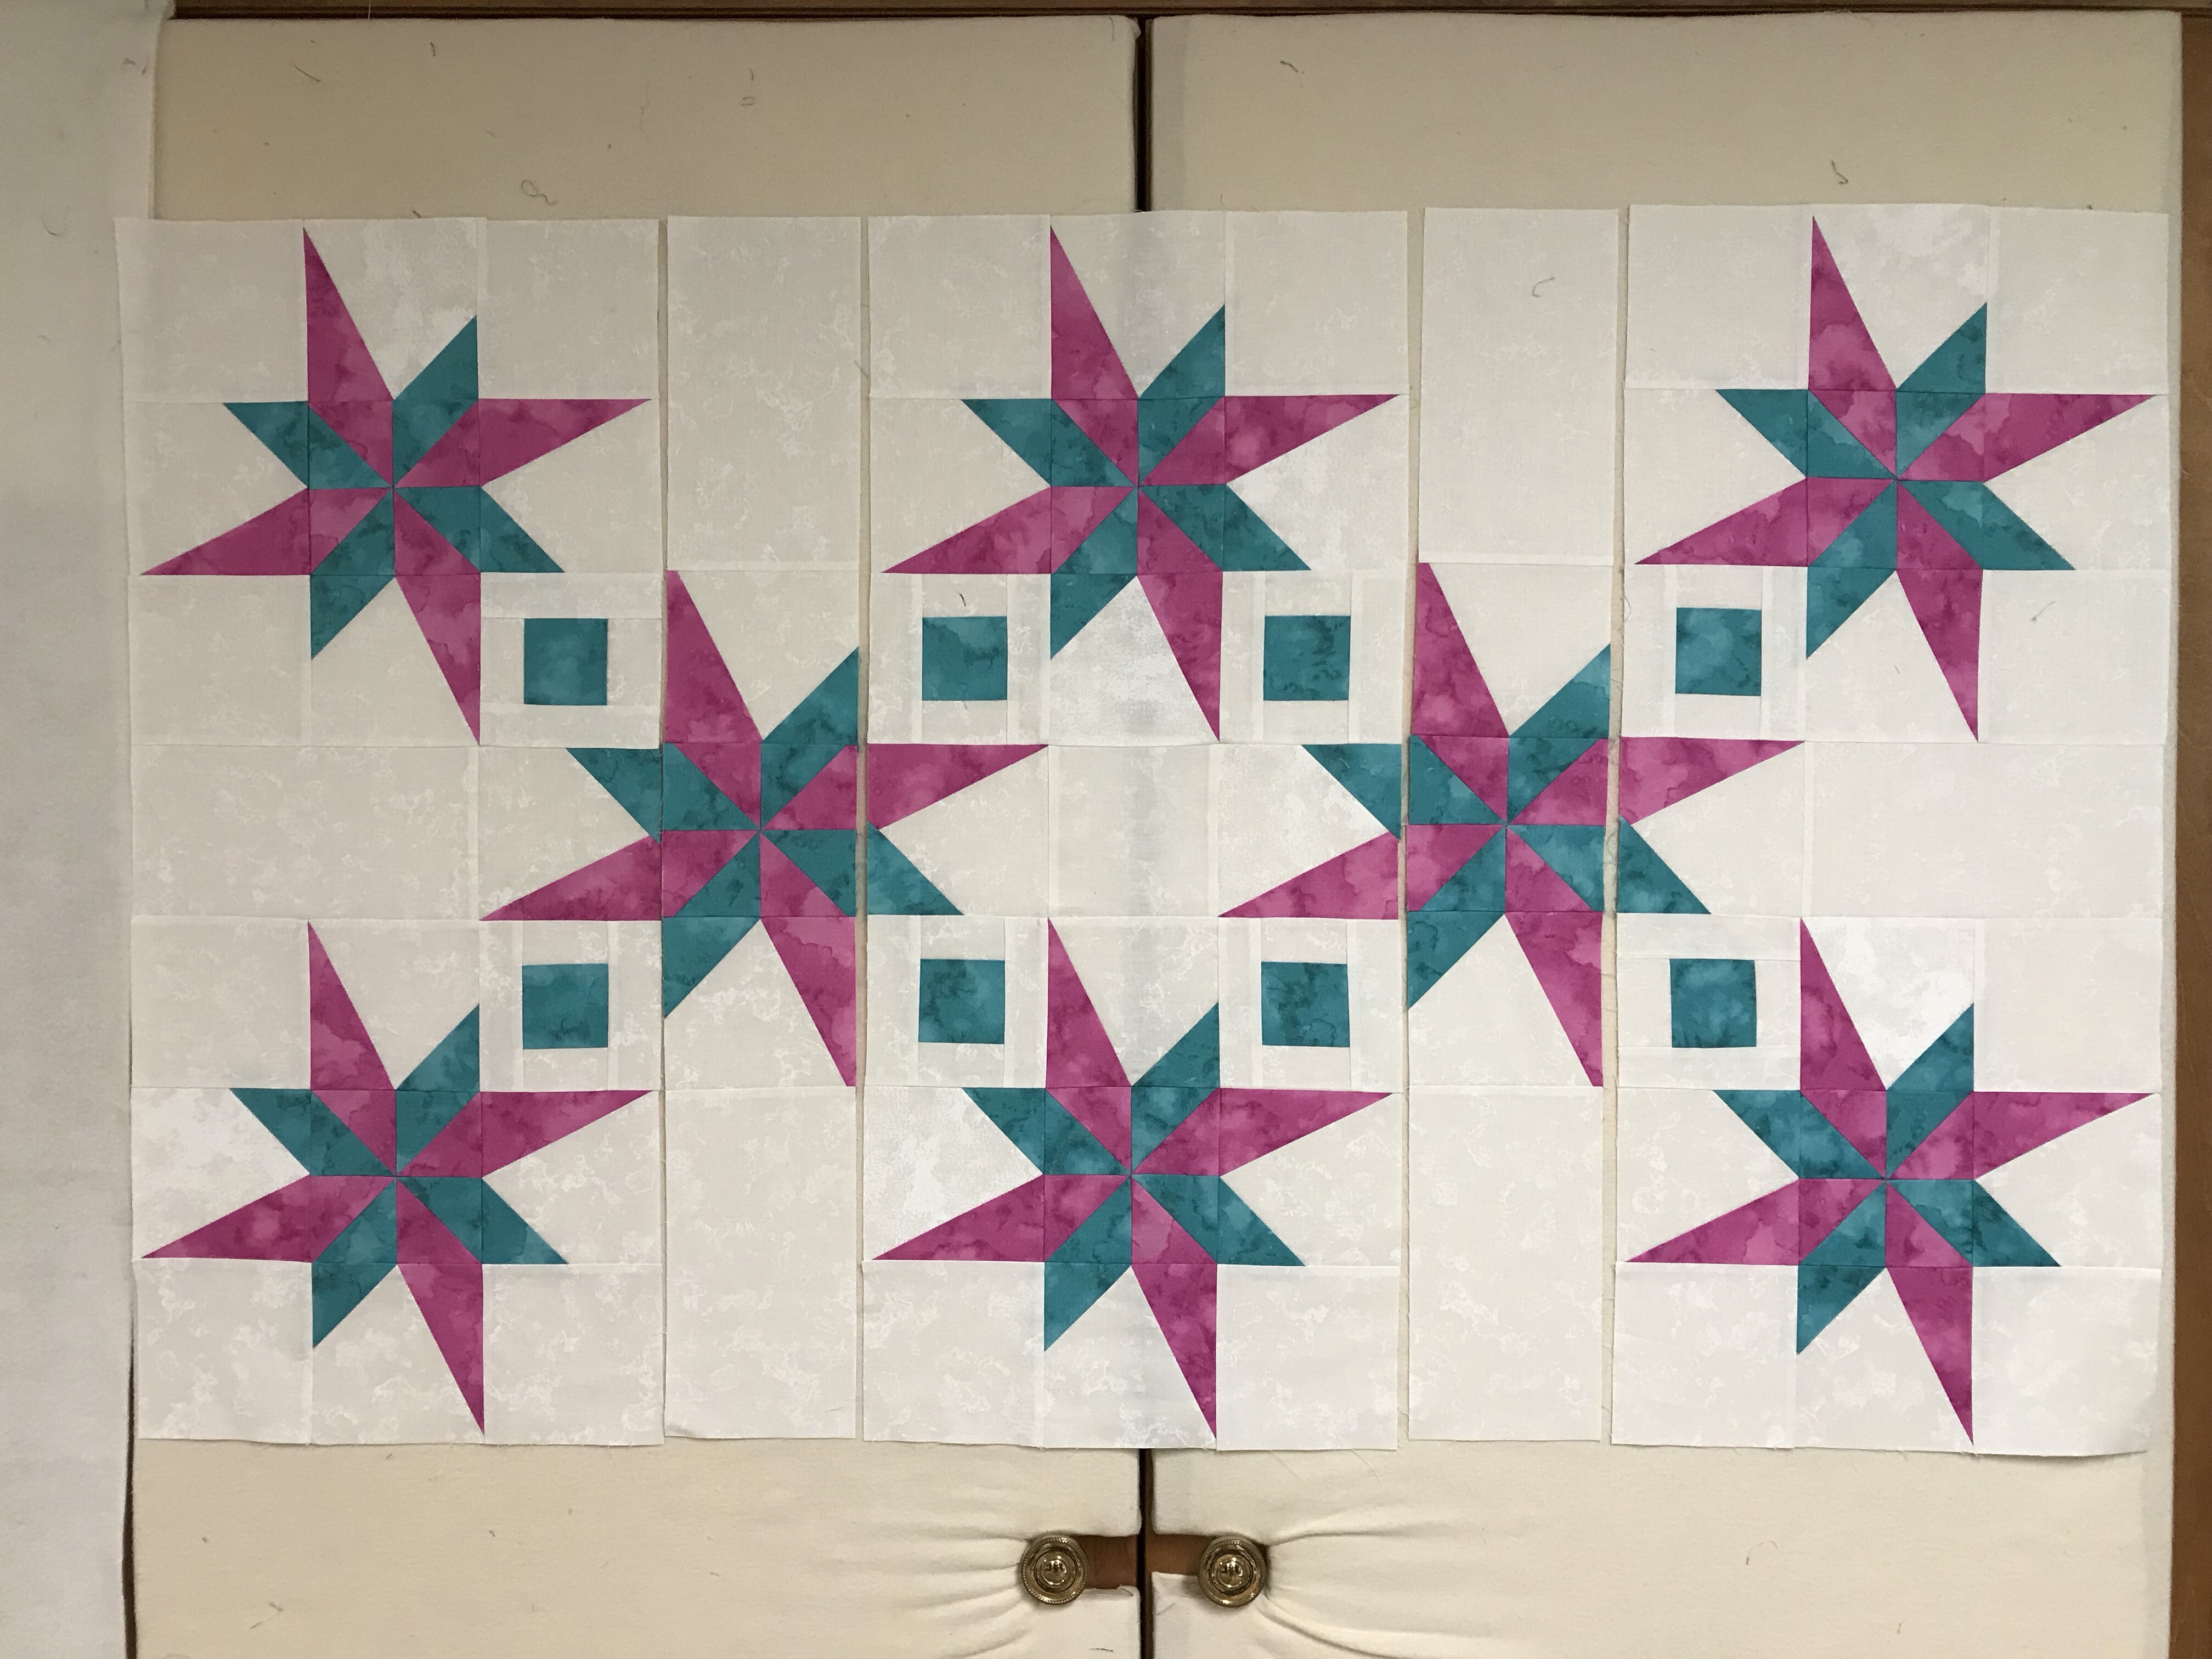
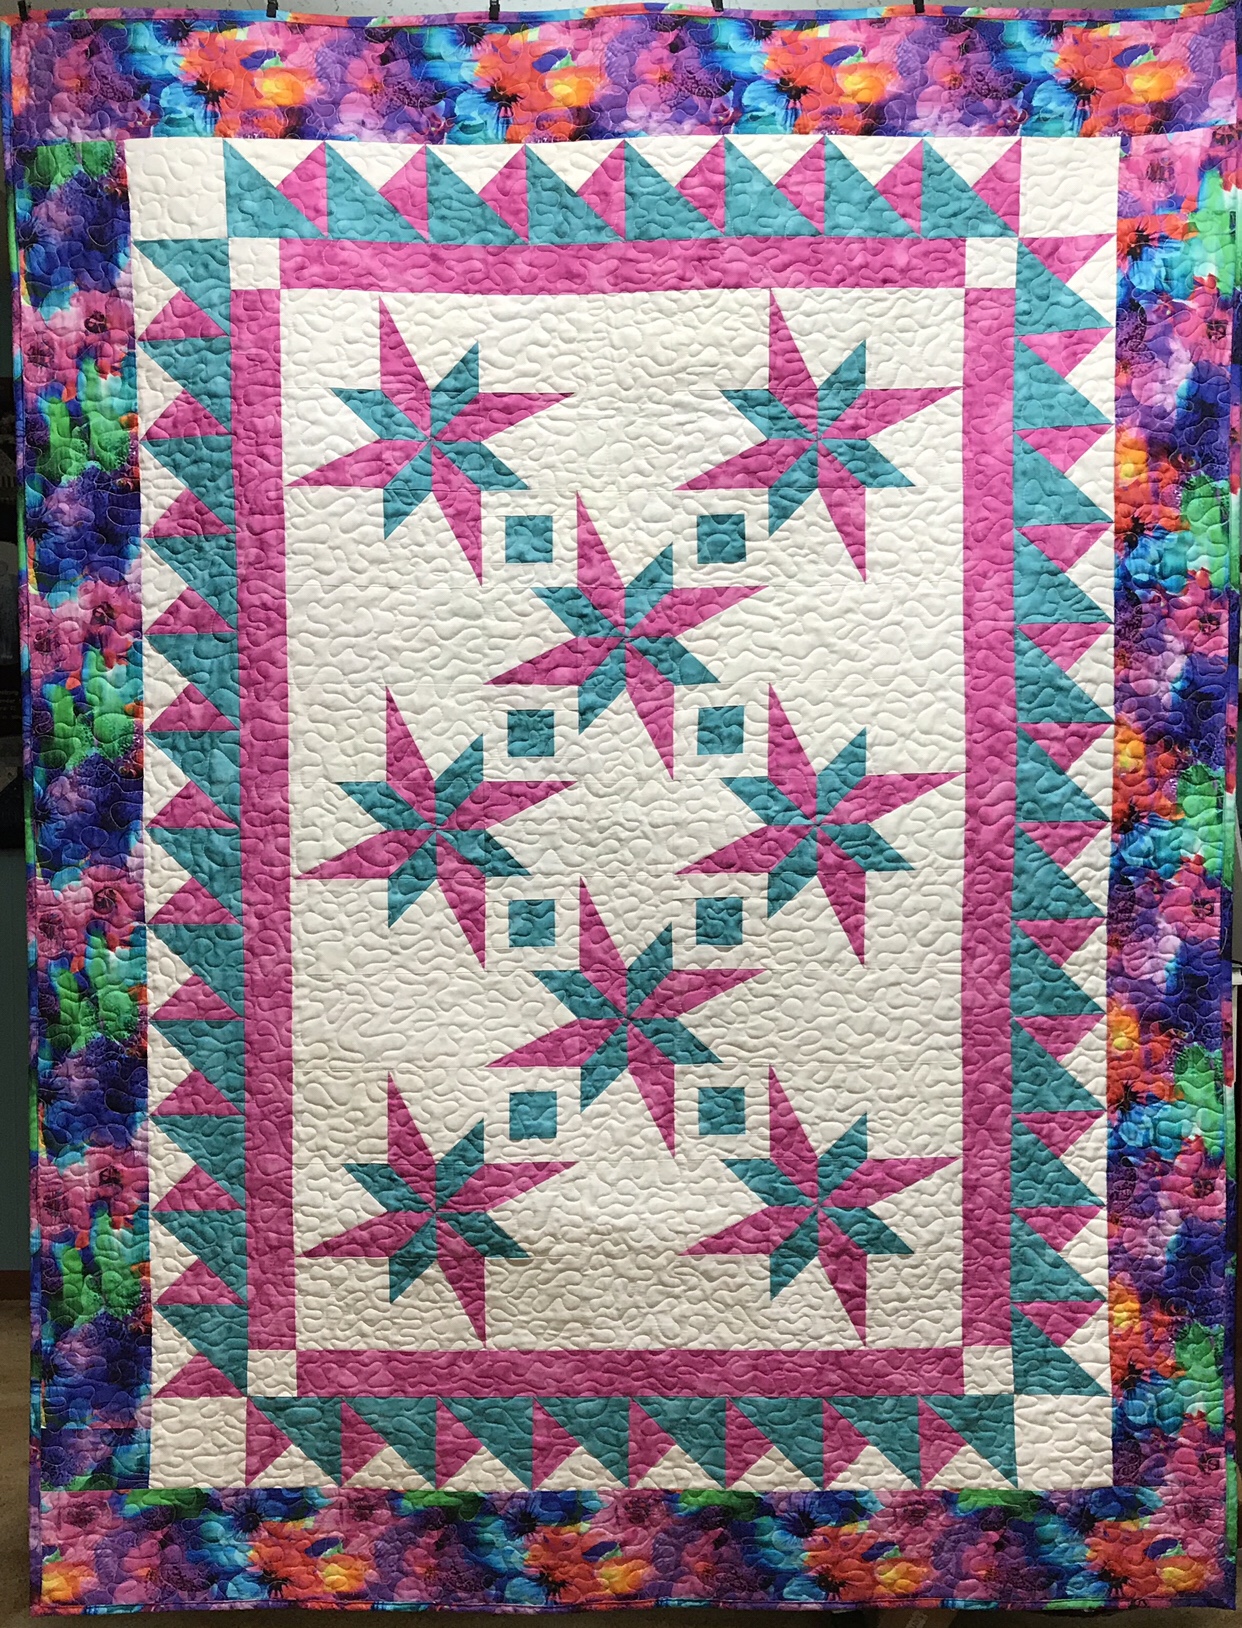
This fabulous pattern, “New Year’s Star” by Deb Tucker is fun to make using your V Block & Tucker Trimmer I tools. It can be made in 3 sizes: 50″ x 66″, 66 x 82″ & 82 x 102″. I love pink and aqua & retro fans. I guess you can say the photo above shows my fan club (HAHAHAHA).
I chose 4 fabrics from Northcott’s “Strokes of Brilliance” collection. The colors are so deep and rich.
Pinwheels:Making the pinwheels begins by making half square triangles using the 3″ dark & medium squares. Trim to 2 1/2″ with your Tucker Trimmer. Arrange the trimmed squares into pinwheels.
Use Care Here!. The blocks should spin exactly as shown in the pattern instructions.
V Block High/Low:
I have cut my background squares and side triangles for unit construction.
Following my pattern instructions I trimmed the background square and stitch a side triangle to it.
Press toward the side triangle, add the square to make the second low side triangle and trim.
Trim using the V Bock tool as shown above. Rotate and trim again.
By placing the high/low units around the pinwheels we get a great looking wonky star!
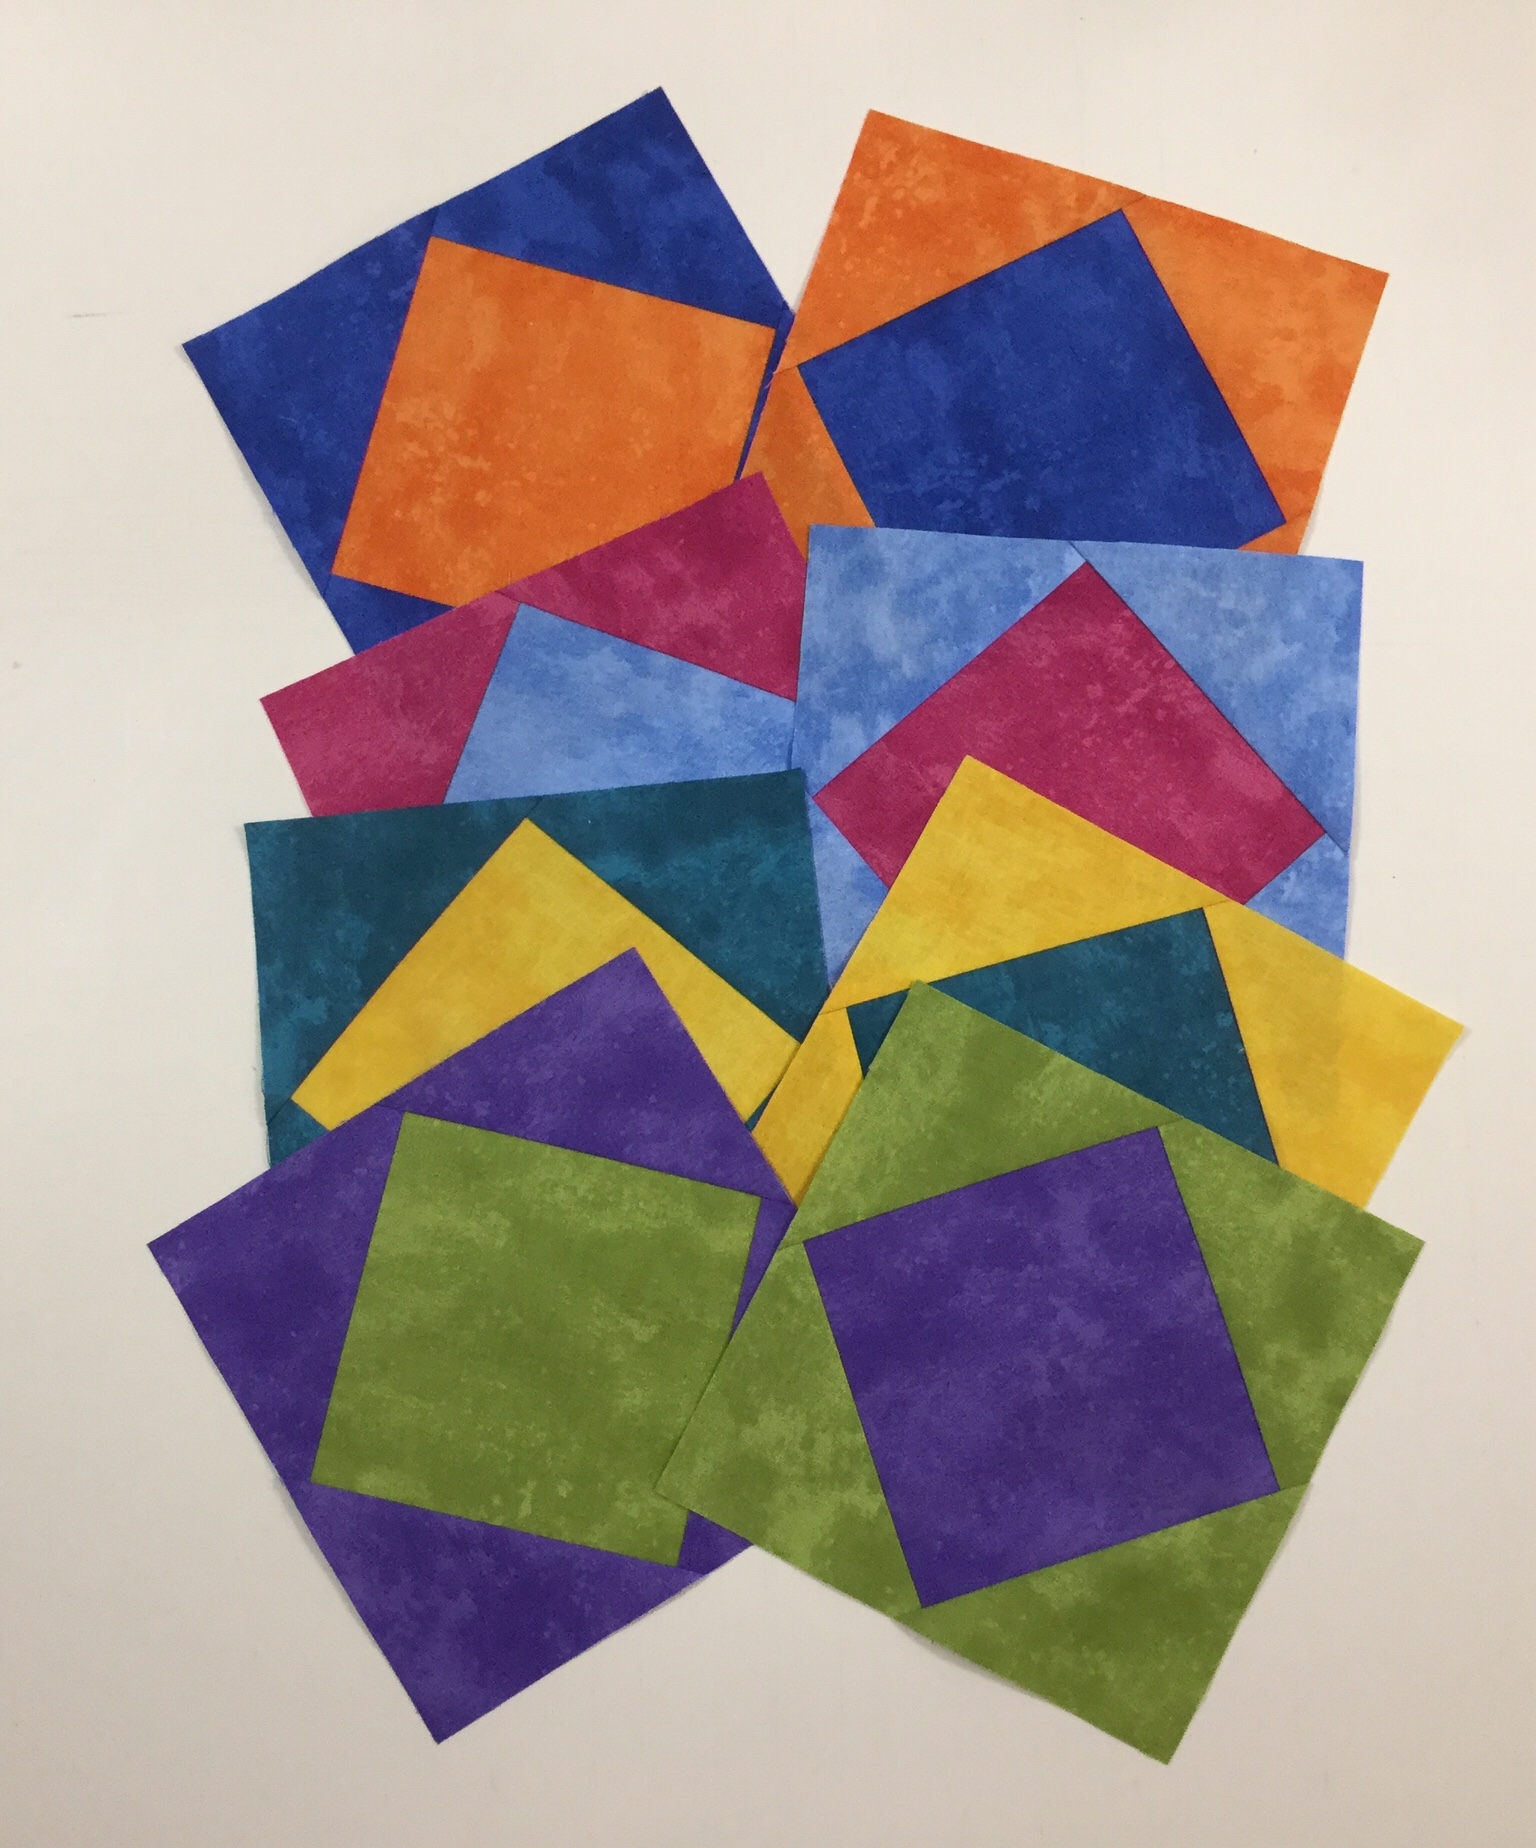
Framed Squares:
Make 8 of these easy framed squares.
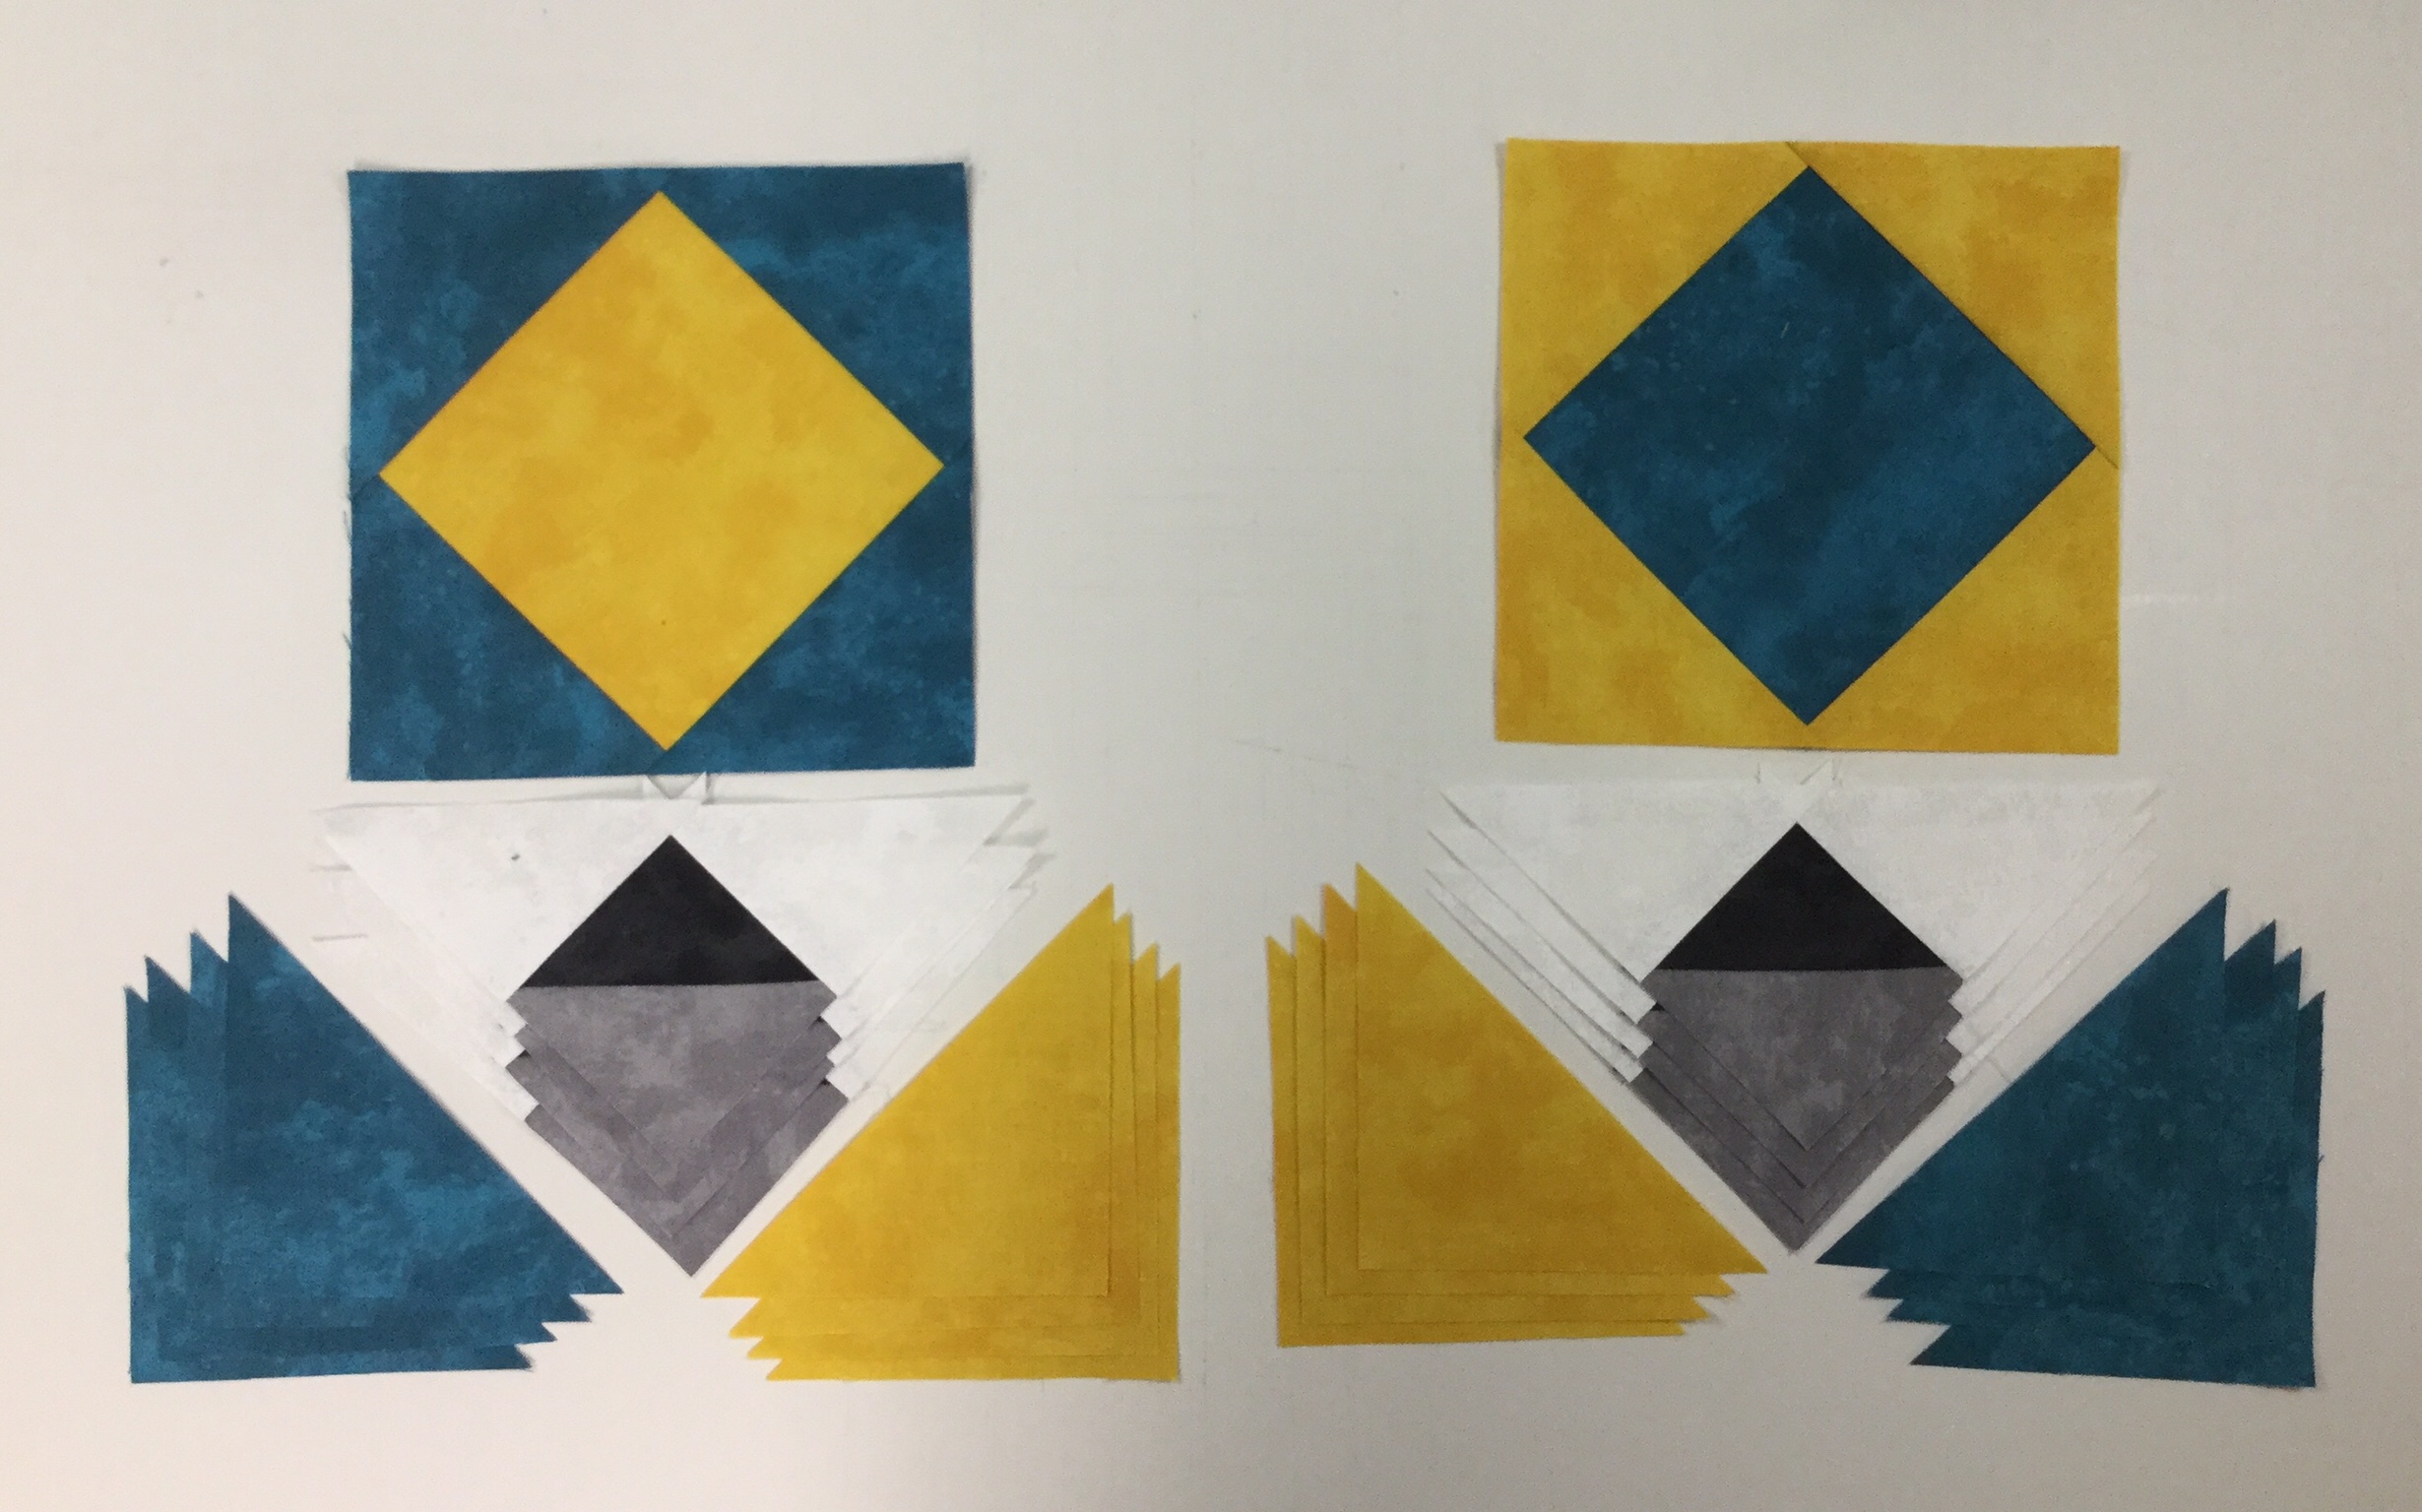
Combination Units:
Using the Magic Wand draw 2 diagonal lines on the back of the 5 1/2″ the background squares and align with the medium squares, stitch on lines.
Cut apart and press toward the darker fabric.
Using the Magic wand draw 2 diagonal lines on the back of the half square triangles (HST). Center the HST’s on a dark 5 1/2″ square, stitch on the lines, cut apart & press toward the large triangle.
Trim using your Tucker Trimmer, rotate and trim again.
Each set makes mirror image combination units. Both are used in the pieced inner border. It is a good idea to keep the units organized into left and right groups. You’ll be glad you did.
Lay out your units.
Stitch into rows.
Add your inner borders.
Add your pieced inner borders and your final outer border.
I love the backing too. This quilt was completed with Quilters dream Batting! Thank you Northcott for letting me create with your beautiful fabrics. The description I’ve shared in this post does not answer every question you may have. Please feel free to contact me with questions.
The fabrics in the post were generously given to me by Northcott Fabrics.
I chose Northcott fabrics from the Sew Musical Row by Row Palette 2018. When I choose my fabrics from Northcott, I get so excited when they are delivered. As soon as I touch the fabric, I feel the quality. These colors are luscious with just enough texture to give depth and interest.
Crossfire is a Studio 180 Design pattern designed by talented Certified Instructor Sarah Furrer. It is a companion pattern for the Large Square/Squared tool.
The block featured in this quilt is called “Bird of Paradise”. The pattern describes this quilt as “whirling stars with accents and chains of black and grey. A new fun variation of a Flying Goose makes for a star with loads more sparkle”, and it does.
This slideshow requires JavaScript.
If you follow me, you know I love to organize my quilt making process by labeling paper plates for my block pieces as I cut them out. I never get lost or forget what the pieces are for. All my block pieces are cut and ready to put together.
Star Blocks: You will be making 8 star blocks, they will be made in pairs. Each pair will contain the same colors, but their arrangements will give you two different looking blocks. Label one of the colors in each pair as Color 1 & Color 2. If you follow the instructions in the pattern you wont have any trouble. After construction the diamond square units are trimmed to the cut size of 6.5″ x 6.5″
Beautiful, perfectly trimmed units leaving a 1/4″ seam allowance, so I will not lose my points. After all…no one wants to be pointless!
Next, we make half square triangles and perfectly trim them using our Large Square/Squared tool.
Lay out your trimmed half square triangles and the and two white triangles as shown. Work with one triangle at a time, stitch & carefully press toward the white triangle as not to distort the shape.
Laying Out the Blocks: Pay close attention to Step 10. Split your pieced geese into two piles of four. Lay out your side triangles so that on one pile you have four Color 1 side triangles on the right side & four Color 2 side triangles on the left side. The other pile will have four Color 2 side triangles on the right side & four Color 1 side triangles on the left side. If you lay them as I did above for every color combination, you will be fine.
It is very important to pay attention to Step 11: Position the right side triangle so that Color 1 shows a bit beyond the white along the top edge. Stitch and press toward the side triangle. Trim the units according to pattern instructions and put your blocks together.
Crossfire is a fun, skill expanding pattern. Finished quilt measures 60″ x 84″.
The Artisan Spirit, Water Garden fabric in this post was given to me by Northcott Fabrics for the Creators Club.
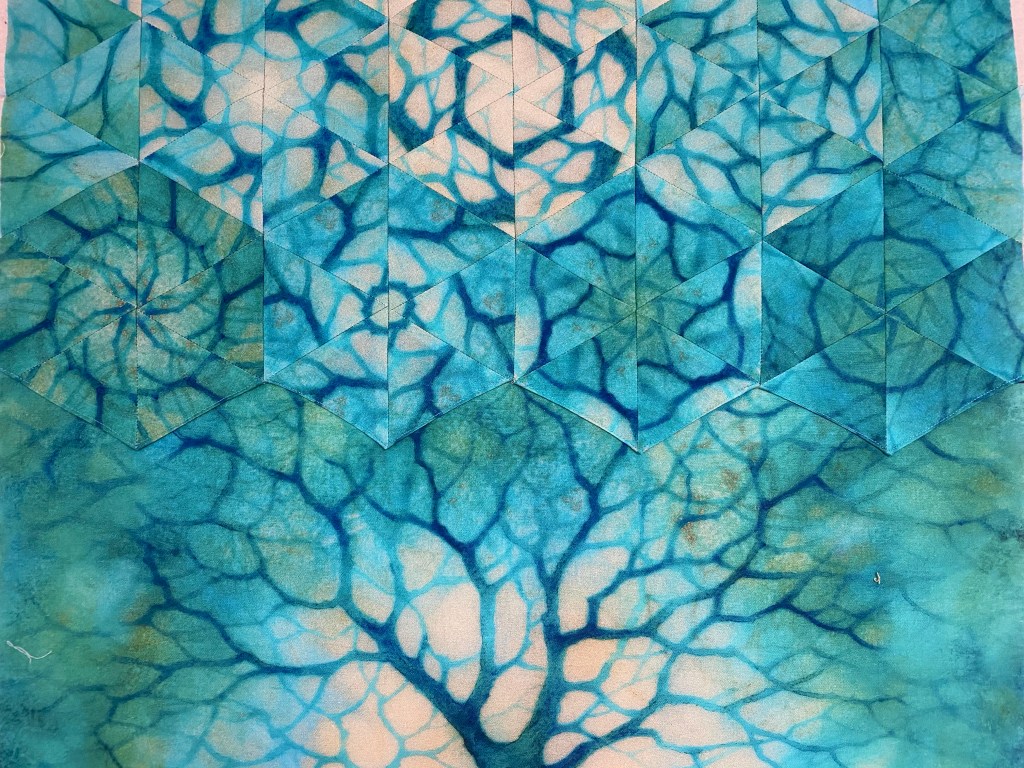
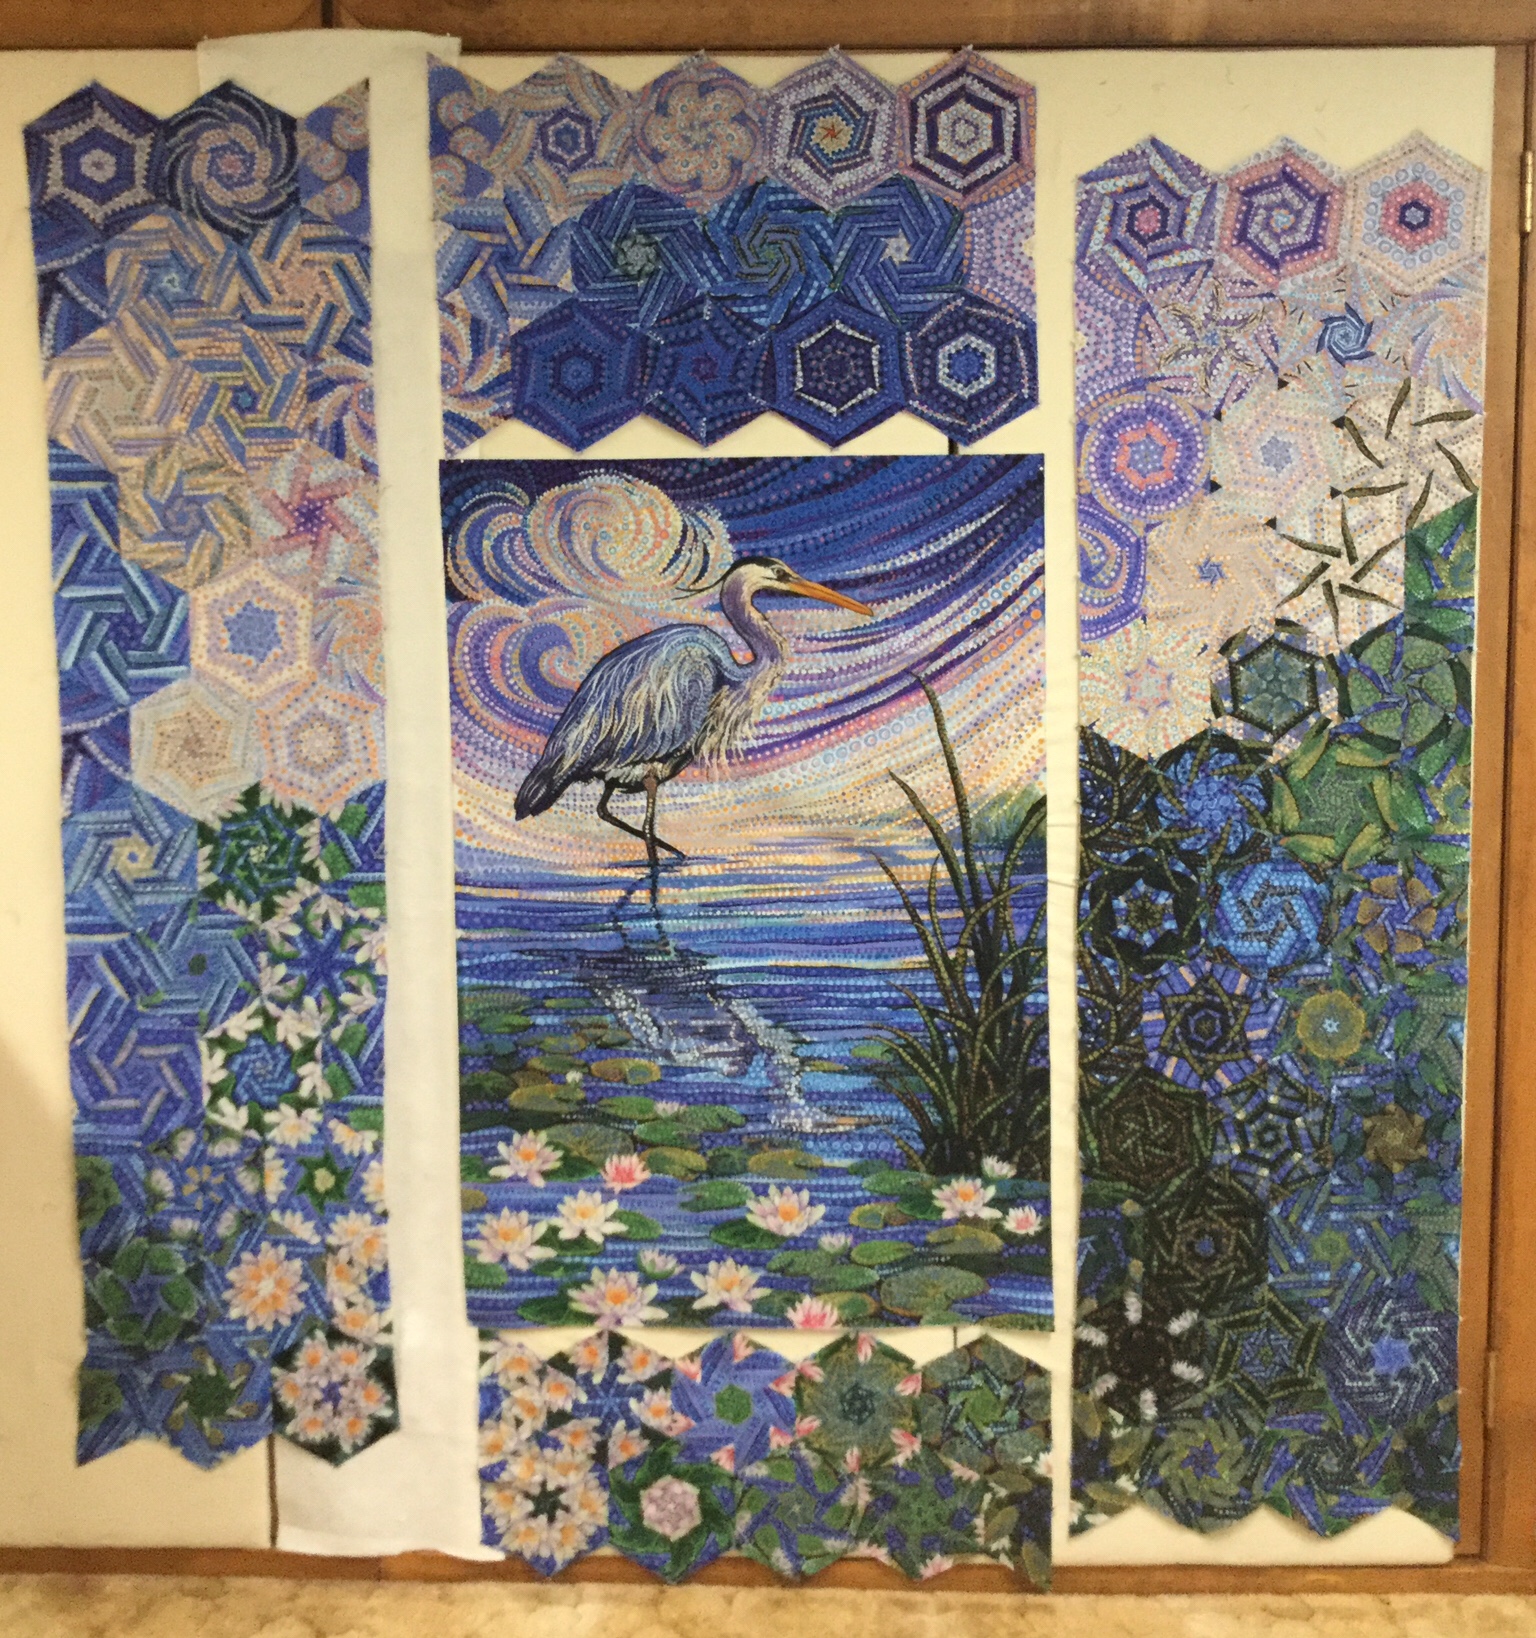
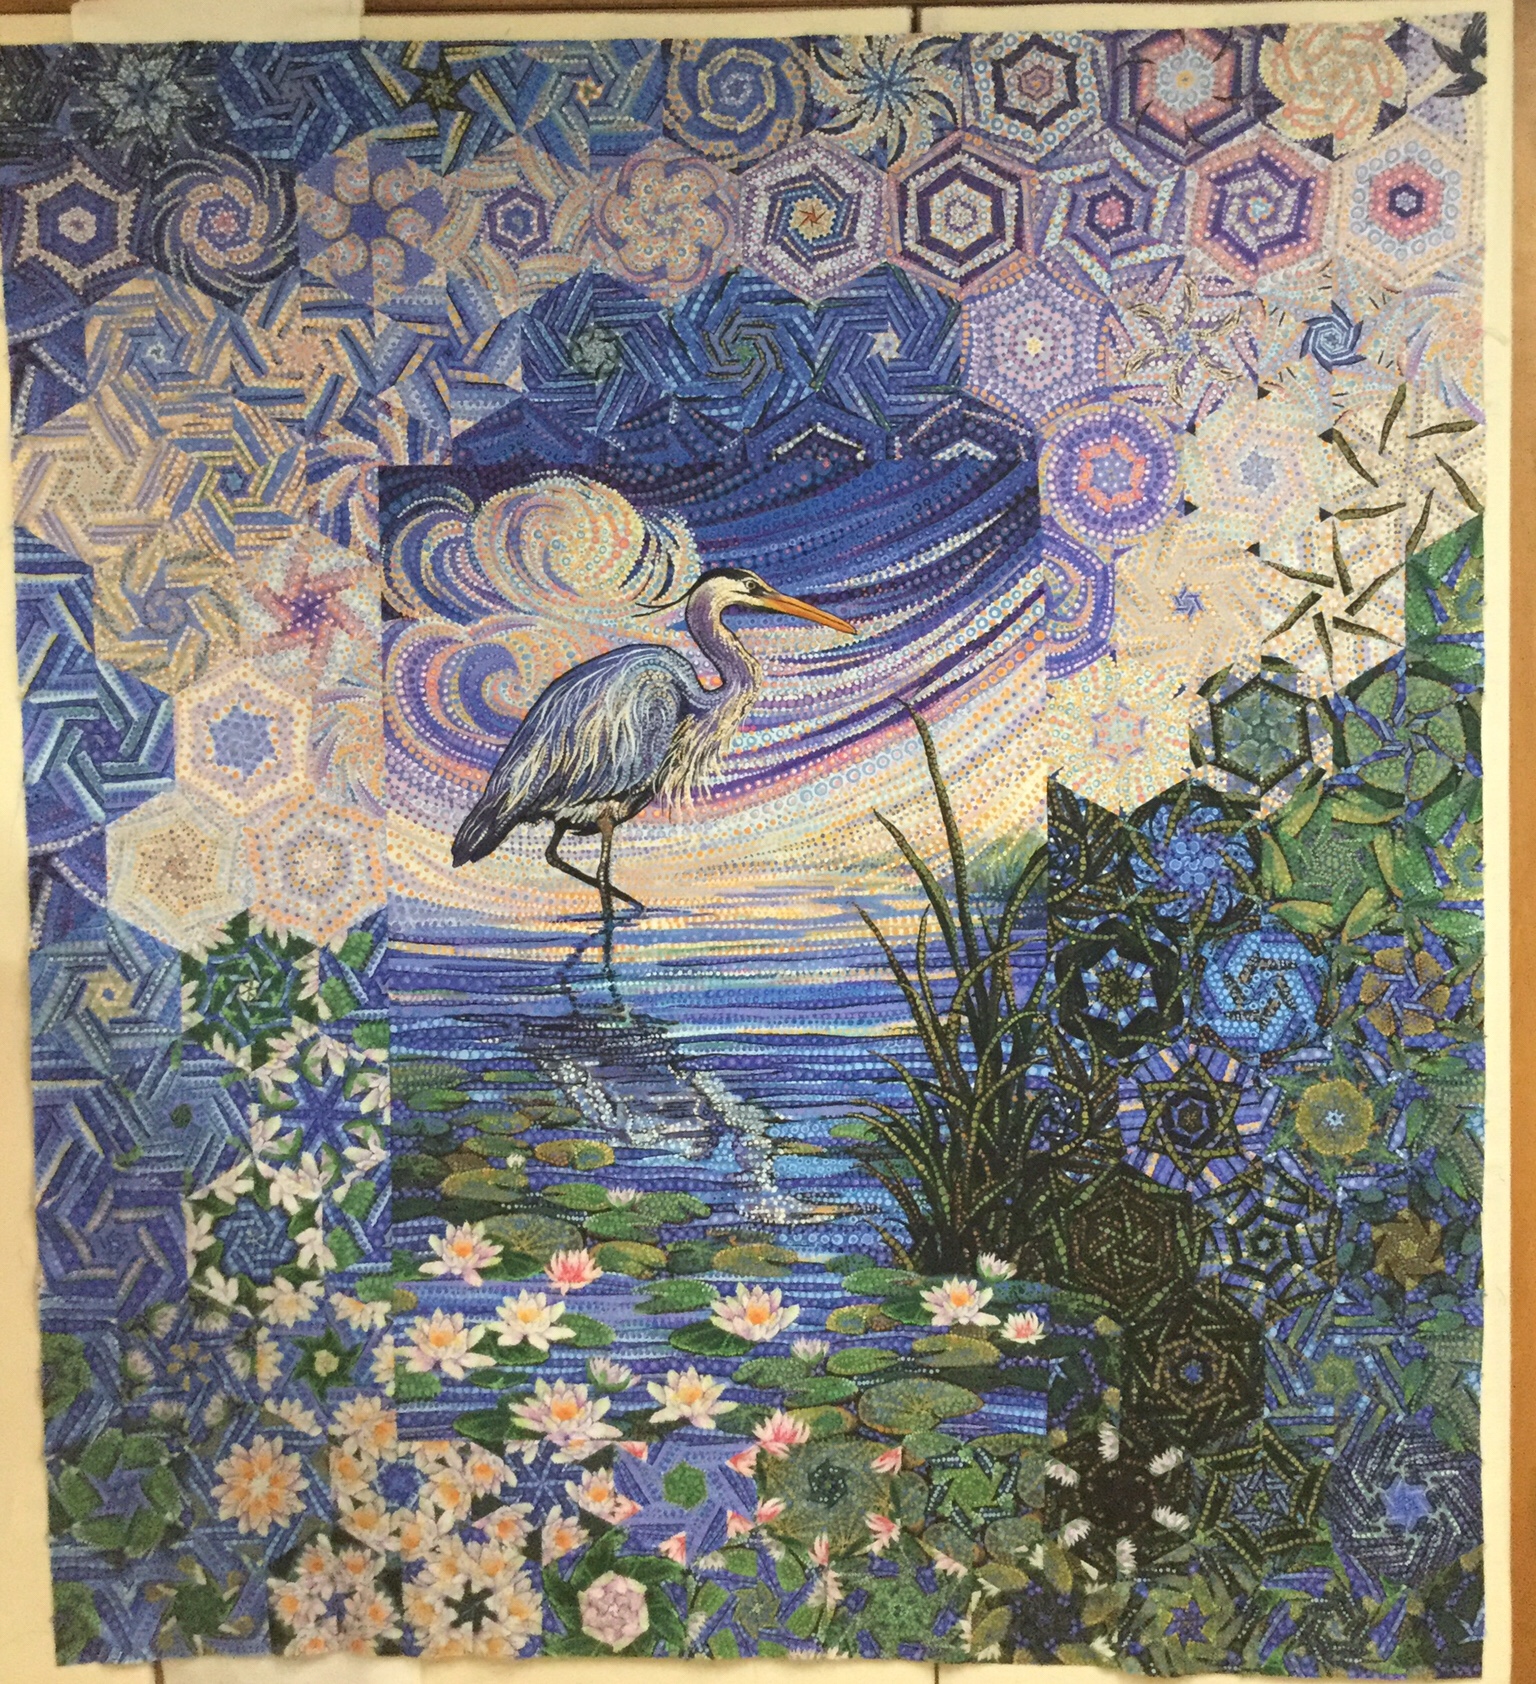
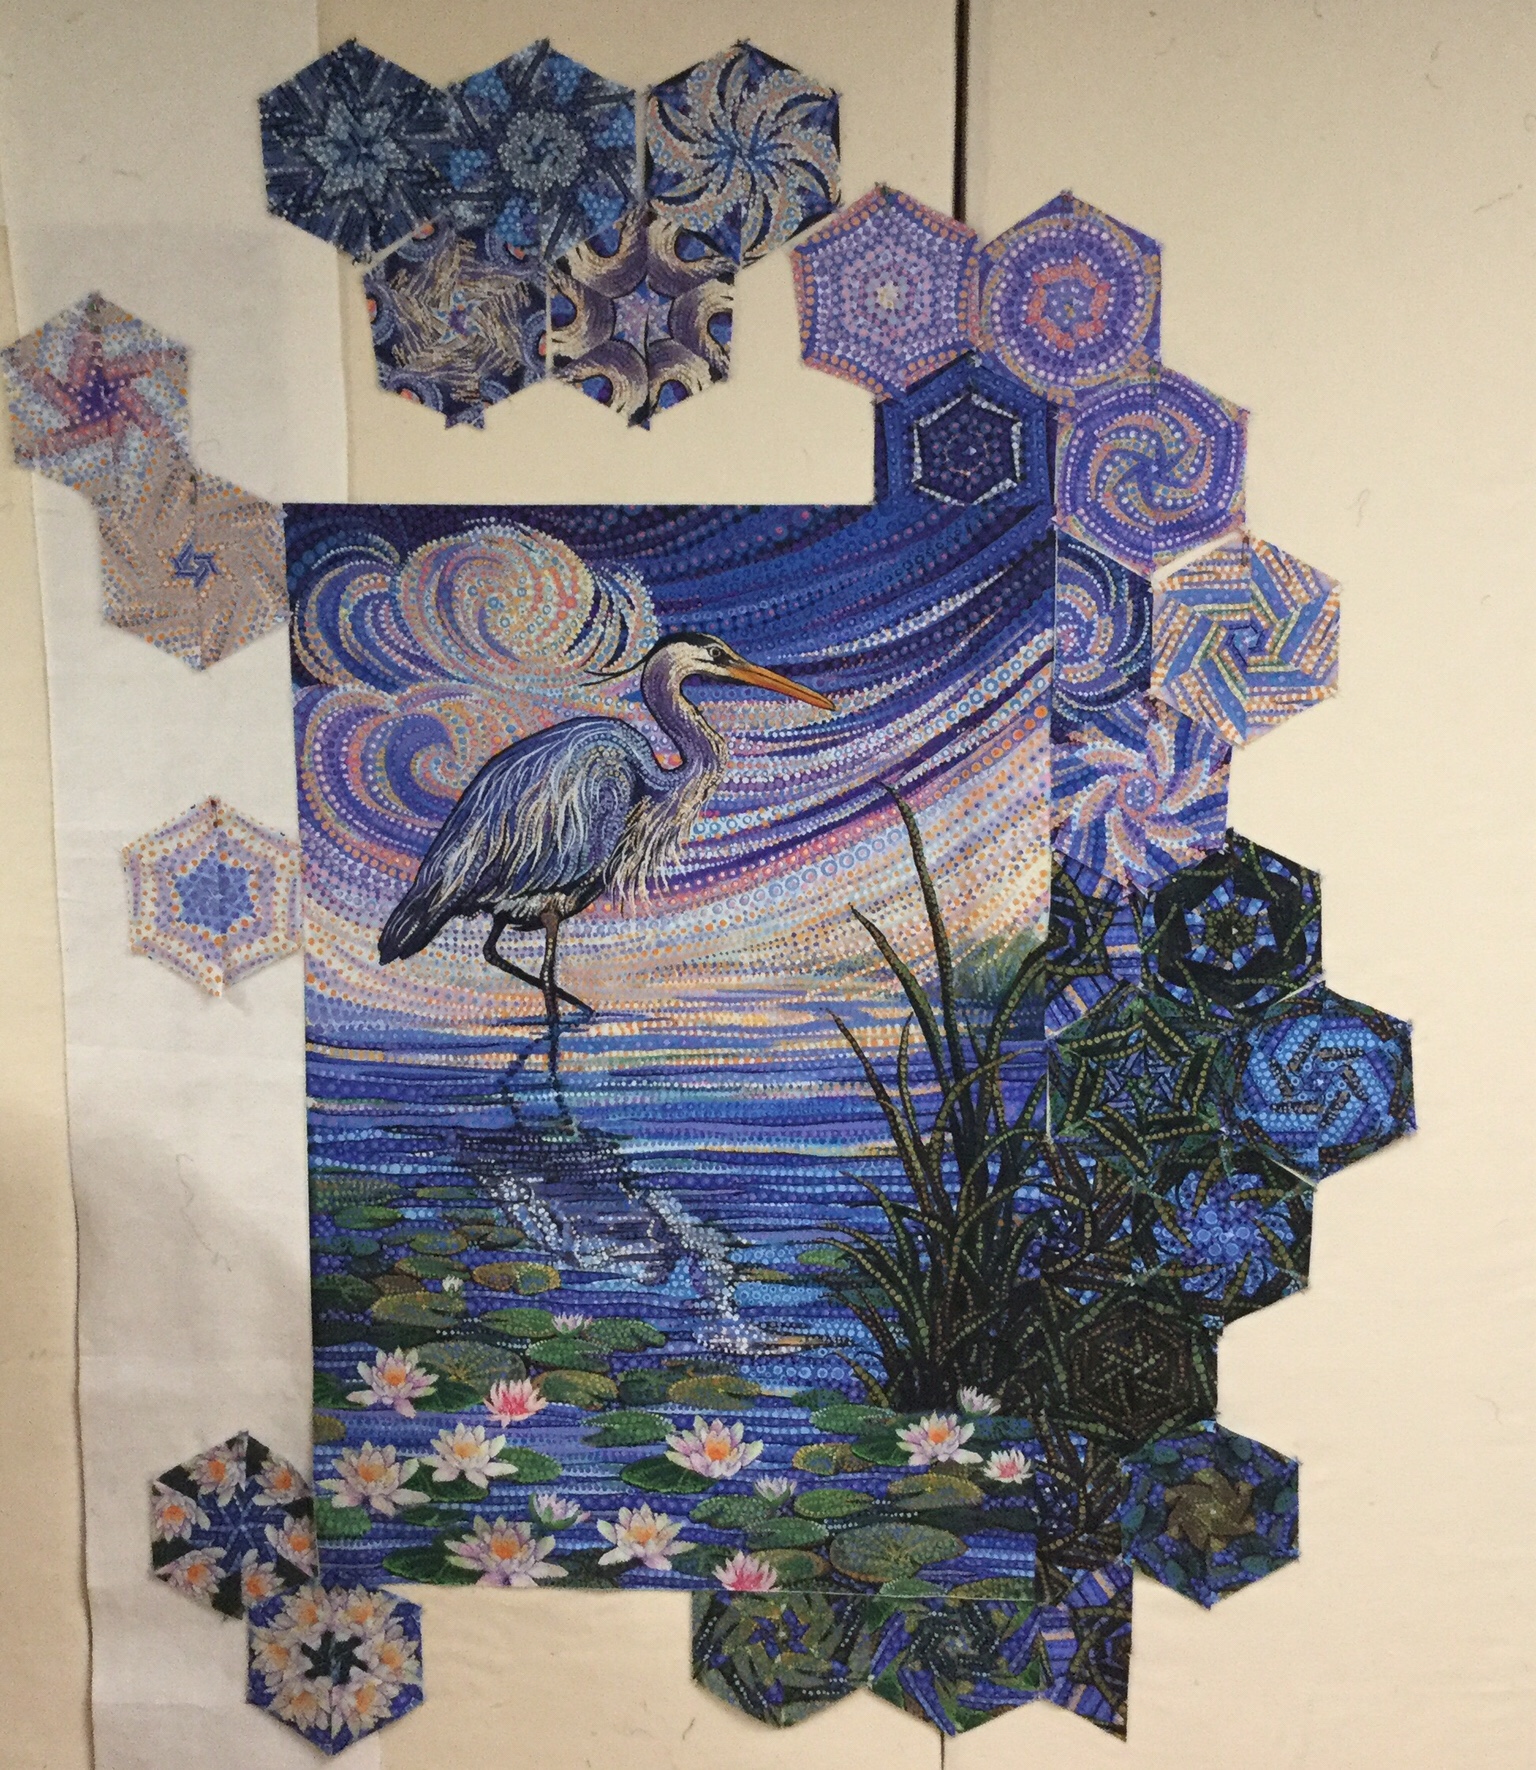
This is my 63rd One Block Wonder, and I love it! It came out better than I had anticipated. This OBW started as a 28″ x 42″ panel.
When choosing fabric for a One Block Wonder (OBW) I look for a large repeat and a large design in colors that I like. OBW’s require 6 repeats of fabric plus more if you want to put the original fabric in the border. With a panel, the repeat is pre-determined. I bought 7 panels, one to integrate into the top of the quilt and 6 for the blocks.
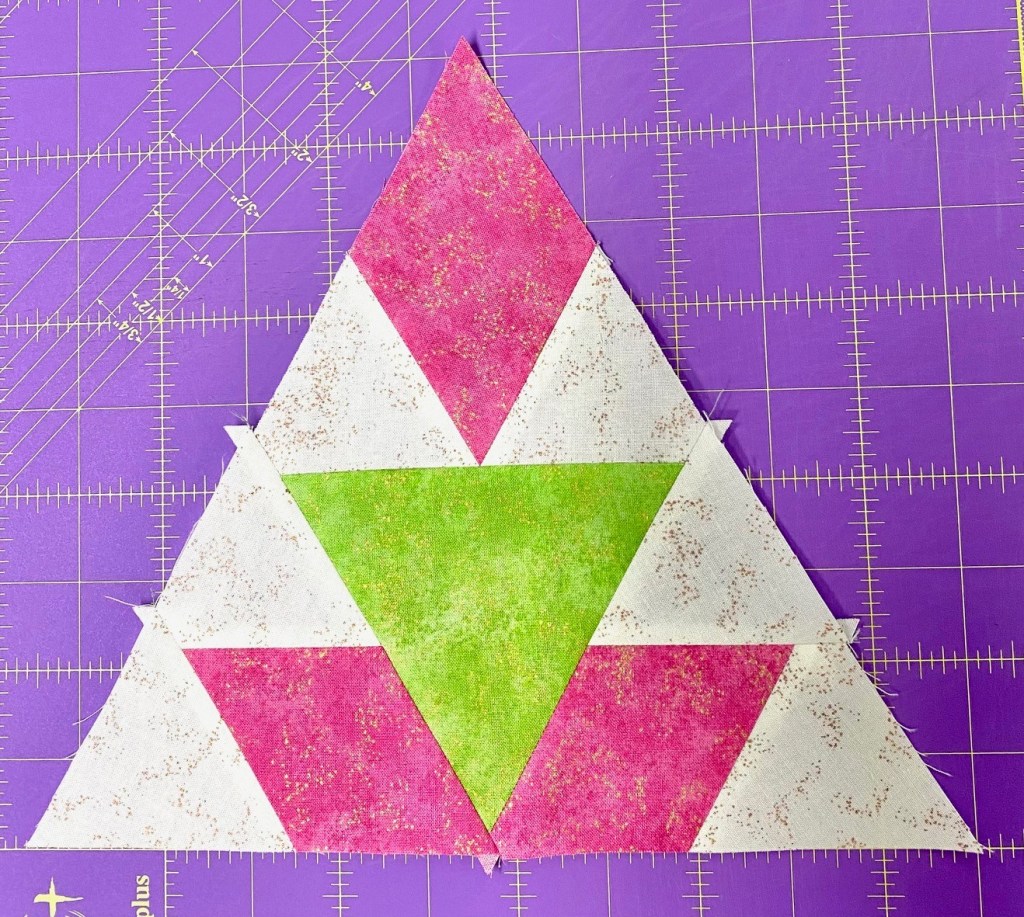
The process starts with aligning your repeats, evening up one end and cutting them into 3 3/4″ WOF strips. With a 24″ repeat I get 6 strips, but this had a 28″ repeat. Bonus, I got 7 WOF strips. I was able to cut equilateral triangles for 127 .hexagon blocks
There are several 60 degree rulers out there. I prefer to cut my triangles using a 6″ x 12″ Olfa ruler with a 60 line.
Each stack of six triangles is a kaleidoscope giving you 3 choices on how to stitch your block together. I have free, detailed video tutorials available here on my site and on YouTube that guide you through the process of making a One Block Wonder. Plus you should check out Maxine Rosenthal’s books, One Block Wonder’s, One Block Wonders Encore, One Block Wonders Cubed and One Block Wonders of the World (2 of my OBW’s are included in that book).
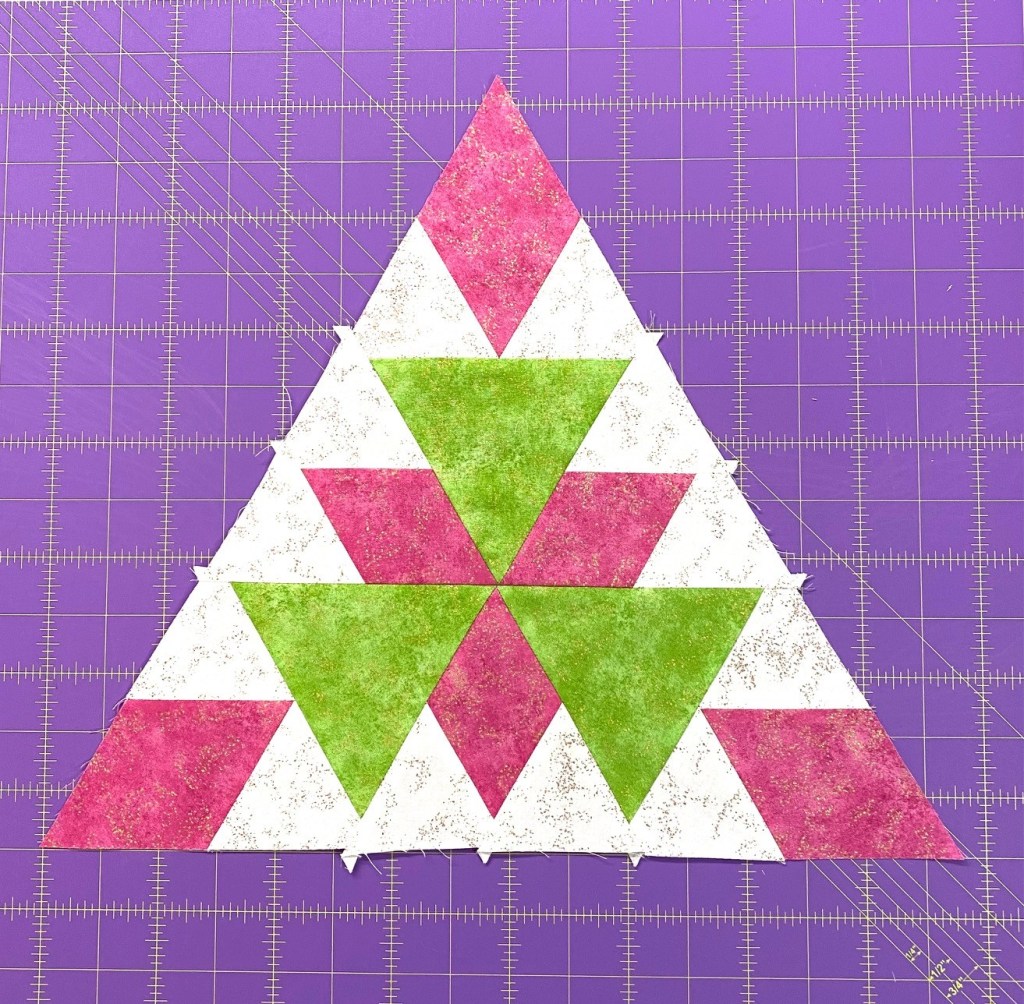
Usually I wait till all my blocks are sewn before going to the design wall. I was so excited that every few blocks I had to start designing. When constructing OBW blocks, you stitch 3 triangles together, pressing all seams open and then sew the other 3 triangles together. DO NOT sew the center seam. Simply overlap the halves at the center and pin it. My goal with this panel was to design it so it seemed the colors were swirling right off the panel.
Once you have a design you like it’s time to sew the blocks into rows.
Un-pin the blocks one row at a time and sew into rows, press all seams open. I love my pressing stick. It makes it much easier to press all the seams open without disturbing what was previously pressed.
Stitch your rows together. I love my Clover Fork Pins. They are thin and grip and hold the fabric in place.
Did I tell you to press all seams open? That pressing stick really helps.
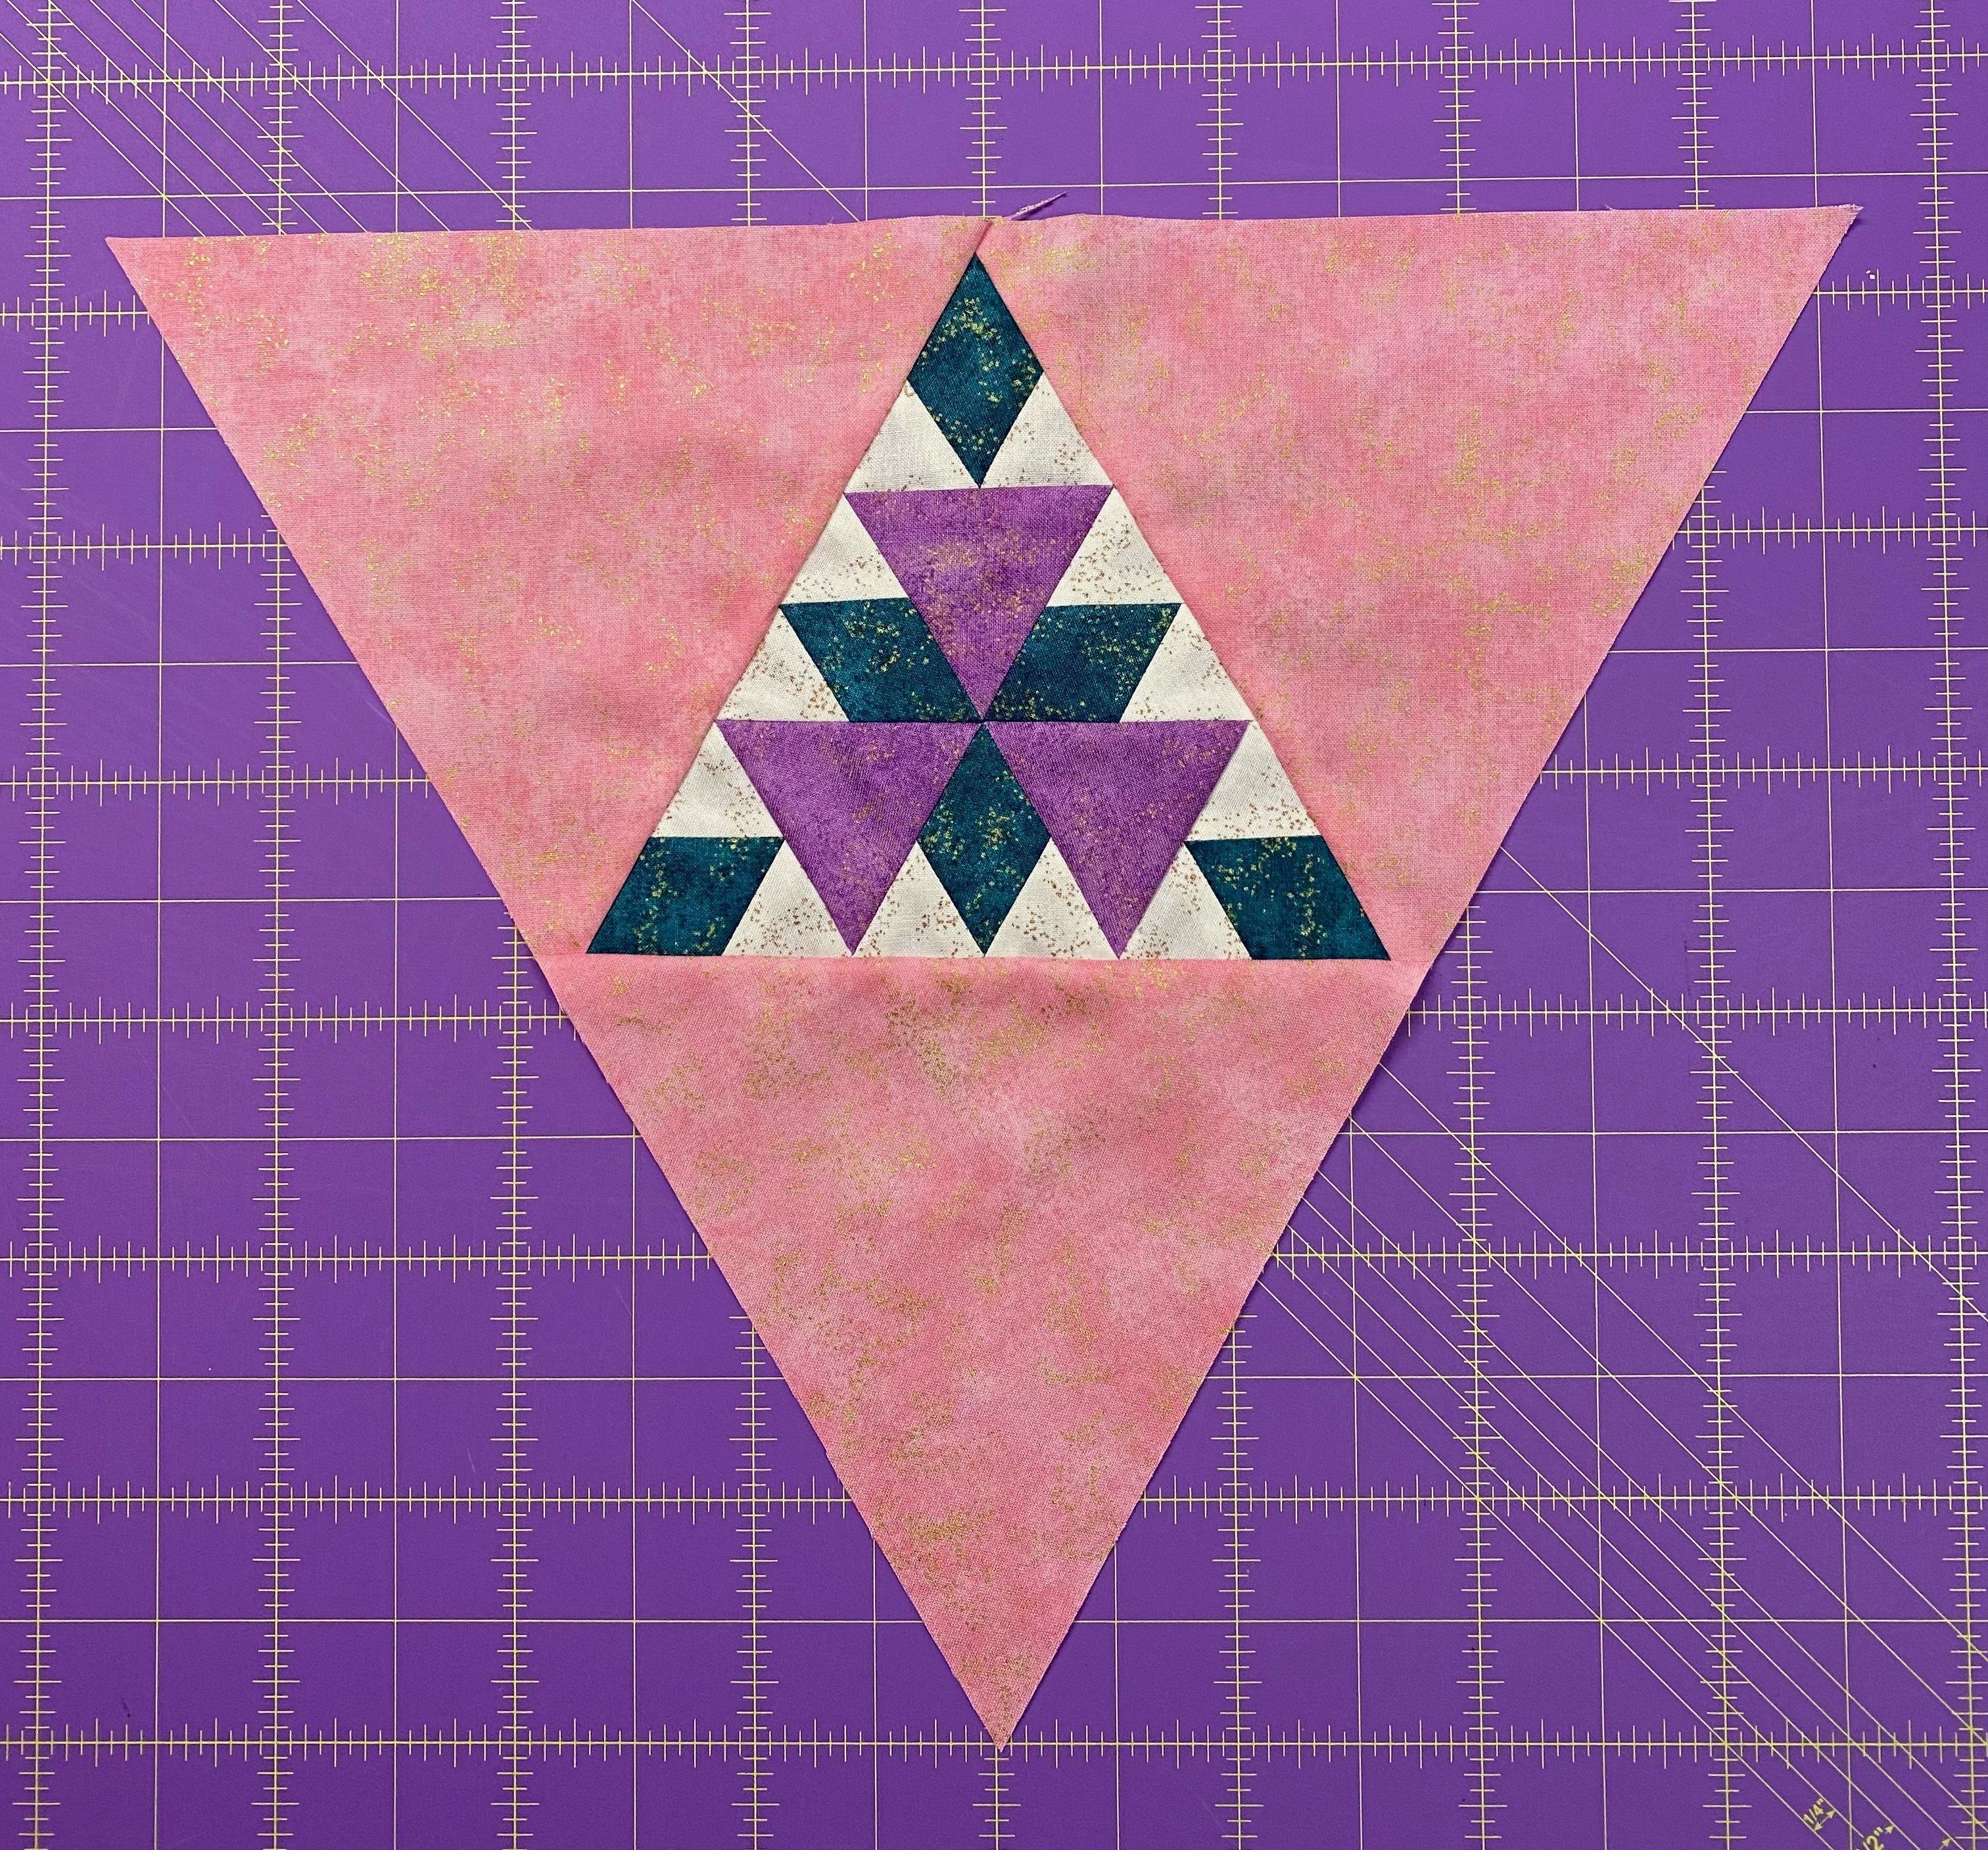
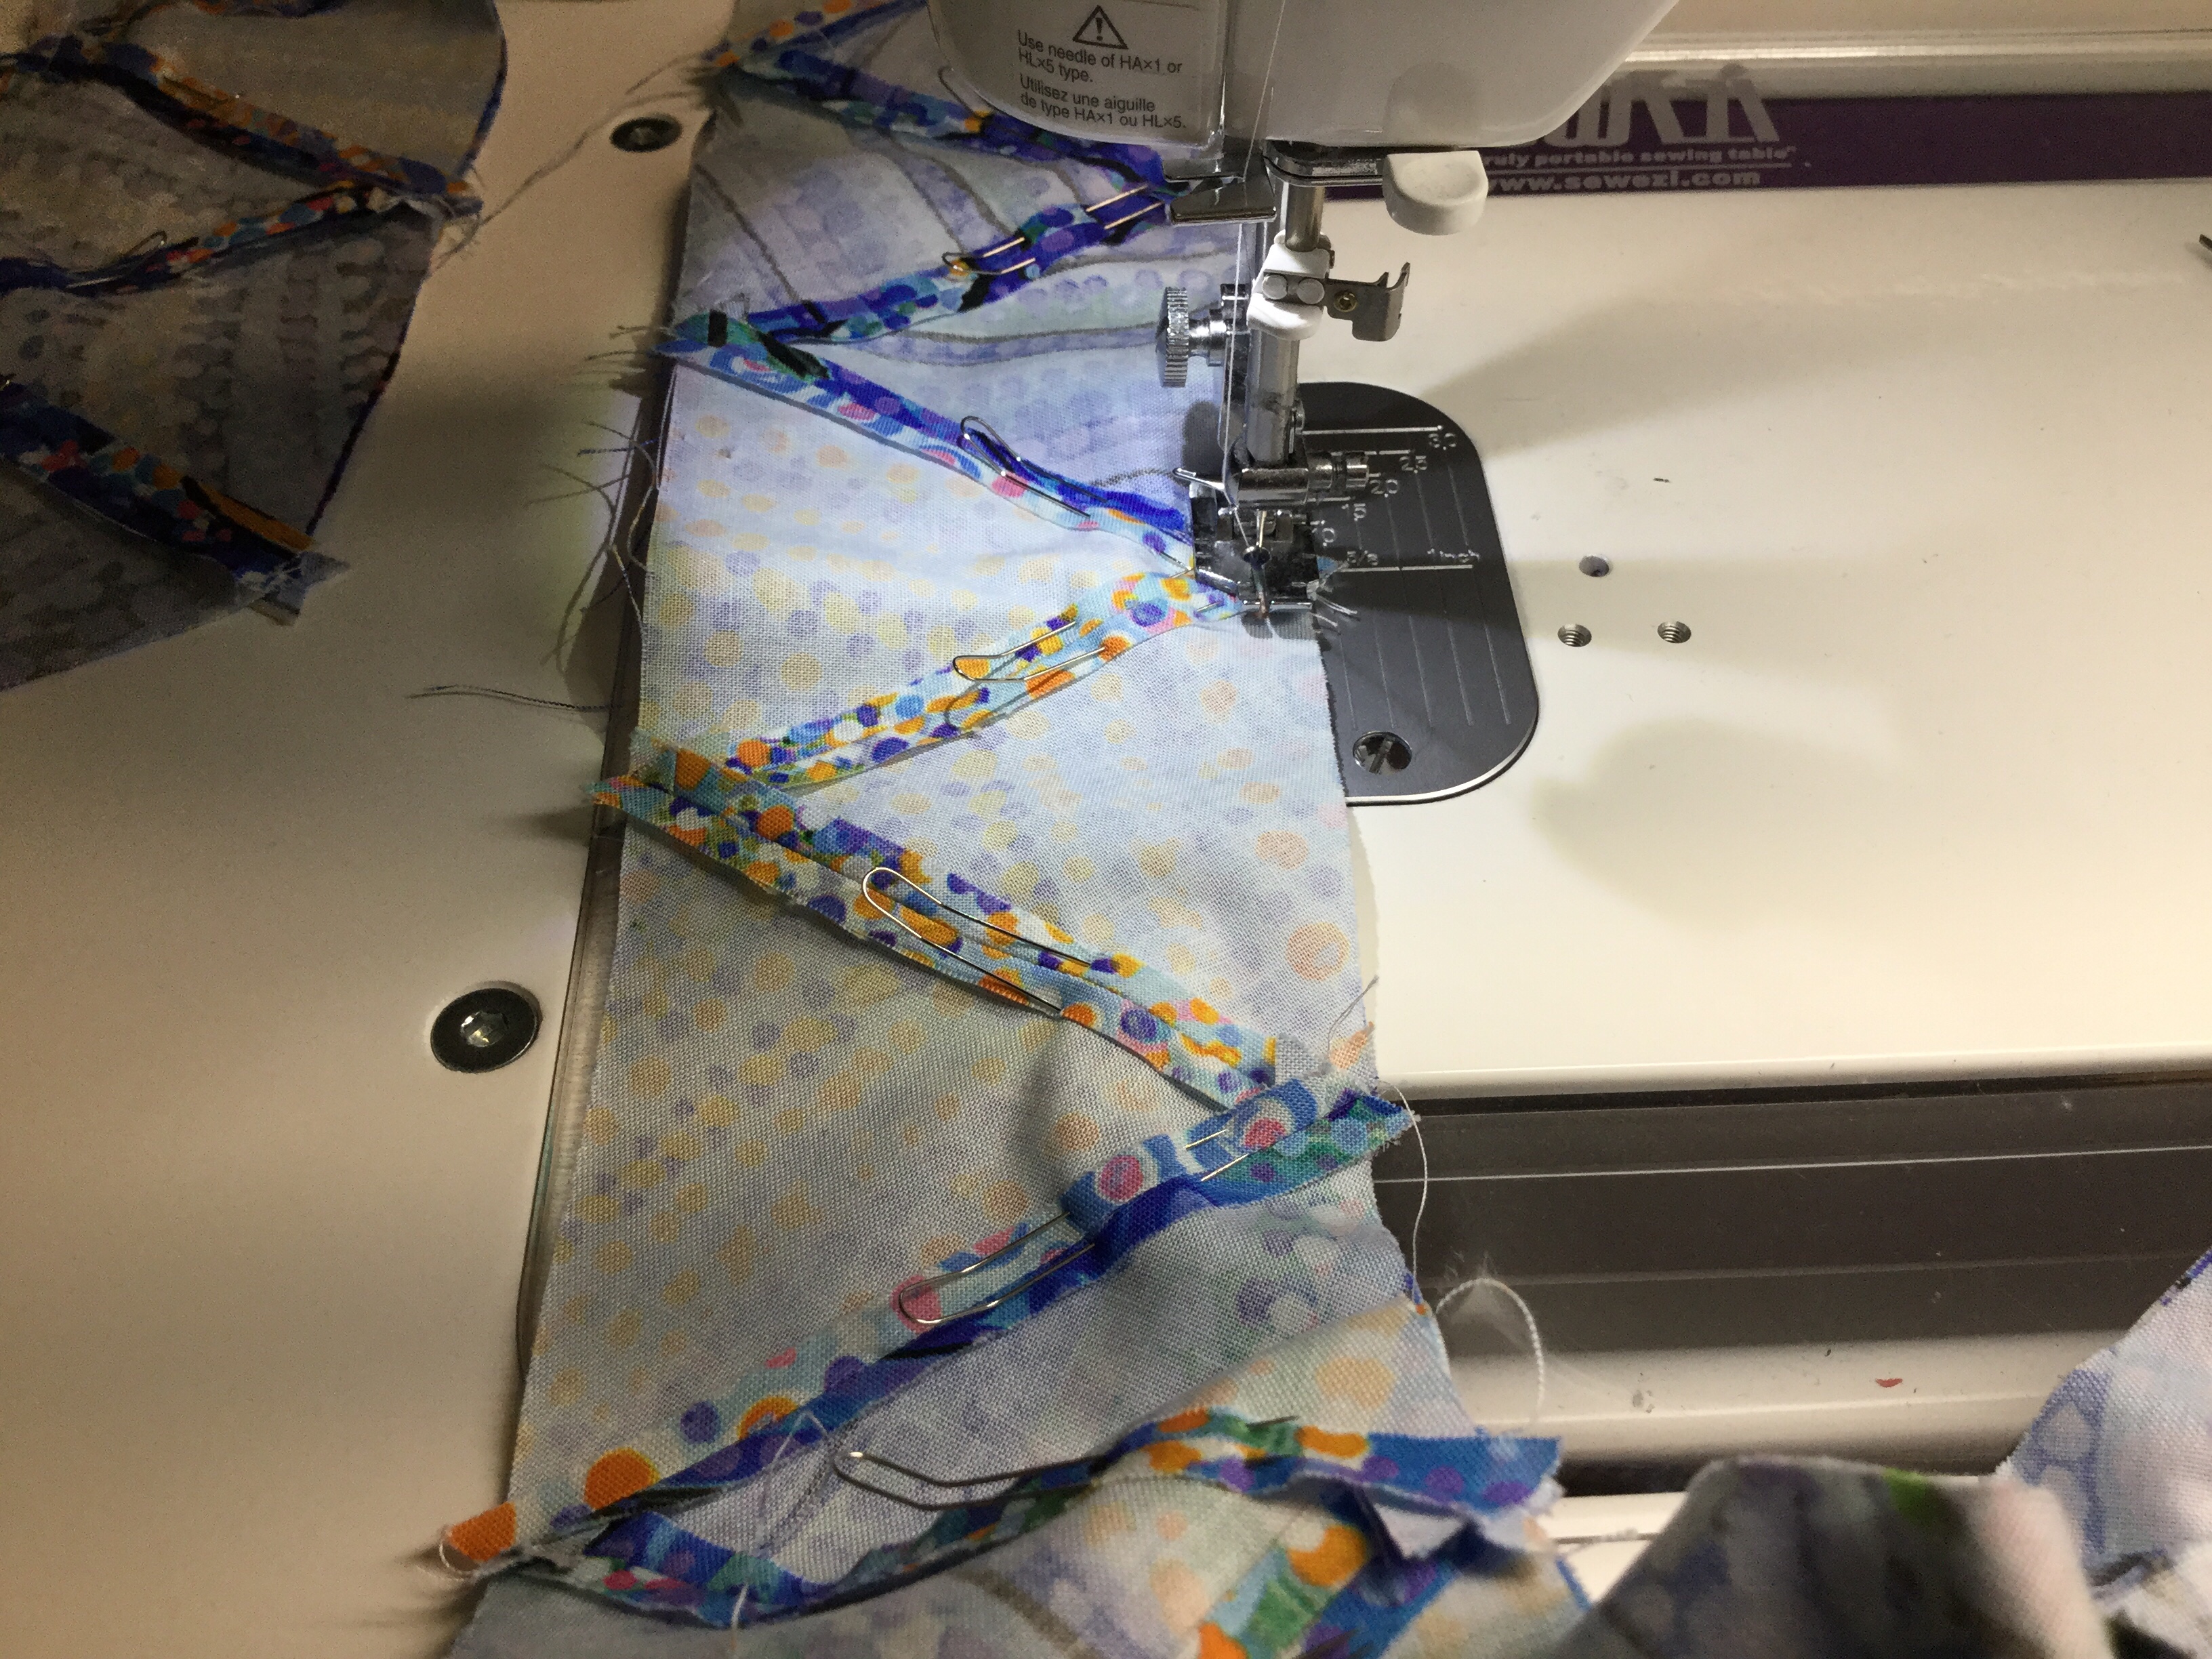
Putting together a One Block Wonder made using a panel in the quilt top is a little trickier than with just stitched rows. I divided rows into four sections to attach them to the panel. It is like making a log cabin block. I wanted the rows to attach in certain places so color seemed as though it continued right off the panel. I began by trimming the bottom section first and attaching it to the panel.
I could now attach the rows to the right to the panel, using a partial seam and leaving room to adjust the top section of triangles and then add the rows to left of the panel.
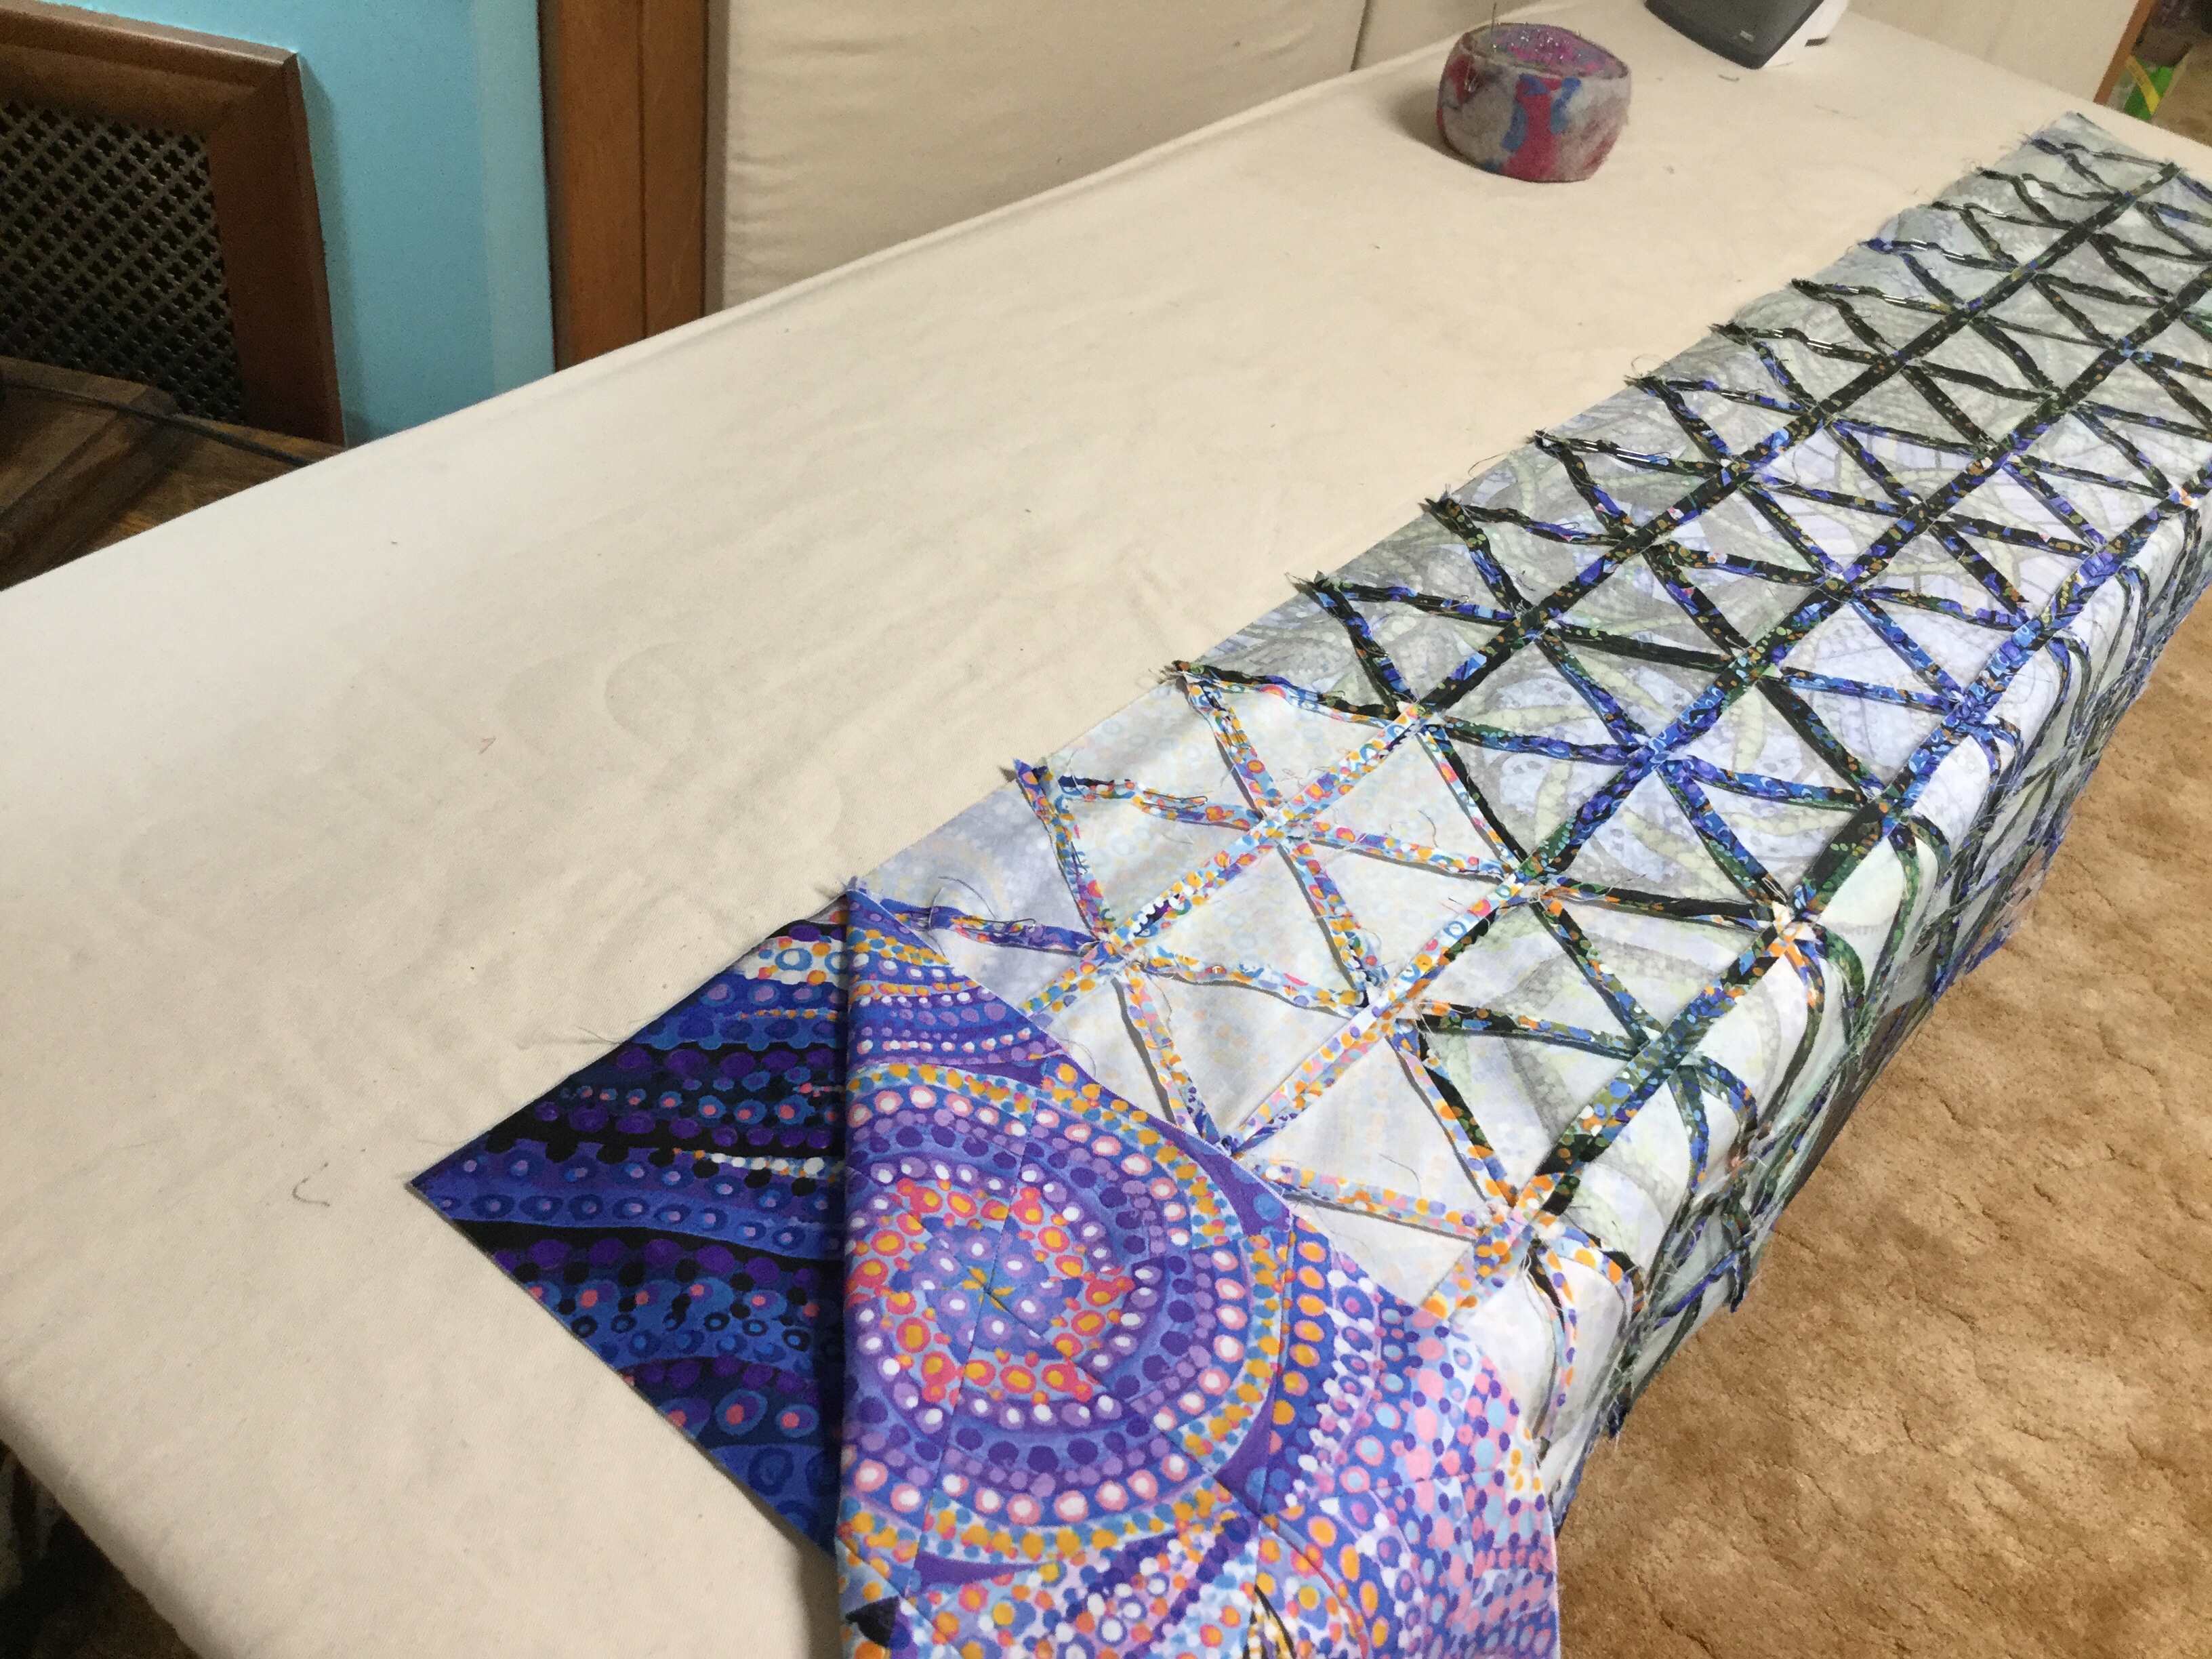
I trimmed the edges of the quilt to square it up. I love it, but still wanted to soften the panel edges.
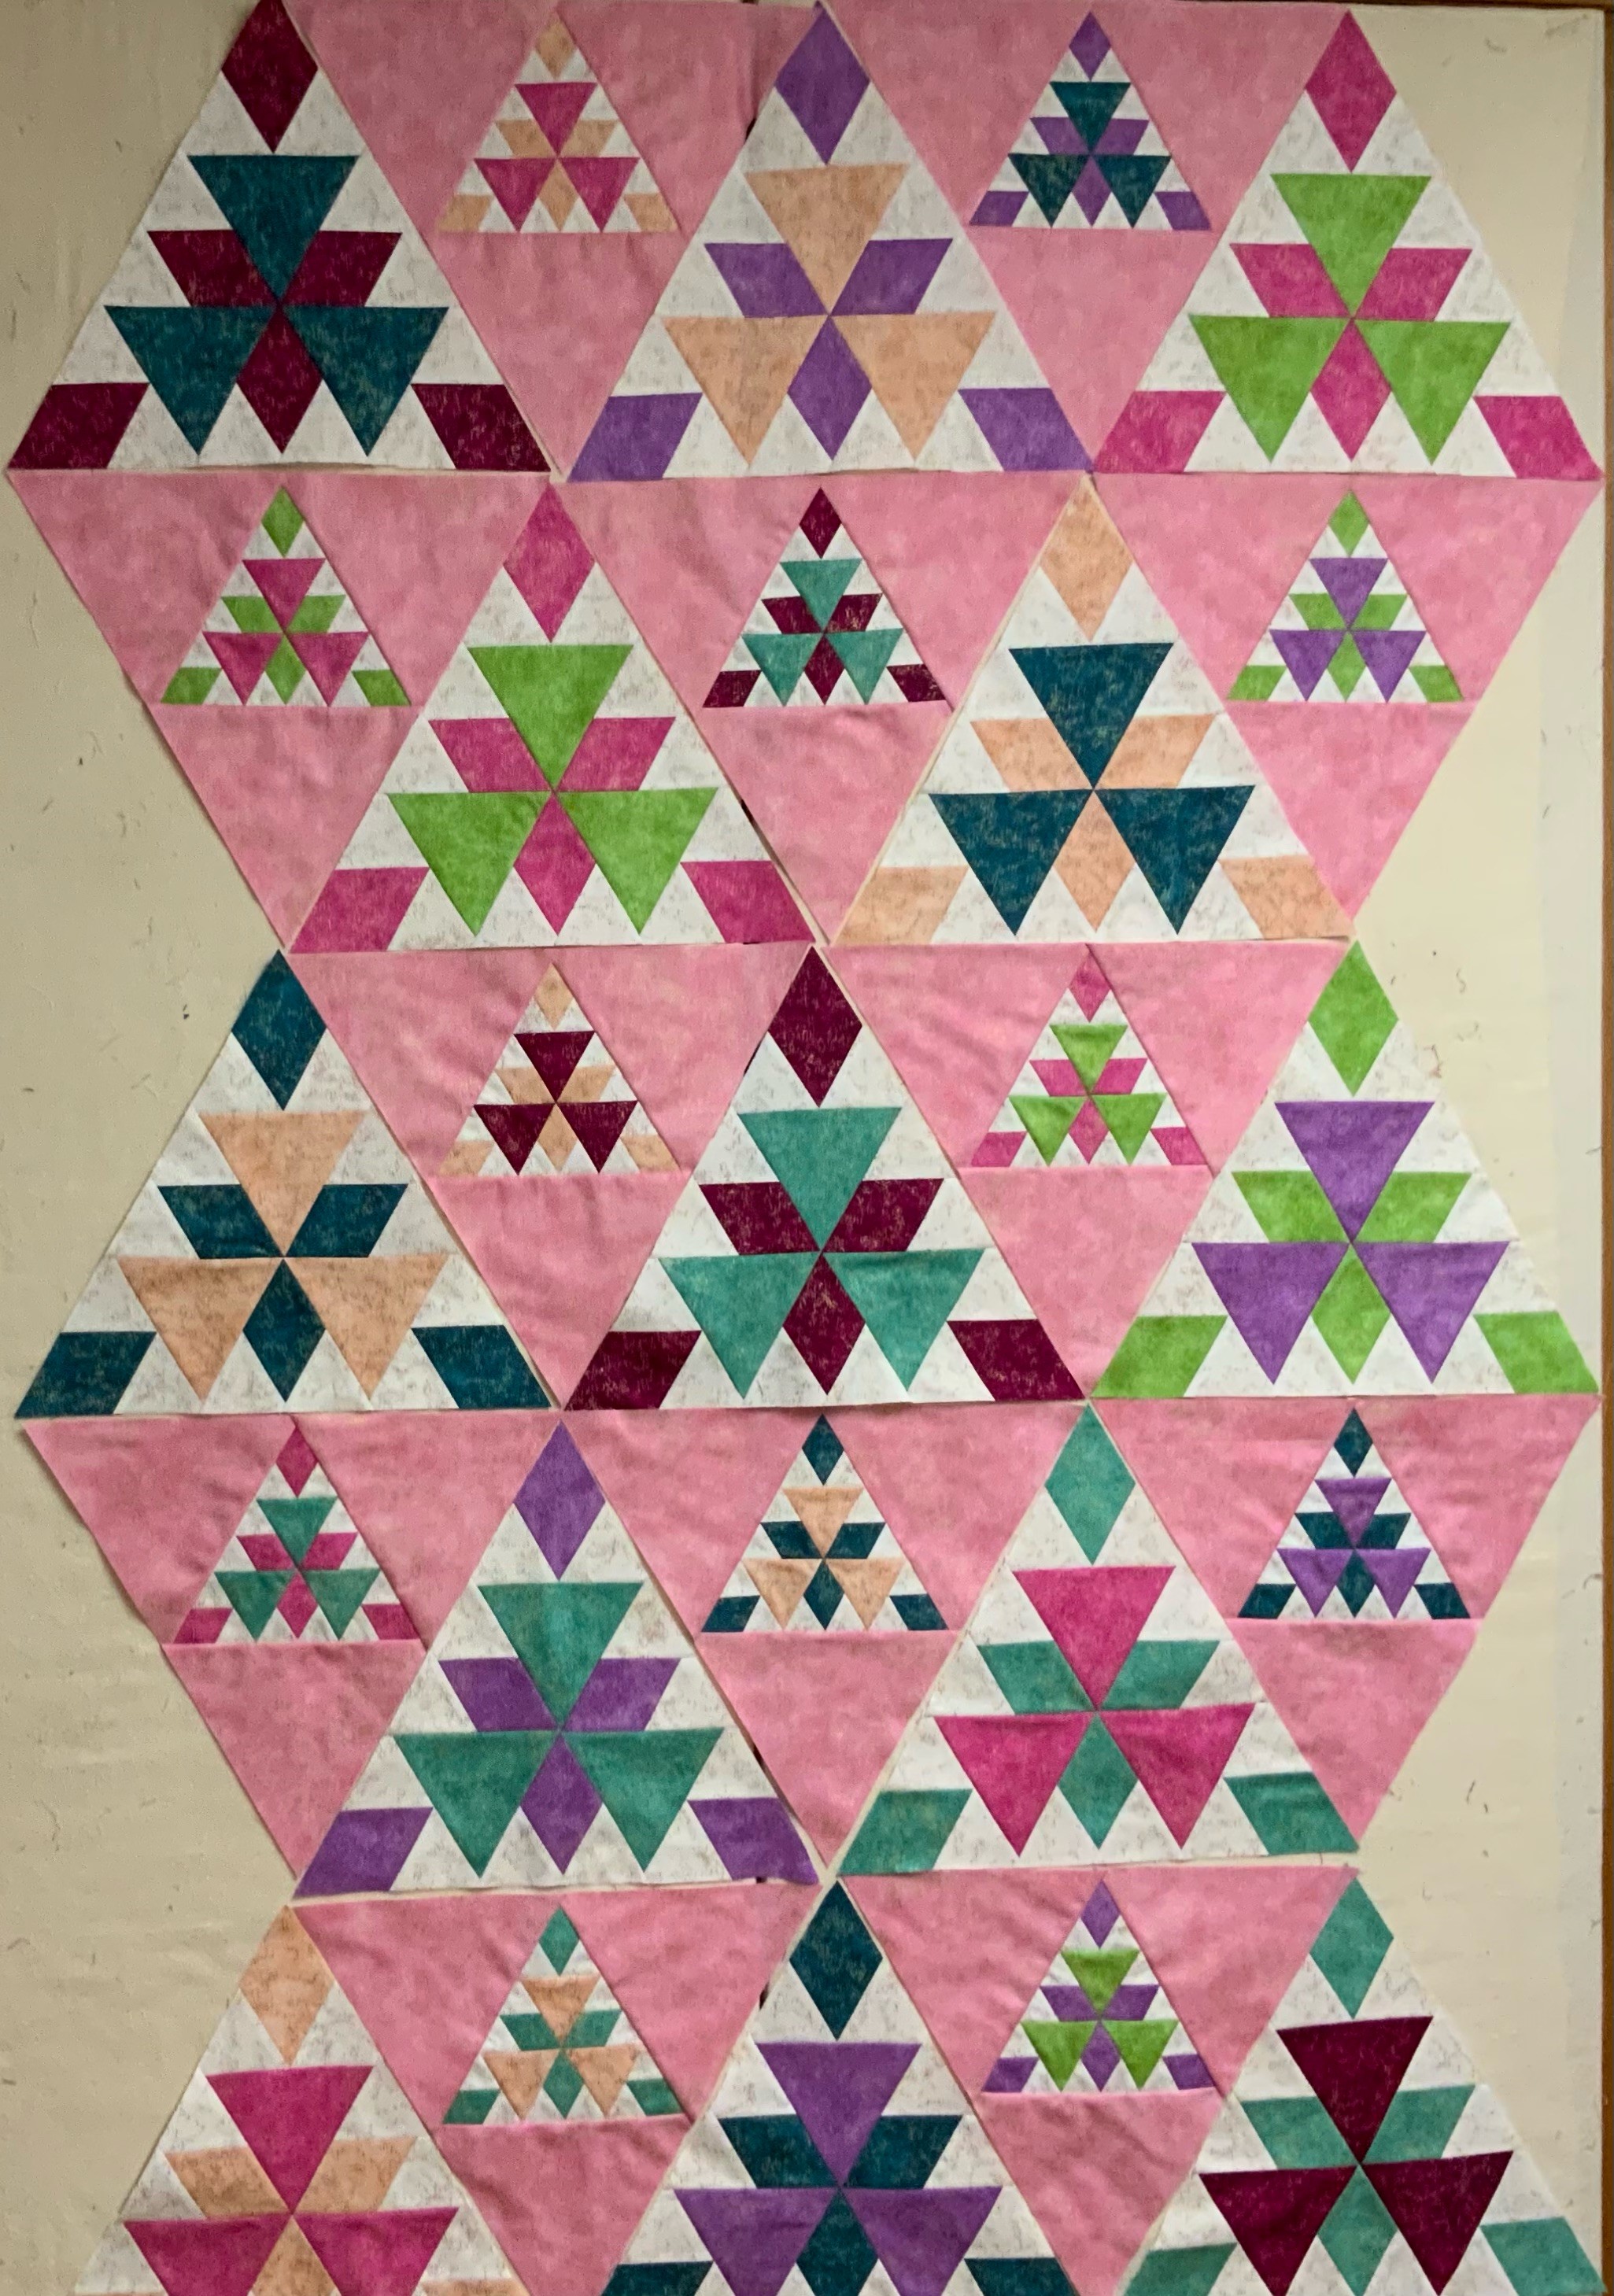
I did not use all the blocks in the quilt top design. I sewed the left over blocks together and trimmed them to make smaller hexagons. I randomly placed them along the edges of the panel and appliqued them down.
The finished quilt measures 60″ x 68″. I did not feel it needed a border. Thank you to Northcott Fabrics and Water Garden designer Ira Kennedy. I really love this quilt.
For OBW inspiration check out the Facebook page “One Block Wonder Quilt Forum”. I am available to teach One Block Wonder Workshops.
I am having so much fun! I don’t even have all the blocks designed yet, I keep going to the design wall. This panel is Artisan Spirit, Water Garden by Northcott. I am making it as part of Northcott’s Creative Club. I can’t wait to finish it! Have you ever made a One Block Wonder using panels?