I have been traveling and teaching. I picked up my friend and fellow Studio 180 Design Certified Instructor Barb Wiseman, we left Pennsylvania and went west to Lexington, KY and met up with another fellow Studio 180 Design Certified Instructor Toni Raynolds. Barb and Toni assisted me while teaching One Block Wonder and a Hollow Cube 60 classes at Thomas Sewing Center. What a fabulous time we had! Thank you Toni for taking such good care of Barb & I.
Thank you to Thomas Sewing Center owner Alysson Rife and everyone who attended. I had a great time.
After Thomas Sewing Center Barb and I traveled south to Fairfield Glade, TN and met up with another fellow Studio 180 Design Certified Instructor Pauline Lang and the Fan-Tastic Quilt Guild for a One Block Wonder Trunk Show and workshop. I had a blast with you all. Thank you Pauline for all your help and wonderful hospitality!
I was on the road for 8 days, driving through 8 states by the time we got home. I am so grateful to be home safe!
Thank you sew very much for a great time! I hope you will all share photo’s of your completed OBW’s.
Does anyone remember an old song from the 40’s called “I got the Sun in the Morning “? It was written by Irving Berlin in 1946 for a musical called “Annie Get Your Gun”.
I’ve been humming that tune while working on this great panel designed by the Morris Group for QT Fabrics. The panel measures 36″ x 43″. Bohemian Sunrise will be available in early 2025.
I was at a quilt retreat last weekend with my friends the Turtle Crew. I took off the borders which left me with a width of 28″ for the panel. I cut 2.75″ strips that yielded 190 – 4″ finished hexies.
I picked coordinating fabrics from QT Fabrics Color Essence line and Morris Group Bohemian Sunrise line for making adding stars and cubes to my design.
Using a set of equilateral triangles for the center and light orange from the Color Essence line and stars fabric from the Bohemian Sunrise line, I made 2″ finished Star 60 units that were stitched to the equilateral triangles to make diamonds. I then made 2″ finished Capped 60 units that I used as side triangles for pieced diamonds. This made a 8″ finished star.
Using a light, medium and dark fabrics from the Color Essence line I made 4″ Hollow Cube 60 units.
I began designing in the upper right corner. I placed hexies 7 across and started going down the left side until I passed the bottom of the panel. Then another 7 hexies across the bottom and up the right side of the panel.
Once I have the four sides established, I can then add hexies until I am please with the design.
I added half hexies on the sides and half rectangle triangles to the top and bottom of each row and numbered my rows.
I used 4″ and 8″ finished hexies in my design. I stitched the 2.5″ rows together above and below the 4.5″ half hexies so they could be stitched to the 4.5″ half hexies. Then joined all the rows on the left side.
The photo above shows the top, bottom and left section attached to the panel, and how much shrinkage there was when the hexies are joined into rows.
Bohemian Sunrise measures 78″ x 63″. OBW # 113, not yet quilted.
“Got no diamond, got no pearl. Still think I’m a lucky girl. I’ve the Sun in morning and Moon at Night”!
If you follow me you know I love my Chihuahua Tucker.
But, These cat panels by Rubin Design Studio, exclusively from eQuilter are just fabulous!
Mysterious Kitty panel measures 43.5″ x 29.5″. I decided to cut my strips 3.25″ yielding 168 – 5″ finished hexies.
I decided to start my design at the top of the panel, choosing the upper right corner to start, and placing 8 hexies across the top before going down to start the left side.
Above is the design I settled on. The edges of the panel range from black to dark blue. I didn’t think the green from the eyes would show up much, so I added Framed 60 stars to the upper right corner. They make the Kitty’s eyes sparkle more. I added Star 60 units to the left side in orange and blue made using the Star 60 Tool.
Above shows the top and bottom sections attached to the panel. Notice how much it shrinks when stitched together. We know we lose 1/2″ between straight seams. But, when stitching the hexies into rows we lose 9/16″ between seams. Depending on how many hexies are in your row, you lose about 3″ or more.
There are always two opportunities to tweak the design. The first is while designing with the hexies. The second is after you finished designing and the rows stitched are together. The photo on the right shows the top stitched together un-tweaked. I needed to soften the dark corners on the bottom of the panel. The photo on the right shows the top tweaked. I added appliqued Star 60 units on the lower right and left corners of the panel in different sizes and colors to created more of a curve I was looking for.
In my OBW Supply List, I show you a method to create appliqued hexies using fusible knit interfacing. This time I tried something different. I used Steam-A-Seam. I traced the fabric unit on the Steam-A-Seam paper, and then cut it out at least 1/4″ smaller. Following the Steam-a-Seam directions, I attached it to the back of the fabric unit. I removed the paper and finger pressed the raw edges under 1/4″. It was now ready to be attached to the quilt top. Once I have all my appliqued units attached to the top, I top stitch them down using Superior Monopoly clear thread.
1/20: Sew Busy, Gloversville, NY, OBW Trunk show & Workshop
2/13: Zoom Workshop, Quilt Inc., Delmar NY
3/6 – 9: Strong House Inn, VT, Play Among the Stars
3/21: OBW Workshop, Amy’s Quilt Room, Union Town, PA
5/2 -5: Long Island Quilter
Reserve your place now for March 6 – 9, 2025 at The Strong House Inn, Vergennes, VT. Play Among the Stars workshop will focus on designing OBW’s. Adding stars/cubes of different sizes. We will cover as many Star 60 techniques as time allows. You can bring OBW projects you want help with designing. This workshop is about creative design. Workshop Description:
A BIG Thank You to Amy of Amy’s Quilt Room in Uniontown, PA. I’m just now home from teaching a One Block Wonder (OBW) workshop or as Amy would call “Quiltpalooza”! It was fabulous! I had so much fun. The Hilton Garden Inn at Uniontown PA was the perfect venue. We had a great space and were very well cared by the staff.
This group of ladies did such a great job. They learned all about OBW’s and how to make Hollow Cube 60’s & Star 60 units. We delve into how to design and enhance our OBW’s.
Just for fun I thought I would share how the Quilt Ninja came about.
It all started in 2008. I went to the Virginia Consortium of Quilters Celabration at Smith Mountian Lake and participated in an Apron contest and won 1st place.
I covered the apron vest in pockets. I placed a pocket on my back to hold a ruler and placed a rotary cutter in a front pocket.
I would whip out the ruler and rotary cutter at the same time, stating loudly “Quilt Ninja”! It was pretty funny. Needless to say, the Quilt Ninja became my alter ego, and over the years has gained a name; “Myrtle May the Quilt Ninja”!
Myrtle May wanted some new duds, so this version was made in 2012.
This version was made in 2015. I embroidered a list of the Studio 180 tools on the back at that time. I changed from a ruler to a Magic Wand on the back.
This version was made 2019. It is covered in Studio 180 Design tool merit badges. It has a Magic Wand on the back.
2024: I needed a vest representing the Star 60 Tool. I made a pocket for each of the star/cubes you can make with the Star 60 tool; Capped 60, Hollow Cube 60, Framed 60, Striped 60, Quad 60, Checkerboard 60, Star 60 & Star 60 Log Cabin. I added a small One Block Wonder I made with a panel. I added embroidered words the distressed women is saying: “Someone has been cutting paper with my fabric sisscors”!
I wanted to share two OBW workshops/retreats coming up. The first one is in Reliance TN at Quilters Getaway, 898 Childers Creek Road Reliance, TN 37369 – November 11 – 13, 2024. Hosted by Toni Raynolds of Pieced Perfection. Join me for a creative journey in the world of 60 degree kaleidoscopes.
Identifying and cutting your repeats.
Aligning repeats including difficult fabrics.
Choosing a ruler and understanding the difference between pointed & blunt tip rulers.
Deciding what strip widths to cut
And of course, cutting all your equilateral triangles.
Designing with the hexagons,
Integrating stars & cubes
Designing around a panel
Make your reservation now by clicking on the link below:
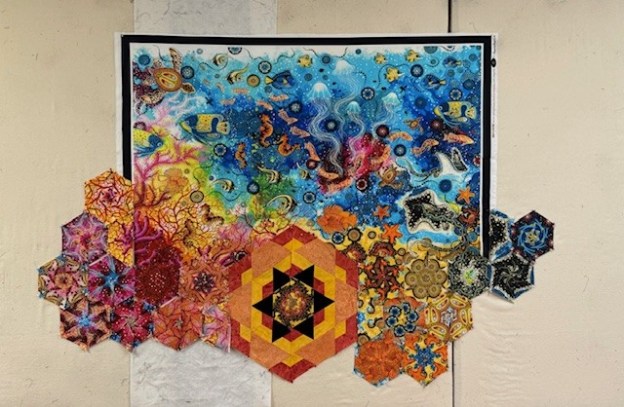
I’ve been playing among the stars, literally! In August I will be going to Amy’s Quilt Room in Union Town, PA to teach a One Block Wonder (OBW) Workshop. I want to show them how to design aound a panel and how to add hexies/stars of different sizes.
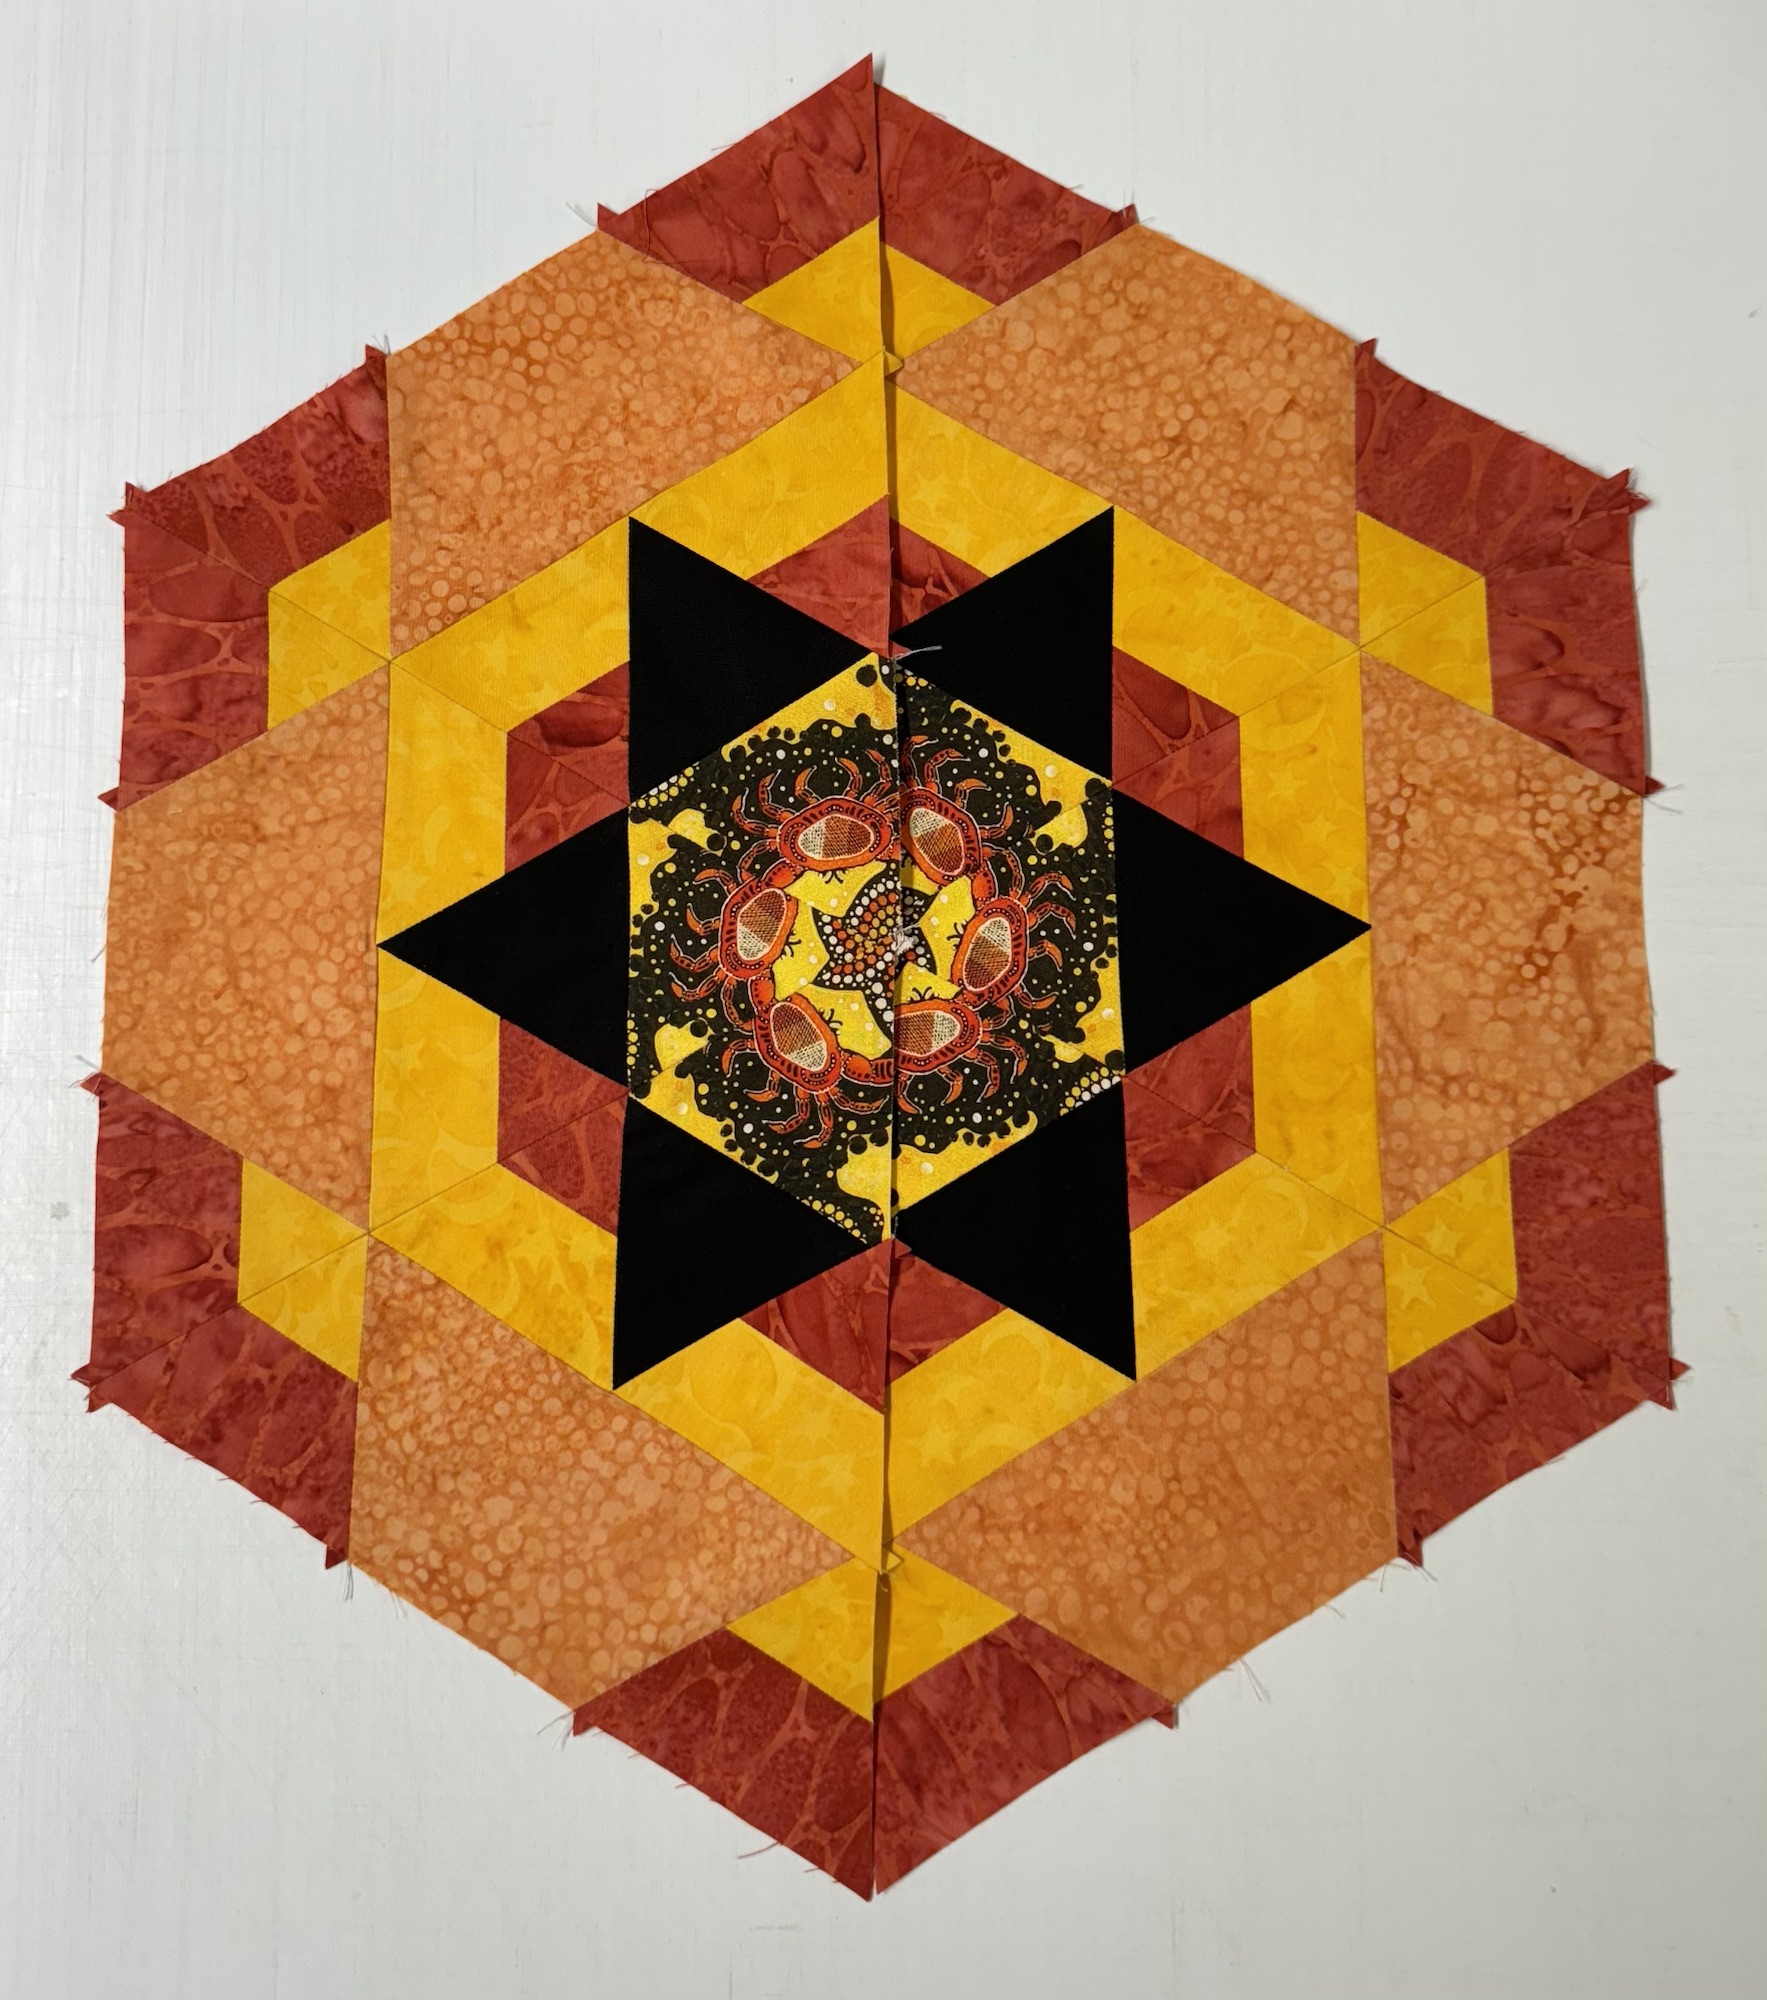
The panel is Salt Water Dreaming by Spirit of the Bush, it measures 41.5″ x 27″. I decided to cut my strips 3.25″ to yield 5″ finished hexies. When you want to add hexies/stars/cubes of different sizes, they must be divisible by the original size of the hexies. Deb Tucker’s Star 60 tool makes it easy to do this.
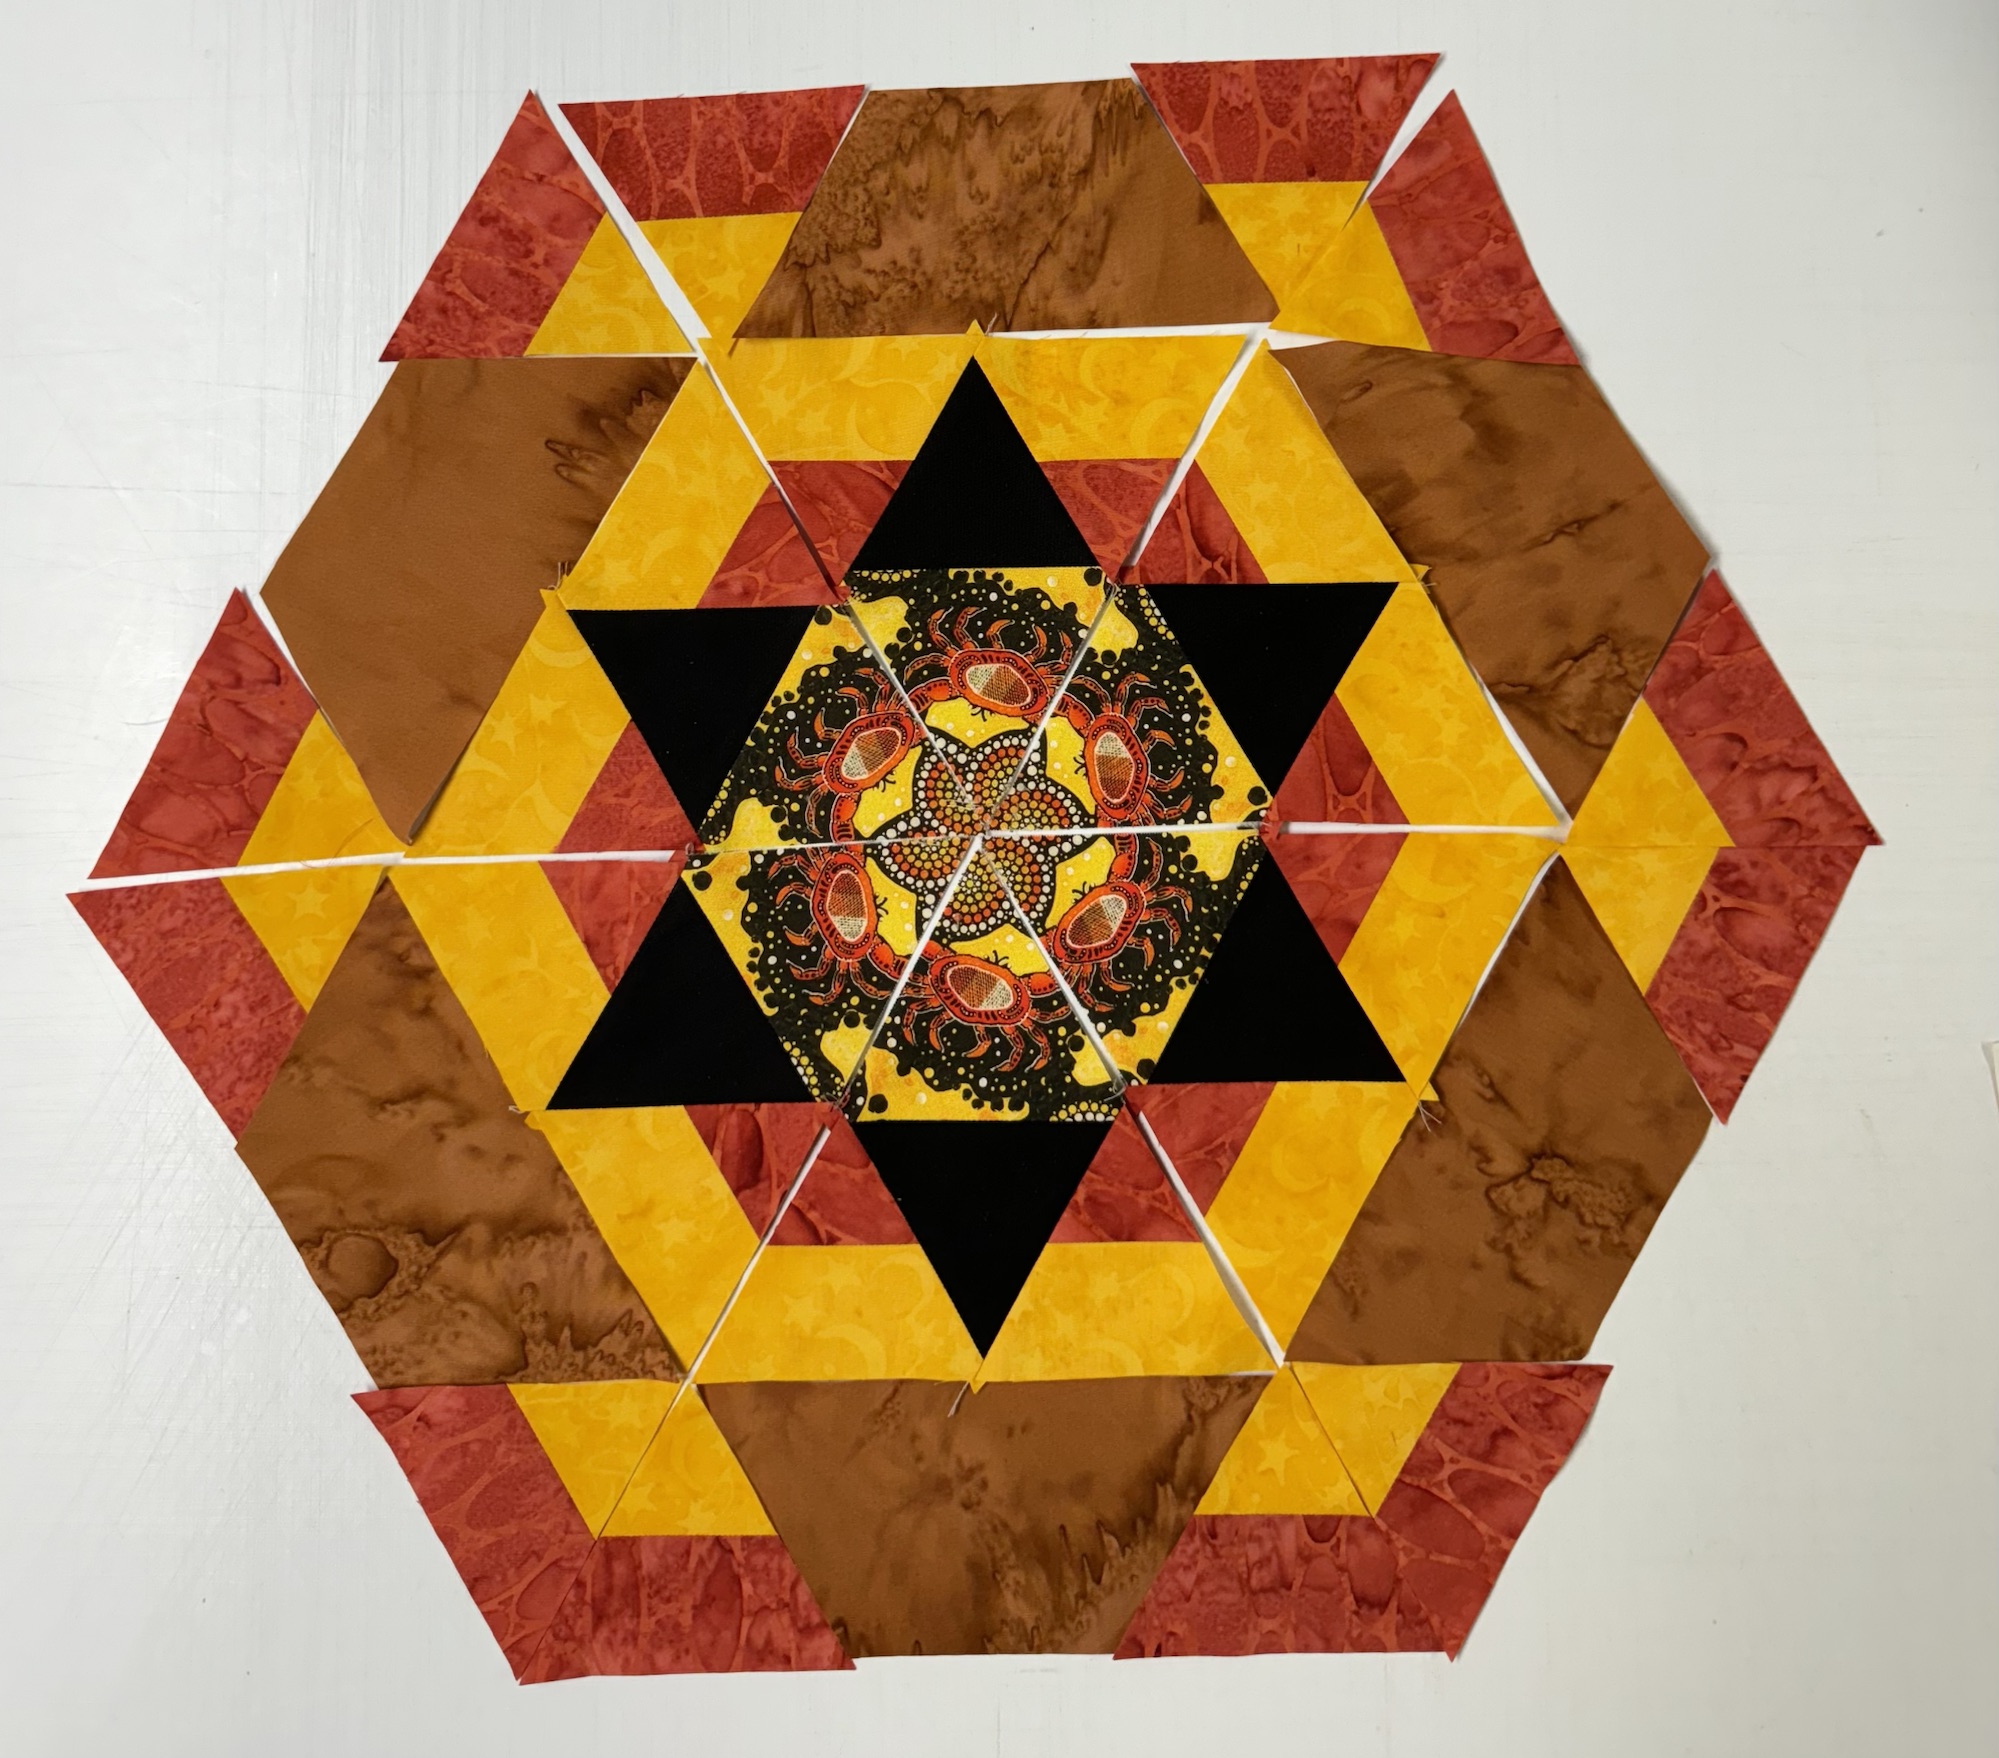
15″ Star Block – This 15″ star is divisible by 5″. This star includes 2 rings of 2.5″ finished Capped 60 units. Your units are always half the size of the finished hexie.
Center: 6 repeats cut into 3.25” strips = a 5” finished hexie.
Companion Triangle: (Black Fabric) Cut 1 – 3.25” WOF strip, cut 6 triangles using the 60 degree line .
Inner Capped 60: ( Orange point, yellow Trapezoid) Make 12 – 2.5” Capped 60 units. Cut two 2” WOF strips from a medium and light fabric.
Half Hexagons: (Bronze fabric) Cut one 3” WOF strip. Using the Star 60 ruler, place the 5.5” line on the bottom of the strip and cut 6 half hexies from a medium fabric.
Outer Capped 60: (Gold points, orange trapezoids) Make 12 Capped 60 units. Cut two 2” WOF strips from a medium and light fabric.
Stitch the center hexie triangle to the black companion triangle. Press seams open.
I used Capped 60 units as side triangles to the diamond shape created by stitching the hexie center to the black triangle. I stitched the second ring of Capped 60 units on either side of the half hexie and then stitched that pieced unit to the pieced center triangle.
Stitch 3 triangles together, pressing the seams open, repeat with the other 3 triangles.
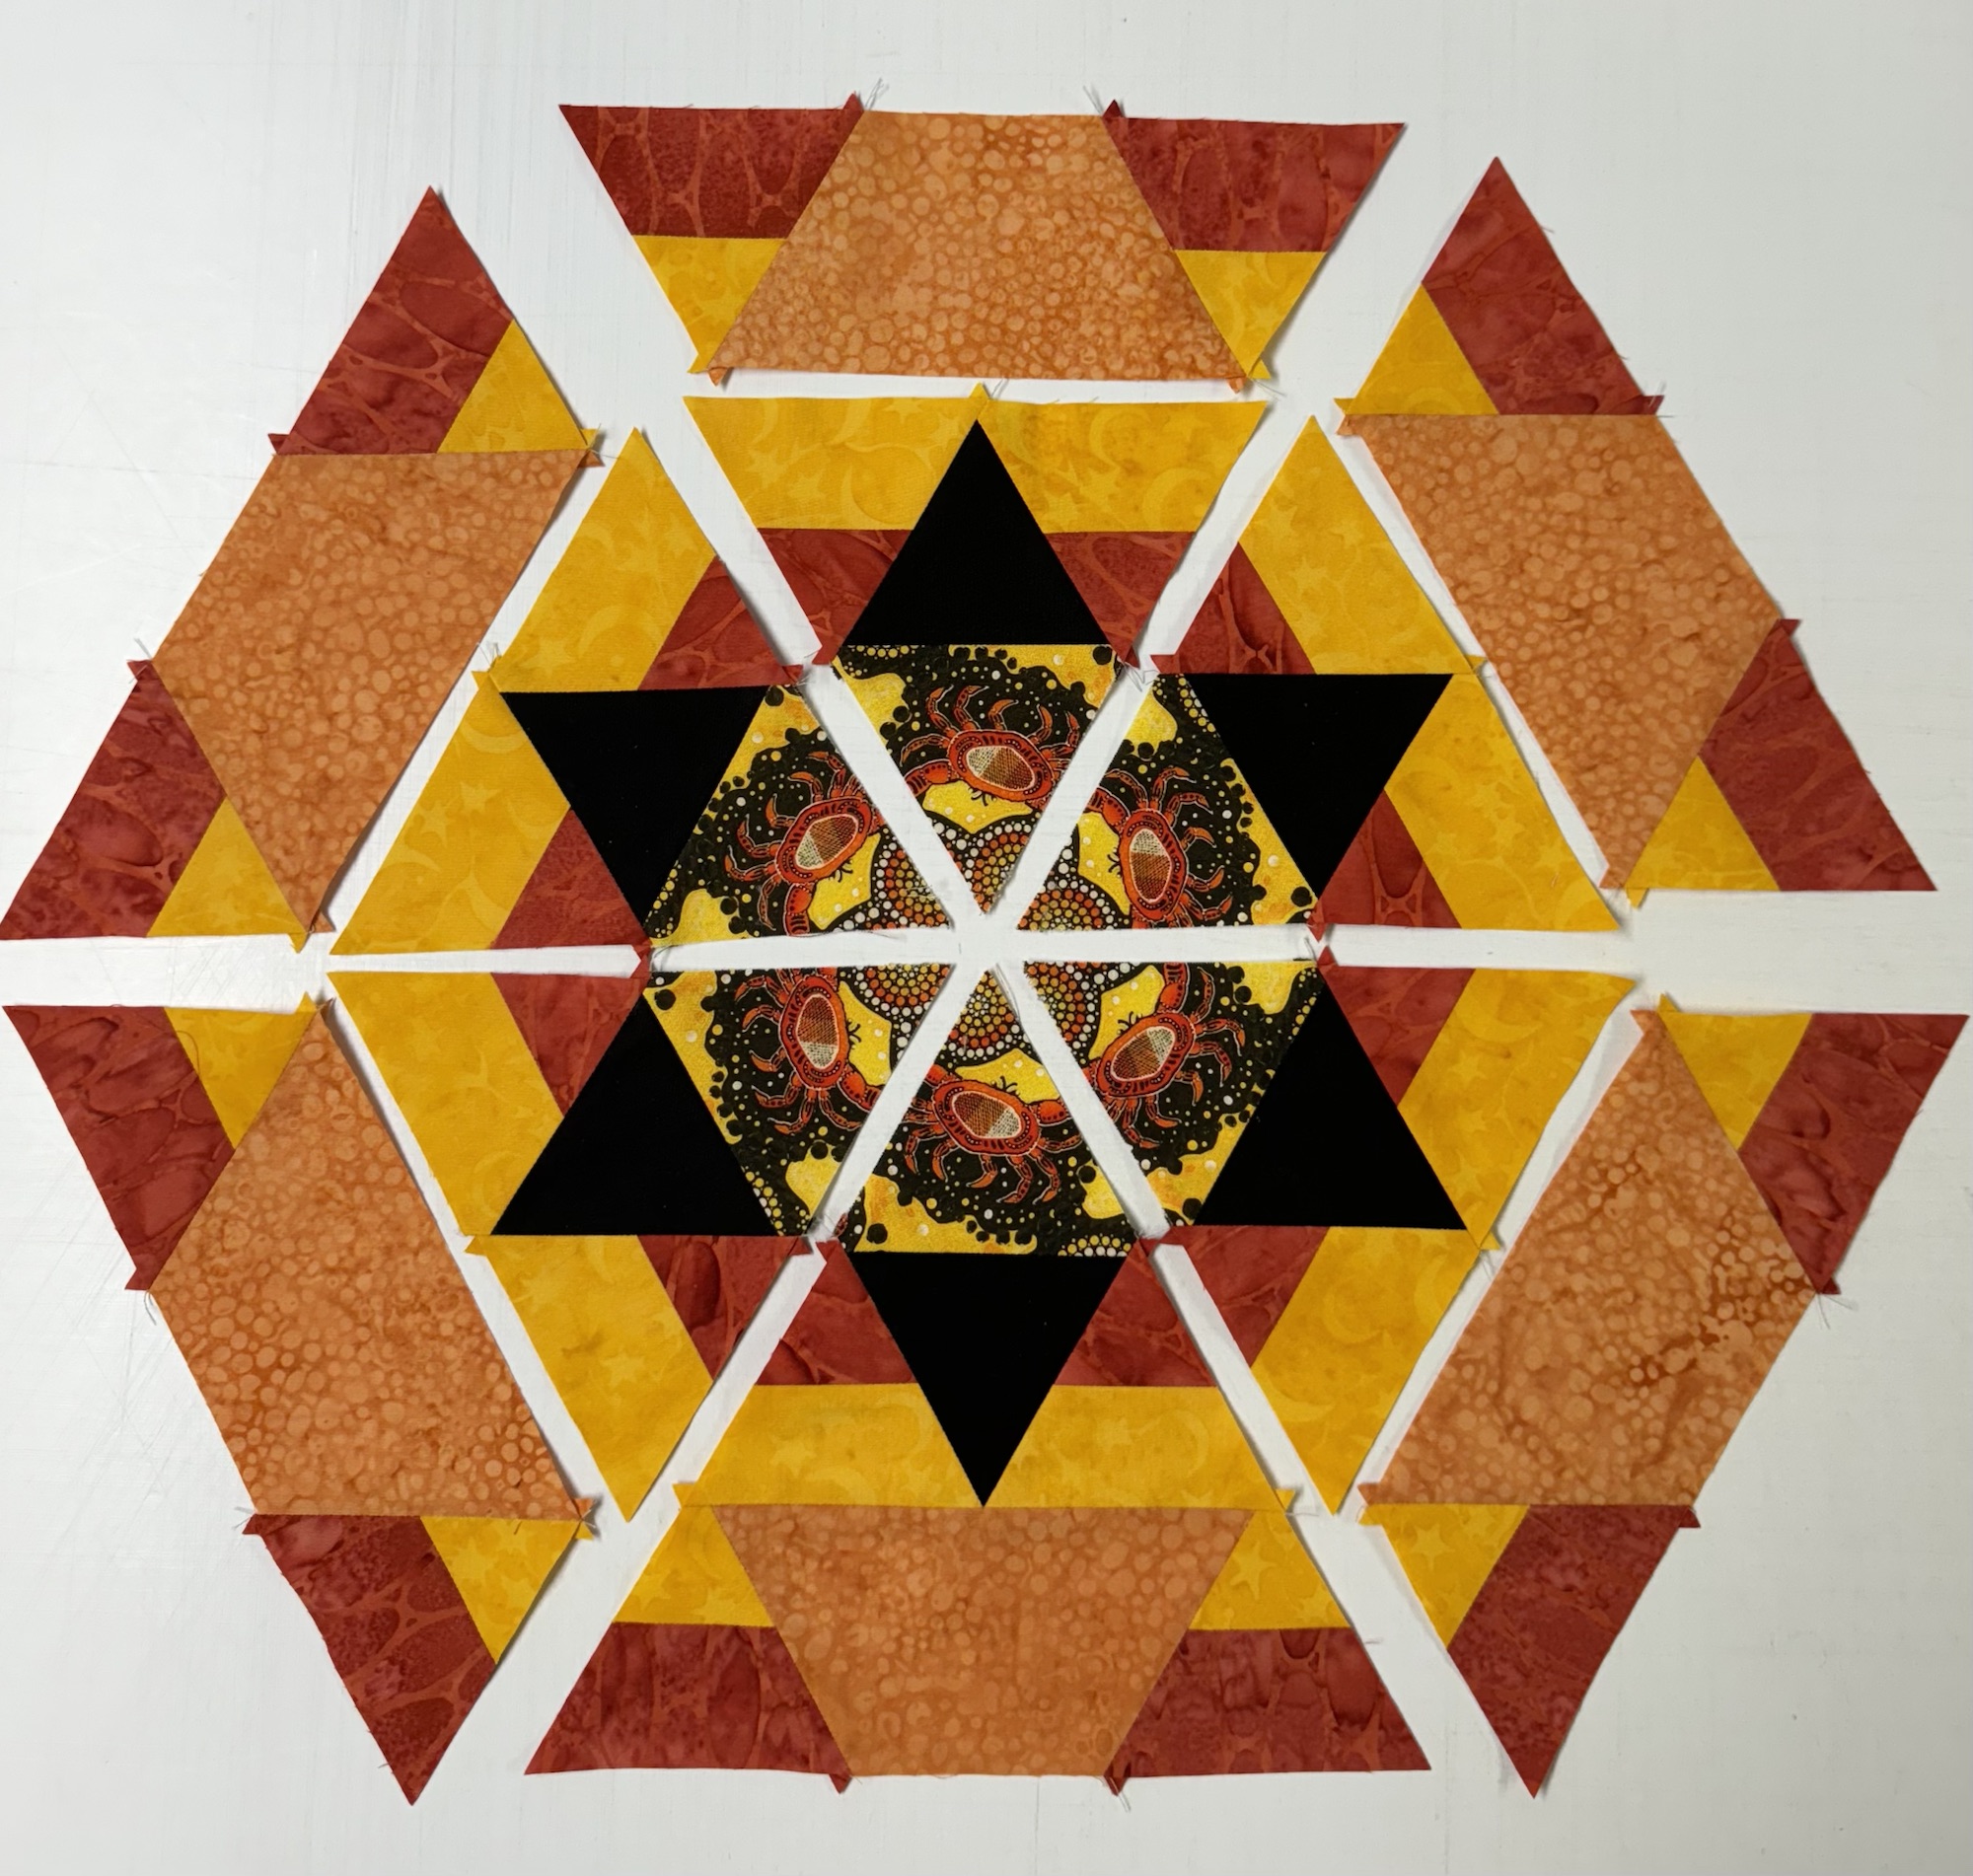
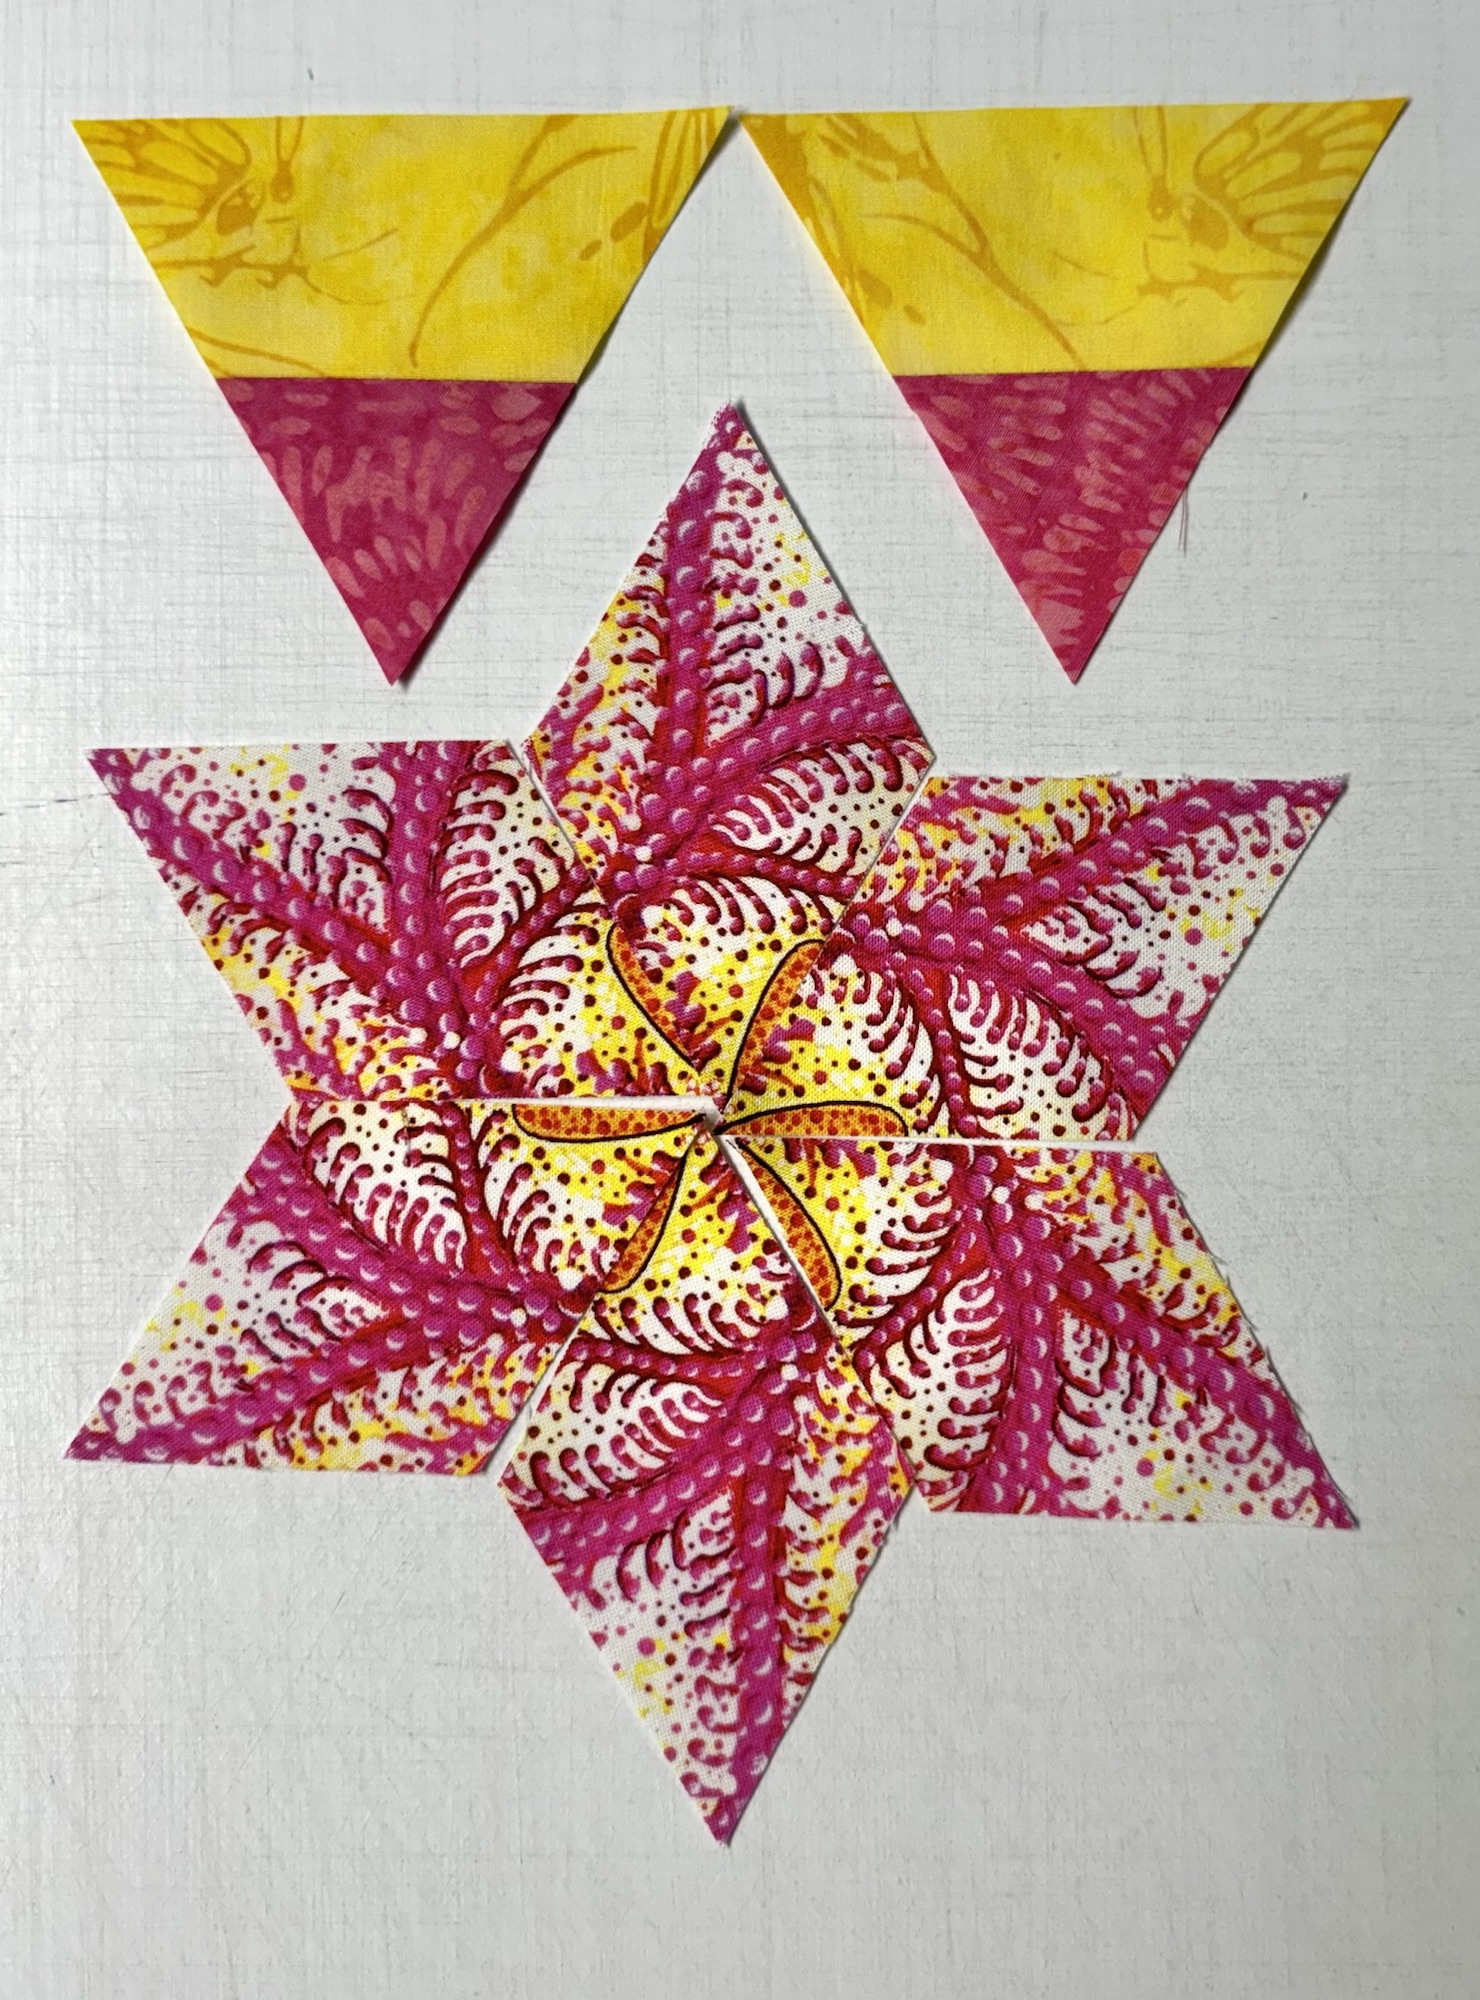
Creating with a Star Center
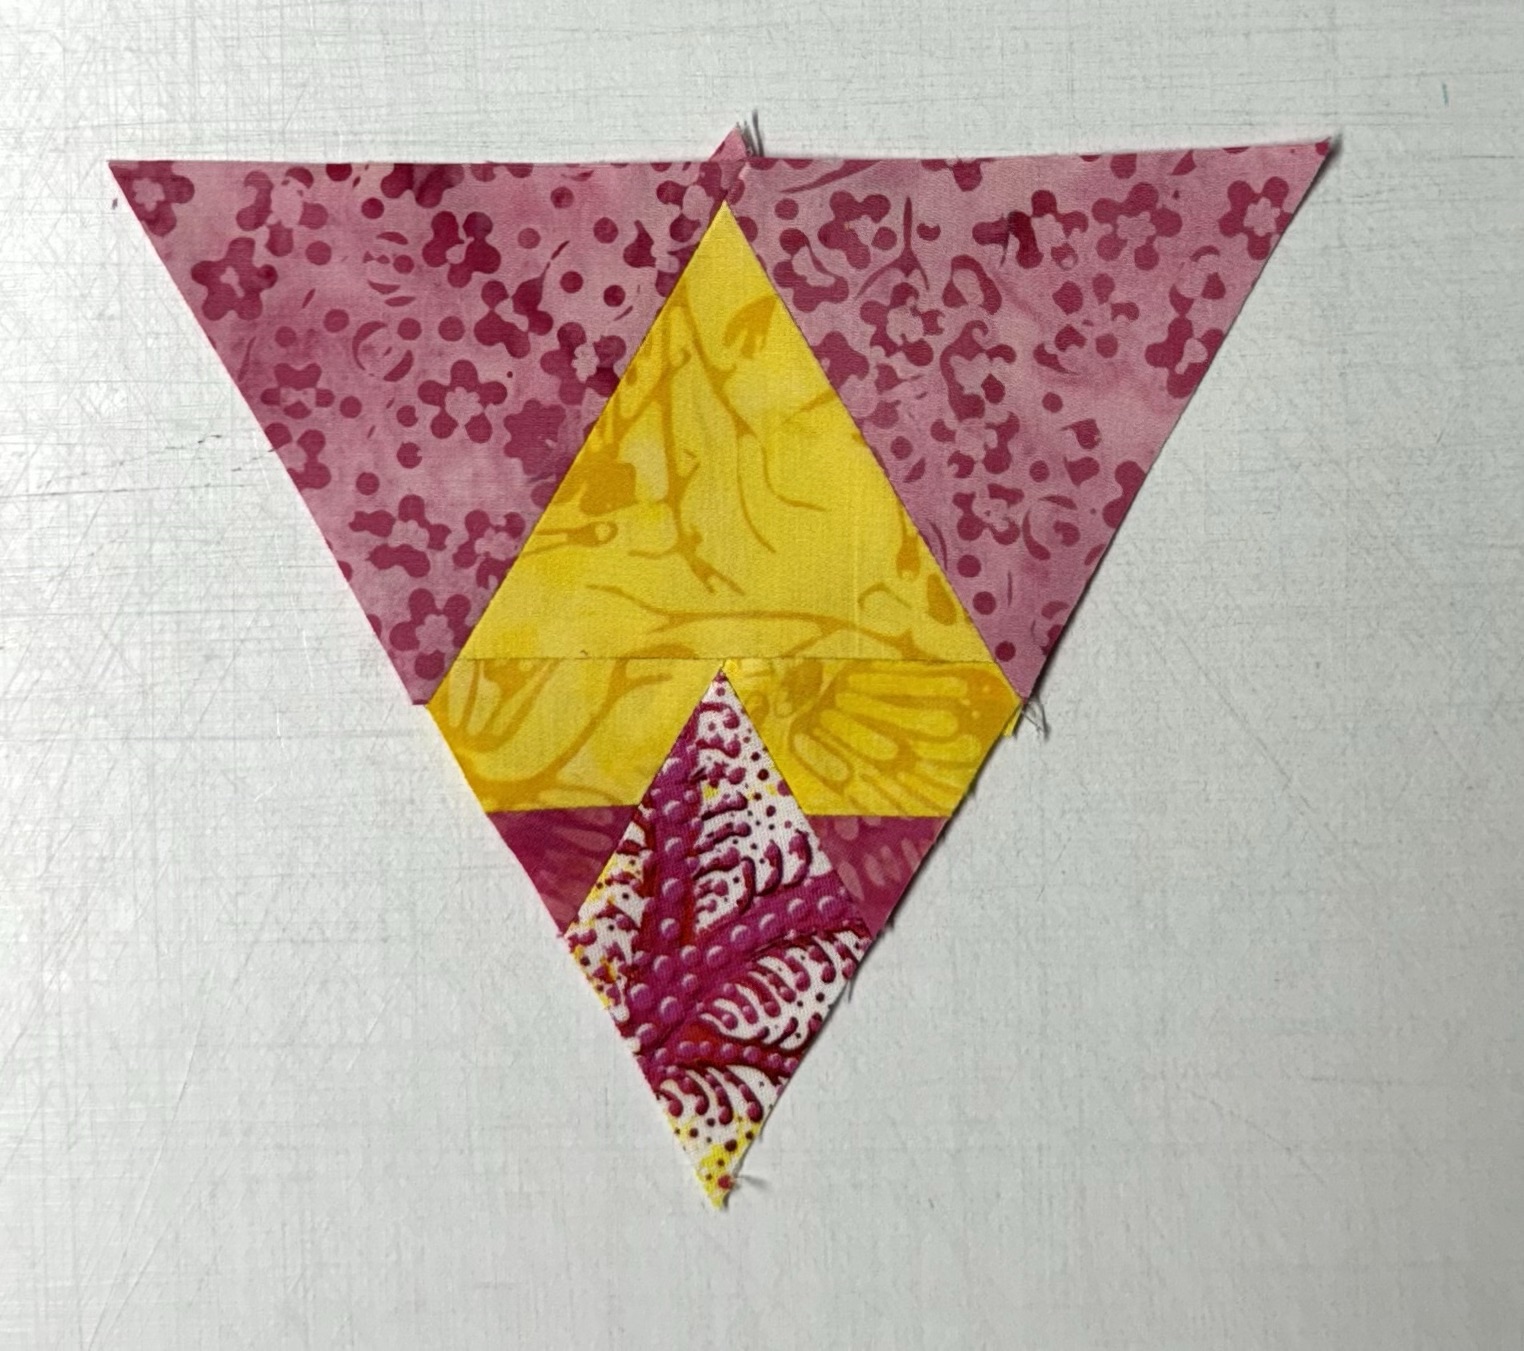
When I was cutting out my hexies from the aligned panels, I had a strip left that was less than 3.25″. I usually save these for cutting out smaller hexies to applique on the quilt top. This time I trimmed the strip to 2″, the size that would make diamonds for a 2.5″ finished Star 60 unit.
I cut the diamonds following the Star 60 instructions on pages 2 – 3. I made 12 – 2.5” finished Capped 60 units. They were trimmed down to 2.25”. Stitch a Capped 60 unit on each side of the diamonds.
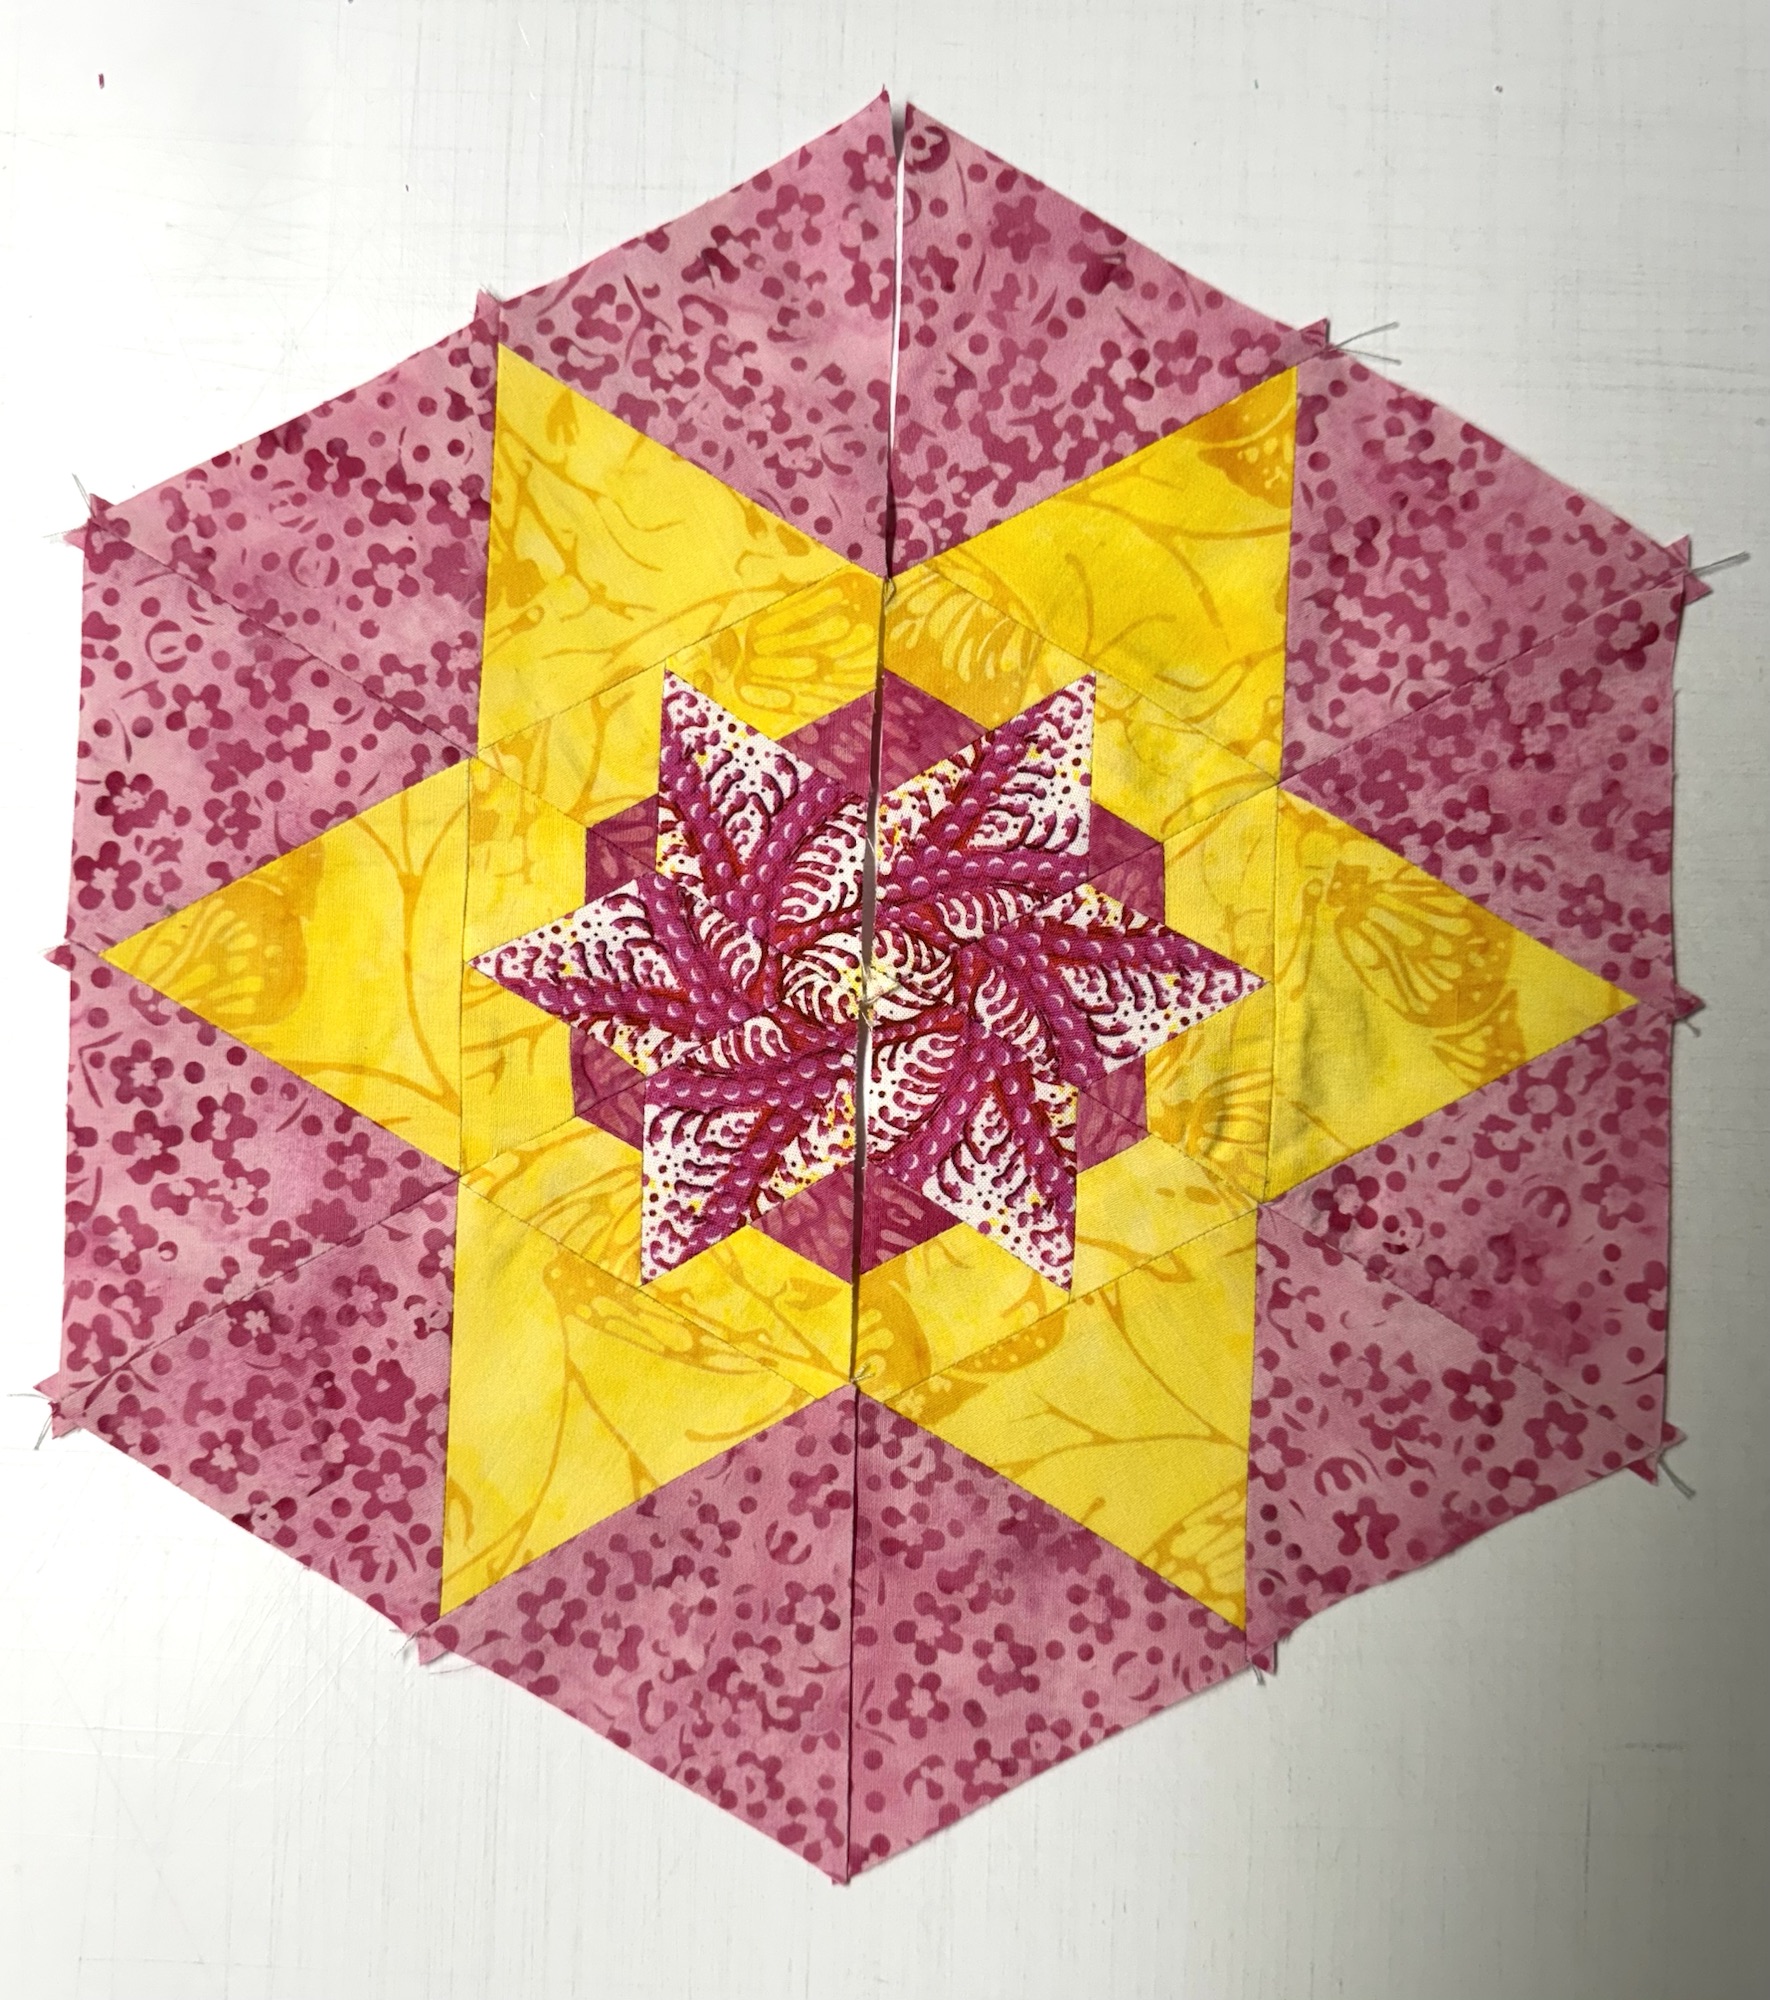
Cut a 3” WOF strip. Cut 6 companion triangles. Stitch to the Star 60 Units creating a pieced diamond. Cut another 3” WOF strip. Cut 12 companion triangles. Stitch to each side of the pieced diamond.
Stitch 3 together, press seam open. Stitch the remaining 3 together and press seams open.
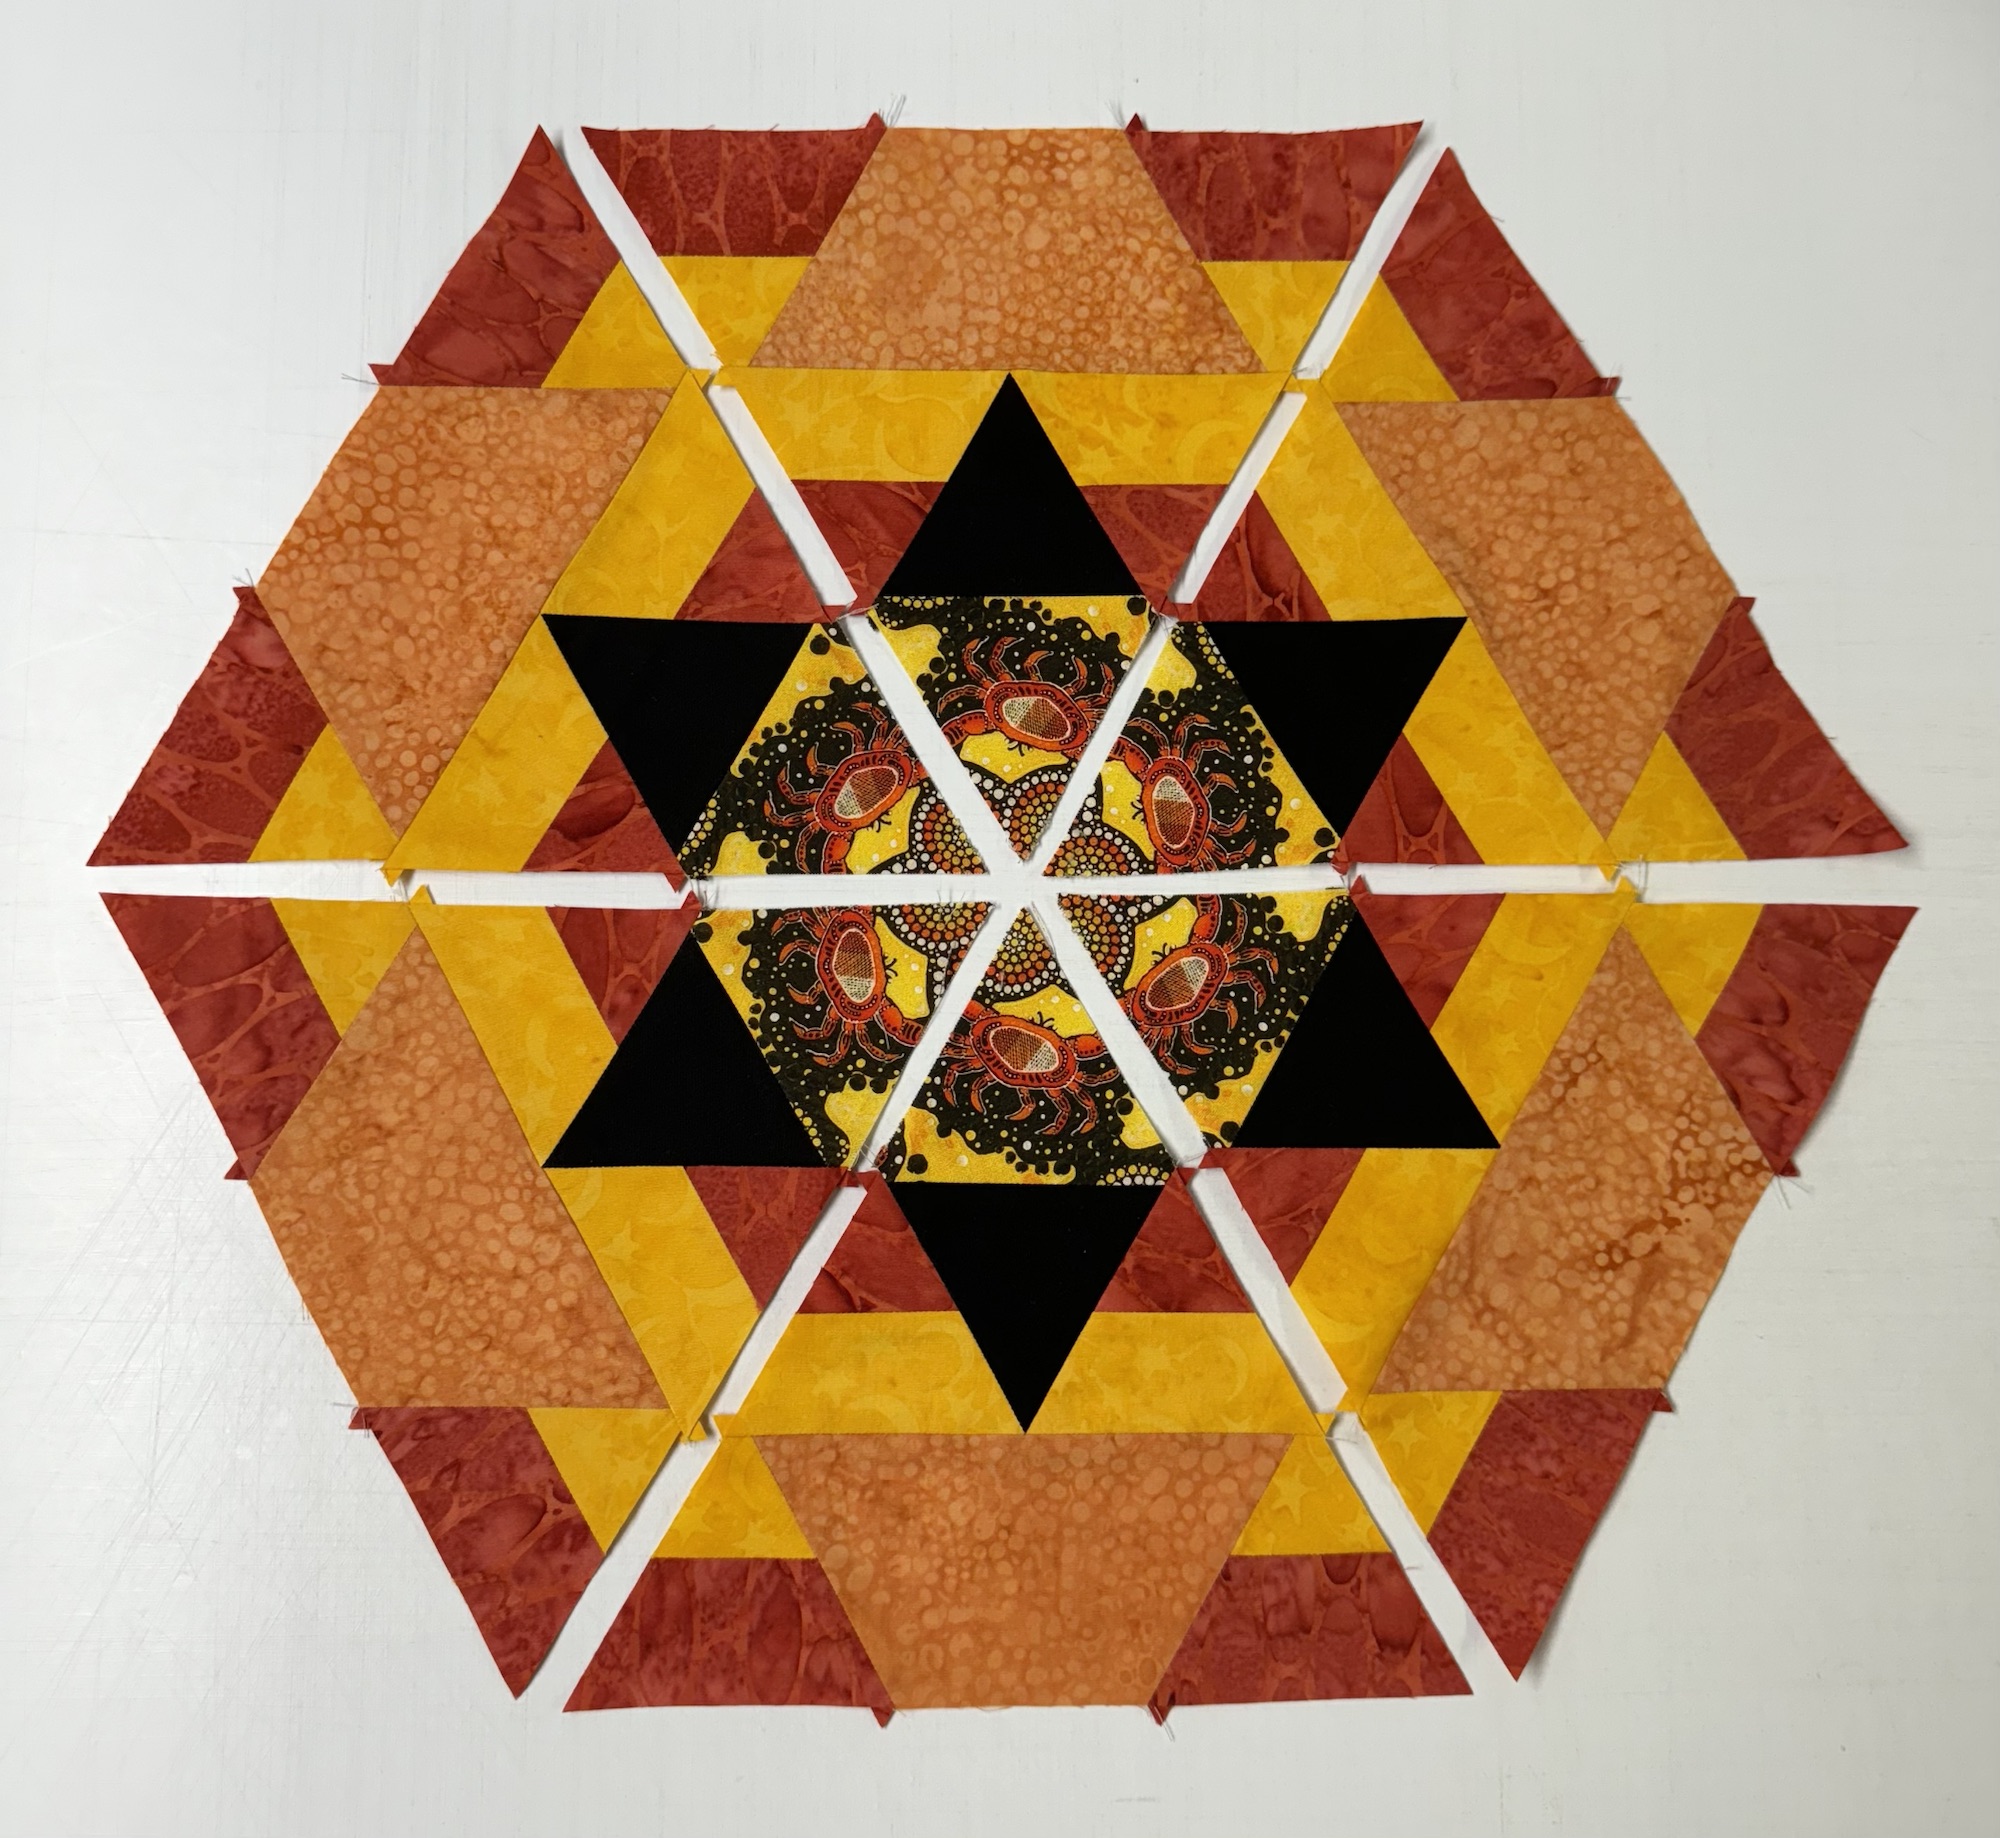
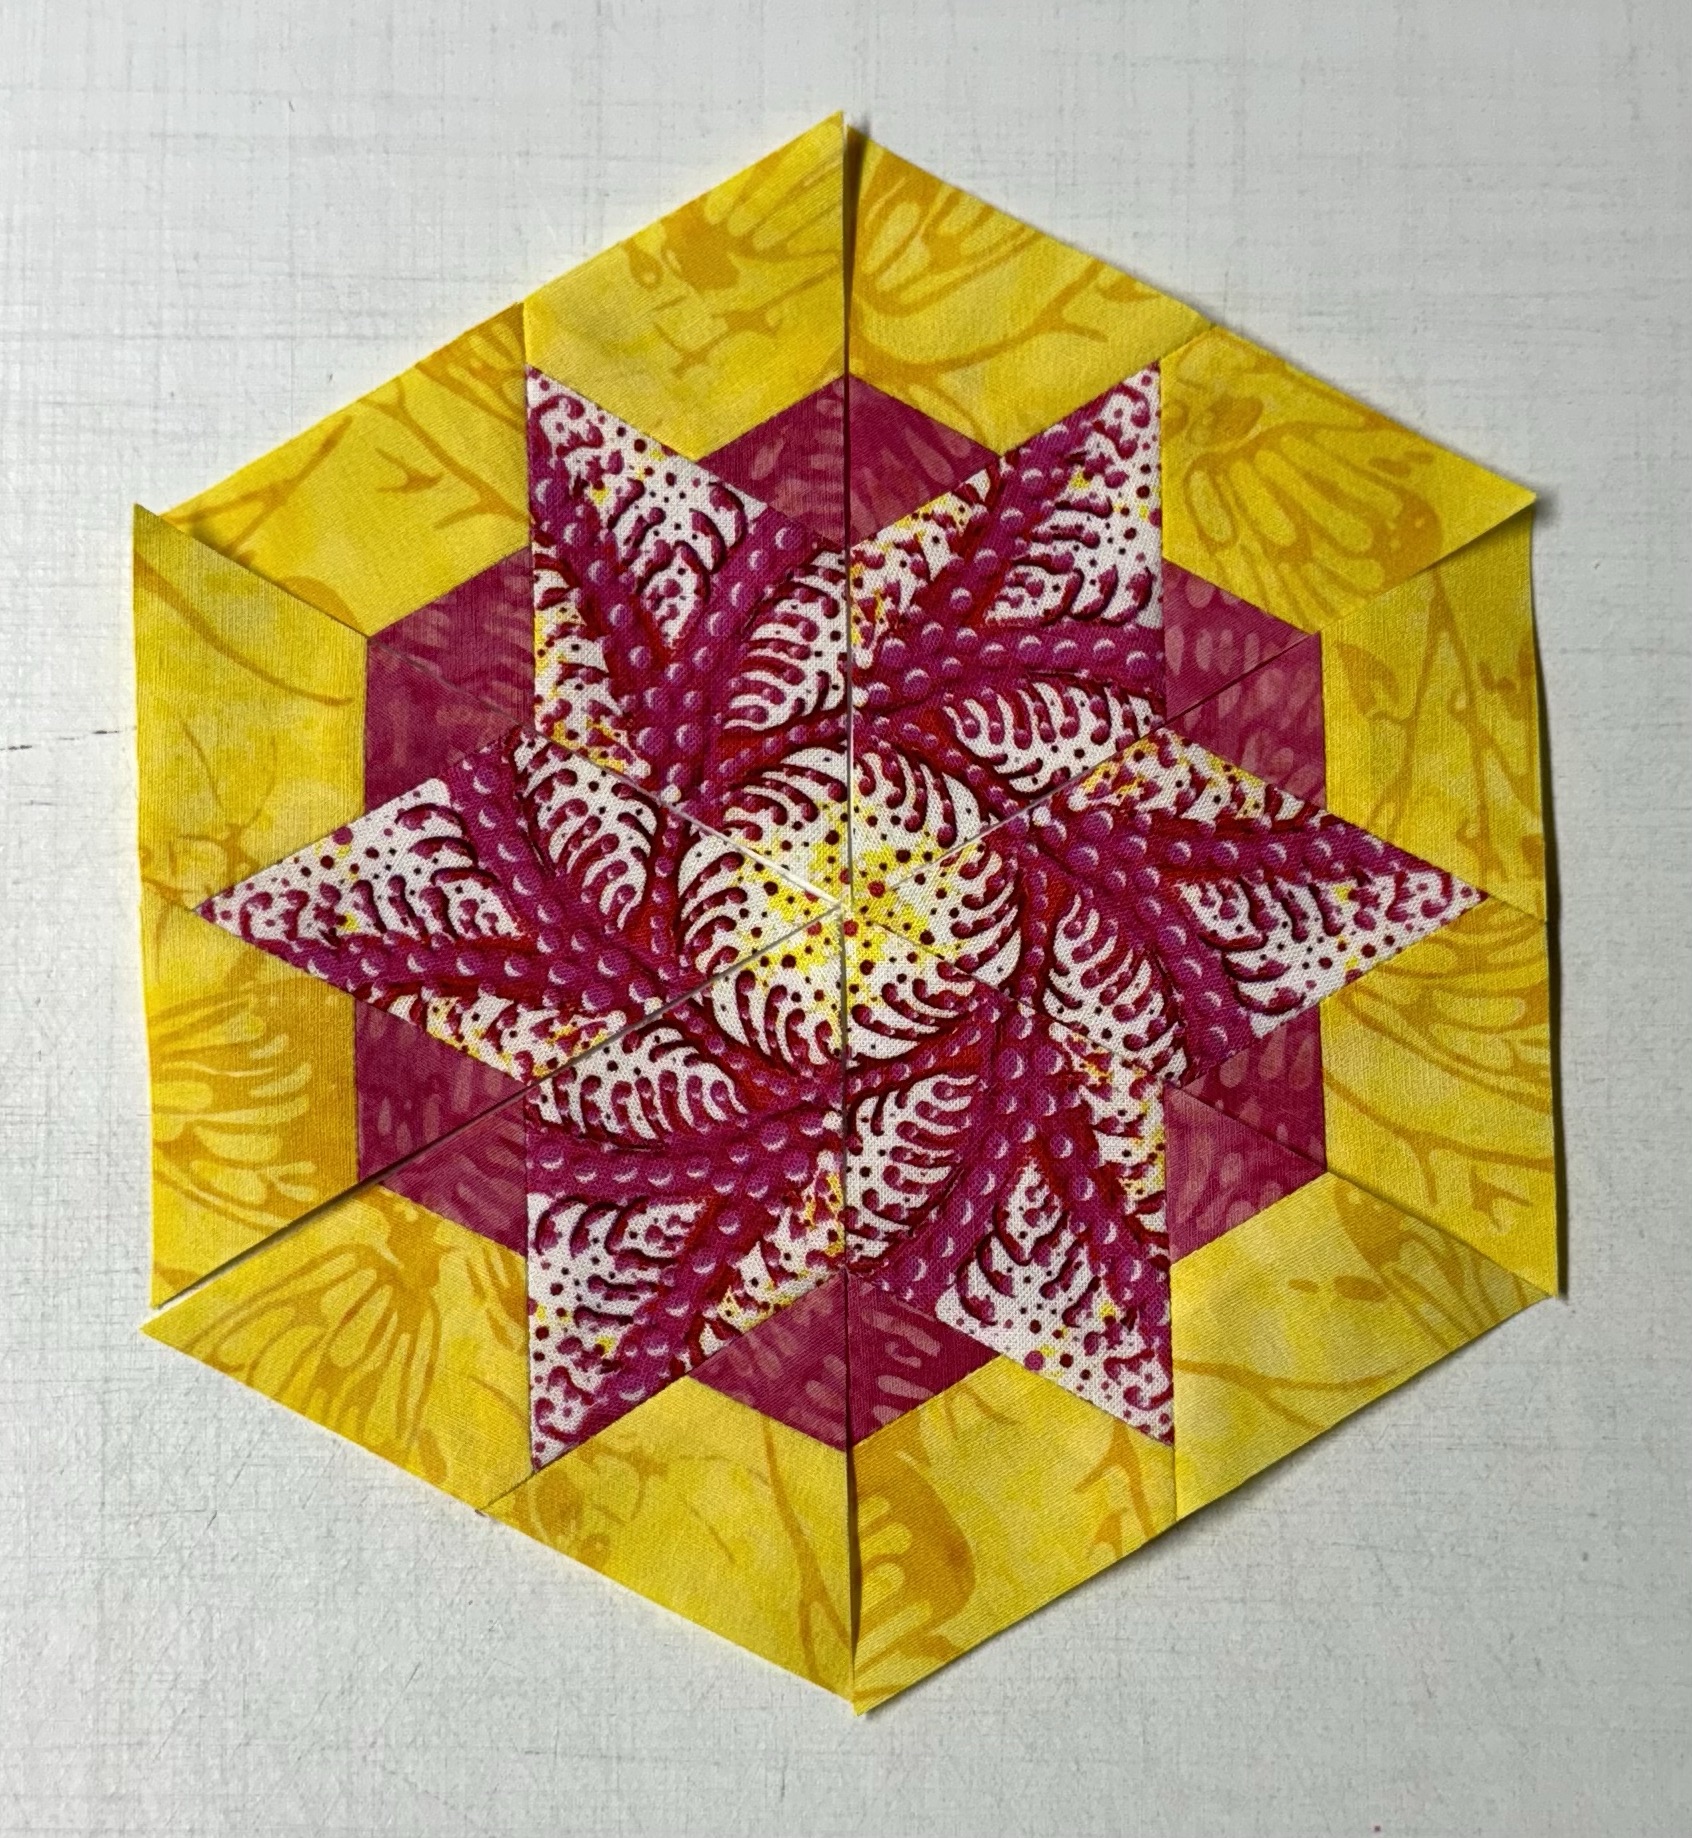
Another Star Variation
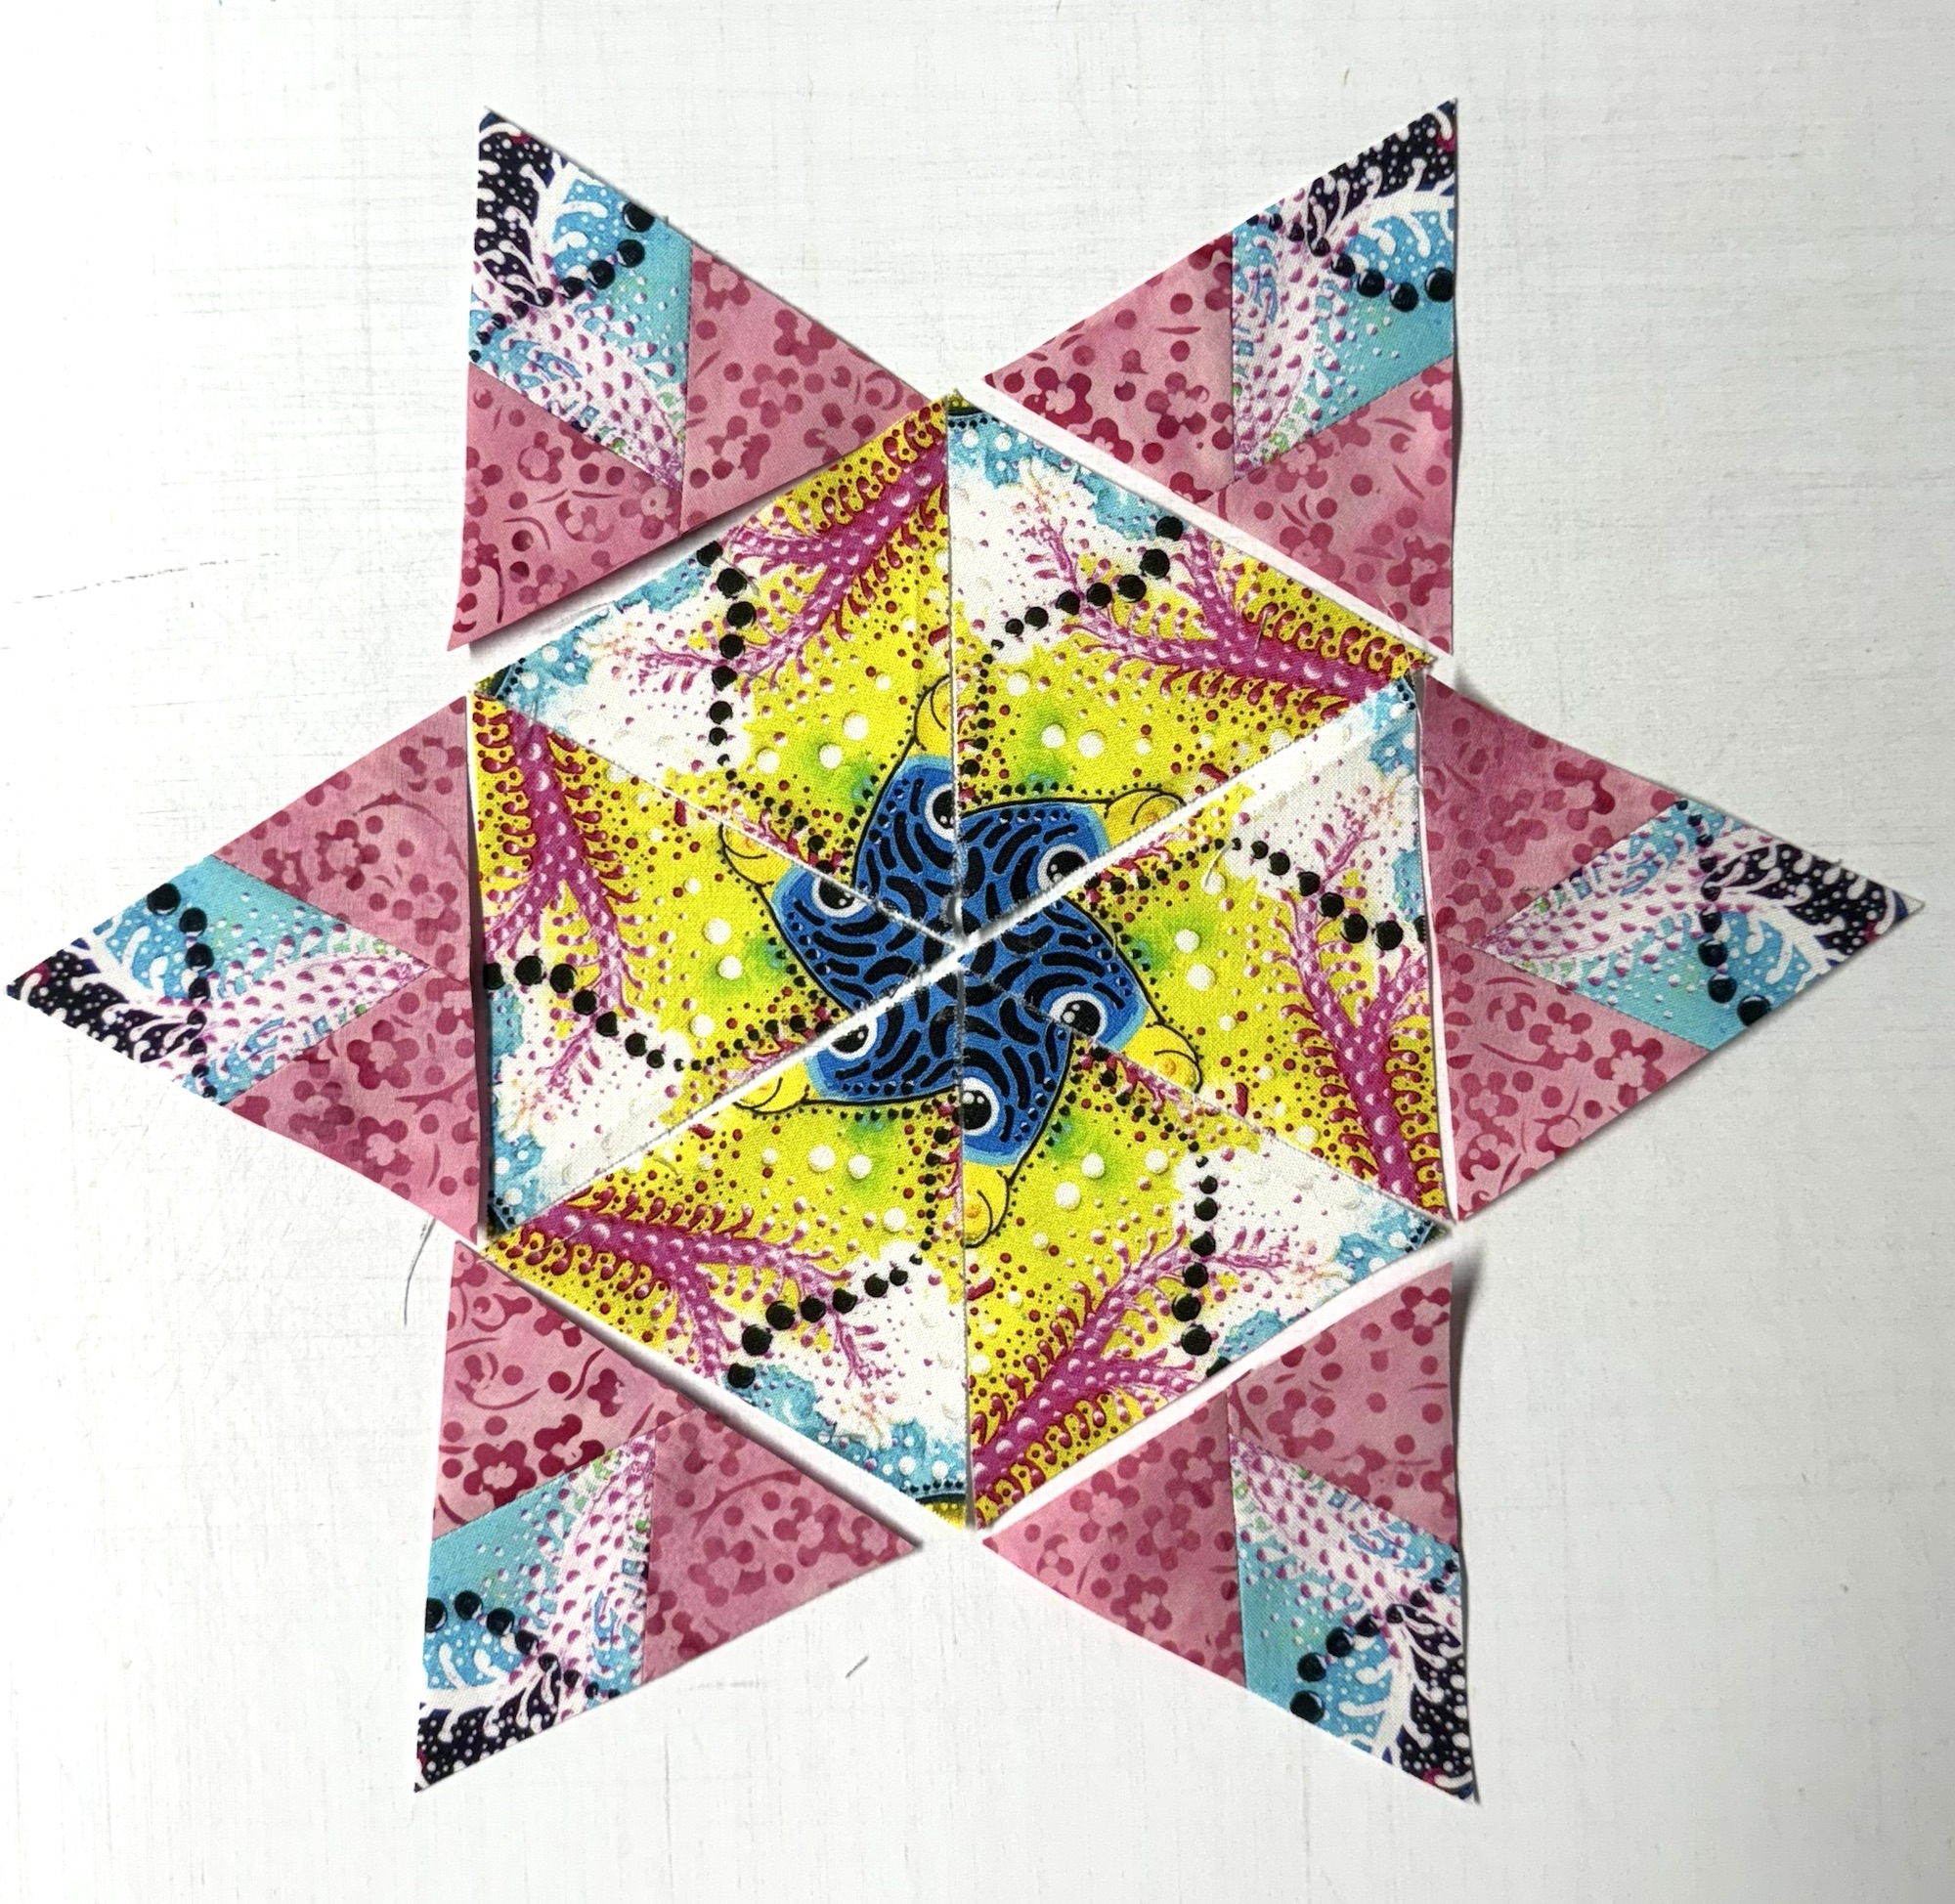
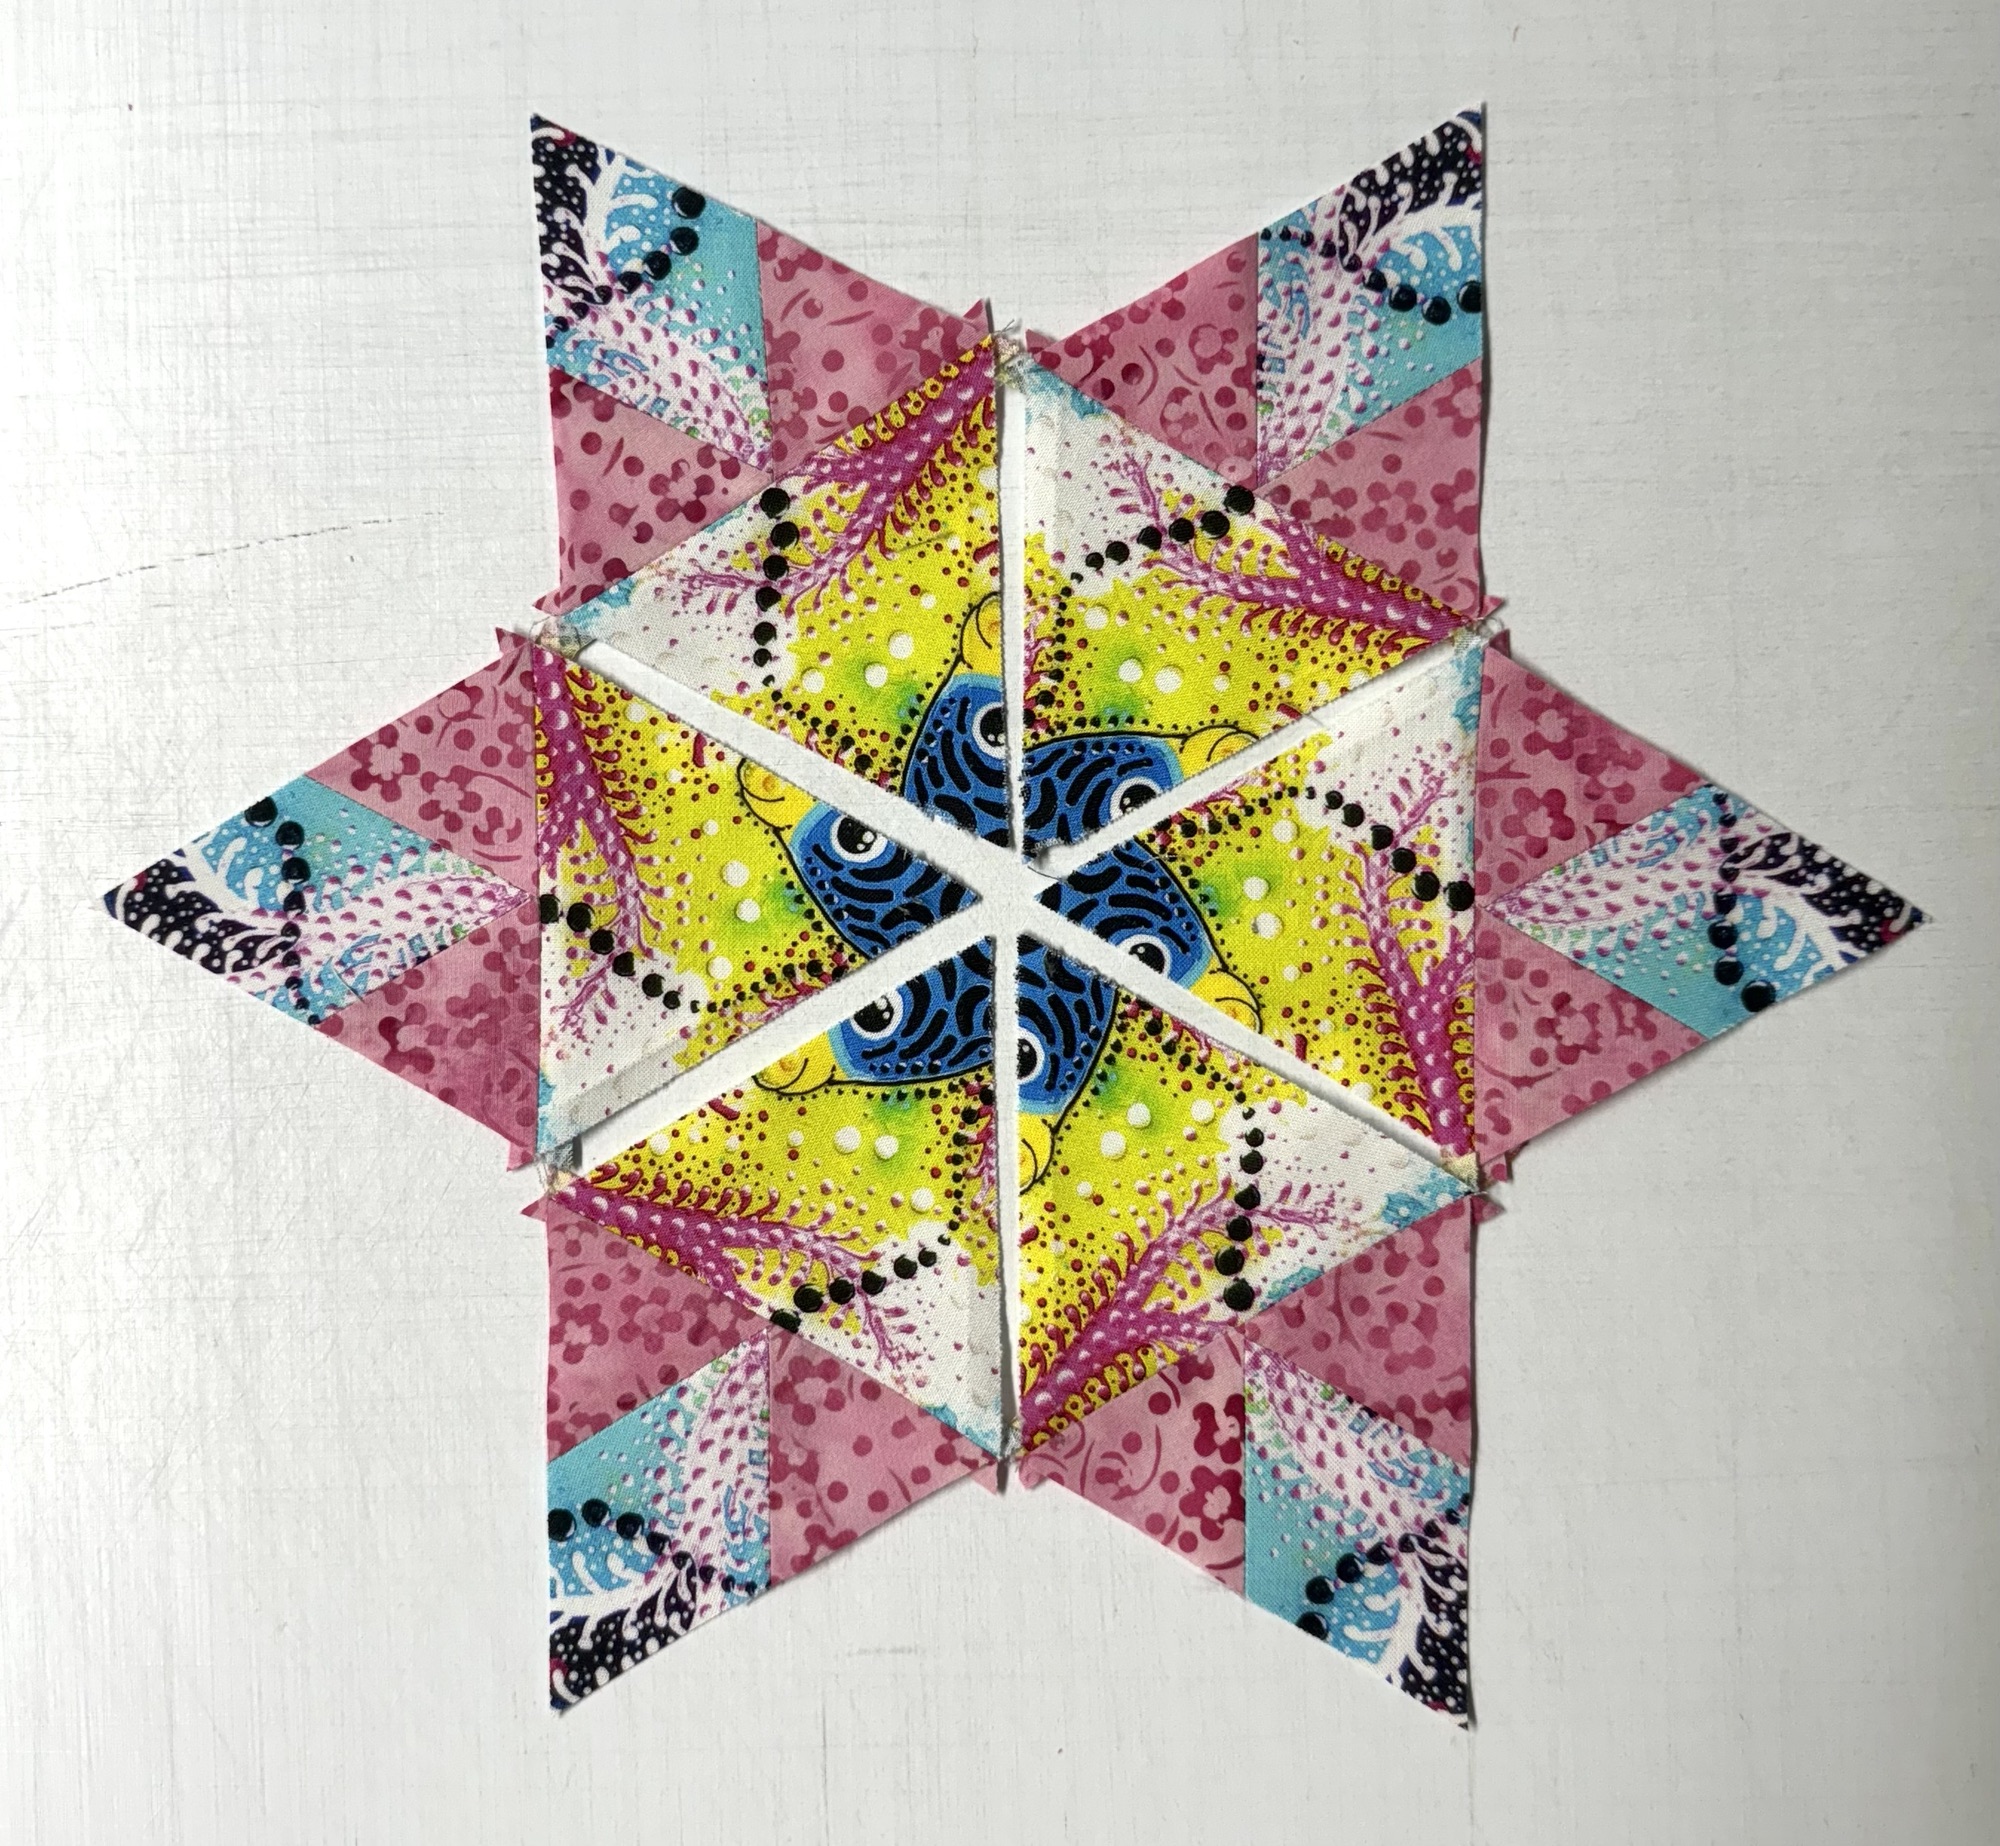
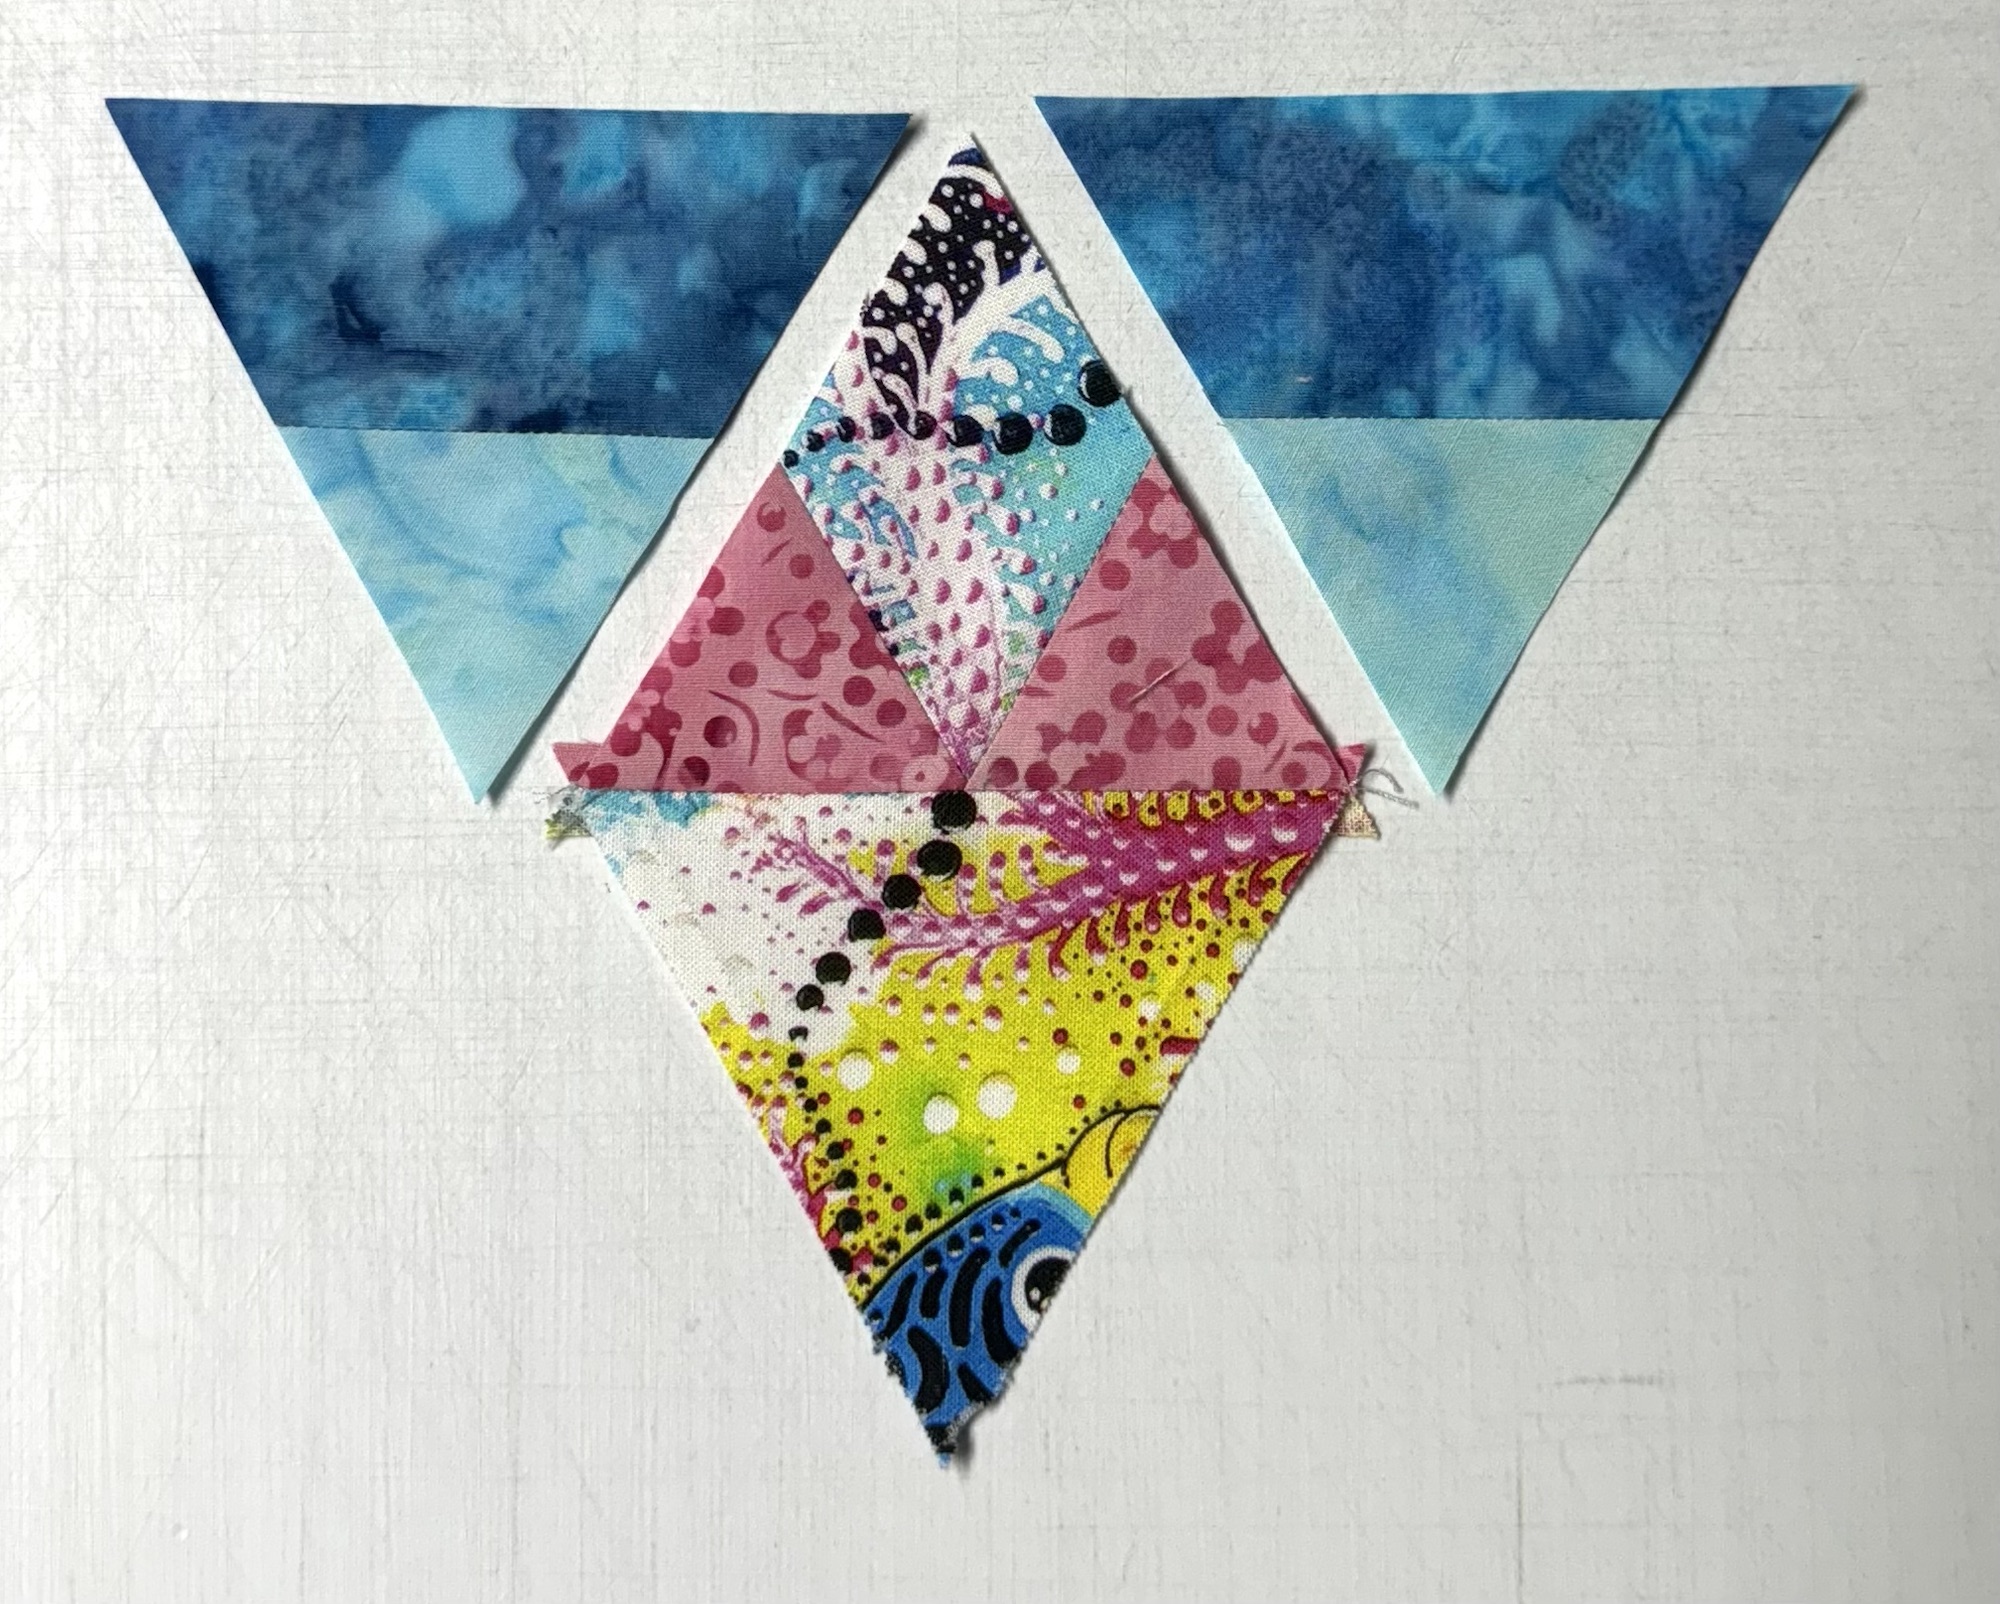
Center: 6 identical equilateral triangles cut from 3.25” strips. Make 6 – 2.5” Star 60 Units. I used diamonds cut from a 2” strip of 6 repeats. Follow Star 60 instructions pages 2 – 6. Stitch the triangles to the Star 60 Units.
Make 12 – 2.5” finished Capped 60 units. Follow Capped 60 Technique Sheet Instructions. Stitch the Capped 60 units on both side of the pieced diamond.
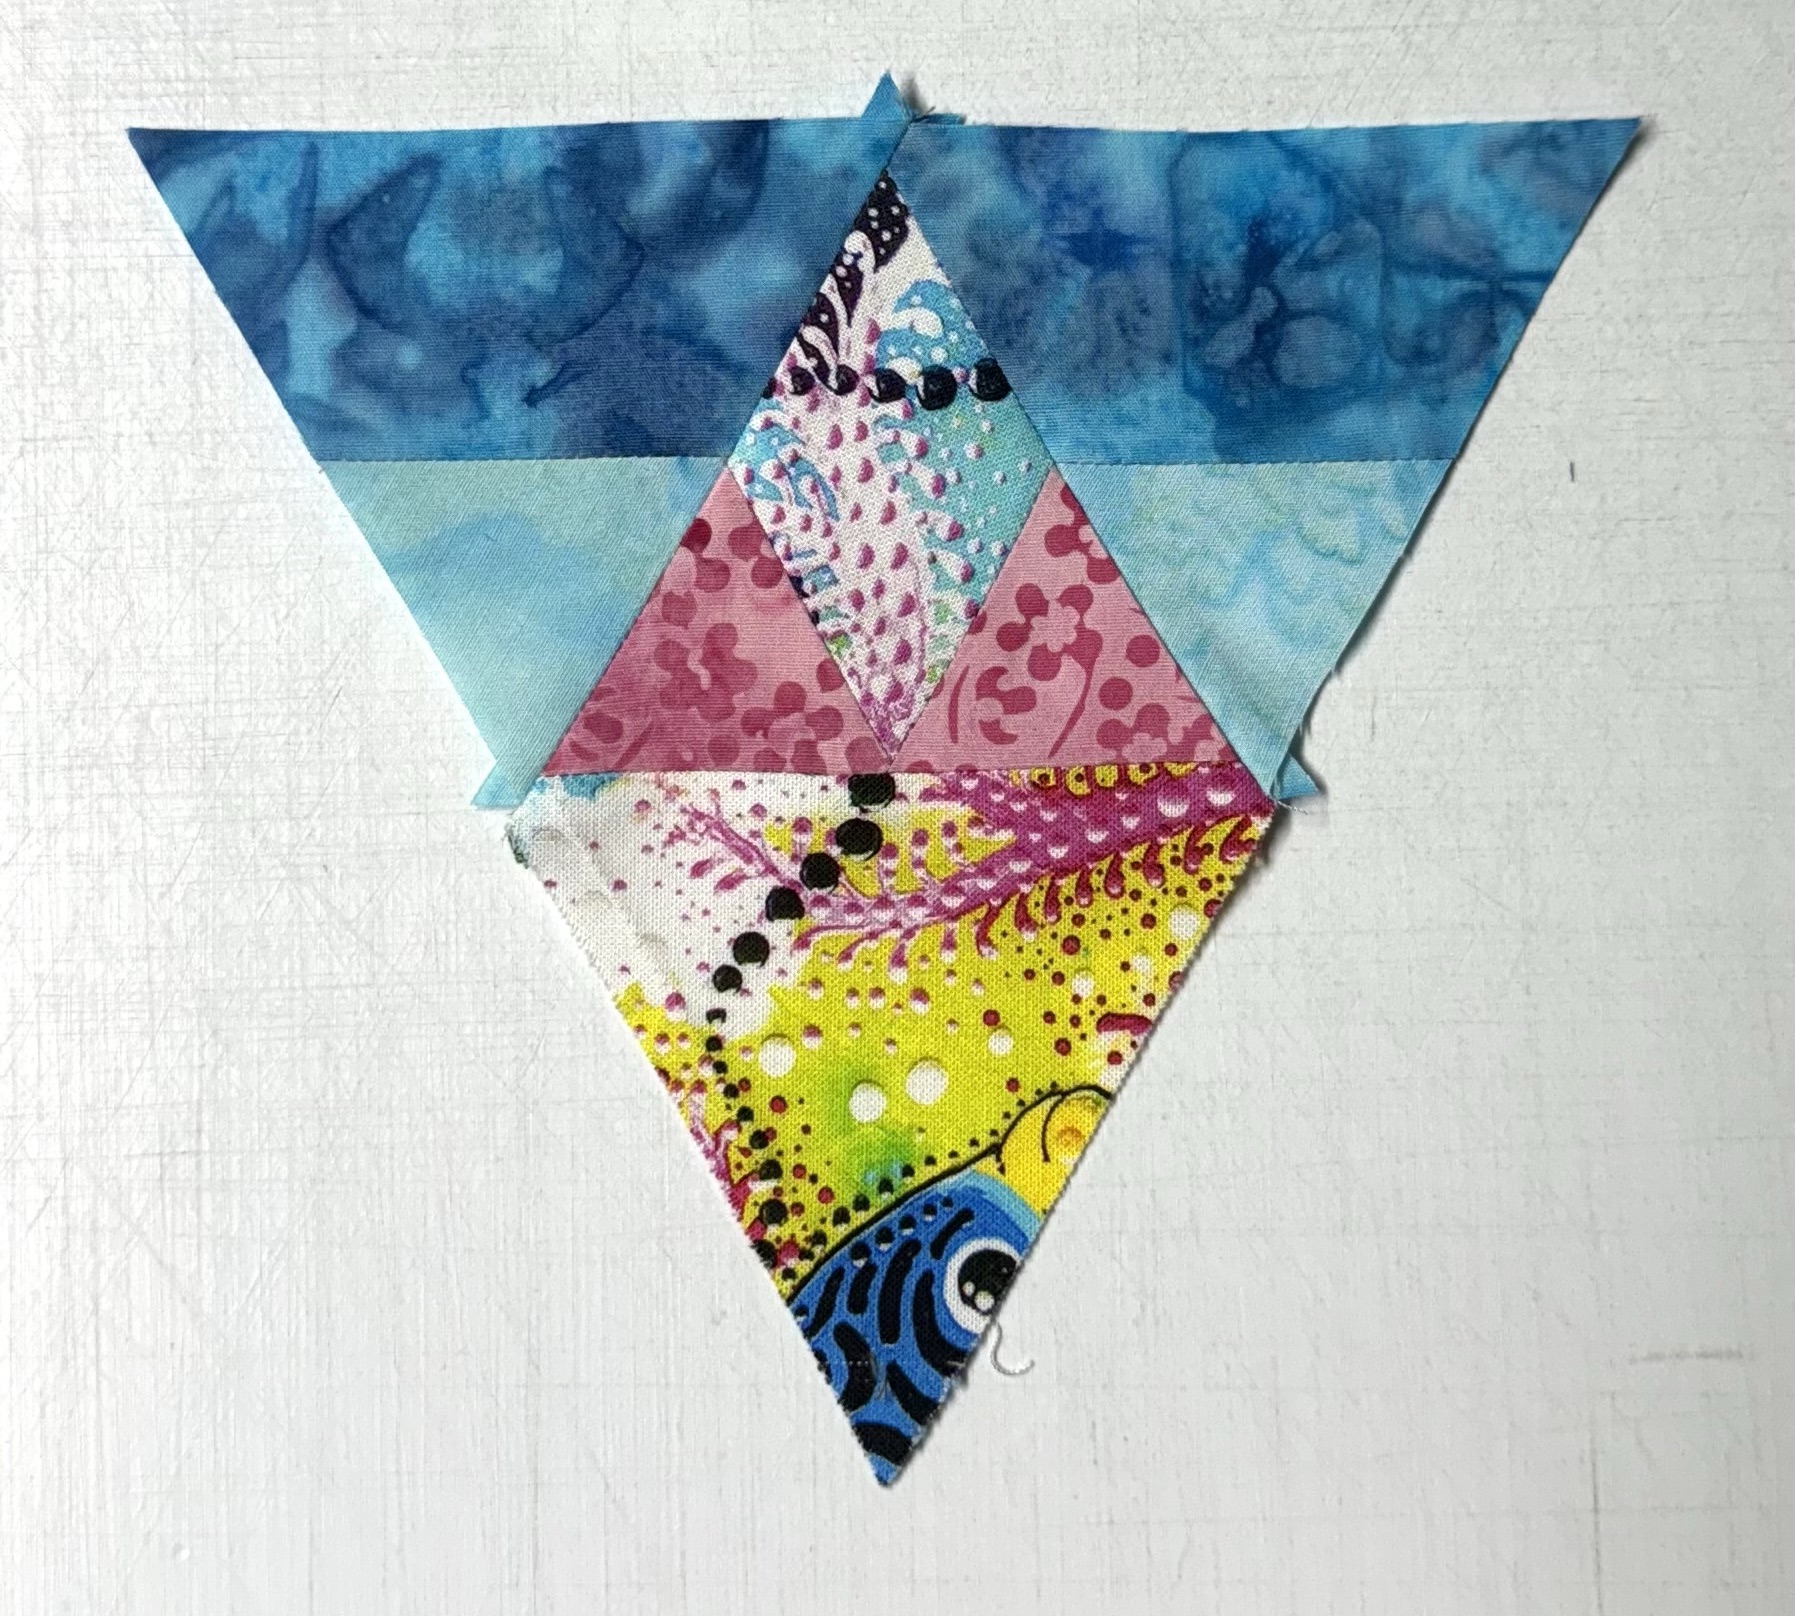
Carefully pin and stitch 3 pieced triangles together, press seams open. Stitch the remaining 3 triangles together. Press the seams open.
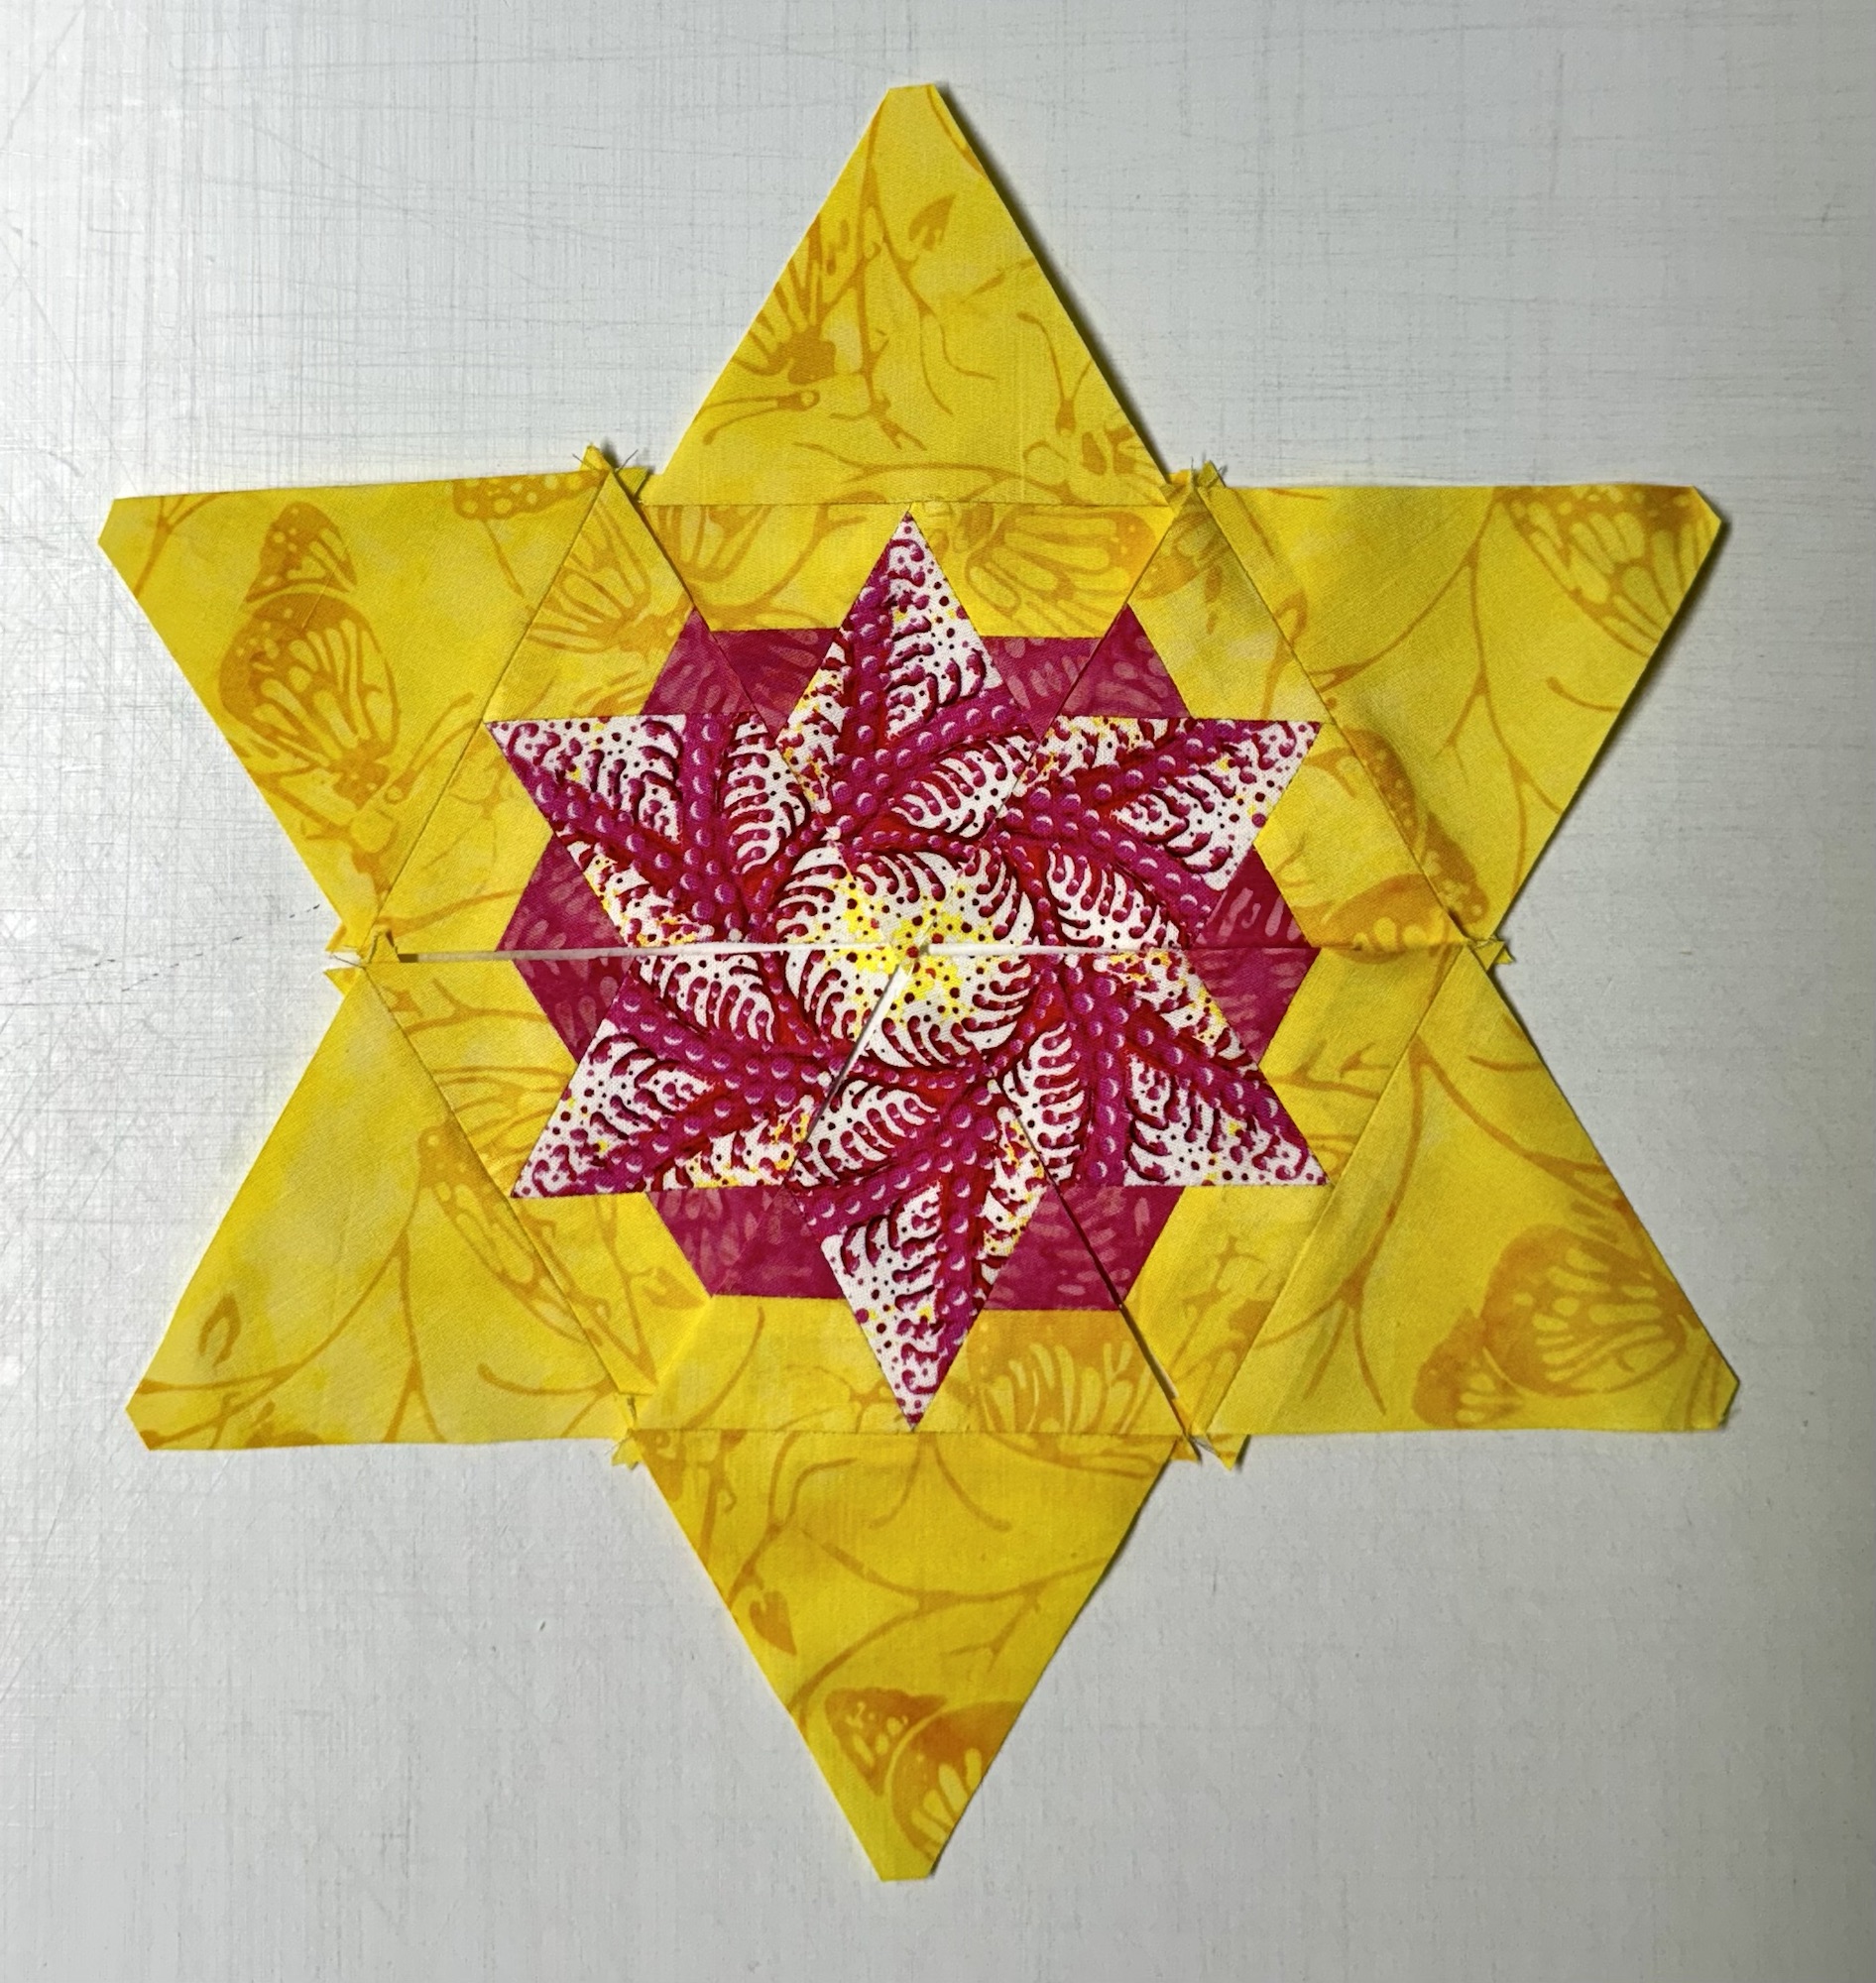
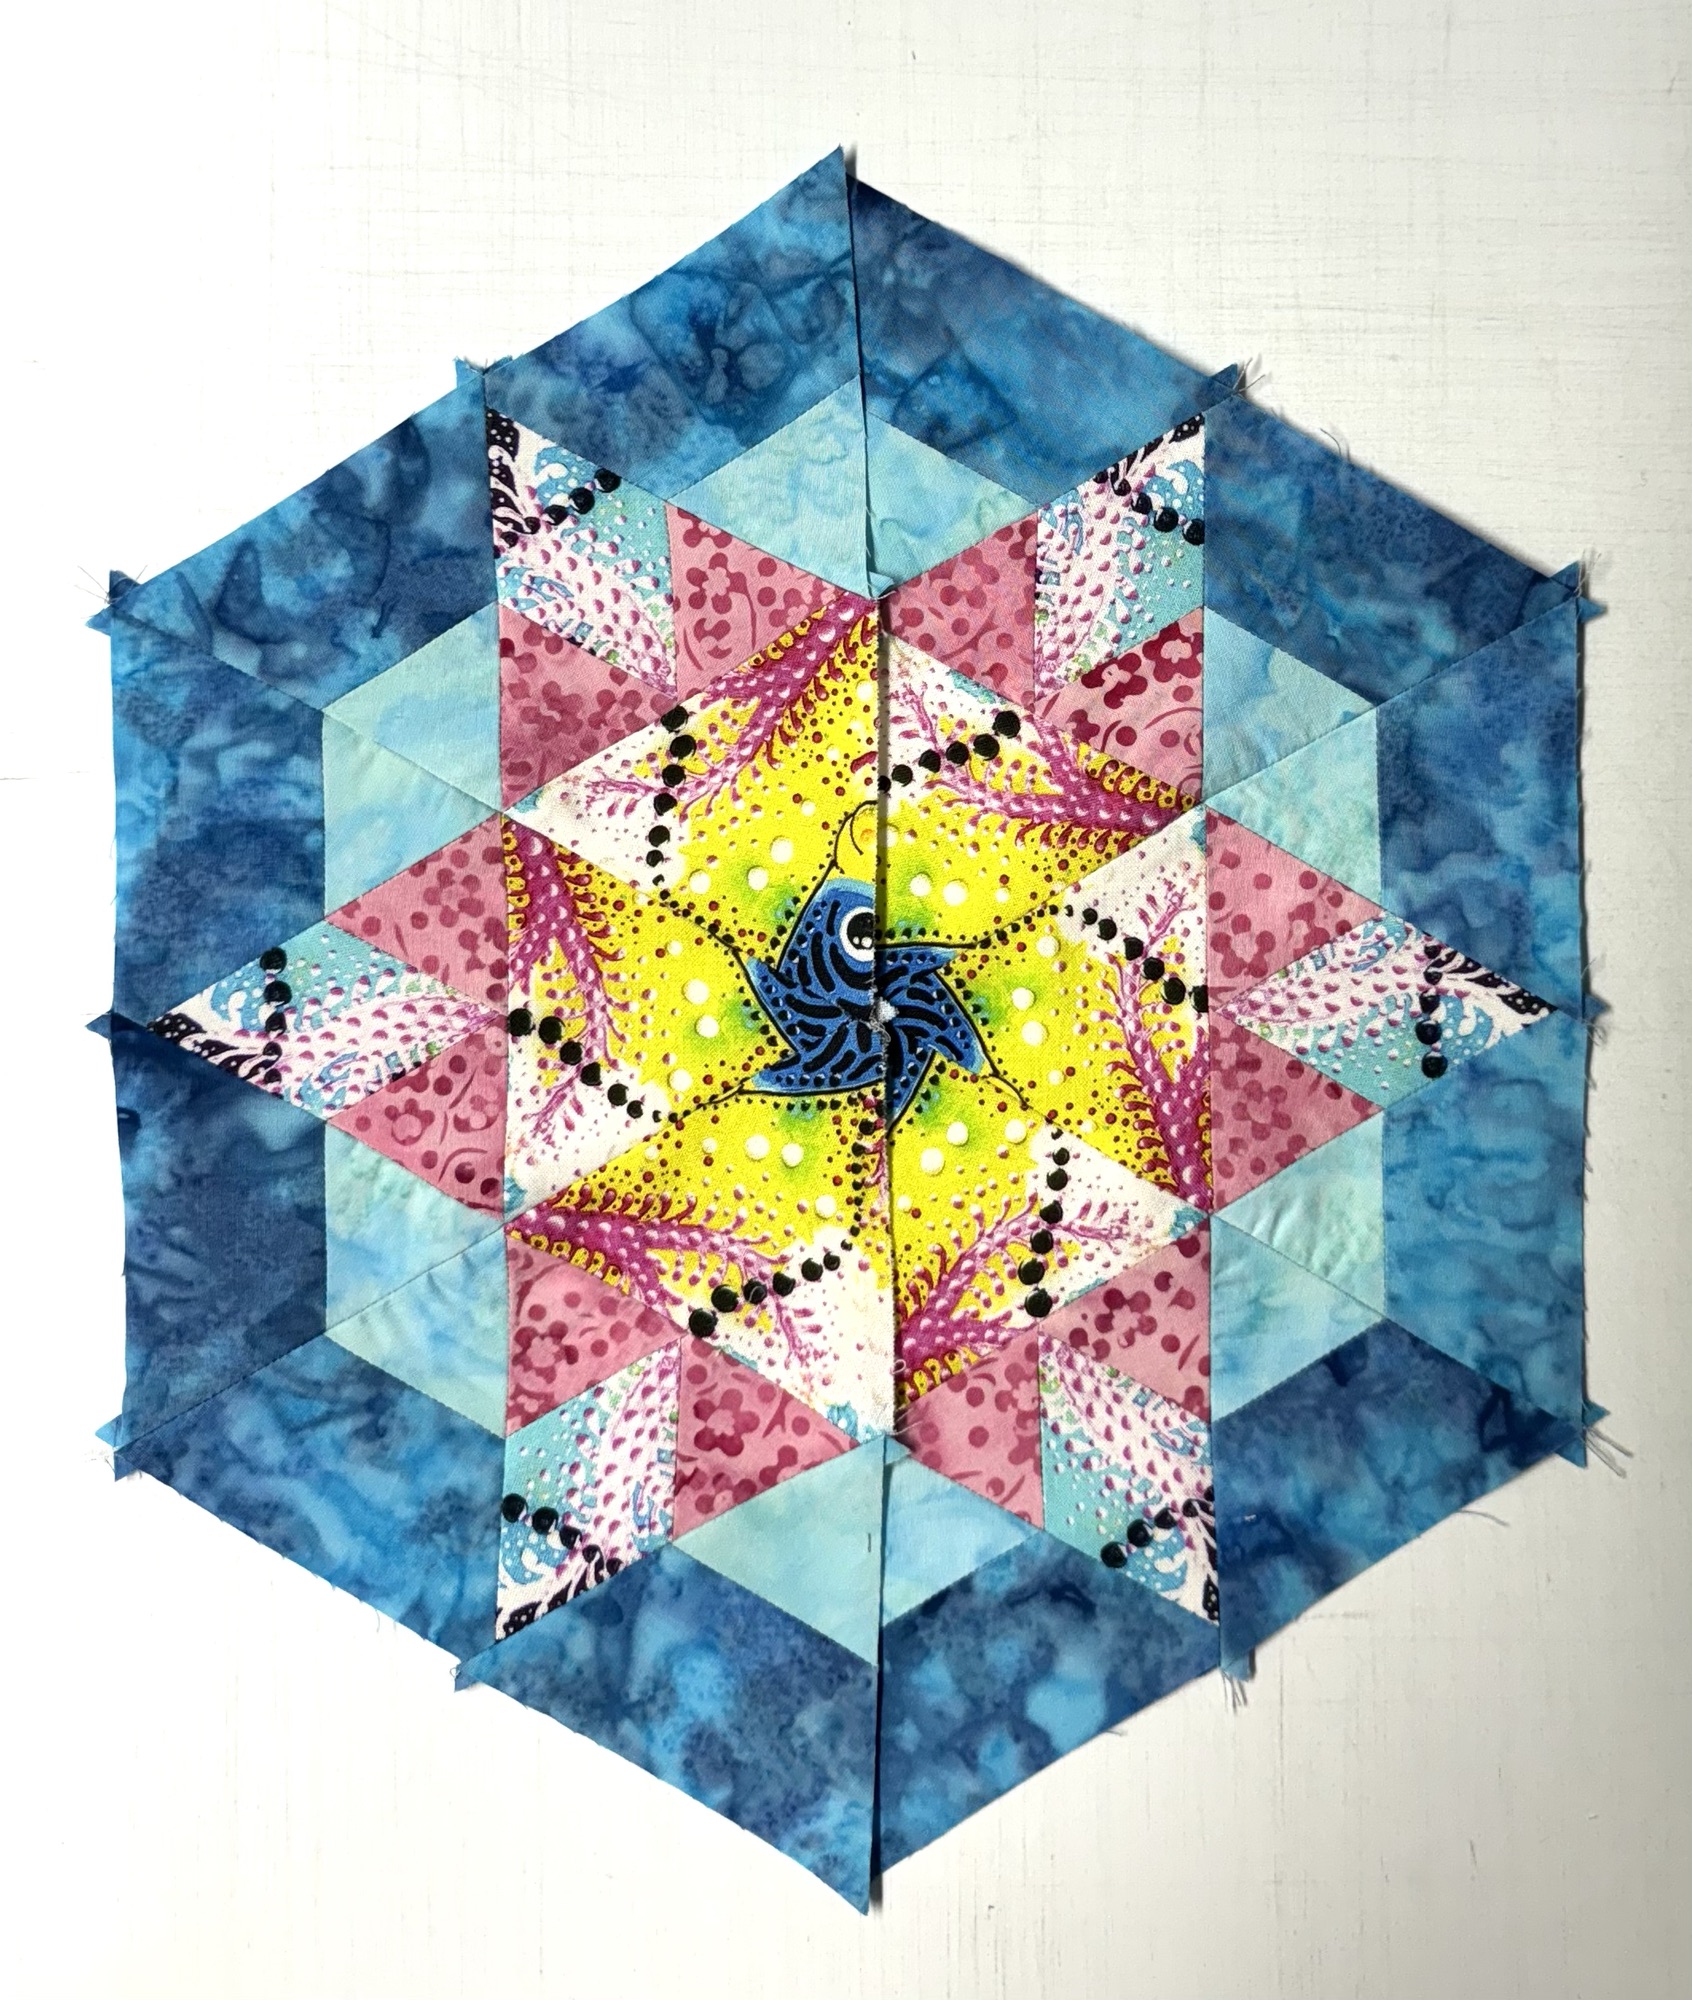
I encourage you to “Play Among the Stars” with the Star 60 tool and the 8 technique sheets that create:
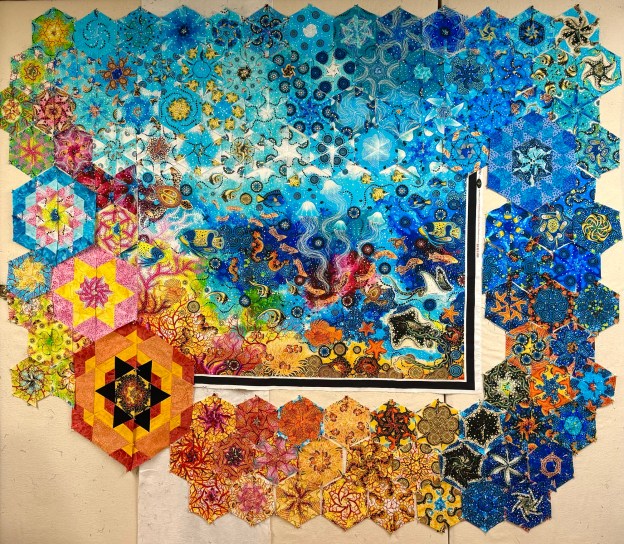
I’m playing around with a panel by Spirit of the Bush, Saltwater Dreaming. I want to see how many intricate hexagons I can make. They seem like they would represent tidal pools to me. The large hexagon on the bottom of the panel is 15″ finished. Can you tell what Deb Tucker techniques I used to make it?