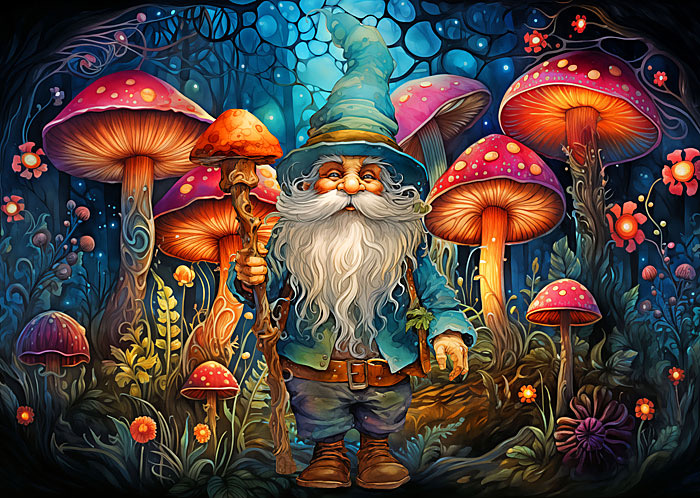
Garden Gnomes symbolize good luck, protection, and prosperity stemming from European folklore where they were believed to be earth-dwelling spirits guarding treasure and helping plants grow at night, bringing fortune and warding off evil spirits.
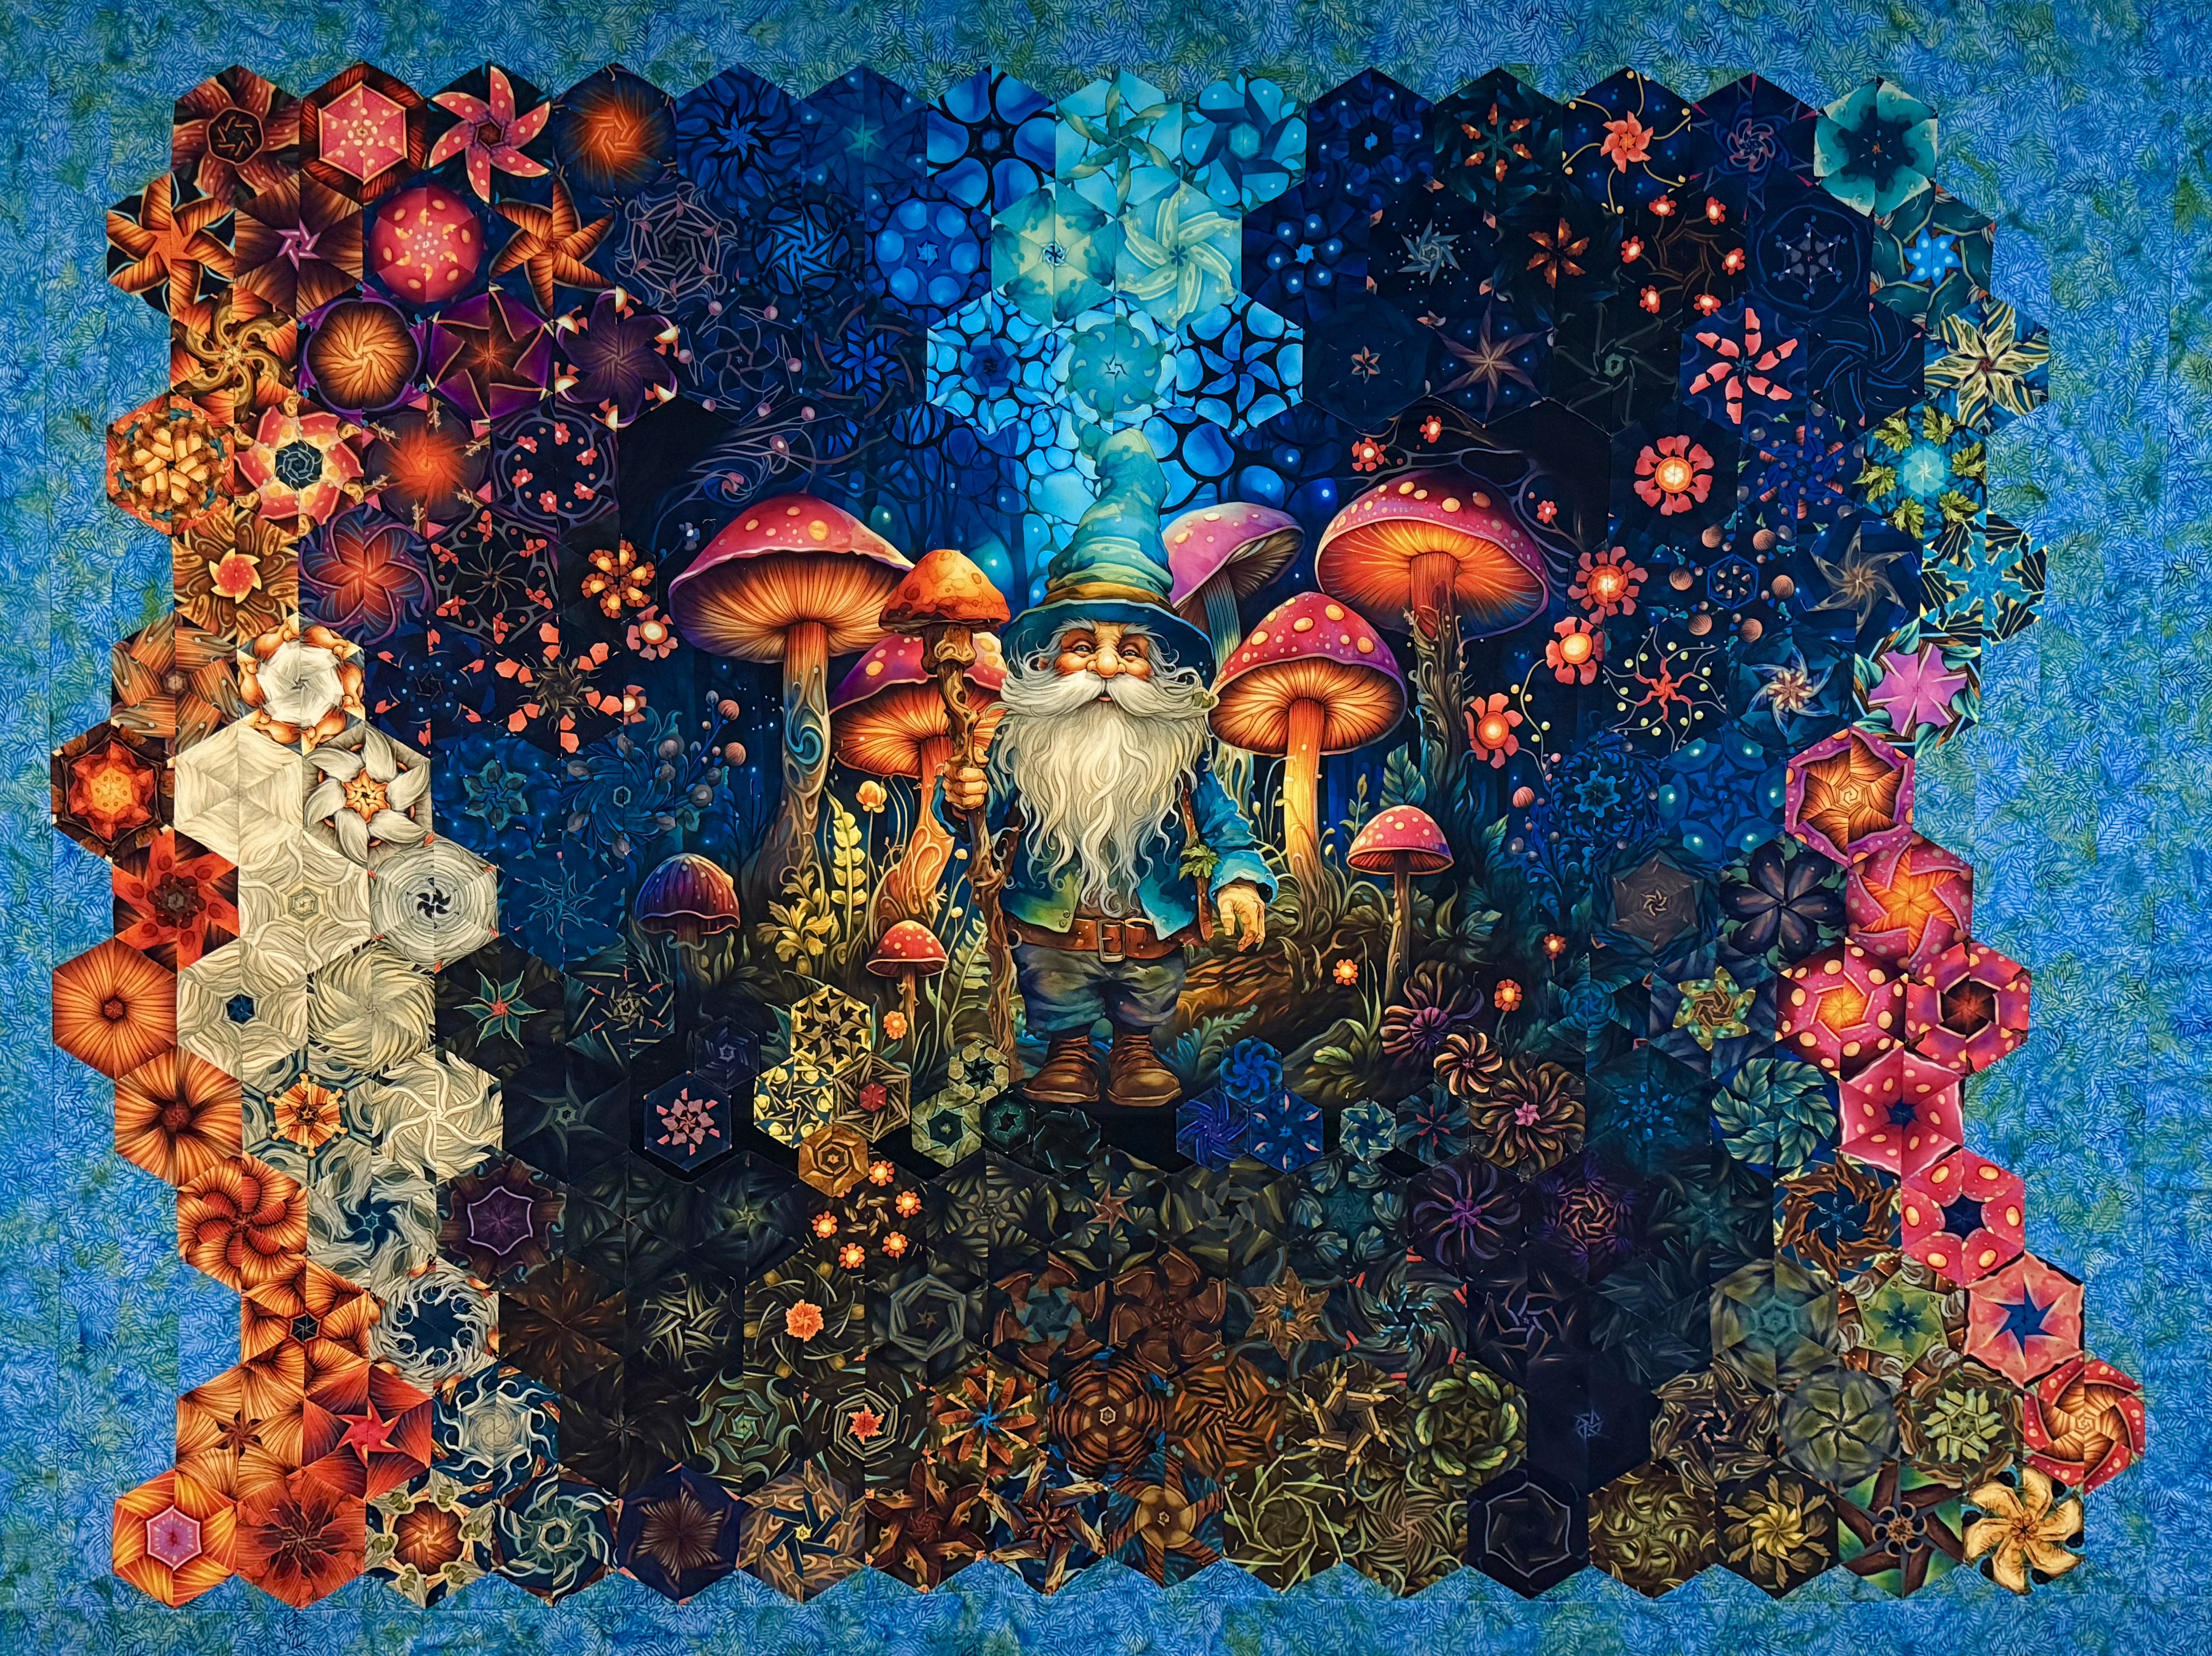
Mushroom Man
This panel is by Rubin Design Studio exclusively for eQuilter.com. This panel measures 30″ x 44″. I love this panel. I call it The Mushroom Man. I cut my strips 3.25″ to yield 5″ finished hexes. I cut my equilateral triangles with my First Choice Rulers.
I’m in love with this quilt. Many times while designing, I subconsciously create a butterfly effect in the background. Can you see it? The magical Mushroom Man has been awakened by the Winter Solstice and has begun to get ready for Spring. Spring is coming!!!
I love creating un-even organic edges on the sides of my OBW’s. When I can, I use Island Batiks for the borders. I fill in the edges by cutting Half Hexagons with my Star 60 Tool. I also added Half Triangle Rectangles to the top and bottom of my columns to give the effect that the top is floating on the border fabric. My Mushroom Man measures 93″ x 70″ un-quilted.
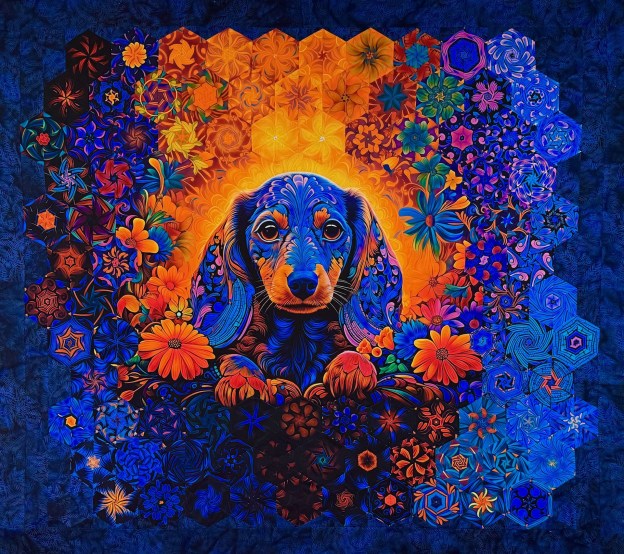
Have you every loved a Dachshund? I have; they are special dogs. When this panel came out from Rubin Design Studio, exclusively for eQuilter.com I knew my Sister Mary would love it.
I cut my strips 3.25″ for 5″ finished hexies. I always use my First Choice Ruler for cutting my equilateral triangles. I placed 8 hexies across the top and bottom of the panel.
Top is together, needs tweaking. Then the borders go on.
“For the Love of Zoey is ready to quilt. Mary wanted a throw size to make it easier to cuddle in. Quilt top measures 70″ x 60”.
This is Zoey and Tucker. Their 10-year friends’ anniversary is in March 2026. Zoey is very patient with Tucker’s type “A” personality.
Be sure follow me and Terri Butler on our joint Facebook page Mama Said These Threads Could Talk . Where Terri will be making a OBW Jacket that will be all about “Manifesting Lars”!
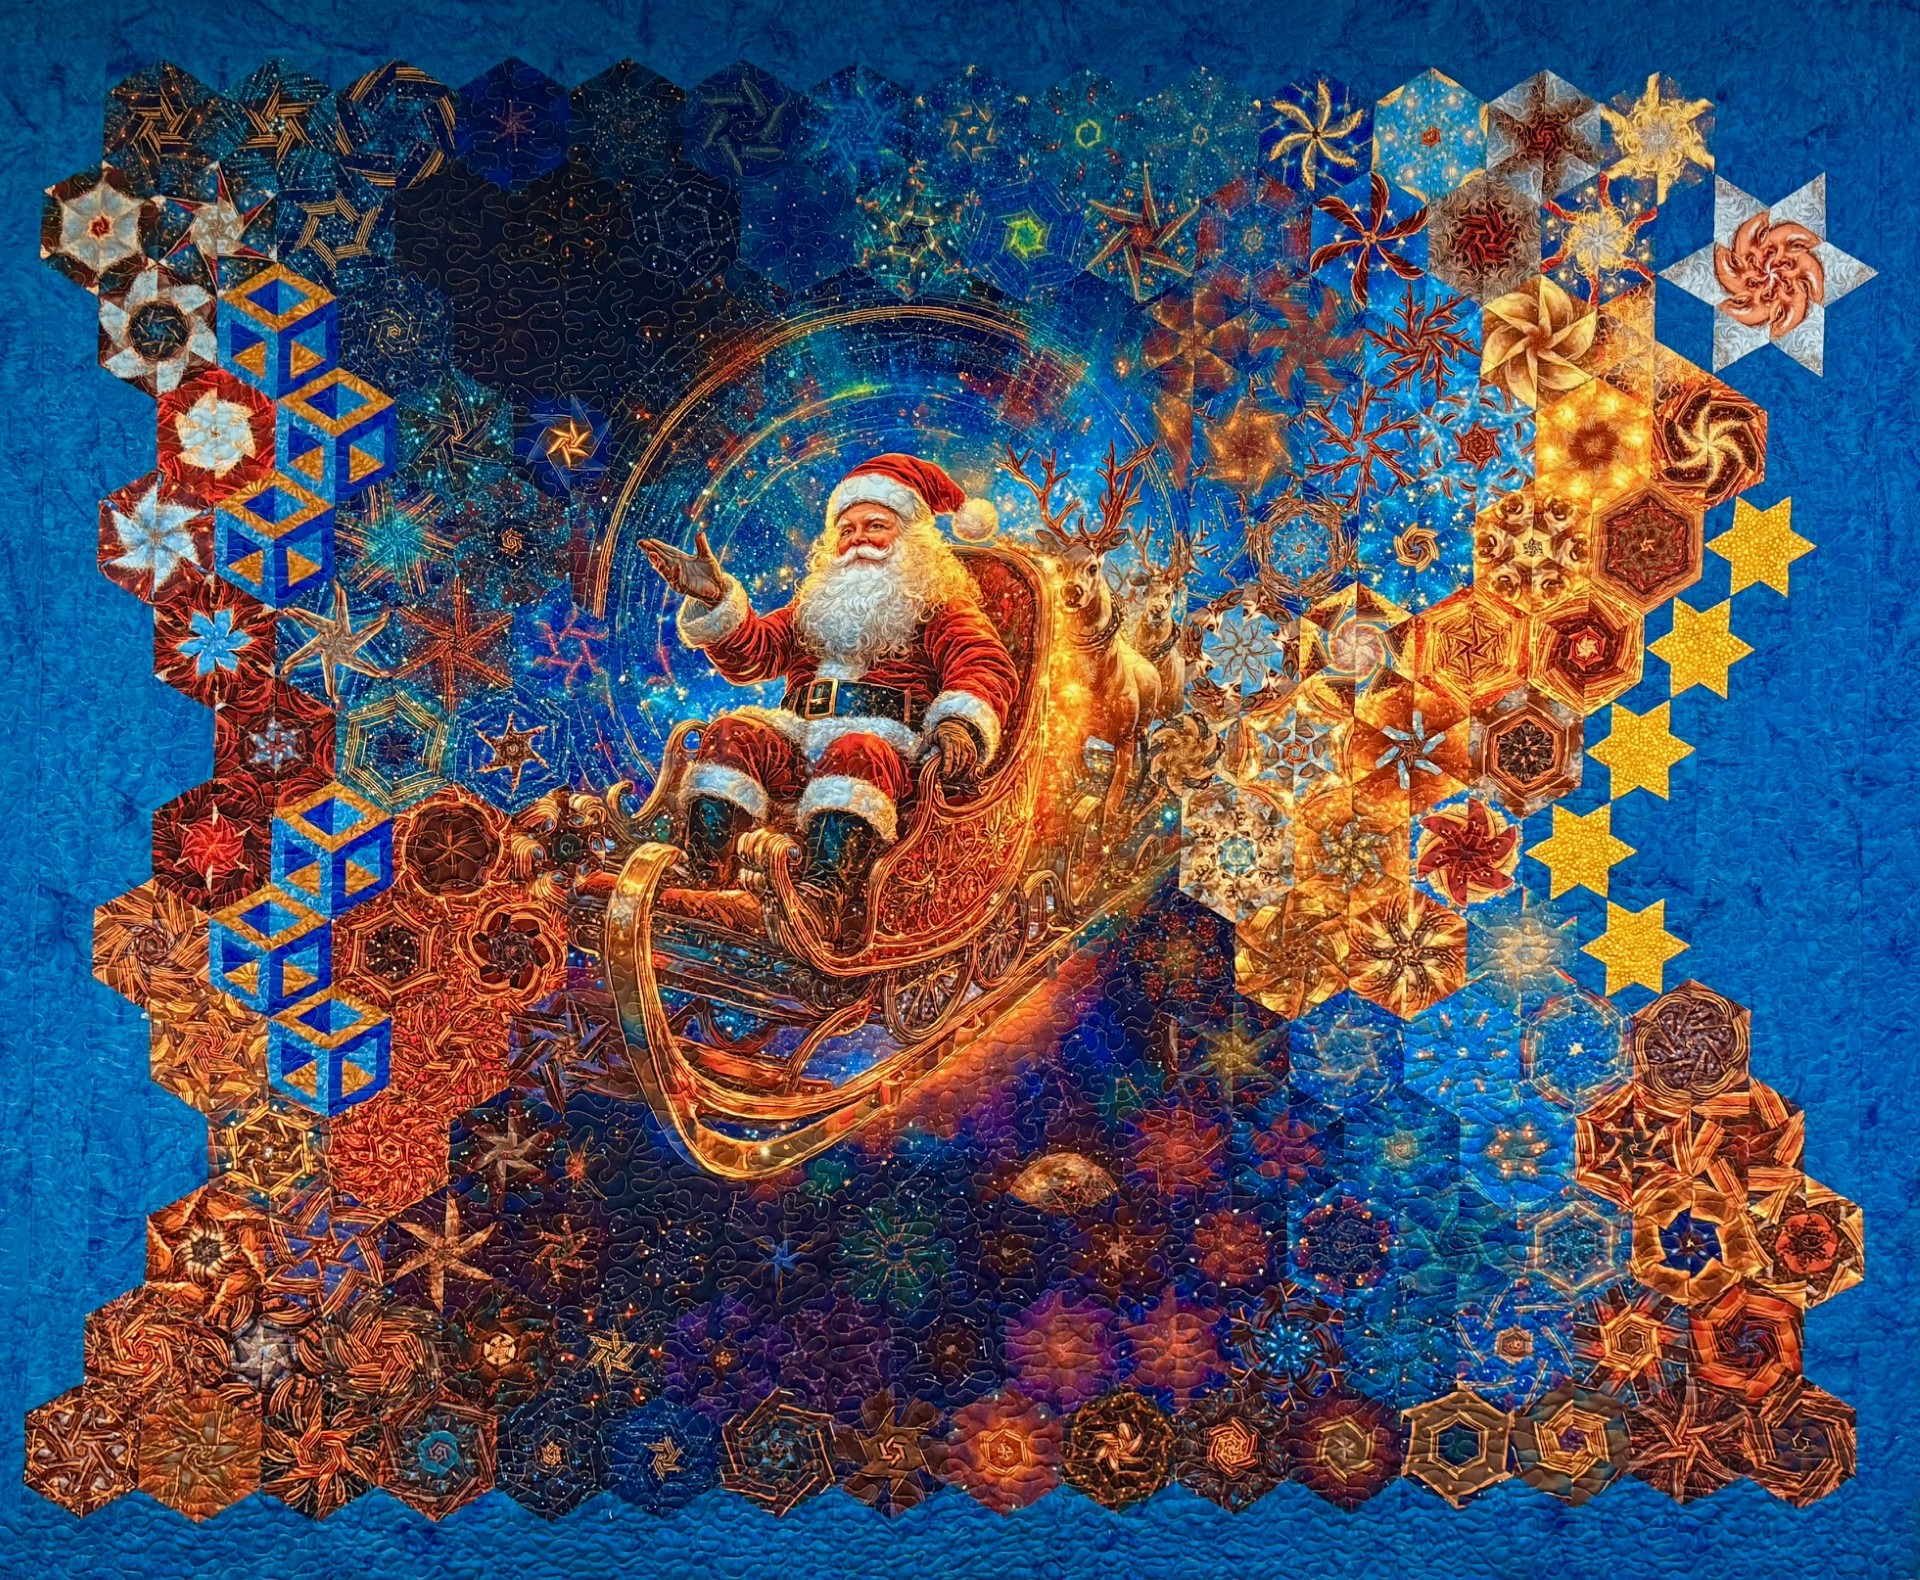
As soon as I saw this panel I wanted it! I love the colors and the Santa! Santa’s Sleigh is by Rubin Design Studio’s exclusively for eQuilter. BUT, then I noticed the reindeer! Why were they behind the Santa’s sleigh??? I decided it must be a shift change. After all we know male reindeer lose their antlers in winter. So, this must be the female reindeer showing up to have Santa’s Back!
I cut my strips 3.25″ using my First Choice rulers for 5″ finished hexies. This panel yielded 176 hexies.
The 5″ finished star 60 units were made with my Star 60 tool.
I made the Santa’s face hexies by stitching together two triangles to create a diamond. Then adding side triangles to create 5″ triangles, making it a 10″ finished Star 60 hexie.
I love this Santa’s Sleigh OBW Quilt. You can never have too many Santa quilts. Santa’s Sleigh measures 88″ x 70″. I Finish all my quilts with Quilters Dream Batting and Superior Omni thread.
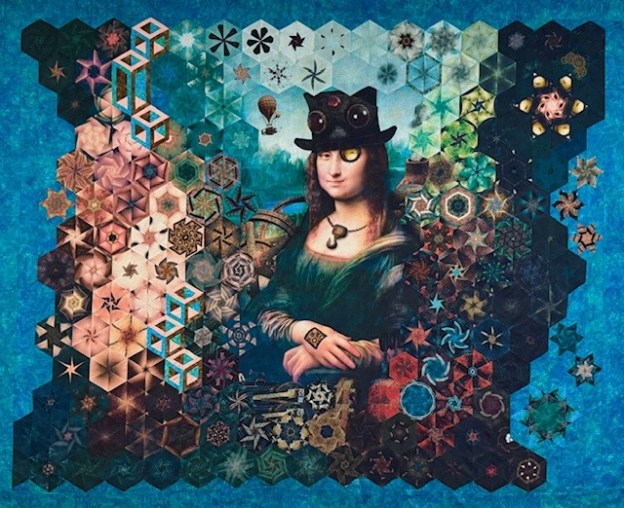
Wind me up & watch me go! Has anyone seen Leonardo? Steampunk Mona is Leonardo da Vinci’s version of AI. Someone greased Mona’s gears and now she is looking for Leo!
Steampunk Mona Lisa is from Rubin Design Studio and eQuilter. She measures 29″ x 44″.
There was much more color in this panel than I expected. I cut my strips 3.25″ to yield 5″ finished hexies. I got 176 hexies to play with.
I played with the hat for a while but decided to leave it alone.
The Hollow Cube 60‘s in the section represent the platform Leonardo launched his flying machine from.
The clock over Mona’s eye didn’t blend with anything. I stitched the clock hexie and Mona’s eye hexies together to create a diamond. Then added side triangles to create a 10″ Star 60.
Steampunk Mona before borders and tweaking.
Steampunk Mona measures 86″ x 69″. She was great fun to make. But wait! There’s more! Terri Butler of Mama Said Sew is working on a Steampunk Mona OBW coat. Follow Terri and me on our adventures at www.facebook.com/MamaSaidTheseThreadsCouldTalk
Elf & Dragon panel by Rubin Design Studio on eQuilter.com Panel measures 33″ x 44″.
I cut my strips 3.25″ to yield 5″ finished hexies. I created 10″ finished Checkerboard 60 units with my Star 60 Tool to be part of the dragon’s body.
The photo above is the quilt top stitched together, but no borders yet. Next I hide what needs hiding.
“The Elf’s song was heard through out the forest. The mossy earth began to shift. The dragon rose from beneath the leaves and mushrooms. The dragon would always come when the Elf called!
Can you find all my appliques’? The Elf and Dragon measures 90″ x 70″.
If you follow me you know I love my Chihuahua Tucker.
But, These cat panels by Rubin Design Studio, exclusively from eQuilter are just fabulous!
Mysterious Kitty panel measures 43.5″ x 29.5″. I decided to cut my strips 3.25″ yielding 168 – 5″ finished hexies.
I decided to start my design at the top of the panel, choosing the upper right corner to start, and placing 8 hexies across the top before going down to start the left side.
Above is the design I settled on. The edges of the panel range from black to dark blue. I didn’t think the green from the eyes would show up much, so I added Framed 60 stars to the upper right corner. They make the Kitty’s eyes sparkle more. I added Star 60 units to the left side in orange and blue made using the Star 60 Tool.
Above shows the top and bottom sections attached to the panel. Notice how much it shrinks when stitched together. We know we lose 1/2″ between straight seams. But, when stitching the hexies into rows we lose 9/16″ between seams. Depending on how many hexies are in your row, you lose about 3″ or more.
There are always two opportunities to tweak the design. The first is while designing with the hexies. The second is after you finished designing and the rows stitched are together. The photo on the right shows the top stitched together un-tweaked. I needed to soften the dark corners on the bottom of the panel. The photo on the right shows the top tweaked. I added appliqued Star 60 units on the lower right and left corners of the panel in different sizes and colors to created more of a curve I was looking for.
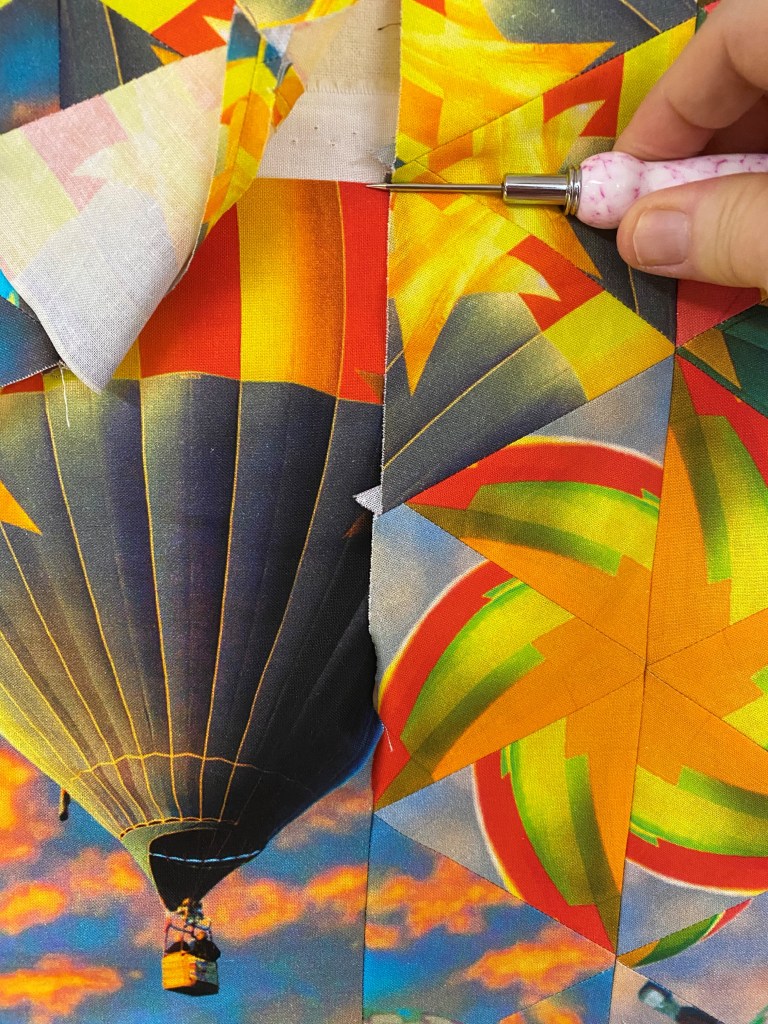
In my OBW Supply List, I show you a method to create appliqued hexies using fusible knit interfacing. This time I tried something different. I used Steam-A-Seam. I traced the fabric unit on the Steam-A-Seam paper, and then cut it out at least 1/4″ smaller. Following the Steam-a-Seam directions, I attached it to the back of the fabric unit. I removed the paper and finger pressed the raw edges under 1/4″. It was now ready to be attached to the quilt top. Once I have all my appliqued units attached to the top, I top stitch them down using Superior Monopoly clear thread.
I saw this panel depicting the 4 Seasons of the Ukraine and loved the soft colors. These Ukrainian figures, costumed in traditional dress, collect Easter baskets in spring, dancing in summer and autumn, and keeping warm by candlelight in winter.
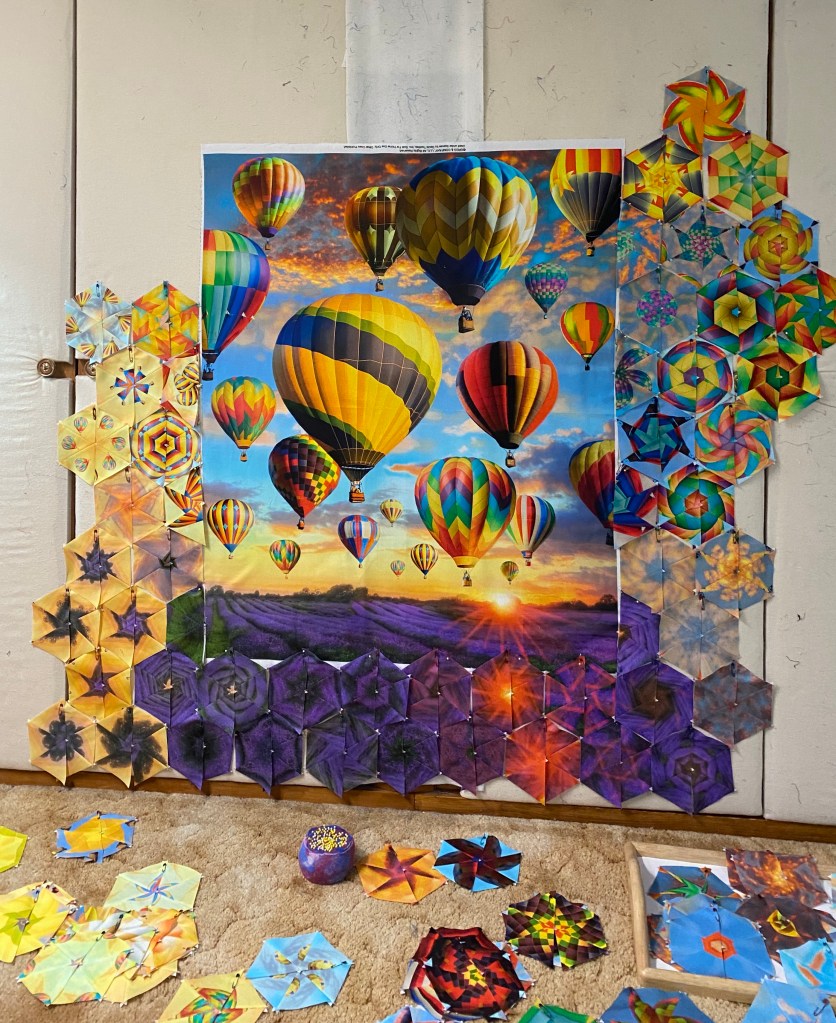
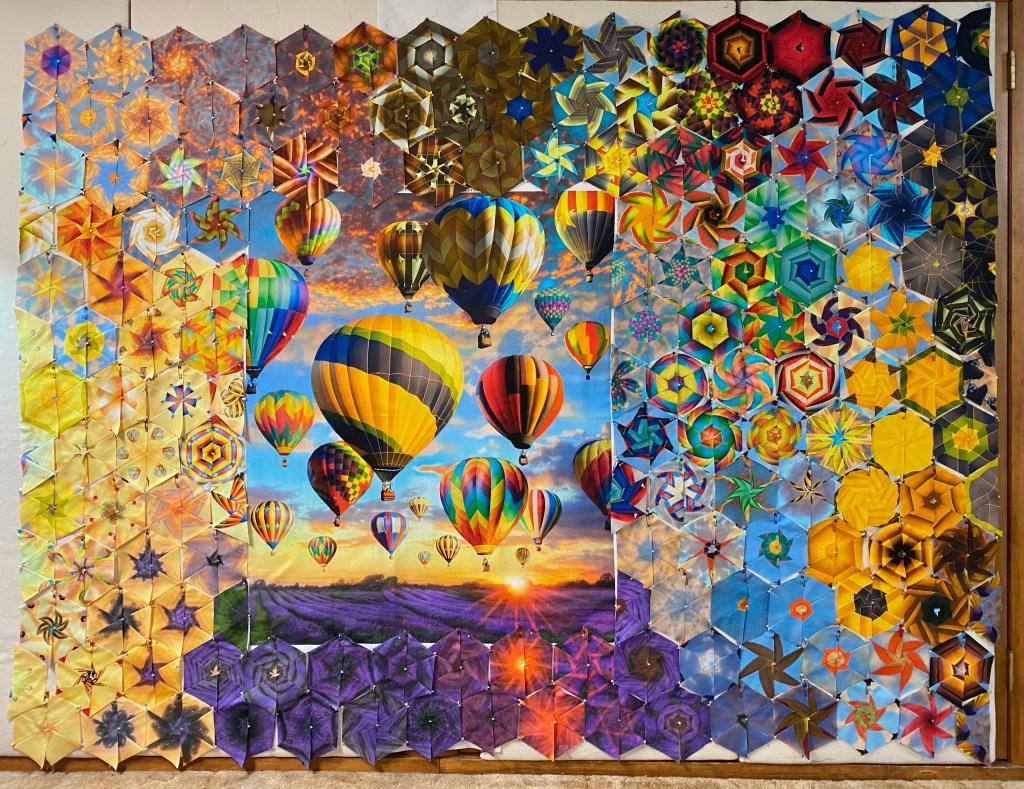
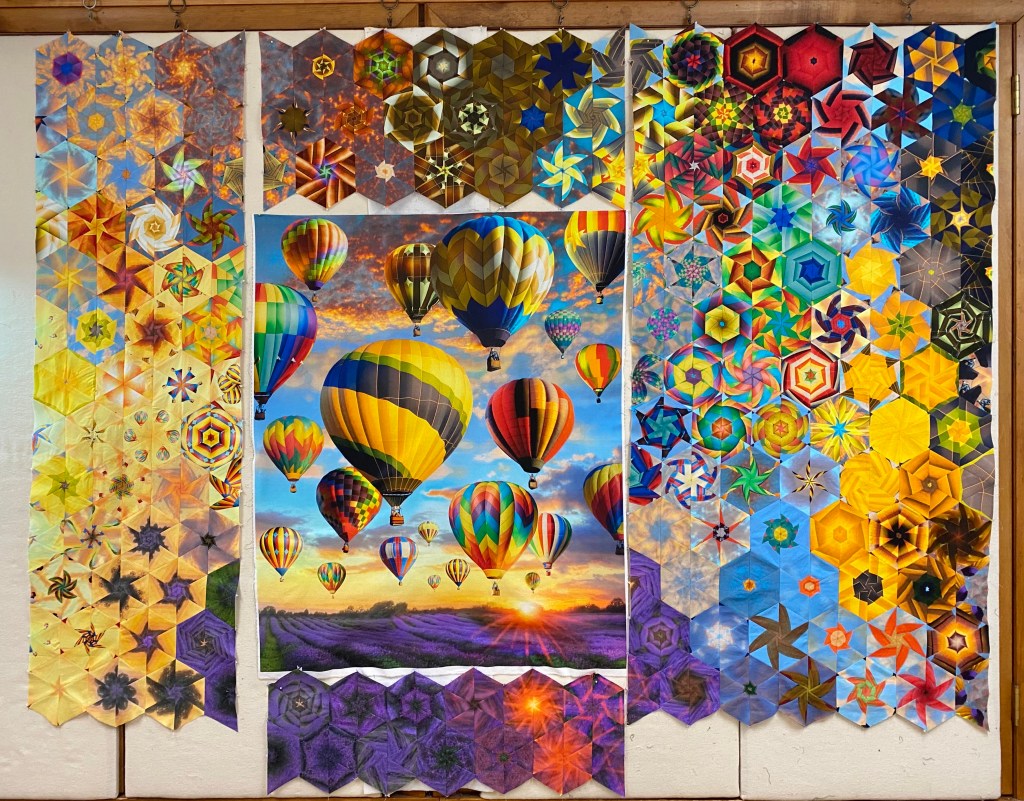
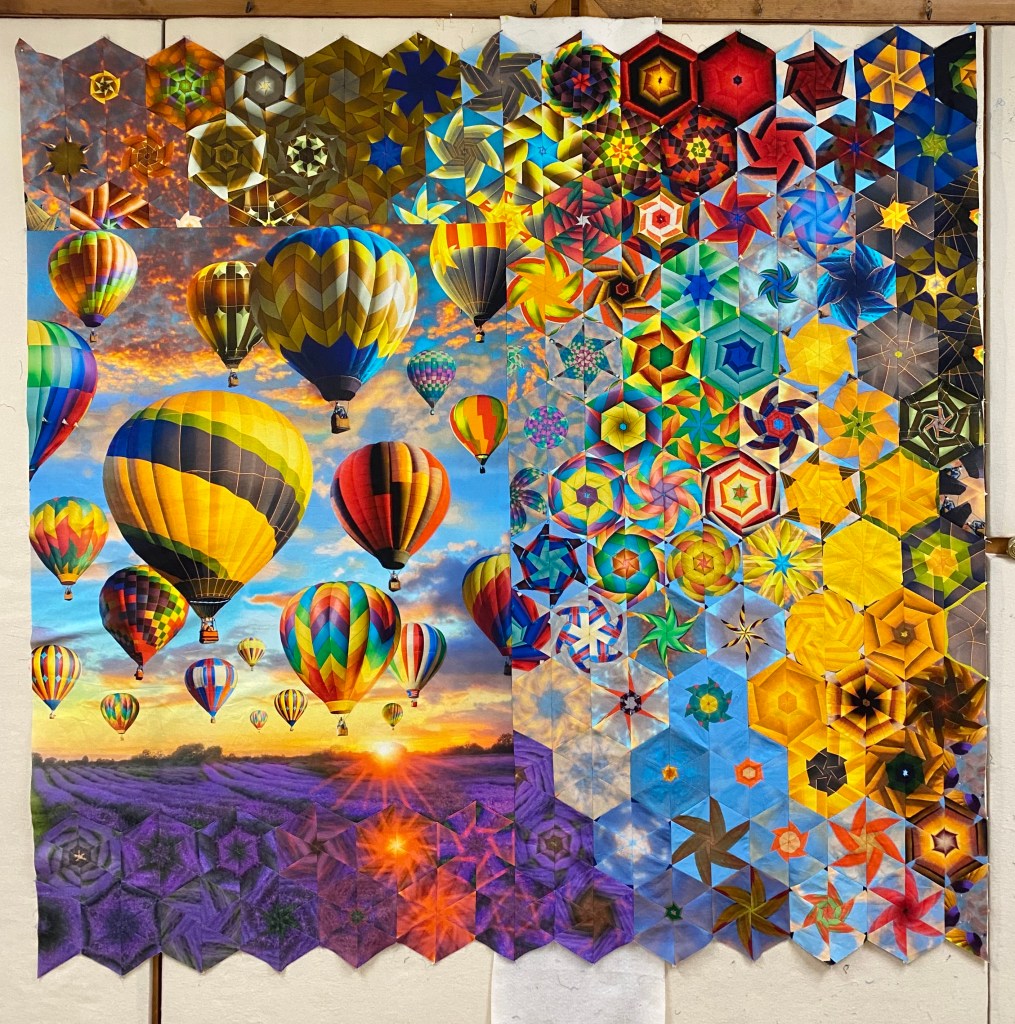
Quarantine quilt number 4 – “Up Up & Away, in My Beautiful Balloon”. While I was visiting my family in Lake Havasu City last January I got to attend their Hot Air Balloon Festival. It was fabulous.
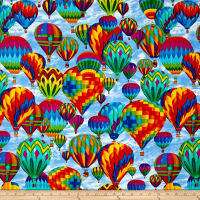
I saw this panel by Greg & Company on eQuilter and just had to get it for a One Block Wonder.
First thing, decide what size strips to cut. I start by trying to get an idea of how many hexies will fit across the top and/or bottom of the panel. It is just like making a pieced inner border to fit around the center of a quilt. The width of the panel should be evenly divisible by the finished size of my hexagon block. This panel measured 34″ x 44″. Even though it is a large print that would support a 6″ finished hexie, the 34″ width is not evenly divisible by 6″. I did not want to trim too much off the panel so I decided to cut my strips 3 1/2″ wide. That would yield 5 1/2″ finished hexagons. If I trim one inch off the panel side making it 33″ x 44″, meaning 33″ divided by 5.5″ = 6. Now I know I will get 6 hexagons (or 12 half hexies) across the width of the panel both top and bottom. Download my Tips for Using Panels for a OBW:
I started at the bottom and worked my way up the sides and across the top.
I used most of my hexagons and got achieved a design I was pleased with.
I number my rows and stitch the half hexies into rows. Then I join the rows pressing all seams open. I cannot stress enough how much easier it is to press your seams open with the help of my Strip Stick. I have 4 different sizes. The 48″ Strip Stick makes pressing the long seams open go quickly without disturbing the previously pressed seams.
I stitch my hexies into 4 groups. Top, bottom, left and right.
I decided I wanted to applique the bottom section to the panel first. Instead of trimming the points I pressed under a 1/4″ seam and stitched it onto the bottom of the panel. I chose to attach the right side next by matching up the dog ears as you would when joining the rows and stitch three quarters of the way up towards the top of the panel (partial seam).
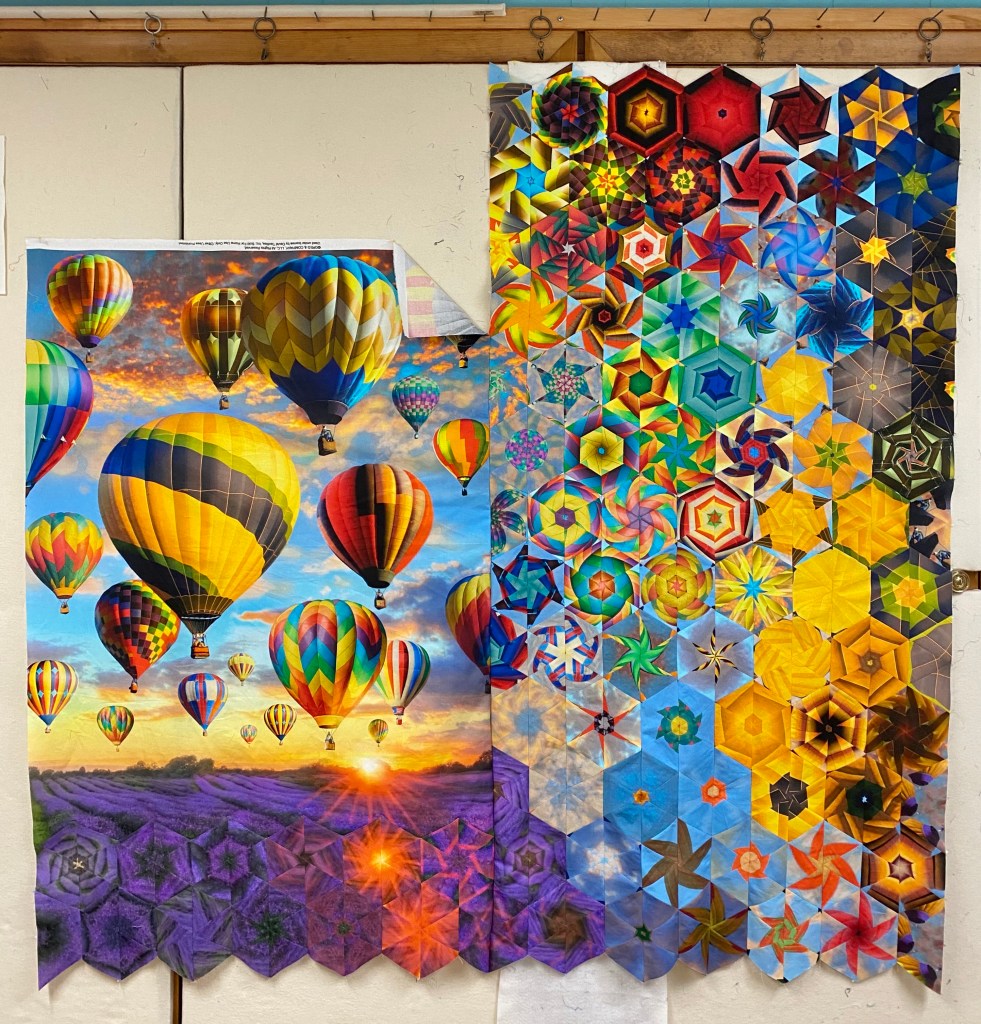
By using a partial seam, it allows you to match up the dog ears of the top hexies with the side rows of hexies.
I will mark where the top hexies hits the top of the panel, add a 1/4″ seam allowance, trim the hexies and stitch to the top of the panel. I decided to trim the hexies because I did not want to cover the balloons.
Now I can finish the partial seam.
With the top, bottom and side hexies stitched in place, I can easily attach the left side hexies to the panel matching up the dog ears.
This is one colorful One Block Wonder. I have ordered some great fabric from Fabric.Com for the back.
As soon as it arrives I will quilt it and send it you Angie!