I just completed my 95th One Block Wonder! I guess I need to shoot for making at least 100 OBW’s!
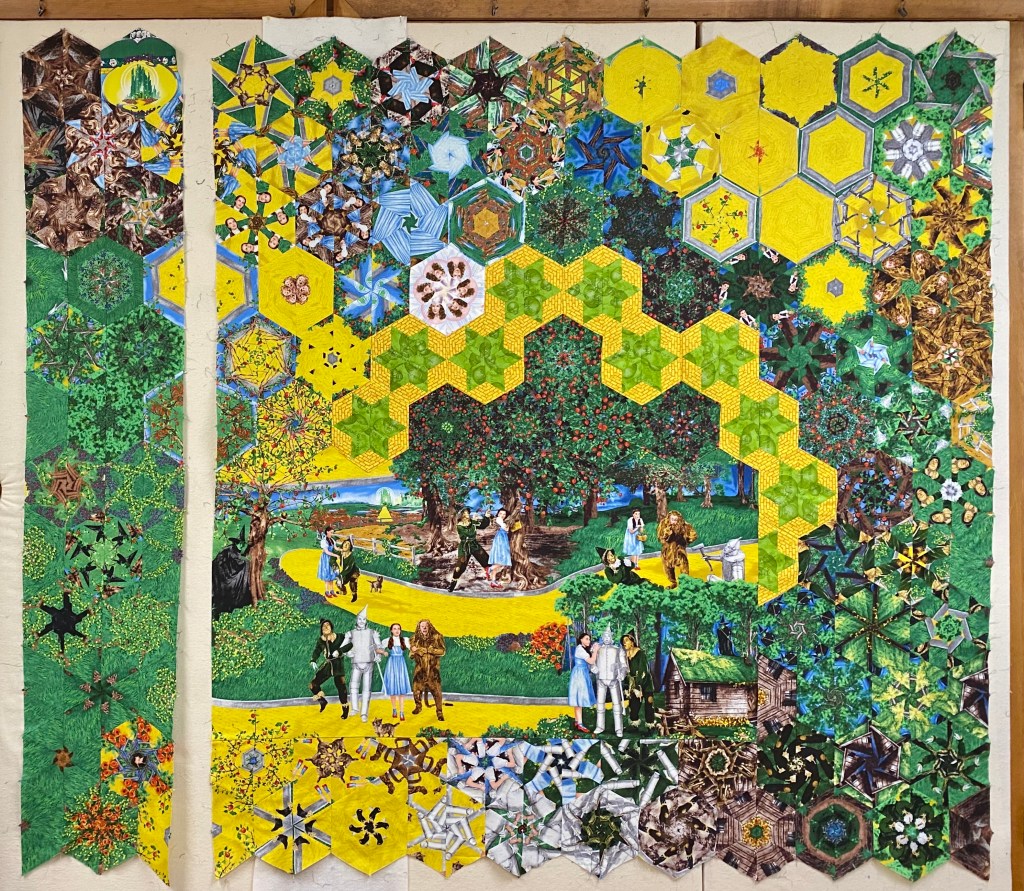
A World of Wonders
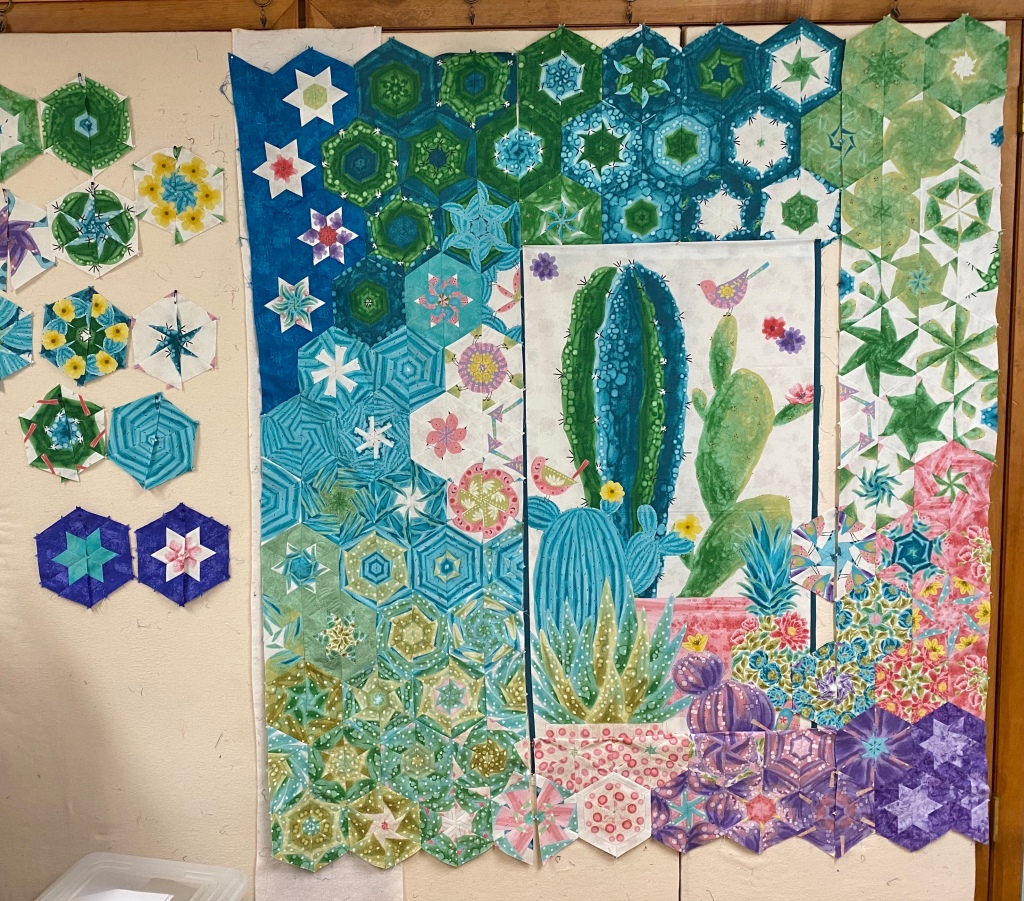
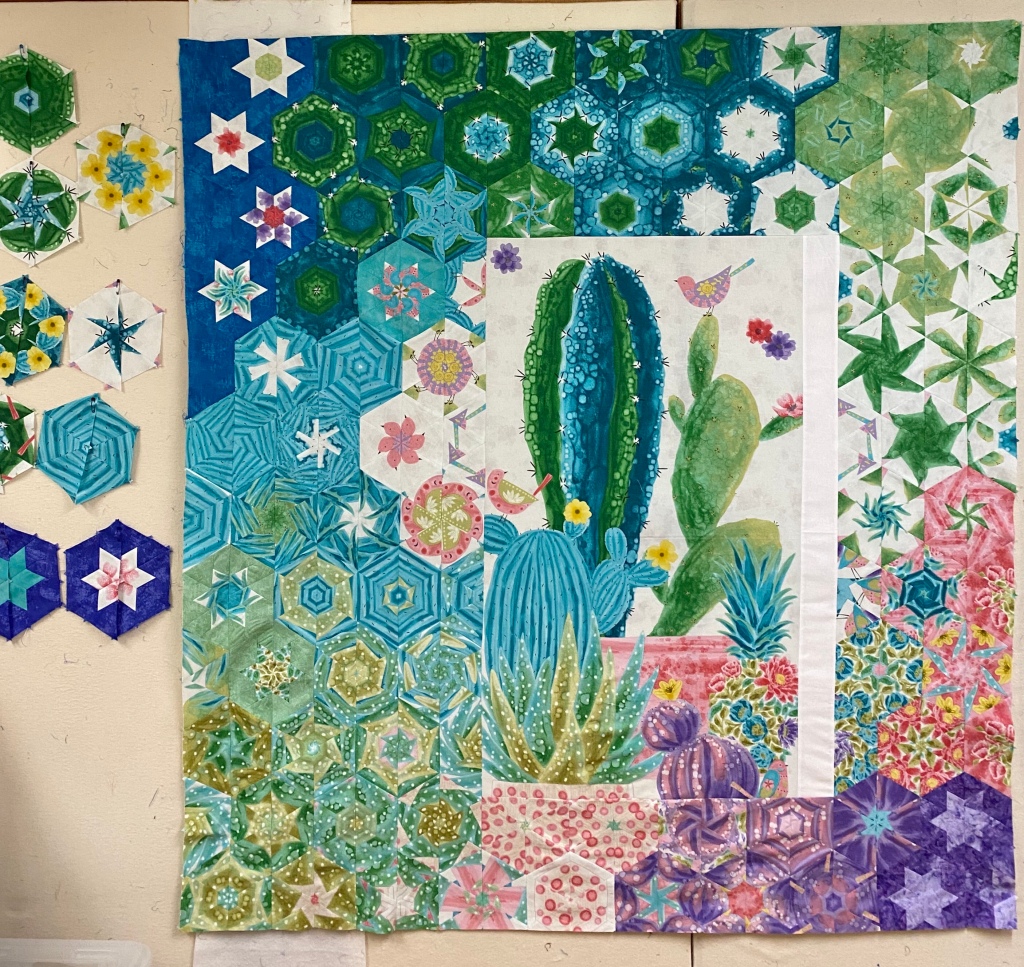
“A World of Wonders” is made from a panel by Josephine Wall and measures 72″ x 97″. I integrated Star 60 and Quad 60 Stars and Island Batik fabrics to enhance my quilt’s story.
I have had this panel by Artisan Spirit Dreamscapes by Ira Kennedy for Northcott for several years. The Dreamscapes panel measures 13″ x 20″. It came two in a panel, so I ended up with 14.
I partially completed the first set of 7 panels to show how to add the sections to the panel. I save this OBW classes.
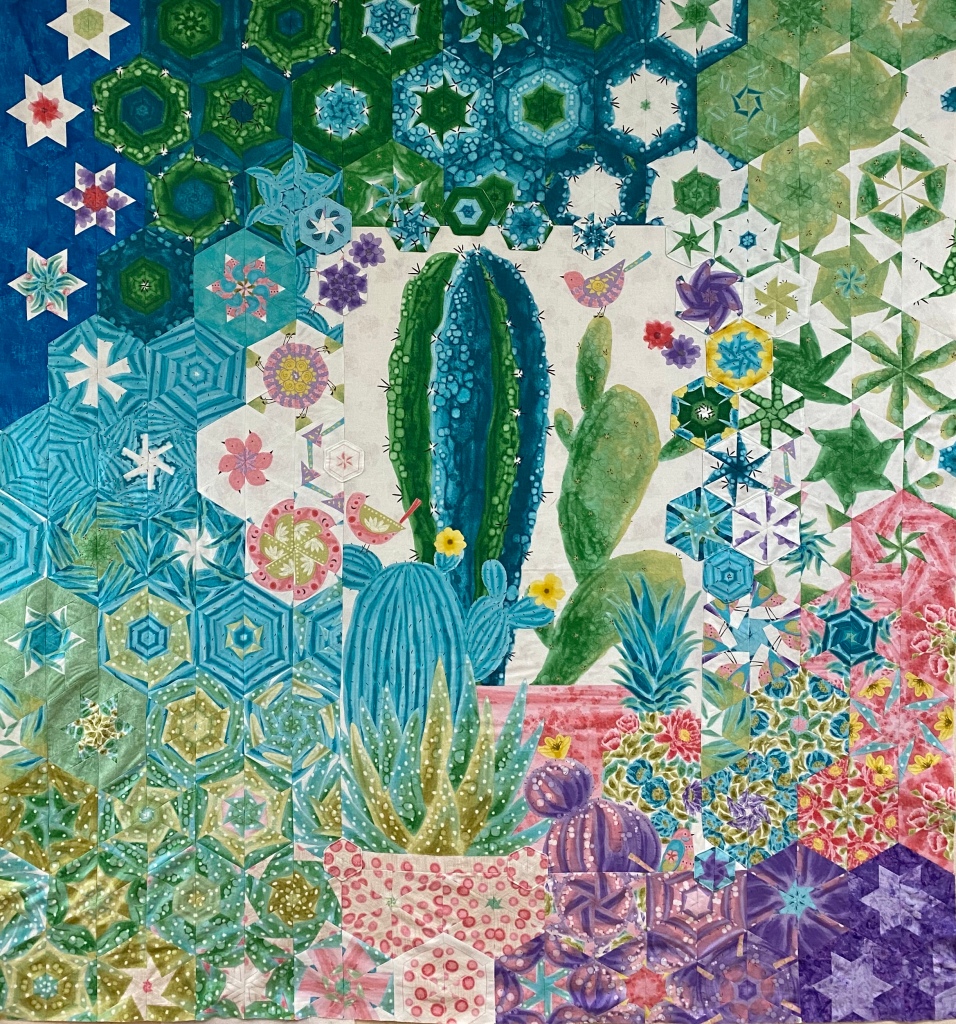
I finally decided to complete the 2nd set of panels. I cut the strips 2 3/4″ for 4″ finished hexies. In hind site I wish I would have made them smaller. To add more hexies and enhance the hexies I had, I added stars made with the Quad 60 Technique Sheet and my Star 60 Tool. My Dreamscapes wall hanging measures 35″ x 41″
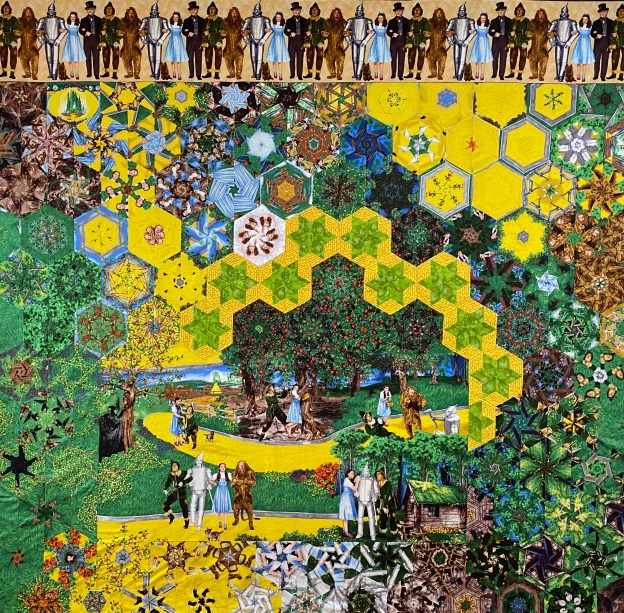
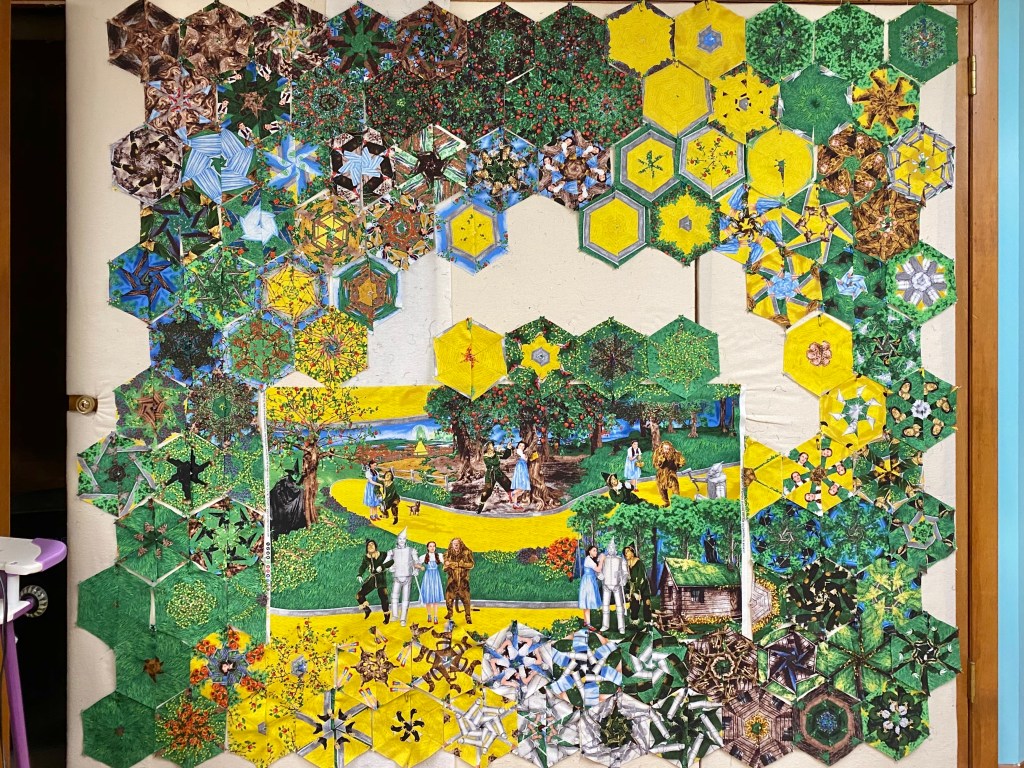
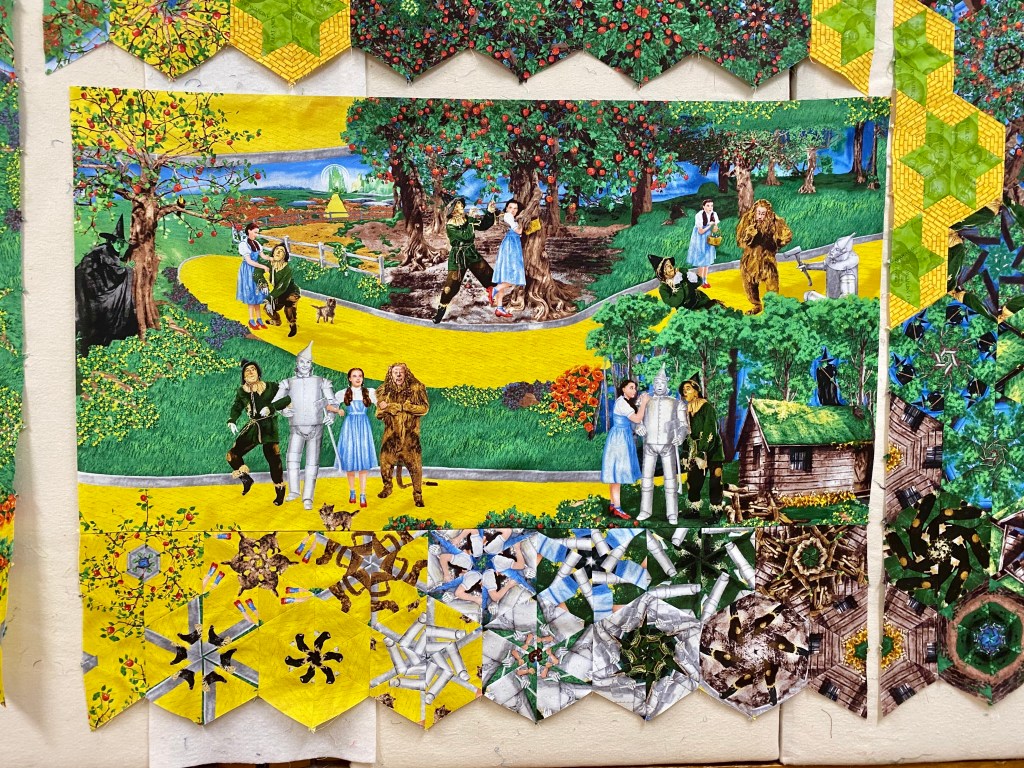
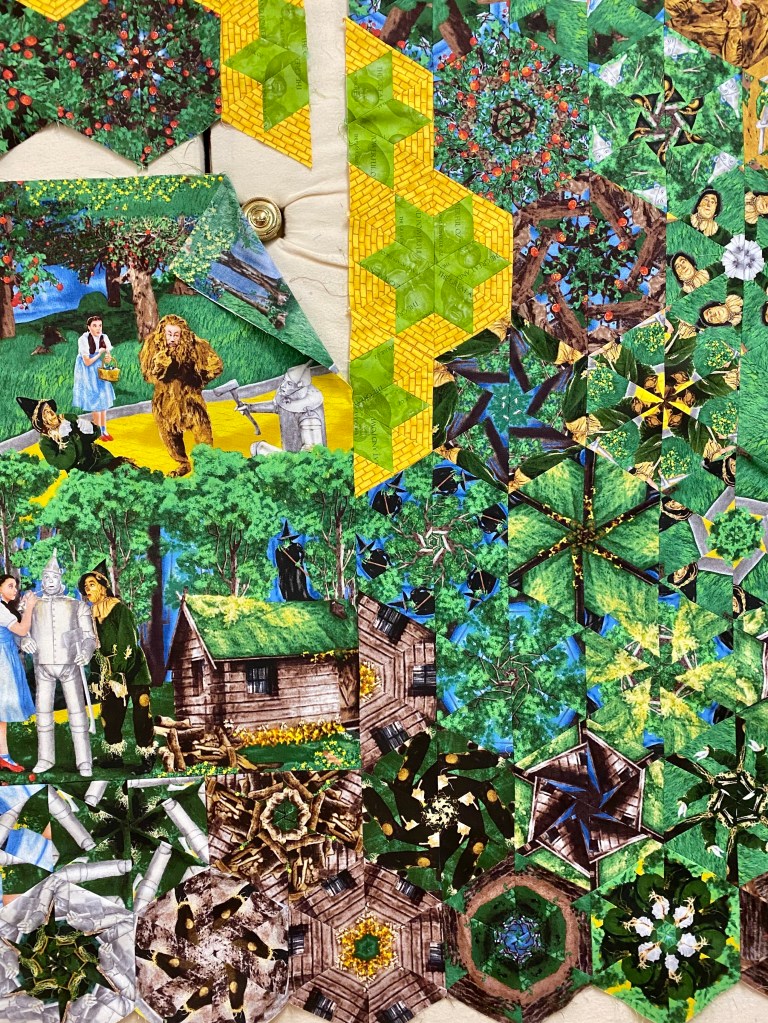
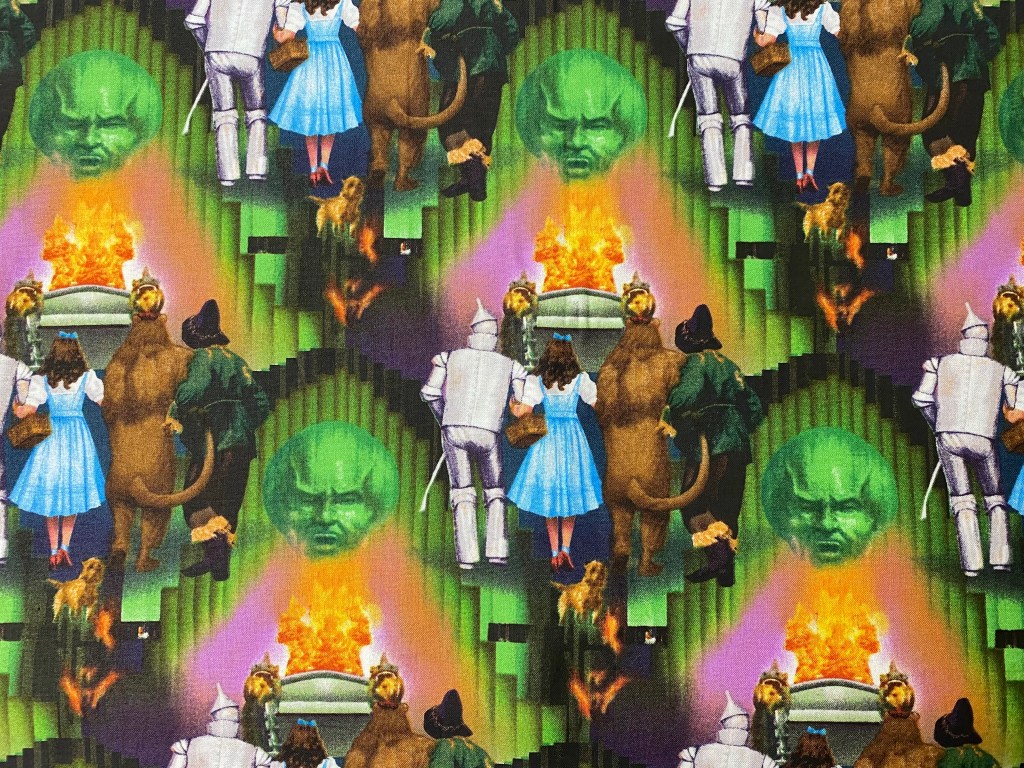
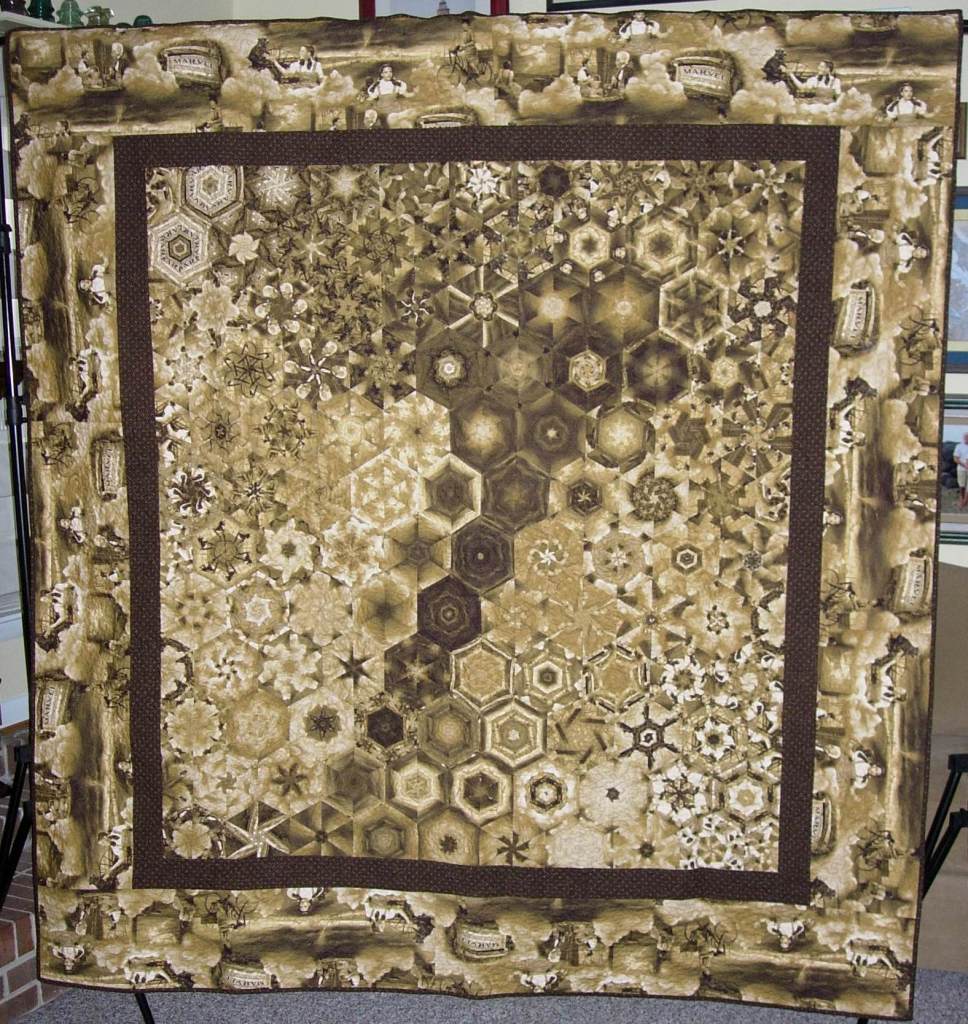
I love the Wizard of Oz! I know it is a very controversial movie, either you love it or hate it! In 2008 Quilting Treasures came out with the Wizard of Oz fabric line. The first fabrics were in sepia tones. I have made many, many Wizard of Oz quilts from my extensive Wizard of Oz fabric stash. This Road to Oz is for me!
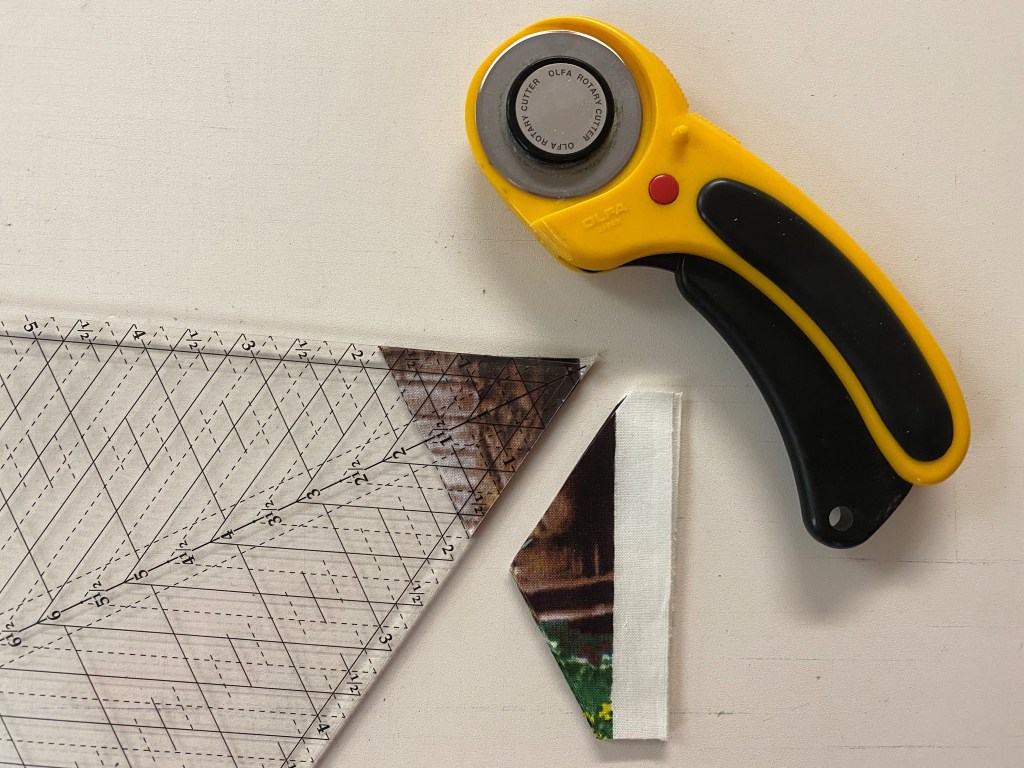
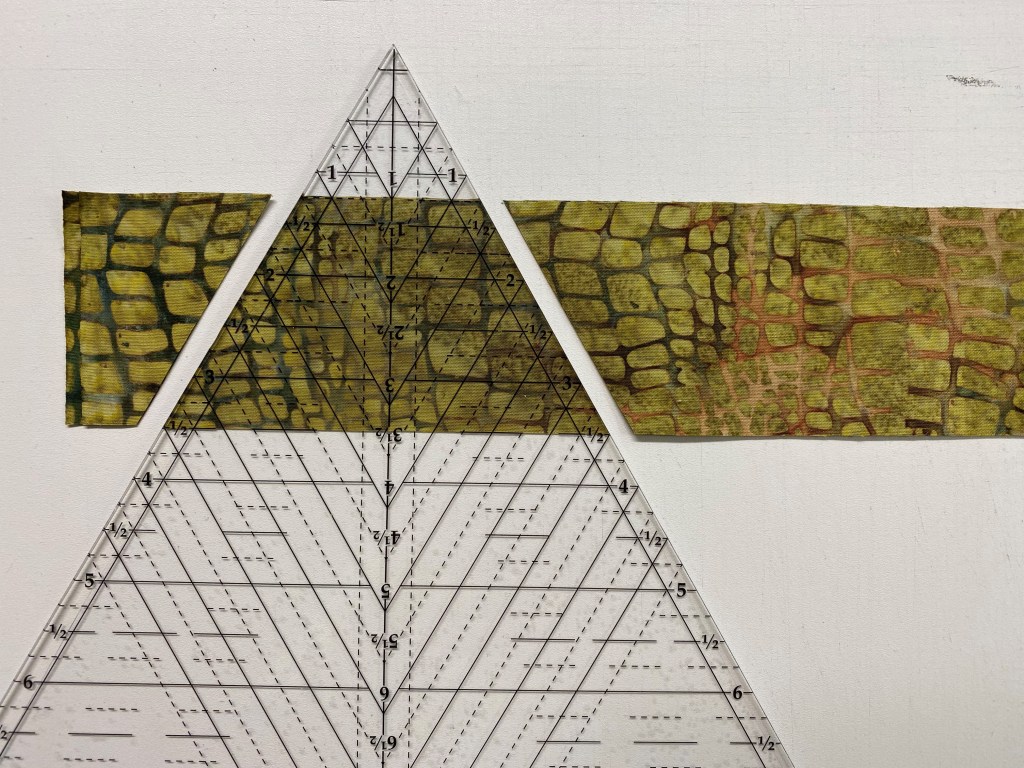
I used Studio 180 Design’s Star 60 Tool to enhance my One Block Wonder. Aside from cutting the equilateral triangles I will share how to cut Whole Hexagons, Half Hexagons and make a Half Hexie Braid for borders with the Star 60 tool.
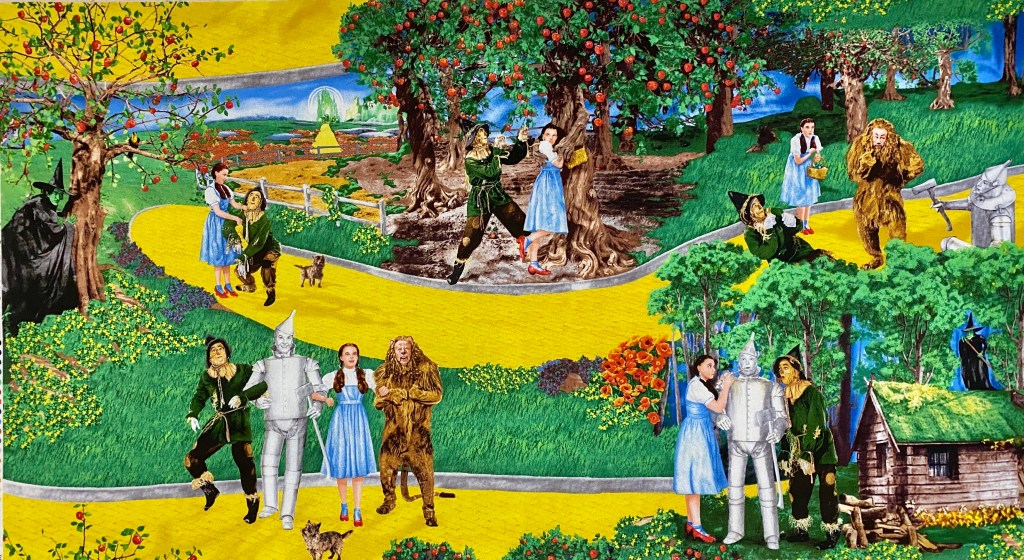
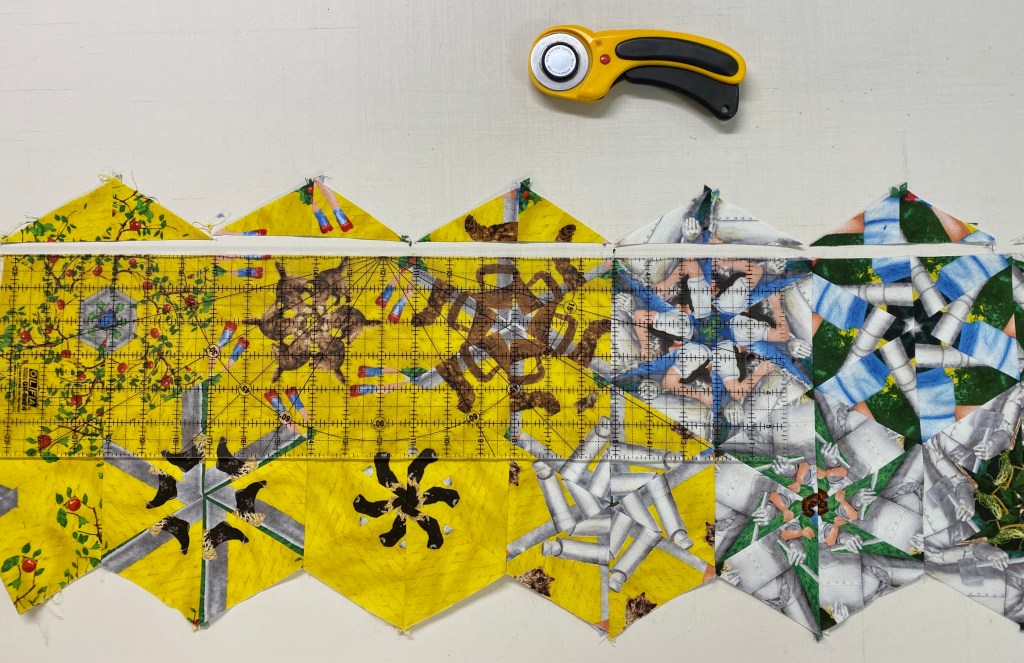
This fabric by Quilting Treasures came out in 2009 and has a 23″ repeat. I’ve decided to use it as a panel on the quilt top. The width is a little over 43″. I need to determine what size finished hexie will fit evenly across the bottom & top of the panel. If I cut my strips 3 3/4″ wide they will produce 6″ finished hexies. If I trim my panel to 42″, I can fit 7 – 6″ finished hexies across the bottom and top of the panel. Note: I NEVER trim the panel until I have my hexies designed and verify they fit the way I want them to.
Strips are cut.
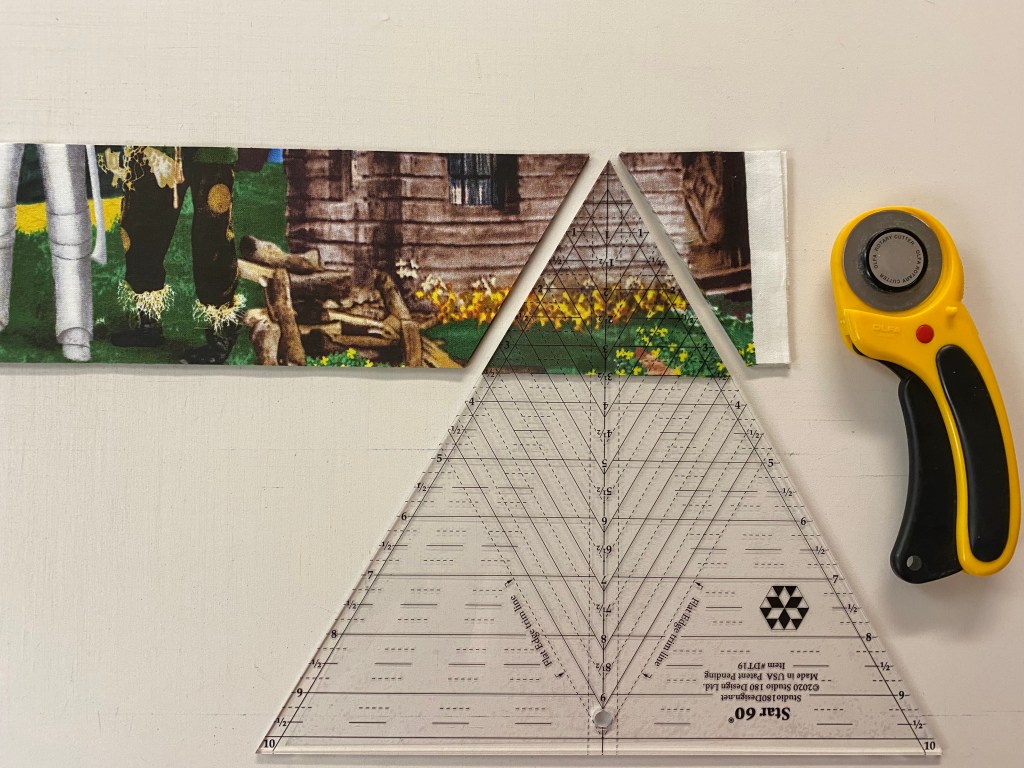
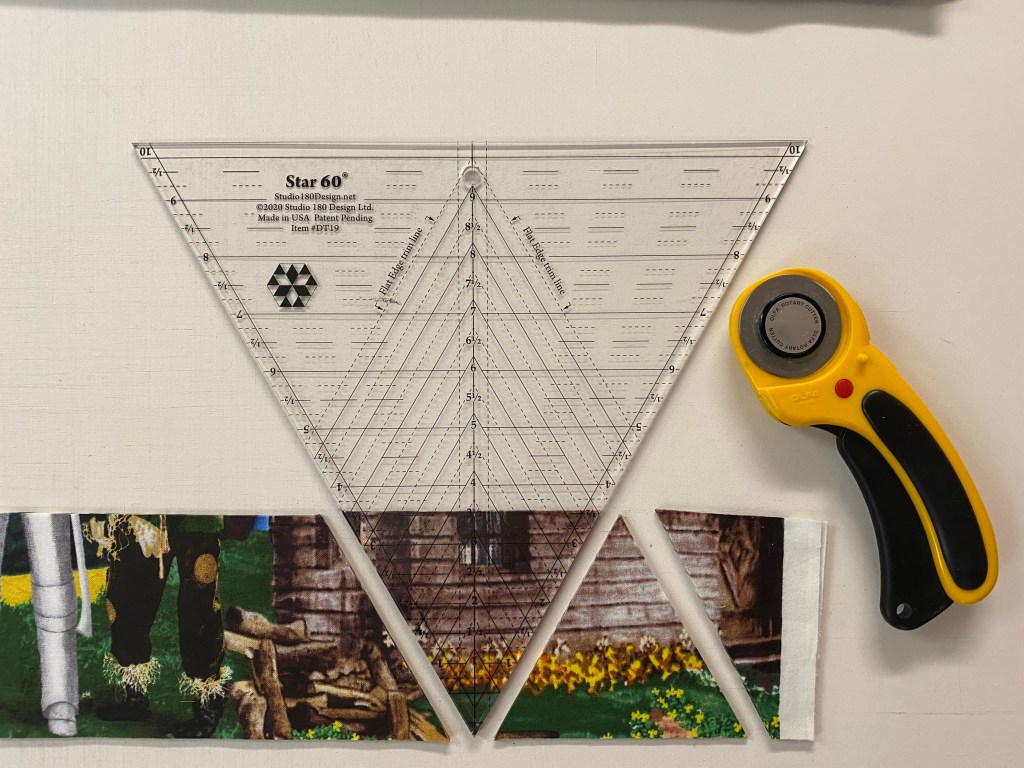
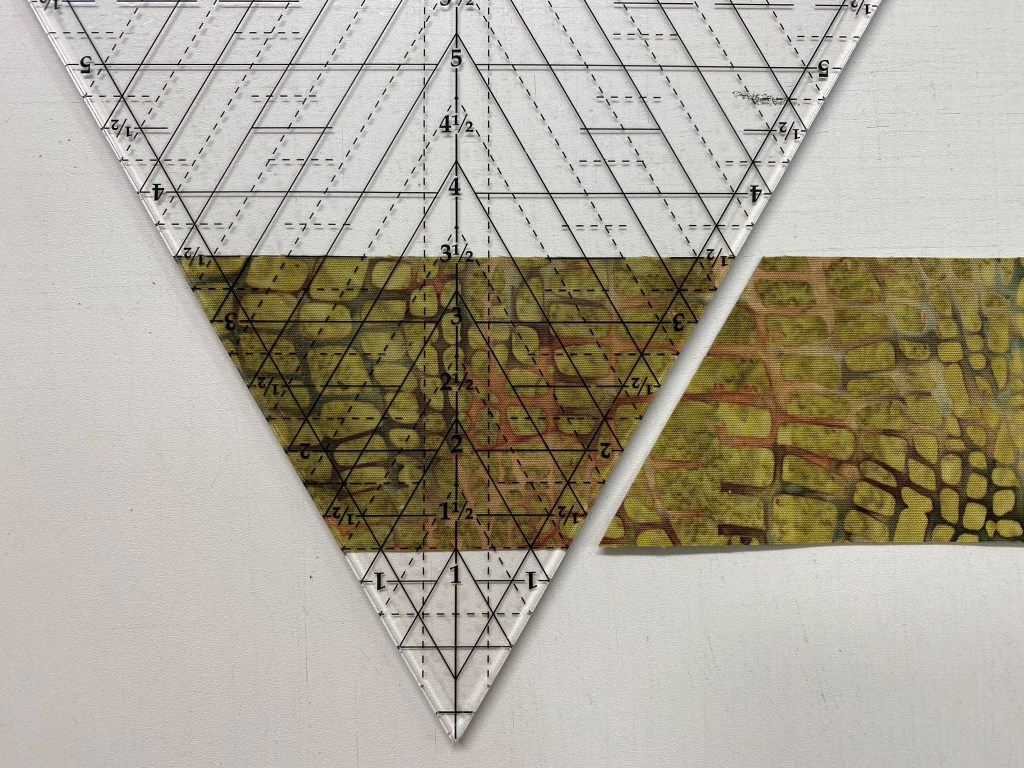
I used my Star 60 Tool from Studio Design to cut my equilateral triangles. Be sure the tool point just touches the cut edge of the strips. we want dogears to help lining up blocks and rows.
TIP: You know those pieces you have left at the of the strips that are too small for a full size hexie? One side is already cut at a 60 degree angle, if you place the tool edge on the straight side of the pieces, adjusting the edge of the tool to not include the selvedge and cut, you will have small hexie that can be appliqued onto your top.
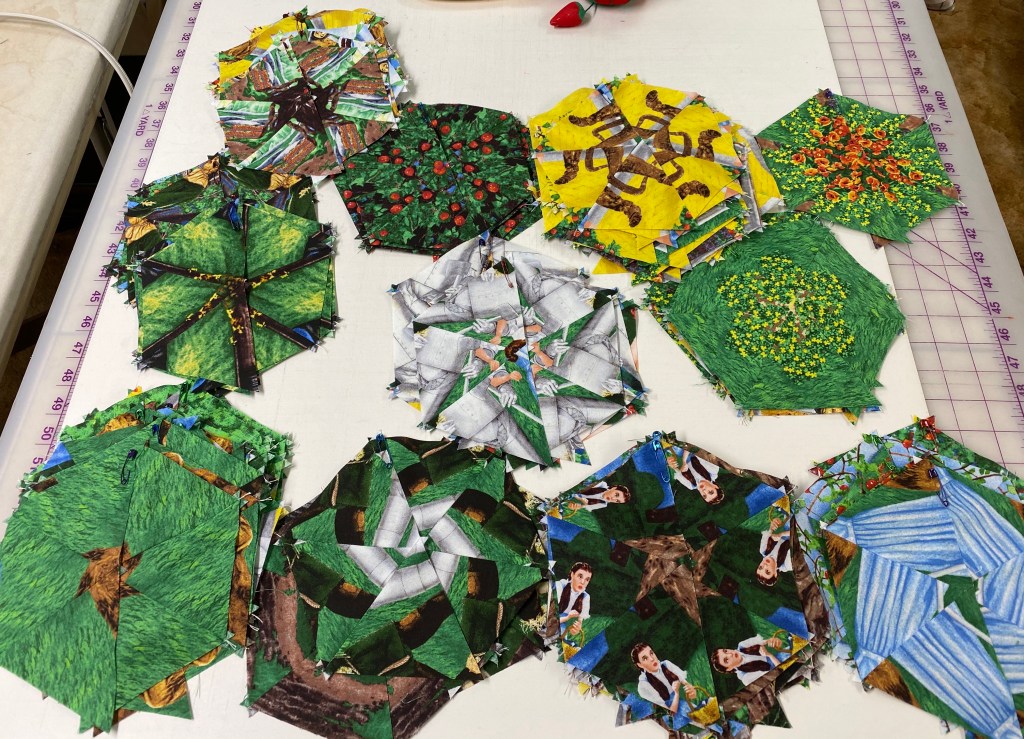
My triangles are cut, stitched and sorted by predominate color.
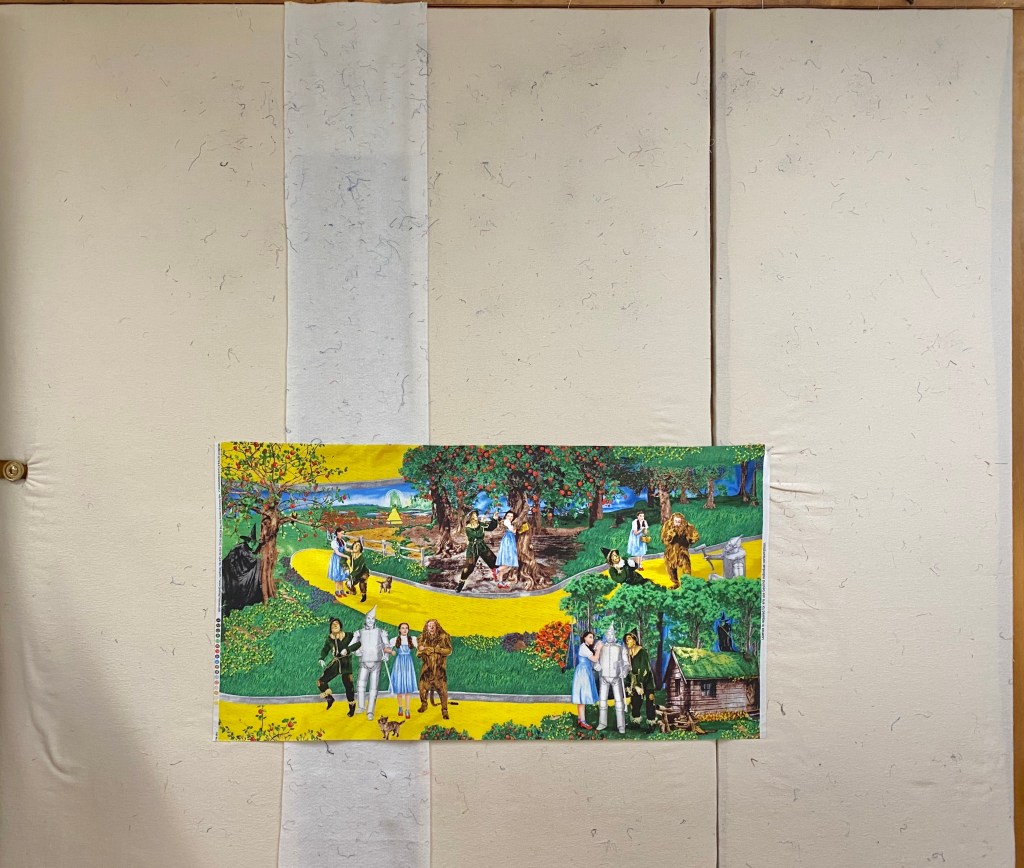
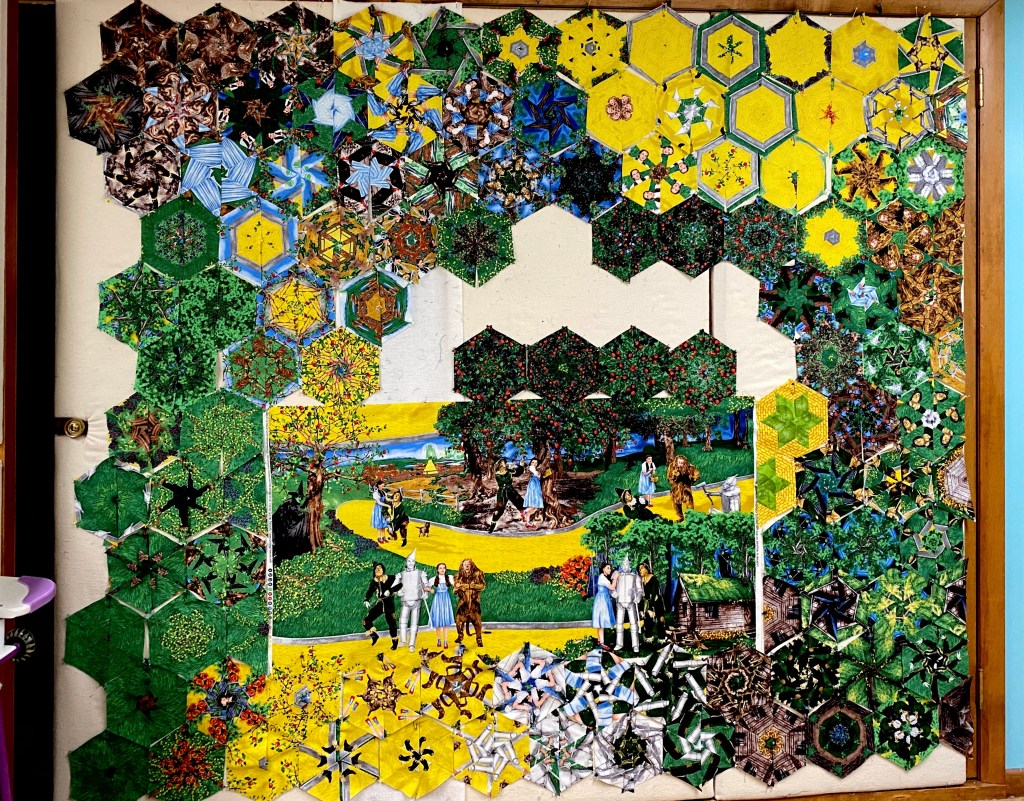
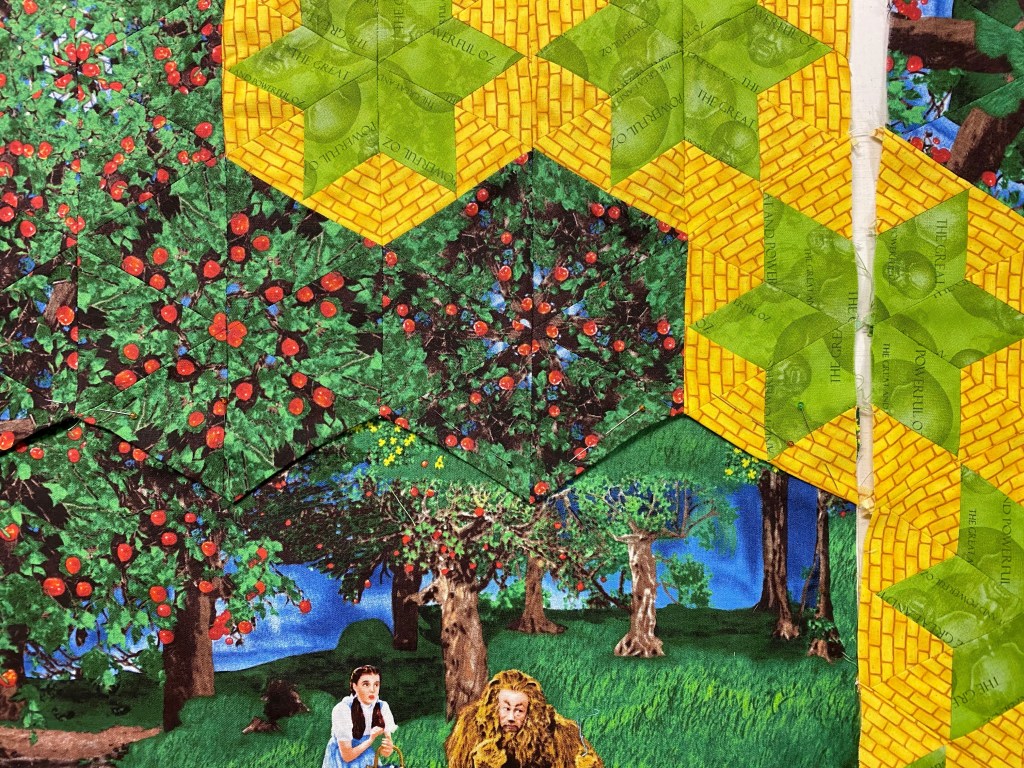
Placing the panel on the design wall takes some thought and planning. My design wall consists of 4 closet doors 24″ wide, that are covered with flannel over insulation, so I have plenty of room. My goal was to create a path that would connect the yellow brick road on the right side with the yellow brick road on the top of the panel. I placed the panel so there would be more room on the right side and the top of the panel.
Remember, I can fit 7 – 6″ finished hexies across the bottom of the panel. The hexies are not finished yet, so they don’t fit well. They extend further than the panel. Keep this in mind to keep track of where your rows are so you don’t get confused. If 7 finished hexies will fit across the bottom, that means 14 half hexies will establish the width of the bottom section and the top section. I started at the bottom of the panel and then worked my way up the sides. You may start at either the top or the Bottom, it doesn’t matter.
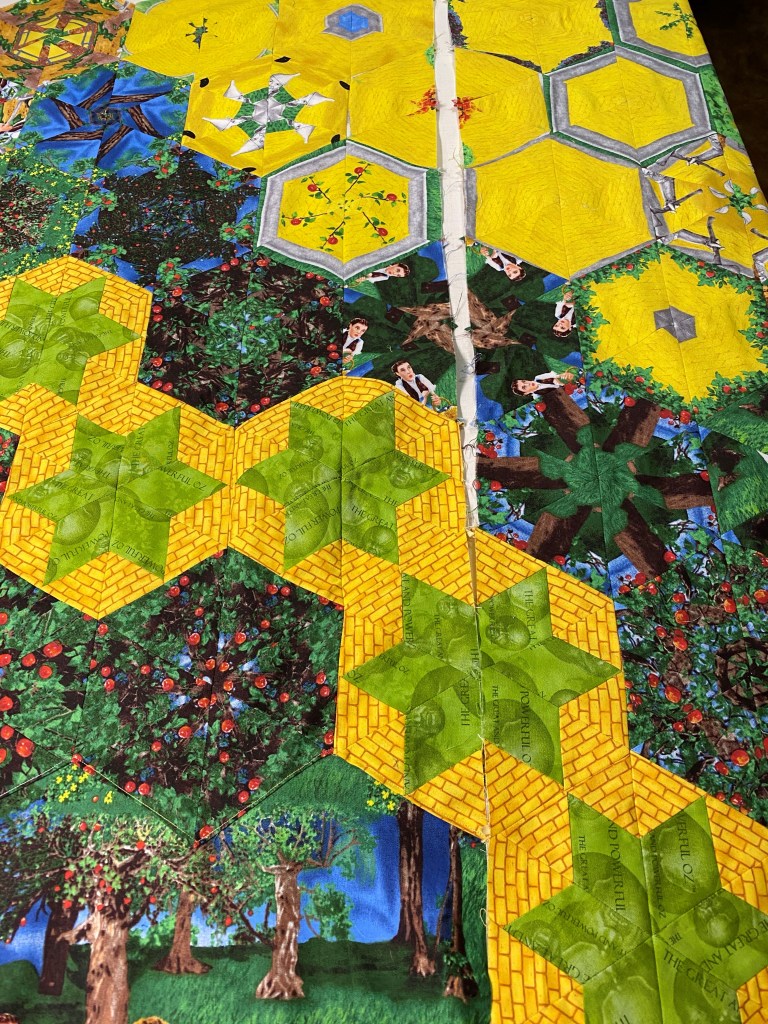
First attempt at my design was close, but I didn’t feel the yellow hexies I had were creating a vibrant connecting path. I tried again surrounding my path with darker hexies & decided to create some Star 60 Units instead.
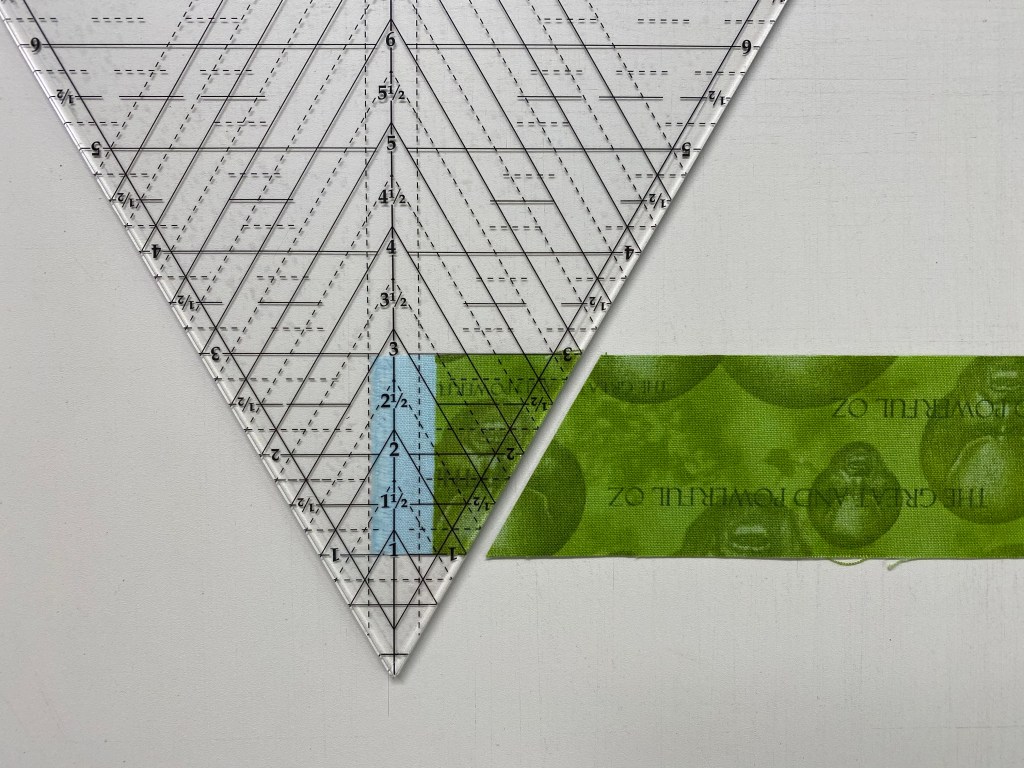
Cutting the Diamonds: To create a Star 60 Unit that contains a diamond with side triangles that would create a 6″ finished hexie I went to the Basic Shape Cutting Chart in the Star 60 instructions. I followed the cutting instructions for 2 1/2″ finished units. For my diamonds, I cut a 2″ WOF strip. Trim the first edge at a 60 degree angle as shown above. Locate the Diamond Sub-cut Guideline in the next column for 2 1/2″ finished unit which is 3 1/2″. Align those guidelines with the raw edges of the strip and the angled cut just made as shown above. Each hexie will need 6 diamonds.
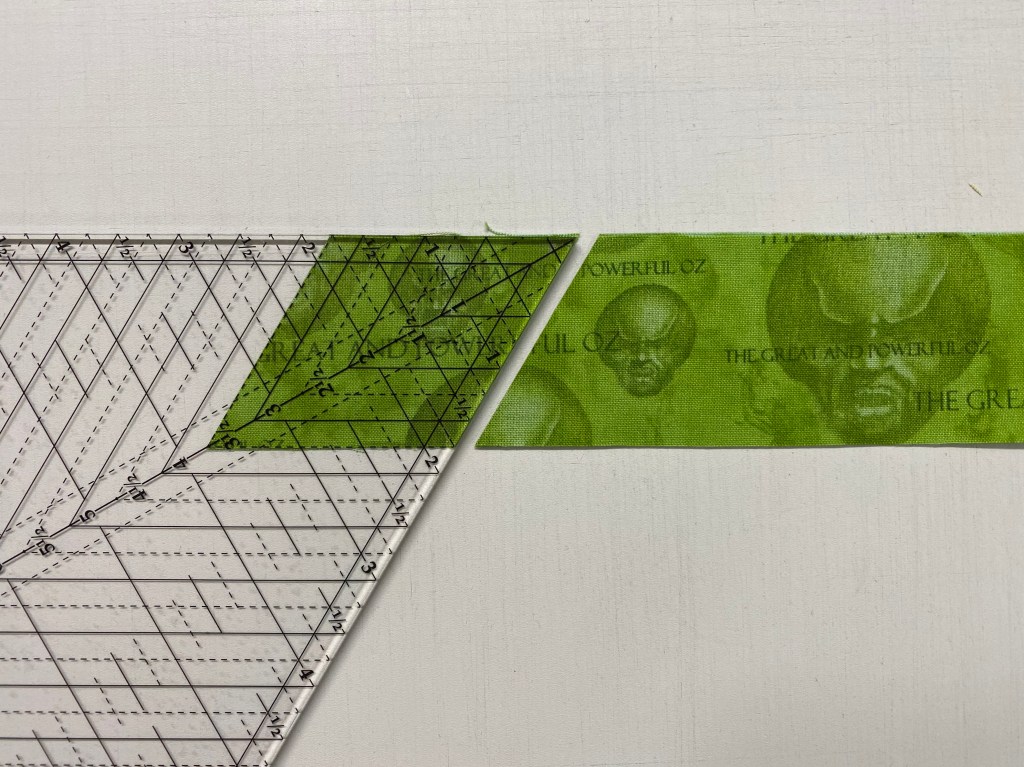
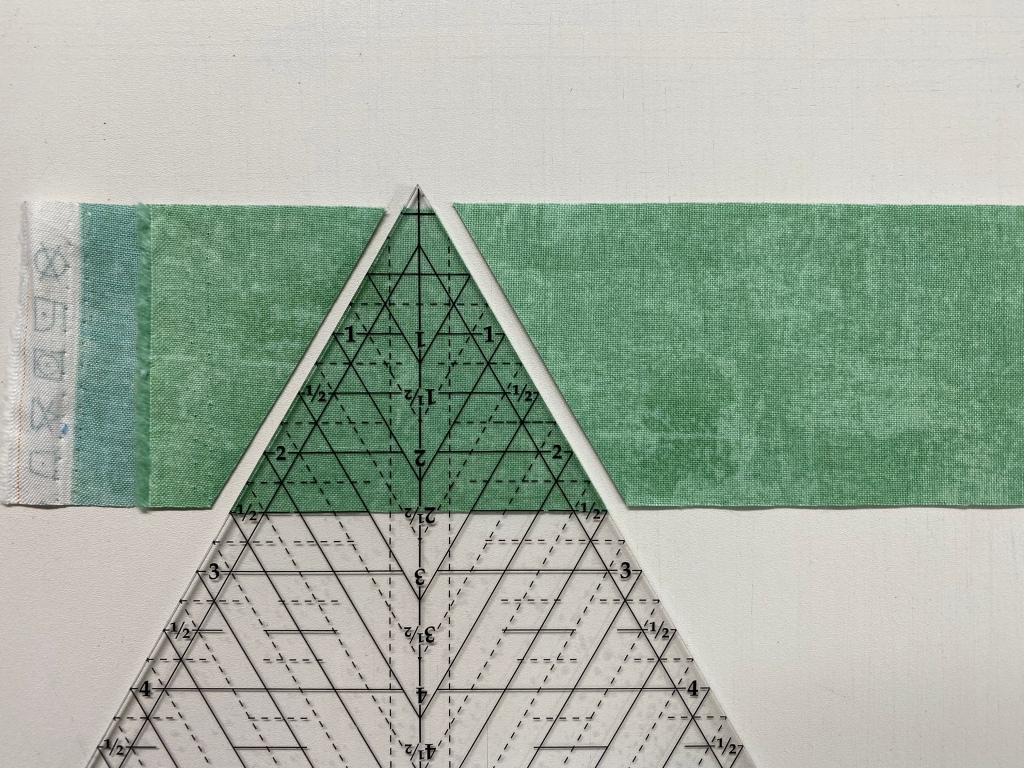
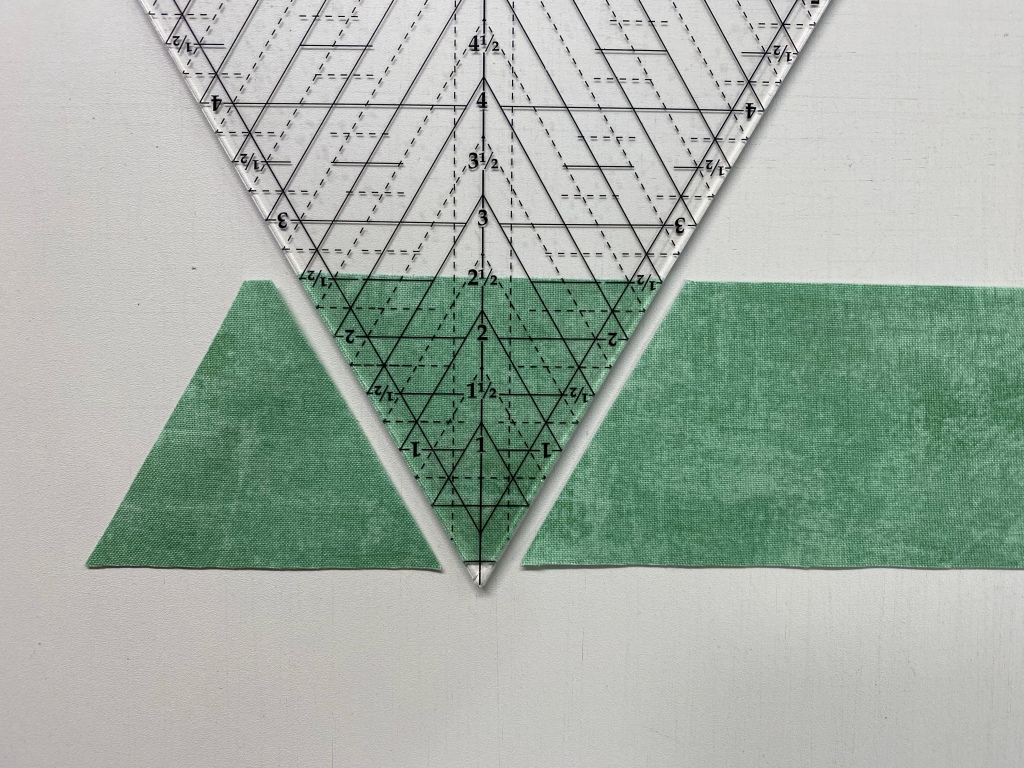
Cutting the Side Triangles.: Checking the chart for Side Triangle Strip size, I cut my 2 1/4″ WOF strips. Align the mark near the top of the tool with the top of the strip and the horizontal line on the tool that corresponds to the width if the strip (2 1/4″). Cut the side triangles then rotate the tool and cut again. Each diamond will need two side triangles. Follow the Star 60 tool instructions for Piecing the side triangles to the diamond.
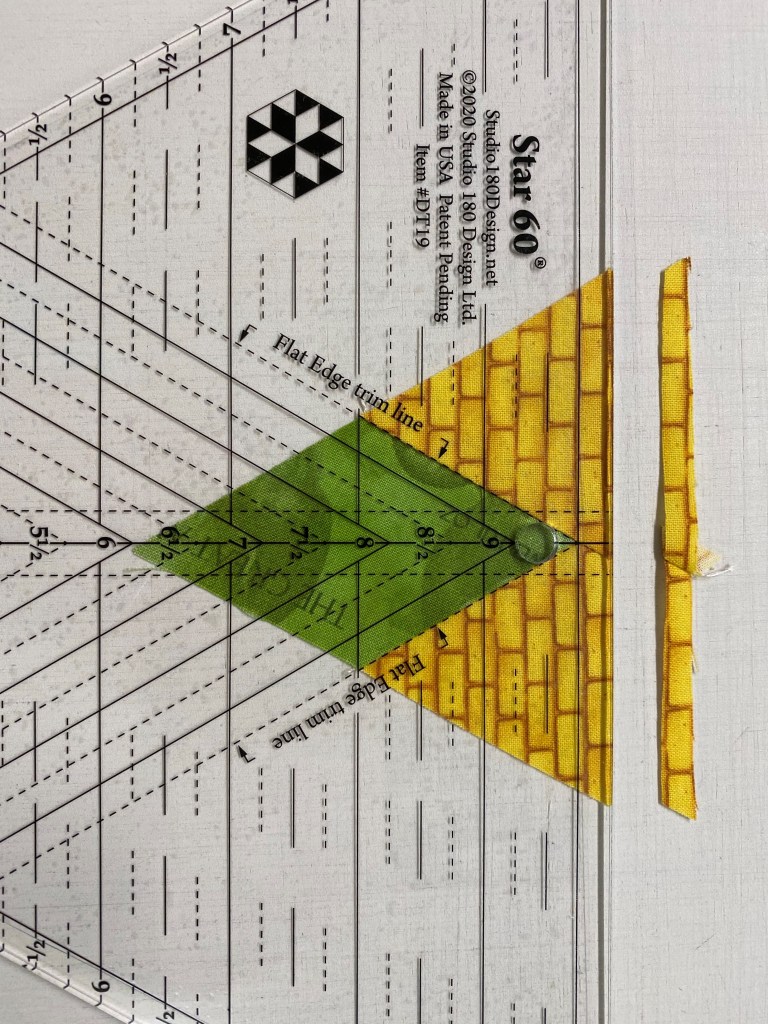
Trimming Star 60 Units: We will be trimming the flat end of the unit only! Align the Flat Edge trim lines with the seams of the diamond. For lefty’s, rotate the unit so the flat side is on left side. Six of these trimmed Star 60 units are the same size as a stack of 6 equilateral triangles cut from a 3 3/4″ strip. These Star 60 units can be made in 17 sizes.
I loved the way the Star 60 units created a vibrant path to connect to the Yellow Brick Road. You notice a very light block near center of the top. That is Glinda the Good Witch. She wasn’t on the panel but I had to add her!
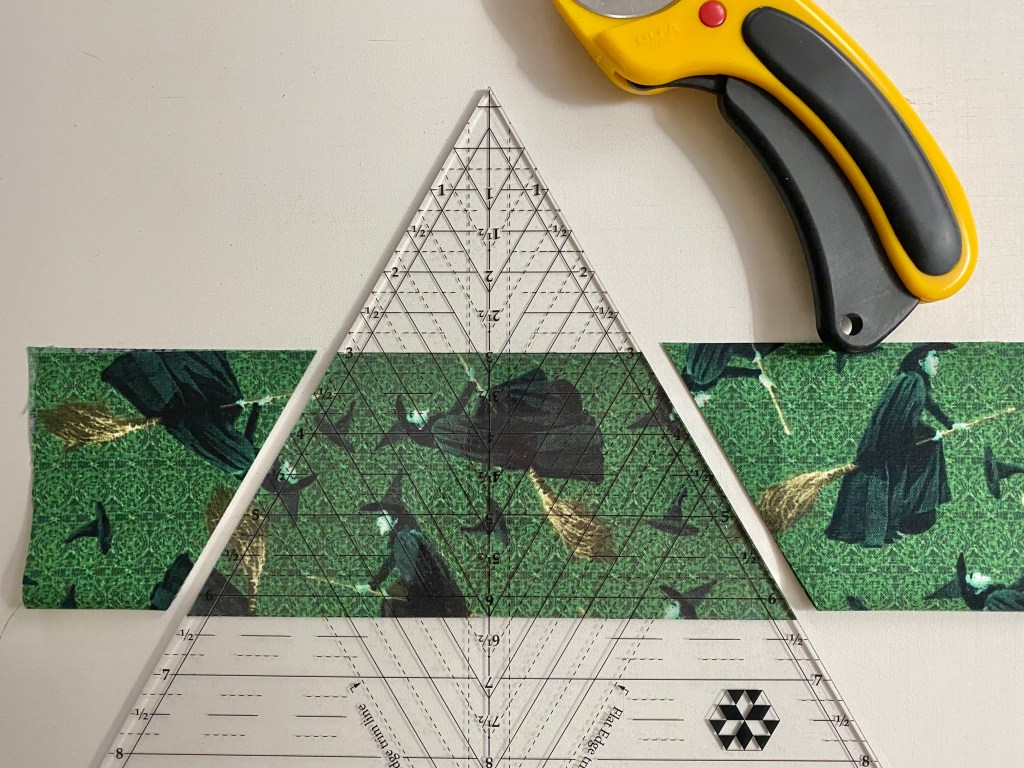
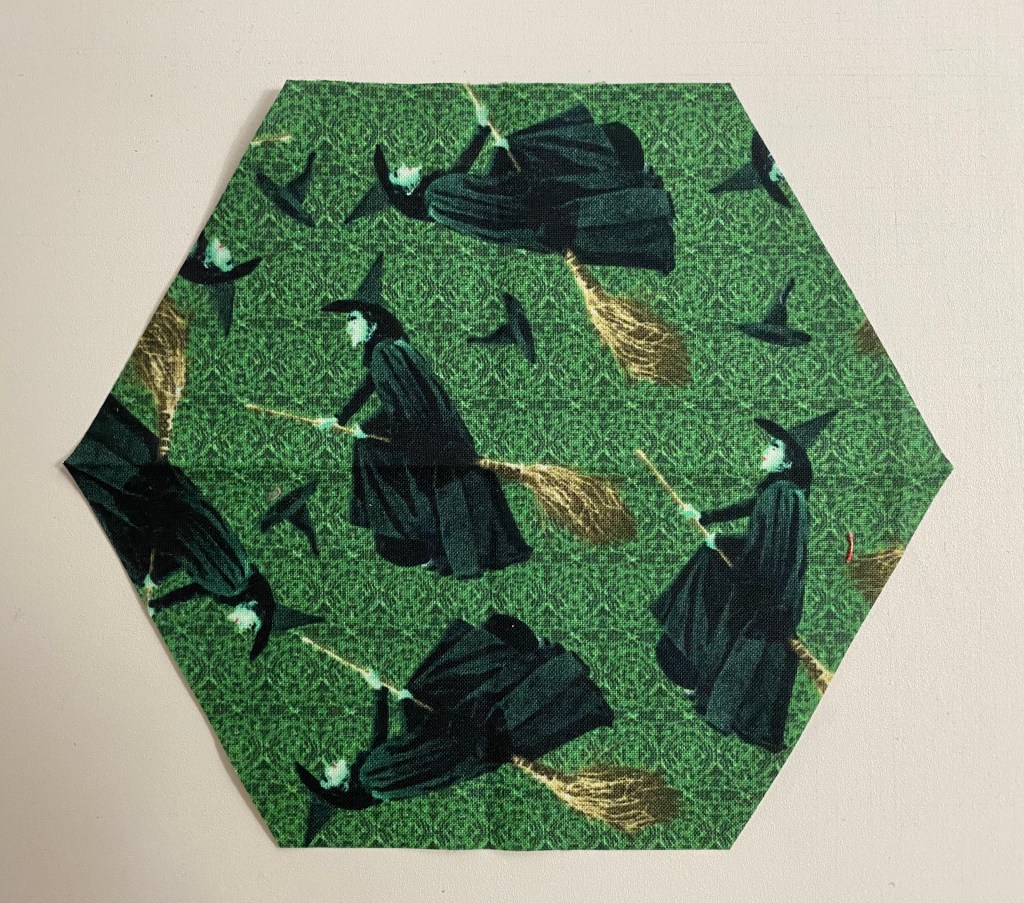
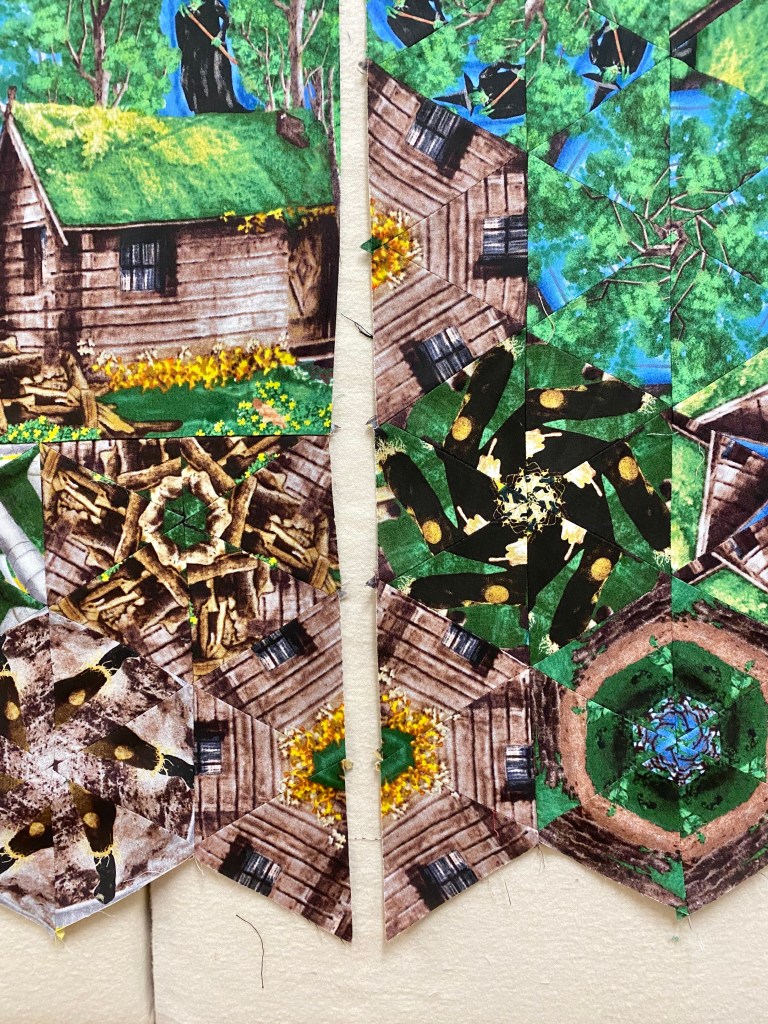
Cutting Whole Hexagons: I wanted a block that contained the Emerald City. I forgot to take a picture while I cut it, so the instructions below use a different fabric.
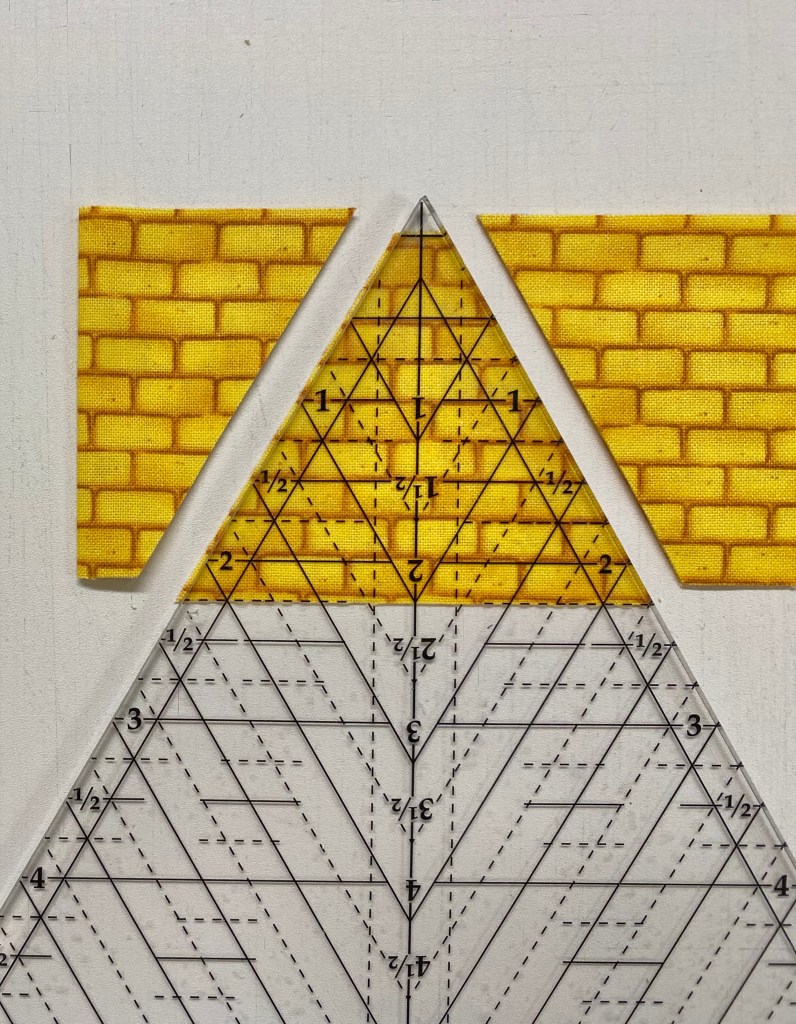
The Hexagon Cutting Chart allows you to cut whole hexagons in 15 sizes. For a 6″ finished (6 1/2″ Unfinished) hexie, cut a strip 6 1/2″ wide. Fold the strip in half. Our Horizontal Guideline Placement is 6 1/4″. Place the 6 1/4″ line on the fold and cut both sides. You now have a 6 1/2″ unfinished whole hexagon.
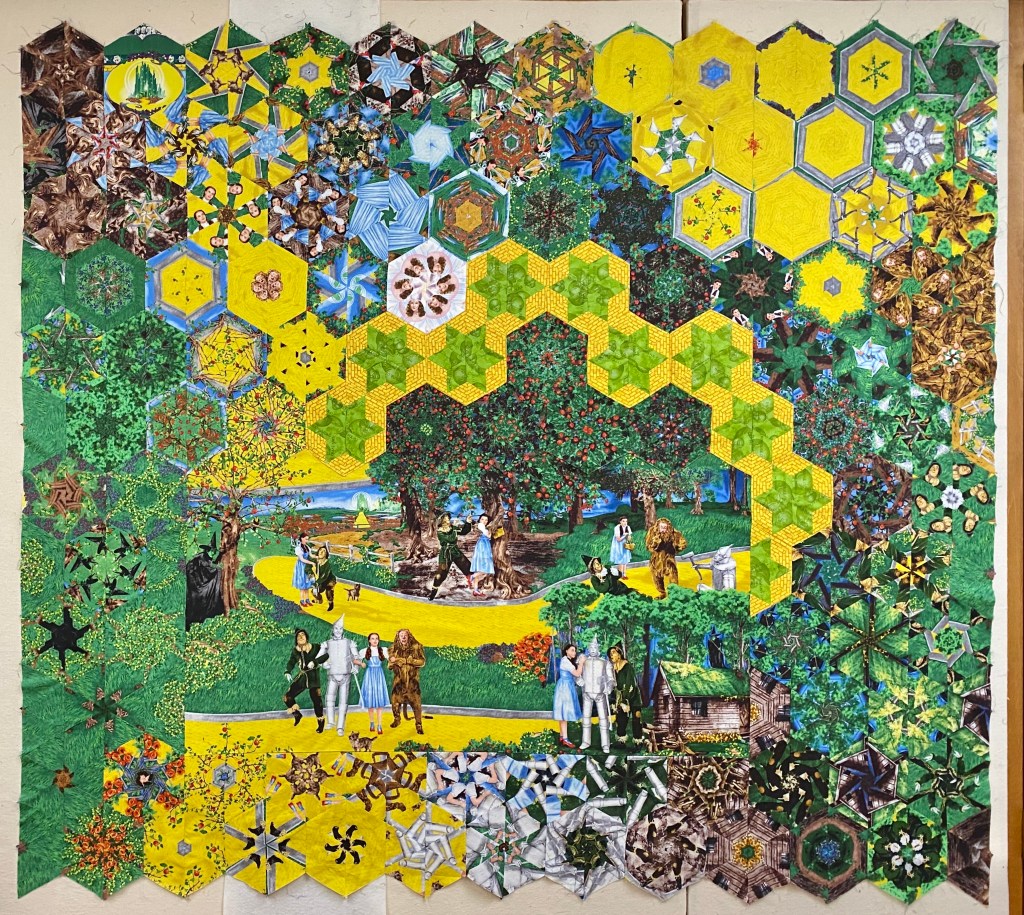
Once I was happy with the block placement, I number my rows across the top and under the bottom section. I stitched the rows into four sections, left, right, top & bottom..
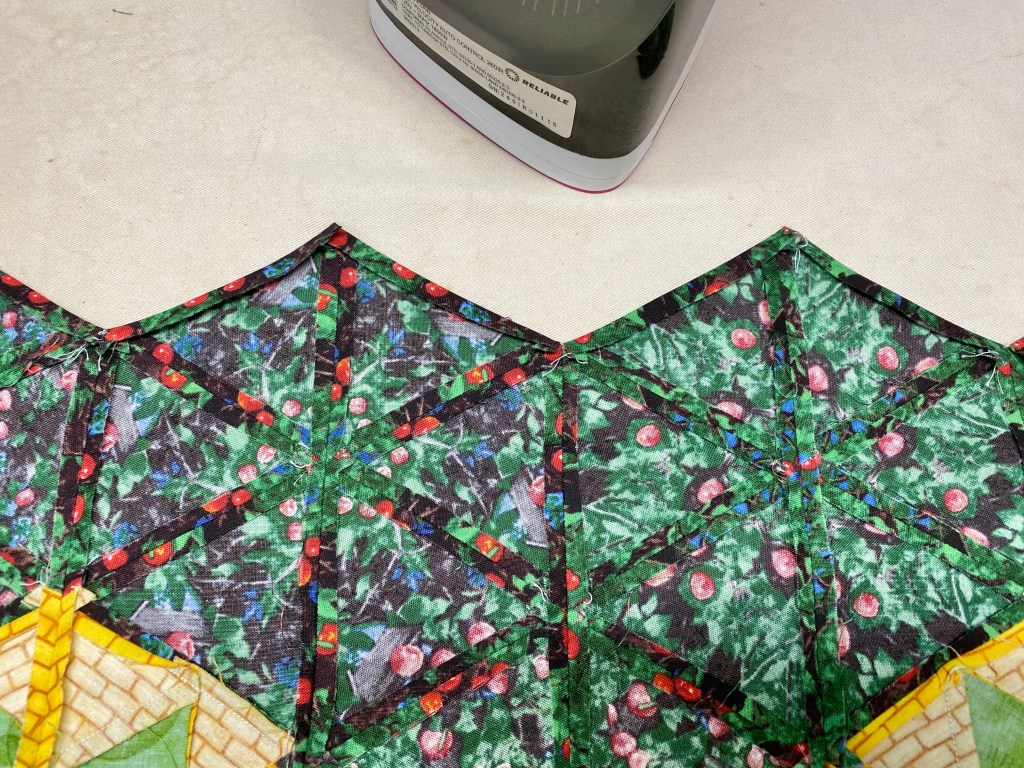
I decided to add the bottom section to panel first. I didn’t want to leave the points because they would cover up Toto, and I couldn’t have that, so I trimmed the top points only. I don’t trim the outside edges until the top is all stitched together.
Adding the bottom section allows me to line up and match the dogears of the rows on the right side.
Lining up the dogears
Pin and stitch the right side rows to the center section using a partial seam. I left a good 8 inches open to leave room for adjusting placement of the top section.
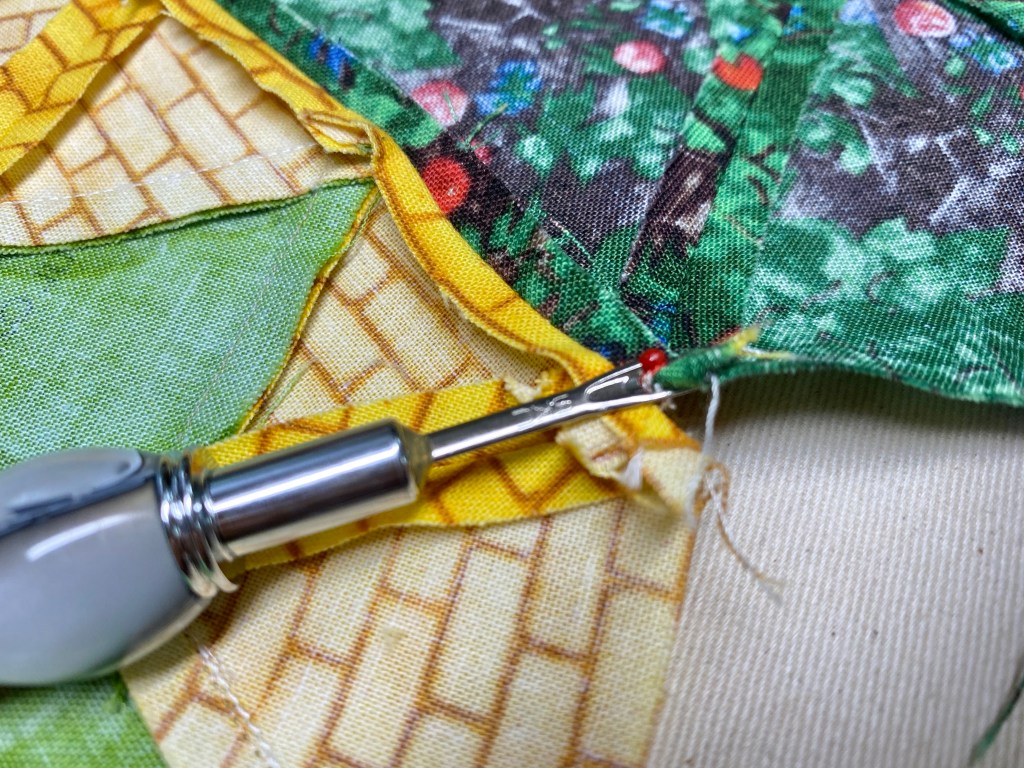
I decided to applique the top section to the panel by leaving the points on the bottom of the top section. I took stitches out about 1/4″ down between the valley of the blocks and pressed the edges under 1/4″.
Lay out the center and the partially stitched right side rows. Lay the top section next to right side rows, matching up the dogears. This will show you how far down the top section will overlap onto the panel.
Pin it well, assuring it is straight and top stitch the center to the panel. Now I’m able to finish the partial seam for the right side.
Adding the left is very easy now. Just match up the dogears and stitch together.
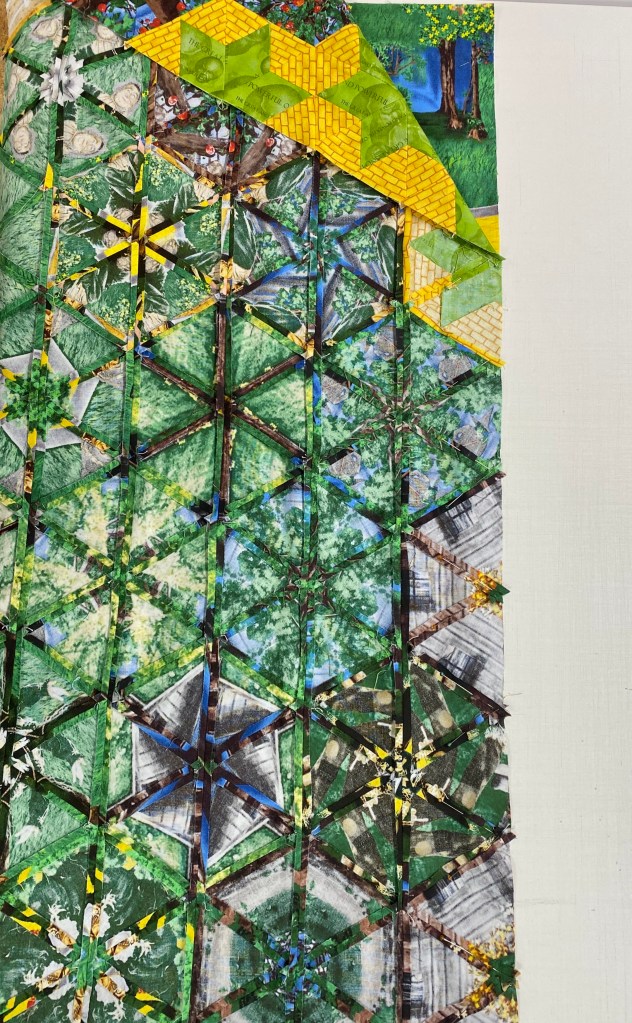
Once the rows are all joined, I trim the points off the top and the bottom of the quilt top. I added a border to the top. I’m thinking about adding a small black border.
Above is a closeup of the showing Glinda & the Emerald City whole Hexie. One more technique I wanted to share is making Half Hexagons. The Star 60 tool instructions have a chart for cutting Half Hexagons in 8 sizes. I thought about making a Half Hexie Braid for a border but my top was too busy.
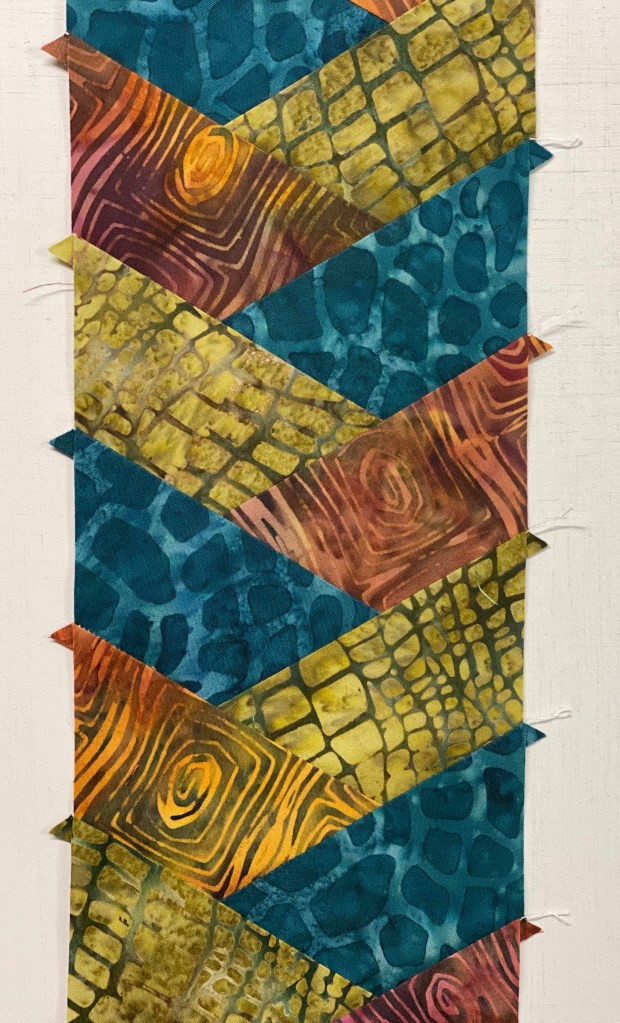
Half Hexies Braid: I followed the cutting instructions for 1 1/2″ finished half hexies. I cut 3 different 2 1/4″ strips. In the chart locate the “Bottom Horizontal Line” for 1 1/2″ finished half hexie, which is the 4″ line. Place it on the bottom of the strip and cut both sides. Rotate the tool placing the 4″ line on the top and aligning the edge just cut.
Above, I laid out my half hexies alternating the 3 colors.
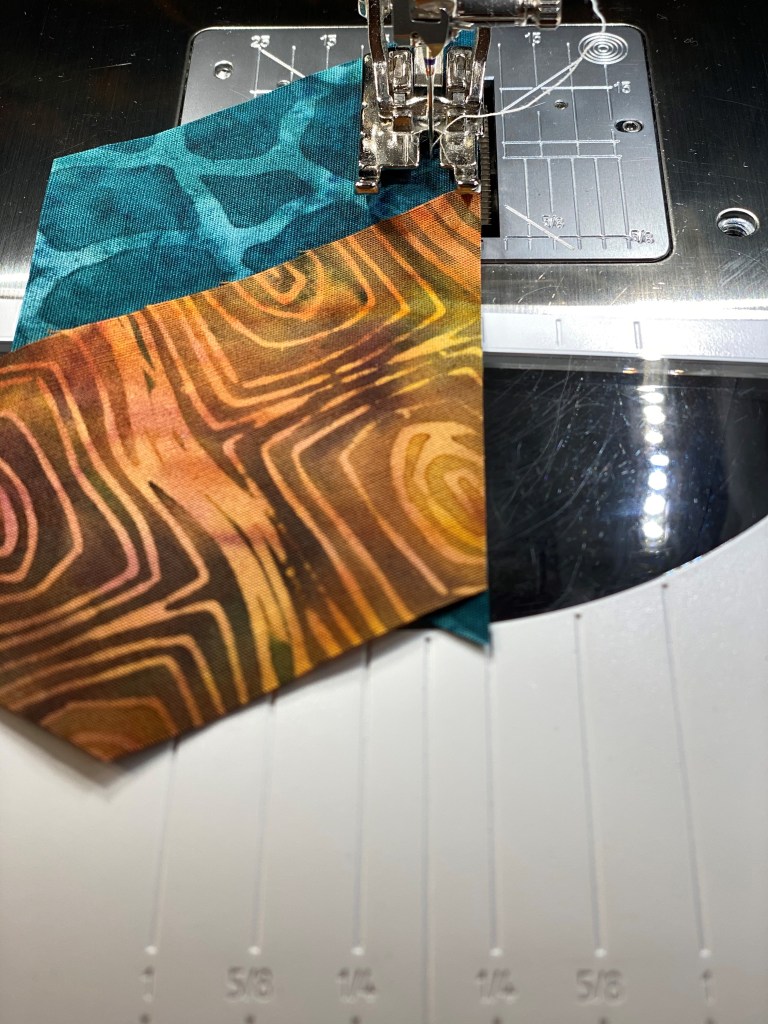
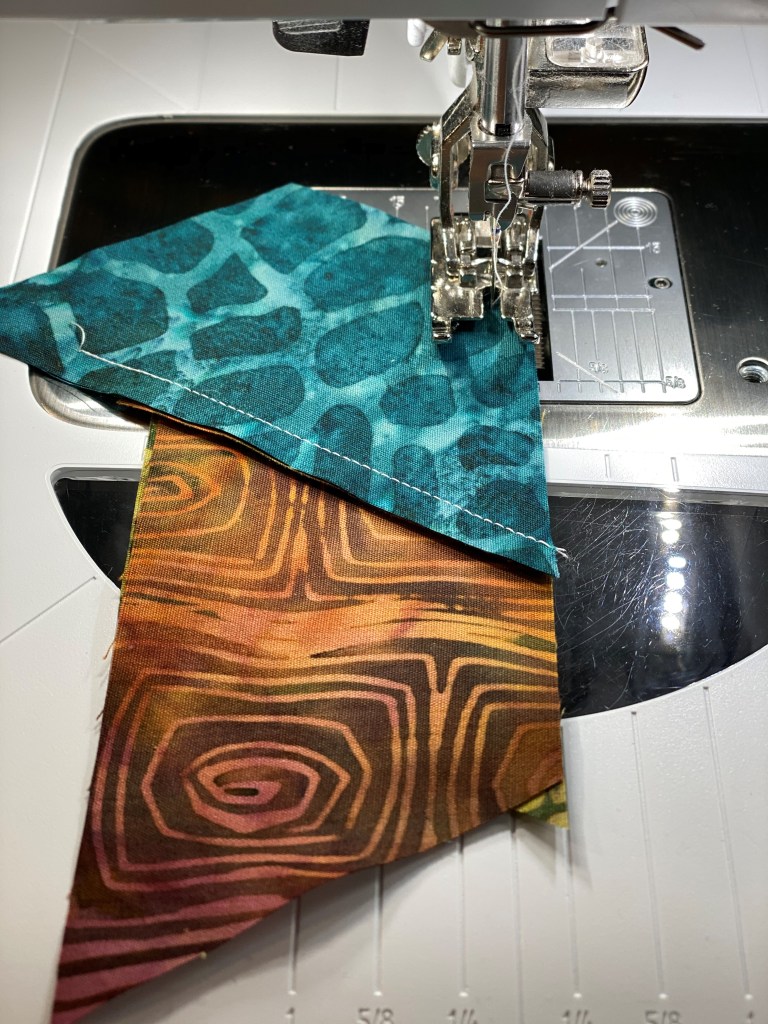
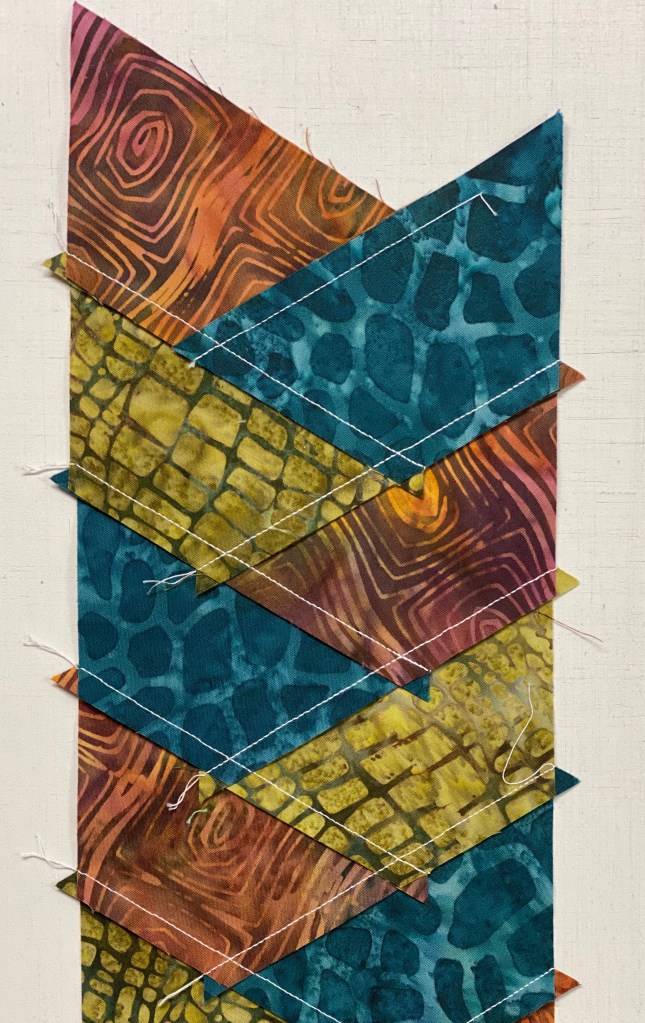
Pick up the first two right sides together, nudging the top half hexie 1/4″ from the point and stitch together. Press toward the first half hexie.
Add a third half hexie by centering it over the two stitched hexies.
Keep adding half hexies until you have the length you want. After the first two half hexies are stitched and pressed, the remaining half hexies are pressed toward the unit just added. I think this a cool inner or outer border that I will be using on another quilt.
Above are “Inside the Twister” and “Yellow Brick Road with a Twist”.
Last January I had the great joy of meeting my half sister Marti for the first time. I also acquired many new family members.
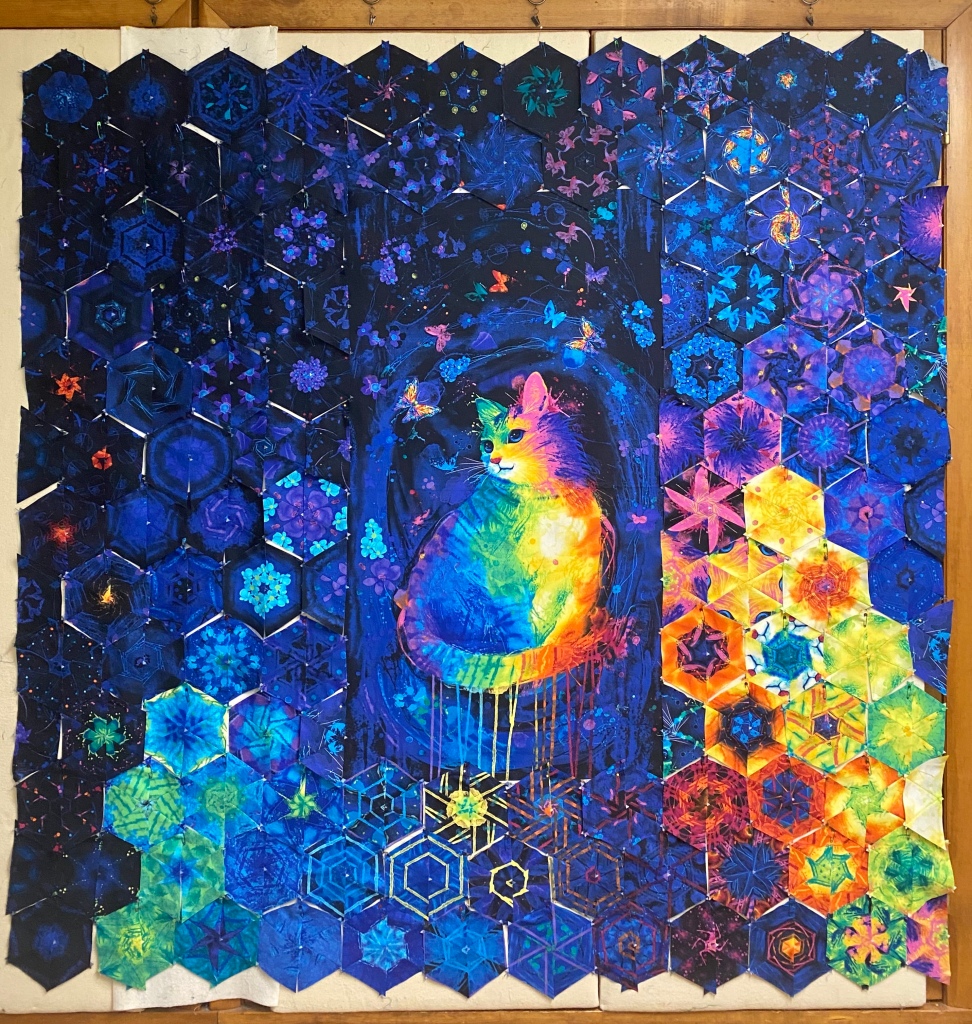
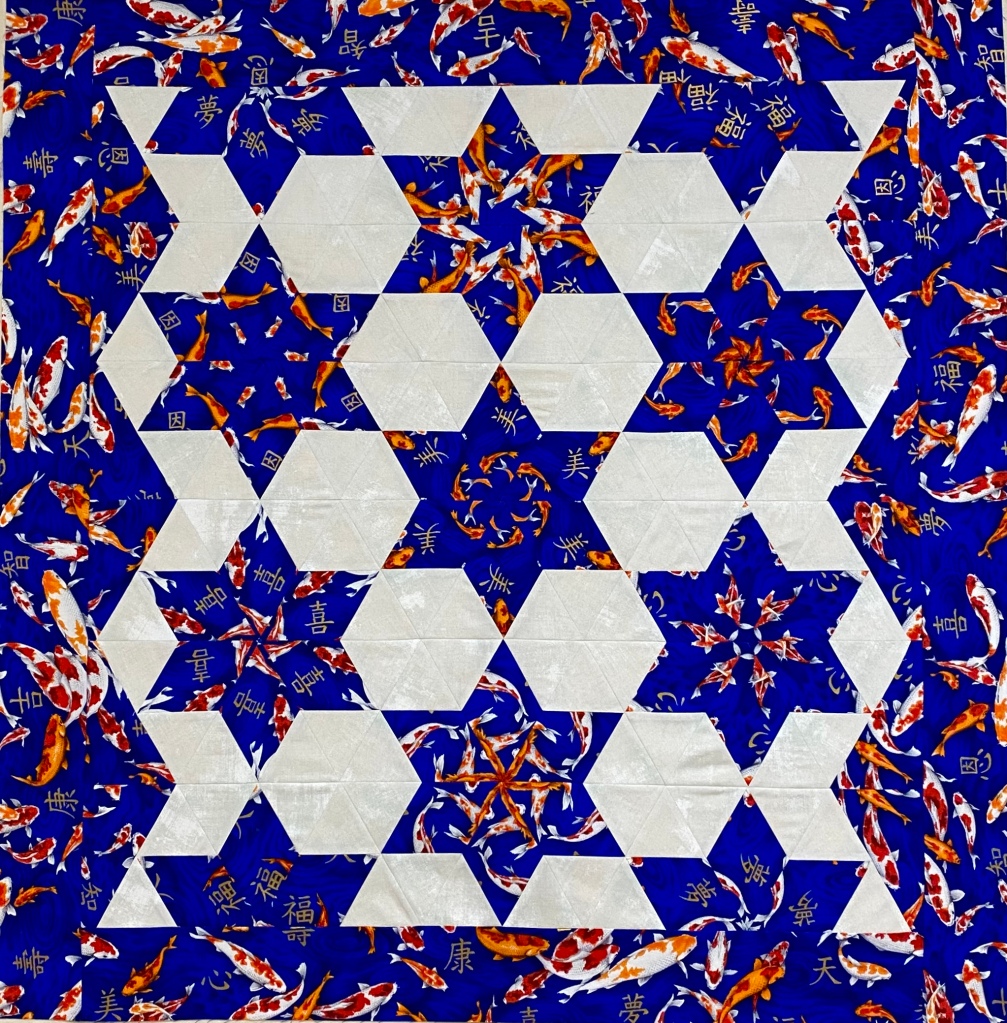
When I saw this panel by Chong-A Hwang for Timeless Treasures, I knew I had to make a One Block Wonder for my Great Niece Alexa. Alexa has a wonderful cat named “Ruca”, whom she has had since she was in college. I met Ruca, a very special cat.
Even though this panel states it measures 24″ by 44″, by the time I cut apart the panels and squared it up, it was more like 23 1/2″ wide. For my finished hexies to fit evenly across the bottom of the panel I would have to make some adjustments. If I cut my strips 3 3/4″ wide, my finished hexies would be 6″ wide, which is not evenly divisible by 23 1/2″. I could just add fabric to the panel to bring it up to 24″ wide and then hide the extra fabric with appliqued hexagons as I have done before.
But I decided to trim the panel to fit the bottom rows of hexagons instead. If I cut my strips 3 1/2″, my finished hexies would be 5 1/2″ wide which would be evenly divisible into 22″. I don’t trim the panel until I’m ready to add the hexies. You can see that four finished hexagons (or 8 half hexies) will fit across the bottom of the panel. Here are my tips for Using Panels for a OBW:
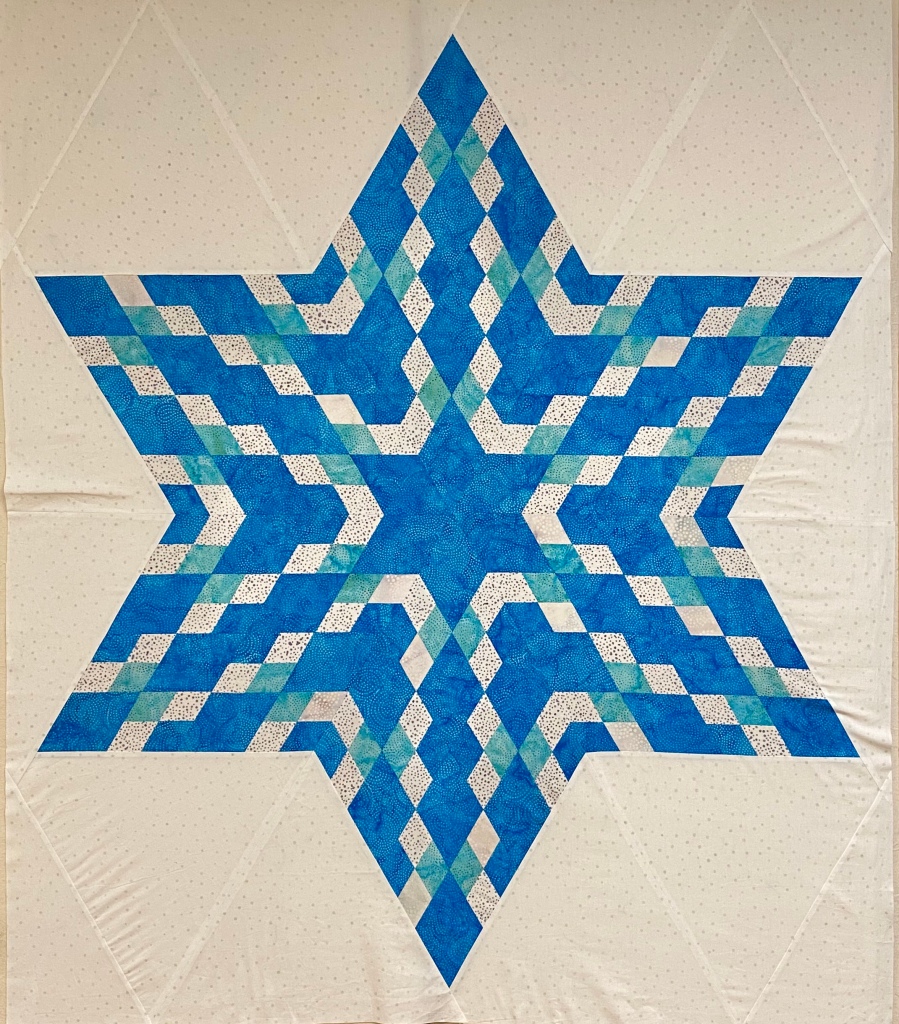
Yes, I’m at it again! Actually I’ve had this panel cut out since last Fall. I love One Block Wonders (OBWs). Sometimes I add cubes to create design interest or just for fun. It occurred to me that Studio 180 Design has a new Star 60 tool.
You can use this tool to cut equilateral triangles easily, along with 60 degree diamonds and side triangles in 17 sizes to create a multitude of 60 degree designs.
I played with Star 60 and created kaleidoscope stars and this 48″ star. Light Bulb moment!!!! Instead of inserting cubes in my OBW, why not a star?
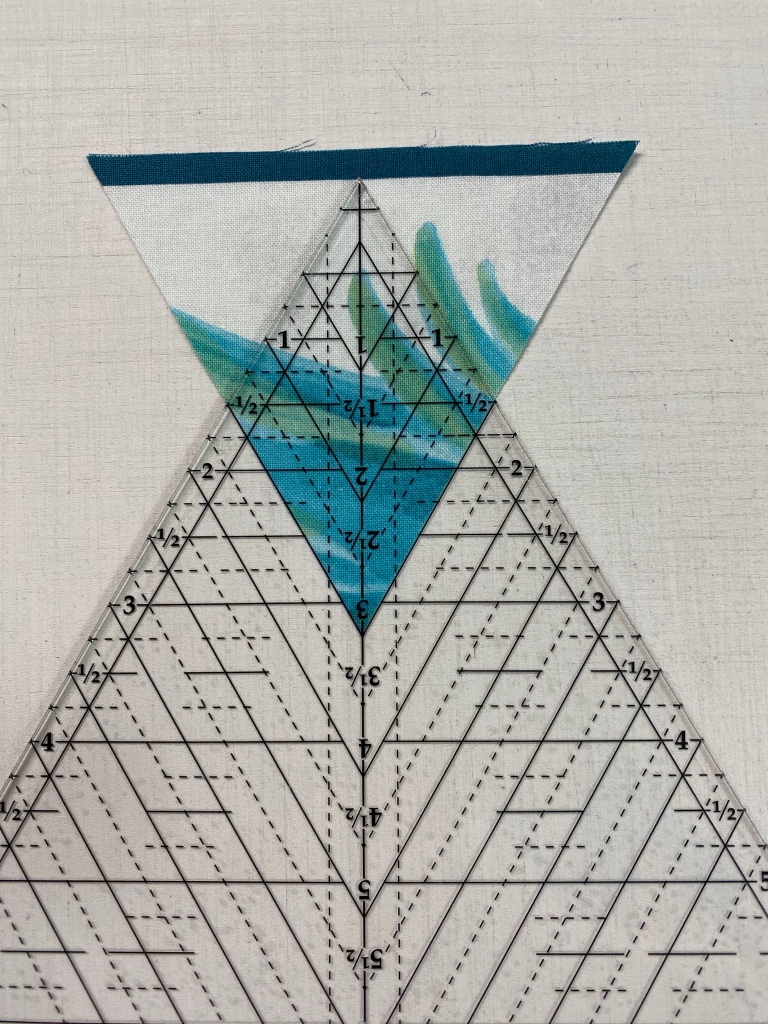
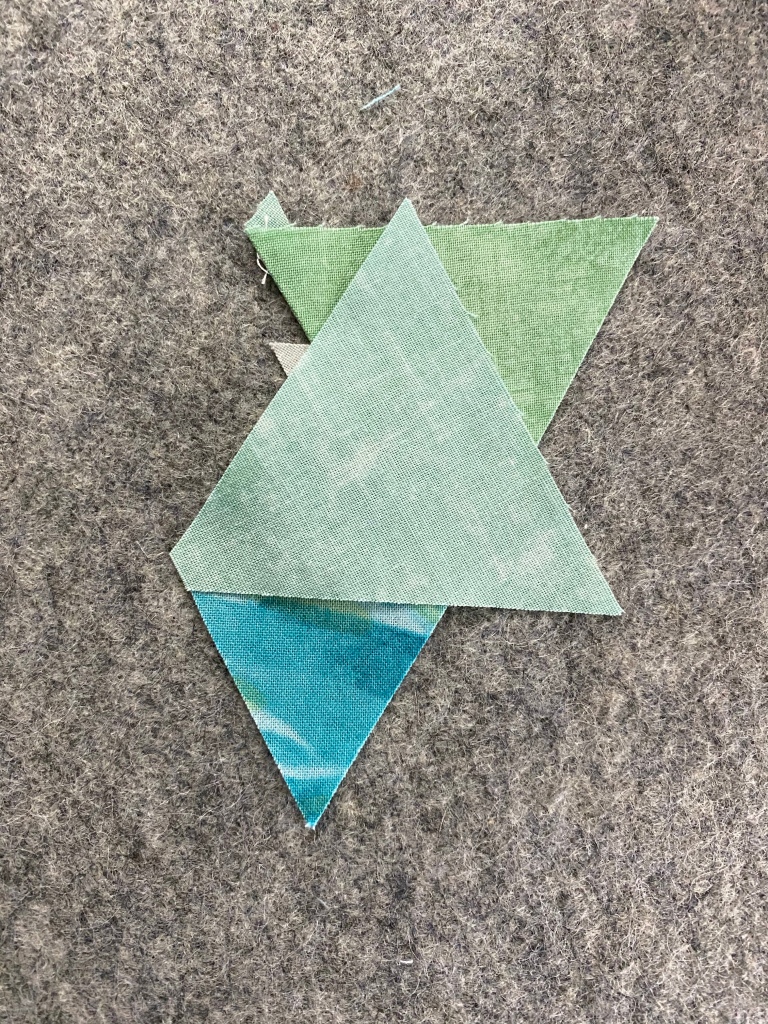
I usually have left over triangles when designing my OBW’s. I had equilateral triangles cut that had a dark edge that was larger than a 1/4″. I was thought it might not make a pretty hexie. These triangles had been cut from 3 3/4″ strips. I laid my Star 60 tool on the triangles and discovered I could cut 3″ diamonds from it. This allowed me to use these left over triangles in a different way.
Way cool! Now I needed side triangles for the star points. I checked the size chart for 3″ diamonds and cut the appropriate size strip,
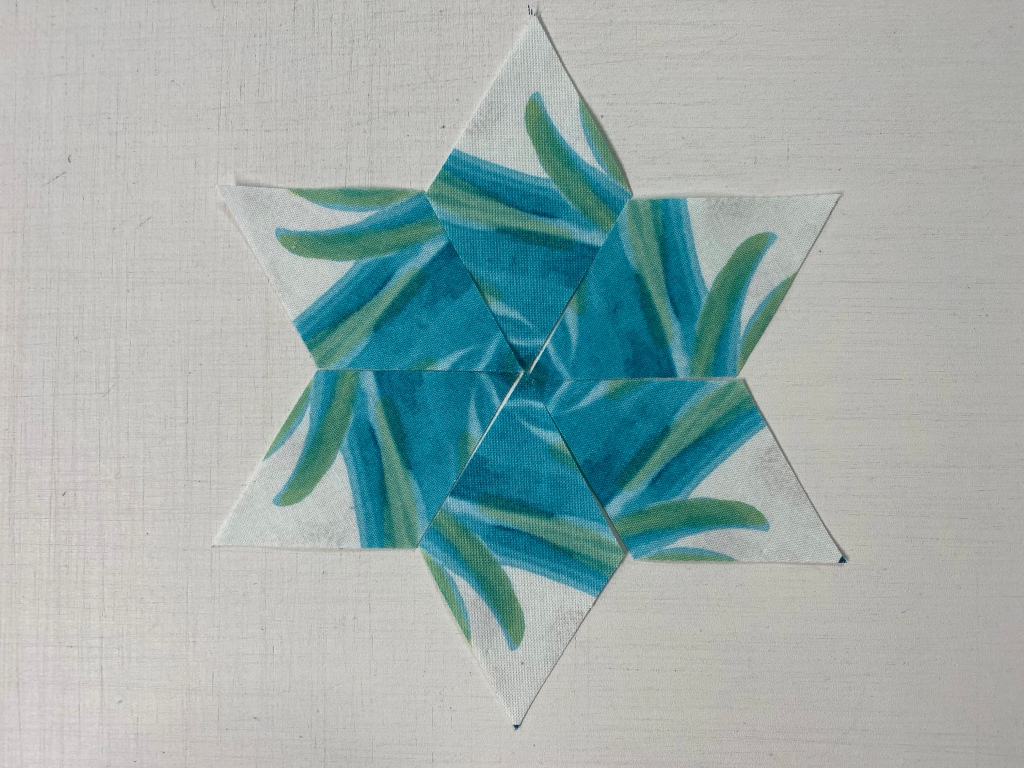
I cut the side triangles for my diamond star points.
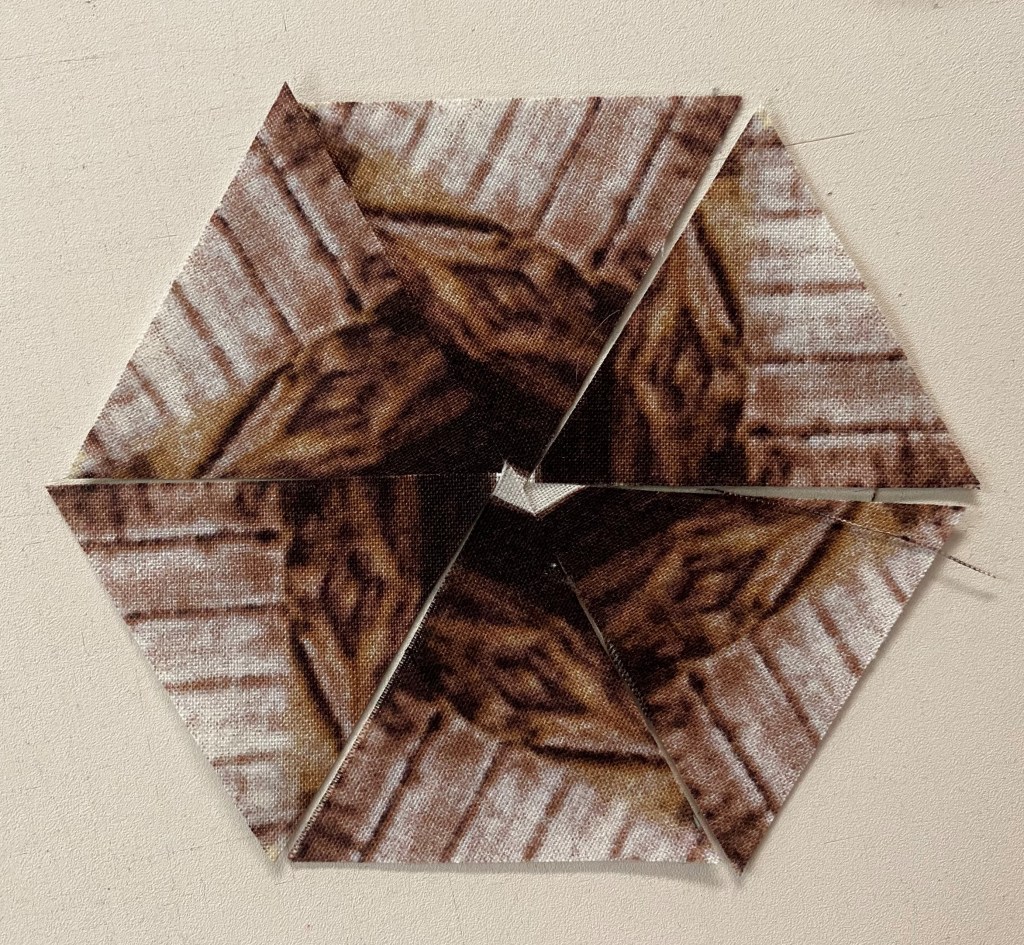
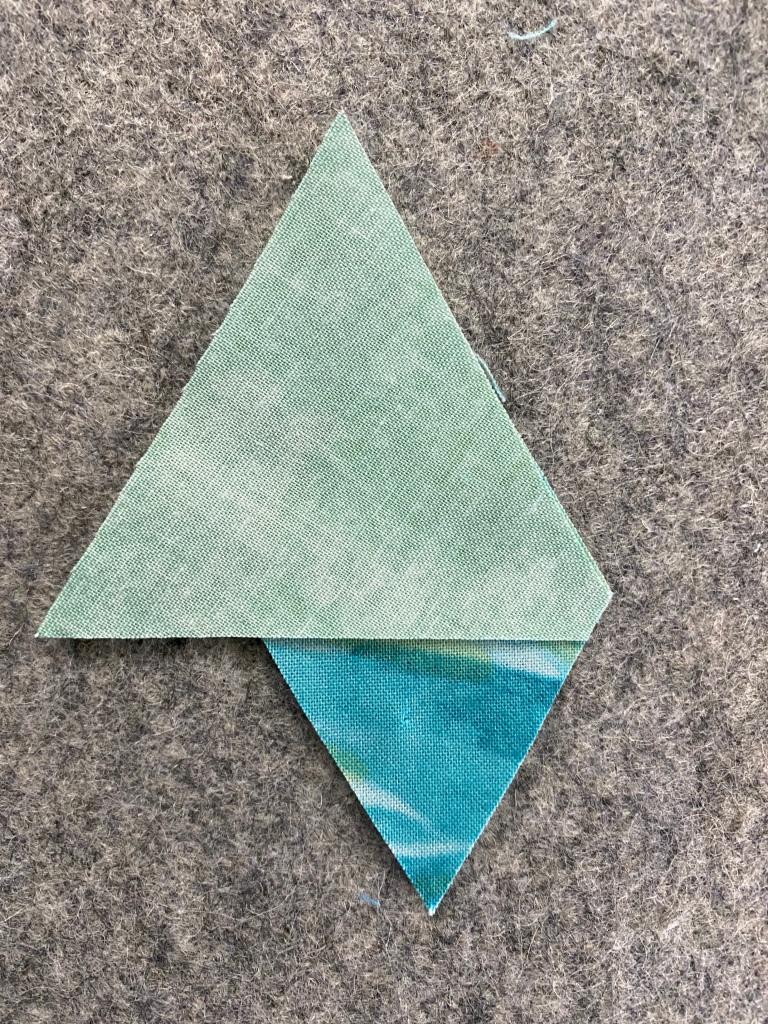
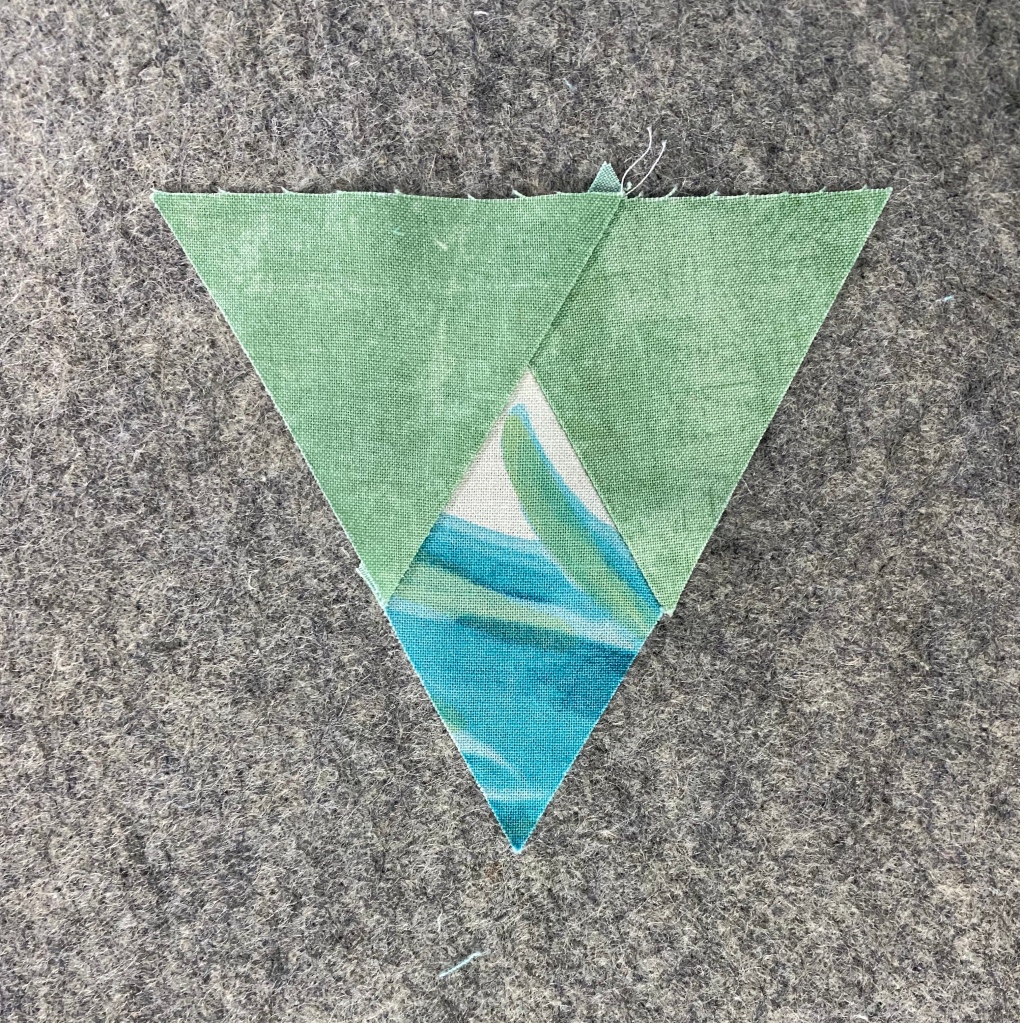
Lay out your units. Stitch the first side triangle to the diamond and press toward the diamond.
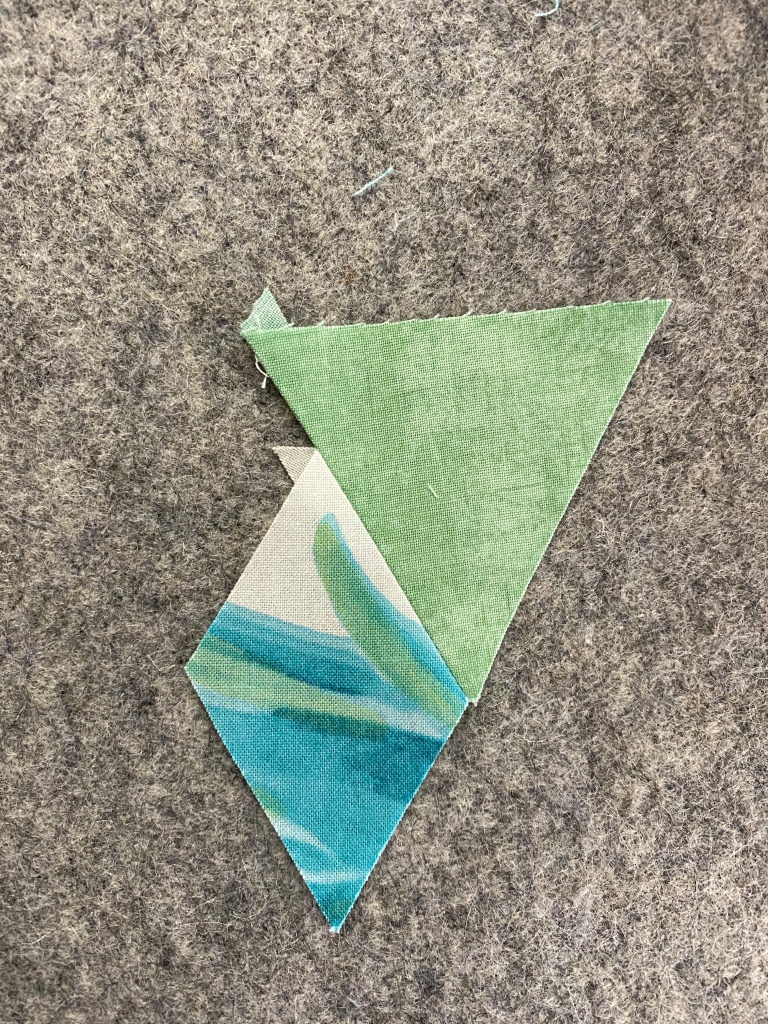
Stitch the opposite side triangle, press toward the side triangle. LOOK what you have! An equilateral triangle.
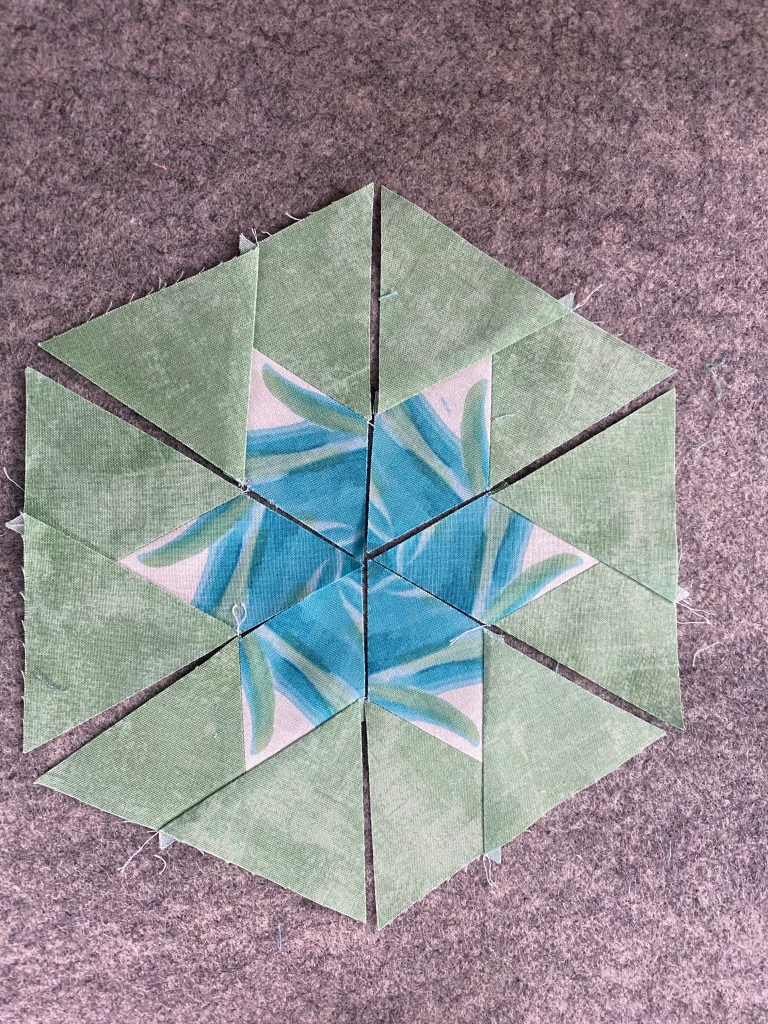
Stitch 3 triangles together, and then the other 3 together, press seams open as you would a regular hexagon.
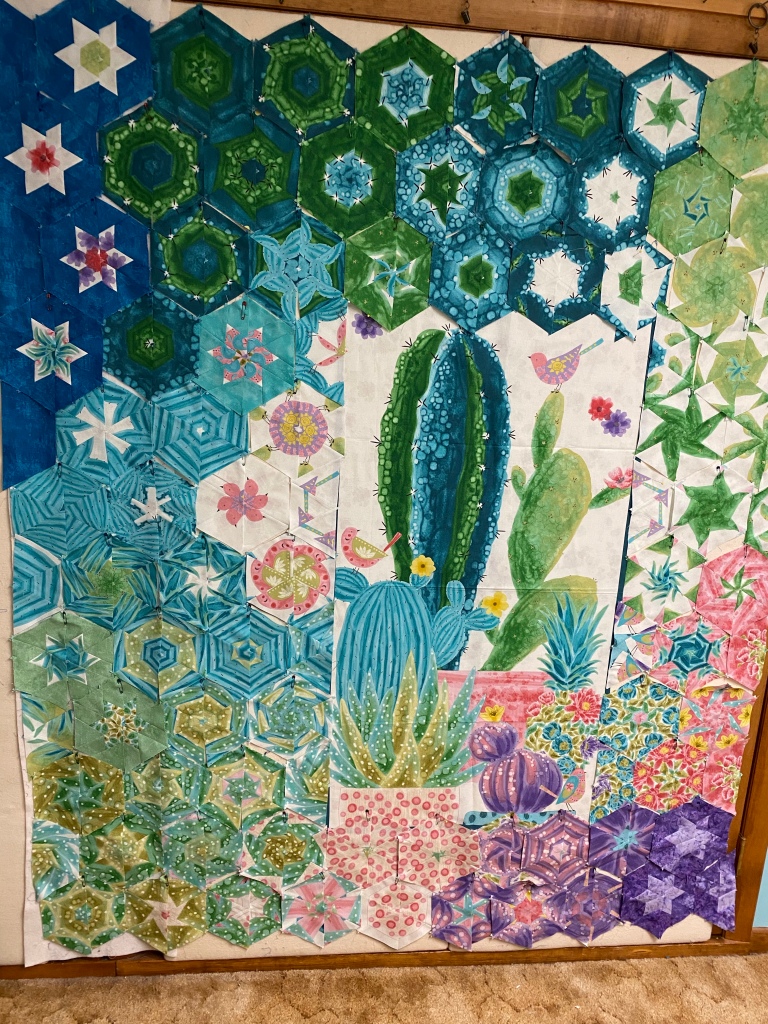
I began designing around my panel. I had great fabric “Canvas” from Northcott. This rich colors worked so well with panel.
I have stitched my hexie’s into four sections to add to my panel. My hexies were cut from 3 3/4″ strips, which means they will finish as a 6″ hexagon. For 6″ hexies to fit evenly across the width this panel should measure 18″ or 24″ wide. This panel is less than 24″ wide.
I did not want to trim my panel to 18″ so I added enough fabric to the panel to bring it up to 24″ wide and would be evenly divisible by 6″. Now to hide the strip.
There are 9 & a 1/2 Star 60 hexie’s in this quilt. The Star 60 tool also made it easy to cut half & whole hexagons. I’ve just barley scratched the surface of cool 60 degree design’s that can be added to a One Block Wonder. You can download my hints for using panels in a OBW below:
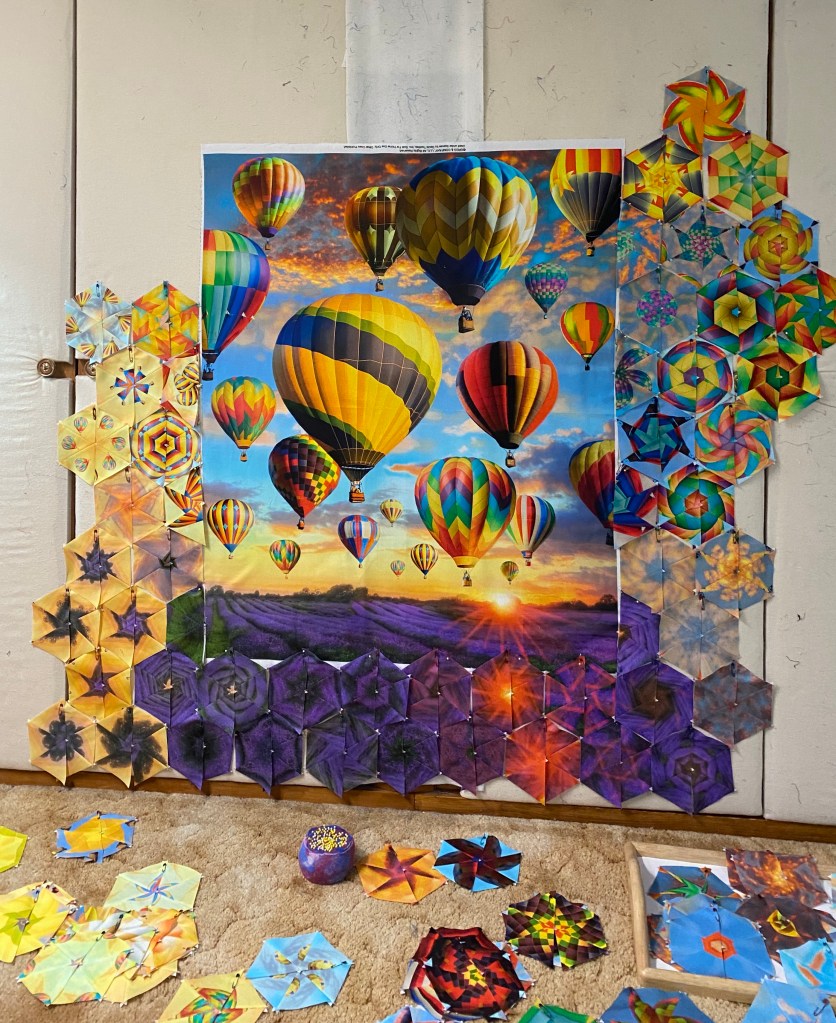
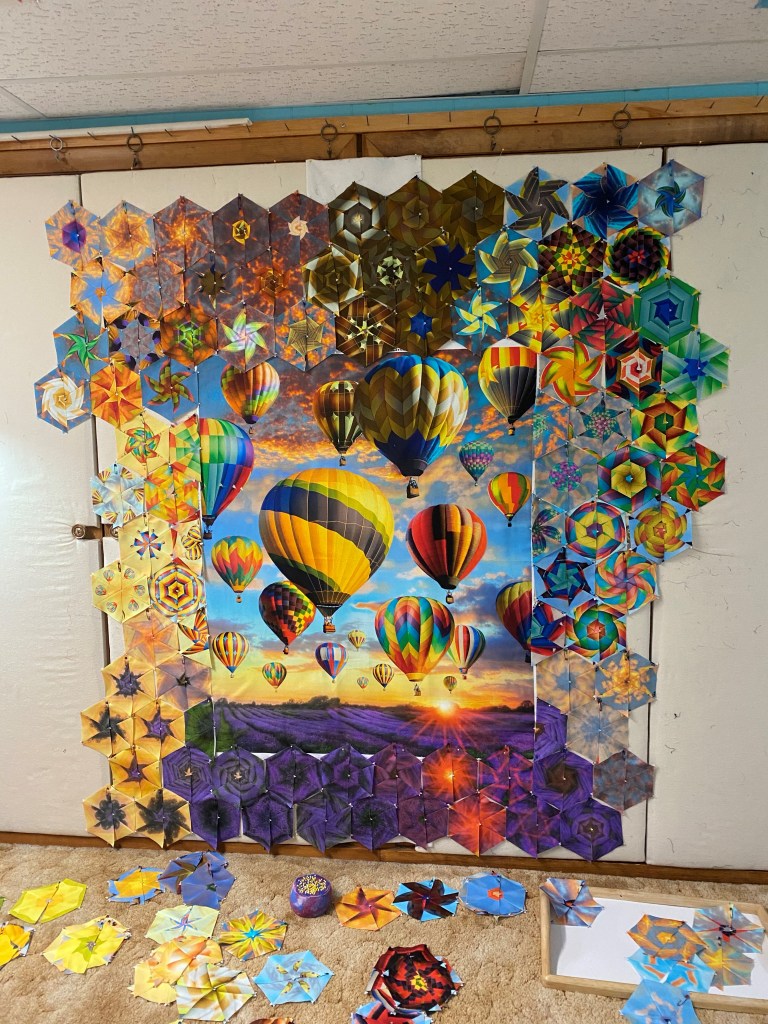
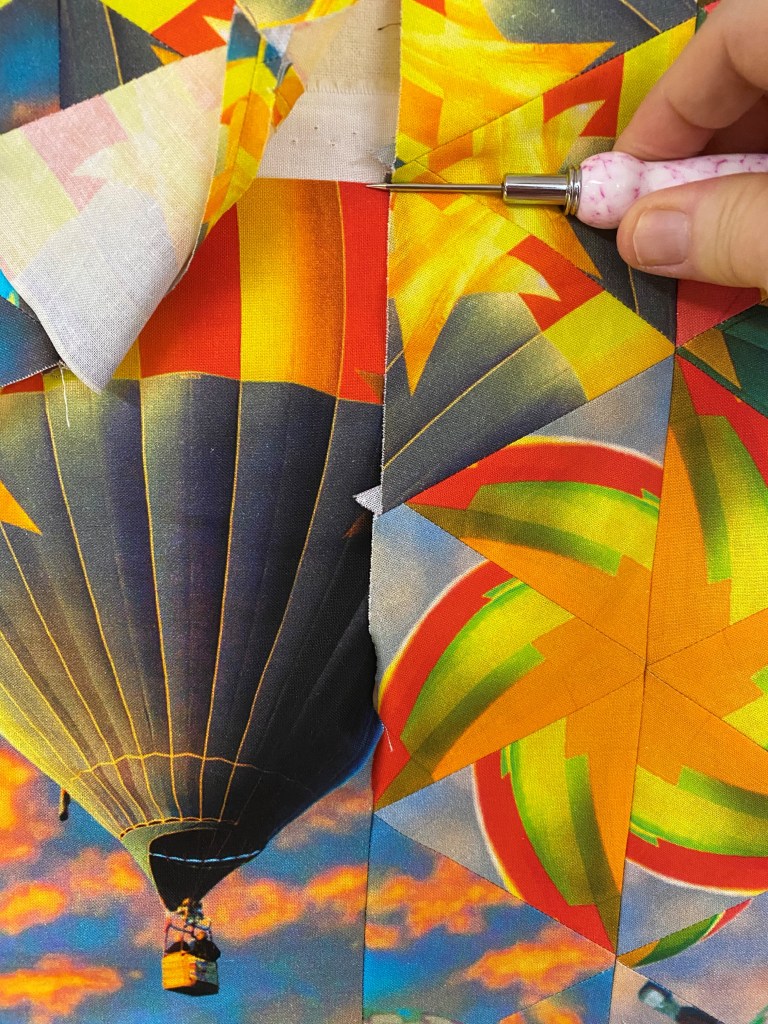
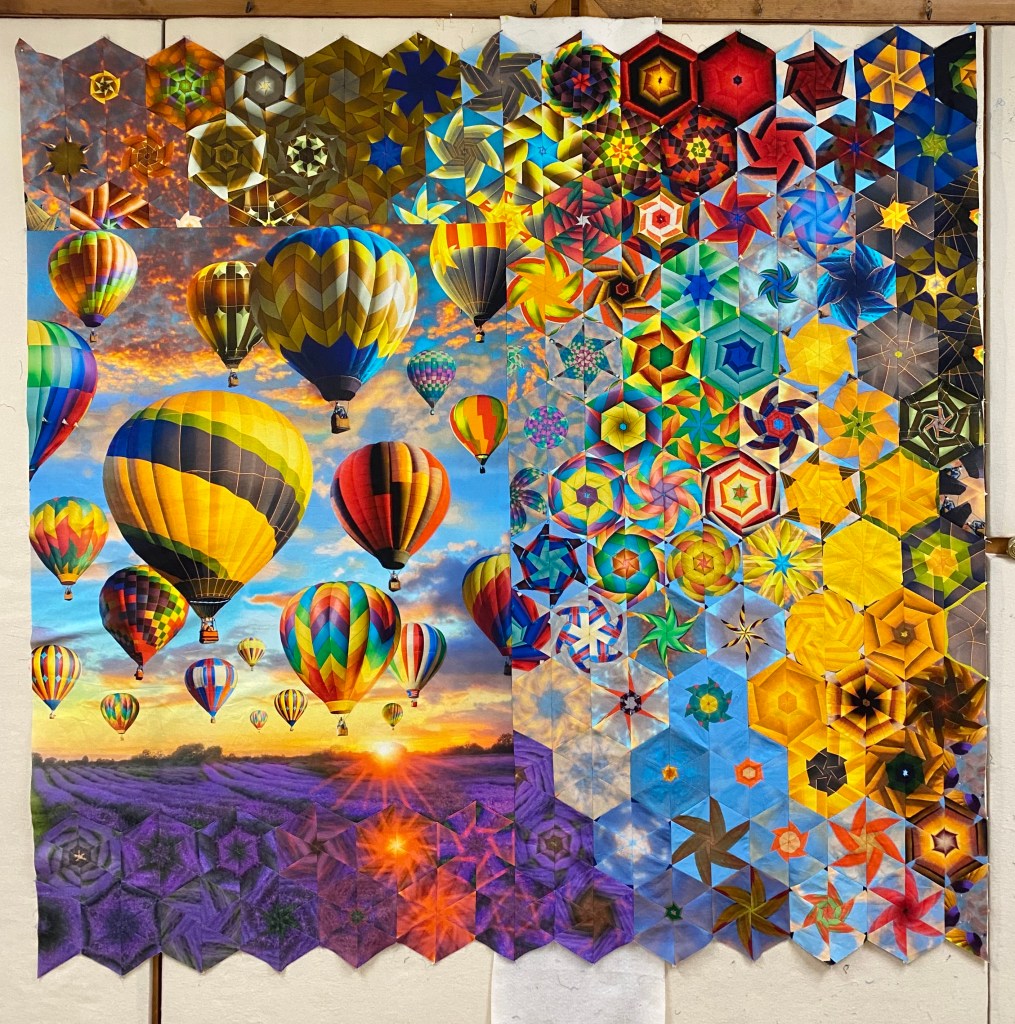
Quarantine quilt number 4 – “Up Up & Away, in My Beautiful Balloon”. While I was visiting my family in Lake Havasu City last January I got to attend their Hot Air Balloon Festival. It was fabulous.
I saw this panel by Greg & Company on eQuilter and just had to get it for a One Block Wonder.
First thing, decide what size strips to cut. I start by trying to get an idea of how many hexies will fit across the top and/or bottom of the panel. It is just like making a pieced inner border to fit around the center of a quilt. The width of the panel should be evenly divisible by the finished size of my hexagon block. This panel measured 34″ x 44″. Even though it is a large print that would support a 6″ finished hexie, the 34″ width is not evenly divisible by 6″. I did not want to trim too much off the panel so I decided to cut my strips 3 1/2″ wide. That would yield 5 1/2″ finished hexagons. If I trim one inch off the panel side making it 33″ x 44″, meaning 33″ divided by 5.5″ = 6. Now I know I will get 6 hexagons (or 12 half hexies) across the width of the panel both top and bottom. Download my Tips for Using Panels for a OBW:
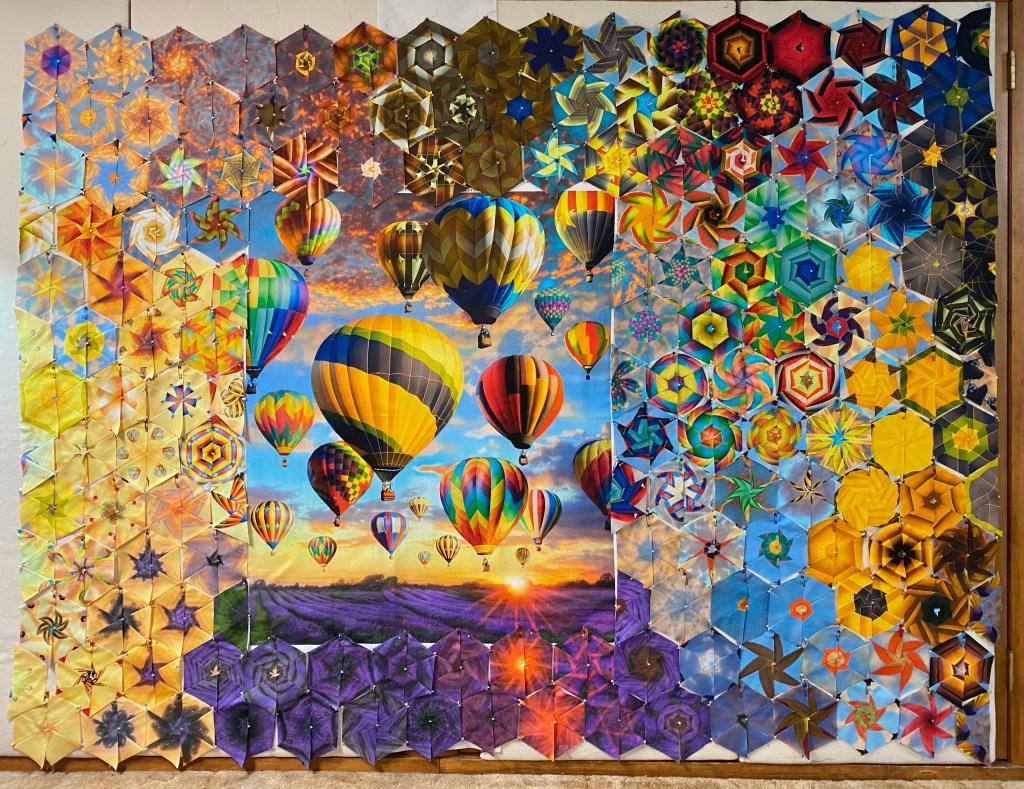
I started at the bottom and worked my way up the sides and across the top.
I used most of my hexagons and got achieved a design I was pleased with.
I number my rows and stitch the half hexies into rows. Then I join the rows pressing all seams open. I cannot stress enough how much easier it is to press your seams open with the help of my Strip Stick. I have 4 different sizes. The 48″ Strip Stick makes pressing the long seams open go quickly without disturbing the previously pressed seams.
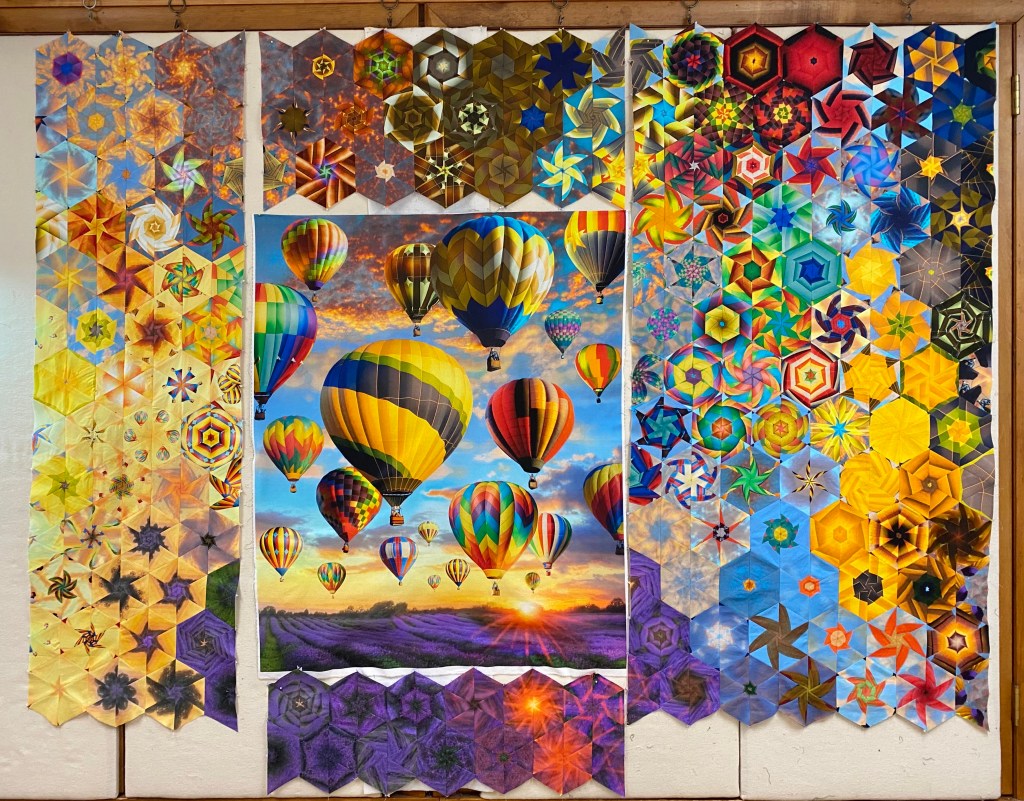
I stitch my hexies into 4 groups. Top, bottom, left and right.
I decided I wanted to applique the bottom section to the panel first. Instead of trimming the points I pressed under a 1/4″ seam and stitched it onto the bottom of the panel. I chose to attach the right side next by matching up the dog ears as you would when joining the rows and stitch three quarters of the way up towards the top of the panel (partial seam).
By using a partial seam, it allows you to match up the dog ears of the top hexies with the side rows of hexies.
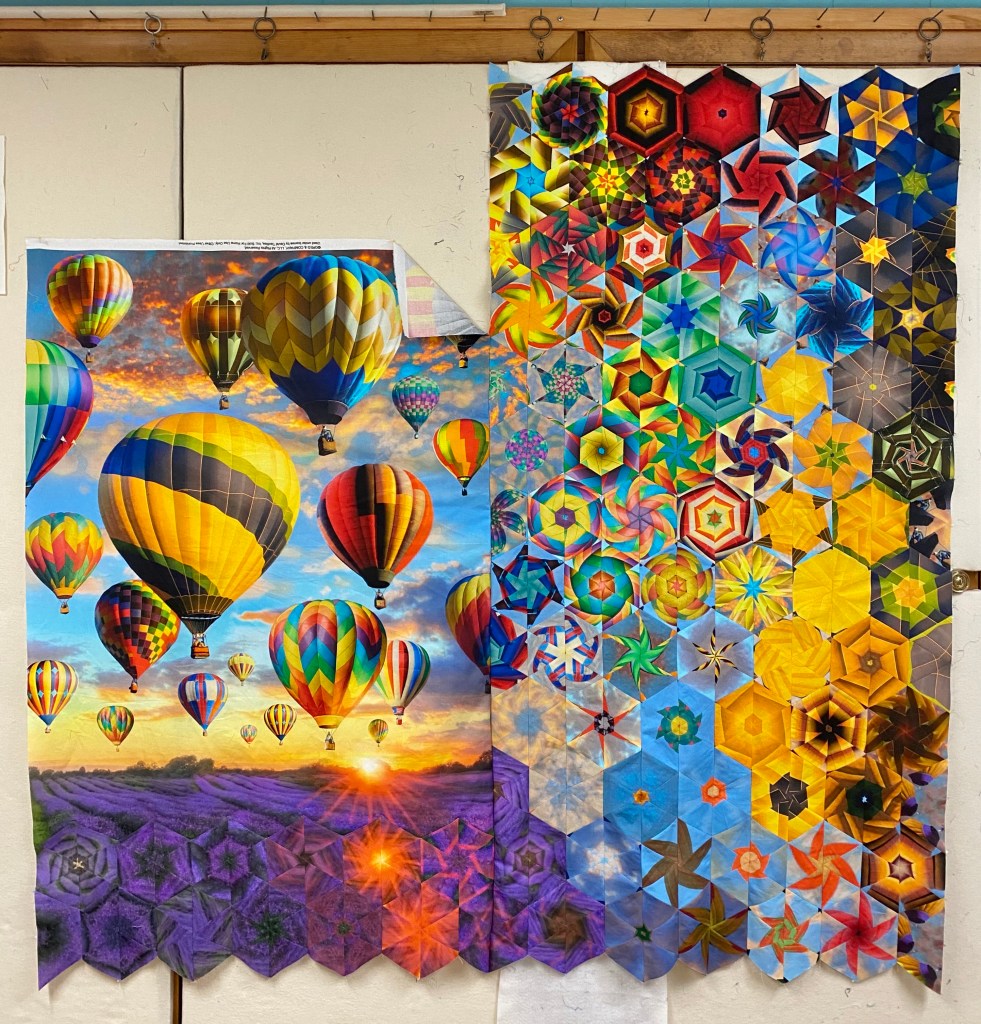
I will mark where the top hexies hits the top of the panel, add a 1/4″ seam allowance, trim the hexies and stitch to the top of the panel. I decided to trim the hexies because I did not want to cover the balloons.
Now I can finish the partial seam.
With the top, bottom and side hexies stitched in place, I can easily attach the left side hexies to the panel matching up the dog ears.
This is one colorful One Block Wonder. I have ordered some great fabric from Fabric.Com for the back.
As soon as it arrives I will quilt it and send it you Angie!
The fabrics shown in this post were given to me by Northcott Fabrics.
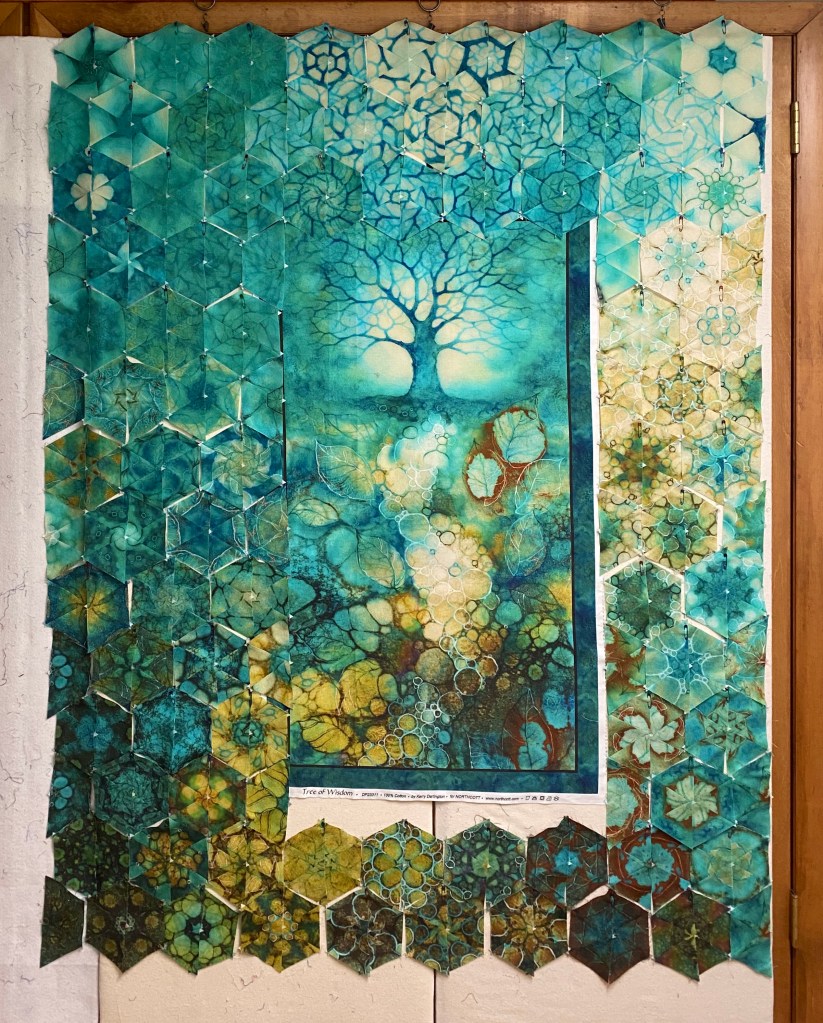
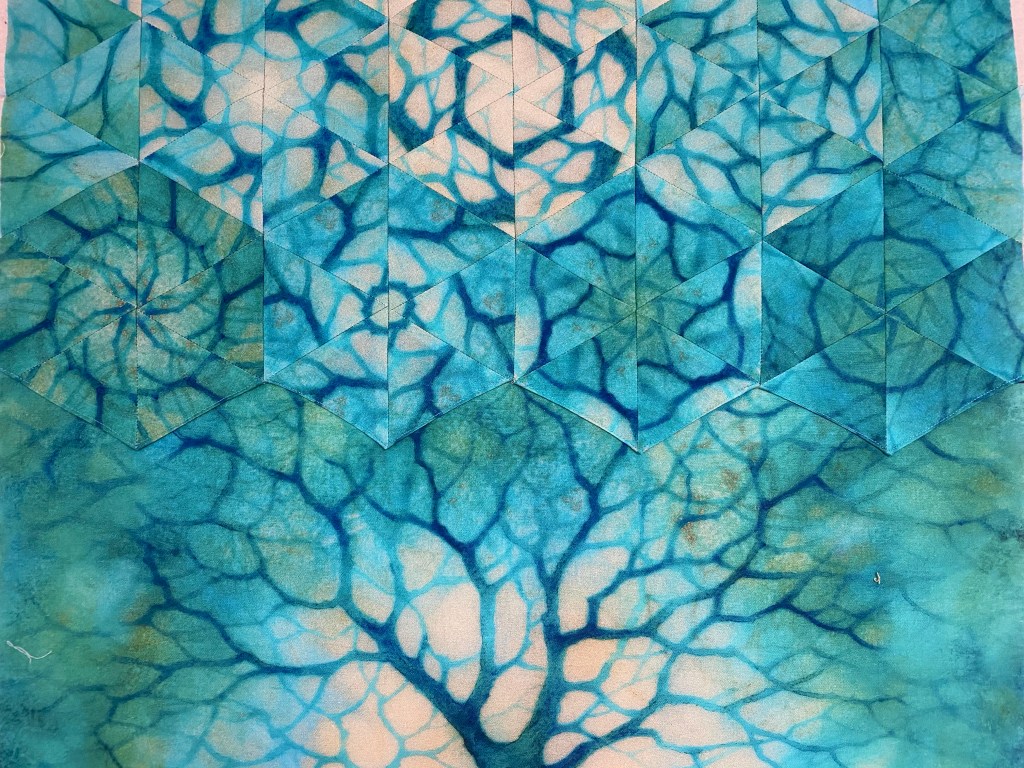
I just couldn’t help my myself. I love trees, and these are my colors!
When I saw this panel I just had to make a One Block Wonder (OBW). The Tree of Wisdom fabric line was designed by Kerry Darlington for Northcott Fabrics. Tree of Wisdom can be found at your local quilt shop and at Keepsake Quilting.
When I approach making a OBW using panels, the first thing I want to know is how wide the panel is. This panel is 24″ including the borders. I did not want to include the borders, I prefer the panel to merge with the hexies as seamless as possible.
The strip width you choose to determines the finished hexagon size:
3.75” strip width = 6.0” Finished Hexie
3.50” strip width = 5.5” Finished Hexie
3.25” strip width = 5.0” Finished Hexie
3.00” strip width = 4.5” Finished Hexie
2.75” strip width = 4.0” Finished Hexie
2.50” strip width = 3.5” Finished Hexie
2.25” strip width = 3.0” Finished Hexie
2.0” strip width = 2.5” Finished Hexie
When I measured the panel without the borders it was 20″. Therefore I cut my aligned strips 3.25″ wide for 5″ finished hexagons.
I start designing around the panel until I get a design I like. Because I know my finished hexies will be 5″ wide, I know there will be 4 hexies across the top and the bottom of the panel. That is why the second photo is offset, so I know which row of hexies will be on the right side of the panel.
I stitch my hexies into four goups: the left, right, top & bottom. I never trim my panel until I’m ready to attach the hexie sections.
I started with the top of the panel. I did not want to trim off my points, so I turned the edges under 1/4″ and pressed well, top stitching the hexies to the panel.
I match up the dog ears at the top and stitch the right side leaving a partial seam. This allows me to match up the dog ears of the right section with the bottom section of hexies. I decided not to trim these hexies either, so I Pressed under the edges to prepare for top stitching.
I have now completed the partial seam on the right of the panel and can now match up the dog ears on the left side of the panel at both the top and the bottom.
As you can see, I need to camouflage where the bottom hexies hit the bottom of the panel.
Can you tell where the bottom hexies hit the panel? To find out how I do this, download here:
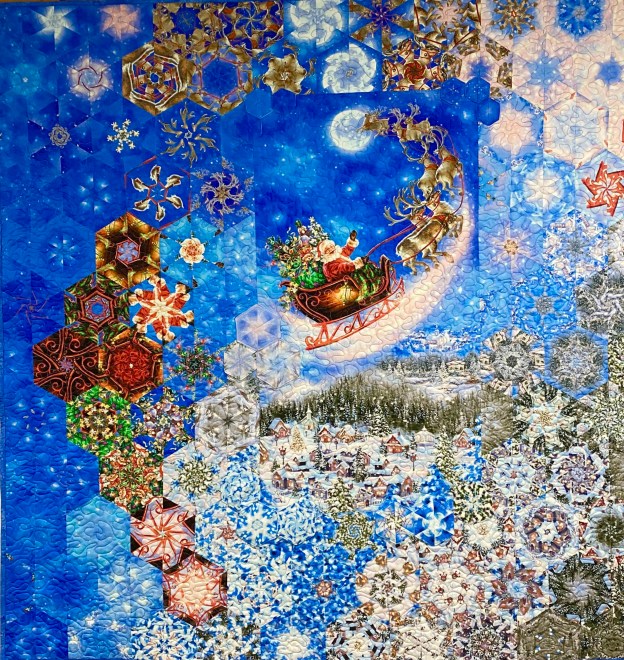
Twas the night before Christmas….no it’s more like a week and a half before Christmas and I just had to finish this One Block Wonder instead of doing what I’m supposed to be doing. I’m supposed to be working on my last quilt of the year for Island Batik.
I just love this panel by Timeless Treasures. My quilt measures 60″ x 62″. If you haven’t tried a One Block Wonder using a panel, here are my tips:
The Unicorn is all about opening up to infinite possibilities and that the infinite possibilities surround you and are available to you at all times.
I made this One Block Wonder for my son Jason’s birthday in a few weeks. Spiritually the Unicorn symbolizes success. If you summon the power of the Unicorn, the Unicorn will give you the blessings to be a success in whatever you choose to pursue. I love you Jason, Happy Birthday!
Here are my tips for using panels to make a One Block Wonder:
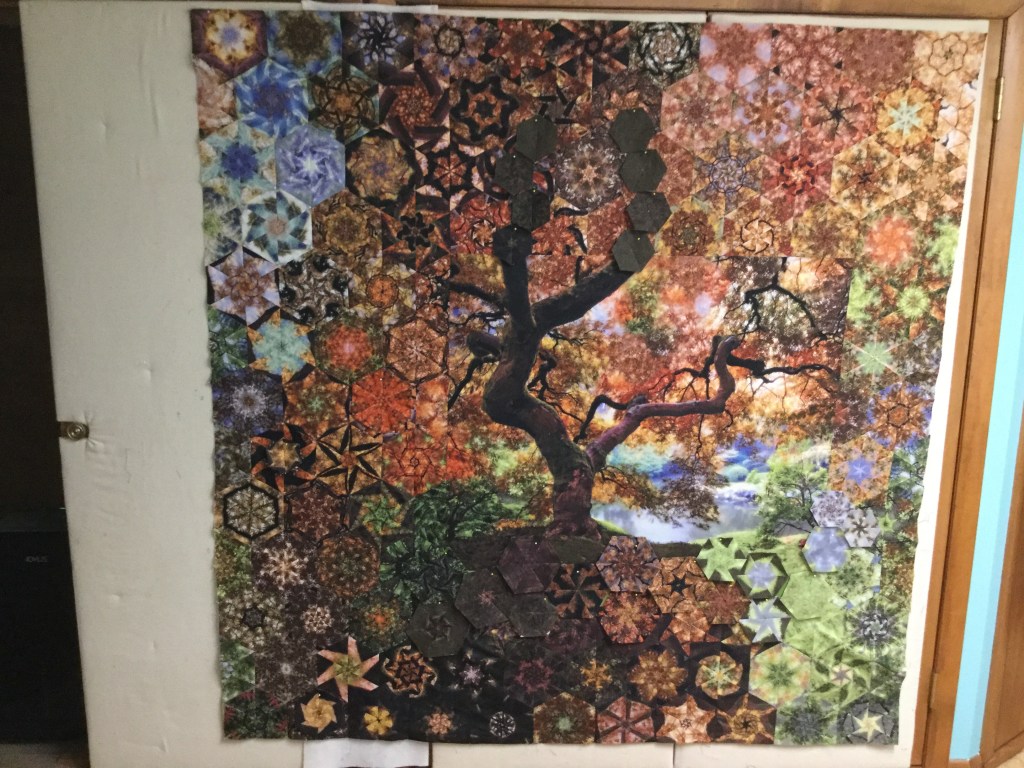
You may have realized I love history and cemeteries. As my sister and I were visiting family in Forest Hills Cemetery (Utica, NY) we were drawn to this tree.
When I saw this panel I couldn’t believe my eyes. I have been taking photo’s of this tree since 2010. It is very near the grave of John Adams Great Granddaughter Mary Louisa Adams. Johnson and not far from our family. I love trees, I think I was a Druid in another life! Needless to say I just had to make a One Block Wonder using this panel from Quilting Treasures.
First attempt at designing.
When I stitched the rows together, I discovered I needed to add some fabric so the hexies would line up as I wanted them to. Then I had to disguise the added fabric and soften the edges.
I’m pretty happy with it. Below is a downloadable description of how I design a OBW with panels.