Tag Archives: One Block Wonders

Ray of Hope – OBW #91

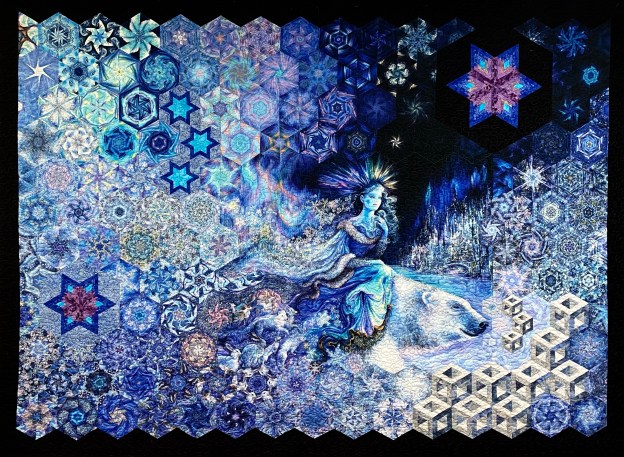
My latest One Block Wonder “Ray of Hope” a panel by Josephine Wall measures 79″ x 62″. I incorporated 6″ finished Framed 60 stars made with the Star 60 Tool.

Ray of Hope

Reserve your spot in my next OBW Zoom Class January 8, 2022, 1:00 PM (Eastern Standard Time). For class details click on the OBW Zoom Classes tab.

Come Zoom With Me!

I made my first One Block Wonder (OBW) in 2006! I was completely captivated by the process and the one of a kind quilts that are possible. So much so, that I have made 90 OBW’s so far and I have been teaching this class for 15 years..

I am offering a two part Zoom class. Each class is approximately 3 hours. The first class you will Identify, cut & align your repeats. You will then cut your equilateral triangles. The 2nd class is scheduled at least two weeks later to give you time to stitch your hexagons and sort them by predominate color. The 2nd class is all about designing your OBW with or without panels.

Last January started my journey of adding stars to my OBW’s. Deb Tucker’s Star 60 Tool gives me the possibility of creating 6 different size stars in a multitude of sizes. I will be adding classes for the Star 60 Tool and the Checkerboard 60, Capped 60, Striped 60, Quad 60, and Framed 60 Technique Sheets.

From the Home page click on the tab “OBW Zoom Classes” for more information and to download the supply list.

Rainbow Forest OBW #90

Rainbow Forest by Alexander Henry

I saw this fabric by Alexander Henry and just had to have it. It is a large print with a 24″ repeat and is full of vibrant colors. I knew I want to add a large star constructed from Star 60 & Quad 60 units.

I made 3″ finished Quad 60 and Star 60 units.

I thought I would incorporate this 12″ hexagon into my design as is.

But, I decided to add points turning it into a 24″ star by adding 6″ finished Quad 60’s for the points.

The photo’s above show how I made the 6″ hexagons and the 24″ star fit together.

Rainbow Forest, measure 64″ x 68″

Rainbow Forest is not yet quilted, but it will be soon.

There’s a Bat in the Belfry OBW #89

I have been on a journey this year to see how many stars and shapes I can place in a One Block Wonder.

Timeless Treasures Last Dance

I found this great fabric from Timeless Treasures called “Last Dance”. The Skeletons are about 6 1/2″ tall.

Octagons

Last Dance made some great octagons. I wanted to add a bat in my design also.

Moonlight Flight

My friend and fellow Studio 180 Design Certified Instructor Beth Sidley designs great patterns. I love Moonlight Flight and decided to use her bat for my quilt. You can purchase Moonlight Flight from her Etsy shop Park Bench Designs.

Twisted Wedge

I also wanted to add stars representing cobwebs using the Twisted Wedge Technique Sheet and the Wedge Star Tool. The bat is made using the Rapid Fire Lemoyne Star and Moonlight Flight pattern.

You can see how using the lemoyne star quarters fit to makes the bat.

Once I added the octagon corners I could stitch the rows together.

There’s a Bat in the Belfry measures 63″ x 69″

It looks like my bat took flight and spread the cobwebs everywhere!

Celestial Journey – OBW # 88

I love Josephine Wall’s art, her fabric panels are glorious. They make spectacular One Block Wonders.

Celestial Journey panel measures 35″ x 43″

These panels must have been either the beginning of the run or the last. The outer edges were off be about 1/2″. I focused on aligning the panels around the unicorn. The outer edges were mostly space so it was not crucial they be perfectly aligned. I cut my strips 3.75″ by WOF.

Celestial Journey, 76″ x 100″

I wanted to give my travelers a destination. I created a nearby galaxy for them consisting of stars created using my Star 60 Tool and 5 technique sheets: Quad 60, Framed 60, Striped 60, Checkerboard 60, Capped 60.

#studio180design #Star60 #Quad60 #Framed60, #Striped60 #Checkerboard60 #Capped60 #QuiltersDreamBatting #Bernina740

DreamScapes – OBW #87 & Quad 60

I have had this panel by Artisan Spirit Dreamscapes by Ira Kennedy for Northcott for several years. The Dreamscapes panel measures 13″ x 20″. It came two in a panel, so I ended up with 14.

I partially completed the first set of 7 panels to show how to add the sections to the panel. I save this OBW classes.

I finally decided to complete the 2nd set of panels. I cut the strips 2 3/4″ for 4″ finished hexies. In hind site I wish I would have made them smaller. To add more hexies and enhance the hexies I had, I added stars made with the Quad 60 Technique Sheet and my Star 60 Tool. My Dreamscapes wall hanging measures 35″ x 41″

#studio180design #DebTucker #Star60 #Quad60 #Northcottfabrics #Quiltersdreambatting #Irakennedy

Spirit of Flight – OBW #86

One day, several months ago I received a text from my sister Marti in Arizona. She frantically wanted to know how panels were needed for a One Block Wonder (OBW). I quickly answered “7” panels were needed. I thought she must have a found a fabulous panel to work with. Then about a week later I a received a package from Marti.

Spirit of Flight by Josephine Wall

Marti had sent me 7 panels by Josephine Wall & 3 Wishes. I was obsessed and couldn’t wait to make this panel into a OBW. Marti said this would be me when I emerged from breast cancer treatment. She was right!

Spirit of Flight measures 97″ x 71″

As I was working on this OBW I realized that most of the hexagons would be toward the back. I made these great stars using Studio 180 Design Star 60 Tool and the Framed 60 Technique Sheet to enhance my design. Now she is shooting for the stars and leaving cancer behind!

#studio180design #star60 #framed60 #3wishesfabric #josephinewall #Bernia #Nolting #Quiltersdreambatting

Cyclones Amongst the Lotus Leaves – OBW # 85

I’ve discovered a whole new way to jazz up my One Block Wonders (OBW)!

I pin my orphan blocks to the drop ceiling in my quilt studio. As I was looking up at them I realized that a Cyclone block could be added to a Octagon OBW! You only need the Cyclone Technique Sheet and a Tucker Trimmer I.

You can make this block in 9 sizes from 4″ to 12″. This block is fun and easy. You don’t have to match up seams!

My original Fabric, Lotus Leaves

I made my octagons 6″ finished, so I will follow the instructions for 6″ finished Cyclones. I chose 3 colors from my original fabric and cut my strip sizes according to the technique sheet.

sew strips together
Press seams open

Step 1 – Piece your strips together in the order shown on the technique sheet. Pressing the seams open gives you a flatter block in the end. Your strip set should measure the “Unfinished Strip Set Width” in the chart.

Step 2 – Sub-cut your strips sets into squares using the “Unfinished Set Width” from the chart. For 6″ finished block I cut my squares 4″.

Step 3 – Cut. Position your square so that Fabric 1 runs from north east to south west. Cut the square north to south. You will get two opposite triangles, separate them into two piles. Use extreme care when making these diagonal cuts. It will effect the spin of your block.

Step 4

Step 4 – Trim. Working with one one group at a time, position the triangle as above with the longest strip at the top of the triangle. Line up the edge of your Tucker Trimmer with the right side of the triangle, the the lower point of your triangle positioned at the number corresponding to your sub-cut size, for a 6″ finished block it is 4″. The lower left edge of the triangle should align with the sizing diagonal.

Step 4 cont.

Cut across the top of the tool.

Layout trimmed triangles

Step 5 – Lay out 8 of the kite shaped pieces that you just trimmed. Make sure that all of your pieces have the same fabric in the outer position.

Stitch pairs

Step 6 – Stitch two kite pieces together so that you create quadrants. Press seams open.

Trim

Step 7 – Trim. True the 90 degree corner using your Tucker Trimmer. Align the common diagonal with the seam and trim. You will only be trimming the dog ears and probably a few “whiskers” of fabric, just enough to ensure a true 90 degree.

Step 8 – Stitch together four like quadrants to create an oversized octagon. Press all seams open.

Pieced octagons

The cyclones are now the same size as my octagons made from the Lotus Leaves fabric, and you have two different cyclones from the same strip set. This is where we stop following the Cyclone Technique Sheet instructions. We will trim the cyclones when we trim the octagons.

Start to create your design layout, then add the corners to the octagons & cyclones.

You trim the cyclone block the same as the octagons but ONLY trimming the edges that will have corner stitched to them as with the octagon blocks.

Trimmed units
Cyclones Amongst the Lotus Leaves, measures 67″ x 73″.
Cyclone Wall Hanging

Click here for the supply list to make the wall hanging shown above.

Flowers of the Sun – OBW #84 & the Diamond Four Patch Wedge

Continuing my journey to create interesting embellishments for my hexagon and octagon One Block Wonders (OBW’s). I created fabulous stars using Studio 180 Design’s Diamond Four Patch Wedge Technique Sheet and the Wedge Star Tool.

Flowers of the Sun by South Sea Imports

Once again I went to my OBW stash, I’ve had this beautiful large large print for at least 10 years. When I showed it to my friend Sue Tucker she immediately suggested Aqua stars be added.

Groovy Seam Rippers are my favorite

I went to my Joen Wolfrom Color Wheel. To find a complimentary color look directly opposite. For Orange/Red it is Aqua/Blue. Groovy Seam Rippers are my favorite.

I could have chosen several values of aqua, but I decided to use two.

I was lucky to find Kona Cotton Paprika for my star side triangles. The Diamond Four Patch Wedge Technique Sheet gives you instructions for making this block in 22 sizes from 6″ to 48″ finished blocks. I decided that I wanted several size stars in my OBW. My octagons are 6″ finished blocks. Therefore, I would choose size variations in multiples of 6″. I made a 24″, 18″ 12″ and three 6″ finished blocks.

Step 1 – Make strip sets. I chose to make my Inner Diamond & Outer Diamonds the same color. See the Diamond Four Patch Technique Sheet for making strip sets A & B.

Step 2 – Layer the strips sets one on top of the other. Make sure both sets are right sides down. Use the Wedge Star tool to get the 45 degree angle.

Make the first cut.

From the first cut, cut angled sections the same width as the cut size of the diamond strip.

You’ll need 8 angles “A” & 8 angles “B” sections for each star.

Pair a section “A” with a section “B”
Mark seam intersection

Step 3 – Pair each “A” section with a “B” section. Make sure that the inner and outer points are oriented correctly. On the edges you will be stitching together, mark the 1/4″ seam allowance across the seams.

Position the pieces so that the intersections of the marked lines and the seams match. Pin and stitch.

Stitch
Press your seams open.

Step 4 – Trim the outer points using the Wedge Star tool. Consult the chart for the line needed, and position the line on the seam of the outer point only, trim each side.

Step 5 – Add the small wedges to the out points that you just trimmed. See the Wedge Star tool instructions, page 3 for “Cutting the Small Wedges”.

Layout the small wedges and the Diamond Four Patches.

Stitch the right wedges first. For complete instruction on “Piecing the Diamond Wedges” see the Wedge Star tool instructions, page 4.

Diamond Four Patch Wedge
18″ Diamond Star Wedge

Step 6 – Trim the pieced wedges using the Wedge Star tool. For finished stars up to 24″, align the desired finished block size line with the outer point.

Step 7 – Assemble and trim the block according to steps 1.12 through 1.18 in the Wedge Star tool Instructions.

As before, I marked the 1/4″ seam allowance across the seams and pinned before stitching. Stitch 2 Diamond Four Patch Wedge together. Remove the dog ears and sliver trim the Wedge pair by placing on the mat Righties orient the pair so the 90 degree corner is in the upper right, lefties position it so the 90 degree corner is in the upper left. Align the common diagonal on your Tucker Trimmer with the seam to trim the dog ears and true up the 90 degree angle.

Tucker Trimmer I

Tucker Trimmer III

Flowers of the Sun measures 65″ X 77″.

Misty Jungle OBW #83 with Capped 60 Cubes

I pulled this 2004 Alexander Henry fabric called Misty Jungle from my stash to play with adding Capped 60 cubes to my OBW.

Alexander Henry Misty Jungle

Although the fabric has a 24″ repeat the design elements were about 3 to 4 inches, so I decided to cut my strips 3 1/4″ to make 5″ finished hexagons. Using my Star 60 tool, I cut my equilateral triangles.

Once I designed my hexies to get an almost final design, It’s time to decide about cubes. I am using Deb Tucker’s Capped 60 Techniques Sheet. The Capped 60 Technique Sheet offers cutting instruction for 17 sizes in whole & half inch increments.

Capped 60 Unit

Above is a Capped 60 Unit. The cutting instructions are based on finished units. I cut my triangles for a 5″ finished hexagon, which would mean my individual triangles would measure 3″ unfinished and 2 1/2″ finished.

We begin by choosing 3 fabrics, light, medium and dark values. Where you place the light fabric gives the illusion of light shinning on it. The strips for both the trapezoids and triangles are the same width.

Cutting Trapezoids. I am making 2 1/2″ finished units so I cut 2″ strips and placed the 3 1/2″ Bottom Horizontal Line on the bottom of my strip to cut my trapezoids. Then rotate the Star 60 tool and place the 3 1/2″ line on the top of the strip and continue cutting trapezoids.

Cutting Triangles. Align the mark near the tip of the tool with the top of the strip and the Horizontal Guideline that corresponds to the width of the strip and cut. Rotate the Star 60 tool and continue cutting your triangles.

For each cubed hexagon you will need 2 light, 2 medium and 2 dark trapezoids, and 2 light, 2 medium and 2 dark triangles.

To make this cube begin by laying out your trapezoids and triangles shown above.

Align one edge of the triangle with the top of the trapezoid, matching the flat edge of the triangle to the top of the trapezoid as shown above.

Once you have laid out your trapezoids and triangles and know what triangles are to be stitched to what trapezoids you can chain stitch and make the process go fast.

Stitch and press seams open. Your unit consists of the Point, Left Side, Right Side and Base.

Trimming the Base. Position the unit so that the base is on the right if right handed or left if left handed. Align the Diamond Point Guideline that corresponds to the finished size of the unit on the seam between the triangle and trapezoid as shown. Trim the base along the side of the ruler.

Trimming the Right and/or Left Side. Locate the Triangle Point Trim Line in the chart for your size. Position the Horizontal Guideline that corresponds to the Triangle Point Trim Line on the seam between the trapezoid and triangle. Trim both sides.

Layout your trimmed units and stitch them into pairs of three as you do your equilateral triangles for the hexagons. Press seams open.

I chose to make Capped 60 Cubes in three color ways. I auditioned them in several places before deciding on the best placement.

Misty Jungle, OBW 83, measures 61″ x 62″

When I cut my strips for the hexagons I had 2 1/2″ left, not enough for the hexies. I decided to cut out smaller triangles to add to a border.

To give the illusion that the hexies are floating I added Half Hexies cut from the border fabric. The instructions for cutting Half Hexagons are located on page 10 of your Star 60 Instructions.

Click here to download Star 60 Instructions: