Bread and Butter is a fun table runner from Deb Tucker and even better when made from Qt Fabrics Autumn Smiles fabric line by Anne Lehman Stolpe. Autumn Smiles will be in quilt shops in early 2025.
This is a great beginner project to learn to use your Tucker Trimmer 1. Bread and Butter measures 18″ x 49″. The three 9.5″ blocks are made Using 3 color hour glass units. I will show you have to make the hour glass units.
Tip: I use plain plain plates to organize the fabrics required for my units.
Making 3 Color Hour Glass Units
Bread and Butter pattern Steps 1 -7 show you how to make your hour glass units.
Pair 3 “A” squares with 3 “B” squares and pair 3 “A” squares with 3 “D” squares.
Mark one of every pair with 2 diagonal lines using the Magic Wand.
Stitch on the drawn lines and then cut them apart.
Press toward the “A” fabric. You will end up with 6 A/B units and 6 A/D units. Remember: whatever you are pressing toward, goes on top.
Mark the back of the A/D units on with 2 diagonal lines using the Magic Wand.
Position each of the A/B units with right sides together with A/D units. Be sure the A’s are not layered on top of each other. Carefully align the center seams. Stitch on the lines and cut apart.
Swirl the centers and carefully press, ensuring the sections are completely pressed to the seams.
This is a 3.5″ unfinished hour glass unit. Place the half circle in the upper right hand corner of the unit. Carefully align both the common diagonal and 3.5″ size diagonal lines over the center seam lines of the unit. Trim up the right side and across the top. Rotate the unit. Line up the 3.5″ lines with the just trimmed raw edges and the 3.5″ size diagonal line as before and again trim up the right side and across the top. (Lefties place the half circle on the Tucker Trimmer in the upper left corner so they can trim up the left side and across the top.)
Make 12 – 3 color Hour Glass units. Follow Steps 8 – 10 to make the pieced units that will be the corners of the block. Note: Deb Tucker has a new Timeout Technique Sheet for these corner units.
Lay out the hour glass units, corner units and the center “G” square as shown above. Stitch into rows.
Join the rows to make the 9.5″ unfinished block. Finish your Bread and Butter table runner by following pattern Steps 12 – 18.
Join me for a Converging Geese Zoom class September 15th at 11:00 AM. Sign up and download the supply list here (pattern is included with the class fee):
I created this pattern November 2018 for an Island Batik Log Cabin Challenge. It has been a popular pattern in my Etsy Shop ever since. This is a variation on the Log Cabin block and is a fun way to use your Square/Squared, Tucker Trimmer I & Wing Clipper I tools.
I named my original design “Converging Geese” because each block has Flying Geese & Geese on the Edge units, along with Square/Squared units.
Each 16″ block contains 12 – 2″ x 4″ finished flying geese, 4 – 6″ finished geese on the edge & 1 square/squared unit.
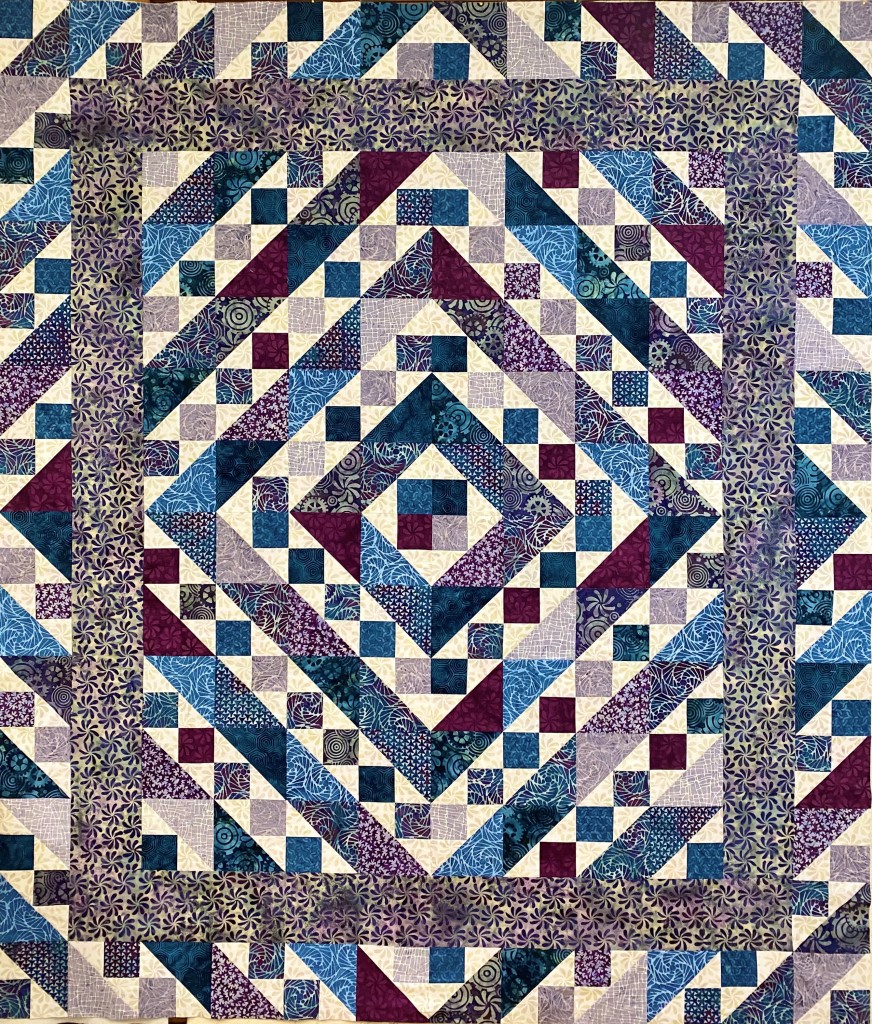
Welcome, Welcome, Welcome to Stitchin Heaven’s Journey’s BOM – Month 12! This has been a spectacular year. You all have worked so hard. Thank you to Deb Luttrell, Founder of Stitchin Heaven, Deb Tucker, Creative Kingpin of Studio 180 Design, Marie Bostwick New York Times best selling author and Jason Yenter Fabric Designer & President of In the Beginning Fabrics for making this all possible. Now to assemble your quilts!
Print 4
Print 6
Print 11
Print 12
Note: WOF stands for width of fabric. This month you will assemble your quilt top and add the borders.
Gather the following pieces:
4 Corner Sections from Month 6
Block K from Month 7
4 Middle Edge Sections from Month 9
4 Pieced Border sections from Month 11
Finishing Instructions
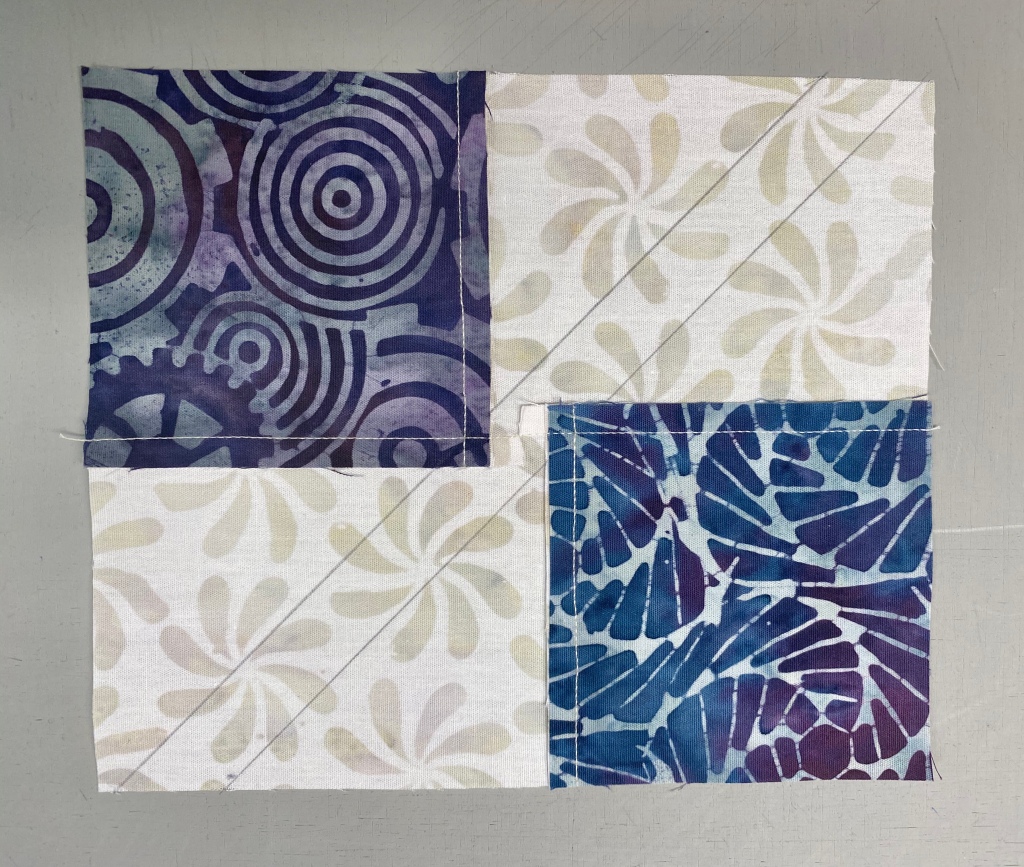
Step 1 – Lay out the Corner Sections, Middle Edge Sections, and Block K as shown in the diagram on page 35.
Step 2 – Stitch the sections together into rows, press the seams open. Stitch the rows together to create the quilt center.
Step 3 – Attach the 72½” Print 11 inner border strips. Find the center of the quilt and the center of the 72½” border strip. Match the center points with right sides together, pin. Match both ends of the strip with the ends of the quilt and pin in place. Ease the quilt top to match the border strip and add more pins between the others to hold the border in place as you stitch. Attach the other 72½” border to the opposite side in the same manner and press toward the inner border strip.
Step 4 – Repeat step 3 for the 75½” Print 11 border strips.
Step 5 – Attach the 75½” Print 6 middle border strips. Using two of the border strips, stitch them to the quilt in the same manner as in step 3. Press toward Print 6.
Step 6 – Stitch a Print 4 middle border corner stone to each end of the remining 2”x 75½” Print 6 borders. Press toward the middle border.
Step 7 – Attach the remining two middle border strips to the quilt as described in step 3. Make sure to nest the seams. Press toward the middle border.
Step 8 – Add the pieced borders. Start with the borders that do not have the N Units on the ends. Orient the pieced borders so that the Corner Pops are against the middle border and the points of the V Blocks are pointing away from the quilt center. Refer to the diagram. Find the center of the quilt top and the center of the pieced border. Match the centers and pin. Match each end and pin. Ease the border to match the quilt top and add more pins between the others to hold the border in place as you stitch. Stitch in place. Press toward the middle border.
Step 9 – Repeat step 8 for the other pieced borders with the N Units attached to the ends. After you have matched the centers and the ends, make sure that you nest the Corner Beam seam with the seam attaching the pieced border.
Note: We recommend that you wait to cut your outer borders to length until you can measure your quilt top. To determine your specific border length, measure the longest side of your quilt in three different places. If those measurements are different, add the three measurements together and divide by three. That will be the length that you need to cut your first two borders. Once the first two borders are attached to the quilt repeat the process for the remaining two sides.
Step 10 – Add the outer borders. Find the center of the quilt and the center of the 90½” outer border strip. Match the center points with right sides together, pin, match either end of the strip with the ends of the quilt, and pin in place. Add more pins between the others, about every 4”, to hold the border in place as you stitch. Attach the other 90½” border to the opposite side in the same manner and press toward the outer border strip.
Step 11 – Repeat step 10 for the 102½” outer border strips.
Step 12 – Finish with Batting, Backing, Quilting, and Binding! Layer quilt top with batting and backing. Baste and quilt. Bind and Enjoy!
Journeys
Thank you all so much for joining us on this Journey! Congratulations on a job well done!
I’ve discovered a whole new way to jazz up my One Block Wonders (OBW)!
I pin my orphan blocks to the drop ceiling in my quilt studio. As I was looking up at them I realized that a Cyclone block could be added to a Octagon OBW! You only need the Cyclone Technique Sheet and a Tucker Trimmer I.
You can make this block in 9 sizes from 4″ to 12″. This block is fun and easy. You don’t have to match up seams!
My original Fabric, Lotus Leaves
I made my octagons 6″ finished, so I will follow the instructions for 6″ finished Cyclones. I chose 3 colors from my original fabric and cut my strip sizes according to the technique sheet.
sew strips together
Press seams open
Step 1 – Piece your strips together in the order shown on the technique sheet. Pressing the seams open gives you a flatter block in the end. Your strip set should measure the “Unfinished Strip Set Width” in the chart.
Step 2 – Sub-cut your strips sets into squares using the “Unfinished Set Width” from the chart. For 6″ finished block I cut my squares 4″.
Step 3 – Cut. Position your square so that Fabric 1 runs from north east to south west. Cut the square north to south. You will get two opposite triangles, separate them into two piles. Use extreme care when making these diagonal cuts. It will effect the spin of your block.
Step 4
Step 4 – Trim. Working with one one group at a time, position the triangle as above with the longest strip at the top of the triangle. Line up the edge of your Tucker Trimmer with the right side of the triangle, the the lower point of your triangle positioned at the number corresponding to your sub-cut size, for a 6″ finished block it is 4″. The lower left edge of the triangle should align with the sizing diagonal.
Step 4 cont.
Cut across the top of the tool.
Layout trimmed triangles
Step 5 – Lay out 8 of the kite shaped pieces that you just trimmed. Make sure that all of your pieces have the same fabric in the outer position.
Stitch pairs
Step 6 – Stitch two kite pieces together so that you create quadrants. Press seams open.
Trim
Step 7 – Trim. True the 90 degree corner using your Tucker Trimmer. Align the common diagonal with the seam and trim. You will only be trimming the dog ears and probably a few “whiskers” of fabric, just enough to ensure a true 90 degree.
Step 8 – Stitch together four like quadrants to create an oversized octagon. Press all seams open.
Pieced octagons
The cyclones are now the same size as my octagons made from the Lotus Leaves fabric, and you have two different cyclones from the same strip set. This is where we stop following the Cyclone Technique Sheet instructions. We will trim the cyclones when we trim the octagons.
Start to create your design layout, then add the corners to the octagons & cyclones.
You trim the cyclone block the same as the octagons but ONLY trimming the edges that will have corner stitched to them as with the octagon blocks.
Trimmed units
Cyclones Amongst the Lotus Leaves, measures 67″ x 73″.
Cyclone Wall Hanging
Click here for the supply list to make the wall hanging shown above.
Welcome to Stitchin Heaven’s Journey BOM – Month 7 Liberty Star. This month, you will be using the 12” markings on the Rapid Fire® Lemoyne Star tool, but you will be working with them as quarters that will be trimmed to 6½” using your Tucker Trimmer 1 before you sew them into the quilt.
Note: Some of your strip sizes are in sixteenths of an inch. These are necessary in order to equally divide the diamond into three sections. To cut the sixteenth of an inch you will see that after the sixteenth measurement there is a 1¼”+ listed. This means that you should locate the 1¼” mark on your ruler then move up just a bit to get to a 1⁵/16” measurement. You want to be as close to the half way point between the ¼” mark and the ⅜” mark as possible.
Piecing Instructions
You will be using the standard Rapid Fire® Lemoyne Star strip piecing for the “B” sections and fussy cut piecing for the “A” sections.
Step 1 – Lay out the Print 1, Print 2, and Print 8 strips as shown in the diagram.
Stitch together Print 2, Print 8 & Print 1, making four strip sets.
Step 2 – Stitch the strips into 4 strip sets, two will be used to create your “A” sections and two will be used to create your “B” sections.
Step 3 – Press all the seams toward Print 2, the widest strip.
Tip: To keep strip sets straight while pressing – it helps to draw a line on your ironing board with a sharpie and ruler. If the strip set wants to curve just keep re-adjusting it along the straight line.
Tip: After stitching your strips together measure the strip set to be sure it measures 3 1/4″ wide.
“B” Section Construction
Step 4 – Sew a strip set from step 3 on page 19 to a background strip to make a “B” section strip. Stagger your pieced strip 4¾” down the background strip. Be sure to sew the Print 1 to the Print 11 background strip. Press the seam toward your colored strip set. Make two.
Step 5 – Cut the “B” sections by placing the strip set right side up on the cutting mat. Make your first diagonal cut to clean up the end and set your angle. Then sub-cut the strip set into 3¼” sections. You will need a total of 16 sub-cuts.
Note: When cutting the Section B segments, place your 45 degree line on a seam to help establish the correct angle. Section B sections are cut 3 1/4″ wide. Cut almost to the end of the ruler and move the ruler up re-aligning the ruler on the 3 1/4″ line.
Step 6 – Cut Again. Make a vertical “second cut” to each sub-cut section. Make sure to leave a small gap between the tip of the diamond and the start of your vertical cut. One quarter of an inch will suffice.
Step 7 – Lay out, stitch, and press your pieced “B” sections toward the small side triangles you just stitched.
Remember, “whatever you are pressing toward goes on top”, so lay your pieced units on the ironing board with the small triangles on top and press.
“A” Section Construction
Step 8 – Cut the 4¾” x 4¾” Print 11 squares in half diagonally. Make the diagonal cut ¼” from the true diagonal to create small and large half square triangles.
Tip: You can use your regular ruler or your Rapid Fire Lemoyne Star tool to make the diagonal cuts as shown below.
Each square yields one large and one small triangle.
Step 9 – Cut the remaining two colored strip sets into individual diamonds. Place a strip right side up on the cutting mat as shown, align the 3¼” window template on the back end of the Rapid Fire® Lemoyne Star tool over the strip set and cut up the side. Rotate the first diamond and again align the 3¼” lines with the edges of the diamond and trim off the excess fabric. Continue repositioning the tool and cutting using the 3¼” window template until you have 16 diamonds.
Step 10 – Lay out, stitch, and press. Lay out the fussy cut diamonds, the large and small half square triangles right sides up as shown. Be sure Print 1 (Dark Blue) is positioned by the small triangle.
Be sure Print 1 (Dark Blue) is positioned by the small triangle.
Stitch the large triangles in place first and press the seam toward the background fabric.
Press the seam toward the background fabric.
Stitch the small triangles next and press these seams toward the diamond section. Make 16 “A” star points.
Press these seams toward the diamond section
Step 11 – Trim all “A” and “B” triangle sections using the 12” line on the Rapid Fire® Lemoyne Star tool. See diagram. Pay Attention here! It’s easy to forget this step.
Step 12 – Assemble quarters. Arrange the sewn and trimmed “A” and “B” sections into quarter blocks. Stitch the sections together and press the seams open to best distribute bulk. You should have 16 quarters total.
Step 13 – Trim the quarters to 6½” x 6½”. Clean up the dog ears and true up the first corner as shown. You should only be trimming off the dog ears and an additional thread or two in this trim. Then rotate the unit to trim the opposite corner. Align the common diagonal with the seam and the 6½” clean up lines with the trimmed edges to trim the remaining two sides. Repeat for all 16 quarters.
First TrimSecond Trim
Step 14 – Assemble the quarters into the center block. Lay out the quarters as shown and sew them together into rows. Press the seams open.
Step 15 – Stitch the rows together and press the seams open. Label this Section K.
Welcome to Stitchin Heaven’s Journeys Month 5. My helper for Month 5 is Deb Tucker, of Studio 180 Design. This month you are going to learn to make Lemoyne Star Quarters using the Rapid Fire Lemoyne Star and Tucker Trimmer I tools. You will be using Prints 7, 9 & 11. Label your fabrics and use your best cutting skills when cutting your starter squares.
Prints 7, 9 & 11
Piecing Instructions
Step 1 – Organize Strips. Place Print 9 and Print 7 into two separate piles. Use Print 7 to make the A Strip Set and Print 9 to make the B Strip Set.
Step 2 – Make Strip Sets A and Strip Sets B in the same manner as described in the Rapid Fire® Lemoyne Star basic instructions. Position each diamond strip 4¾” down from the top of the background strip. Sew the strips lengthwise and press as indicated in the diagram below. Pay close attention to proper strip alignment and pressing to ensure success.
Step 3 – First Cuts. Layer Strip Set A and Strip Set B right sides together as illustrated. Trim the ends of the strips at a 45° angle, then continue making 45° angle cuts every 3¼” across the length of the strips. You will get 8 cuts from a paired strip set. Cut the remaining strip sets in this manner until you have 20 pairs.
Step 4 – Make Second Cuts going vertically south to north, as shown. Position the ruler edge at the tip of the star strip and trim straight up. These triangles will be added to the pieced unit.
Jackie’s Tip for staying organized is to label two paper plates A & B. For Right handers, Strip “A” is on top & Strip “B” is on the bottom. Cut one unit at a time, place the “A” unit on plate marked “A” & the “B” unit on plate marked “B”. You will always know which units are A & B for pressing.
Step 5 – Arrange, position and stitch the cut pieces together into pieced triangle units. Press as shown in the diagram to yield future nesting seams.
You can chain stitch your “A” and “B” units for easier pressingPress “A” units toward the Star PointPress “B” units toward the side triangle
Tip: Remember “whatever you are pressing toward – goes on top”!
Step 6 – Trim down all pieced triangle units using the 12” line on the Rapid Fire® Lemoyne Star tool as shown in the diagram.
Step 7 – Assemble quarters. Arrange the sewn and trimmed A and B sections into quarter blocks. Stitch the sections together and press the seams open to best distribute bulk. You should have 20 quarter blocks total.
You can choose to press your seams open or…You can choose to press the seams so they are all going in the same direction.
Step 8 – Trim the quarters to 6½” x 6½” with your Tucker Trimmer® I tool. Clean up the dog ears and true up the first corner as shown (this should just be a few threads at most), then rotate the unit 180o to trim the opposite corner. Align the Common Diagonal with the seam and the 6½” clean up lines with the trimmed edges to trim the remaining two sides. Repeat for all 20 quarters. Label the finished quarters Unit H.
First TrimSecond Trim
Recap: Make 20 Unit H – Homeward Bound Units.
Homeward Bound, Unit H
Congratulations, you have learned to use your Rapid Fire Lemoyne Star tool!
What is a One Block Wonder (OBW)? I bought Maxine Rosenthal’s book “One Block Wonders” in 2006 and was totally awestruck! So much so, that I have made 79 hexagon OBW’s since. Whether you are making hexagons or octagons your are creating kaleidoscope blocks – each one unique by using one fabric, one shape for one of kind quilts! With hexagon OBW’s you cut 6 identical repeats and with octagon OBW’s you cut 8 identical repeats.
Octagons are used in the cover photo.
In 2007 I bought Alexander Henry’s fabulous fabric “Lion Eyes”. I always buy at least 6 yards. This time I had 12 yards in my stash.
I made my 27th hexagon OBW and named it “Just Lion Around” It was included in Maxine Rosenthal’s 4th book One Block Wonders of World.
Just Lion Around 2007, OBW #27
I made my first OBW in 2006. That year I made 16 OBW’s. It only took me 14 years to finally make my first octagon One Block Wonder!
Cutting the Repeats: I cut my 8 identical repeats and aligned them just as I would for a hexagon OBW. Now it is time to cut octagon and corner triangle strips. You can make octagon OBW’s in any size. Following Maxine’s suggestion I cut my octagon strips 4″ wide. Maxine said to cut the strips for the corner triangles 2 3/4″ wide. I am a Studio 180 Design Certified Instructor. You may be able to take the girl out of the studio…but you will never take the studio (180) out of the girl!
Instead of 2 3/4″ strips, I cut my corner triangle strips 3″ wide, that would give me a little more to trim off the completed octagon blocks. After I aligned and trimmed one long edge of the repeats, I re-measure the width of my repeat to verify how may strips I can cut. My trimmed, aligned repeat measured 23″. For every two strips used to make octagons, cut one strip for the “Sensational Squares” (corner triangles). If I cut four 4″ strips and two 3″ strips it equals 22″. Now I know I have enough fabric in my repeat without cutting myself short.
First cut
As I said earlier: You may be able to take the girl out of the studio…but you will never take the studio (180) out of the girl! I am using Studio 180 Design’s Wedge Star Tool to cut my wedges for the octagon blocks.
The beauty of the Wedge Star tool is you can make octagons in sizes 3″ to 24″.
I found it easier to cut both left and right wedges by placing the octagon strip vertically on my cutting table and pull the strip toward me as I cut. The Wedge Star tool instructions show how to cut the units horizontally also:
Continue cutting your wedge units. I got 23 wedges per strip.
From the 3″ strips cut your 3″ squares using your Tucker Trimmer I.
Cut you squares diagonally once and set aside.
Because hexagons are made with equilateral triangles you have 3 choices as how to design your block. With Octagons you only have one choice, the narrow end of the wedge is always the center.
Align two wedges and chain stitch the four pair.
As with hexagons, press all seams open. I love my Strip Sticks for that.
Remove “dog ear” and sliver trim the wedge pair. Righties orient the wedge pair so the 90 degree corner is in the upper right (lefties orient the wedge pair so the 90 degree corner is in the upper left). Align the common diagonal line on the Tucker Trimmer with the seam and slide it toward the corner just until the sides of the tool touch the very edge of the wedge pair and trim. Note there may be just a few whiskers trimmed here. This is called Trueing up your 90 degree angles and will create a much more square unit.
Match up two wedge pairs, stitch them together and press seams open.
Find the center of the two wedge halves by placing a pin where the two seams meet in both units and align the halves. Pin close to both sides of the first pin, then remove the pin in the center. This will help to center you octagon wedge halves.
Stitch your wedge halves together.
Press your seams open.
I placed my octagons on the design wall as I made them. This helped me to see what I had.
Here I am looking at life through rose colored glasses. again Time to sort the octagons. Looking at the octagons through red plastic helps me to sort the octagons by value. If you didn’t know, I have been battling breast cancer. I am responding well to treatment, but as my hair grows back, I’m noting a resemblance to the Old Man Dancing for the Six Flags commercials.
Sorting the octagons by predominate color or value was more difficult than I thought it would be. I think because the octagons don’t nest with each other as the hexagons do, you don’t get the same flow and movement. I’m saying this because after I added the corner triangles i wasn’t as happy with the design. Take your designing!
Tip: This is most important tip! Place a flower pin in the top wedge of each octagon! By doing this you will be able to easily orient the octagons as you remove and place them back on the design wall. It will keep your brains from falling out!
Adding the “Sensational Squares” (corner triangles).
One set of corner triangles is laid out as shown above making a kaleidoscope square.
Those squares will fit into the space between 4 octagons.
When you step back from the design wall, the square will appear to be gone as the 4 octagons blend together.
I worked with one row at time, deciding which set of corners to add. Remove one octagon at a time and stitch the triangle to the appropriate octagon wedge. In affect, you will be adding corners that effect two rows at a time. In the end, each octagon will have a different triangle on each corner.
Center the octagon wedge over the corner triangle and stitch. Press toward the corner triangle. Remember Deb Tucker’s tip when pressing: “whatever you are pressing toward, always goes on top”!
Above shows the corner triangles added to the inner octagons.
Once the inner octagons have the corners added, continue adding the final corner triangles to the outside edges of the octagons.
Trimming the Octagon Blocks: The octagon units need to be squared up to 6 1/2″.
If you don’t know the beauty of using the Tucker Trimmer you will love this. The Tucker Trimmer is marked with a “Common Diagonal line and Size Lines to help you perfectly center each unit or block for trimming. For righties the Common diagonal line is placed on the center seam going from the bottom left to the upper right. The 6 1/2″ size line is positioned from the upper left to the lower right going through the center of the block. The size line and common diagonal line should intersect in the center of the block centering it perfectly for squaring up. Trim up the right side and across the top. Rotate the block place the 6” clean up lines of the Tucker Trimmer on just trimmed lines of the block. Trim up the right side and across the top.
When all the octagons are trimmed it’s time to stitch your blocks into rows and then join your rows to complete your quilt. My layout was 9 X 10 = 90 – 6″ finished blocks measuring 57″ X 63″ unquilted. I learned a lot in this process. I think my layout would have been more satisfying if I had left it more random. I was trying to create an oval shape with the lighter blocks in the center. But there wasn’t enough contrast between the medium and light blocks. I’ve always been a little contrast challenged.
Welcome to Stitchin Heaven’s Journeys Month 2. My helper for Month 2 is Amy Lemke, a talented graphic artist for Studio 180 Design. This month you are going to learn to make Half Square Triangles (HSTs) and Combination Units with your Tucker Trimmer I with Prints 1, 2, 5, 10, & 11. Label your fabrics and use your best cutting skills when cutting your starter squares.
Prints 1, 2, 5, 10 & 11.
Tip: I use plain paper plates and write on them what it is I have cut out. For instance, if you are new to using a Tucker Trimmer, I would label 6 paper plates: one for each print. Using a pen or pencil label the first plate “Print 1, Combination Units (unit D)”, and so on.
Half Square Triangle Construction
Note: For more information and left handed cutting and trimming directions, refer to the instruction that came with your Tucker Trimmer.
Prints 5, 10, & 11.
Step 1 – Mark two stitching lines ¼” on either side of the center diagonal. Draw the lines on the wrong side of all the 7” squares from Print 11. I like to use my Quilter’s Magic Wand™ for this task.
Mark using a Magic Wand.
Step 2 – Layer the 7” Print 11 squares right sides together with the 7” squares from Prints 5 and 10. Stitch on the lines, then cut down the middle. Press away from Print 11 or open.
Layer.
Stitch and cut apart.
Press.
Step 3 – Trim the units to 6½” using the Tucker Trimmer® I. Align the 6½” Sizing Diagonal with the seam and trim the first two sides.
First Trim
Step 4 –Rotate the unit 180 degrees and align the 6½” Sizing Diagonal with the seam as well as the 6½” cleanup lines with the outside edge. Trim the remaining two sides to create your precise Half Square Triangle units. Label the units made with Print 5 Unit C, and label the units with Print 10 Unit B.
Second Trim
Make 8 each from prints 10 & 11 and prints 5 & 11.
Combination Unit Construction
Prints 1, 2 & 11
Step 5 – Repeat steps 1 and 2 using the 7½” squares from Print 1 and Print 2 to make 4 Half Square Triangles. Press away from Print 2 or open. Do not trim!
Starter Squares
Step 6 – Mark two stitching lines ¼” on either side of the center diagonal line of the pieced Half Square Triangles.
Mark back of HSTs
Step 7 – Position the pieced squares right sides together with the 7½” Print 11 squares. Note that the edges are not intended to match. Stitch on the lines, then cut down the middle. Press toward the large triangle.
Stitch, cut apart & press.
Step 8 – Trim the units to 6½” using the Tucker Timmer® I. Align the 6½” Sizing Diagonal with the long seam and the Common Diagonal with the short seam. Trim the first two sides.
First Trim
Step 9 – Rotate the unit 180o and align the Sizing and Common Diagonals with the seam as well as the 6½” cleanup lines with the trimmed edge. Trim the remaining two sides to create your precise Combination units. Label them Unit D.
Second Trim
Congratulations, you have learned to make half square triangles and combination units using your Tucker Trimmer I.
I’m sitting here in Tuckerville, watching TV, looking at my ceiling. I pin orphan blocks on my drop ceiling.
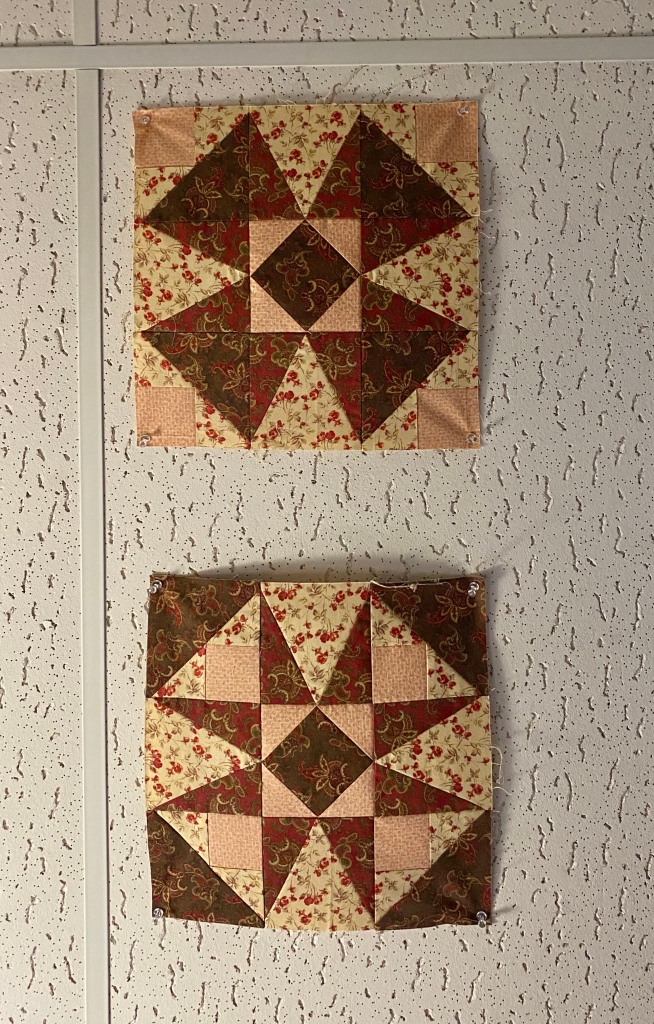
Two of a Kind
These two blocks are made from the same fabric and units. They both have a Square Squared for the block center, 4 V Block units for the star points and 4 Shaded Four Patch Units (with the Tucker Trimmer I) in the block corners. The top block has the Shaded Four Patch unit small square facing out, while the bottom block has the Shaded Four Patch unit small square facing in. Two very different looks from the same block.
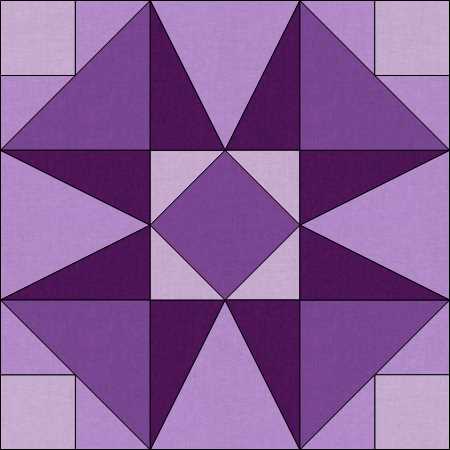
As I stared at these blocks on the ceiling I wondered what the secondary design would be if I put them in a quilt. Time to break out EQ8!
I used shades of purple and lavender because I thought my sister may like it. This is pretty cool. EQ8 is fun to use and brings quilt designs to life. Time to break out my Studio 180 Design tools get busy!
Got some fat quarters? Deb Tucker has many free patterns for you and this one is called Twilight Paths. It uses 14 fat quarters and a background with the Tucker Trimmer I. Twilight paths uses 5″ finished Shaded Four Patch units (5.5″ unfinished). The Shaded Four Patch Technique Sheet shows you haw to make this unit in 21 sizes! This whole quilt is made with Shaded Four Patches!
This is Twilight Paths using Deb Tucker’s Twilight Chic fabric line from Island Batik!
Download your pattern and let’s go!
Group 1
Group 2
To get a great scrappy quilt, Deb suggests that you split your fat quarters into two groups. Group 1 along the 22″ side, cut two 3 1/4″ strips and one 6″ strip, sub-cutting into 3 – 6″ x 7″ rectangles. Group 2 along the 22″ side, cut one 3 1/4″ strip and two 6″ strips, sub-cutting each into 3 – 6″ x 7″ rectangles. Cut one more 3 1/3″ strip from leftover from Group 1.
From your assorted dark fat quarters you will need 22 – 3 1/4″ strips, and 64 – 6″ x 7″ rectangles. From your background you will need 22 – 4 1/4″ strips.
Step 1 – Position each 3 1/4″ strip right sides together with a 4 1/4″ wide background strip and stitch lengthwise. Press seams toward the wider strip.
Step 2 – Pair two of the pieced strips right sides together with the narrow strips on opposite sides, so that each narrow strip faces a wide background strip. Sub-cut the strip sets every 3 1/4″ units until you have 128 rectangles.
128 – 3 1/4″ units Pick up each unit the same way when stitching one side.
Step 3 – Keep the two rectangles paired; stitch each pair of cut pieces together along one long side. Note the seams are not supposed to nest.
Snip
Snip the seam allowance at the half way mark between the two squares all the way to the seam.
Press each half of the seam allowance away from the square as shown above.
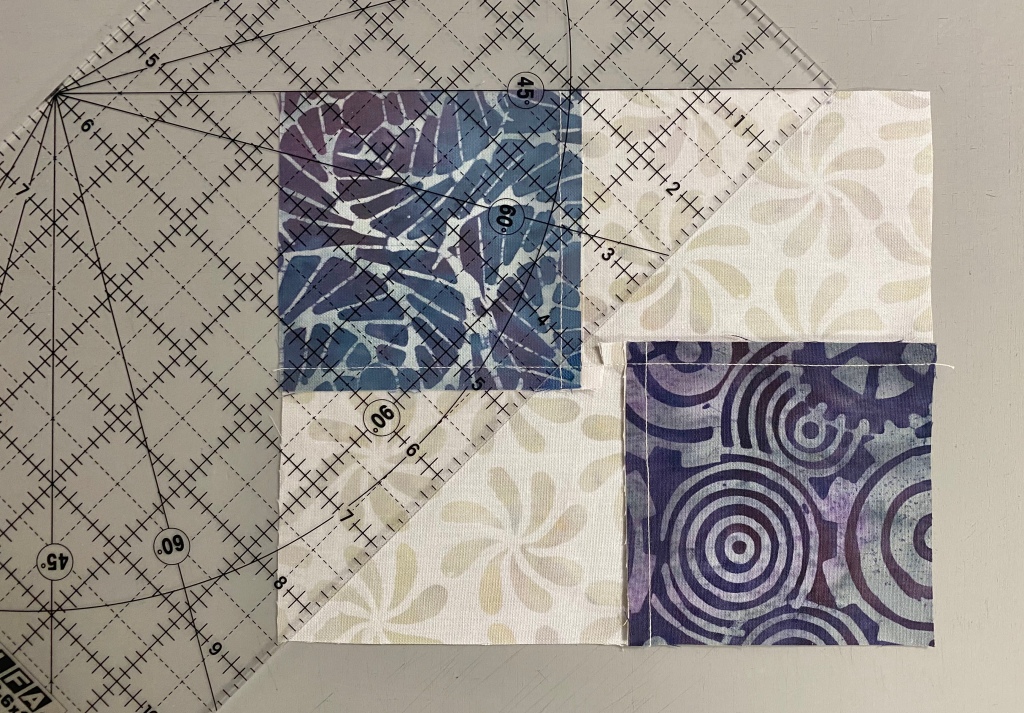
Step 4– Mark stitching lines. Select a ruler with a 45 degree angle marked on it. Draw a 45 degree sewing line from top to bottom, through the corner of the square where the stitching lines meet. Draw a 2nd line through the corner of the other square.
Step 5 – Center each marked, pieced rectangles right sides together with a 6″ x 7″ rectangle.
Stitch on both lines.
Trim seams 1/4″ from the stitching lines.
Press all seams toward the large triangles.
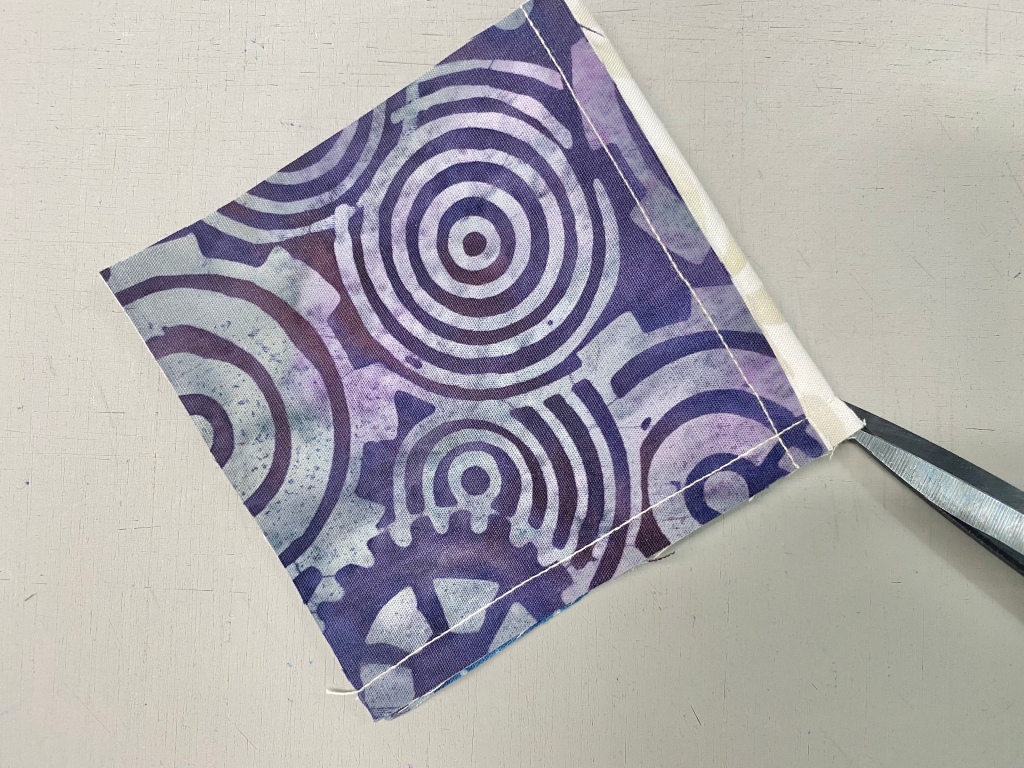
Step 6 – Trim the 128 oversized units with your Tucker Trimmer I to 5 1.2″ x 5 1/2″. Align the 5 1/2″ Sizing Diagonal with the diagonal seam of the unit. Position the common diagonal so it passes through the center of the unit. Trim the two sides.
Step 7 – Rotate the unit and line up the 5 1/2″ cut size lines on the tool with the previously trimmed edges, align the sizing diagonal and the common diagonal as before and trim the other two edges.
Step 8 – Layout 80 units according to the diagram on page 5 to create the quilt center.
Stitch the units into rows and then stitch the rows together. Press all seams open.
Step 9 – Attach the Inner Border. Stitch the inner border strips to the quilt center.
Step 10 – Assemble the Outer Border. Stitch the remaining units together into 4 border strips containing 12 units each. Make sure you orient the units as shown in the pattern. Press all seams open. Finish as indicated.
My top is not yet quilted. I used Deb Tucker s Steam Engine fabric line by Island Batik in my quilt top. So I guess I will call mine Steam Engine on the Tracks!