What are you working on this weekend?

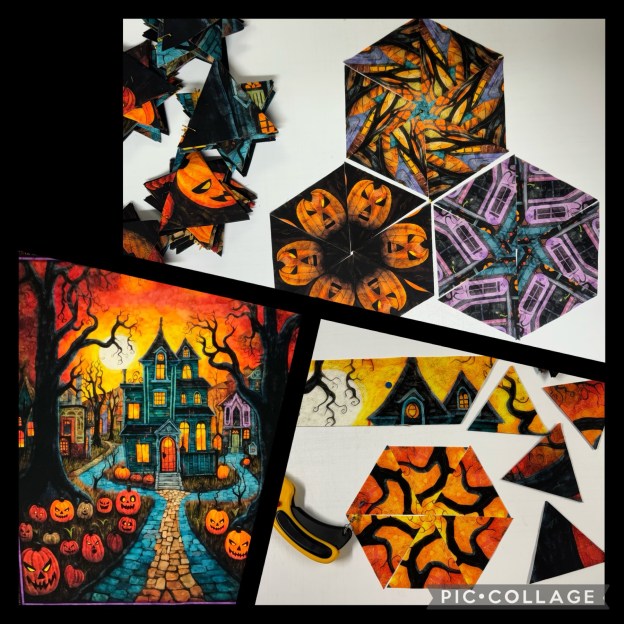
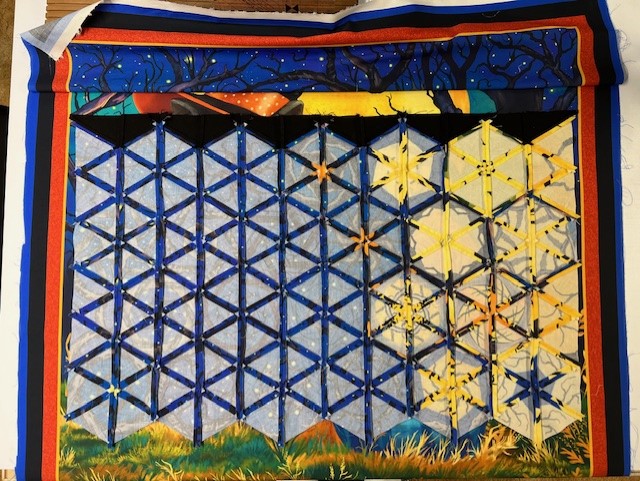
I’m working on a One Block Wonder, using “Creepin it Real” by QT Fabrics.
What are you working on this weekend?
I’m working on a One Block Wonder, using “Creepin it Real” by QT Fabrics.

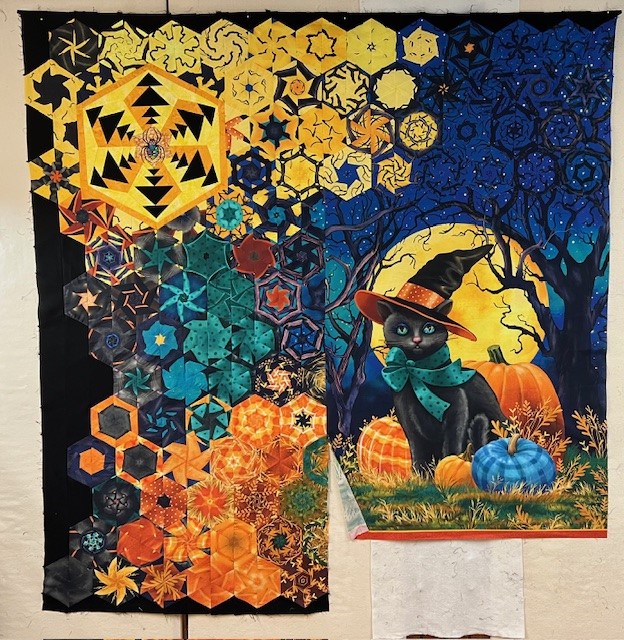
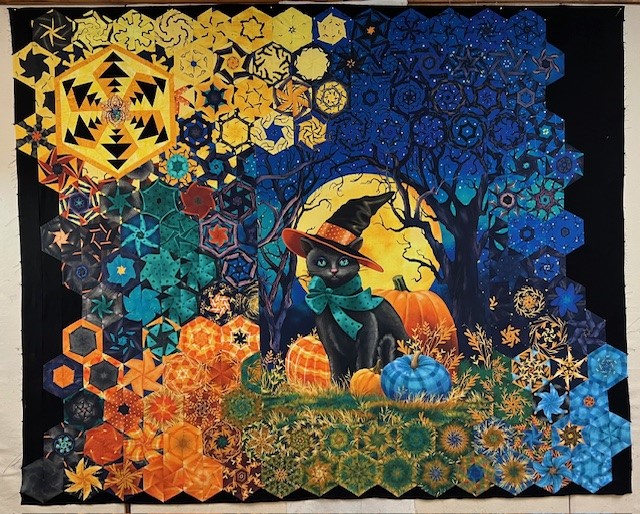
I fell in love with this panel from QT Fabrics as soon as I saw it! The colors are so rich!
The panel by Gina Jane for QT Fabrics, measures 36″ x 42″ including the frames. I cut my strips 3.25″ to yield 5″ finished hexies. The 6 panels yielded 165 hexies.
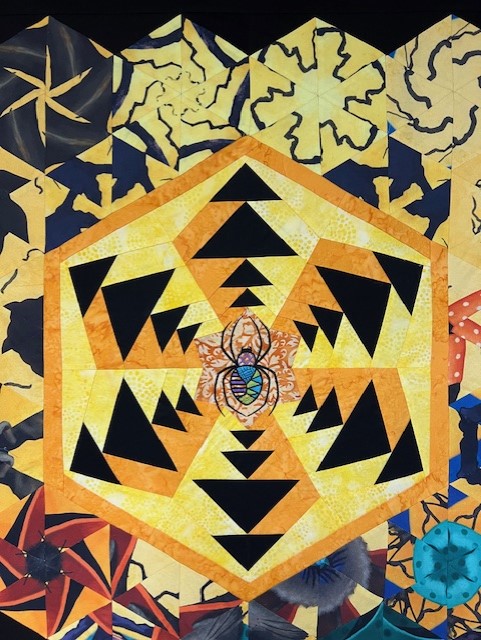
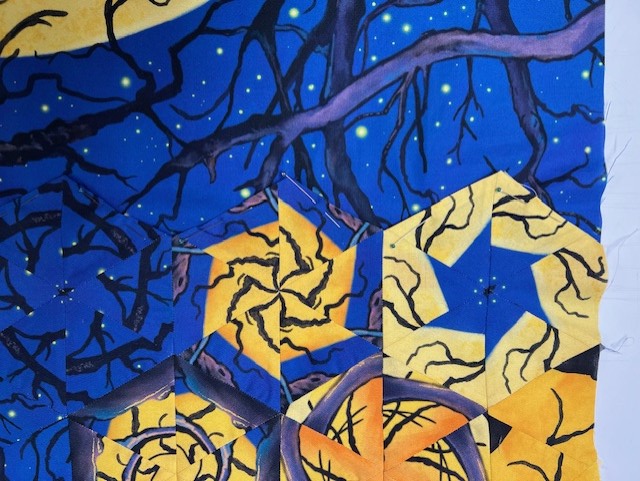
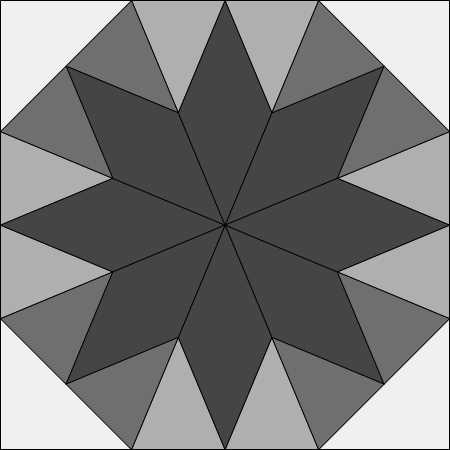
This block was created by fellow Certified Instructor, Sonny Dewitt. He is so creative. He used Deb Tuckers Geese on the Edge Technique Sheet and Wing Clipper Tool to make the Geese on the Edge units & then trim the square units using the Star 60 Tool to create a hexagon shaped block. I thought it looked like a spider web, so I embroidered a cool looking spider in the center. It added so much to my OBW.
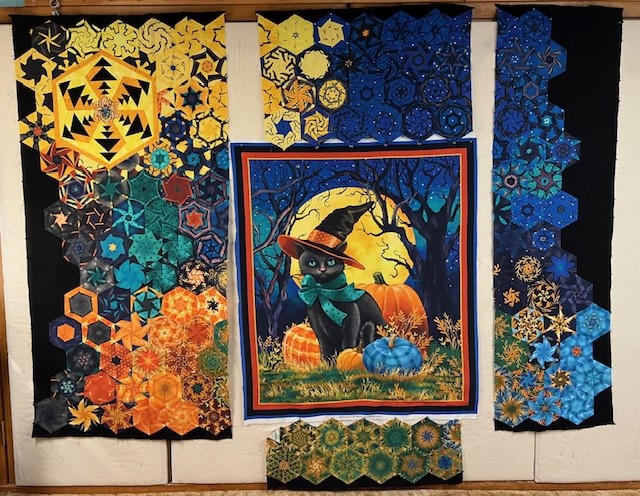
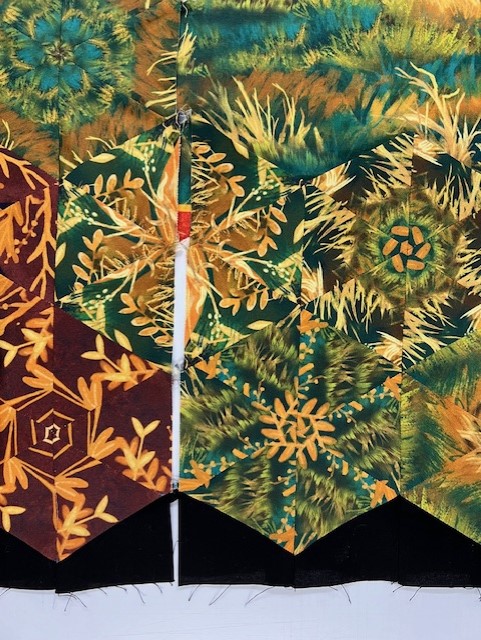
After designing with my hexies. I sitched them into 4 sections around the panel.
I centered and laid the the top section on the panel to show me how much to trim off each side to make the panel the same size as the top and bottom sections.
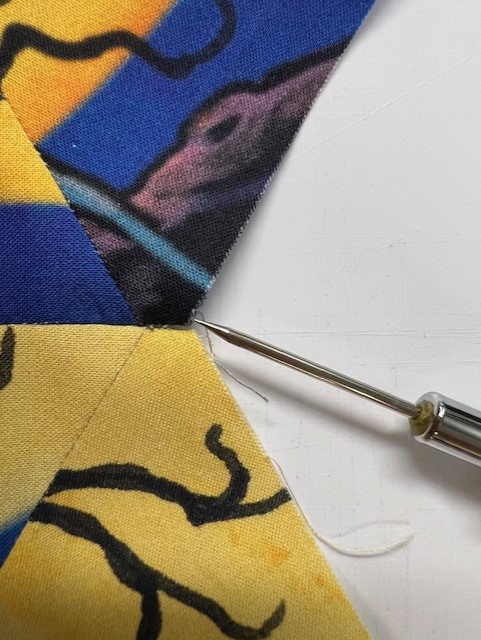

I remove a few stitches from valley’s of the top section and pressed under the 1/4″.
I pin the top section to the panel and top stitched using MonoPoly thread.
Match up the dog ears of the left section with the dog ears of the top and stitch using a partial seam stopping about 8″ from the bottom.
By matching the dog ears it allows me to know where the bottom section will attach to the panel. Remove a few stitches from the valleys and press under attaching it to the panel as with the top section.
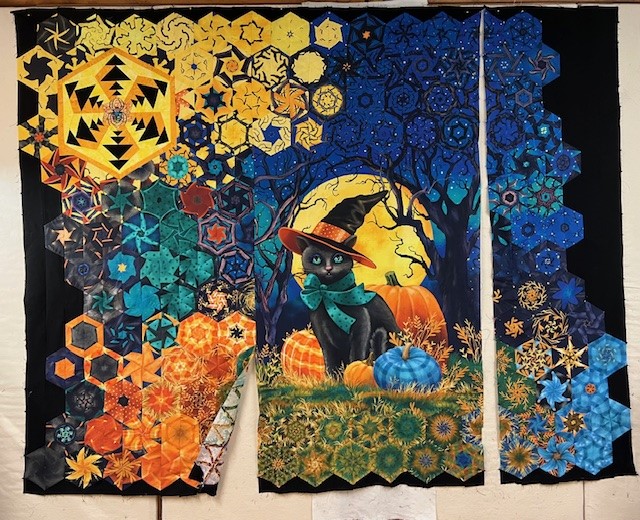
Once it is stitched in place, finish the partial seam.
The right side is easy to add now.
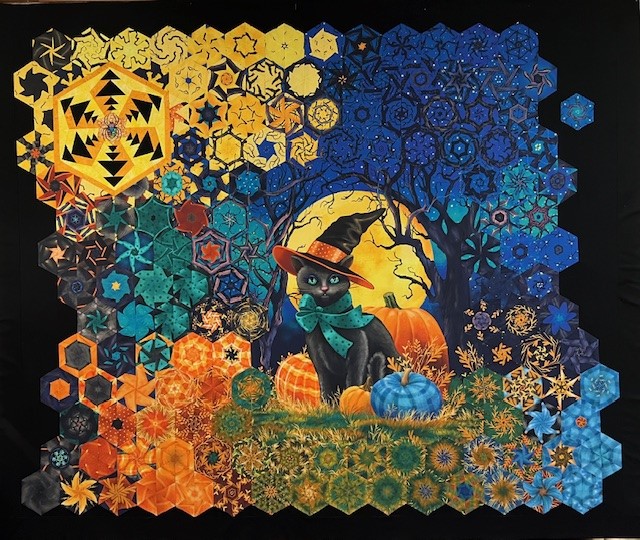
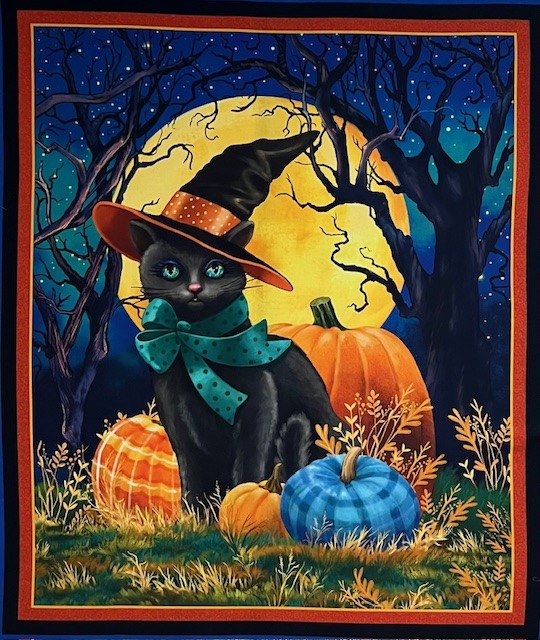
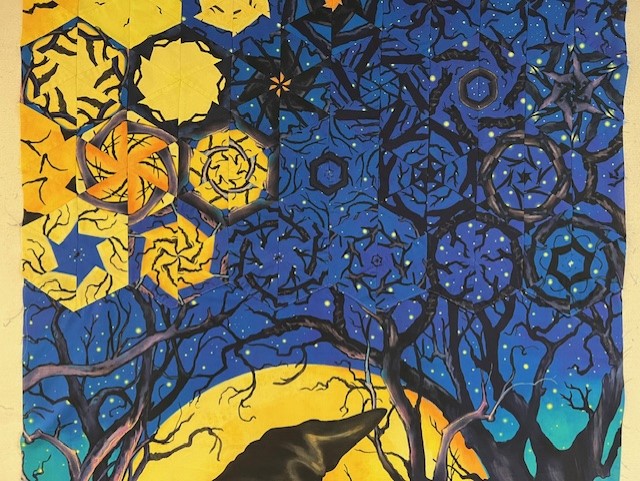
I added 3″ borders and few tweaks. Abra-Cat-Dabra measures 71″ x 85″. Abra-Cat-Dabra is not quilted yet.
#qtfabrics #studio180design #debtucker

Get a head start planning your quilt retreats for 2024. I will be at the Strong House inn in Vergennes, Vermont April 25 – 28, 2024.
During this 3 day retreat you will learn to:
Not to mention be spoiled the staff at the Strong House Inn.

Learn about adding Star 60 units to your OBW’s!
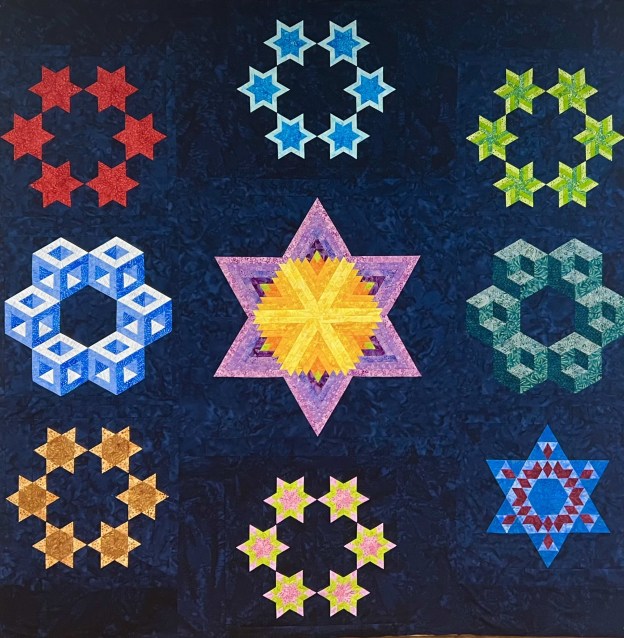
I love my Star 60 tool from Studio 180 Design. I’m teaching a Hollow Cube workshop at the end of September at Tiger Lily Quilt Company and in October for the Thread Bears Guild in Oneida, NY. I wanted to create a quilt that would showcase all that the Star 60 tool can create.
I had this quilt, but it didn’t include the Star 60 Log Cabin or Power Strip.
I call this the Star 60 Solar System, it measures 76″ x 76″. In the center is the Star 60 Log Cabin. Starting at the top left and going clockwise is the Star 60, Framed 60, Striped 60, Capped 60, Power Strip, Checkerboard 60, Quad 60 & Hollow Cube 60.
Links to the Star 60 Technique Sheets:
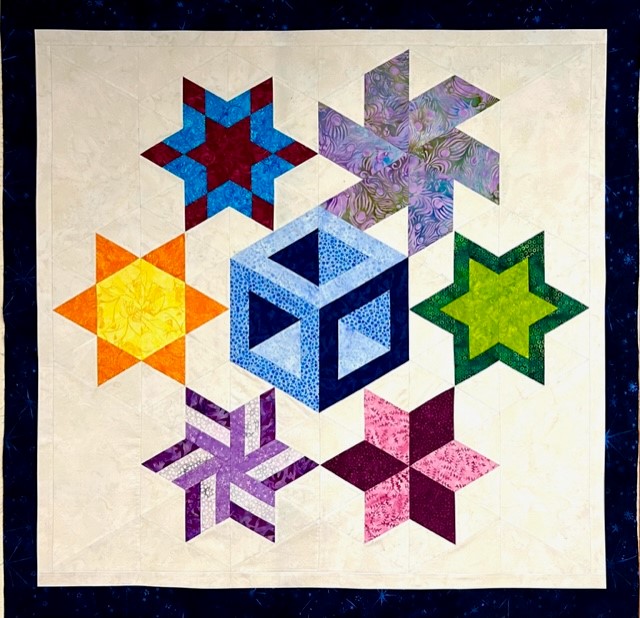
Aside from adding Star 60’s to One Block Wonders, they can be turned into a square to added to traditional quilts.
Chrysanthemum made with just the Star 60 tool and Tucker Twinkle is made with the Framed 60, and Checkerboard 60 technique sheets. The Star 60 tool can definitely bump up your creativity no matter what you are working on.

I have just finished a birthday quilt for my sister Mary. I made her Alaska by Edyta Sitar. This pattern uses templates to make the blocks. I “Tuckerized” the pattern by using Studio 180 Design’s Wedge Star tool instead.


Alaska is made using 5 Wedge block variations, 5 Mixed block variations & 3 Wedge Star Variations.
A total of 13 different blocks all cut out with Deb Tucker’s Wedge Star Tool.

Tuckerized Alaska measures 71″ x 71″. Fabrics used were Marcus Fabrics by Pam Buda, Plumberry II. Made with love for my sister Mary.

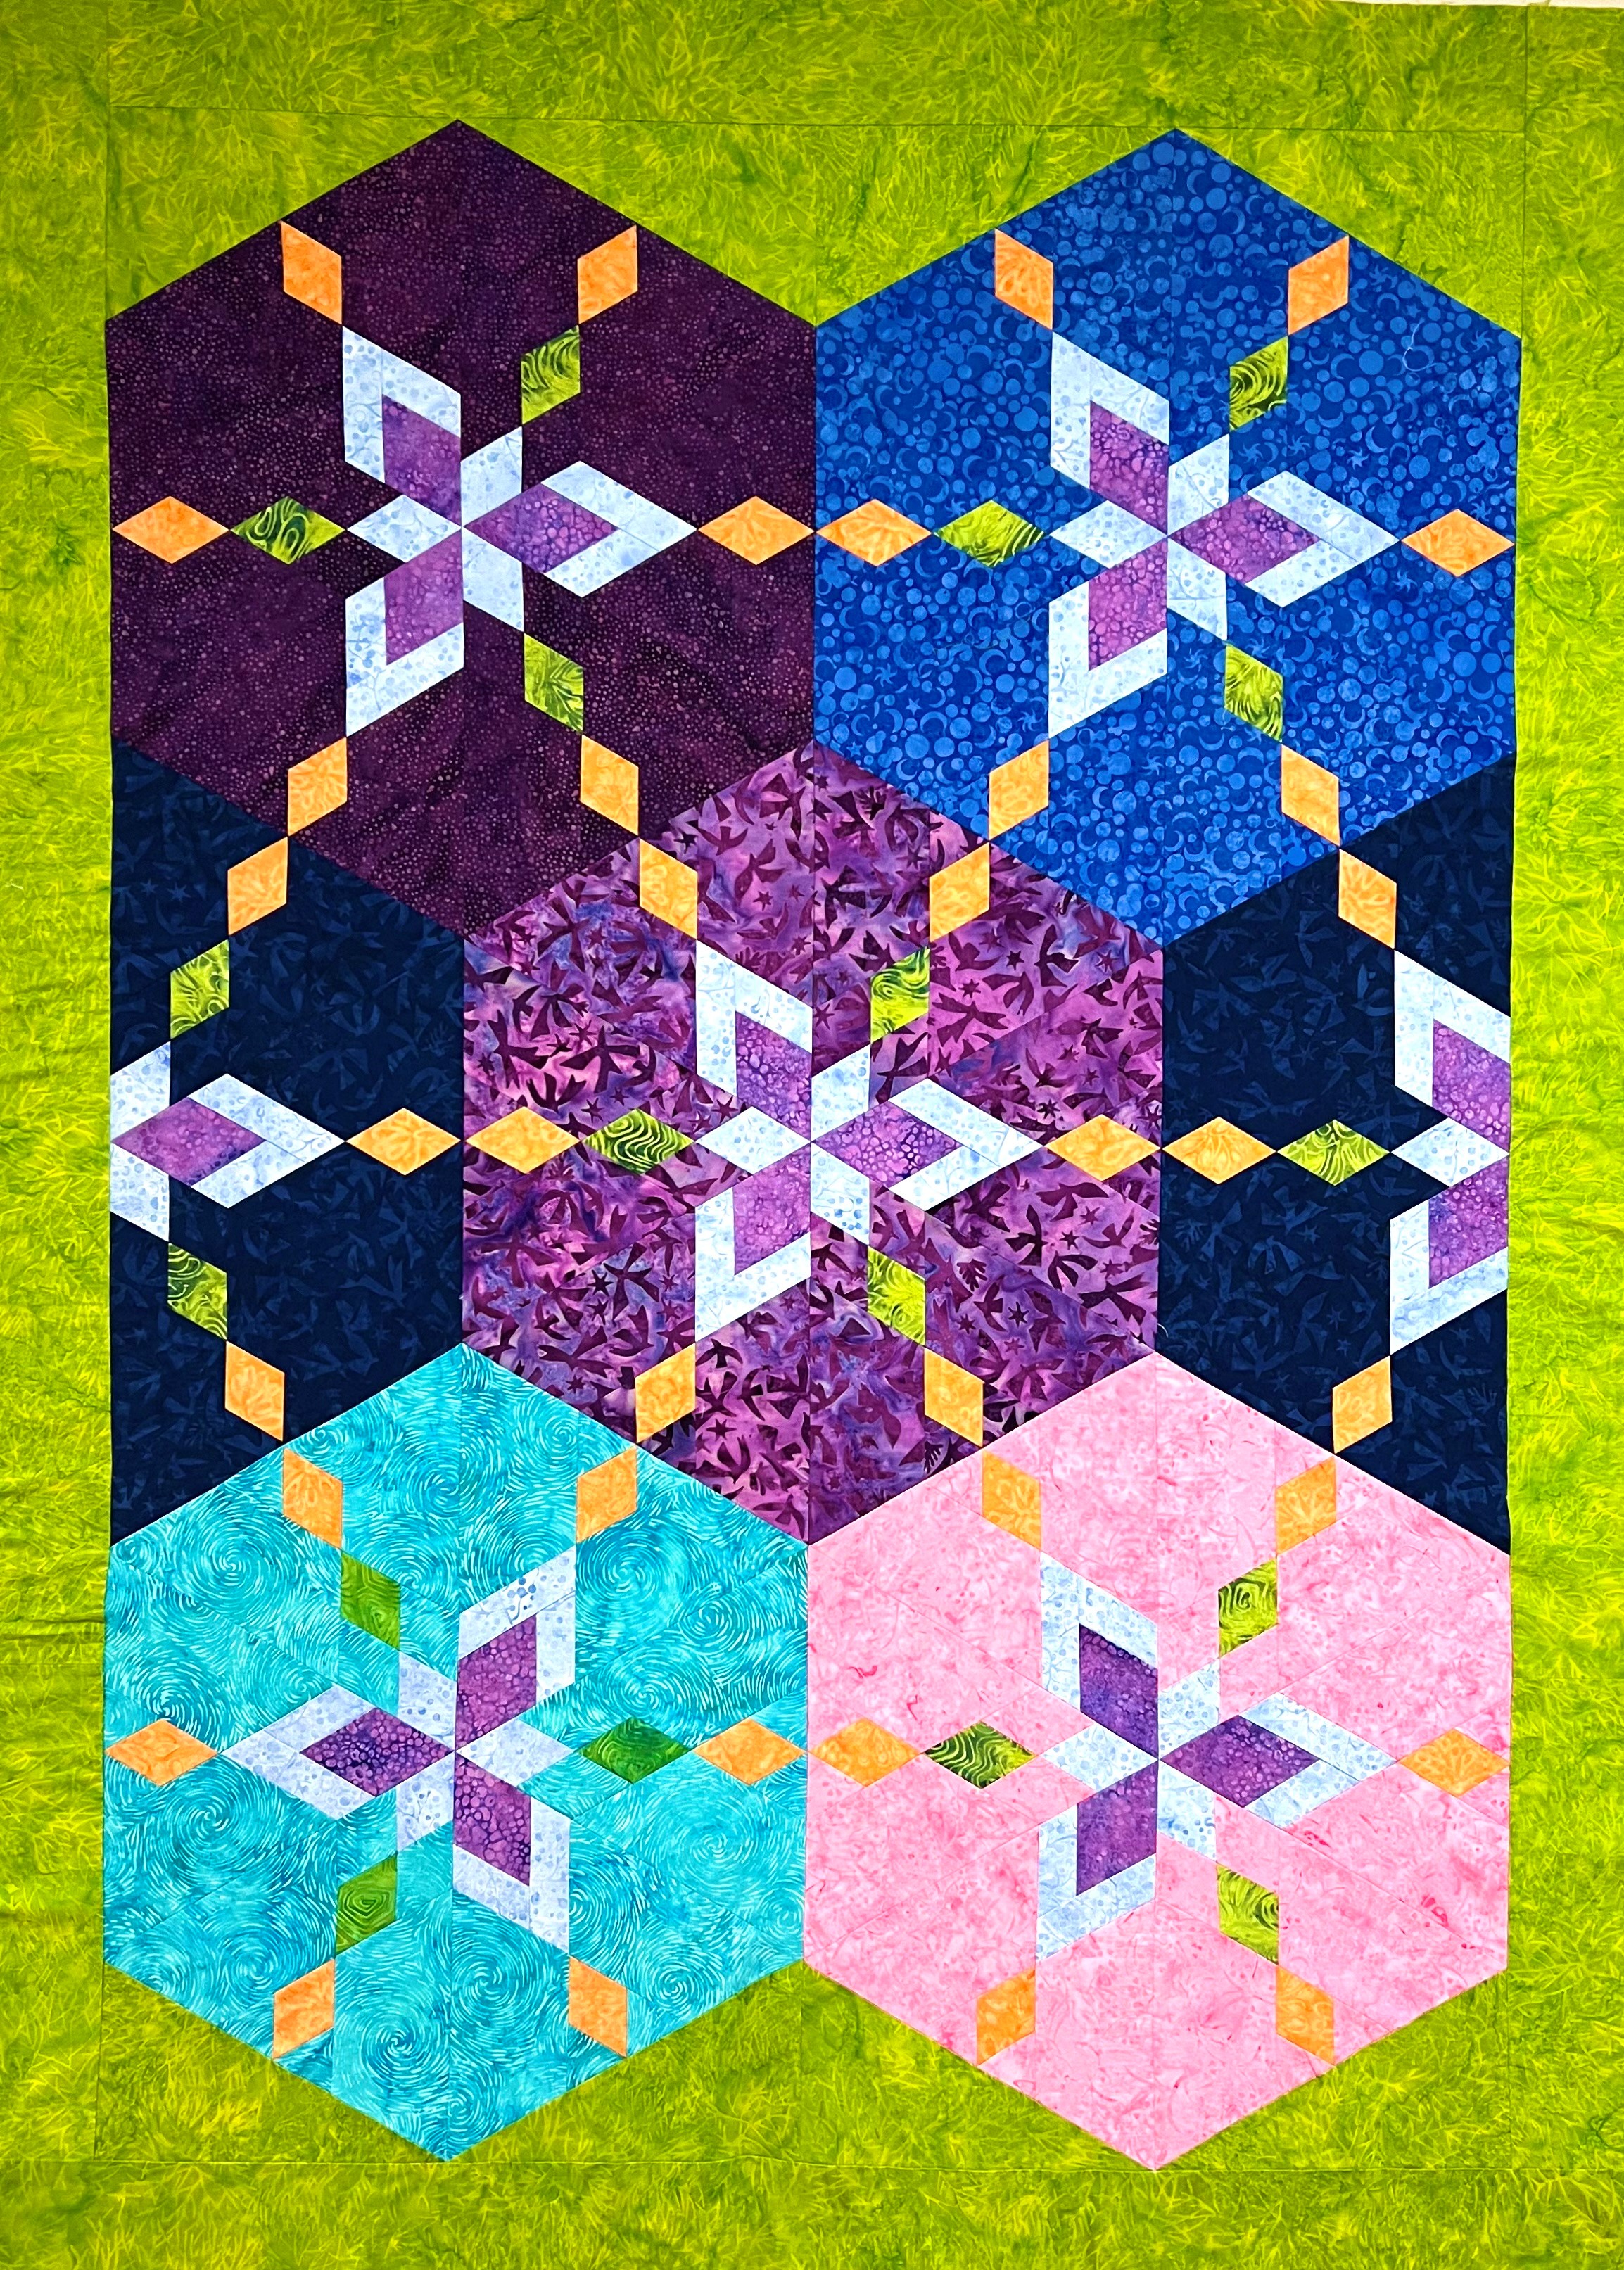
I fell in love with the colors in this panel by Carol Cavalaris and QT Fabrics.
I did not want to include the panel borders in my One Block Wonder (OBW), so I measured the inside as 30.75″ x 36.75″. I cut my strips 3.25″ to yield 5″ finished hexies. As there was little design in corners, I aligned around the turtles and plants in 12 different places. I cut my strips on the shorter 30″ side as opposed to the length of the panel. I had 165 hexies to design with.

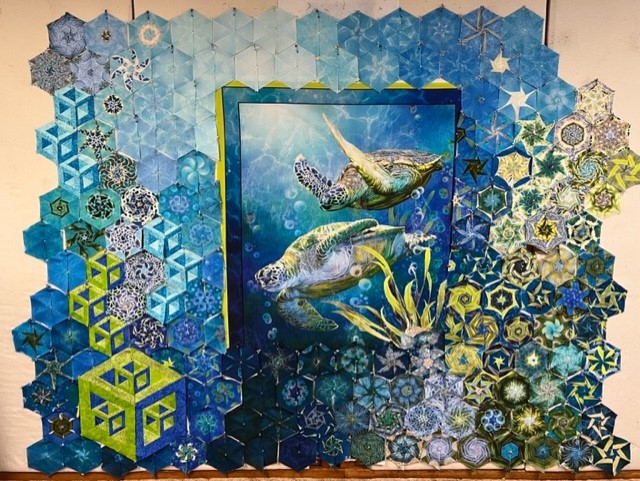
I started designing on the bottom right of the panel going across the bottom and up the right side. I added a 15″ Hollow cube that had 3 – 5″ hollow cubes inside it. My cubes are made using Deb Tucker’s Star 60 ruler and the Hollow Cube 60 Technique Sheet.
I added half hexegons made using the Star 60 ruler and a darker Island Batik fabric to fill in around the hexies from the panel.
My rows are numbered and ready to be stitched together into sections .
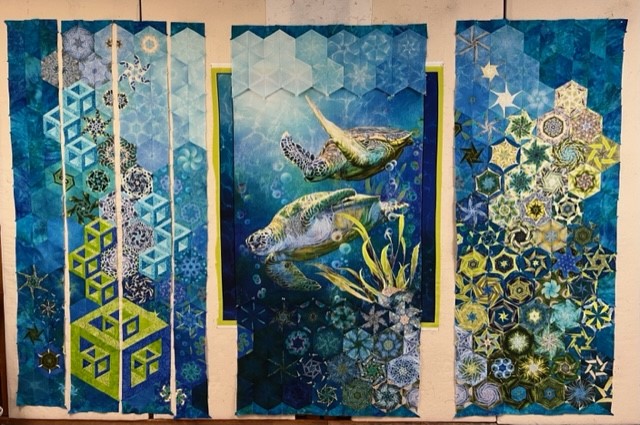
The photo above show how the 15″ cube is incorporated into the 5″ hexies. I don’t trim the panel till I’m ready to stitch the sides to it.

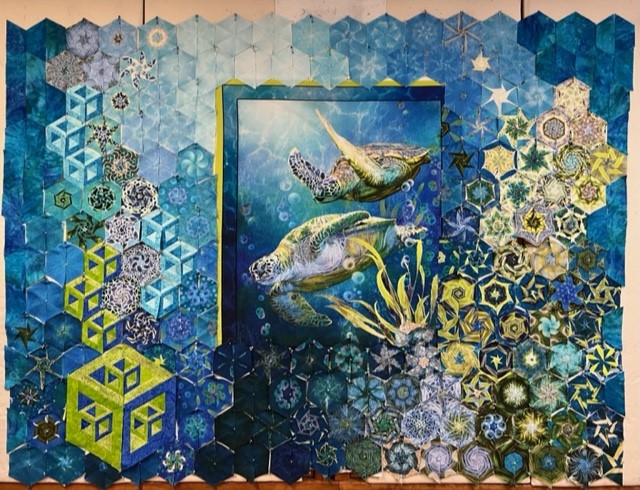
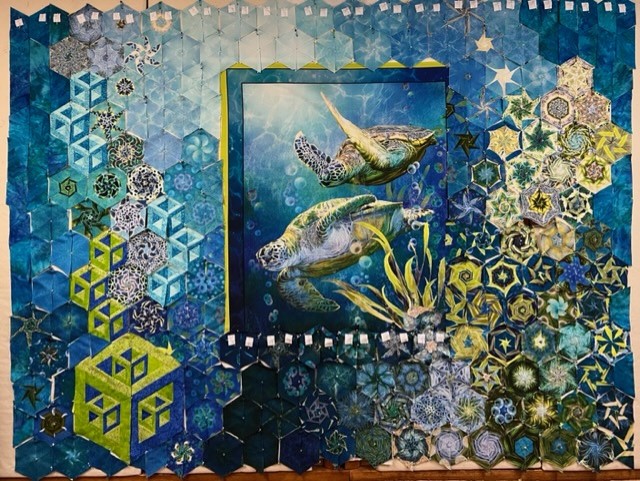
All four sections are stitched together and ready to add to the panel.
I add the bottom section to the panel first. I did not want to trim the points, so I took out few stitches in the valley’s and pressed under about 1/4″. After the bottom is stitched to the panel, I add the right side and stitch, ending about 8″ from the top of the of the panel. This shows me where to attached the top section to the panel. Once the top is attached I can finish the seam of the right section to the panel. Now the left side can be easily added.

Once all the sections are attached to the panel, I can begin to tweak and soften the edges around the panel.

I made 3″ finished Hollow Cube 60’s to applique on the left side and on the top to hide where the panel border was showing. I use Island Batik fabrics to create my Hollow Cube 60’s. Heading to the Turtle Boudoir is now ready to be quiulted. This quilt won a 4th Place Ribbon at the New York State Fair, 2023.
@studio180design @islandbatik @star60 @Hollowcube 60

You can probably tell, I’m a huge fan of Josephine Wall panels. I feel so lucky to have found this one.

The name of the panel is Wings of Joy. I added “Emerging from the Cocoon” because I think the design suggests she is emerging with great joy. The panel measures 35″ by 43″.

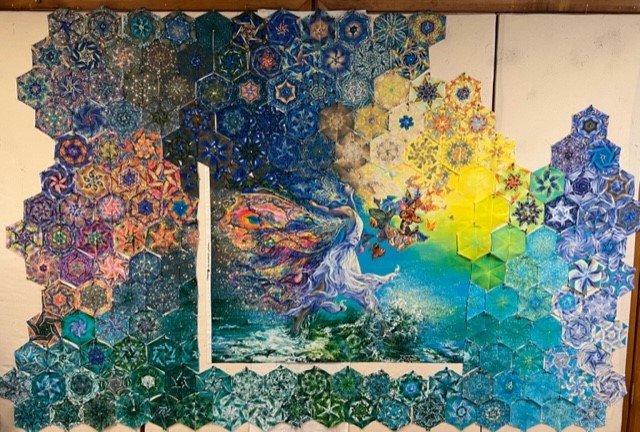
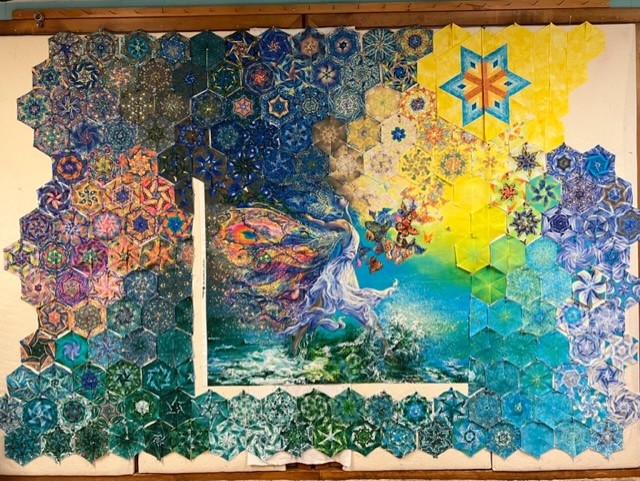

I cut my strips 3.25″ to yield 5″ finished hexies. With 5″ finished hexies I would fit 8 across the top and bottom of the panel. I will to trim the panel to fit the top and bottom sections. I had to give her a destination, so I using my Star 60 Ruler and my Star 60 Log Cabin Technique Sheet, I added a 15″ log cabin star.


My Star 60 Log Cabin finishes as 15″. I stitched three rows of hexies together above and below each half of the log cabin star, which made it possible to seamless add the 15″ star.

Now, I have the top, right and bottom sections ready.

Above, all four sections have been added to the panel.

After a little tweaking “Wings of Joy, Emerging from the Cocoon” is ready to quilt. She measures 100″ wide by 70″ tall. As always, I use Island Batik fabrics to enhance my OBW’s.
@studio180design @Star60logcabin @IslandBatik

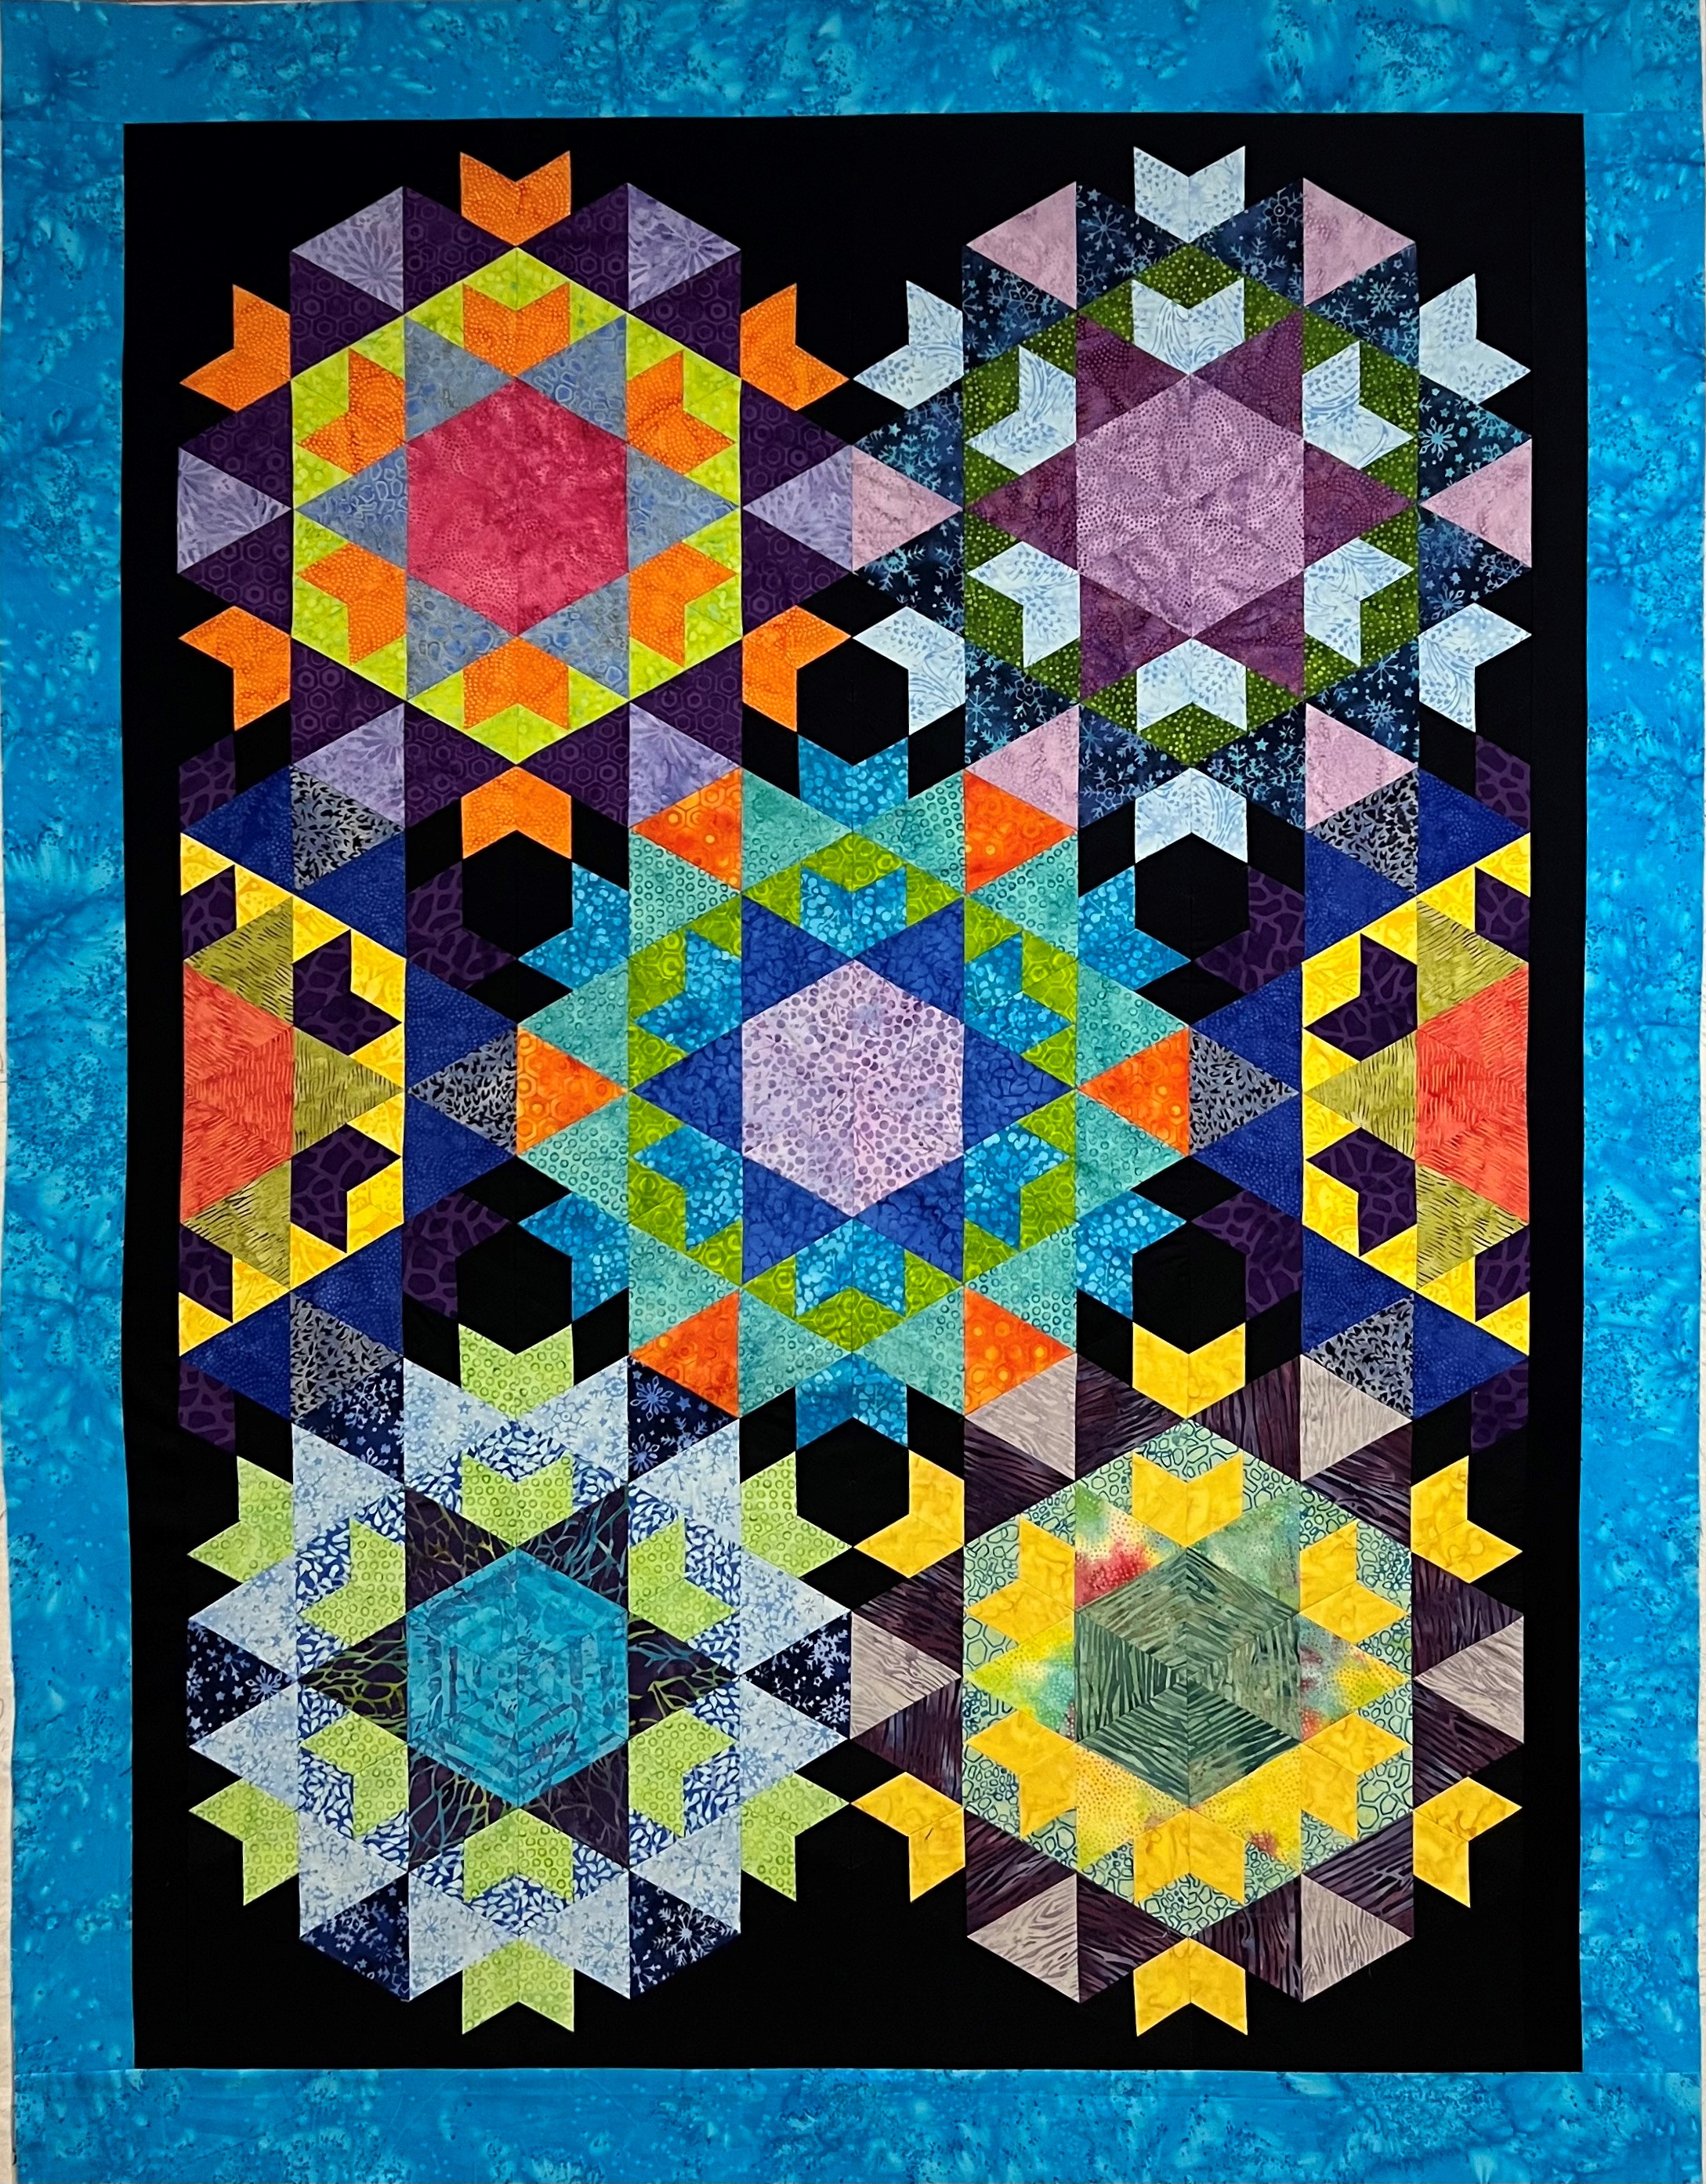
I love Deb Tucker’s Star 60 ruler! It can be used to cut out equilateral triangles for a One Block Wonder (OBW), and has 8 accompaning technique sheets for stars and cubes that can be added to a OBW or any quilt.

This quilt shows the Checkerboard 60, Caped 60, Quad 60, Framed 60, Striped 60 , Star 60 & Hollow Cube 60 techniques.

This star was made using the Star 60 Log Cabin technique Sheet.

The star above was made using the Power Strip Technique Sheet.
Traditional Lone Star’s are made using a 45 degree angle. I wanted to make a Lone Star quilt using the Star 60 ruler.

I chose 7 fabrics and a background fabric from Island Batik. I used the Checkerboard Technique Sheet and made 6″ finished Checkerboard units and 6″ diamond units.

The trick with creating multiple pieced diamonds is to only trim the side of the diamonds that are being stitched together at that time. To help with this I created a chart So I always know which sides are trimmed. This combination makes a 12″ finished diamond.


I made 6 of the pink and green diamonds, 6 of the blue and orange diamonds and 12 of the blue and green diamonds.

This shows the layout and how the four diamonds fit together.

Once trimmed, stitch the halves together to create a 24″ diamond.


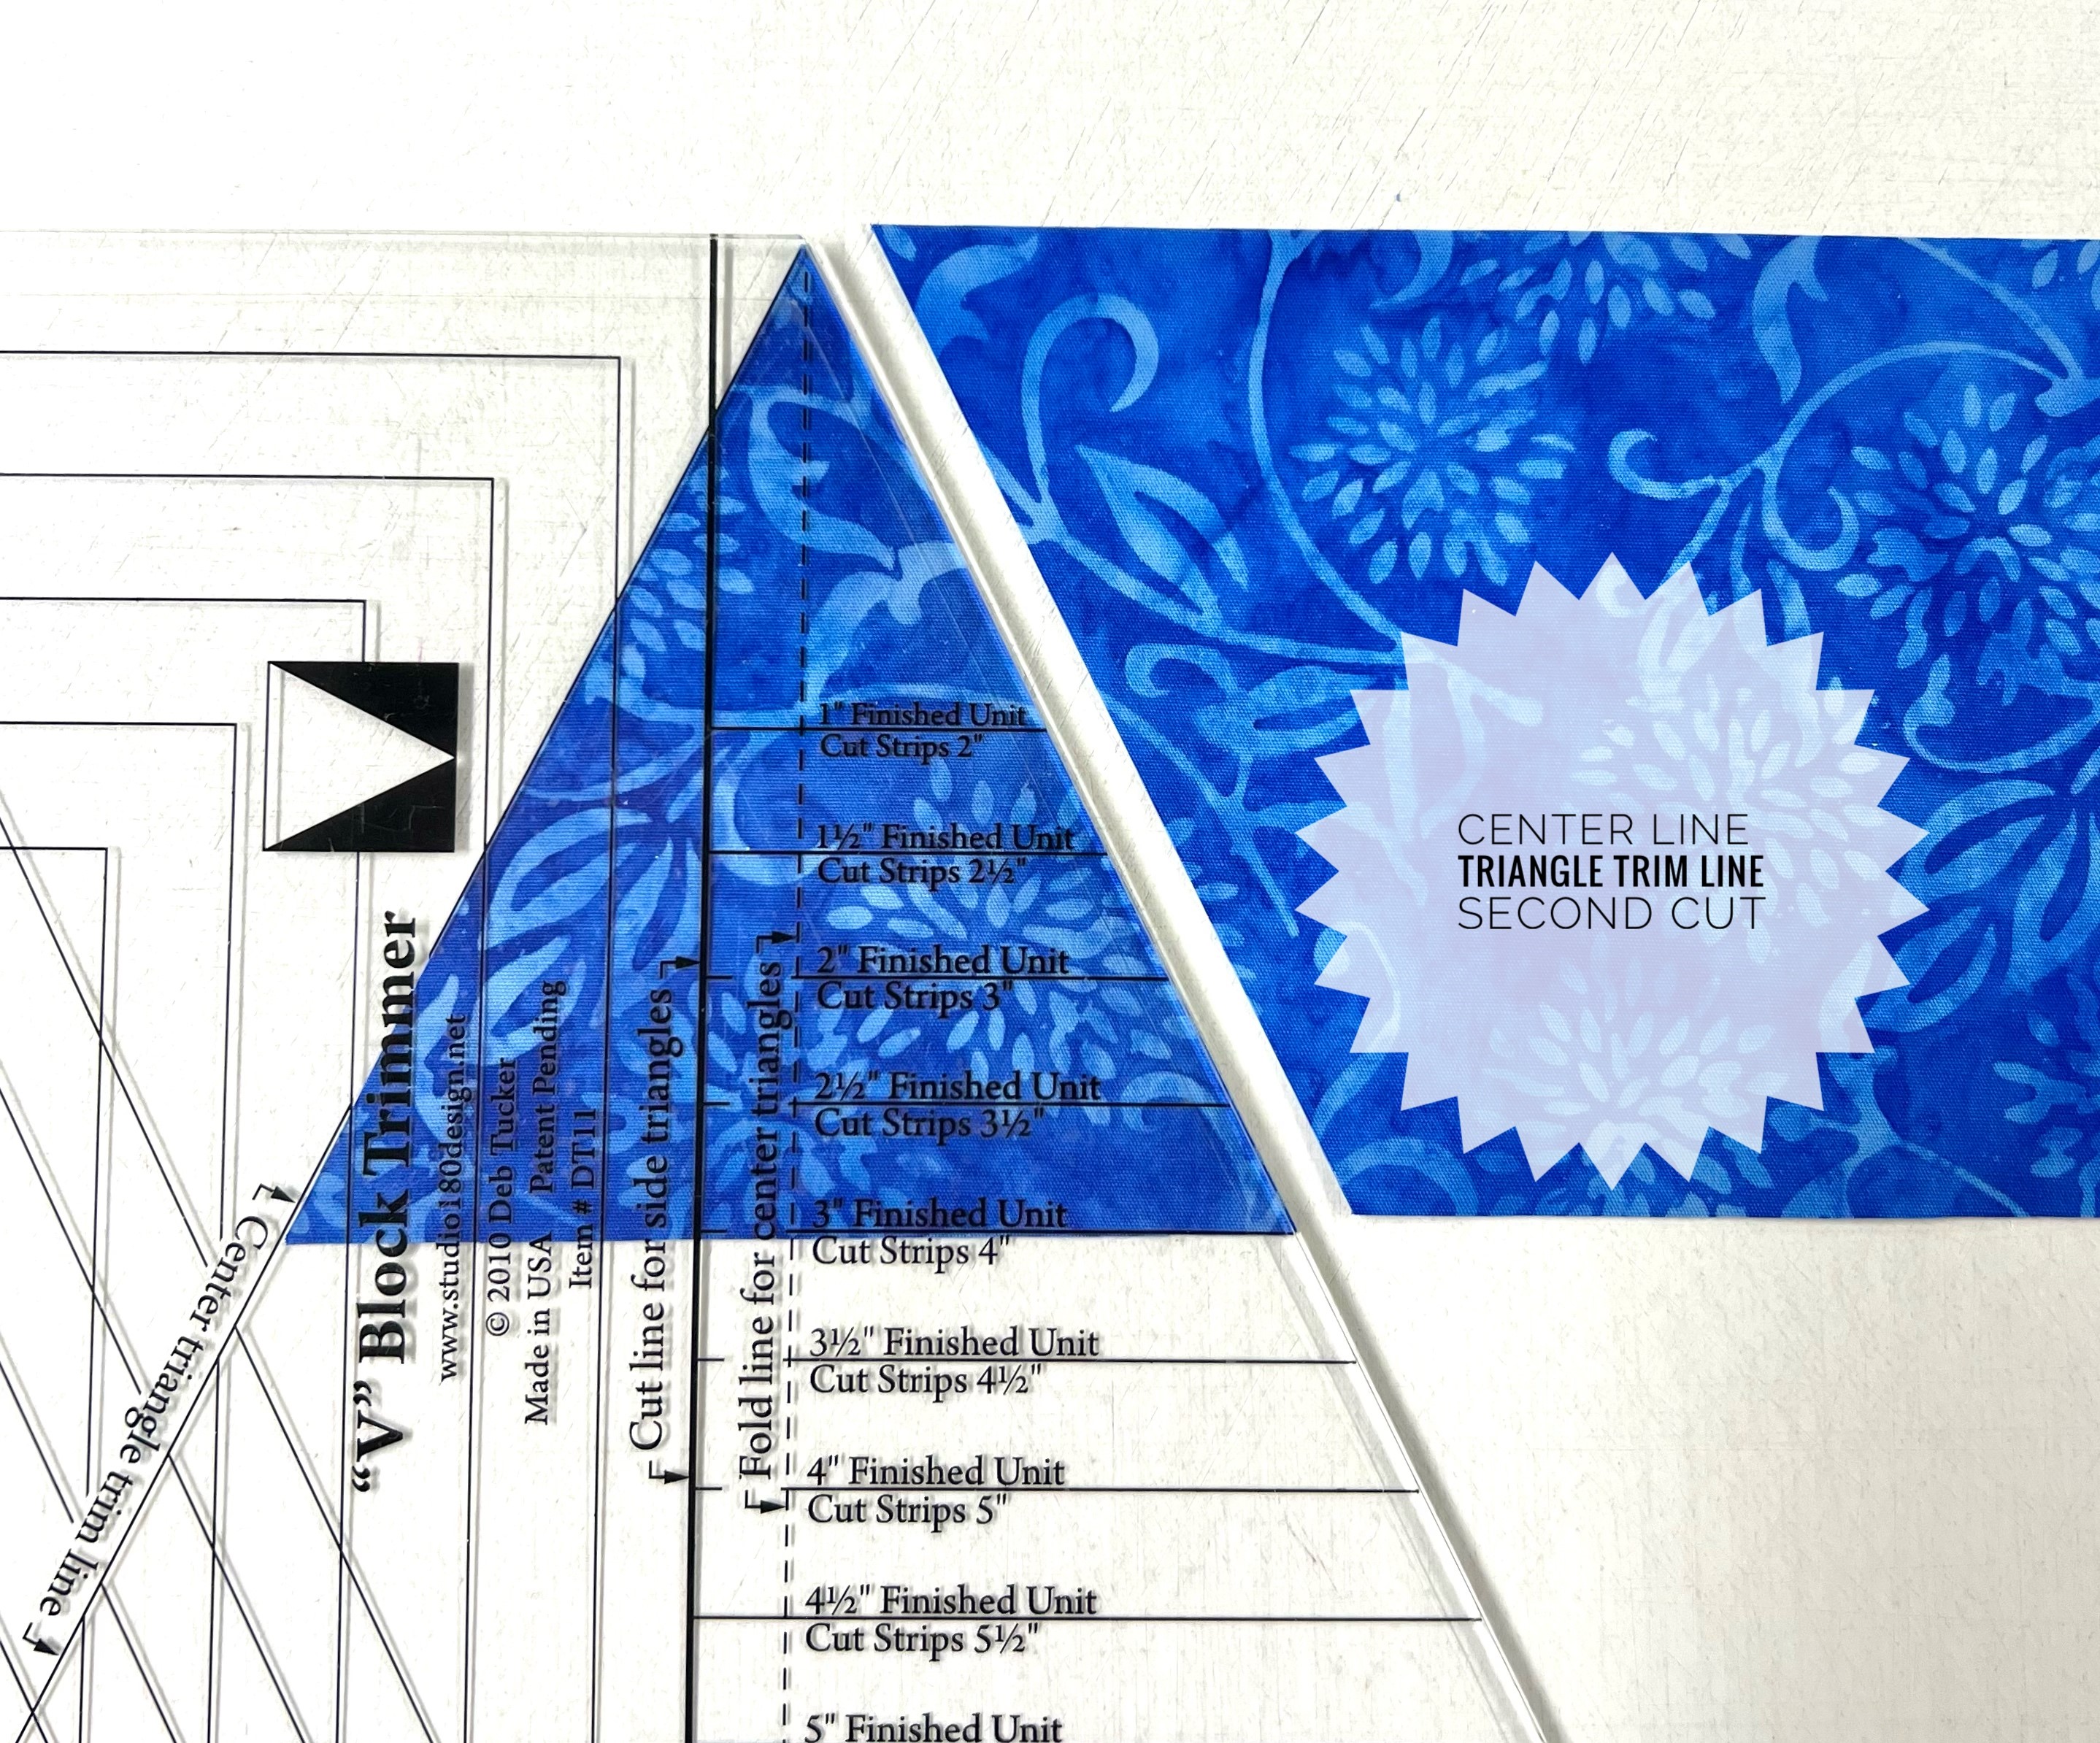
I cut 13″ WOF strips and used my Star 60 ruler and my 6″ x 24″ Olfa ruler to establish the 60 degree line and continued to cut side triangles for my 24″ diamonds

Layout the side triangles on the left and right sides of the diamond.


Stitch the right side triangle first, press toward the diamond. Stitch the left side triangle, press toward the side triangle.


Rotate the unit so that the untrimmed edge is either by your right hand for trimming if you are right handed or by your left hand if left handed. Locate the Flat Edge trim line on the Star 60™ Tool. Align the Flat Edge trim lines with the seams of the Diamond. Bump up a 24″ long ruler next to the Star 60 ruler and trim, leaving a 1/4″ seam allowance.

Stitch triangles together in groups of 3, creating half hexagons, press seams open. This is a 48″ star.


Create Half Triangle Rectangles by cutting a 25″ WOF strip, trim to 16″ x 25″, make sure they are right or wrong sides together, align the ½” line on the tool with
the top edge and the center line with the edge of the rectangle, place a regular ruler next to the Star 60 tool. Move the Star 60 tool out of the way and cut along the edge of your long ruler.

The Half Triangle rectangles (HTR) turn the hexagon into a rectangle. Once the HTR’s are stitched to the half hexies I added 4.5″ strips to the side to make it a square.


My Star 60 Lone Star top measures 65″ x 65″, and was made Island Batik fabrics.
#studio180design #islandbatik #star60

Every month participating Studio 180 Design Certified instructors reimagine a BlockBuster block. February was BlockBuster #8.

When I looked at the block I thought it needed a different center. I wanted there to be a glow around the star.

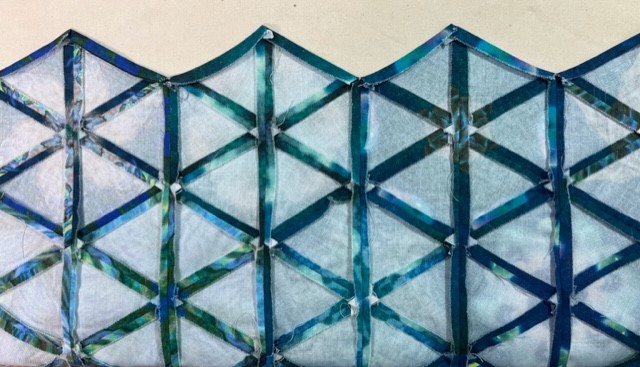
Blue V Blocks.
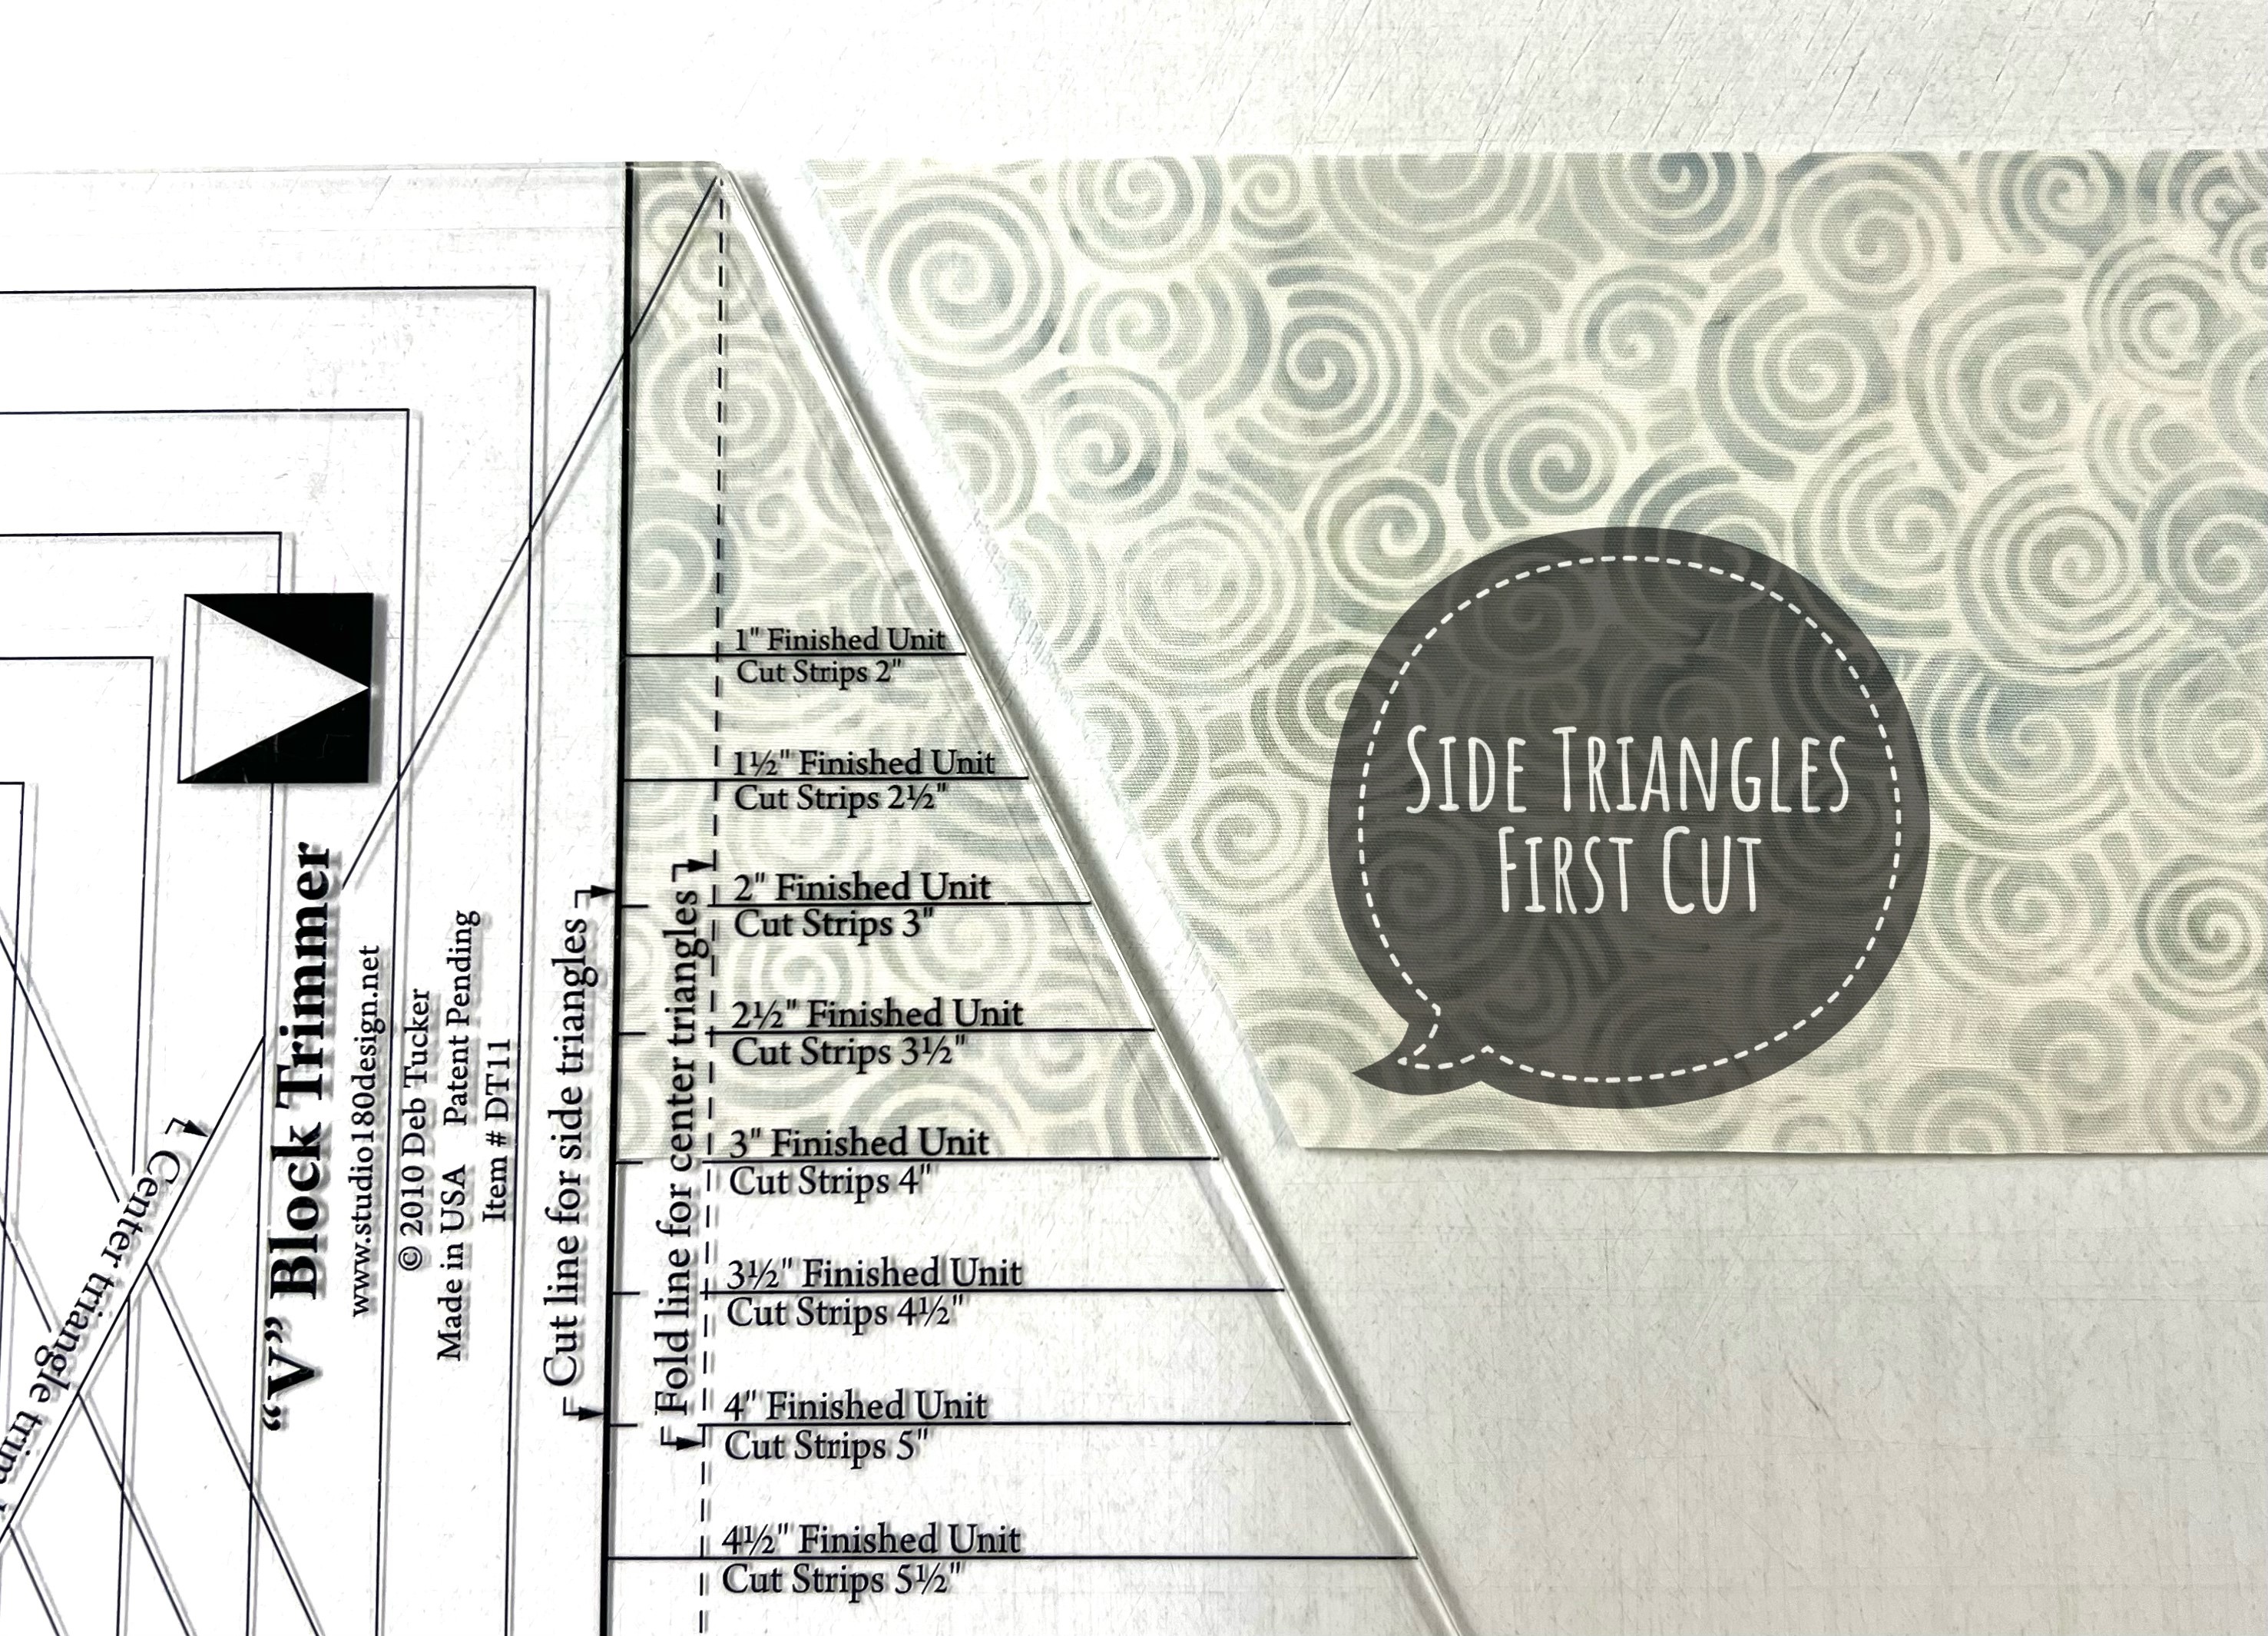


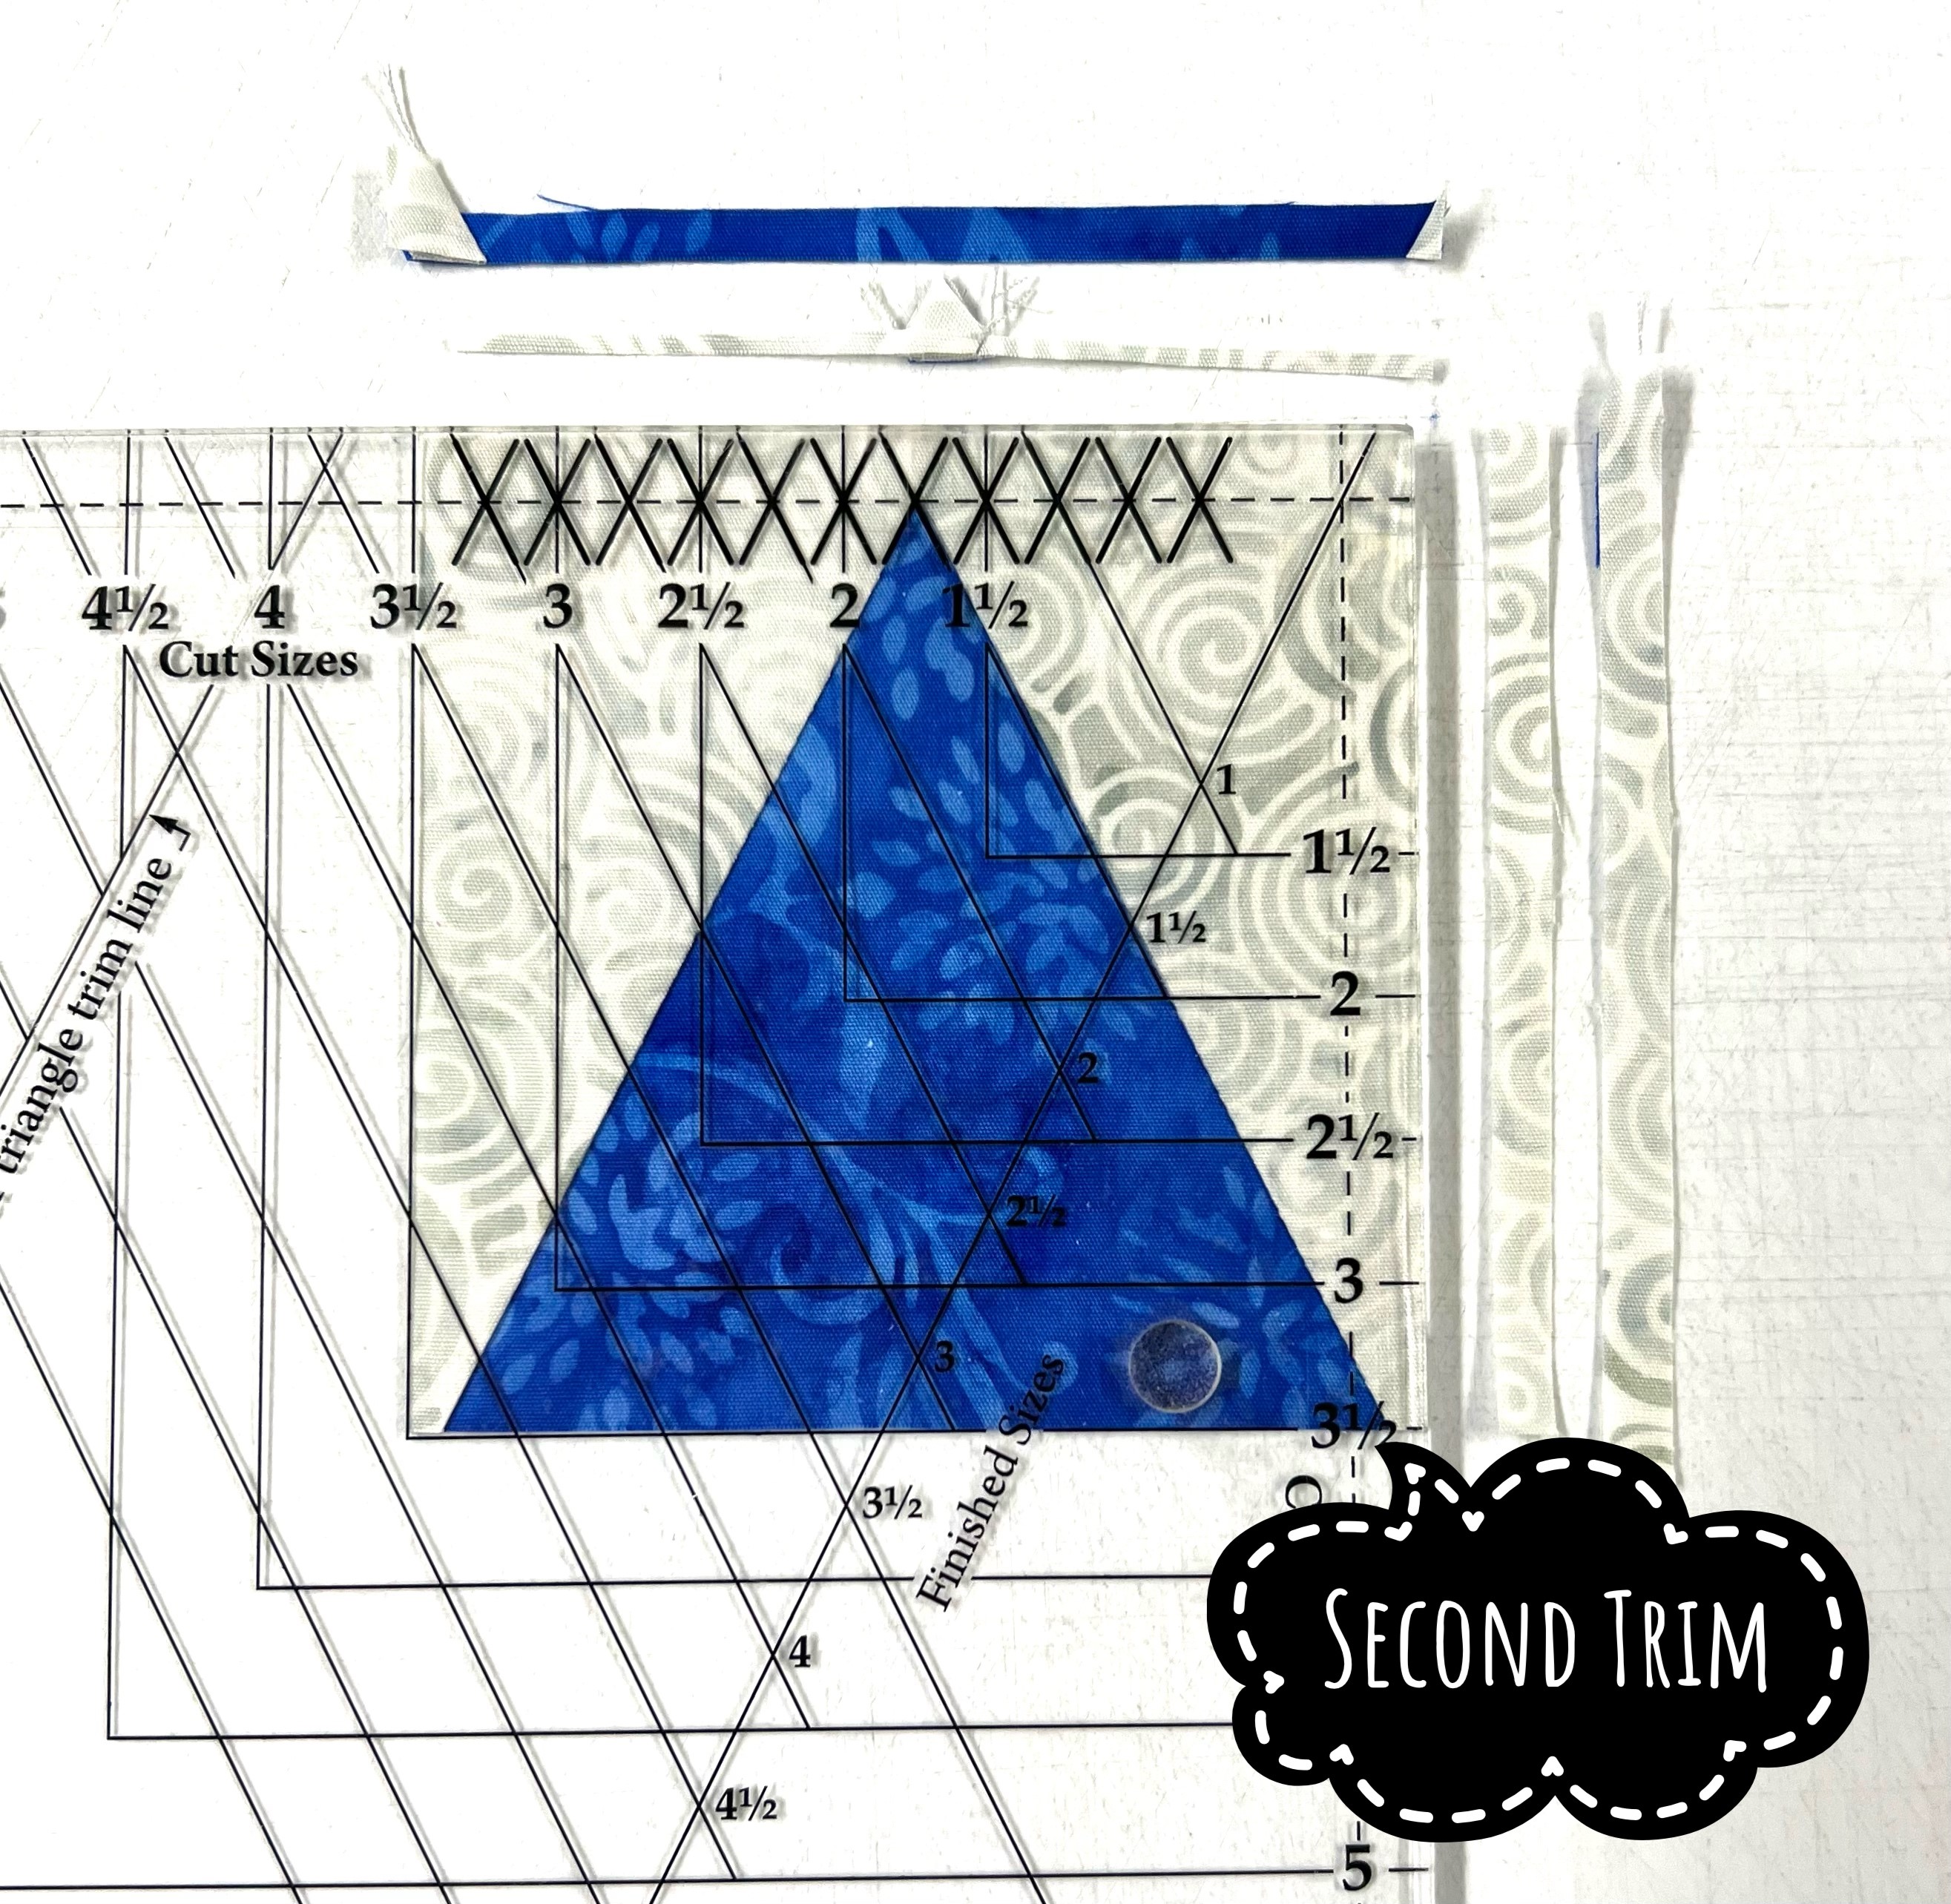

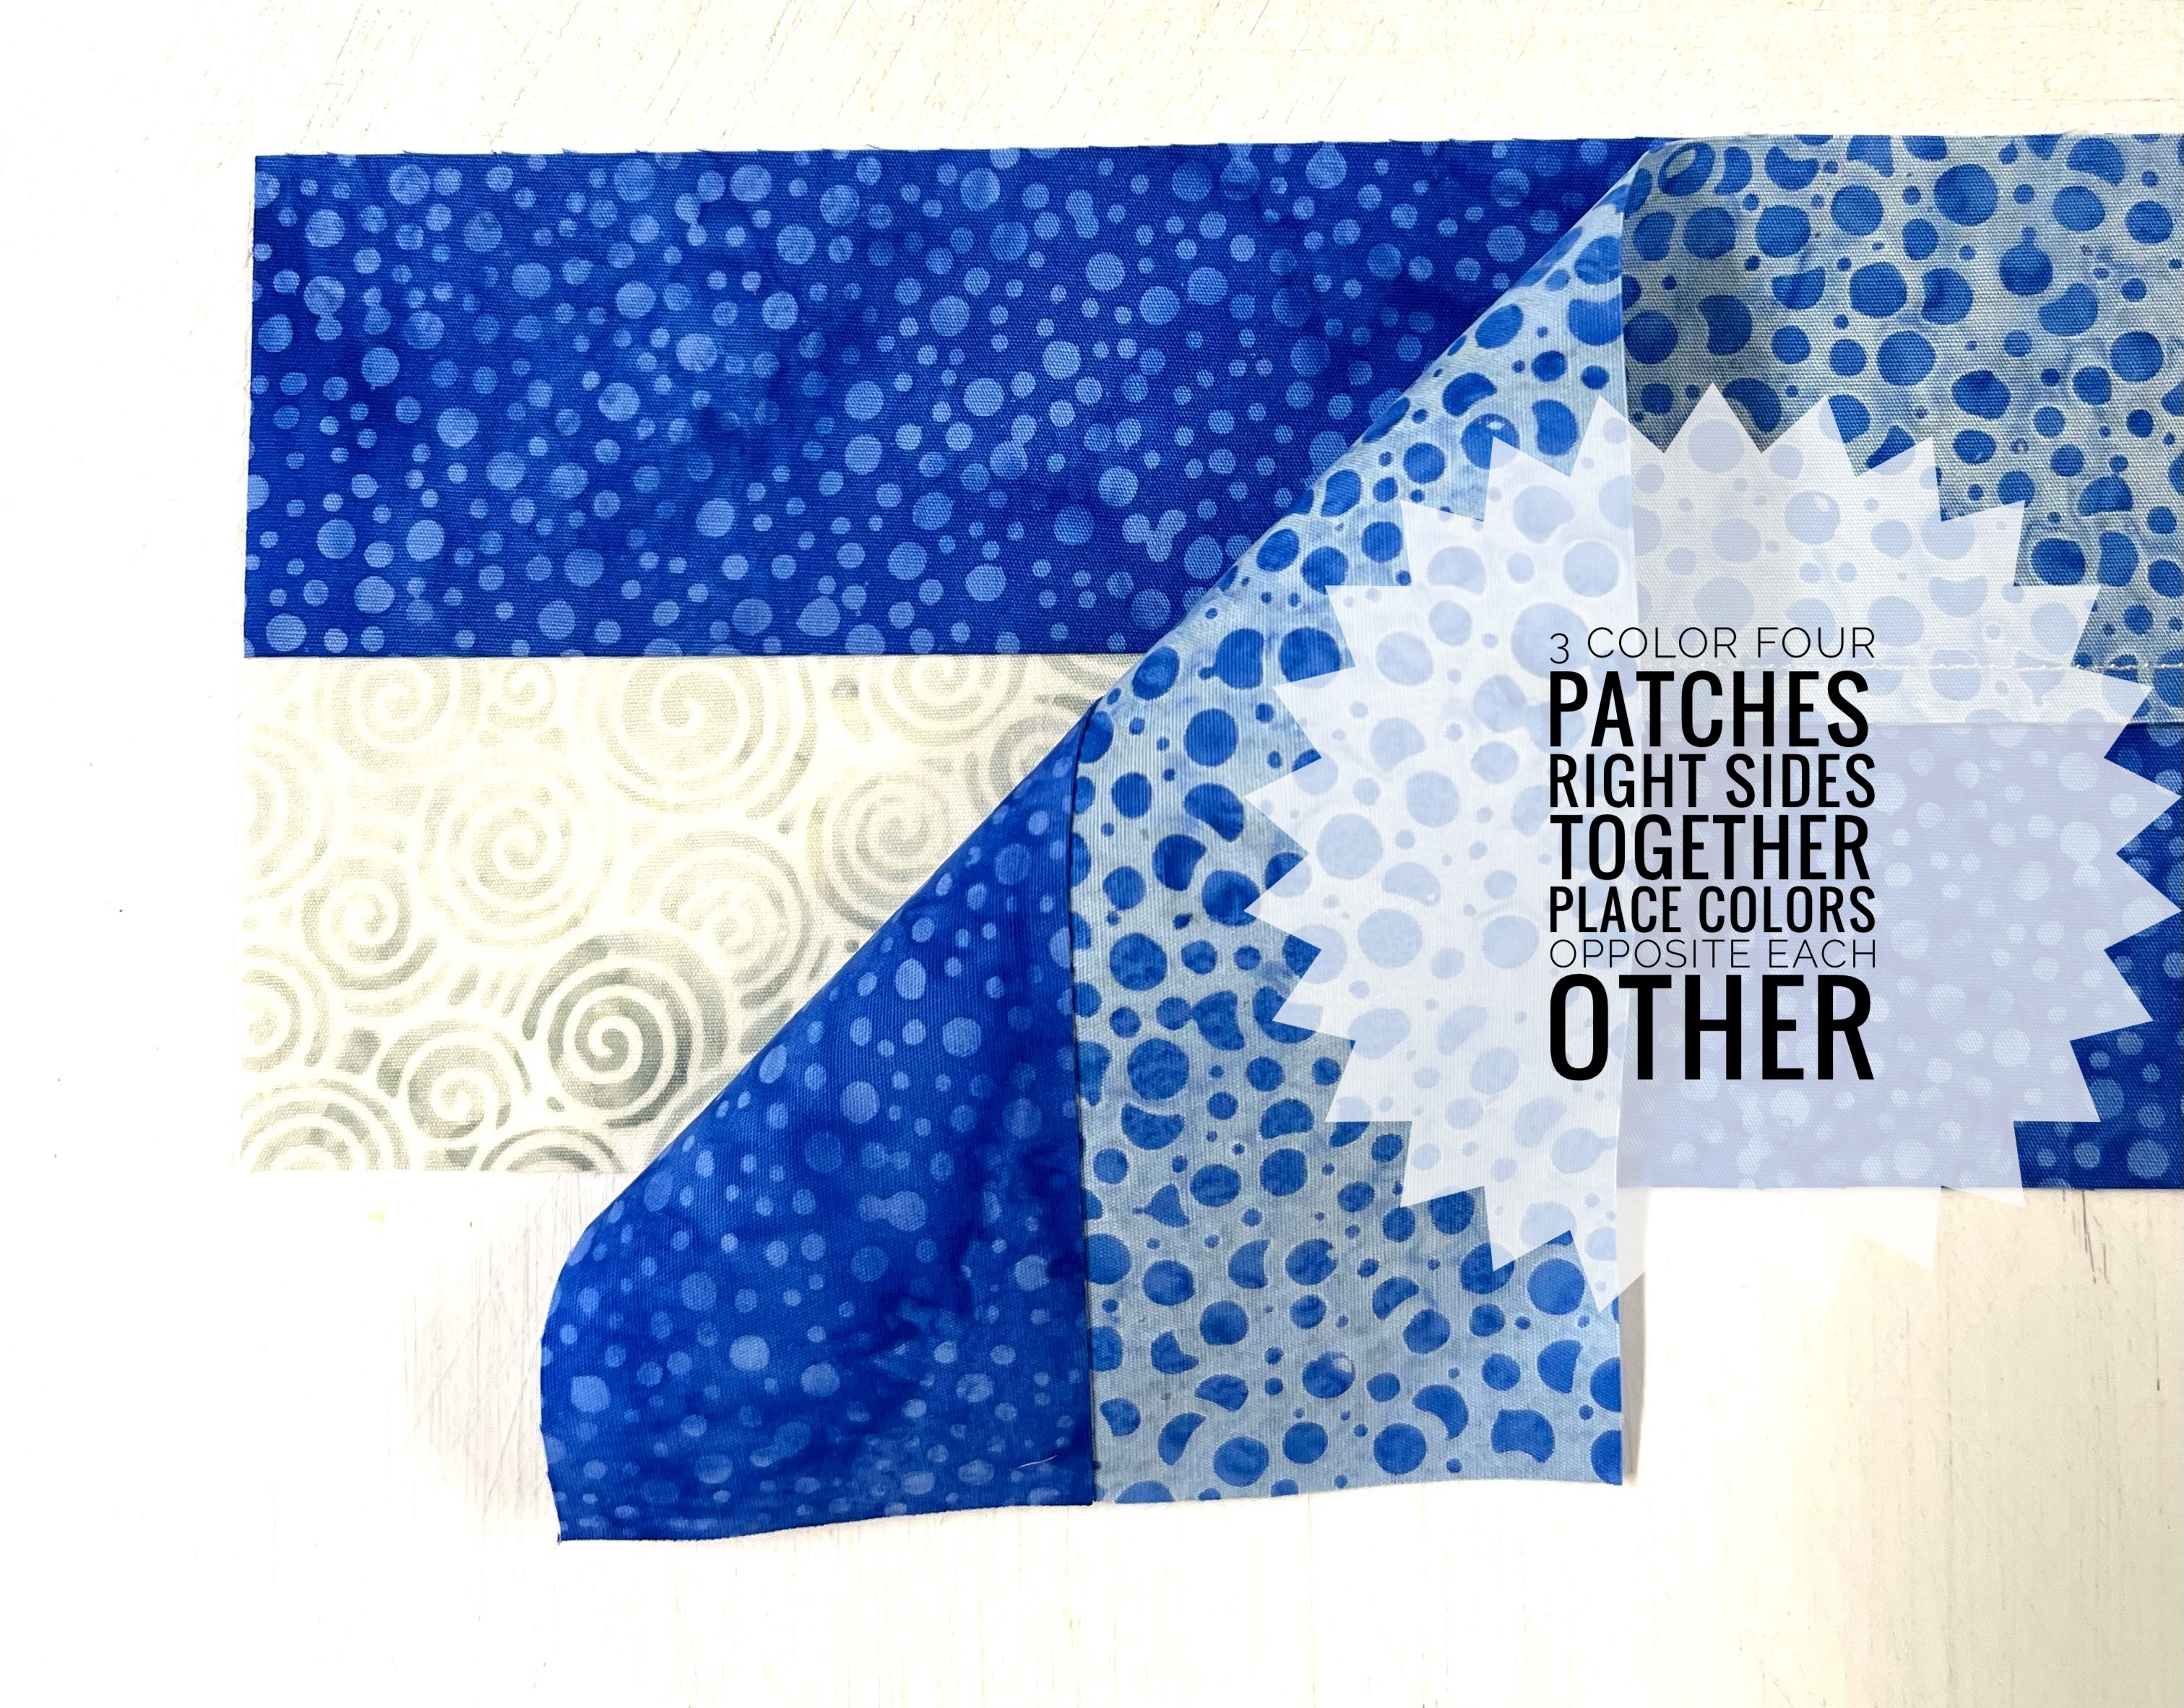


I made 1″ V Blocks for the center of my BlockBuster #8, 9.5″ finished block. See what my fellow CI’s are up to:
@murgabooquilts
@quiltingaffectiondesigns
@sarfr08
@quilthaventhreads
@quiltingwithmrsclaus1
@sew_square_quilting
@thequiltingescape
@quiltersnook
@lynnwheatleyquilter
#54-40orfightblockchallenge
#blockbusteronequiltblock
#studio180blockchallenge
#FebruaryCIblockchallenge
#FebruaryS180blockchallenge
#quilt
#quilts
#Studio180CertifiedInstructor
#quiltblock
#quiltblocks
#tuckeruniversity
#studio180design
#tuckertrimmer#vblock
#fourpatchsquareup

February 2023 Zoom Classes:

February 11, 2023 – 1:00 PM (EST) Star 60: 3 hour class. Difficulty 2 Stars. This class is an introduction into making the Star 60, which can be made in 17 sizes. As with all the Star 60 Stars they can be incorporated into your OBW’s.

February 18, 2013, 1:00 PM (EST) – Hollow Cube 60: 4 hour class. Difficulty 3 Stars. Add the illusion that light is shining on your quilt from the direction you choose by adding Hollow Cube 60’s. These cubes can be made in 16 sizes. You must stay organized, but they are simple to construct.
Sign up for these zoom classes here: OBW & Star 60 Zoom Classes for 2023 | If These Threads Could Talk
