Tag Archives: Half Square Triangles

Journeys Month 2 – Triangle Units

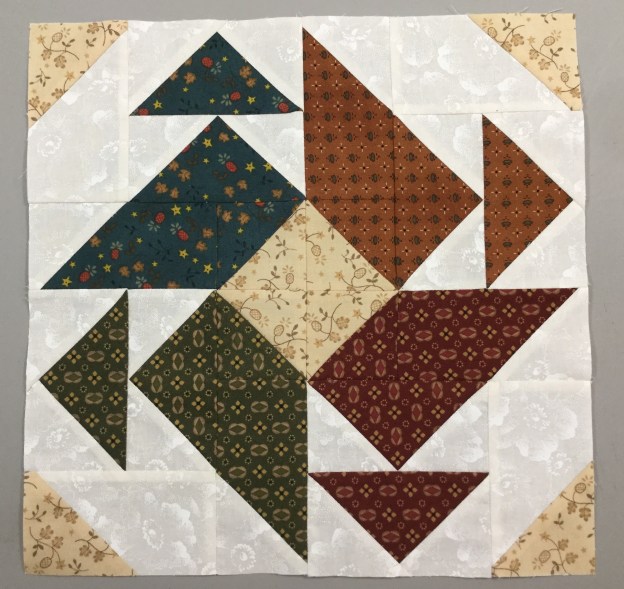
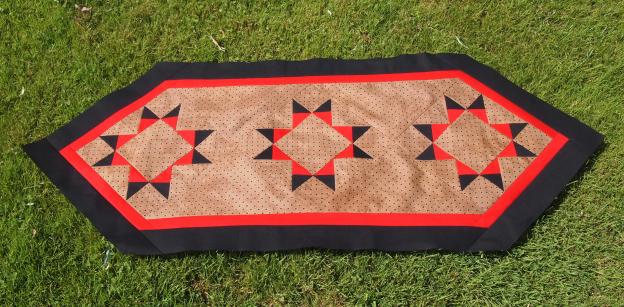
Welcome to Stitchin Heaven’s Journeys Month 2. My helper for Month 2 is Amy Lemke, a talented graphic artist for Studio 180 Design. This month you are going to learn to make Half Square Triangles (HSTs) and Combination Units with your Tucker Trimmer I with Prints 1, 2, 5, 10, & 11. Label your fabrics and use your best cutting skills when cutting your starter squares.

Prints 1, 2, 5, 10 & 11.

Tip: I use plain paper plates and write on them what it is I have cut out. For instance, if you are new to using a Tucker Trimmer, I would label 6 paper plates: one for each print. Using a pen or pencil label the first plate “Print 1, Combination Units (unit D)”, and so on.

Half Square Triangle Construction

Note: For more information and left handed cutting and trimming directions, refer to the instruction that came with your Tucker Trimmer.

Prints 5, 10, & 11.

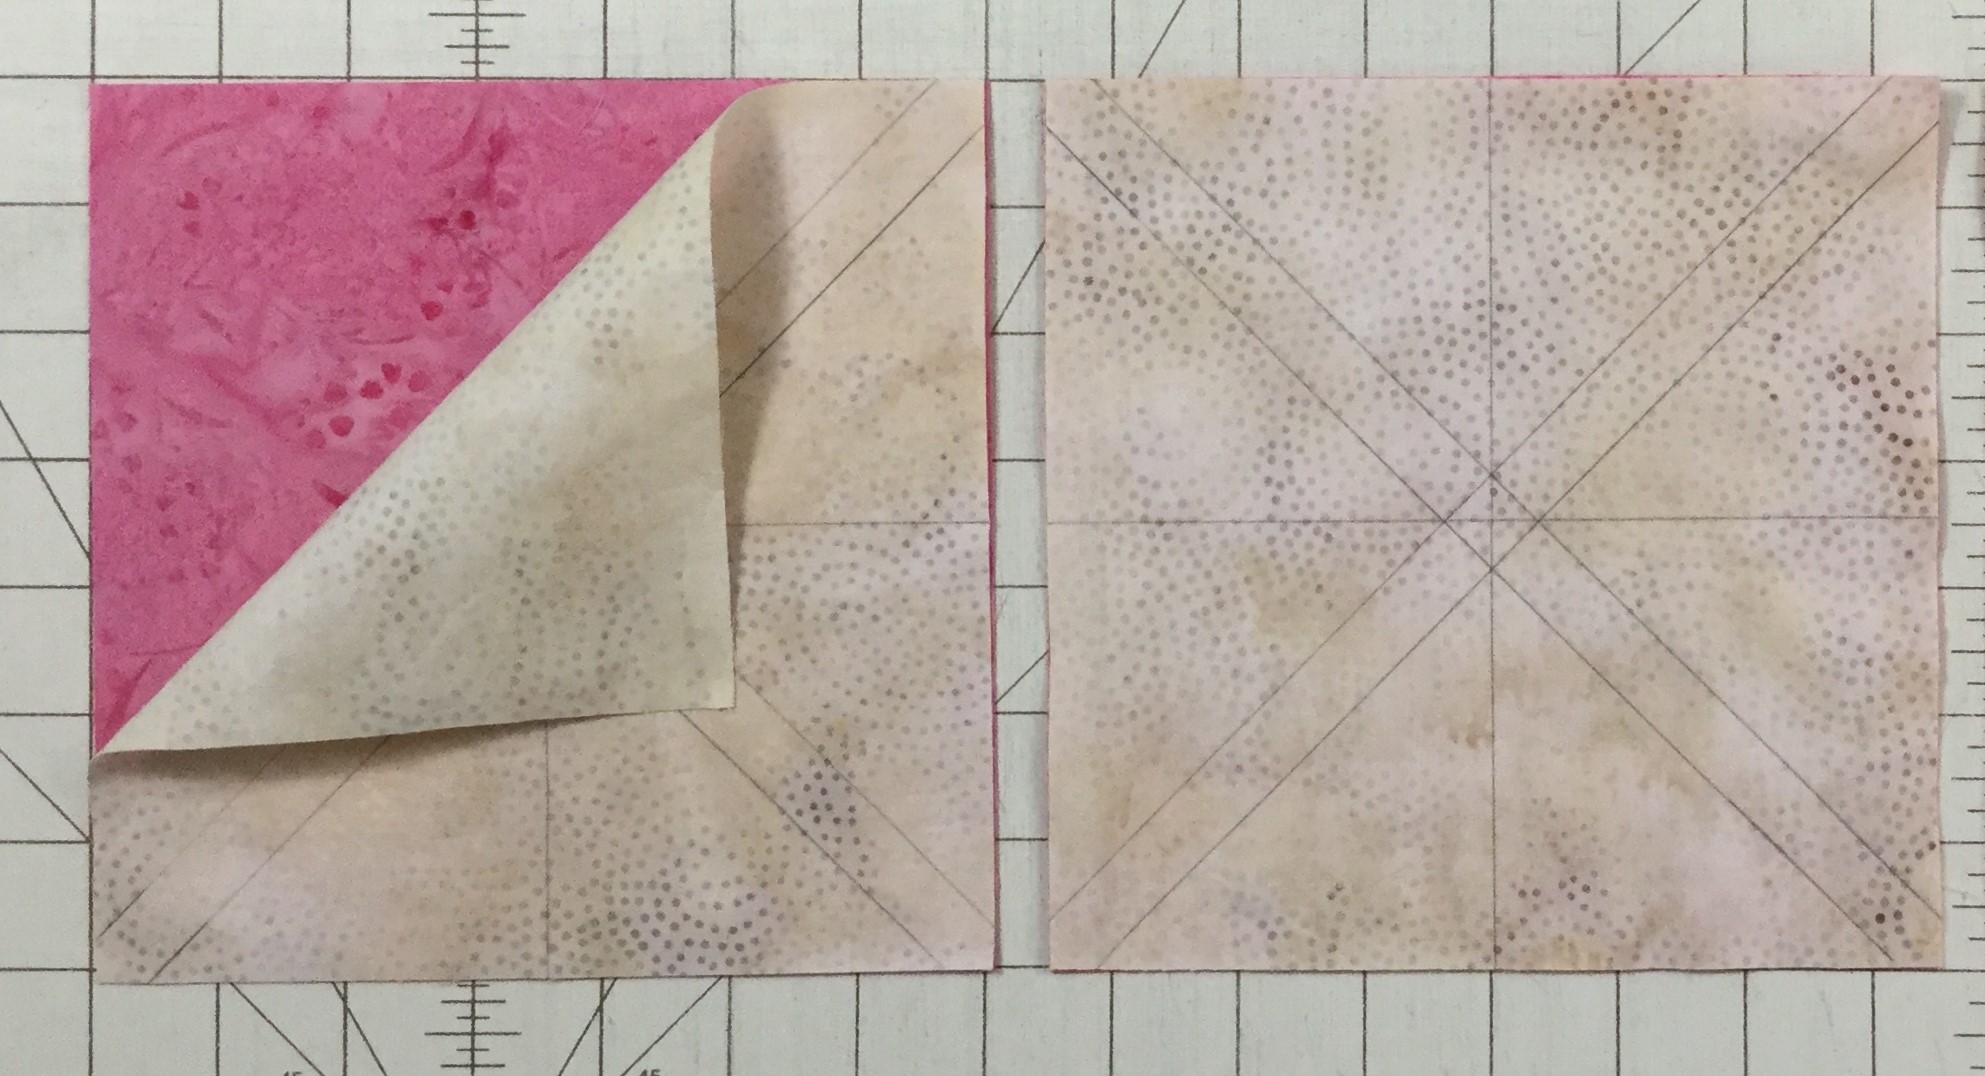
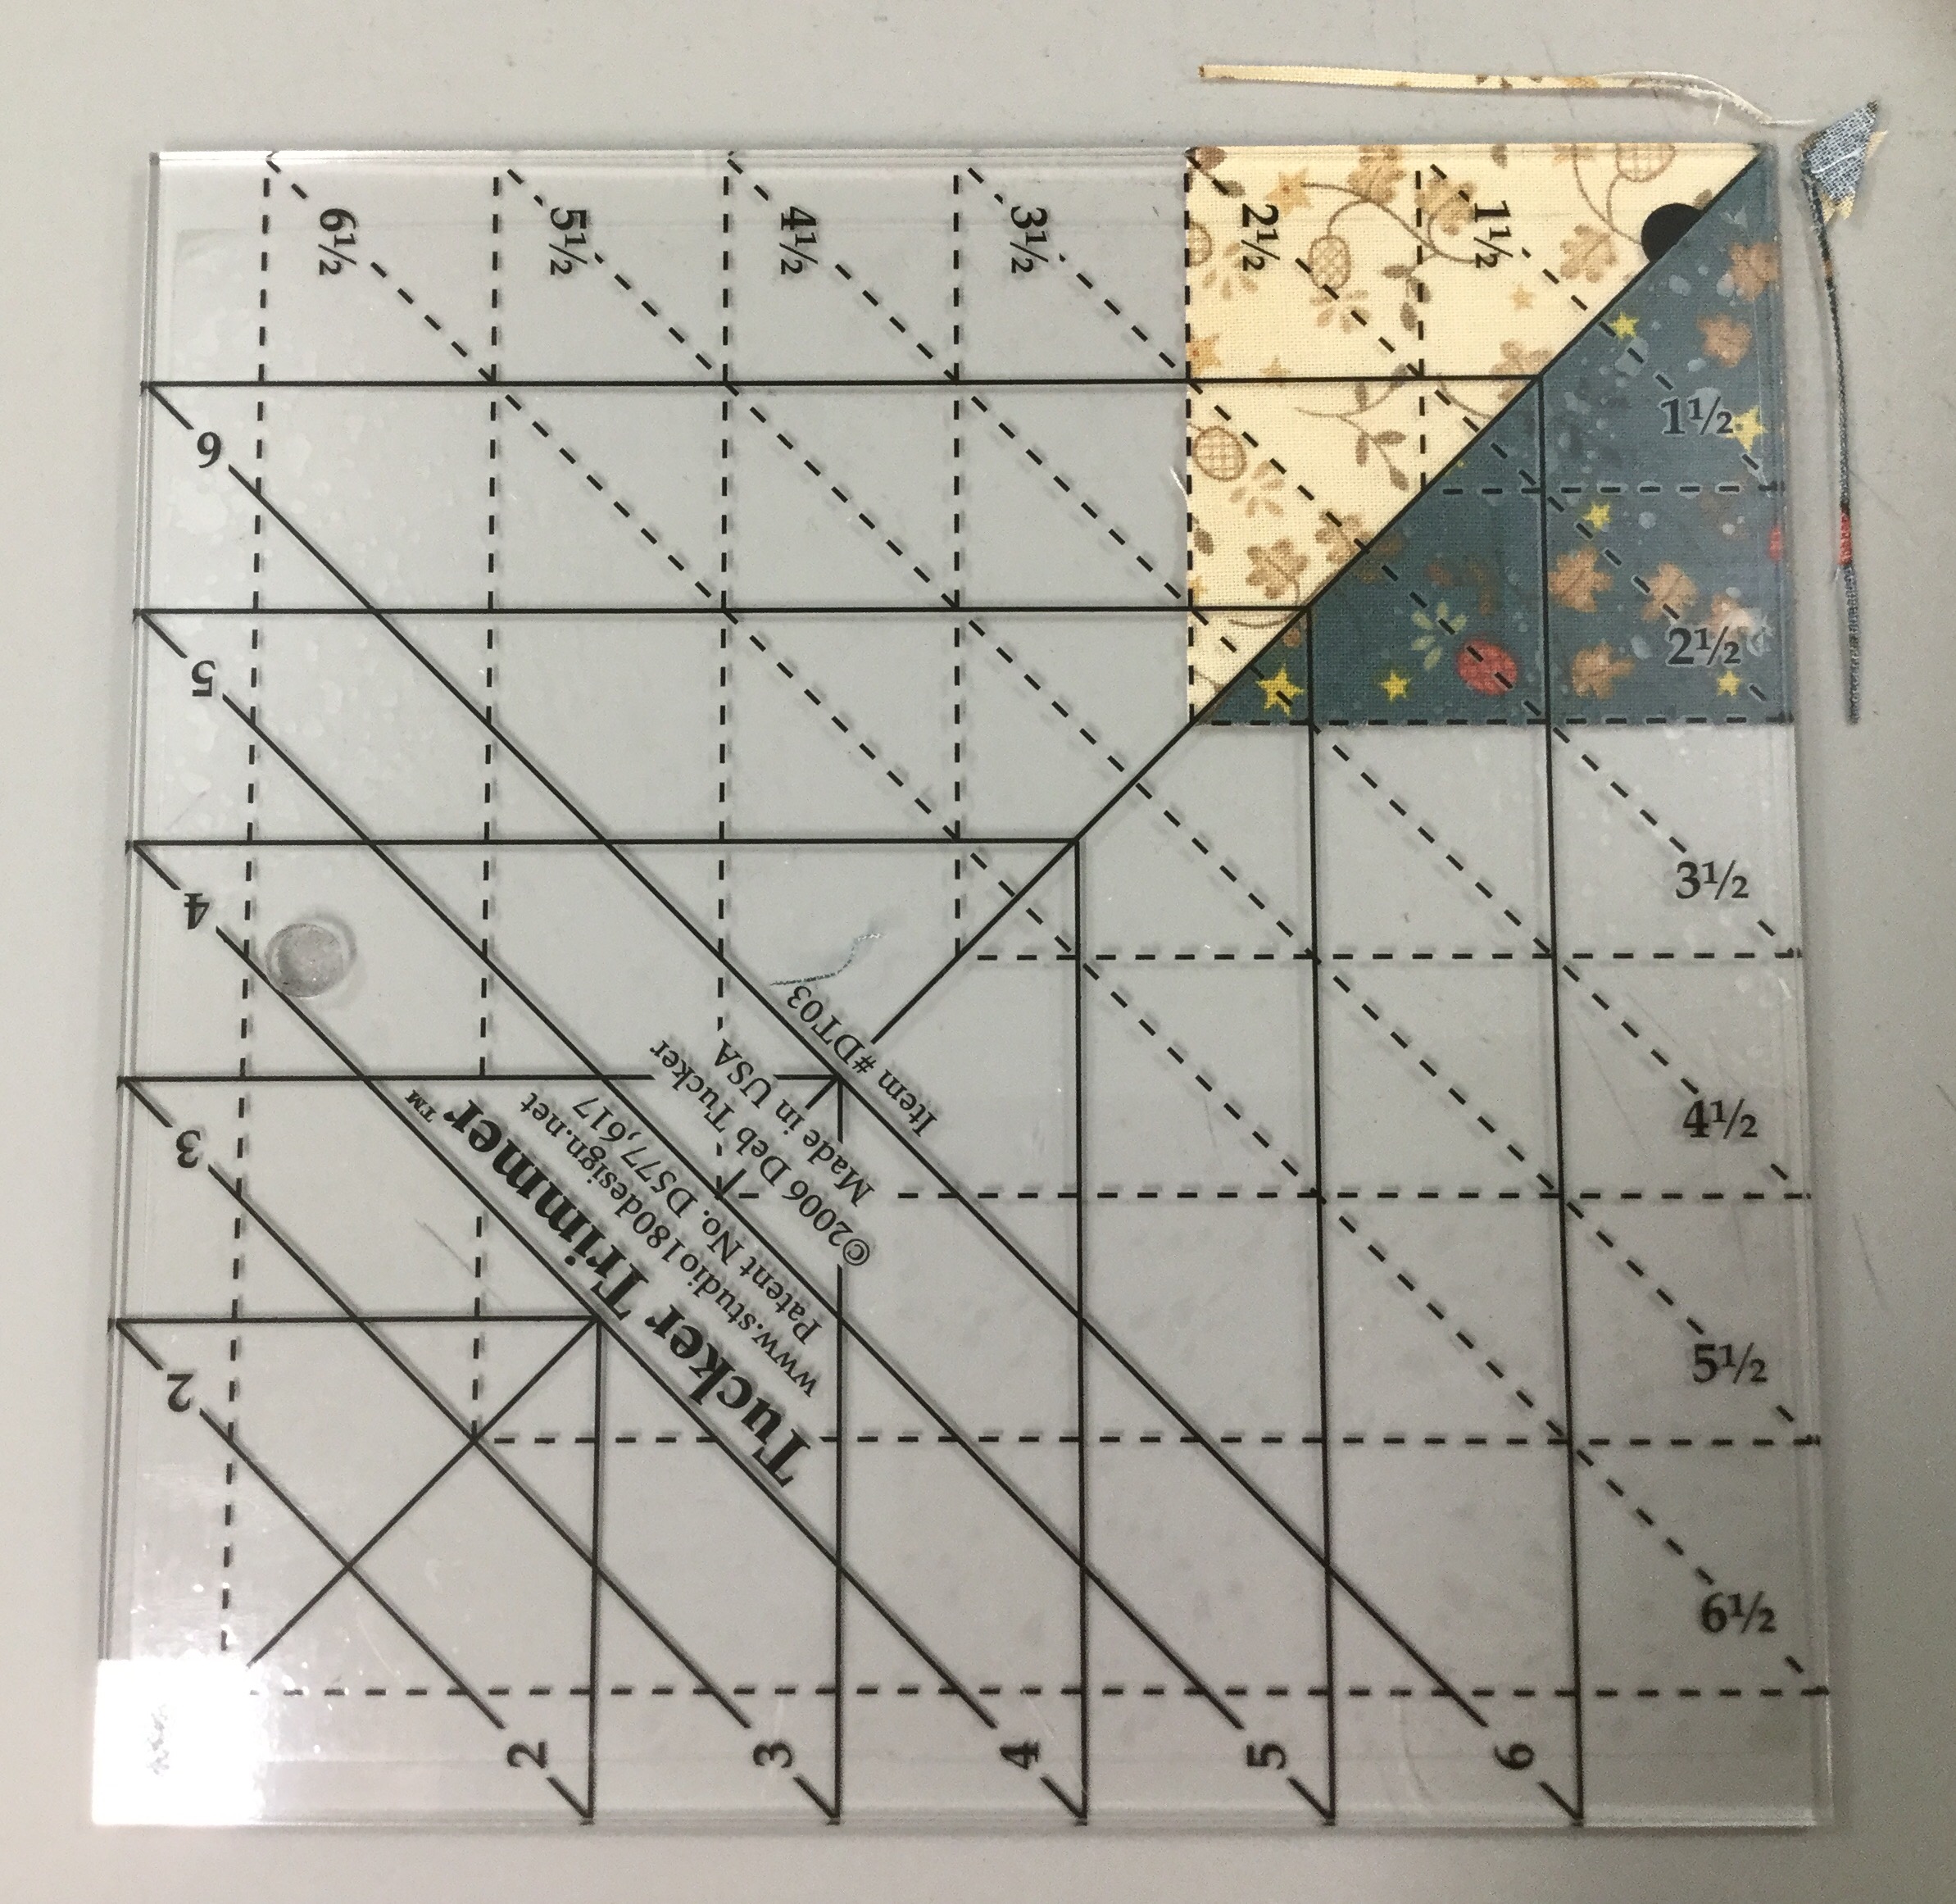
Step 1 – Mark two stitching lines ¼” on either side of the center diagonal. Draw the lines on the wrong side of all the 7” squares from Print 11. I like to use my Quilter’s Magic Wand™ for this task.

Mark using a Magic Wand.

Step 2 – Layer the 7” Print 11 squares right sides together with the 7” squares from Prints 5 and 10. Stitch on the lines, then cut down the middle. Press away from Print 11 or open.

Layer.

Stitch and cut apart.

Press.

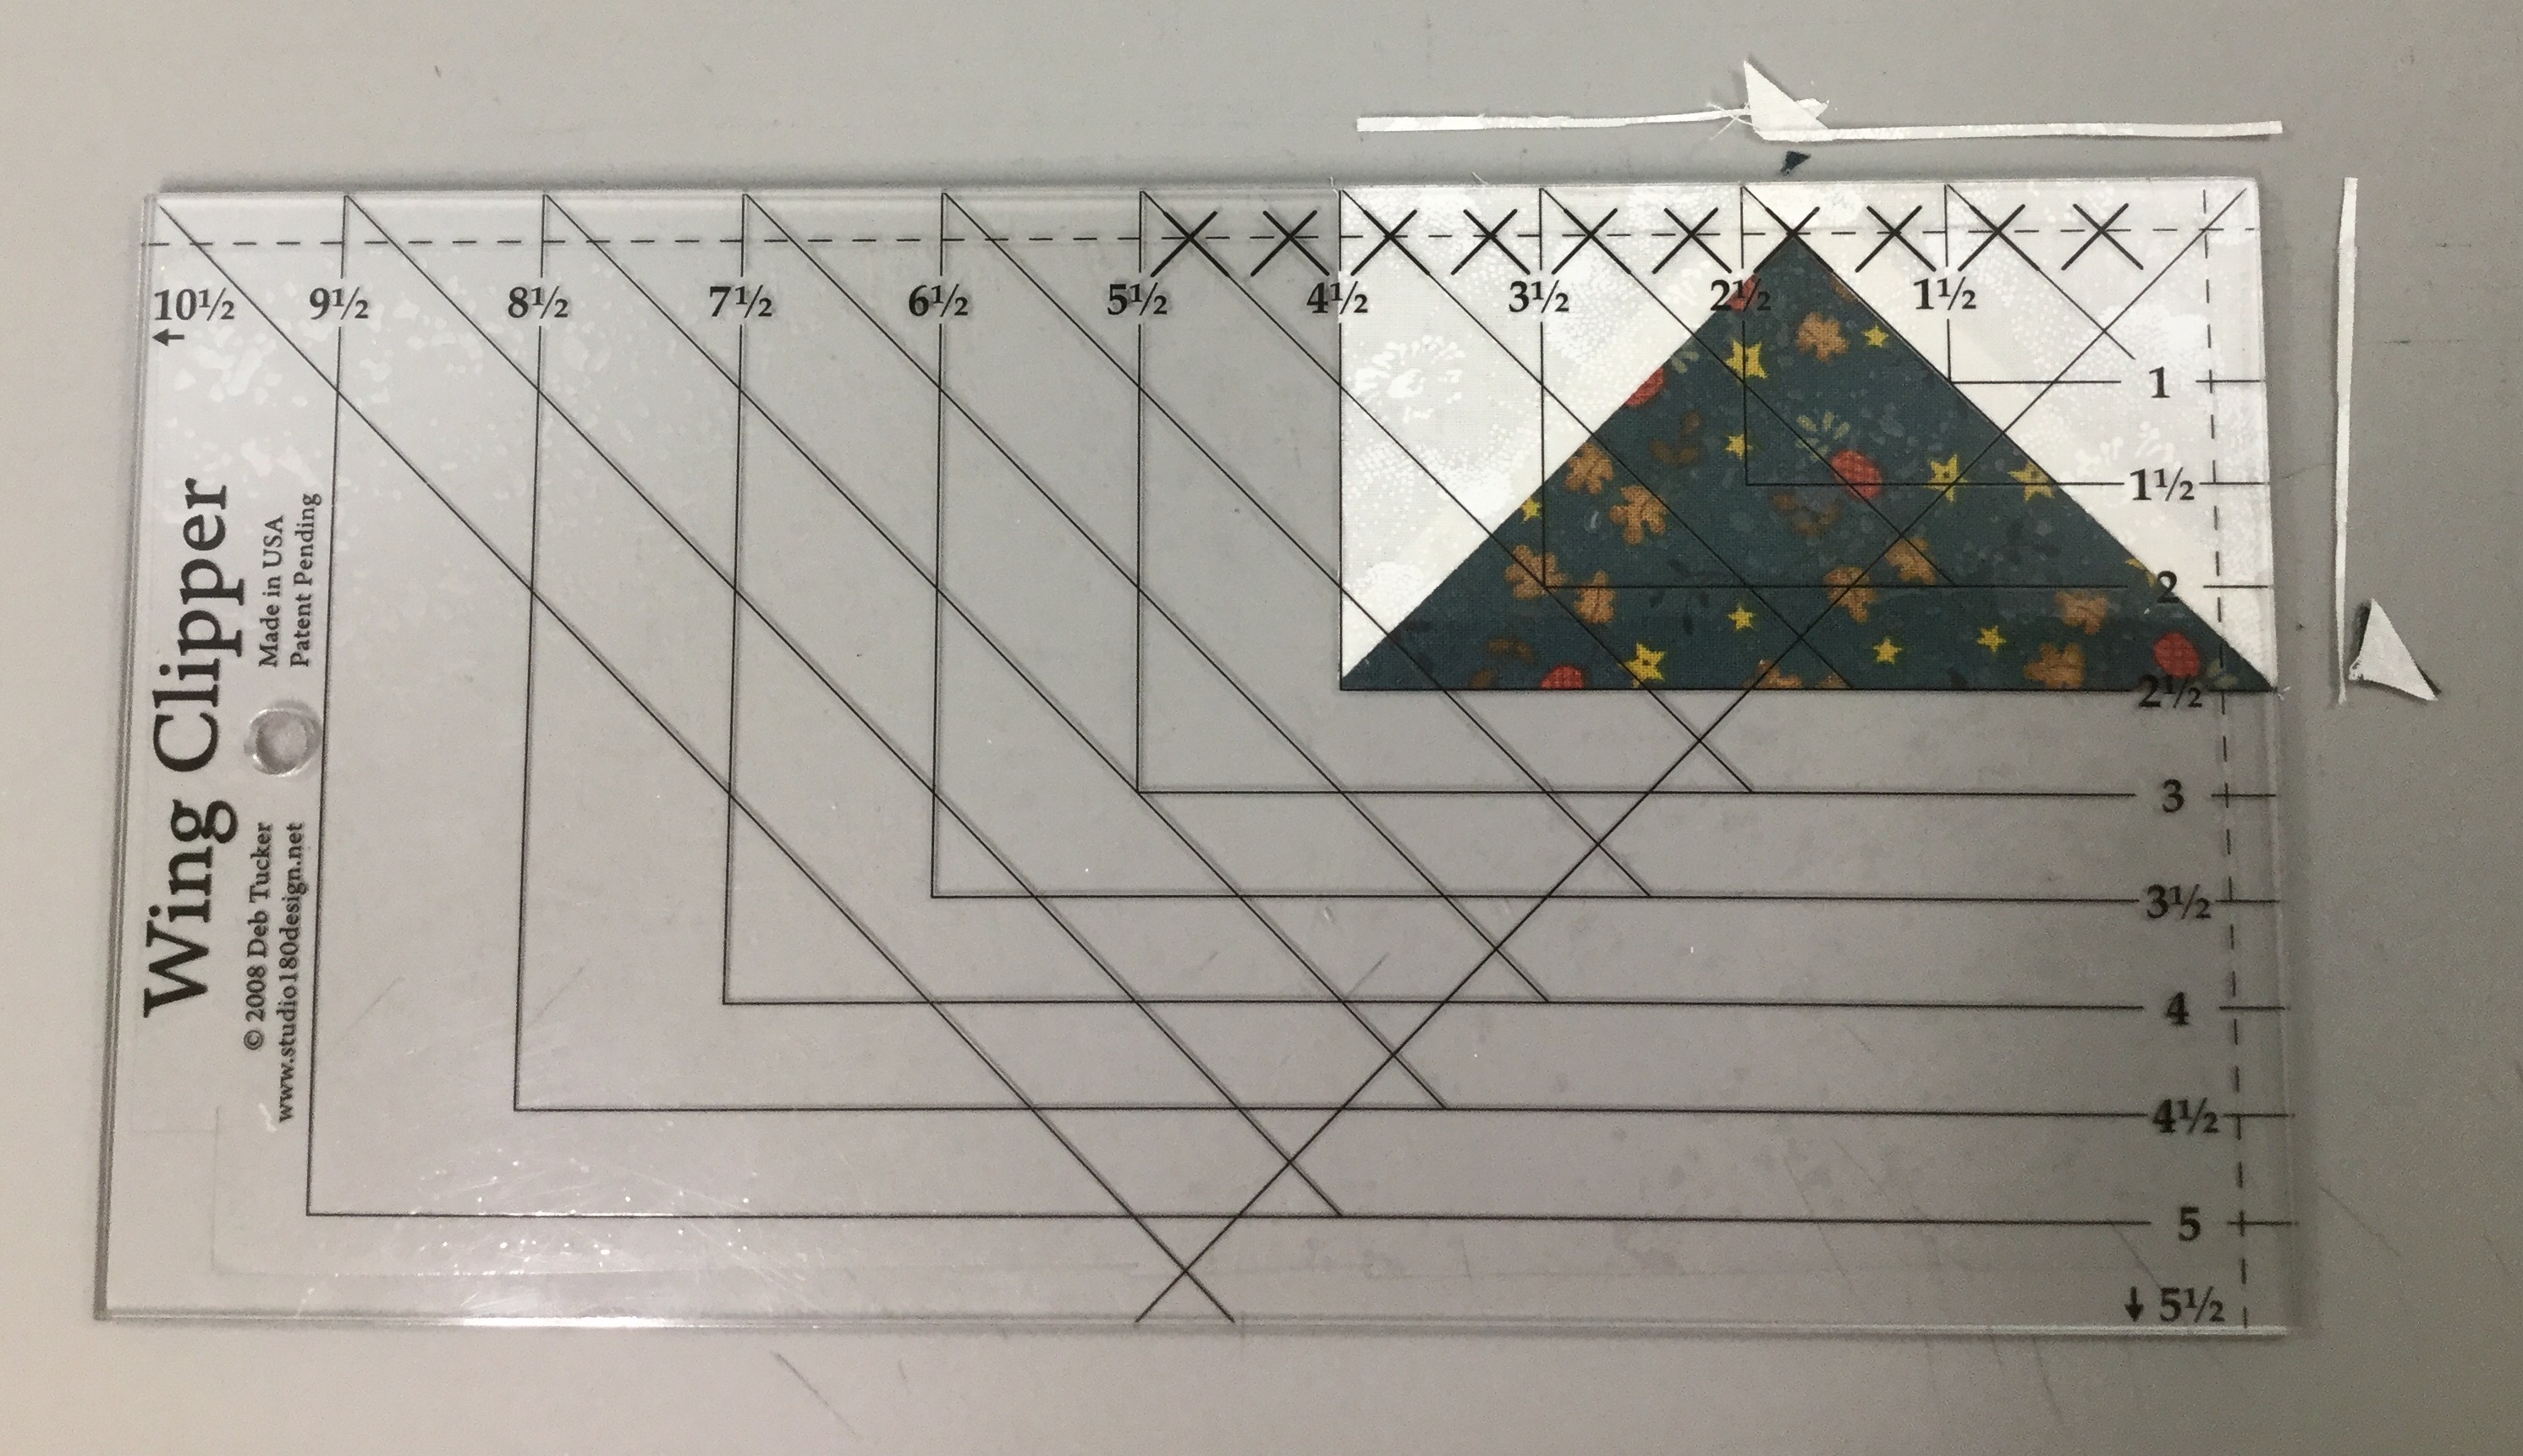
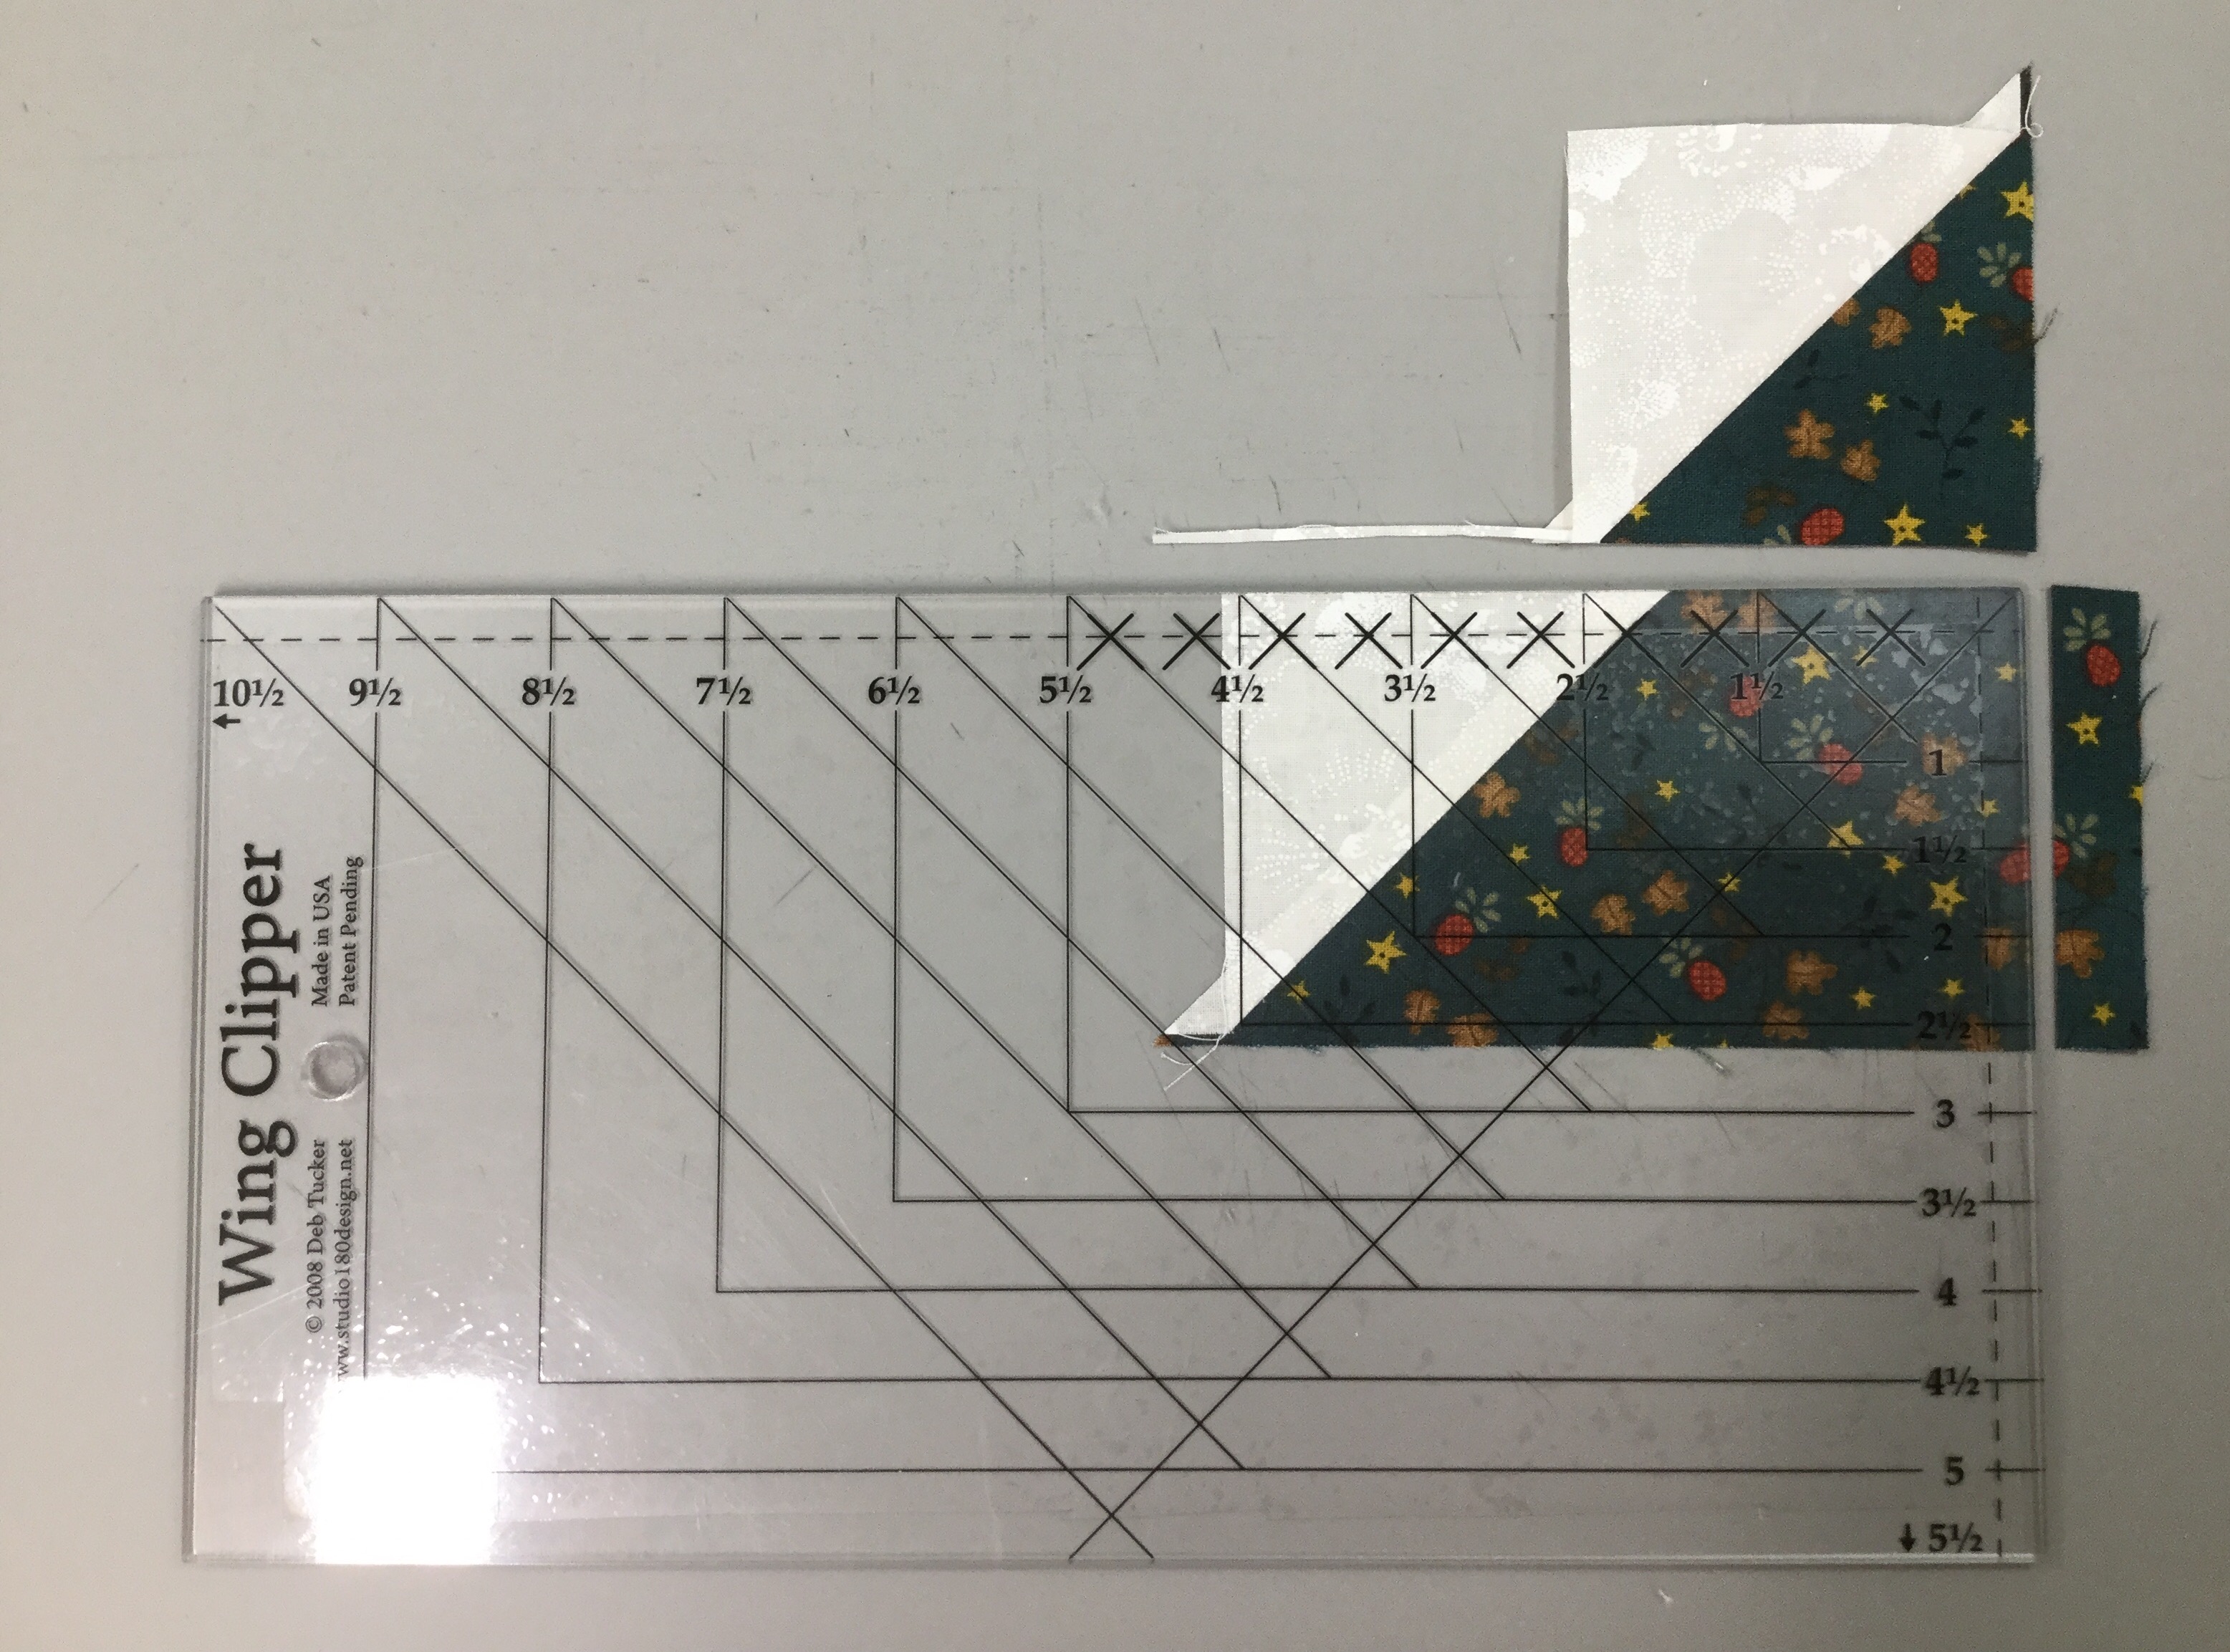
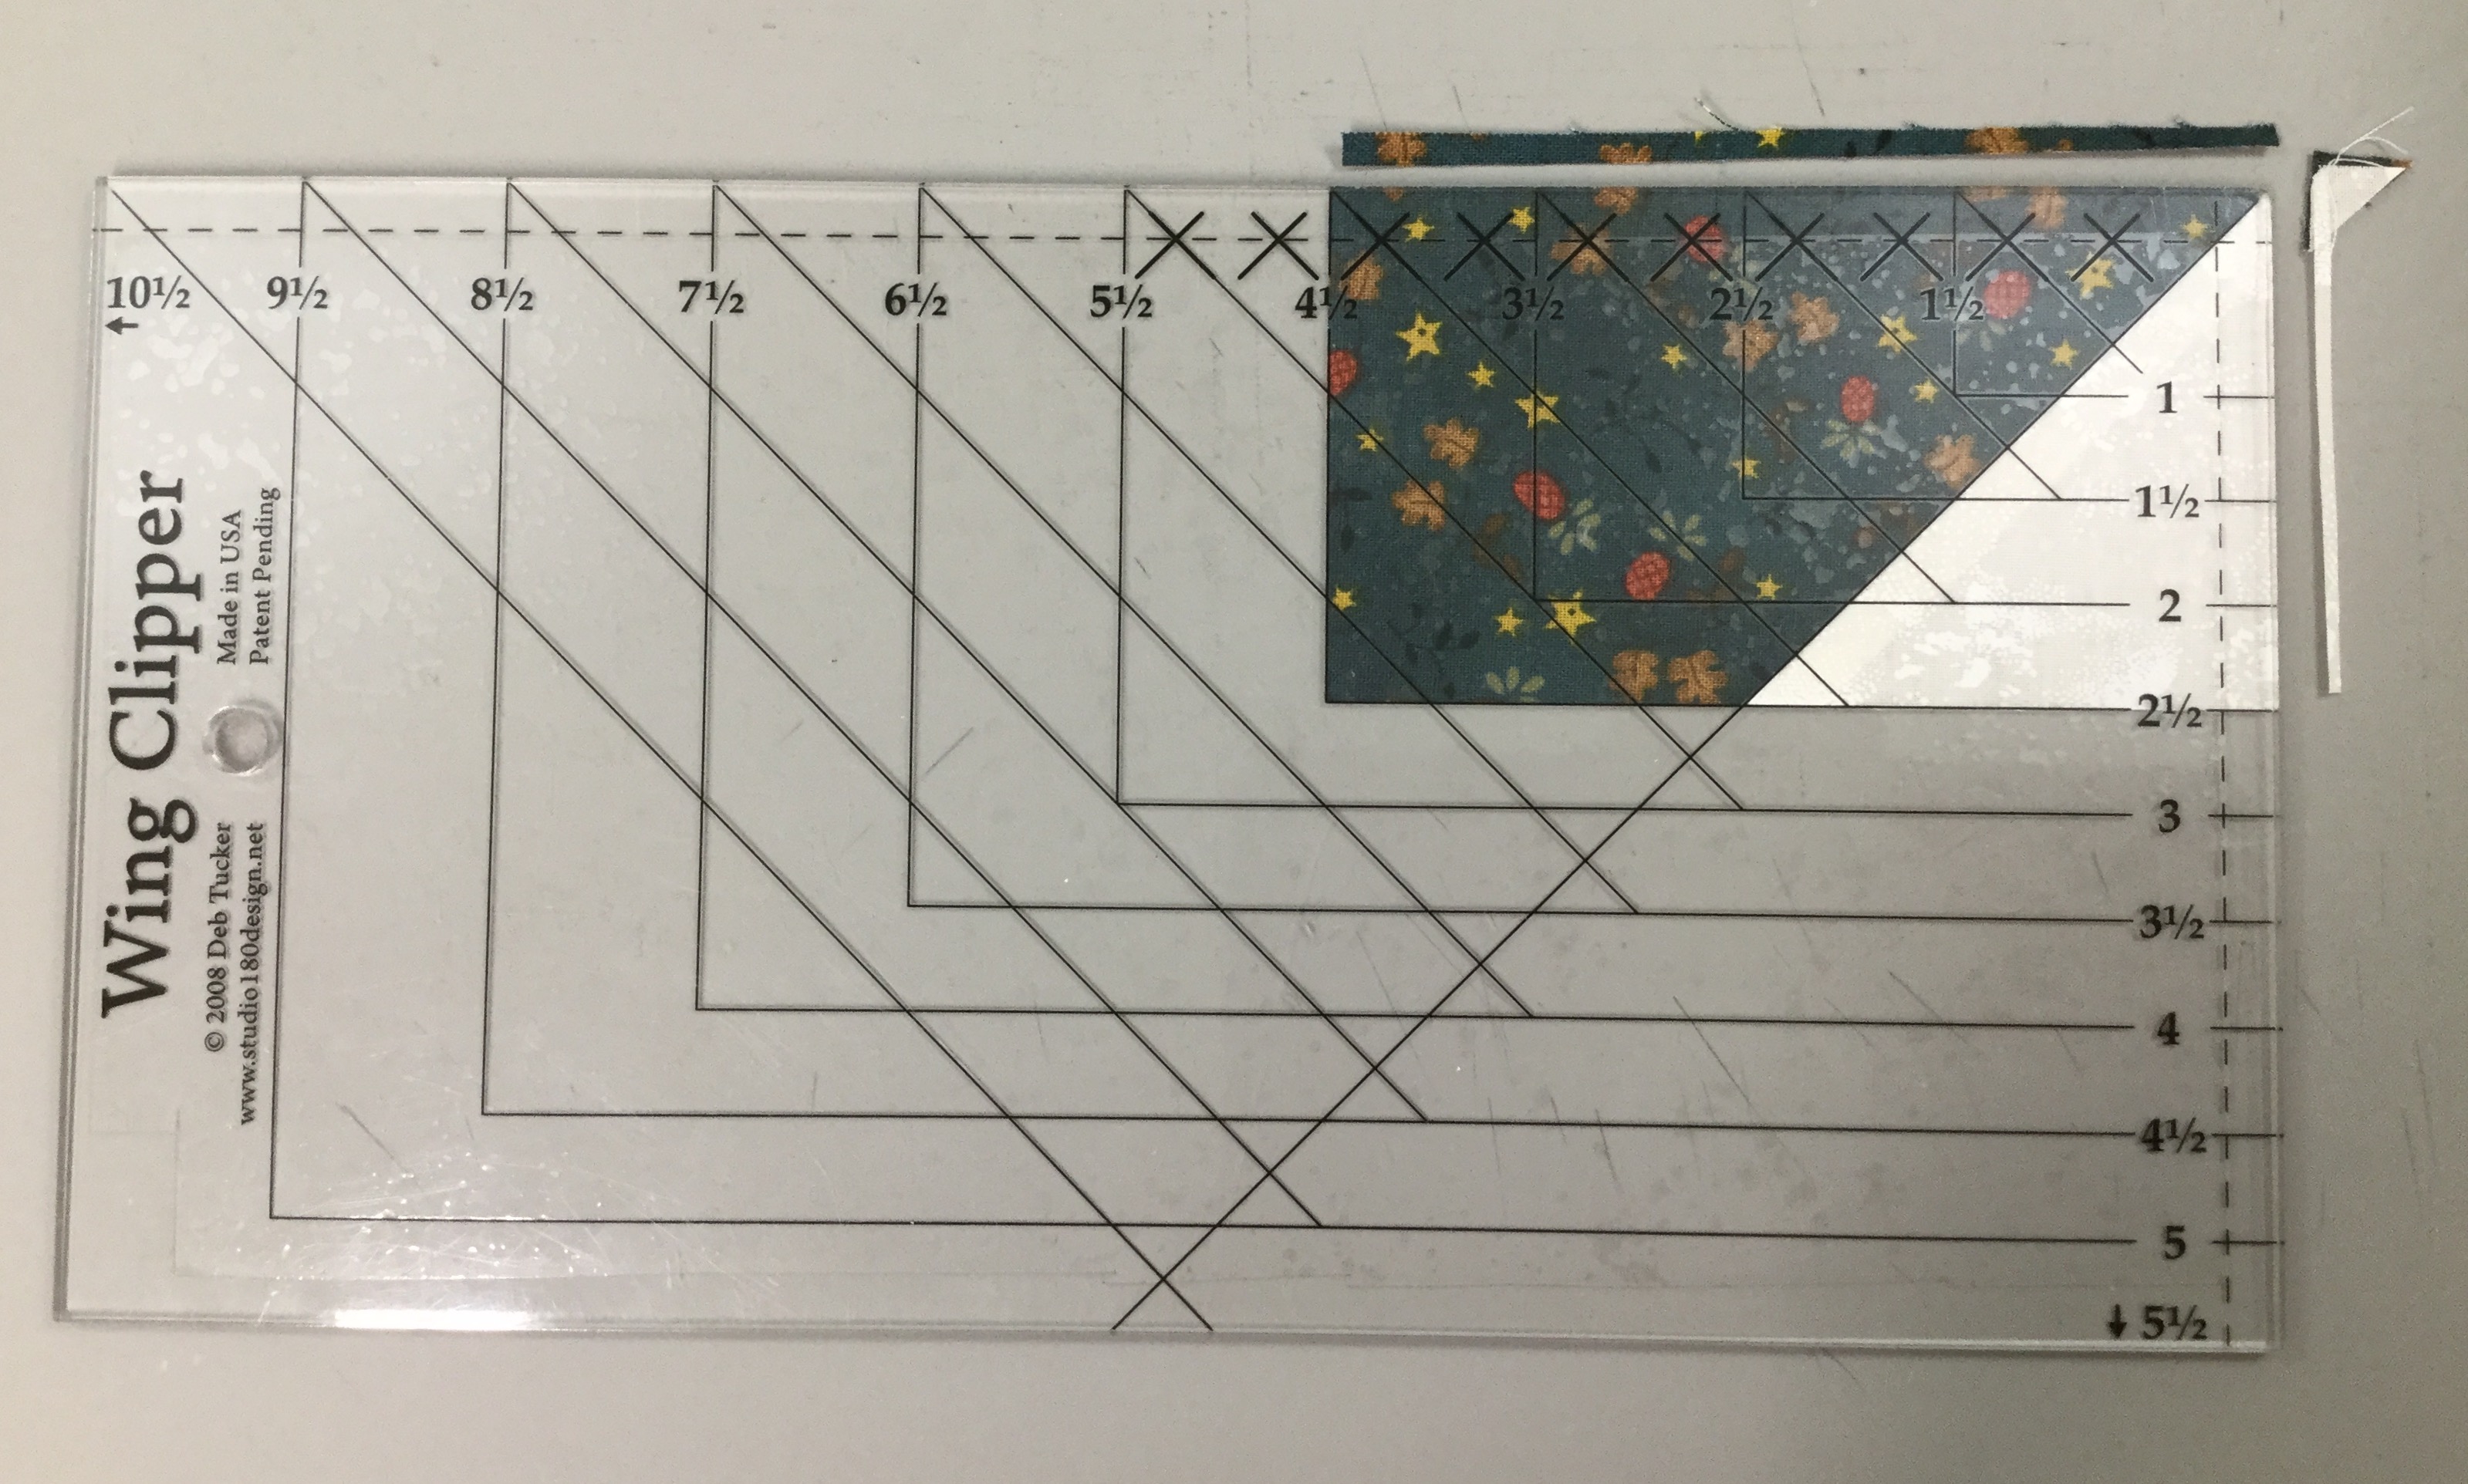
Step 3 – Trim the units to 6½” using the Tucker Trimmer® I. Align the 6½” Sizing Diagonal with the seam and trim the first two sides.

First Trim

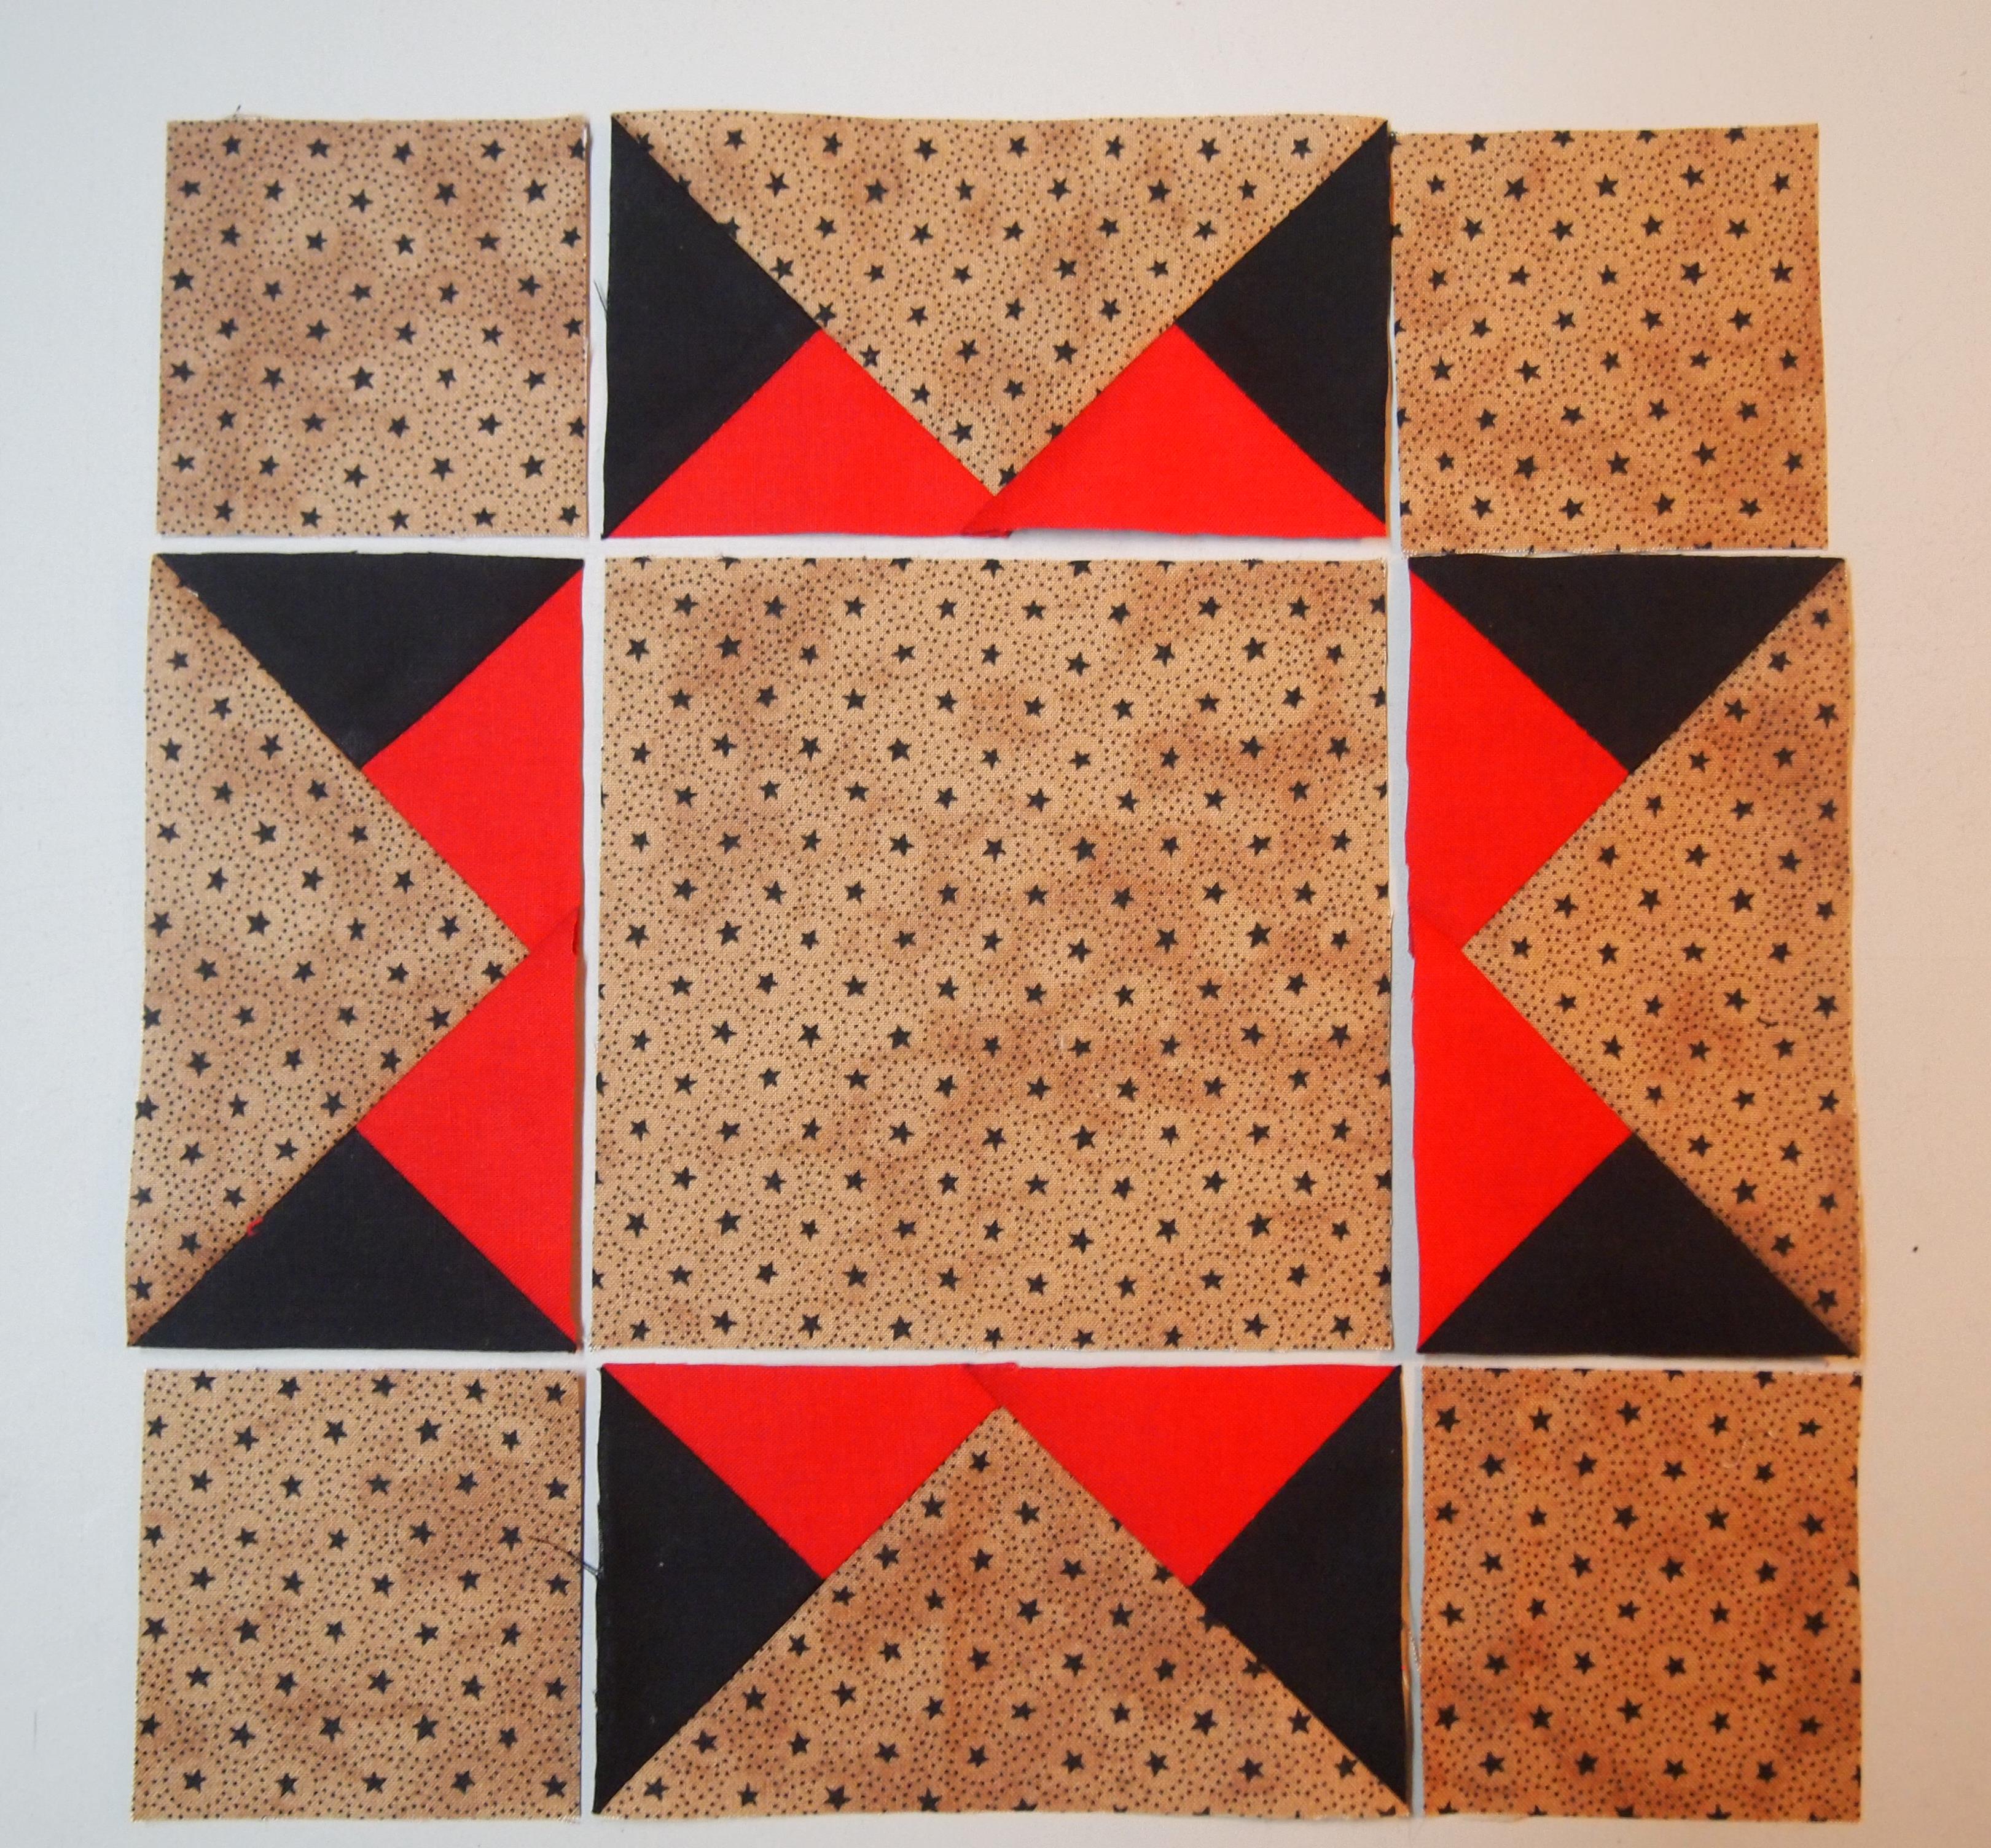
Step 4 – Rotate the unit 180 degrees and align the 6½” Sizing Diagonal with the seam as well as the 6½” cleanup lines with the outside edge. Trim the remaining two sides to create your precise Half Square Triangle units. Label the units made with Print 5 Unit C, and label the units with Print 10 Unit B.

Second Trim

Make 8 each from prints 10 & 11 and prints 5 & 11.

Combination Unit Construction

Prints 1, 2 & 11

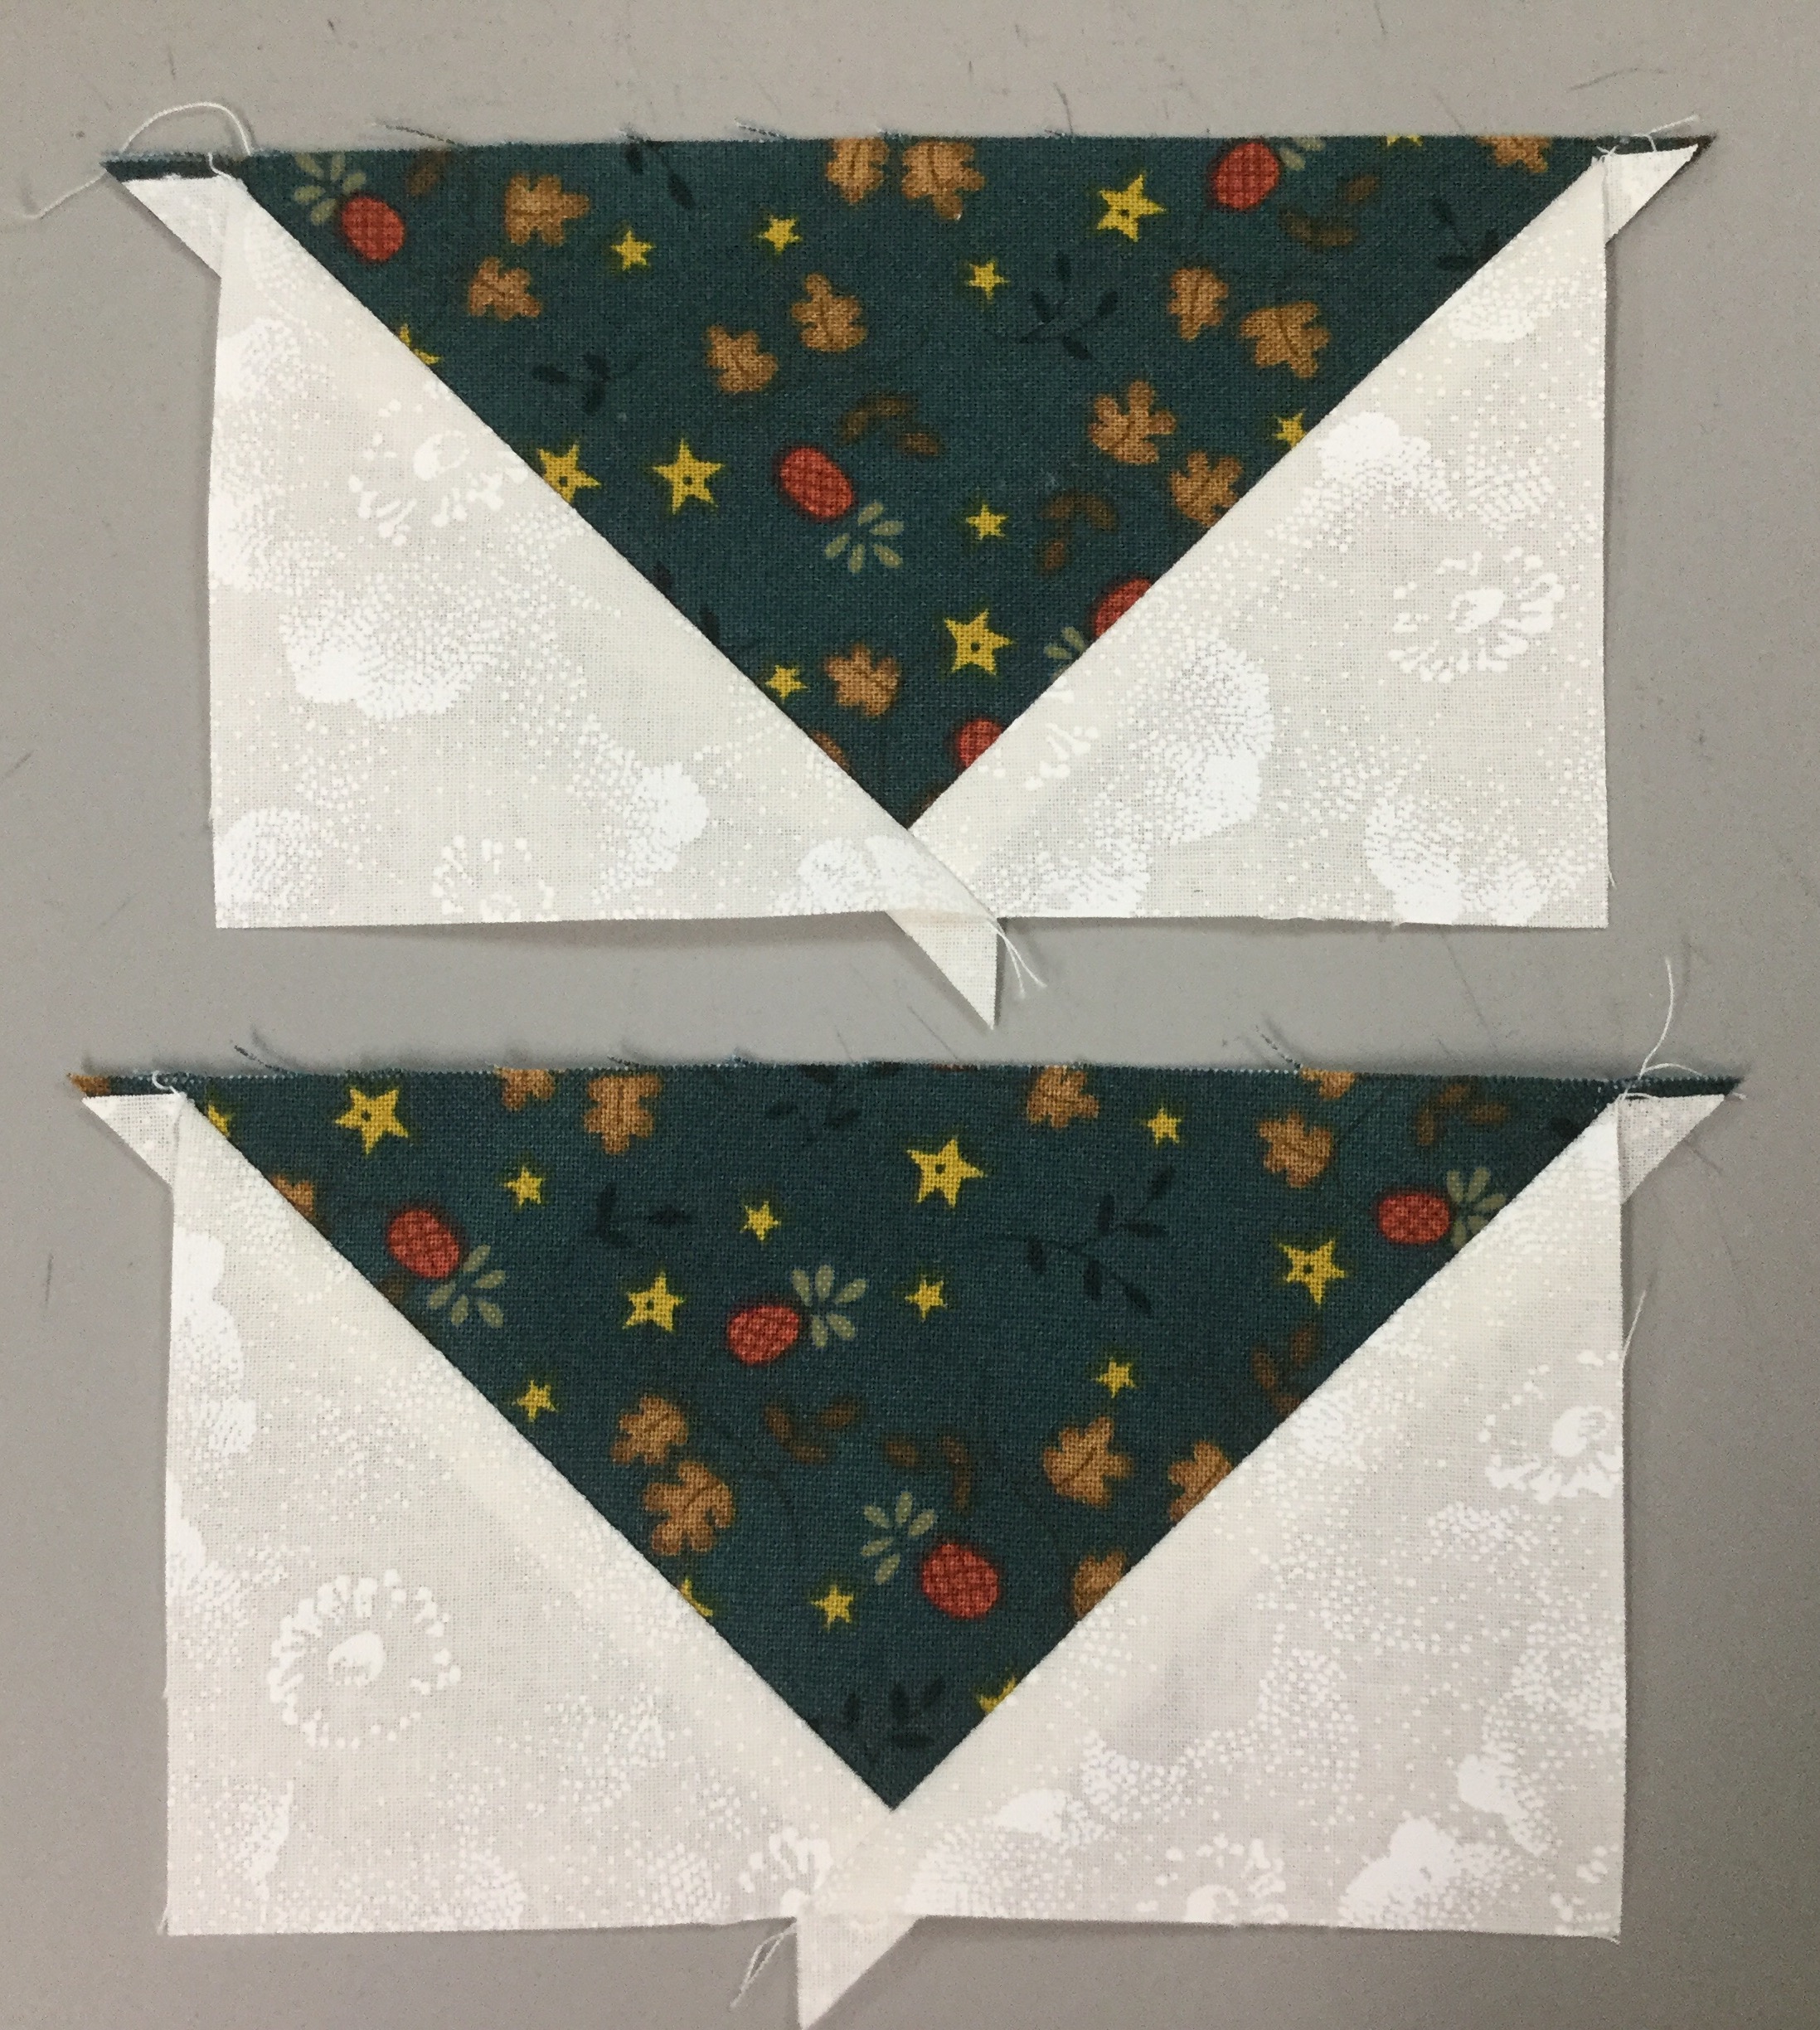
Step 5 – Repeat steps 1 and 2 using the 7½” squares from Print 1 and Print 2 to make 4 Half Square Triangles. Press away from Print 2 or open. Do not trim!

Starter Squares

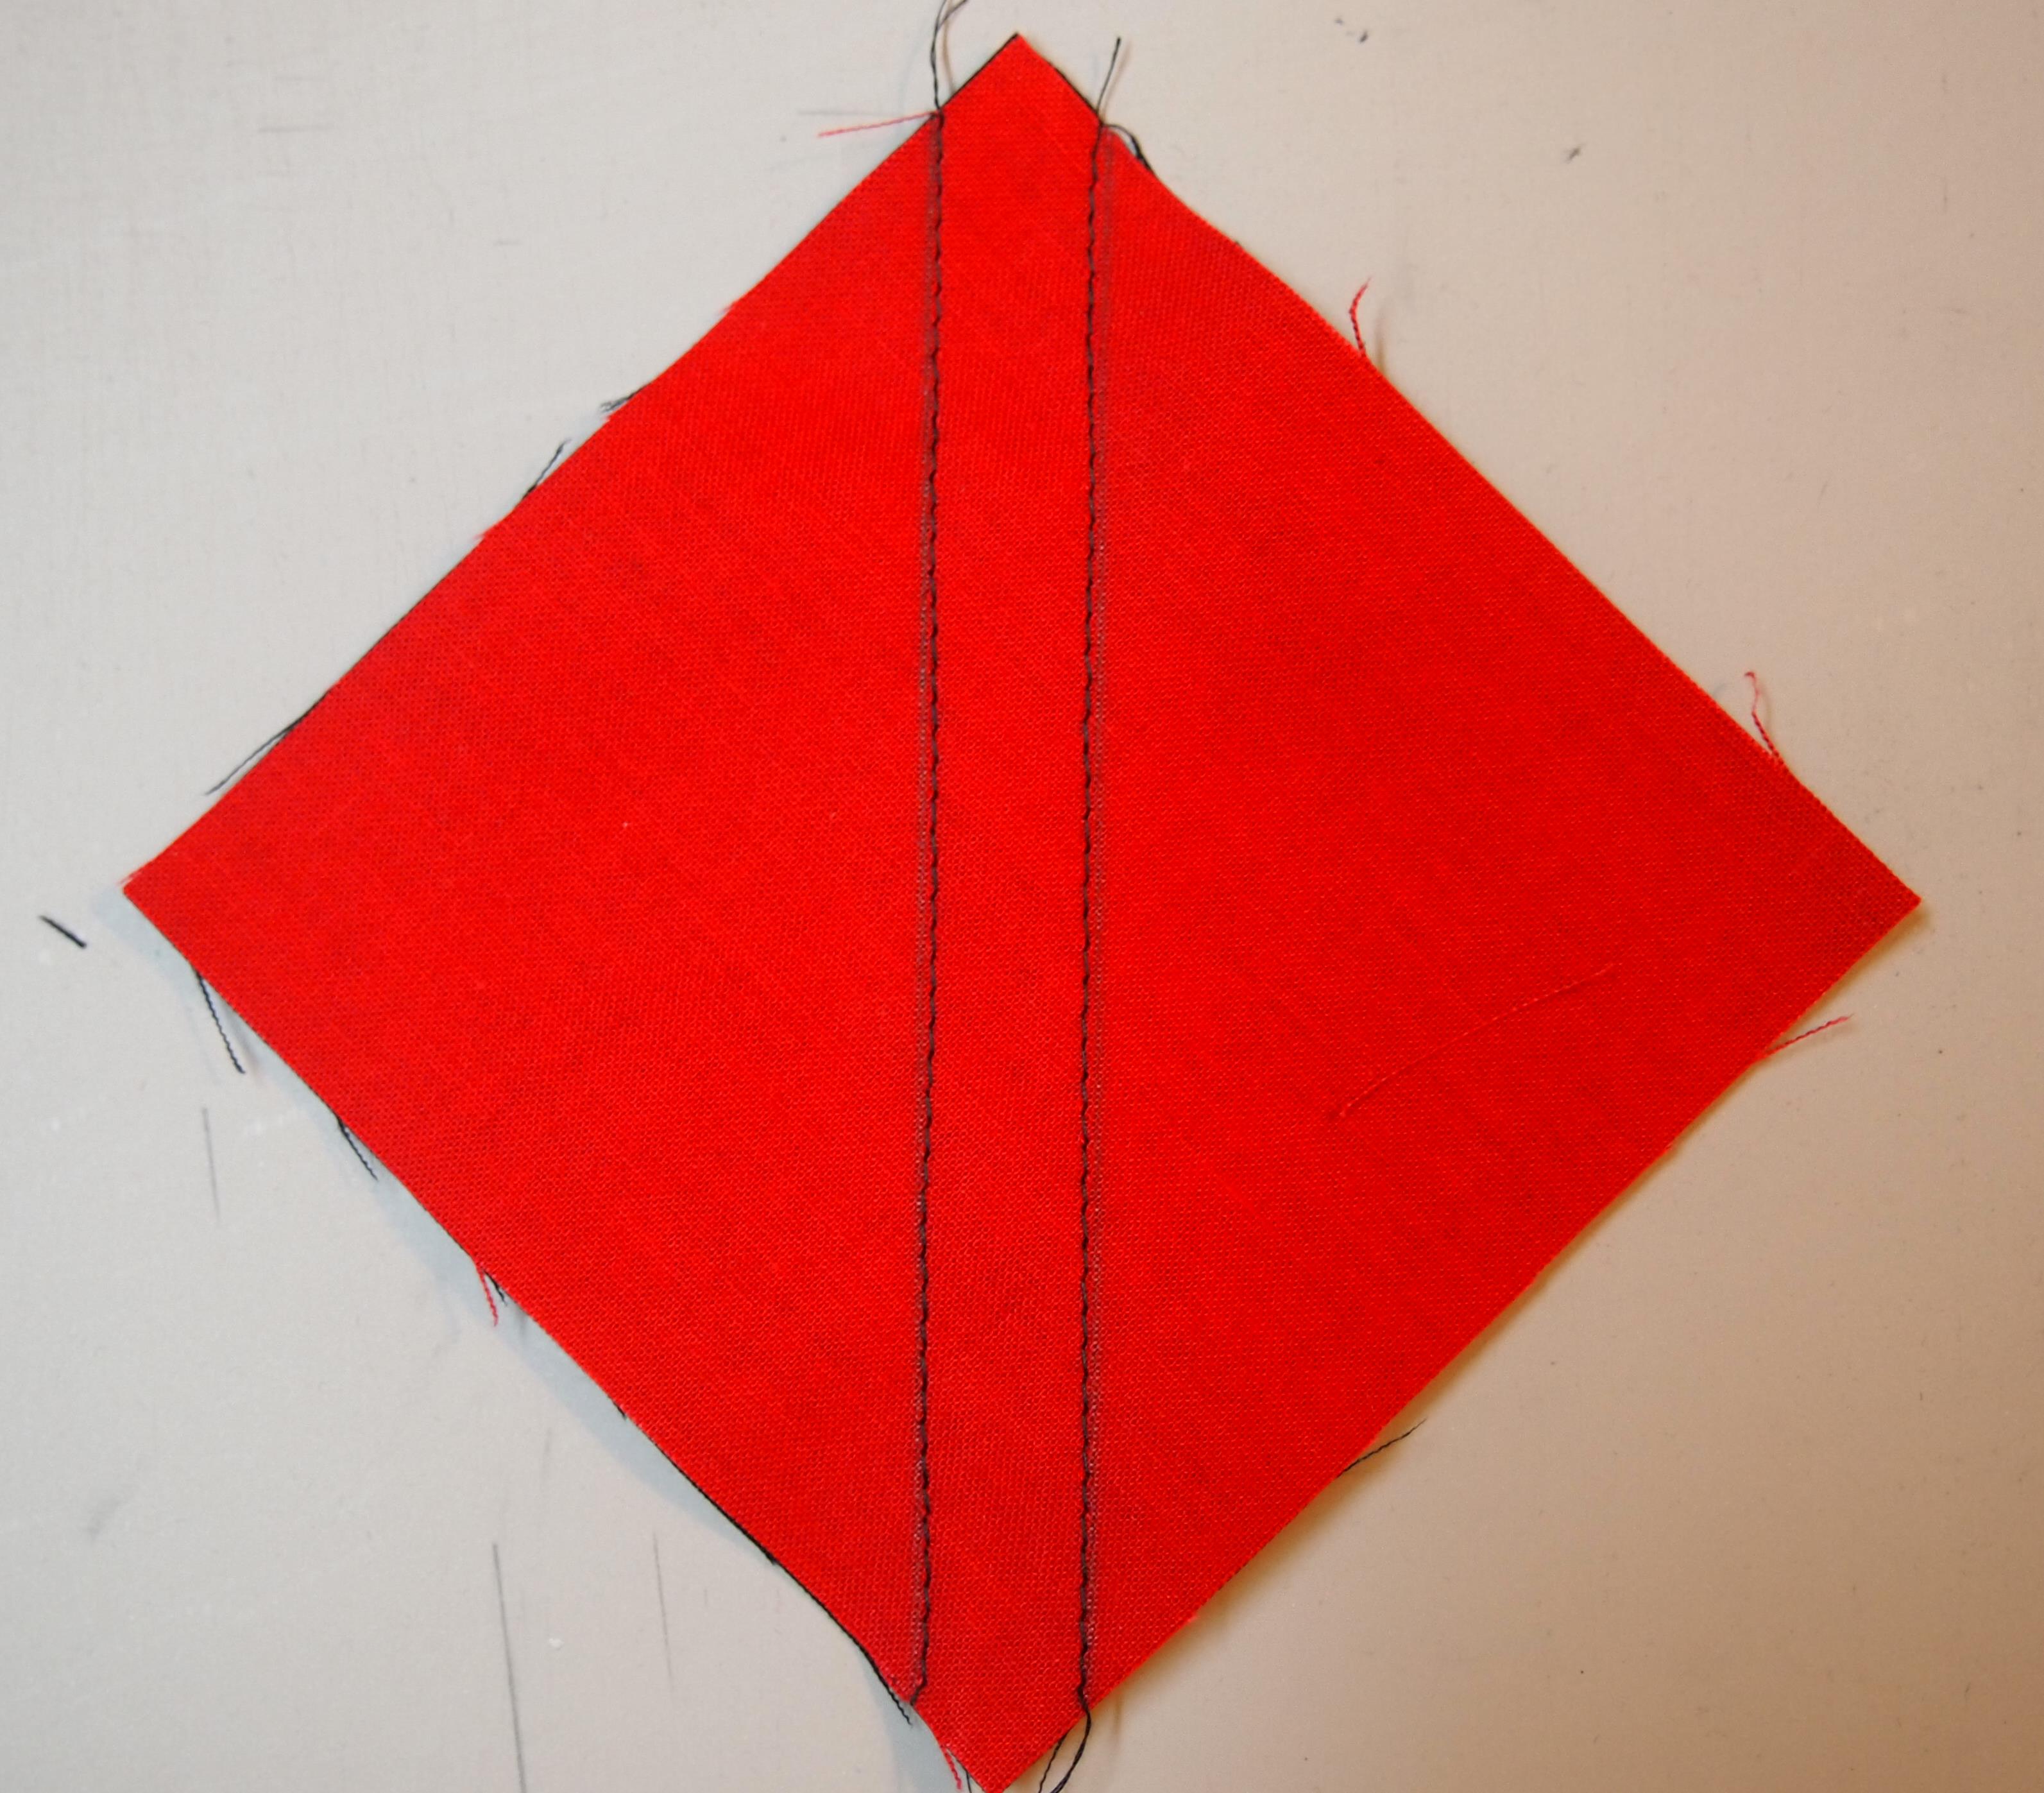
Step 6 – Mark two stitching lines ¼” on either side of the center diagonal line of the pieced Half Square Triangles.

Mark back of HSTs

Step 7 – Position the pieced squares right sides together with the 7½” Print 11 squares. Note that the edges are not intended to match. Stitch on the lines, then cut down the middle. Press toward the large triangle.

Stitch, cut apart & press.

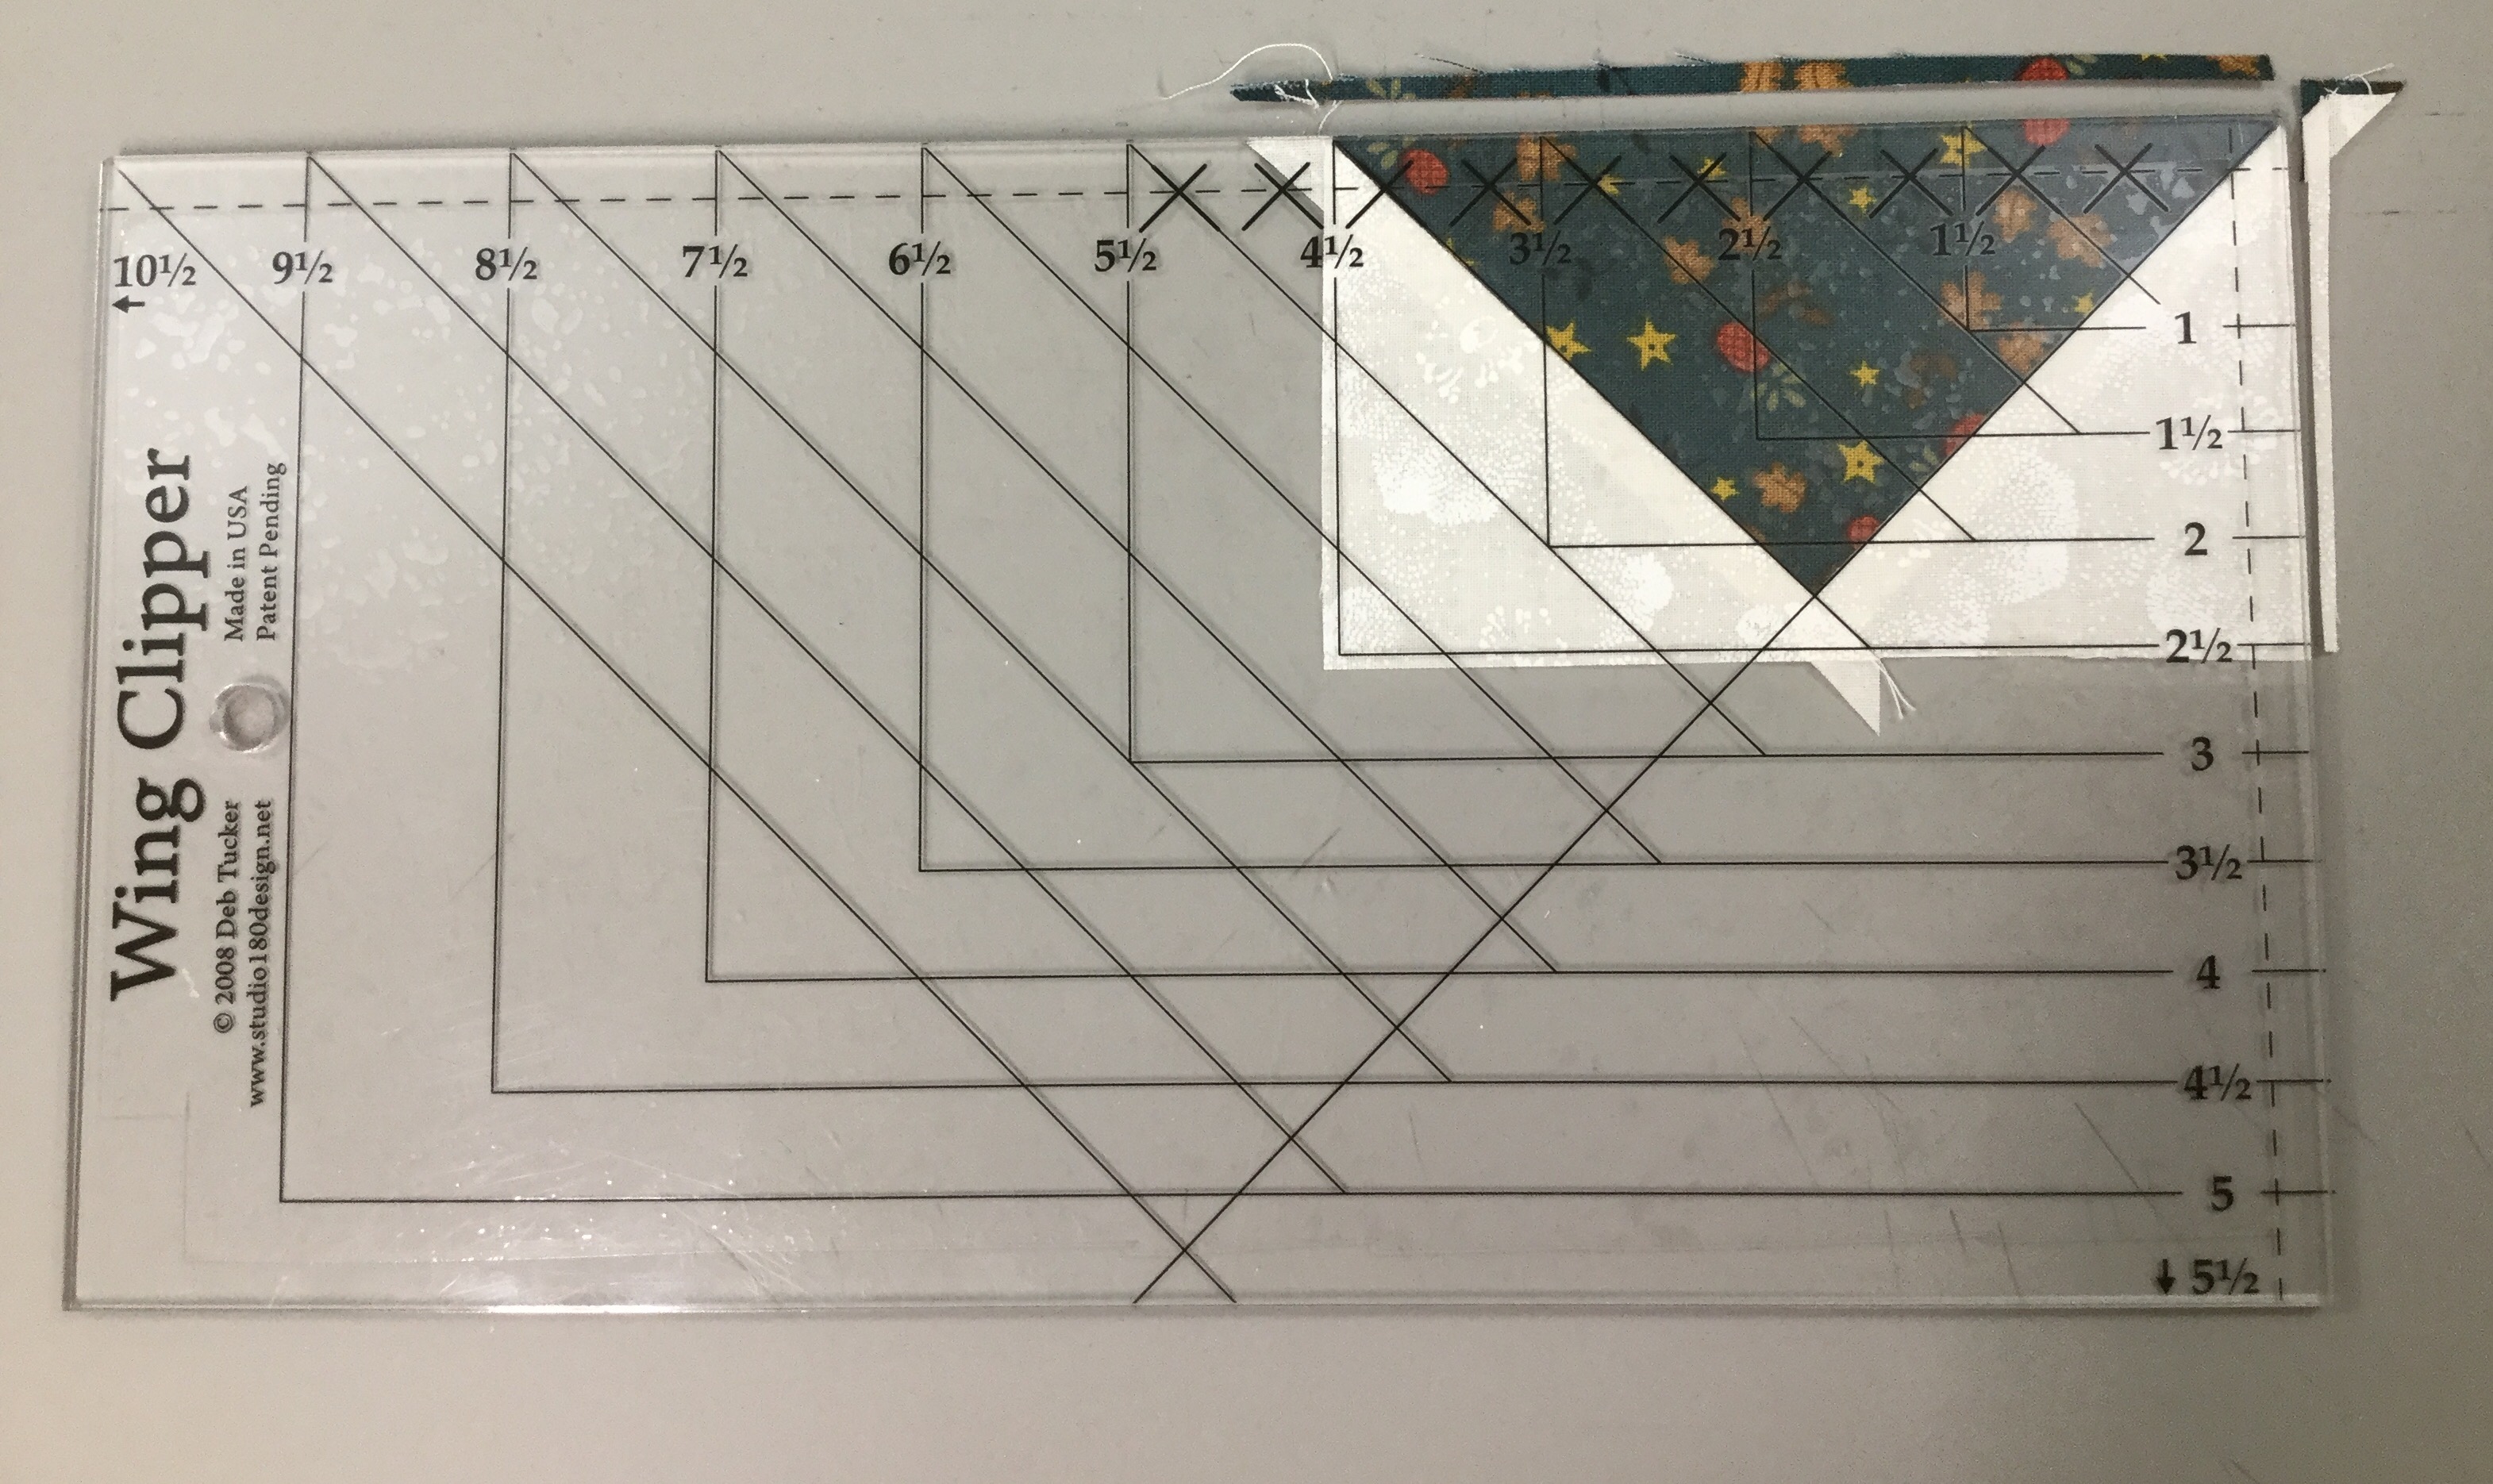
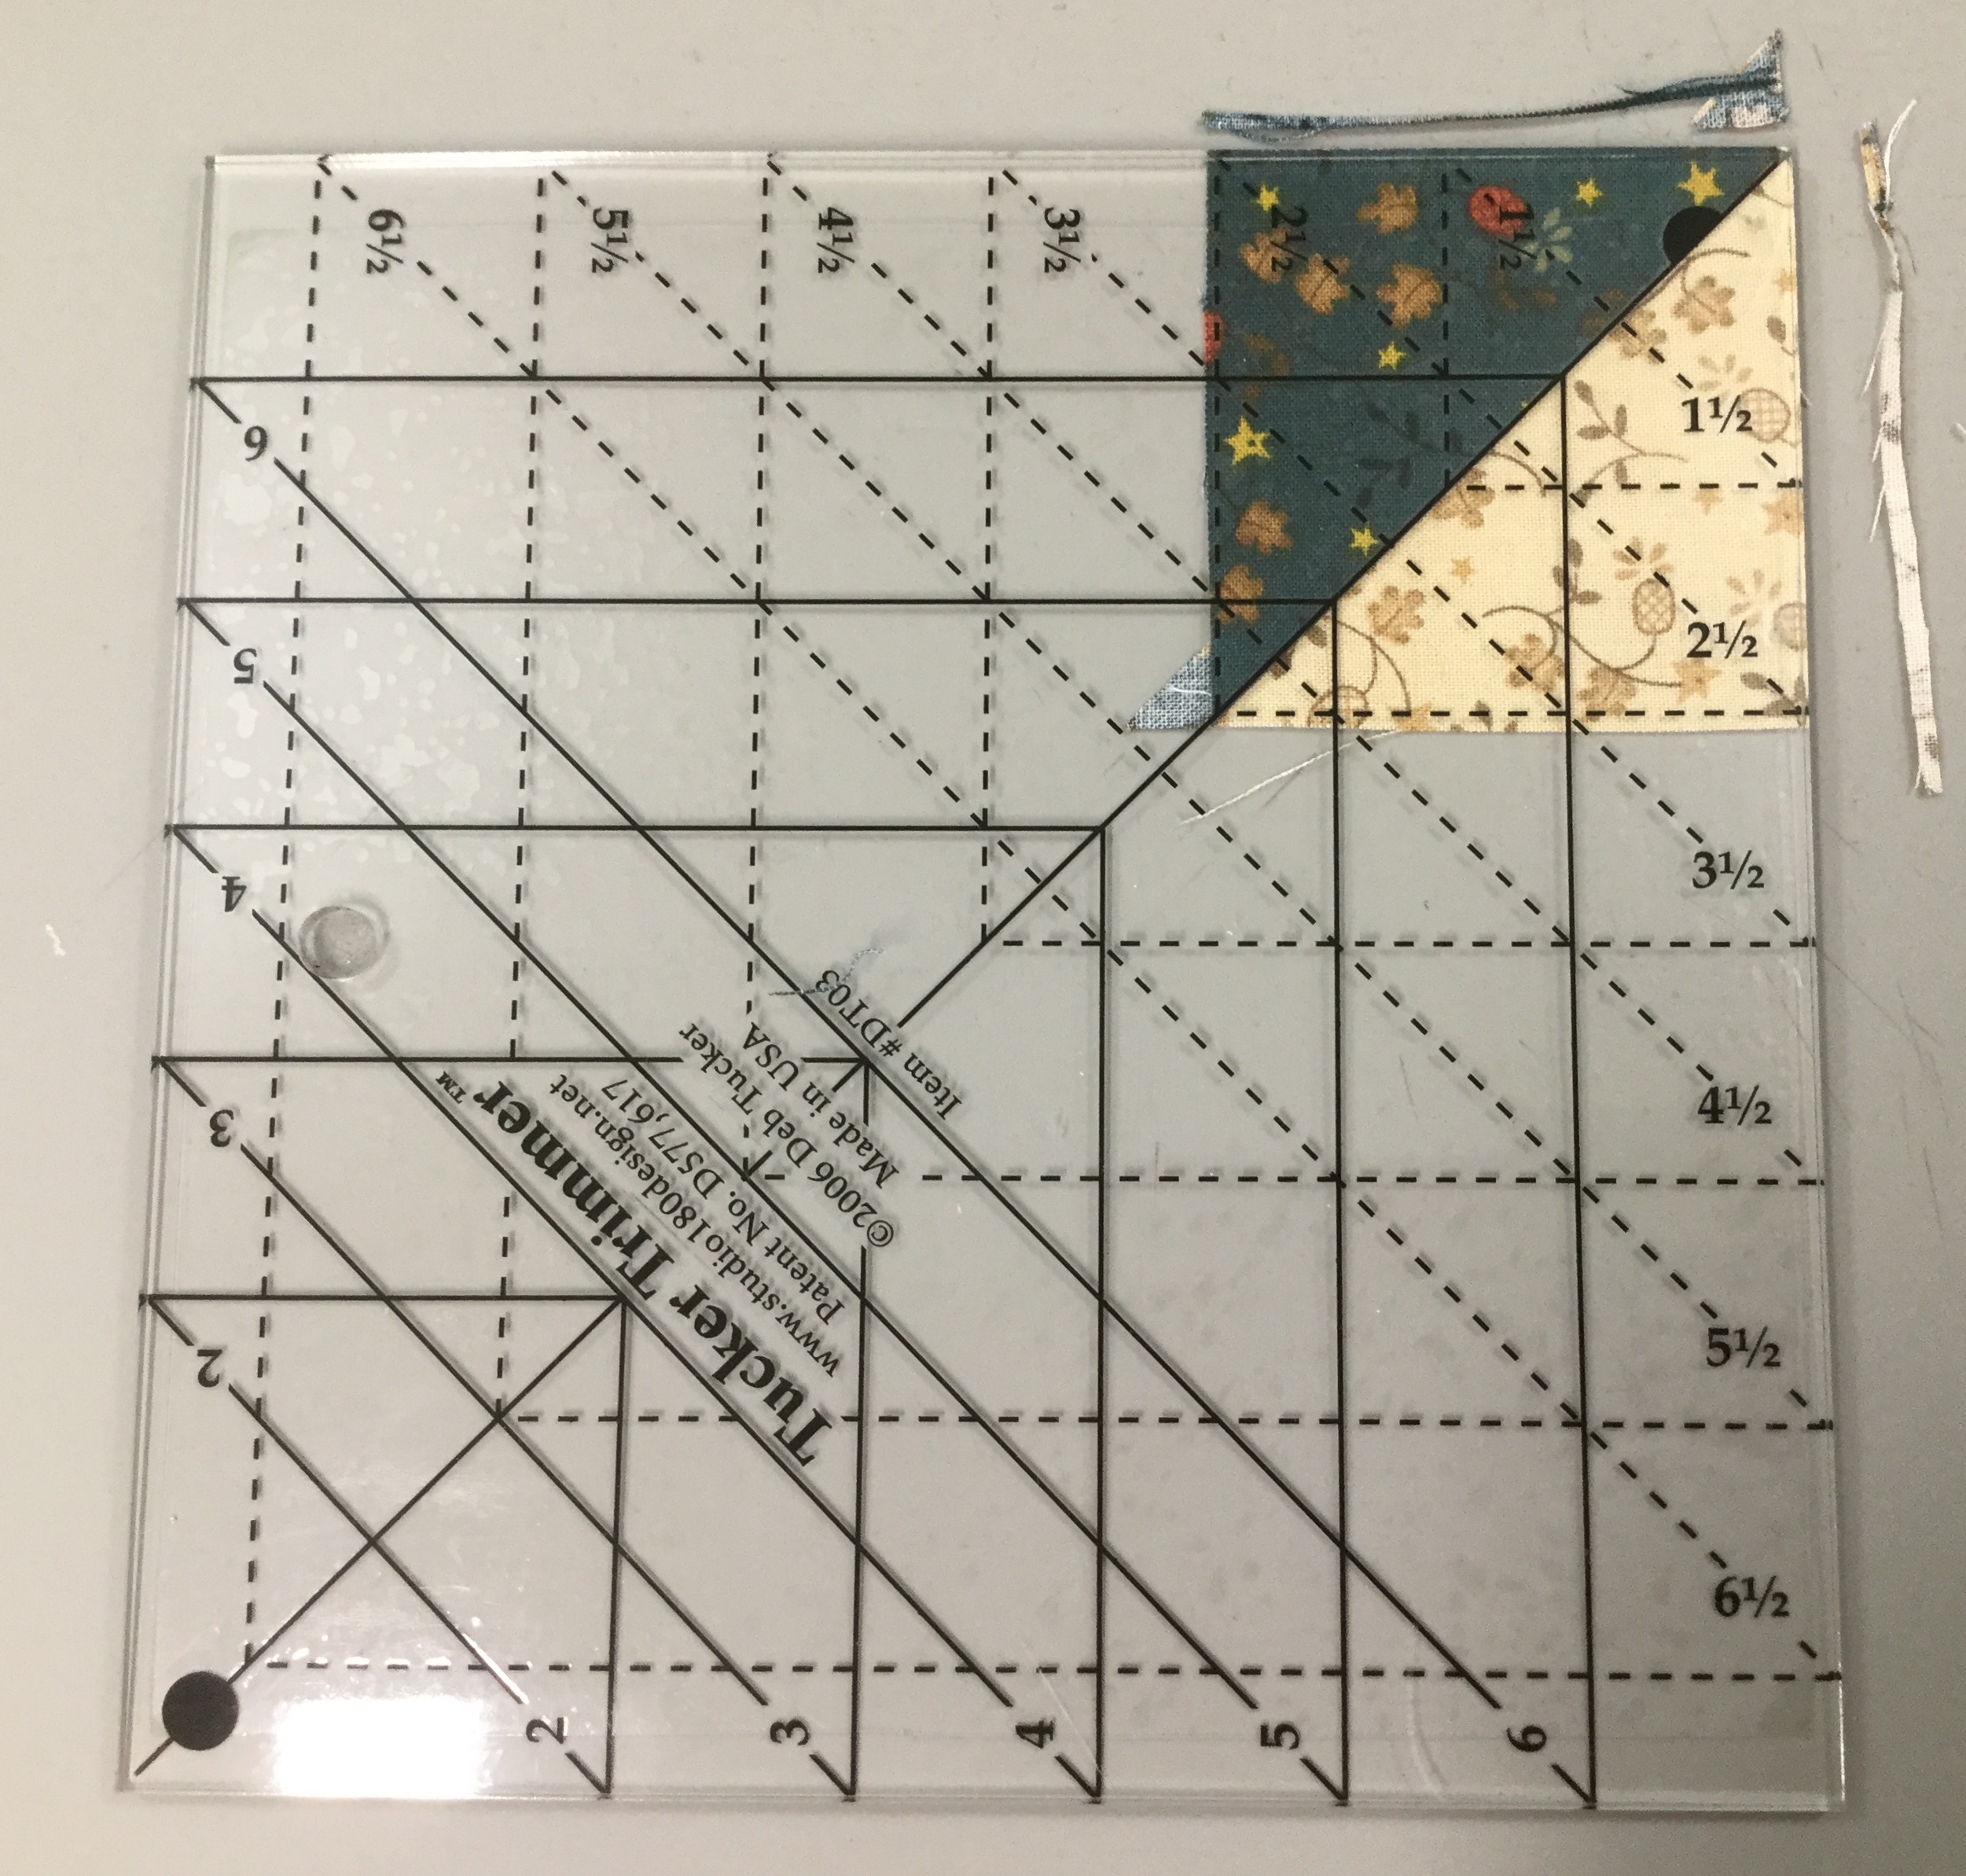
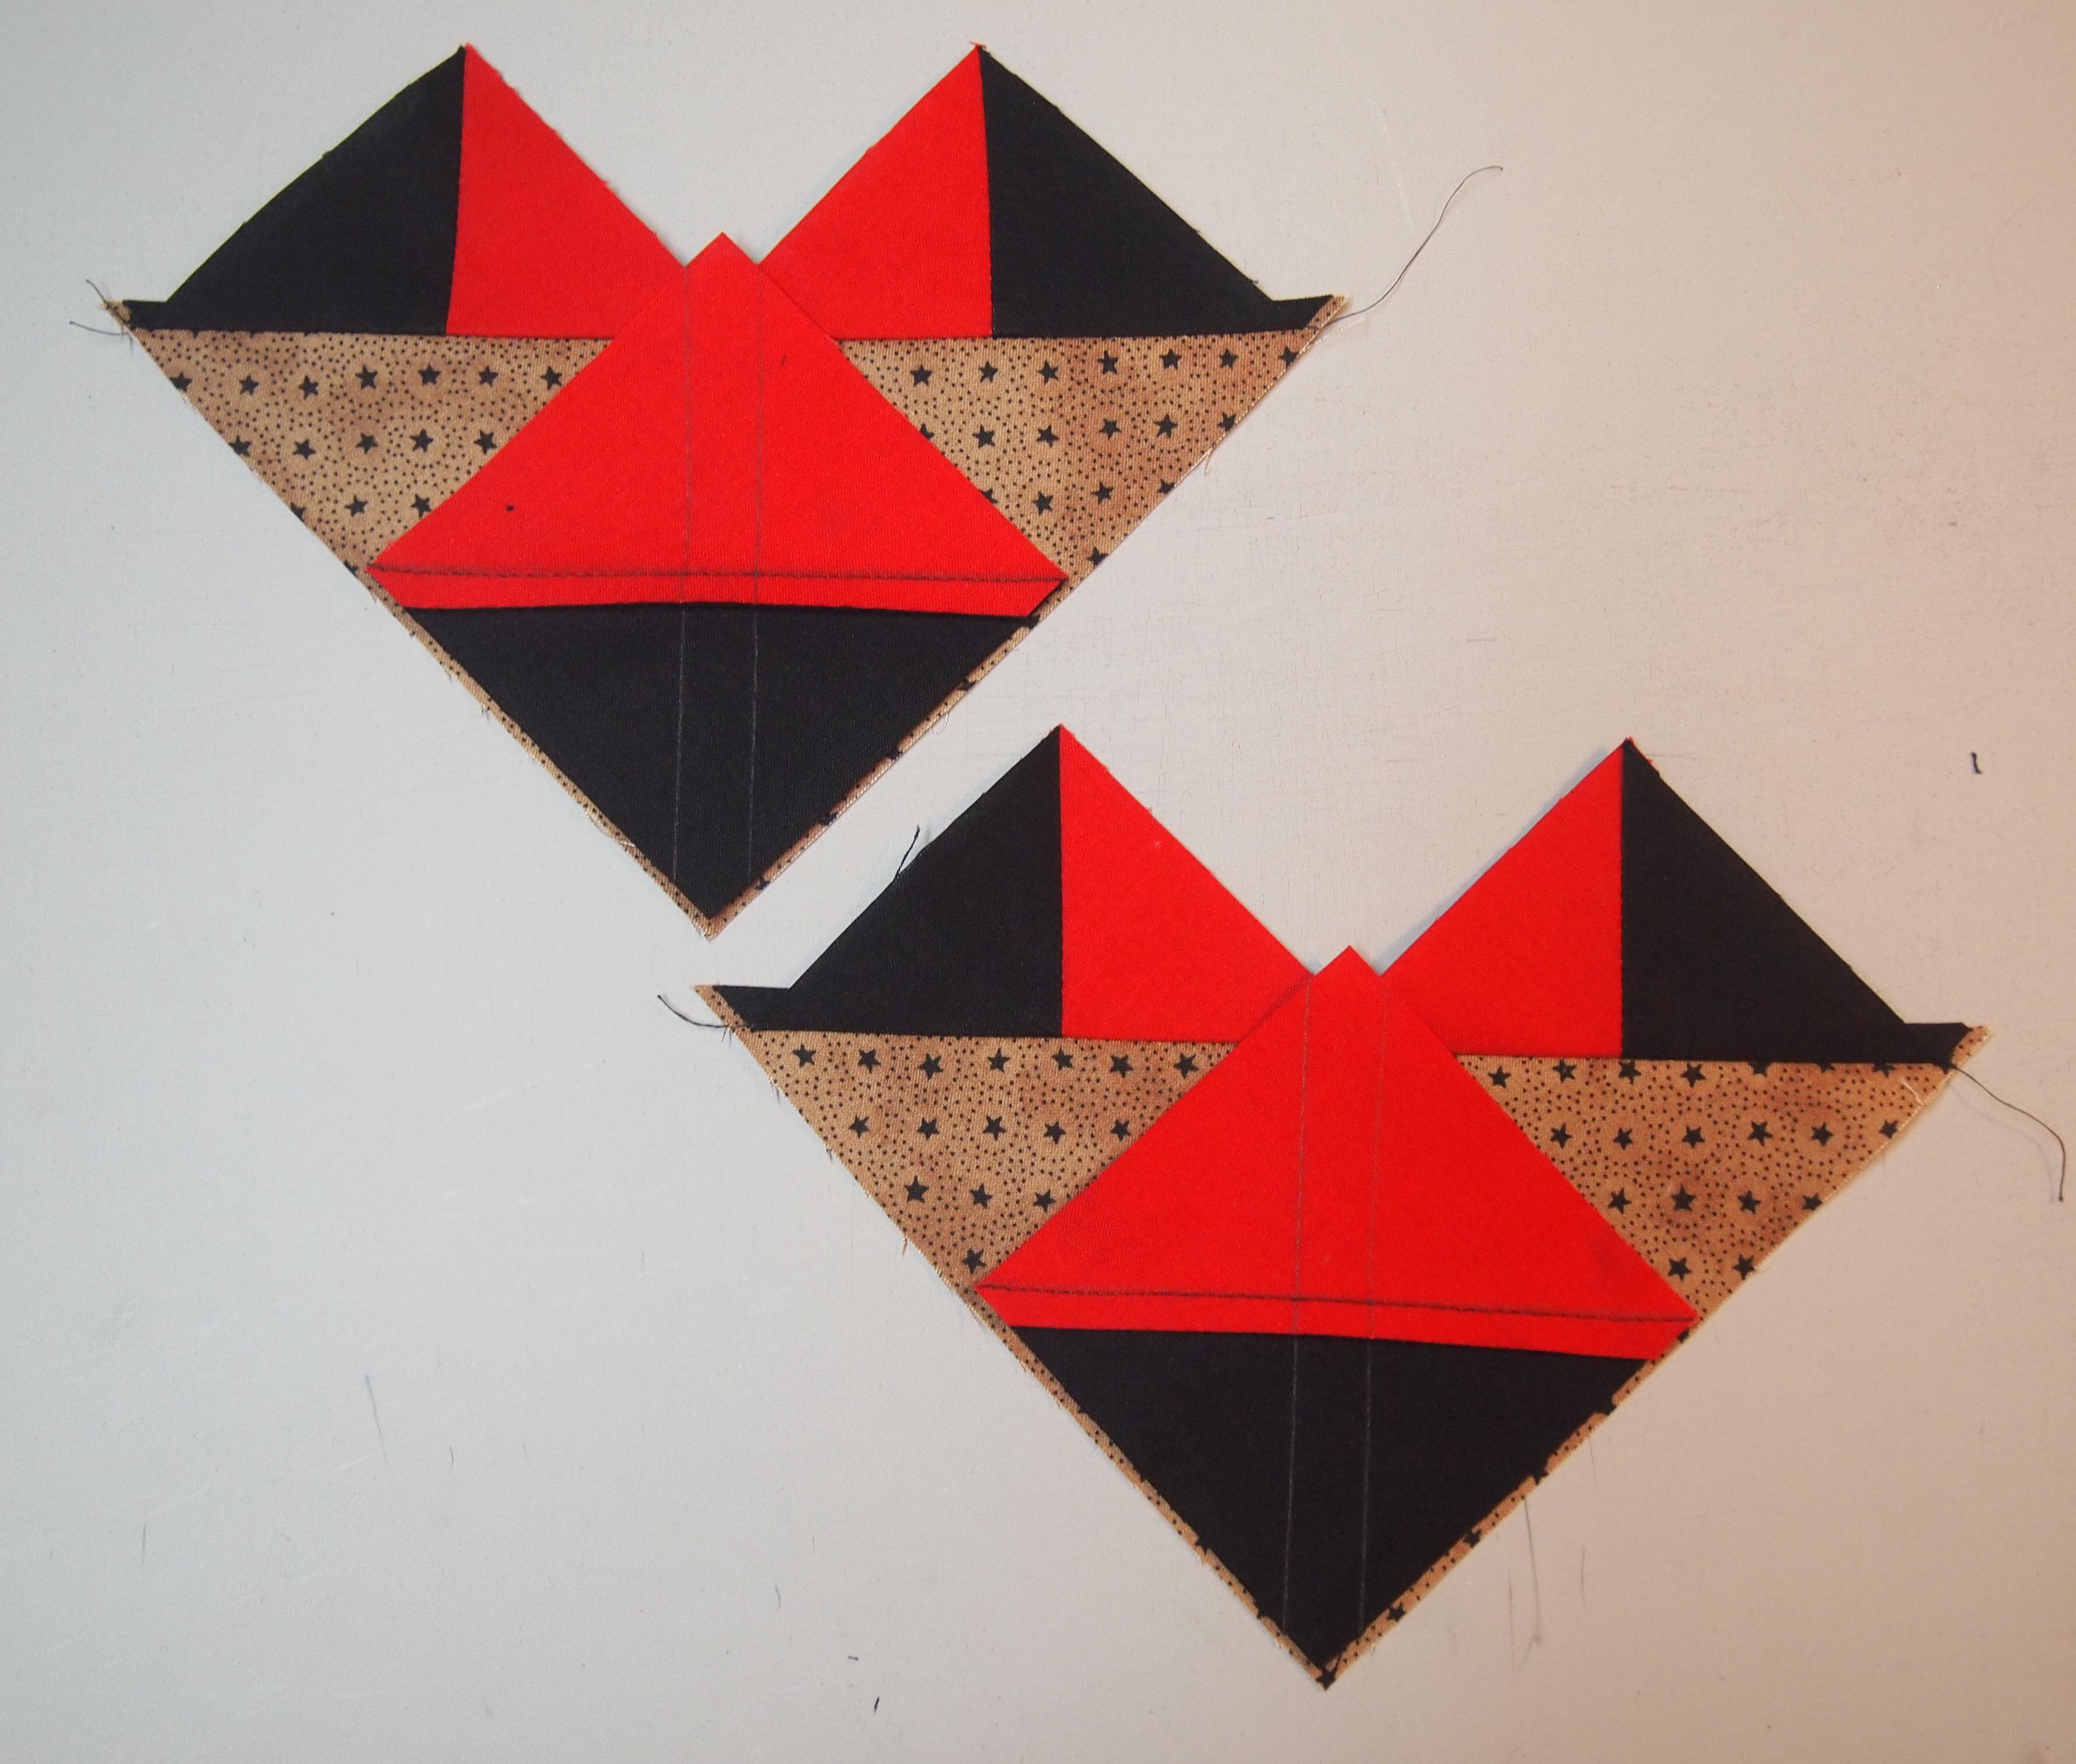
Step 8 – Trim the units to 6½” using the Tucker Timmer® I. Align the 6½” Sizing Diagonal with the long seam and the Common Diagonal with the short seam. Trim the first two sides.

First Trim

Step 9 – Rotate the unit 180o and align the Sizing and Common Diagonals with the seam as well as the 6½” cleanup lines with the trimmed edge. Trim the remaining two sides to create your precise Combination units. Label them Unit D.

Second Trim

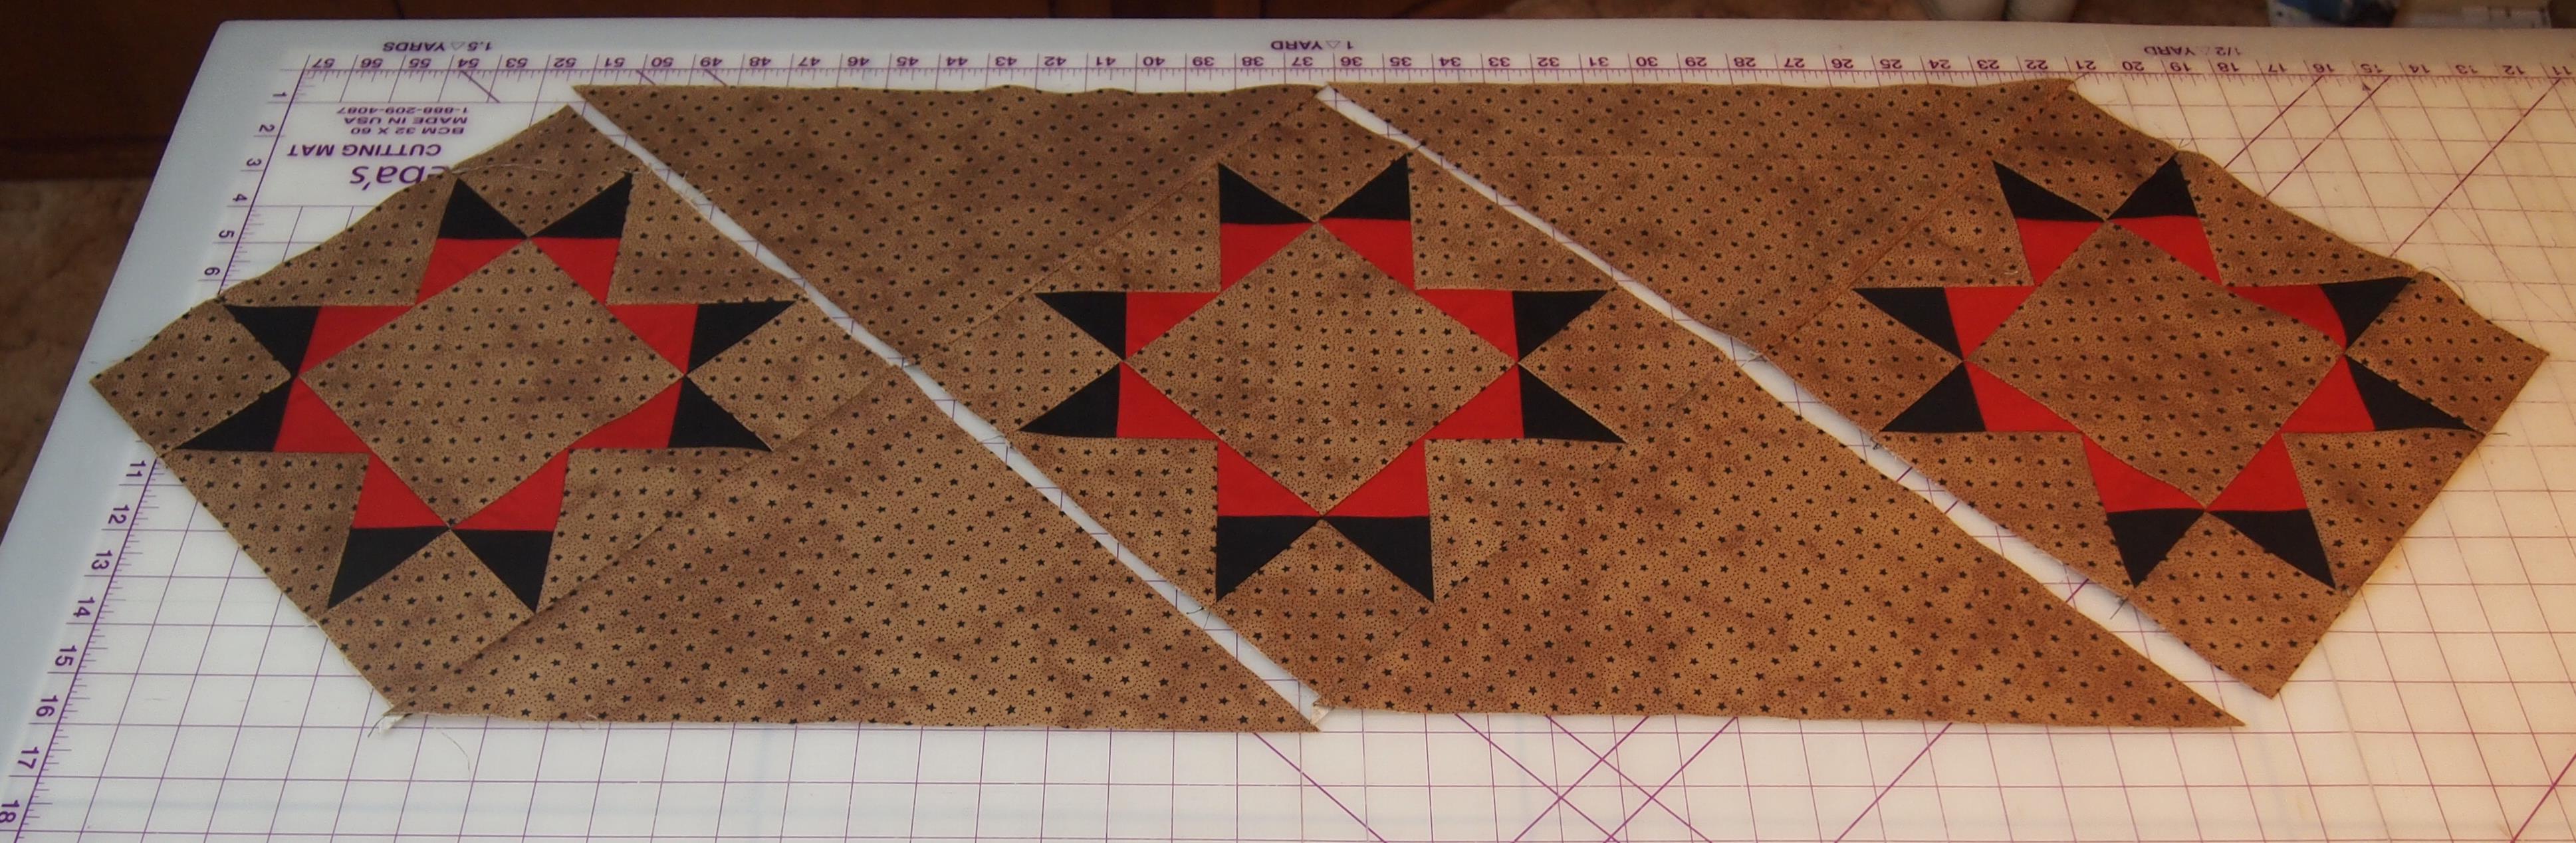
Congratulations, you have learned to make half square triangles and combination units using your Tucker Trimmer I.

Mini Love

As an Island Batik Ambassador the products featured in this post were given to me by Island Batik.

Do you like mini quilts?  Part two of Island Batik’s Ambassador February assignment was to make a mini quilt 24″ square or smaller.  I chose a simple block.

I used Island Batik Neutral Buttermilk & Mini Flower Carnation Pink, plus 2 fat quarters from  the Galentine Day Bundle, one red for the star points and another red for the border.

24 Block front

I decided to make 4 blocks.  Each block has a center square, 4 two color quarter square triangles for the star points and 4 half square triangles.  My block units are 2 1/2″ finished, and the block measures 7 1/2″ finished.  I decided to start with the half square triangles (HST).  For four blocks I would need 16 HST.  With my Tucker Trimmer I,  I can make two at a time.  Deb Tucker has a new Technique Sheet called “Eight at Once”.  This technique sheet has a chart that gives you the fabric requirements for oversized HST in 11 sizes.  For 16 – 2 1/2″ finished HST I would need two 7″ squares of the Mini Flower Carnation Pink and two 7″ squares of Neutral Buttermilk.

03 layer


Using my Magic Wand, draw diagonal lines on the wrong side of the lightest fabric.  I also marked the vertical halfway mark & the horizontal halfway mark.

02 Mark

Stitch on all four diagonal lines only.

First trim  the vertical halfway mark & then the horizontal halfway mark.  Then trim in between the stitched diagonal lines. And, all at once you’ve got 8 HST.

06 Press

Press toward the pink.  Do you know that “what ever you are pressing toward…goes on top”?  That means lay your units with pink fabric on top.  Set your seams, then push over the pink fabric and press.

Lay your unit on the cutting mat.  We always trim our units to the cut size.  My units are 2 1/2″ finished, that means the cut size is 3″.  Find the whole circle on your Tucker Trimmer, align the 3″ diagonal line on the HST’s diagonal line and center it.  Trim up the right side and across the top.  Rotate the unit, align the just trimmed edge with the 3″ clean up line, again align the 3″ diagonal, trim up the right side and across the top.  If you are left-handed, position your unit to the left and the whole circle on your Tucker Trimmer would be positioned to the left also. You woud trim up the left side and across the top.

Now we will make our Quarter Square Triangles (QST).  I check the chart in my Tucker Trimmer instructions.  For 2 1/2″ finished units, my starter squares should be 4″.  For all four blocks I need Eight Red 4″ squares & Eight Pink 4″ squares.  Using my Magic wand I draw 2 diagonal lines on each pink square.  Layer one pink square with one red square aligning the raw edges.  Stitch on both diagonal lines and cut apart.

We are going to press toward the red , so lay your units red side up and press as before.  Divide your HST’s into two even piles.  Using your Magic Wand draw two diagonal lines as shown above on half of your HST’s.

Position one HST marked with the stitch lines with a HST without the stitching lines, right side together, and opposite colors facing each other.  Align and nest the center seams.

Stitch on the lines and cut apart.  Swirl the center as shown above and press.

Position the Tucker Trimmer over the pieced square.  Carefully align both the common diagonal and the 3″ size diagonal lines over the sewn seam lines.  Trim up the right side and across the top.  Rotate the unit, line up the Tucker trimmer again.  This time be sure to position both the diagonal lines and the outline of the square to the exact measurement of 3″, trim up the right side and across the top.

Cut four 3″ red squares for the block centers.  Lay out the block as shown above.

Stitch the units into rows, press the seam as shown.

Stitch the rows together and press as shown.

Make all four blocks.  I added sashing.  I cut two 1 1/2″ x 8″ strips and joined the two blocks on top row, and then the two blocks on the bottom row.  I cut three strips 1 1/2″ x 16 1/2″.  I joined the top row to the bottom row and added a strip on either side of the square.  Cut two strips 1 1/2″ x 18 1/2″ for the top and bottom of the square.  Note:  Always measure your blocks for accurate sashing measurements.  

From another Galentine Day fat quarter  I cut 3″ outer borders.  I finished it with my Hobbs Cotton Batting.  I stitched in the ditch and bound it with some Island Batik Neutral Buttermilk.  It was pieced & quilted with Aurifil Mako 50 thread.

28 Top (2)

This is a sweet simple quilt.  Reminds me of Forest Gump, “Life is like a box of chocolates, you never know what you’re going to get”, these blocks look like nicely wrapped chocolates.  Happy February!


BlockBuster 5 – Whirligig

This is a very cool block, but be sure to use your best pressing, measuring and cutting skills as this is a 3 out of 4 stars for difficulty.  All the instructions to make this block can be found in the instructions that came with your Wing Clipper I, Tucker Trimmer I and on the Pickets & Quickets technique sheet.

This is a tricky block; you will need to pay attention to your fabric placement and the orientation of your quicket and picket units.  To help you out here is link to the Whirligig Black Line Layout you can print this sheet and use your colored pencils to help choose your fabrics and placement.

01 Fabric Choices

I chose five colors and a background fabric to make 4 different color units, each containing 2 flying geese, a Picket, a Quicket and a half square triangle.

The 05 Whirligig block can be made in 3 sizes:  6″, 9″ and 12″.   I chose the 12″ block.  Check the Cutting Chart, and choose the size block you want to make.  We will start with the Flying Geese Unit.  The cutting chart gives you the finished and the cut sizes of the units.  Check your Wing Clipper instructions to see what size starter squares you need to cut.  As you know when using the Wing Clipper you start with one large square and 4 small squares.

02 Mark for FG

Following the instructions use your Magic Wand and draw two diagonal lines on the back of your small squares.

03 Position

Position 2 of the small squares right sides together in diagonally opposite corners of the large square, nudging them in toward the center by just a few threads

Stitch on both drawn lines, them trim between the lines on the center diagonal.

06 Press

Press the seams toward the smaller triangles.  One of these units will make 2 flying geese, the other will be saved to make a left slanted Quicket.

Position one of the smaller squares in the corner of the previously pieced unit.  Nudge the square in like you did before.  Stitch on the drawn lines and trim between the lines as before.

09 Press

Press the seams toward the smaller triangles.

10 Trim 1

Position your oversized unit horizontally on your cutting mat with the goose pointing toward you.  Align the diagonal guide lines of the Wing Clipper with the sewn seams of the flying geese unit. Trim up the right side and across the top.  (See the Wing Clipper Instructions for left hand cutting.)

11 Trim 2

Lift your Wing Clipper and rotate your flying geese unit 180 degrees.  Reposition your Wing Clipper to align cleanup guidelines with the previously trimmed raw edges and the “X” at the top with the intersection of the seams.  Trim up the right side and across the top.

12 Picket Position

Remember we only used one of the heart shaped units for the flying geese.  We will use the other to make our left slanted Quicket.  Lay the unit on your cutting mat as shown above.  Position your Wing Clipper tool over the unit, the “X” on the tool should align with diagonal seam.  I am making a Quicket with a cut size of 4 1/2″ by 2 1/2″, so I positioned my tool to ensure I can trim all four sides.

13 Picket Trim1

Trim up the right side then across the top.

14 Picket Trim 2

Lift your Wing Clipper tool and rotate your unit 180 degrees.  Align the trim down lines with the just trimmed raw edges and aligning the long diagonal line on the tool with the single diagonal seam.  Trim up the right side and across the top.

15 Quicket

The cut size of my right slanted Picket is 2 1/2″ by 4 1/2″.  Following the instructions on my Pickets & Quickets Technique Sheet, I bump up the size by  1/4″.  My rectangle is 4 3/4″ by 2 3/4″.  My small square is 2 3/4″.  Draw a diagonal line from corner to corner on the small square.

Position the small square right sides together with the rectangle and align the raw edges.  Stitch on the line and trim the excess.  Press toward the small triangle.

17 Quicket

Position your Wing Clipper tool over the unit, the “X” on the tool should align with diagonal seam.  Trim up the right side  and across the top.

18 Quicket

Lift your Wing Clipper tool and rotate your unit 180 degrees.  Align the trim down lines with the just trimmed raw edges and aligning the long diagonal line on the tool with the single diagonal seam.  Trim up the right side and across the top.

Follow the instructions that came with your Tucker Trimmer I for making Half Square Triangles (HST) in the size you chose.  Using your Magic Wand draw two diagonal lines on the back of one of your starter squares.  Place your starter squares right sides together. Stitch on lines and trim down the center.  I pressed toward the dark fabric.

21 HST Trim 1

Trim the oversized HST to the desired cut size.  Mine are 2 1/2″.  (See the Tucker Trimmer Instructions for left hand cutting.)

22 HST Trim 2

Lift your Tucker Trimmer and rotate the HST 180 degrees position the diagonal line and the outline of the square to the measurement desired and trim up the right side and across the top.

23 Unir Layout

We are now ready to sew this unit together.  Layout the  2 flying geese, 1 left slanted Quicket, 1 right slanted Picket and 1 half square triangle as shown above..

First stitch the 2 flying geese together, press in the direct the geese are flying. Then stitch the geese to the right slanted Picket.  Press toward the Picket.

Stitch the HST to the left slanted Quicket, pressing toward the Quicket.

25 Stitch 2 together

Stitch the two sections together.

26 Block Layout

Repeat the process for each of the other 3 sections.  If all of your geese are the same color you can make all your flying geese in sets of four, then make the Pickets & Quickets using the method in the technique sheet.  When I stitched the four sections togehter I pressed the seams open to avoid bulk.

27 Block

As I said in the beginning, “very cool block”!

A Goose of a Different Feather

I was going through some magazines from last year and saw a quilt made by Catherine Hughes that had a block in it that contained different kind of Flying Geese units, the background of the geese were half square triangles.  I decided to Tuckerize it, which meant  I would use my favorite Studio 180 Design Tools.

I decided to make a 10″ finished size block containing a 5 1/2″ center square. The Studio 180 Design method of making flying geese using the Wing Clipper 1 uses one large square and four small squares.  For this project the small squares would be half square triangles instead of just squares.  The cut size of the flying geese would be 3″ by 5 1/2″.  To determine what my large square and small squares should be I checked the chart that comes with the Wing Clipper 1. I cut the large square 6 1/2″. The cut size of the small squares should be 3 1/2″.  Now I went to the chart that comes with my Tucker Trimmer I.  For half square triangles that finish 3″ the cut size is 3 1/2″ which meant my starter squares should be 4″. Whew that was a mouthful!  For 3 blocks I cut 6 red – 4″ squares and 6 black – 4″squares.

OLYMPUS DIGITAL CAMERA

On the back of the red squares use your Magic Wand and draw diagonal lines on either side.

OLYMPUS DIGITAL CAMERA

Place 1 red square on each black square.

OLYMPUS DIGITAL CAMERA

Sew on the lines.

OLYMPUS DIGITAL CAMERA

Cut apart between the sewn lines.

OLYMPUS DIGITAL CAMERA

Press toward the dark.

OLYMPUS DIGITAL CAMERA

Square up to 3 1/2″ using your Tucker Trimmer I.

OLYMPUS DIGITAL CAMERA

Using your Magic Wand draw diagonal lines on the wrong side of the half square triangles.

OLYMPUS DIGITAL CAMERA

Place a 6 1/2″ square right side up and position 2 half square triangles wrong sides together as shown nudging the half squares triangles in from the corners about a 1/16″.

OLYMPUS DIGITAL CAMERA

Sew on the drawn lines and cut apart.

OLYMPUS DIGITAL CAMERA

Press toward the small triangles.  Position another half square triangle as shown again nudging away from the corner 1/16′.

OLYMPUS DIGITAL CAMERA

Sew on the lines and cut apart.

OLYMPUS DIGITAL CAMERA

Press toward the small triangle.

OLYMPUS DIGITAL CAMERA

First trim.

OLYMPUS DIGITAL CAMERA

Rotate unit, second trim.

OLYMPUS DIGITAL CAMERA

Block layout. Cut 3″ squares for the block corners.

OLYMPUS DIGITAL CAMERA

Repeat process to make 3 blocks.  Cut one 15 1/2″ square and cut diagonally twice to make the side triangles.  Sew the side triangles to blocks as shown.

OLYMPUS DIGITAL CAMERA

I cut 4 – 1 1/2″ red strips for the inner border and 4 – 2 1/2″ black strips for the outer border.