Category Archives: BlockBuster’s

Island Batik’s “A Piece Of” Blog Hop

The fabrics shown in this post were given to me by Island Batik.

Tropical Escape

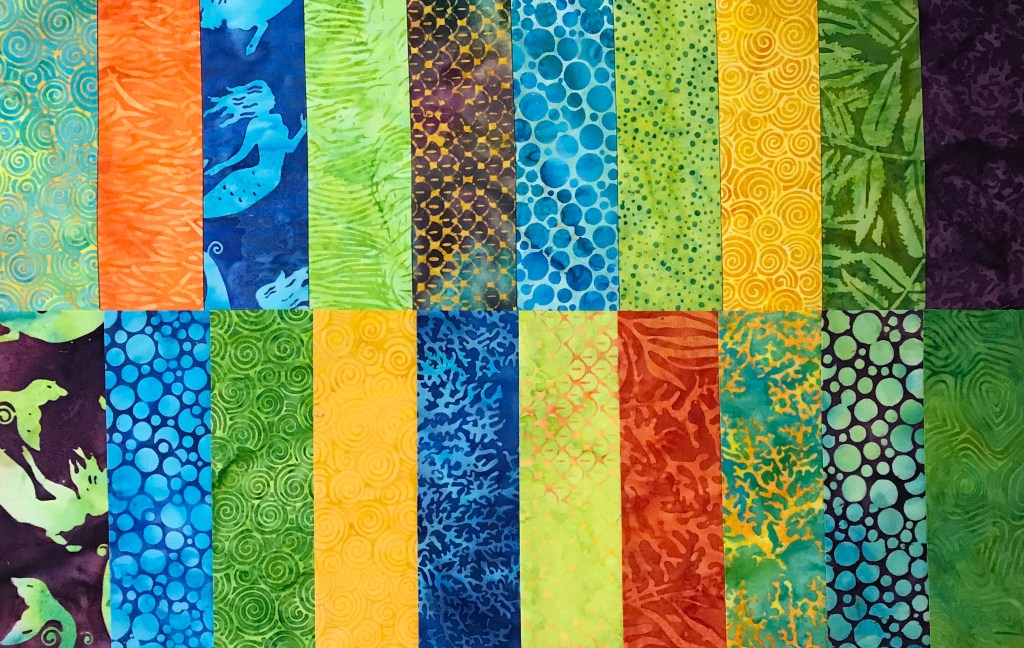
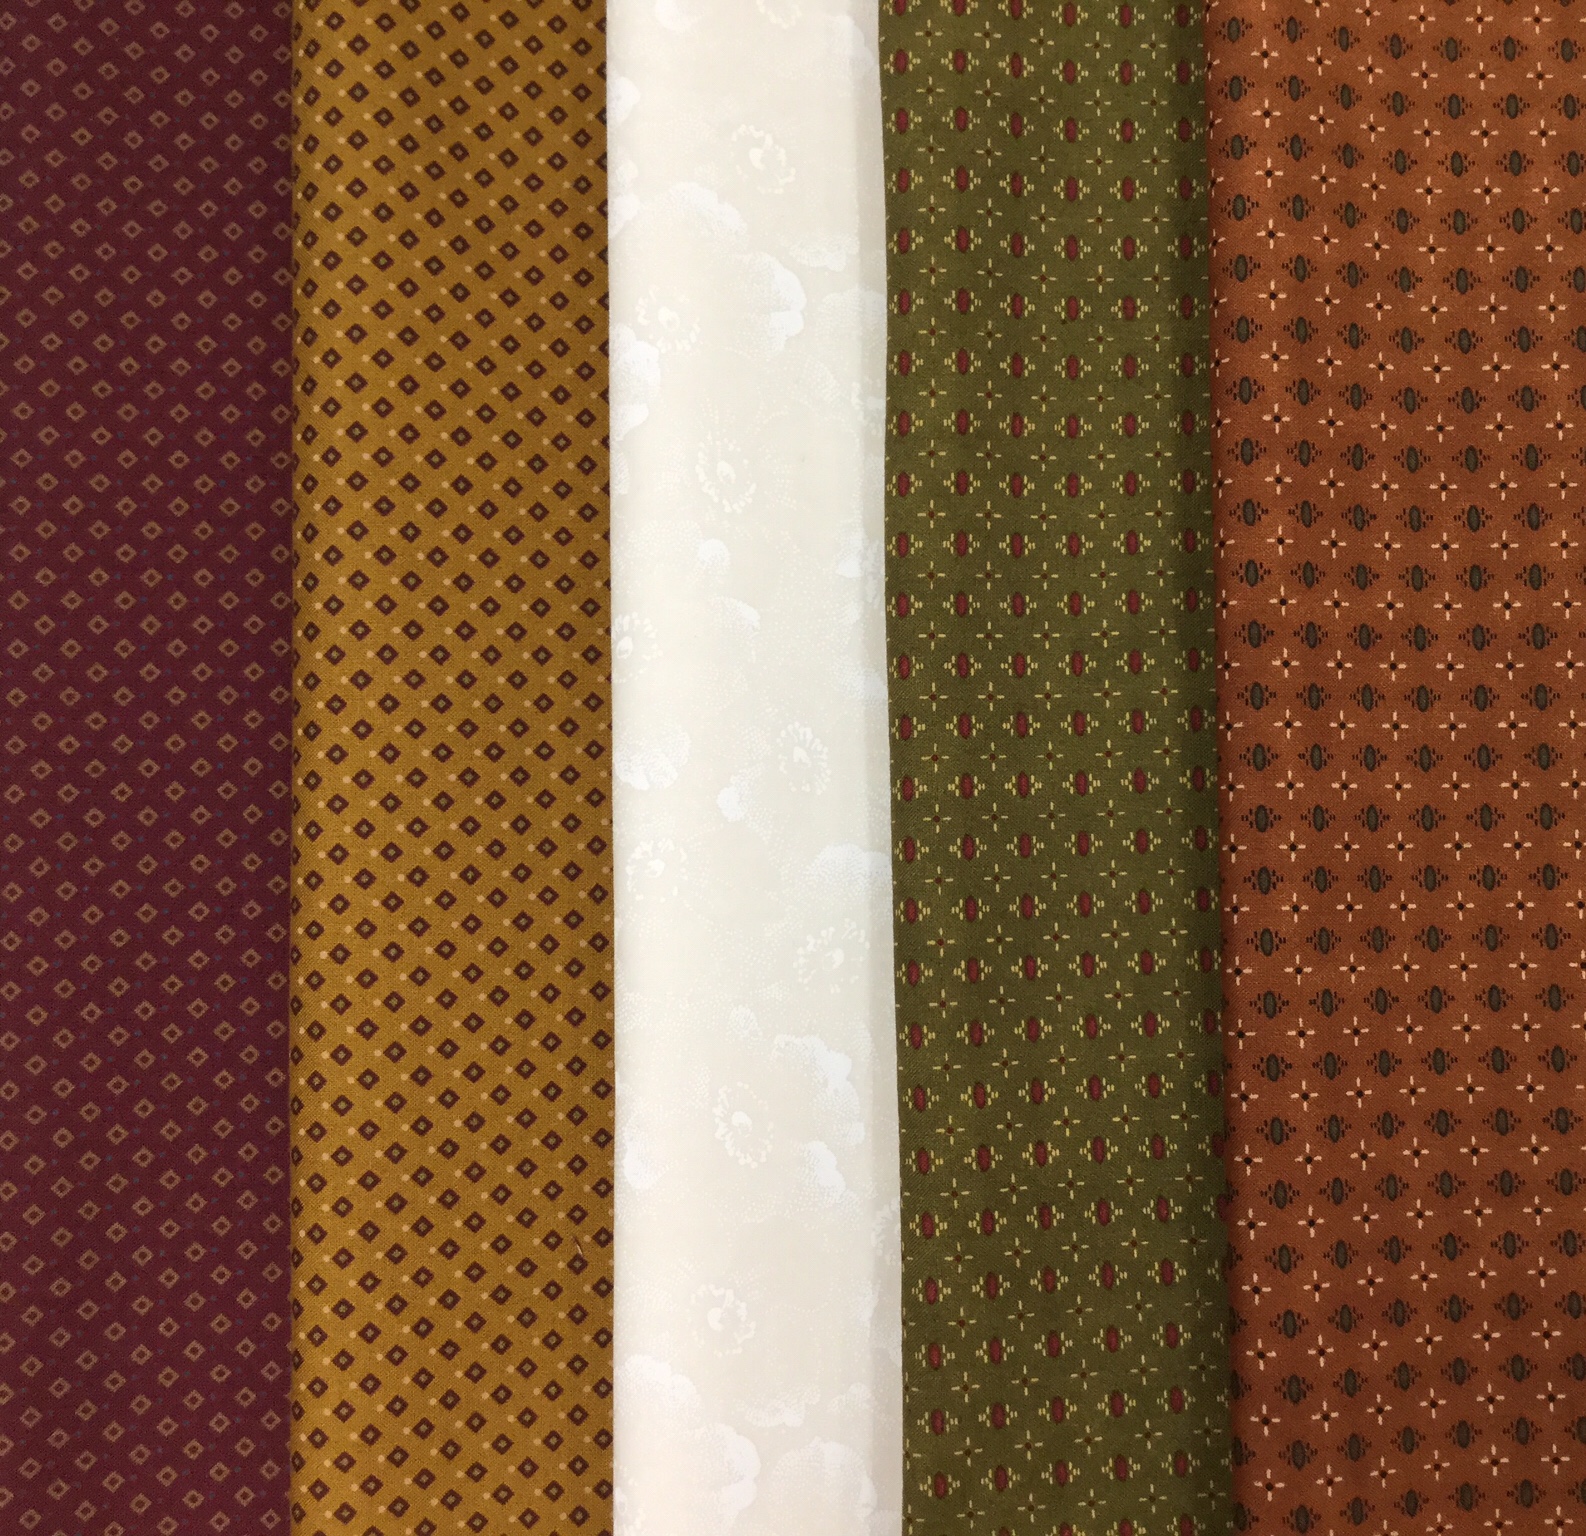
Last January Island Batik gave me a secret bundle to hold onto till November, it was Tropical Escape shown above. I sat and looking at the bundle of gorgeous fabrics, waiting for them to talk to me. The goal is for me to introduce the Tropical Escape fabric line by making a quilt showcasing as many of the 20 fabrics as possible.

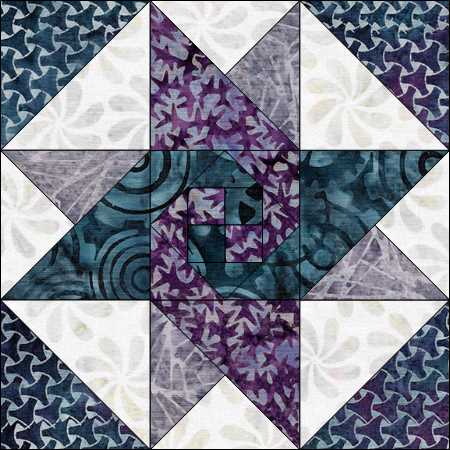
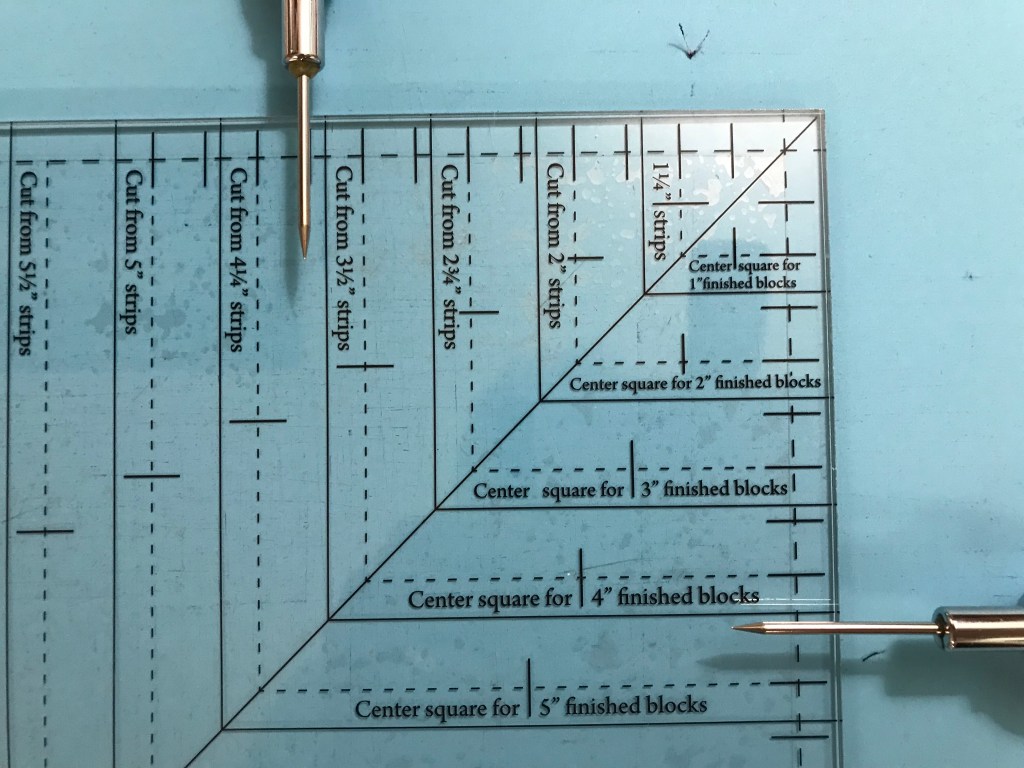
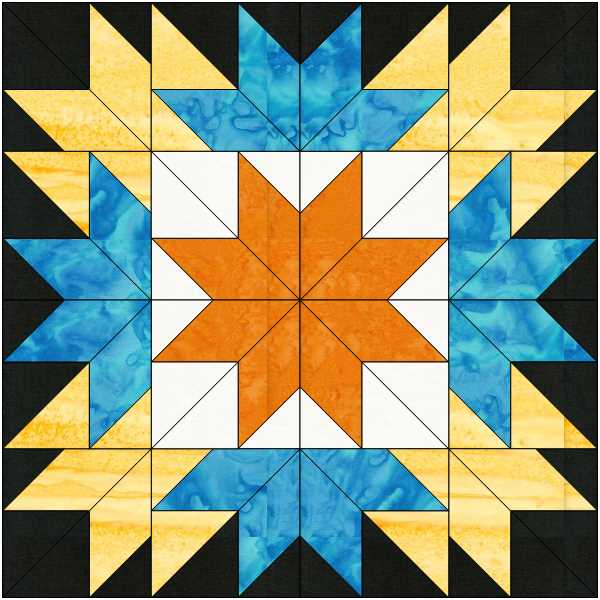
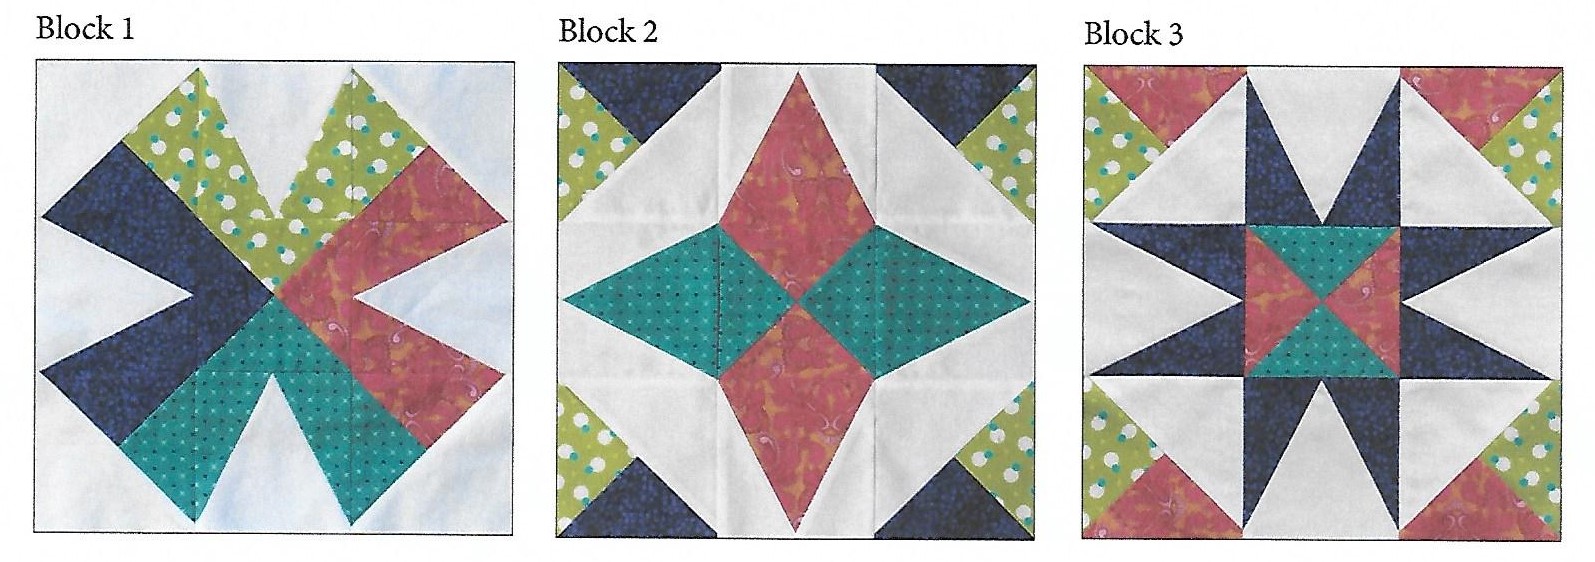
I decided to use Studio 180 Design’s BlockBuster pattern #29 Pointsettia. This block requires the Rapid Fire Lemoyne Star, Split Rects and Tucker Trimmer I tools. You can download the BlockBuster pattern below:

I loved that the Poinsettia block could be made in 7″, 14″ or 21″ finished blocks. I chose the 21″ blocks.

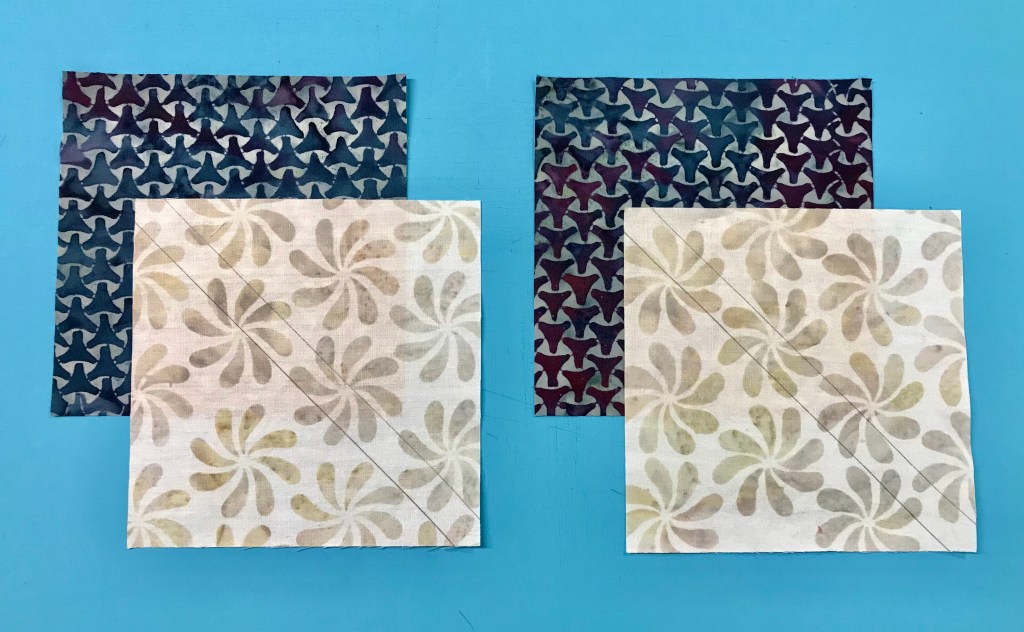
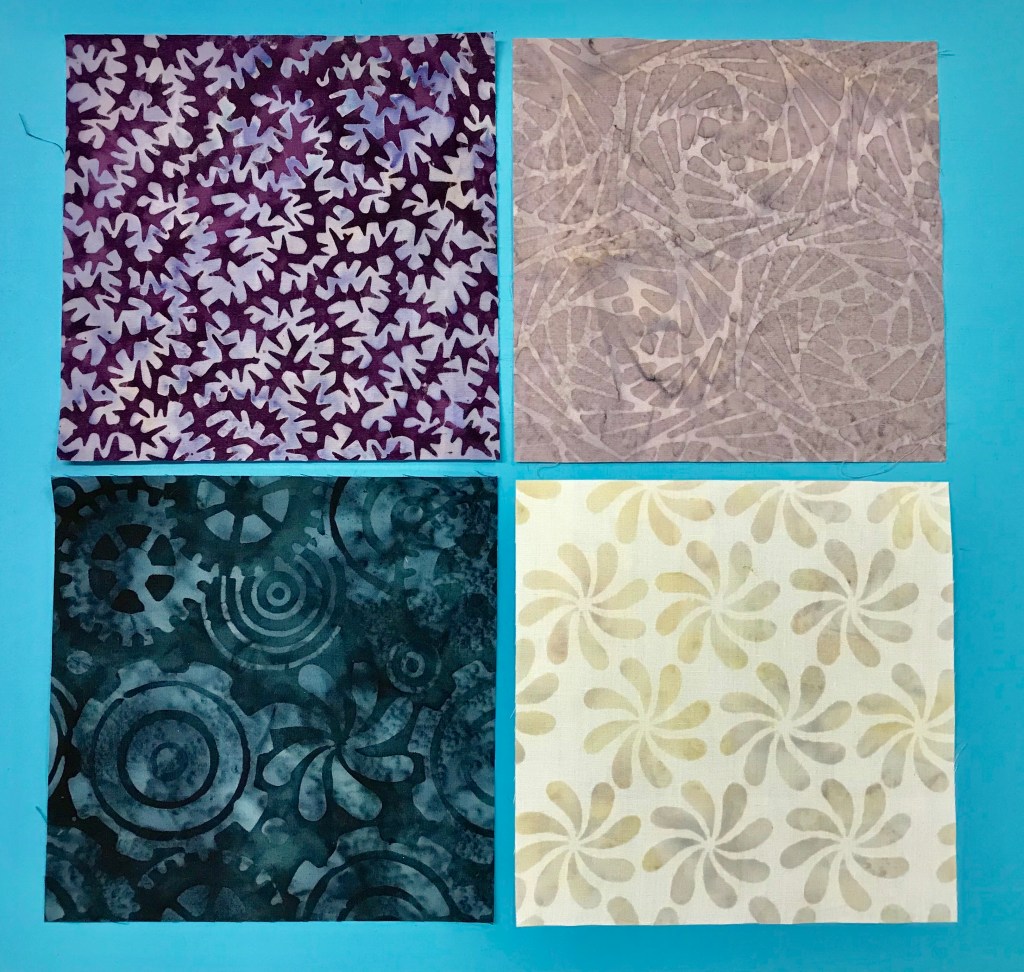
Time to break out the paper plates. I sorted my fabrics by color and value, pairing a light/medium value with a darker value. This would allow me to use 16 different fabrics to form the flowers. I would use the lighter value fabric for the Lemoyne star quarters and the darker value fabrics for the split rects units.

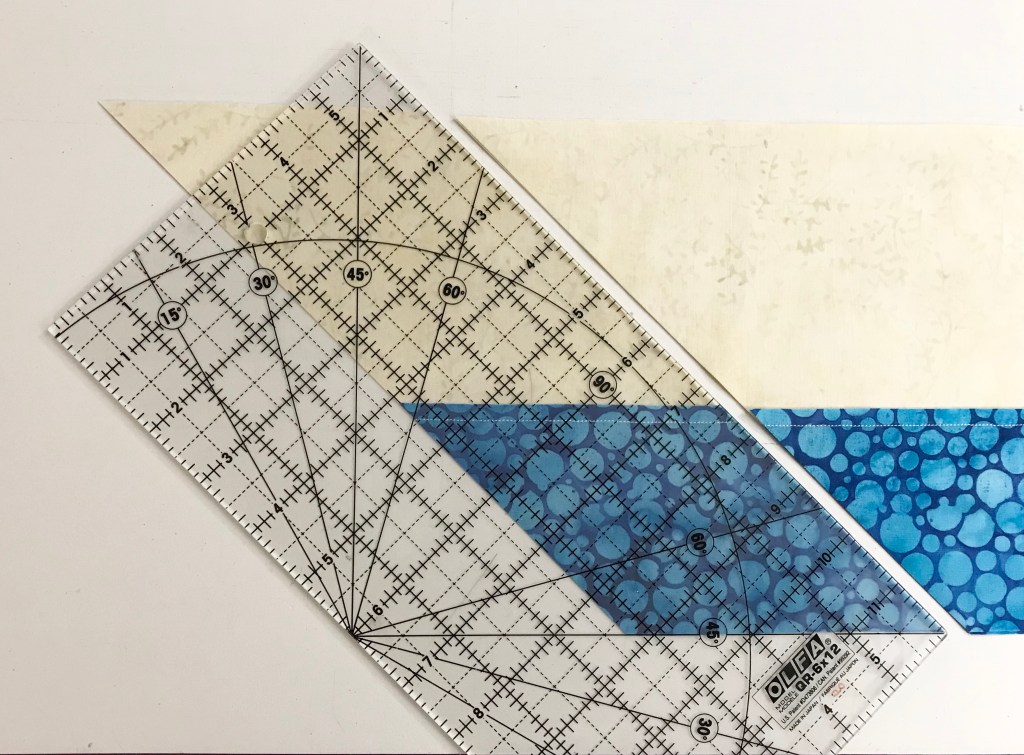
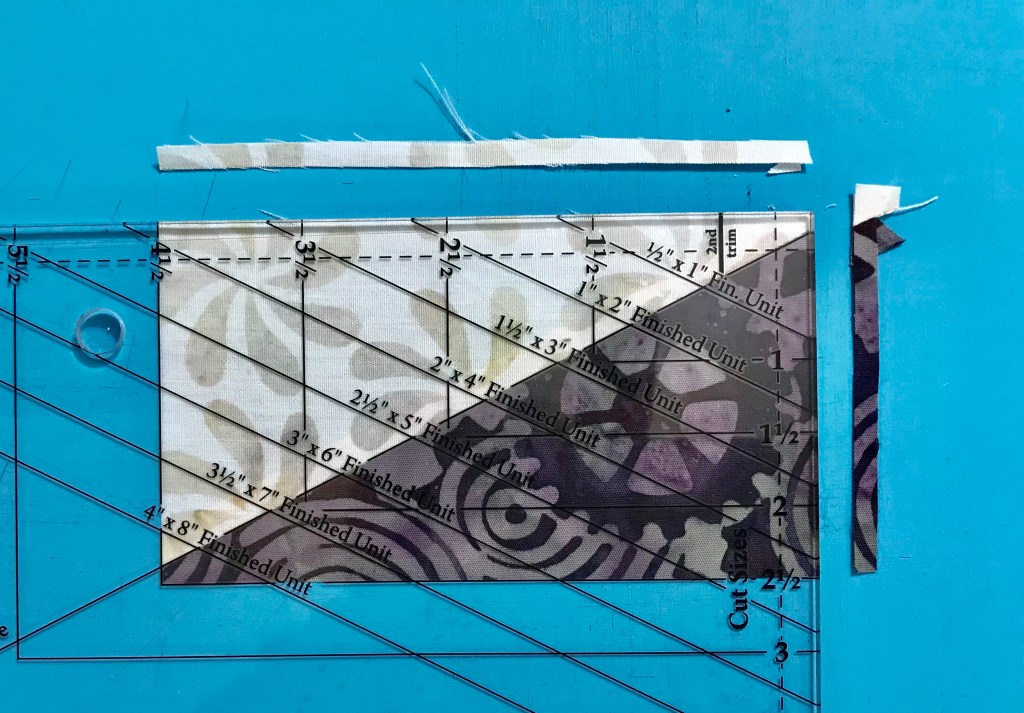
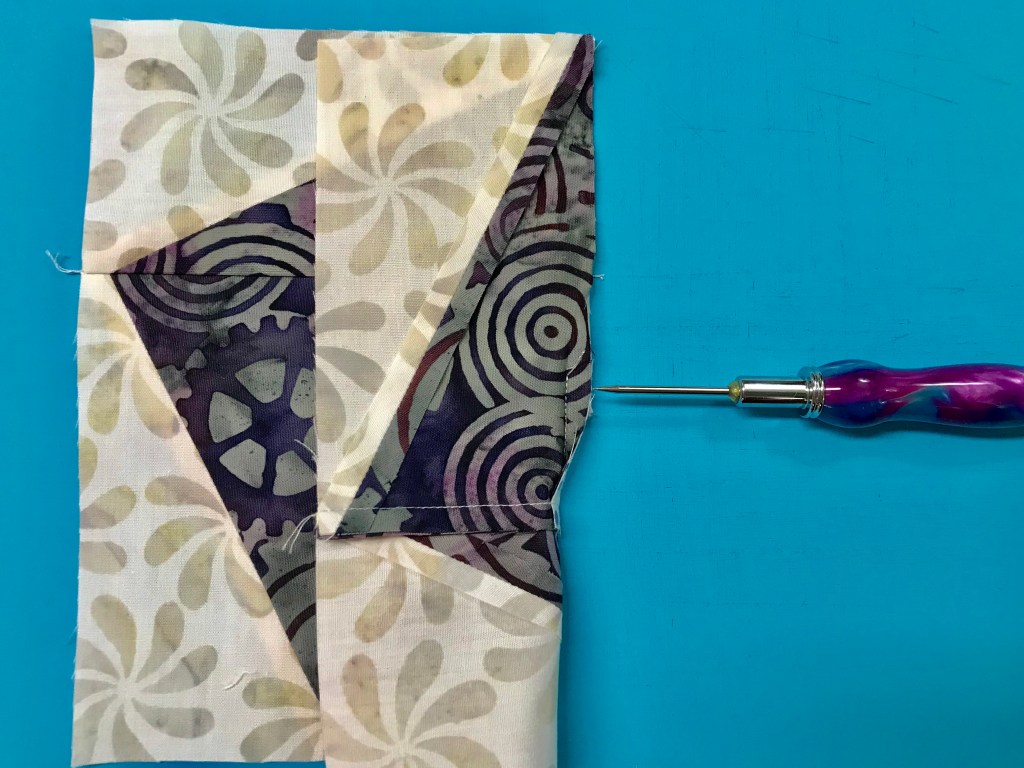
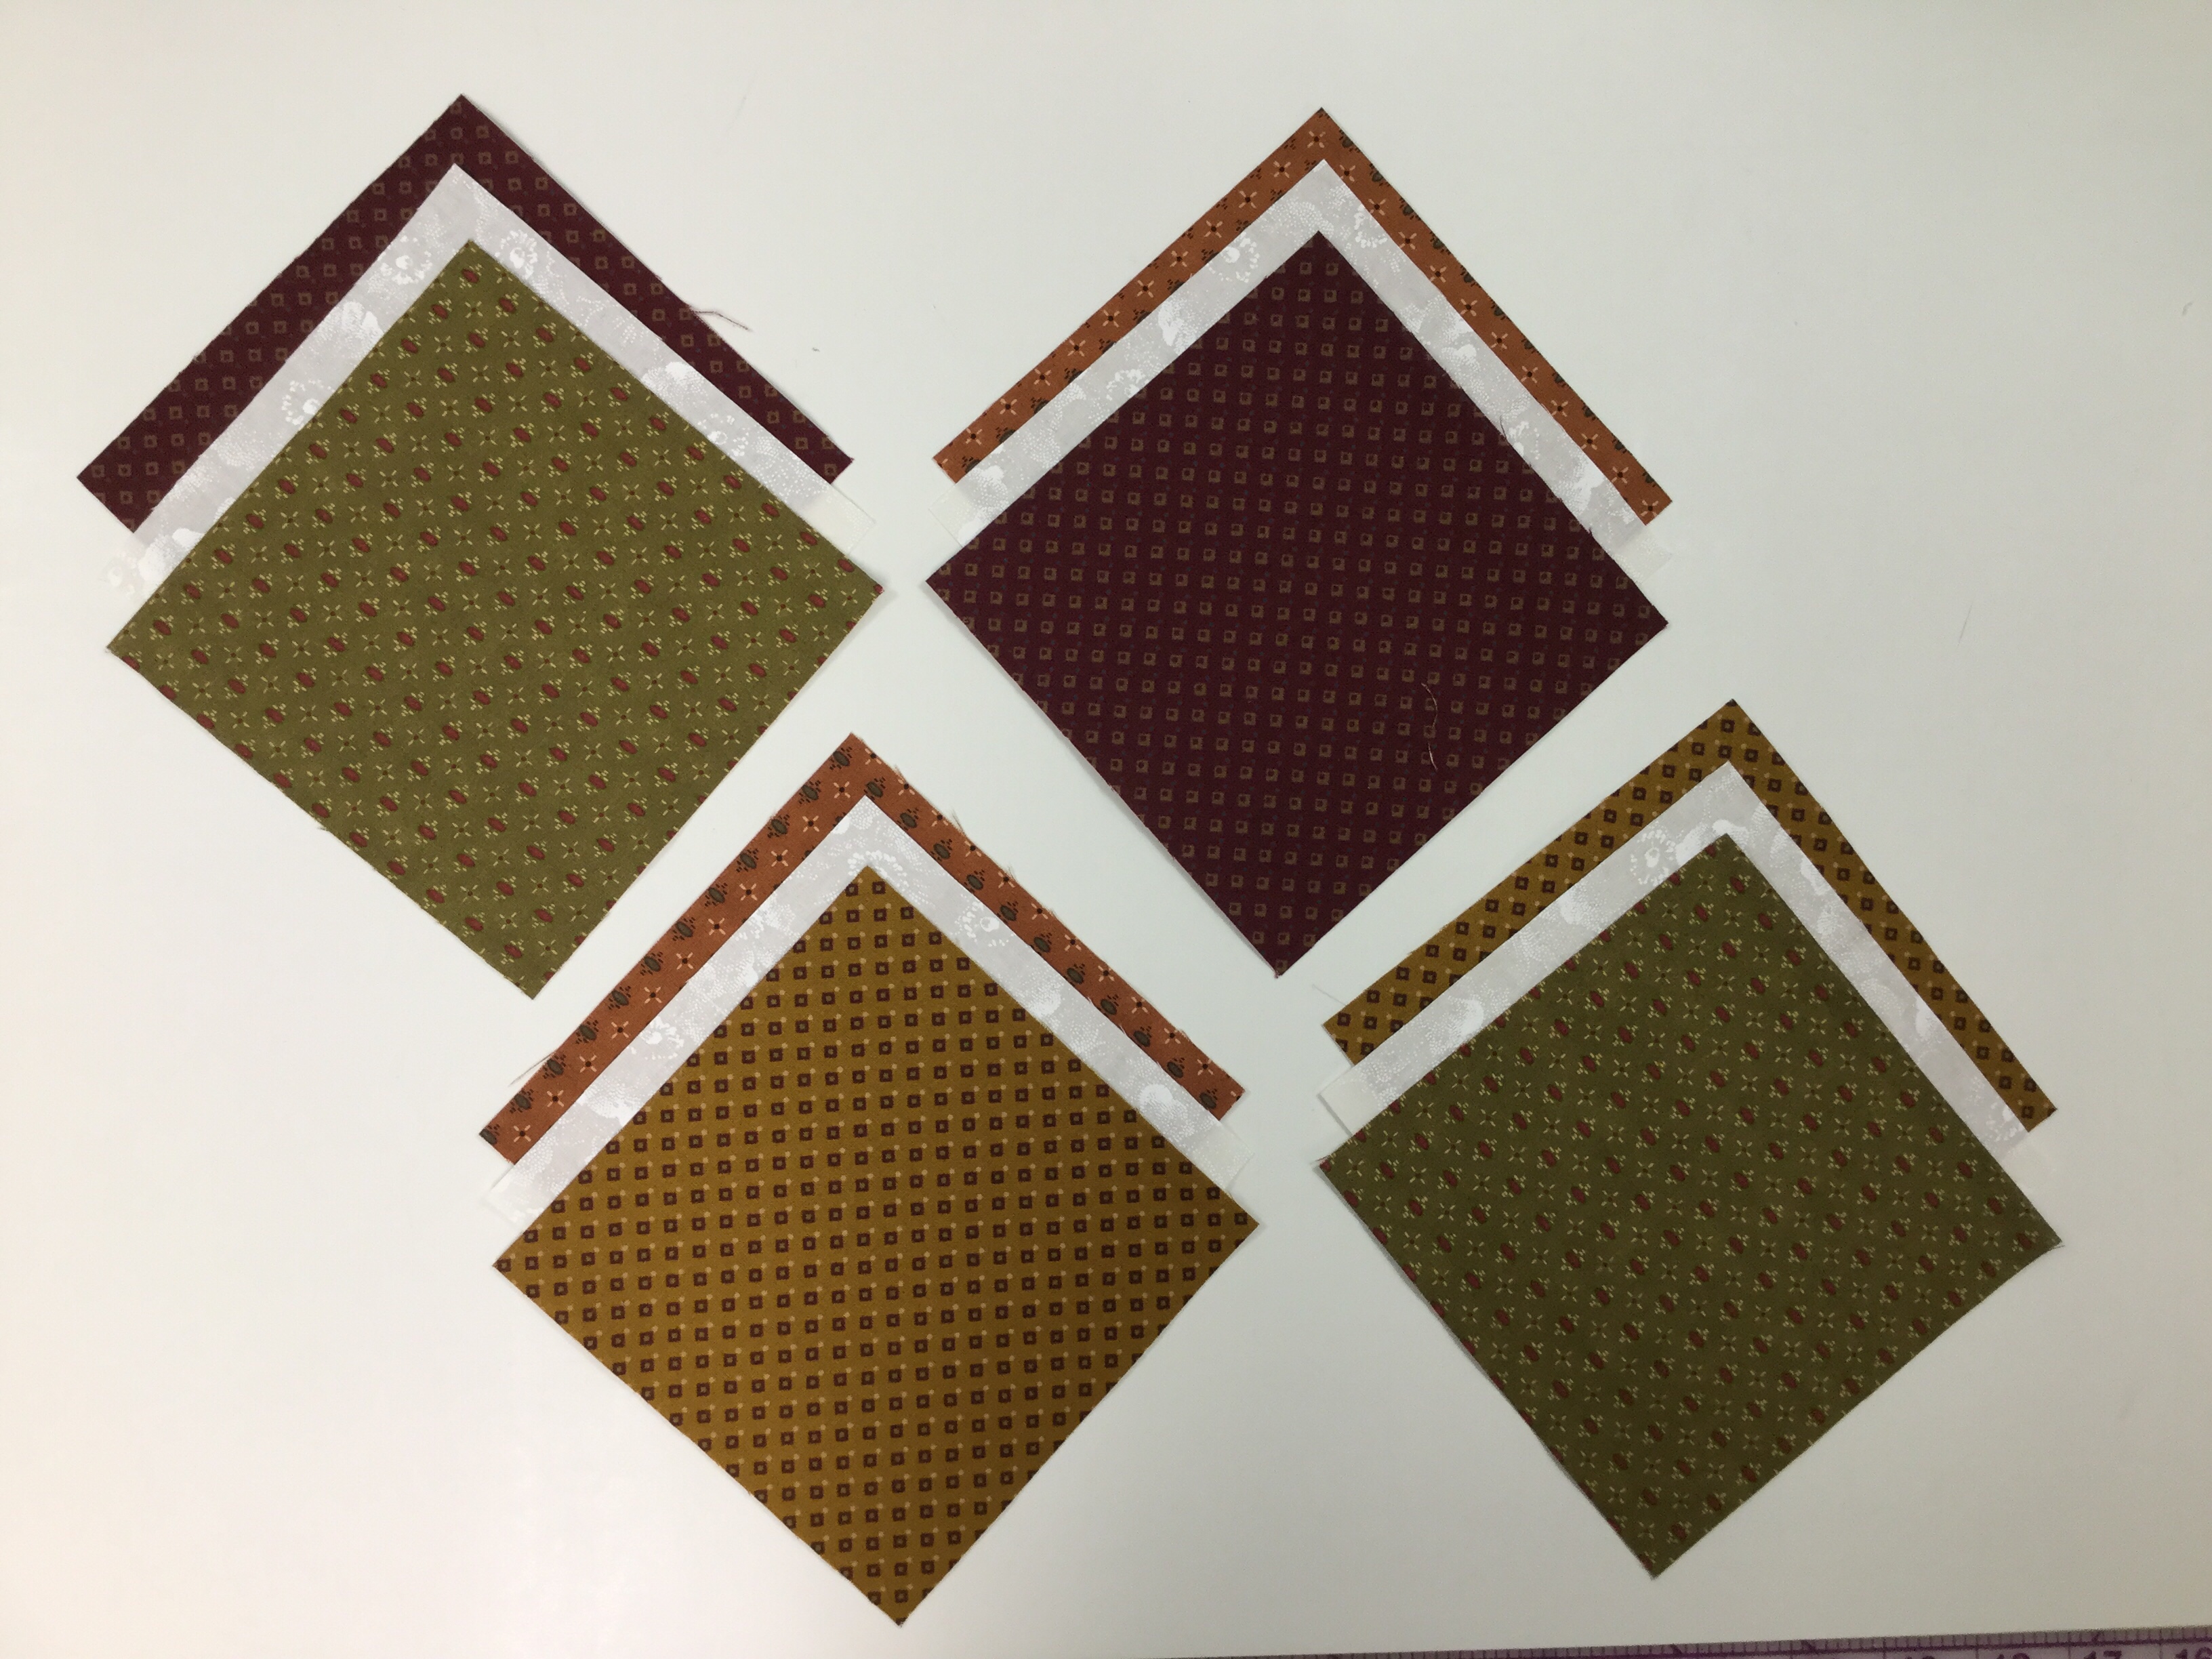
My tip for staying organized while making Lemoyne stars is to label two paper plates, one “A” & one “B”. Follow the Lemoyne star tool instructions. When you come to Step 7, make one 45 degree cut – then imediateley reposition your ruler to cut the side triangles as you go.

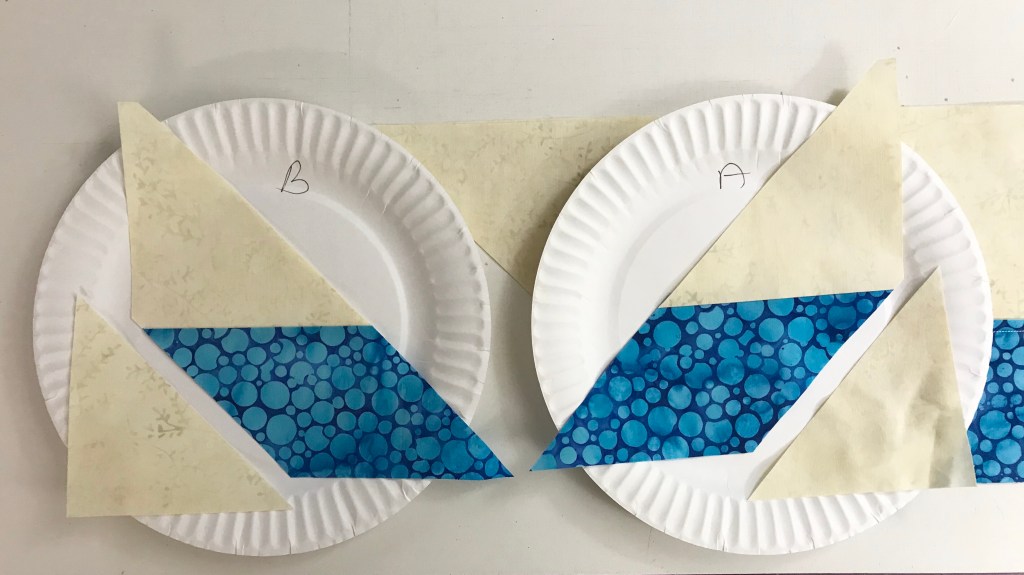
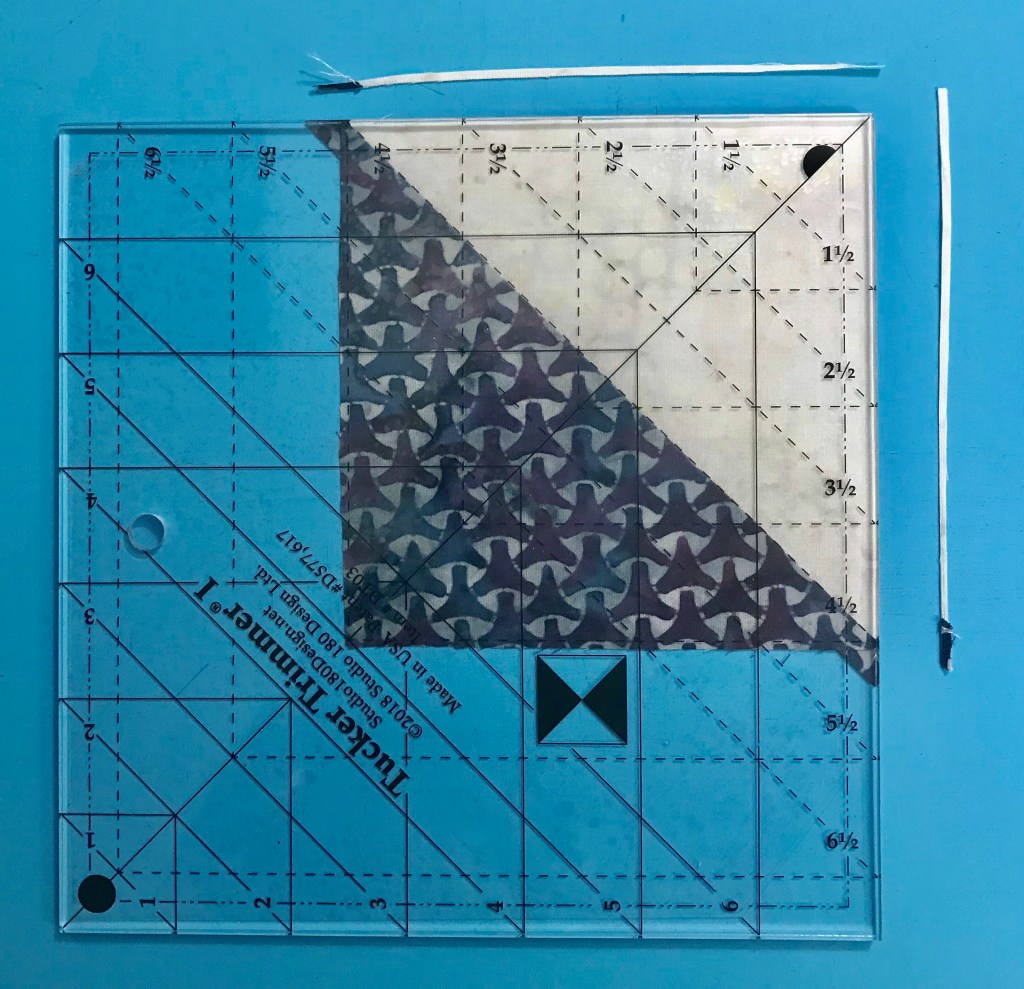
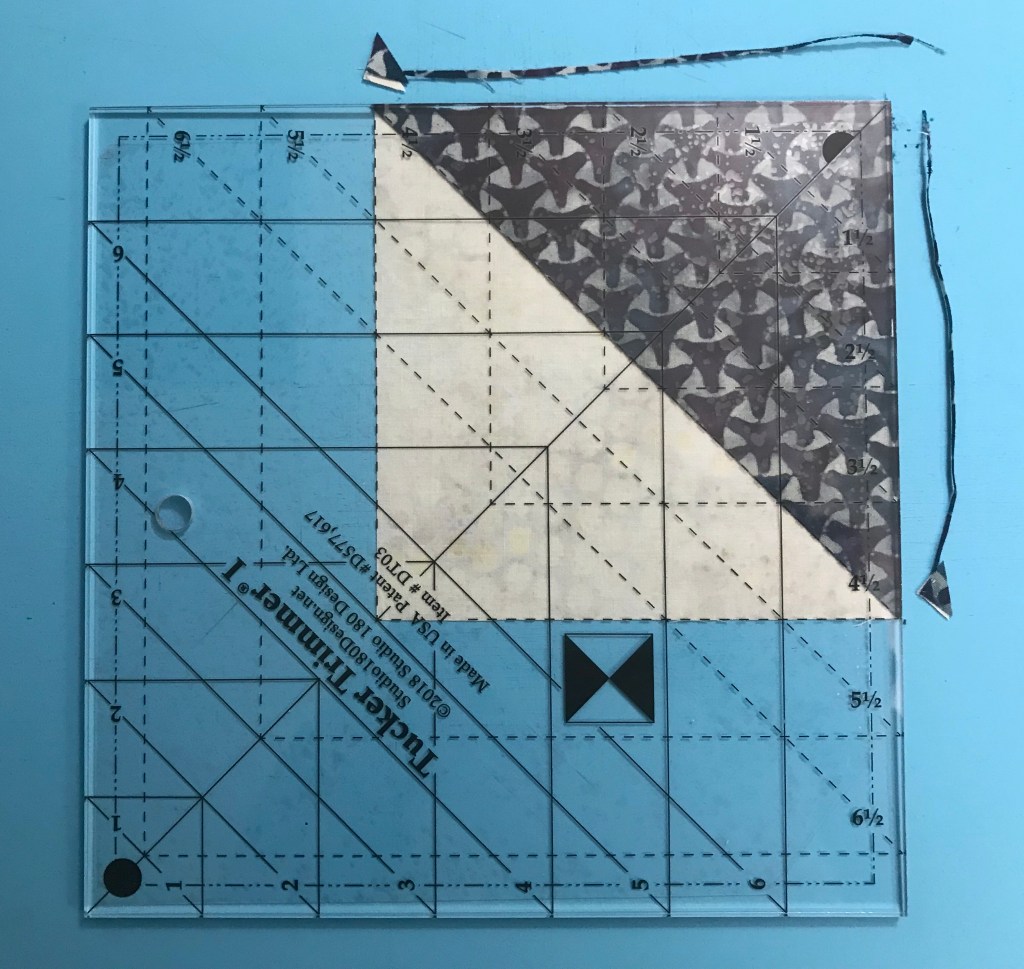
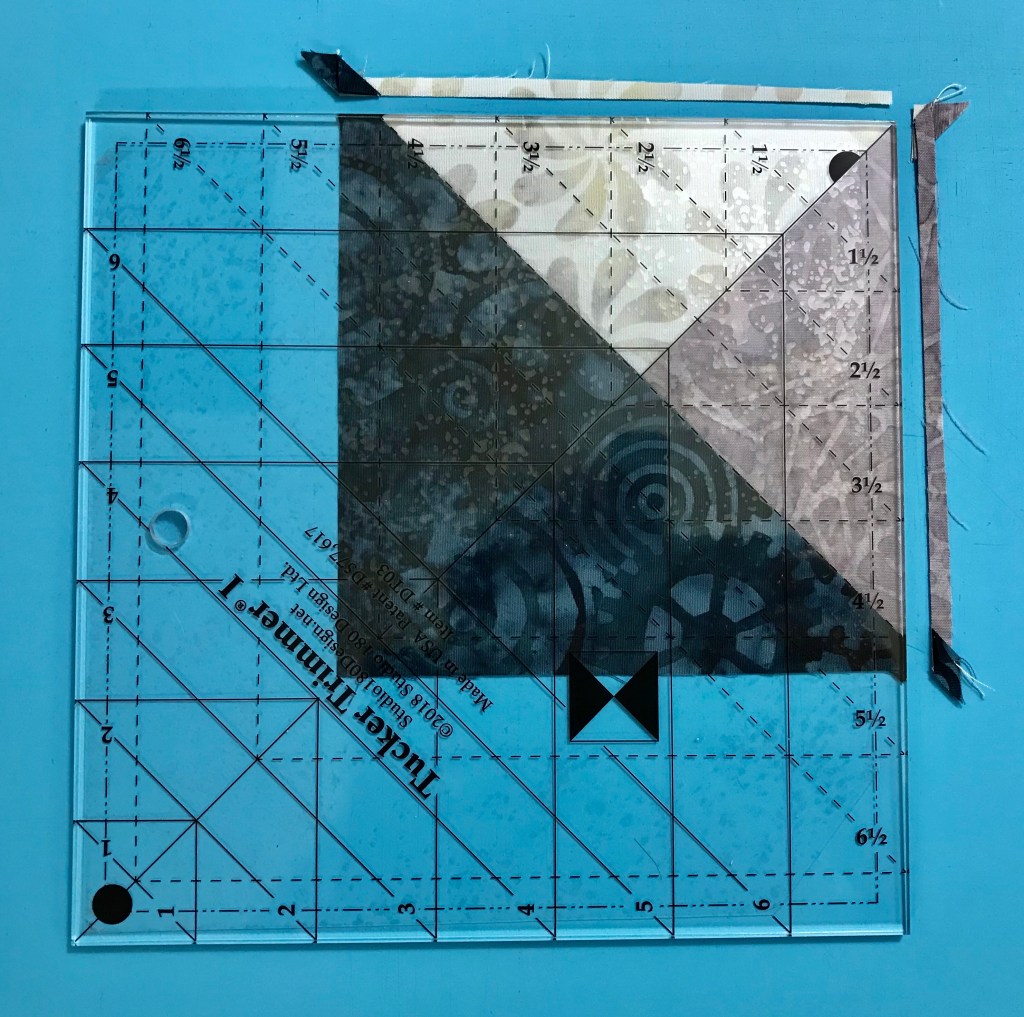
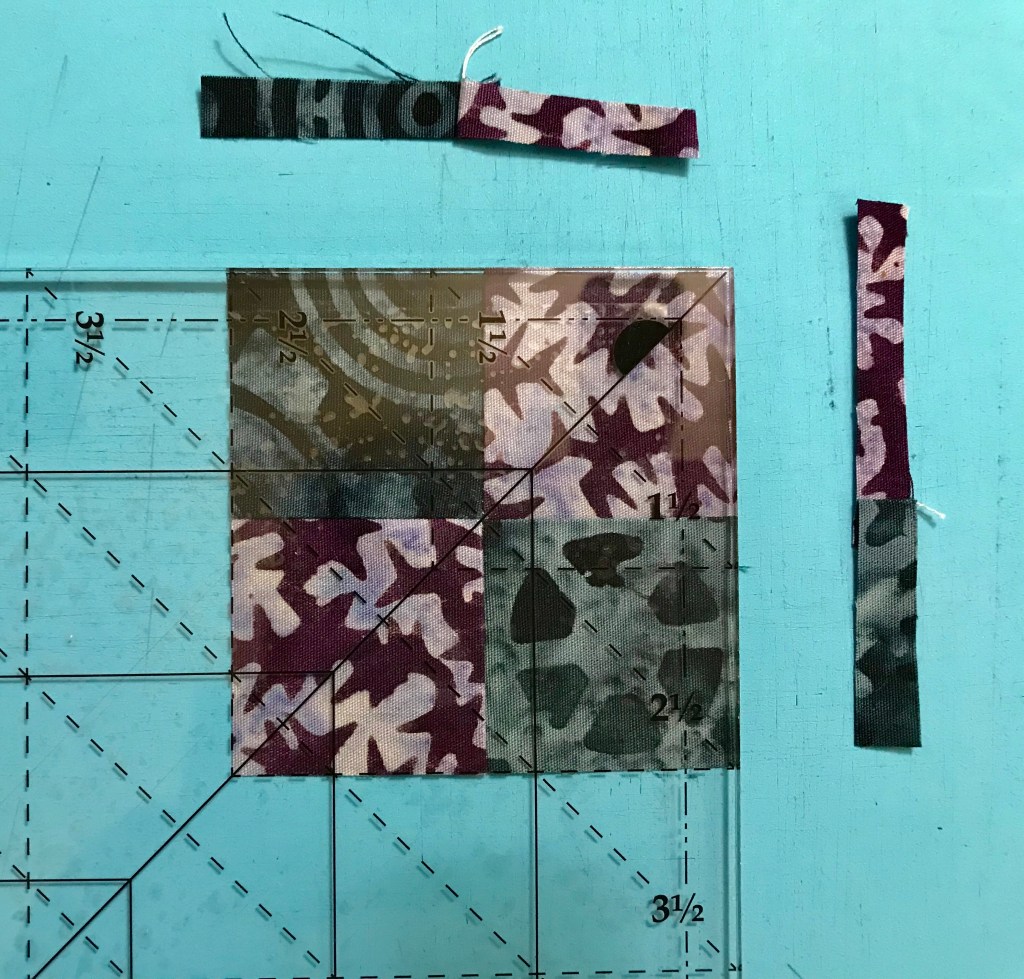
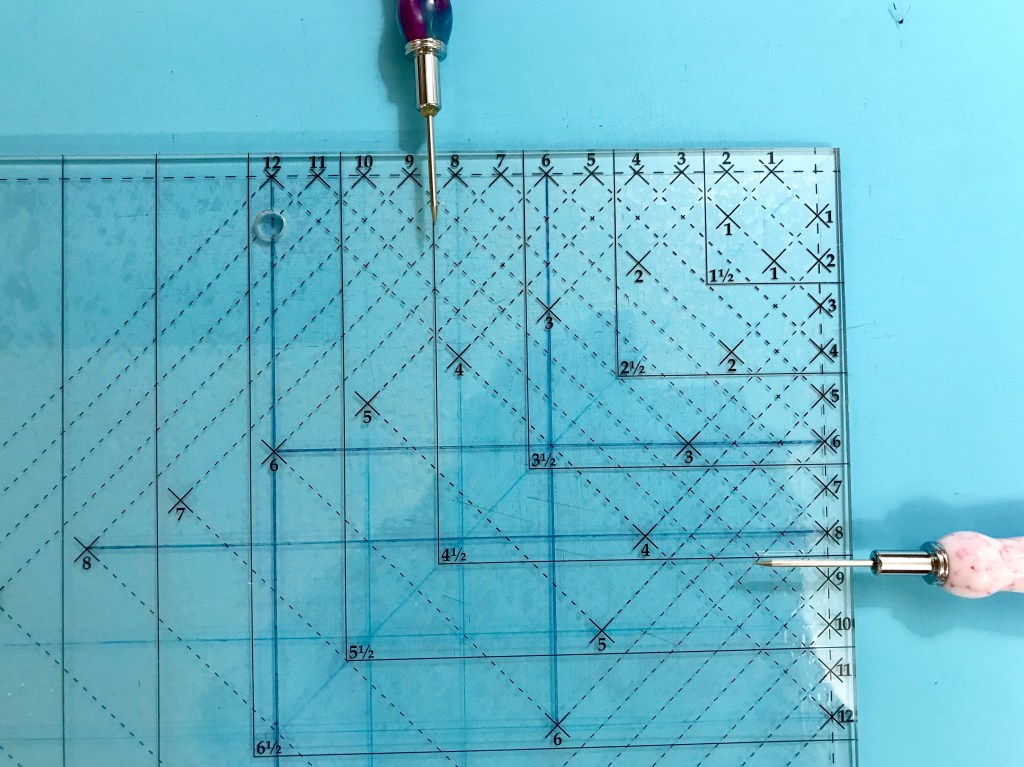
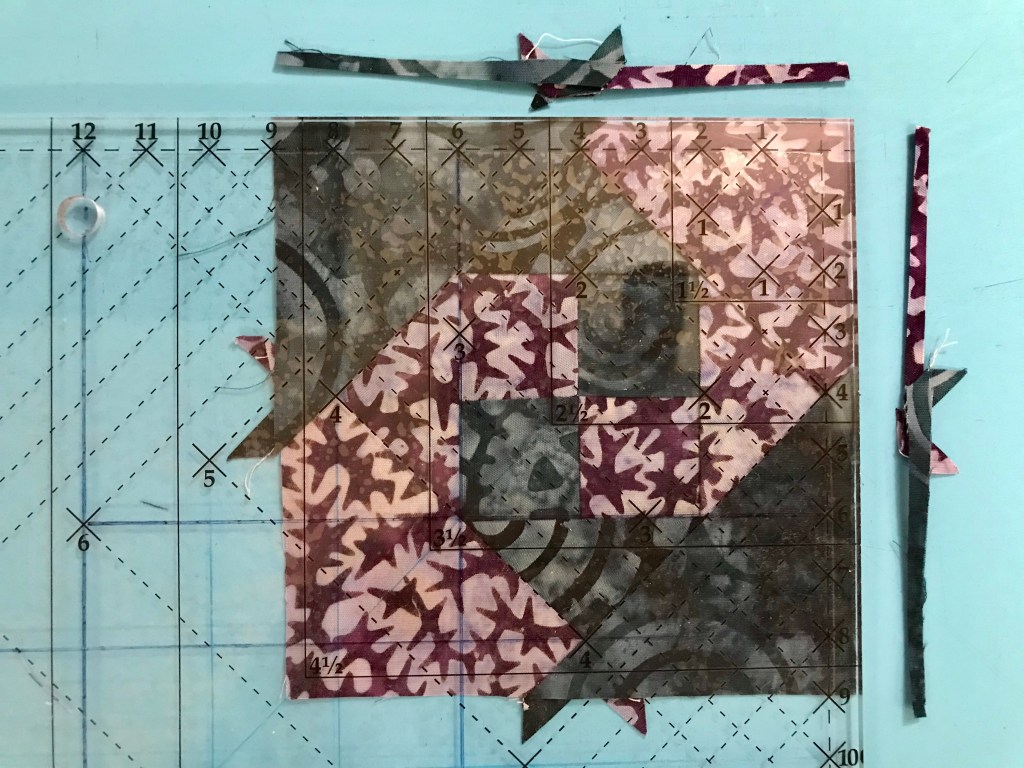
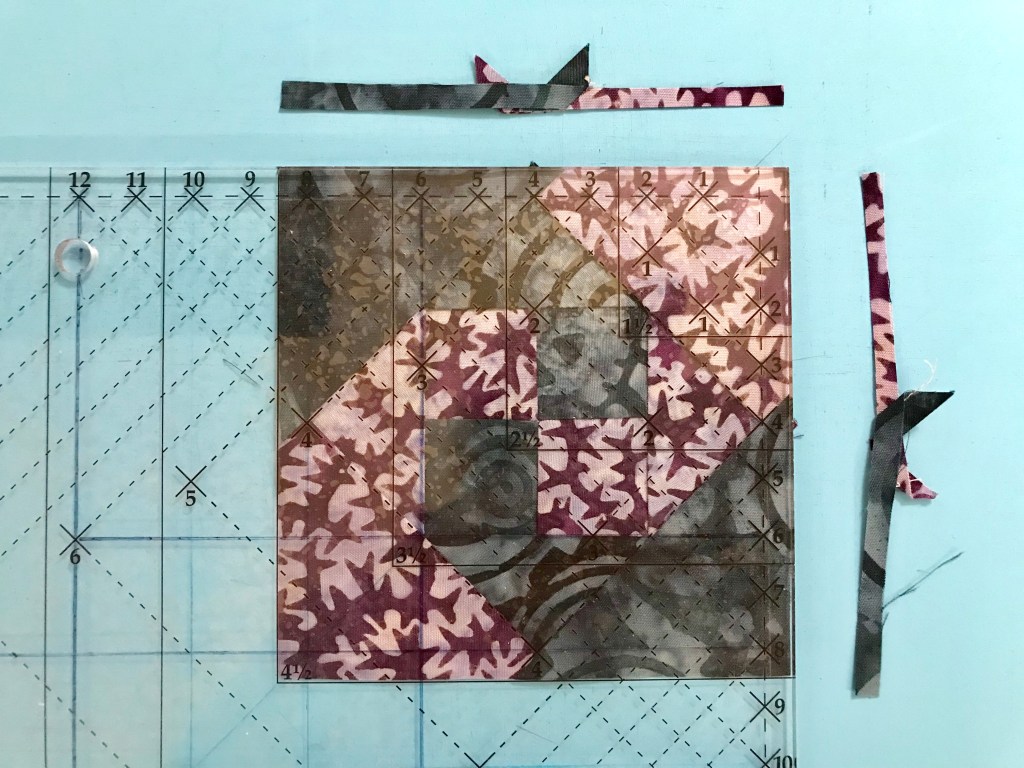
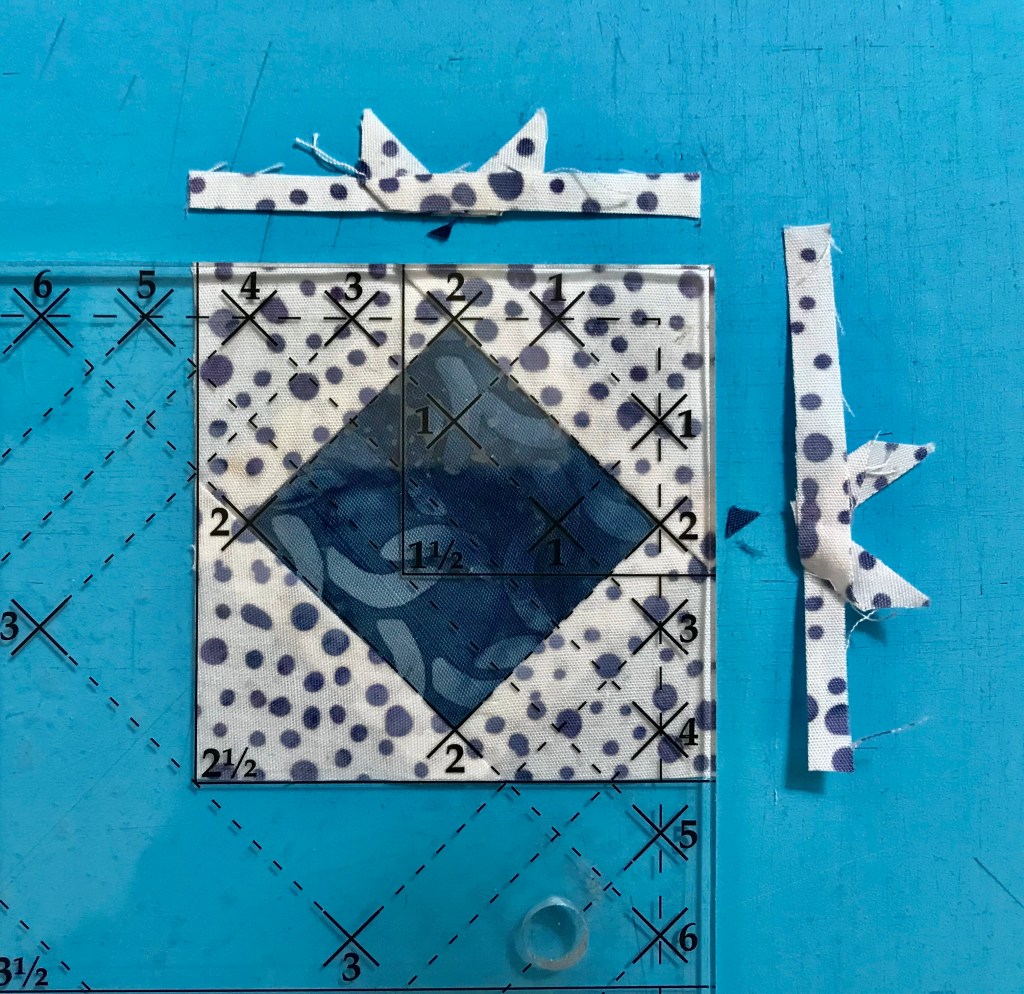
If you are right handed the “B” strip was on the bottom & the “A” strip was on top. Place the “A” unit on the plate marked “A” and the “B” unit on the plate marked “B”, place one triangle on each plate also. (If you are left handed the “A” strip would be on the bottom and the “B” strip would be on top). Continue cutting your units, placing each unit on their assigned plate. Construct the Lemoyne units as instructed. Throughout the process you will always know which units are “A” and which are “B”. This is important for knowing which way to press your seams. Another tip for pressing the lemoyne star units is to “remember, the Lemoyne star point should always be pointed to the left”. To make Lemoyne star quarters you will square them up using your Tucker Trimmer 1 before stitching them to the split rects units.

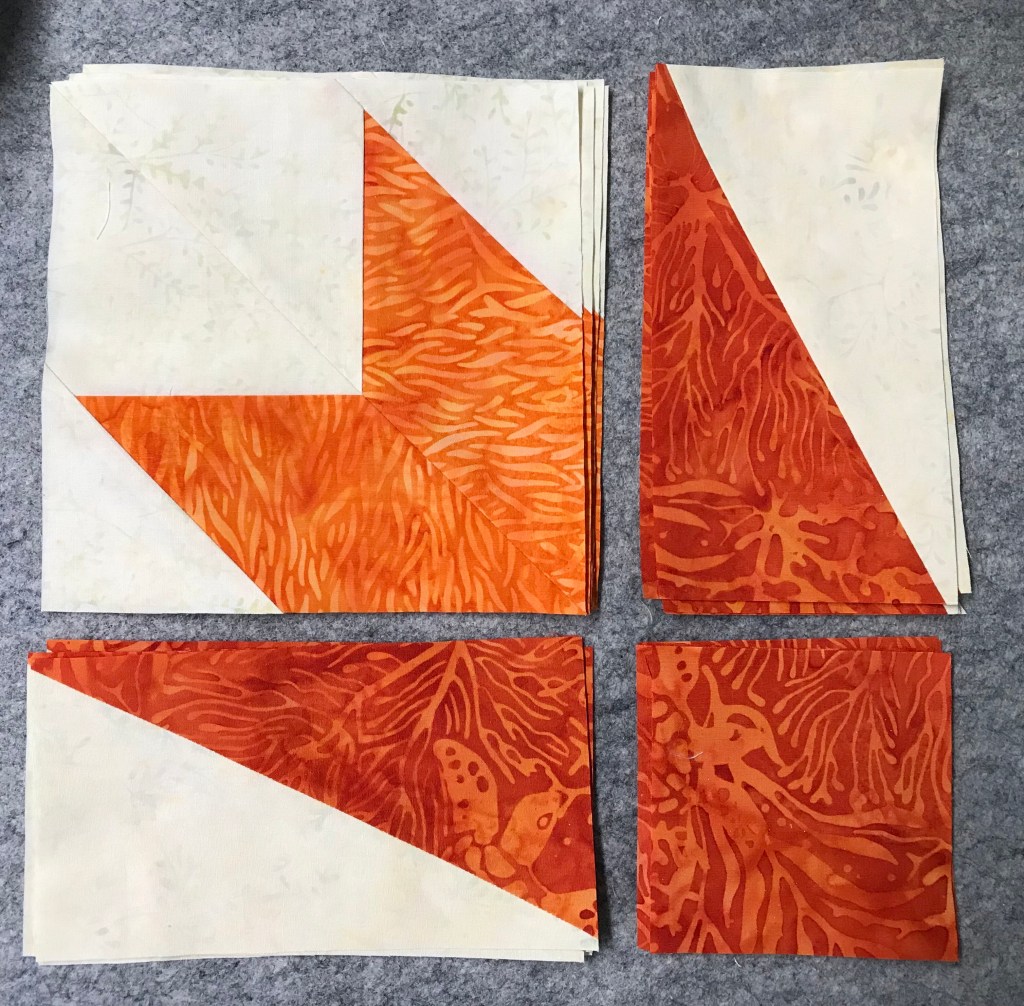
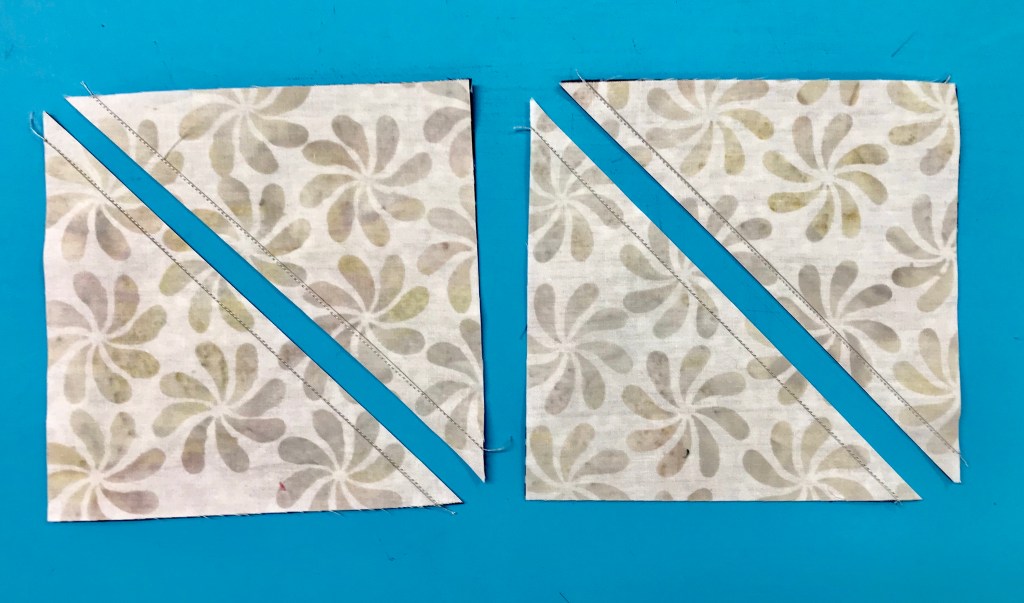
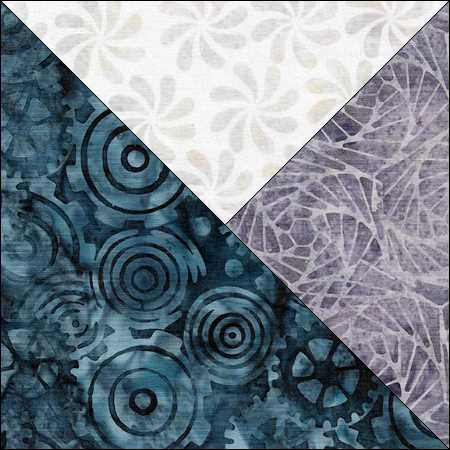
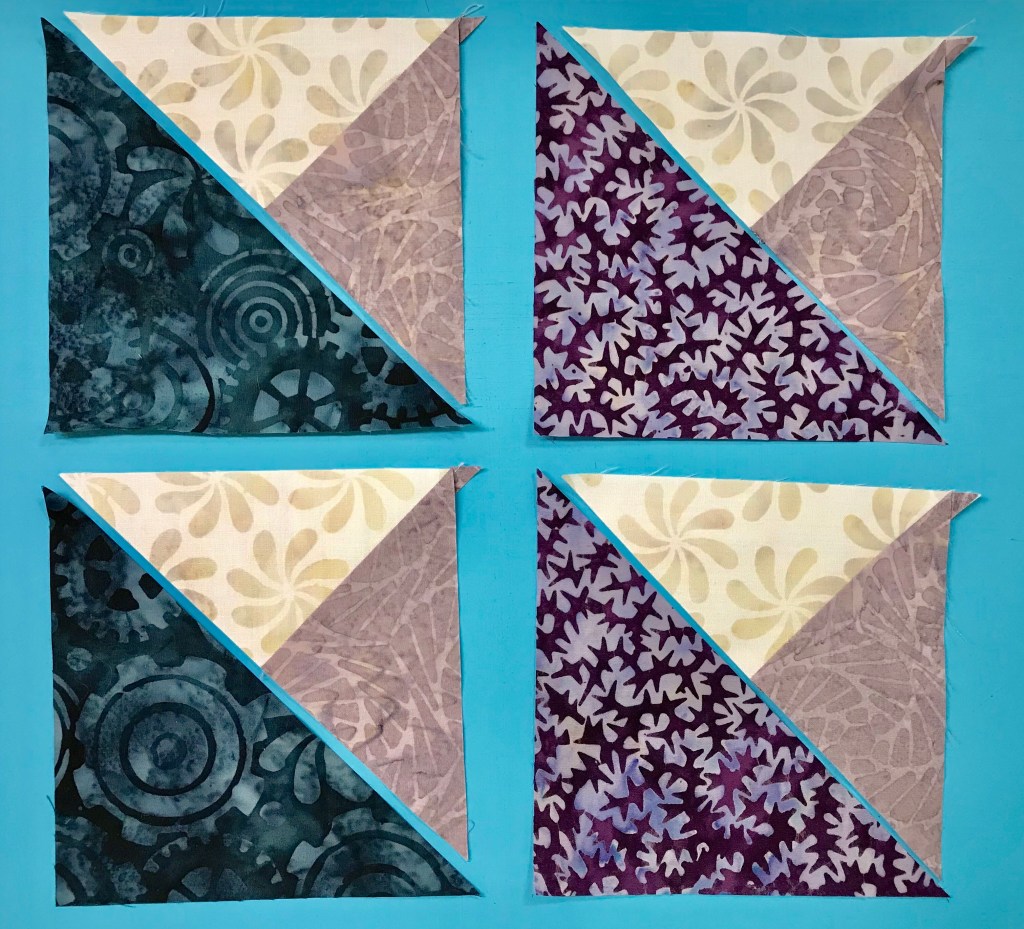
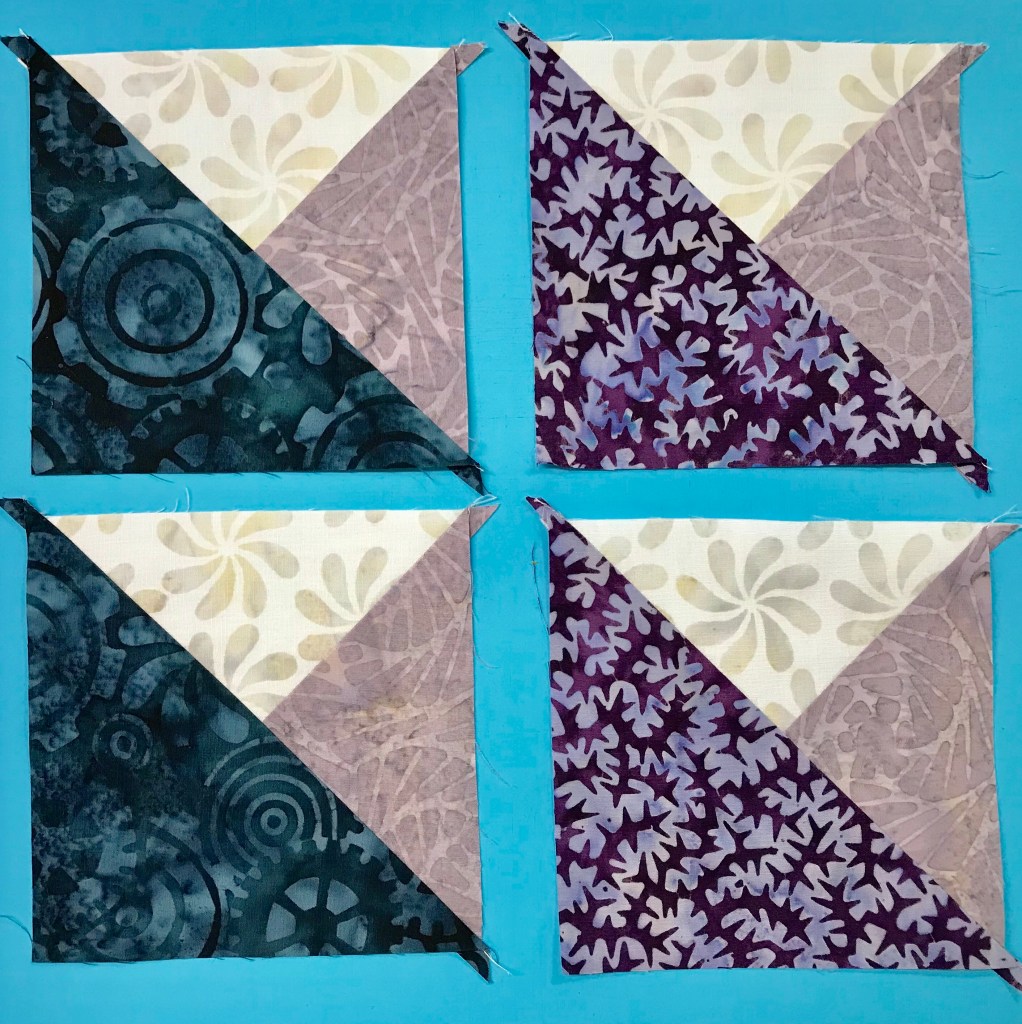
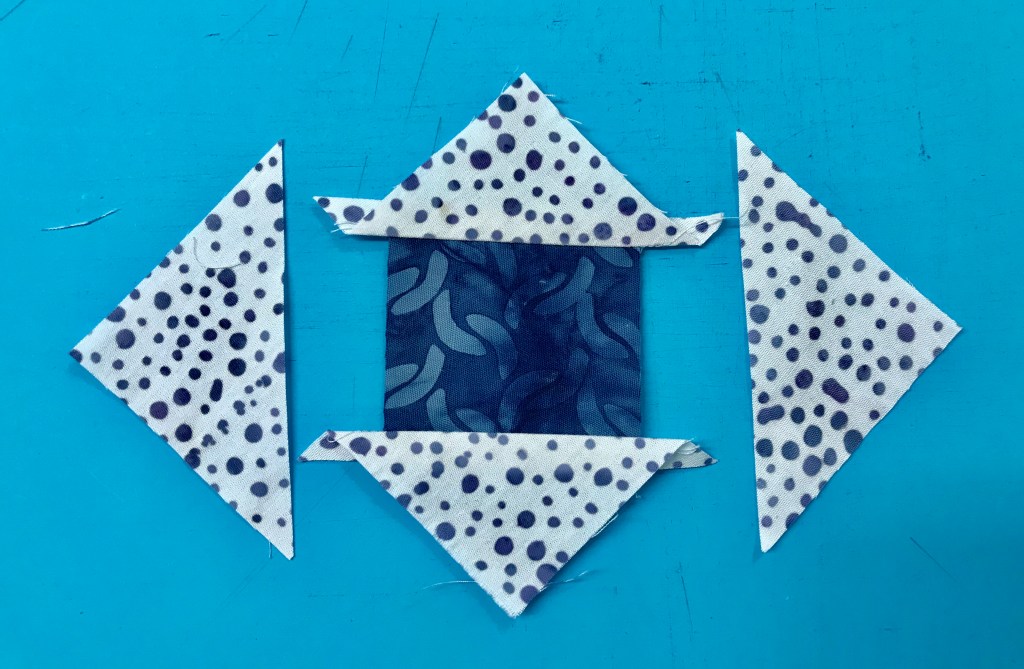
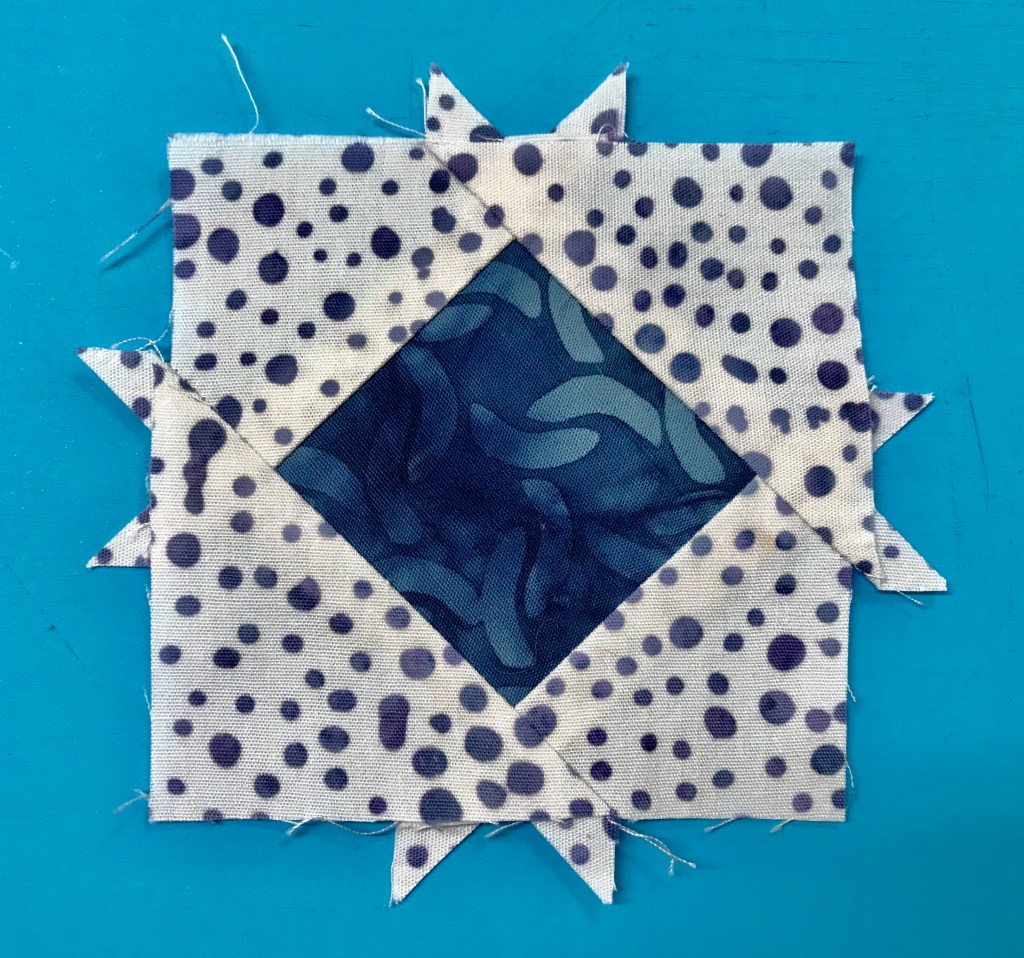
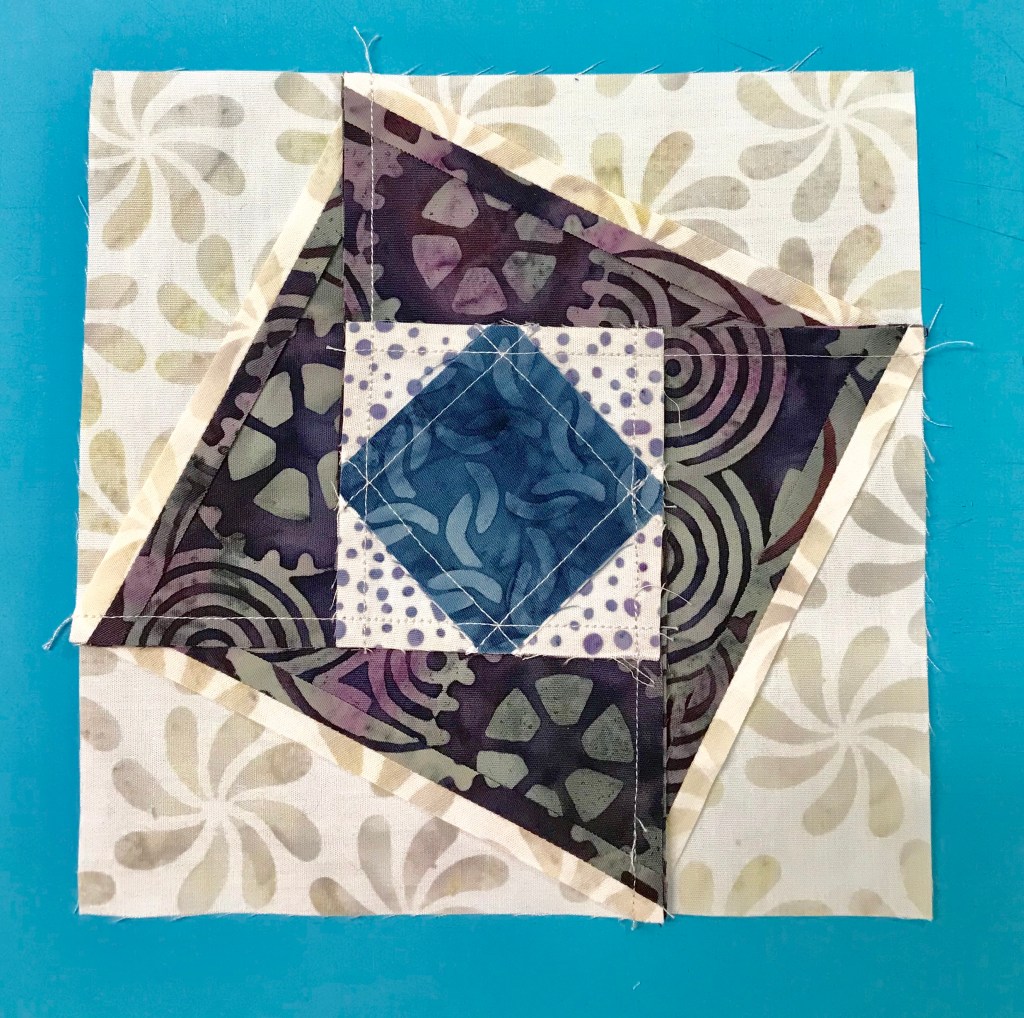
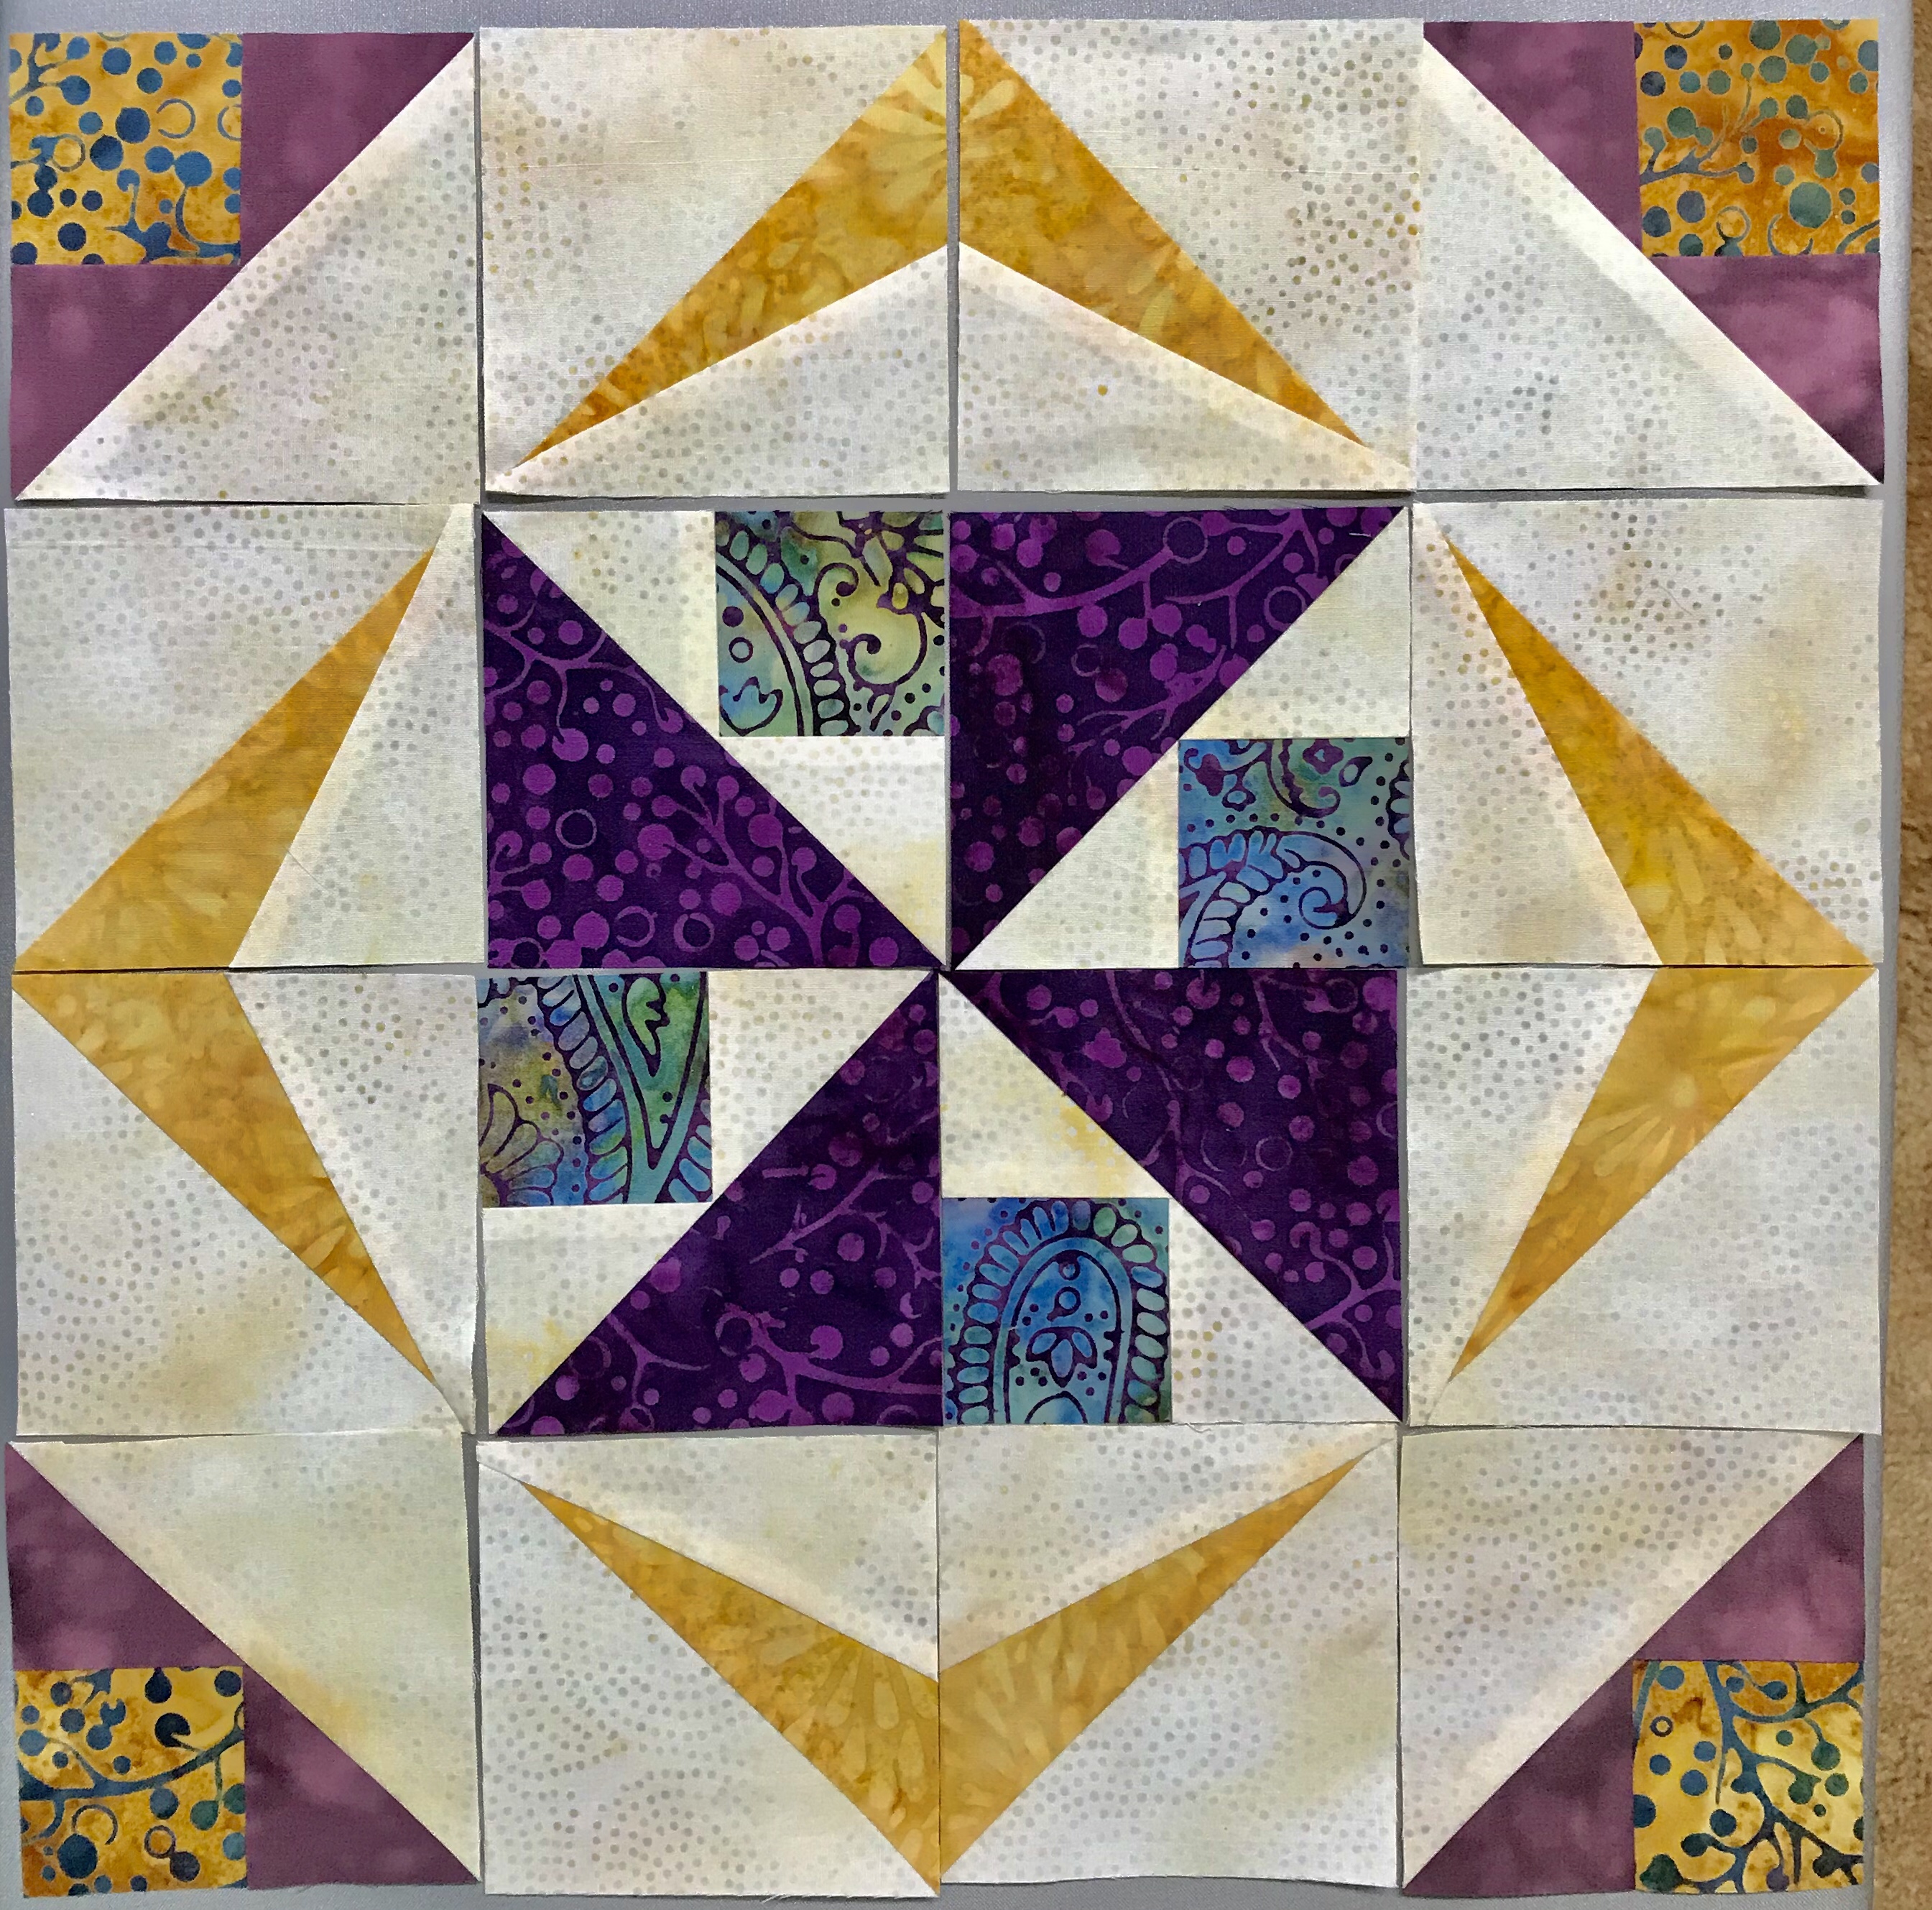
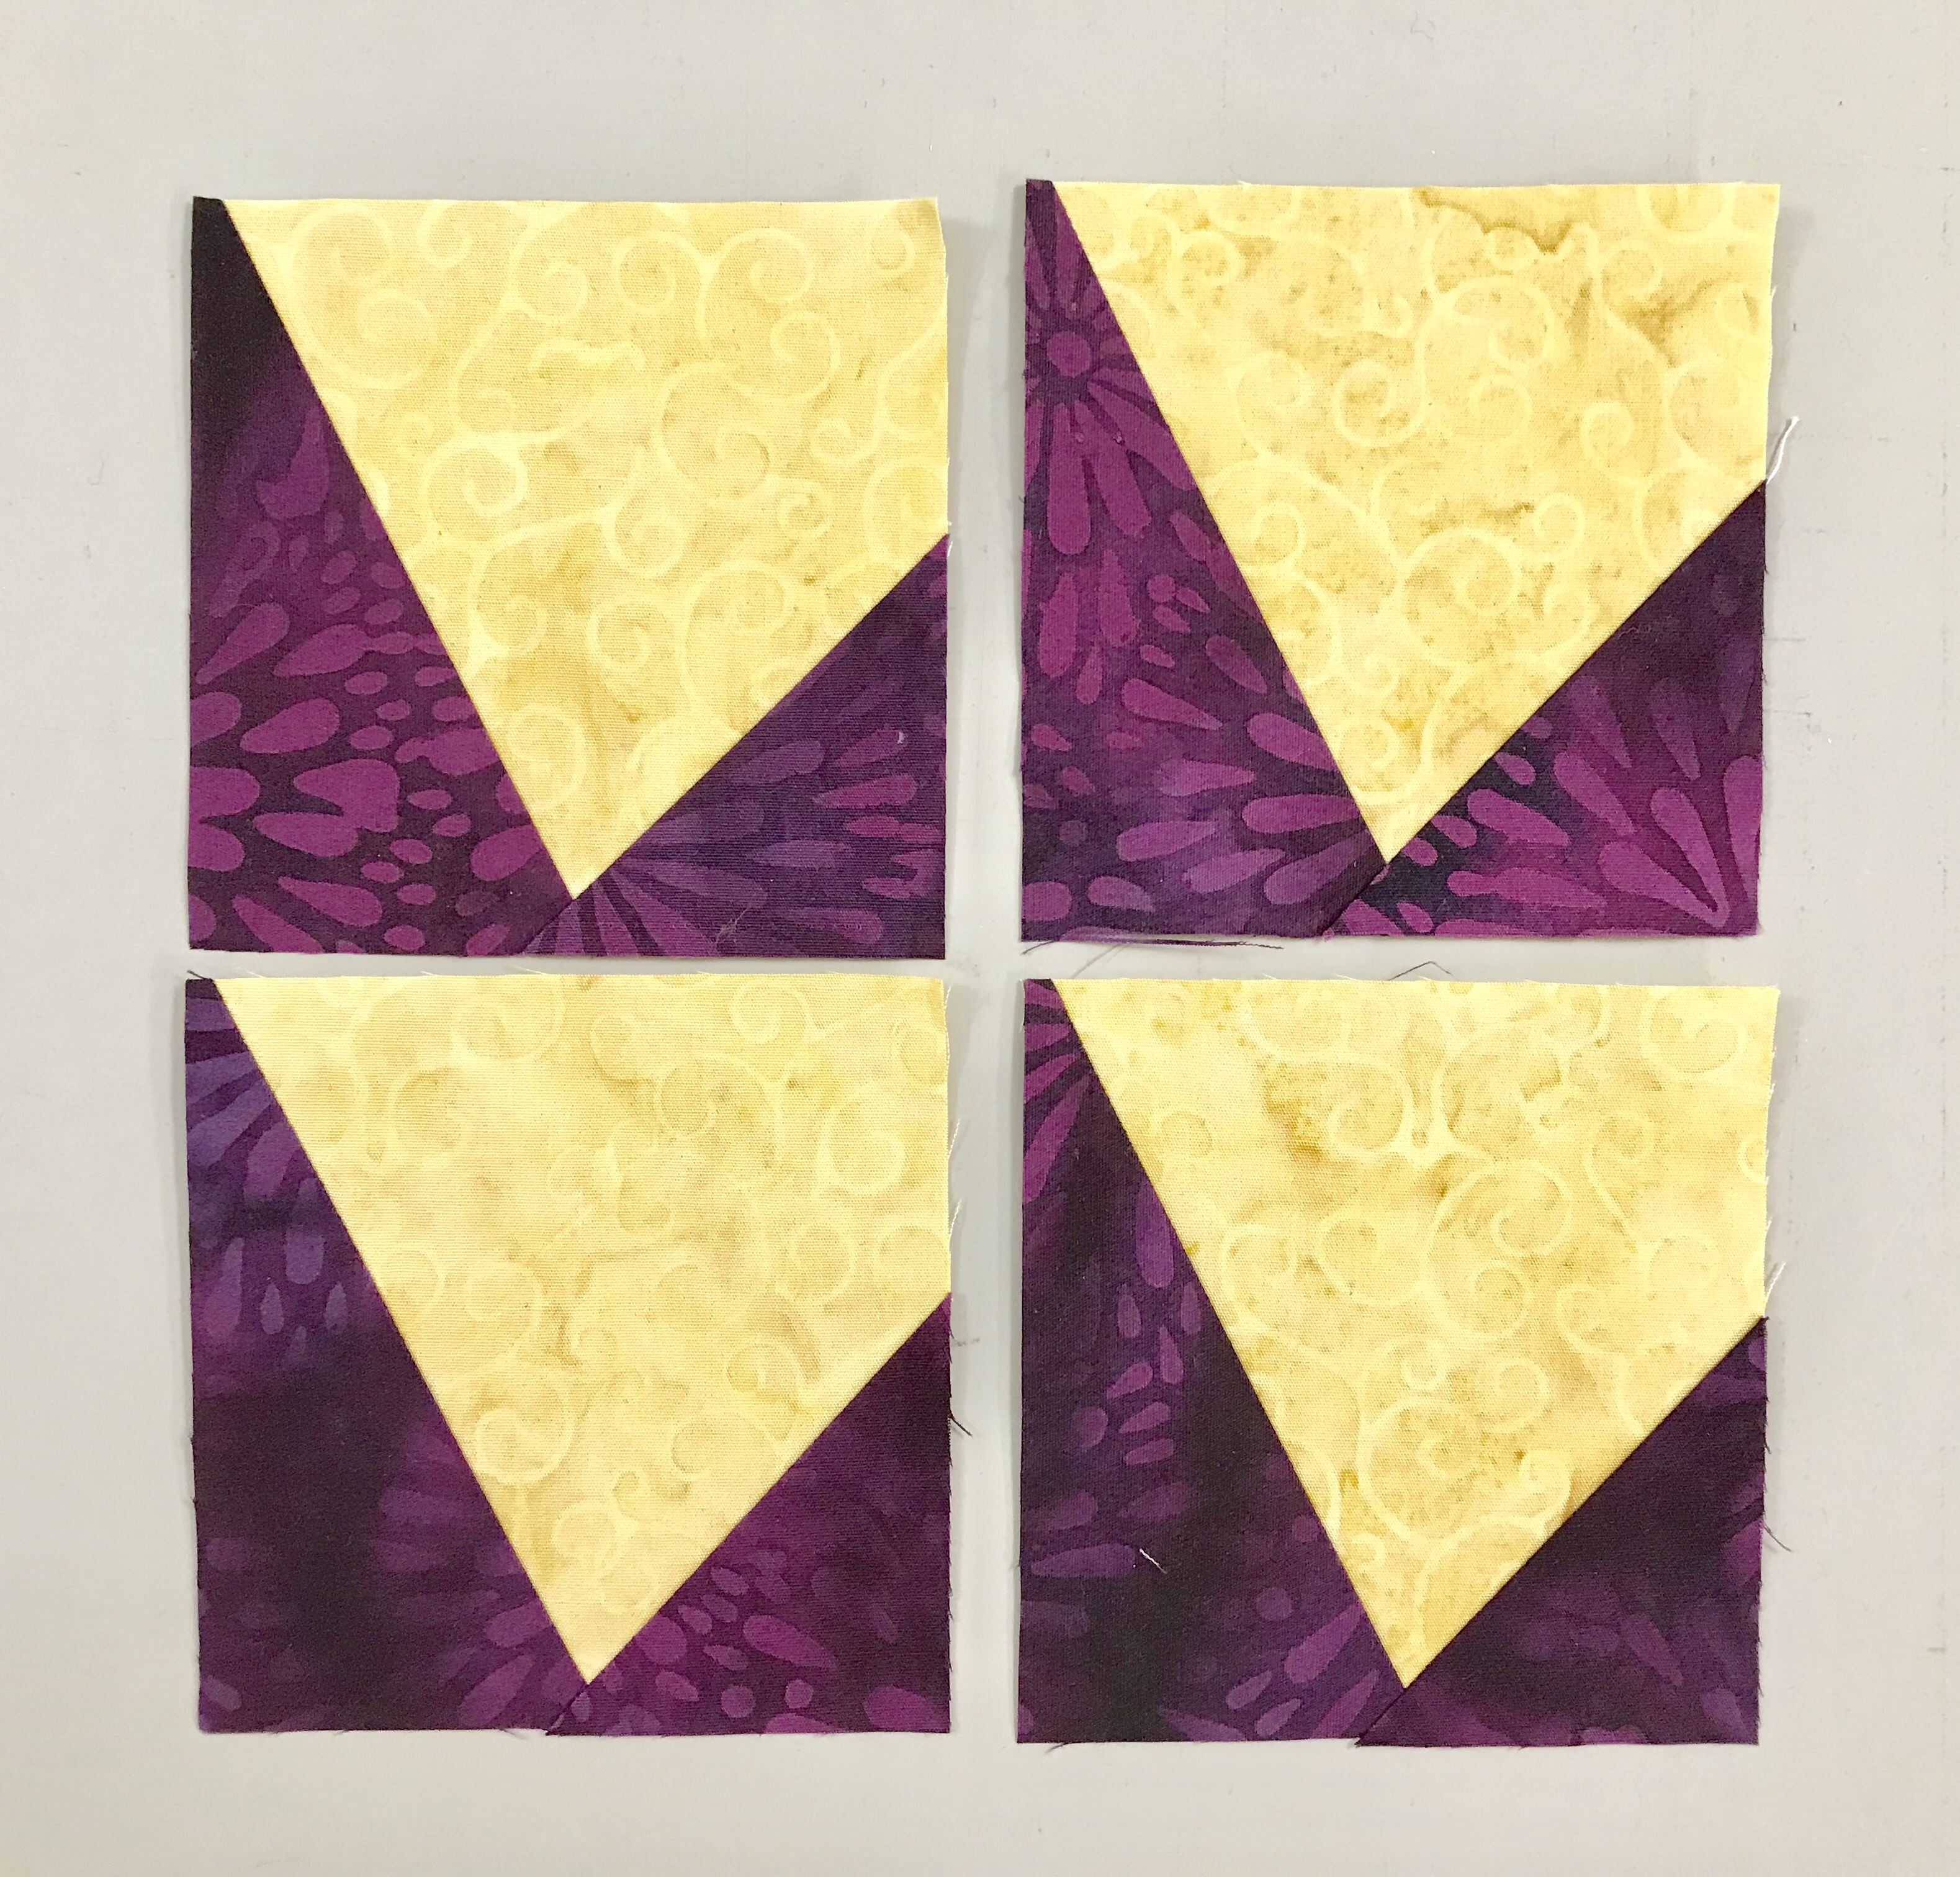
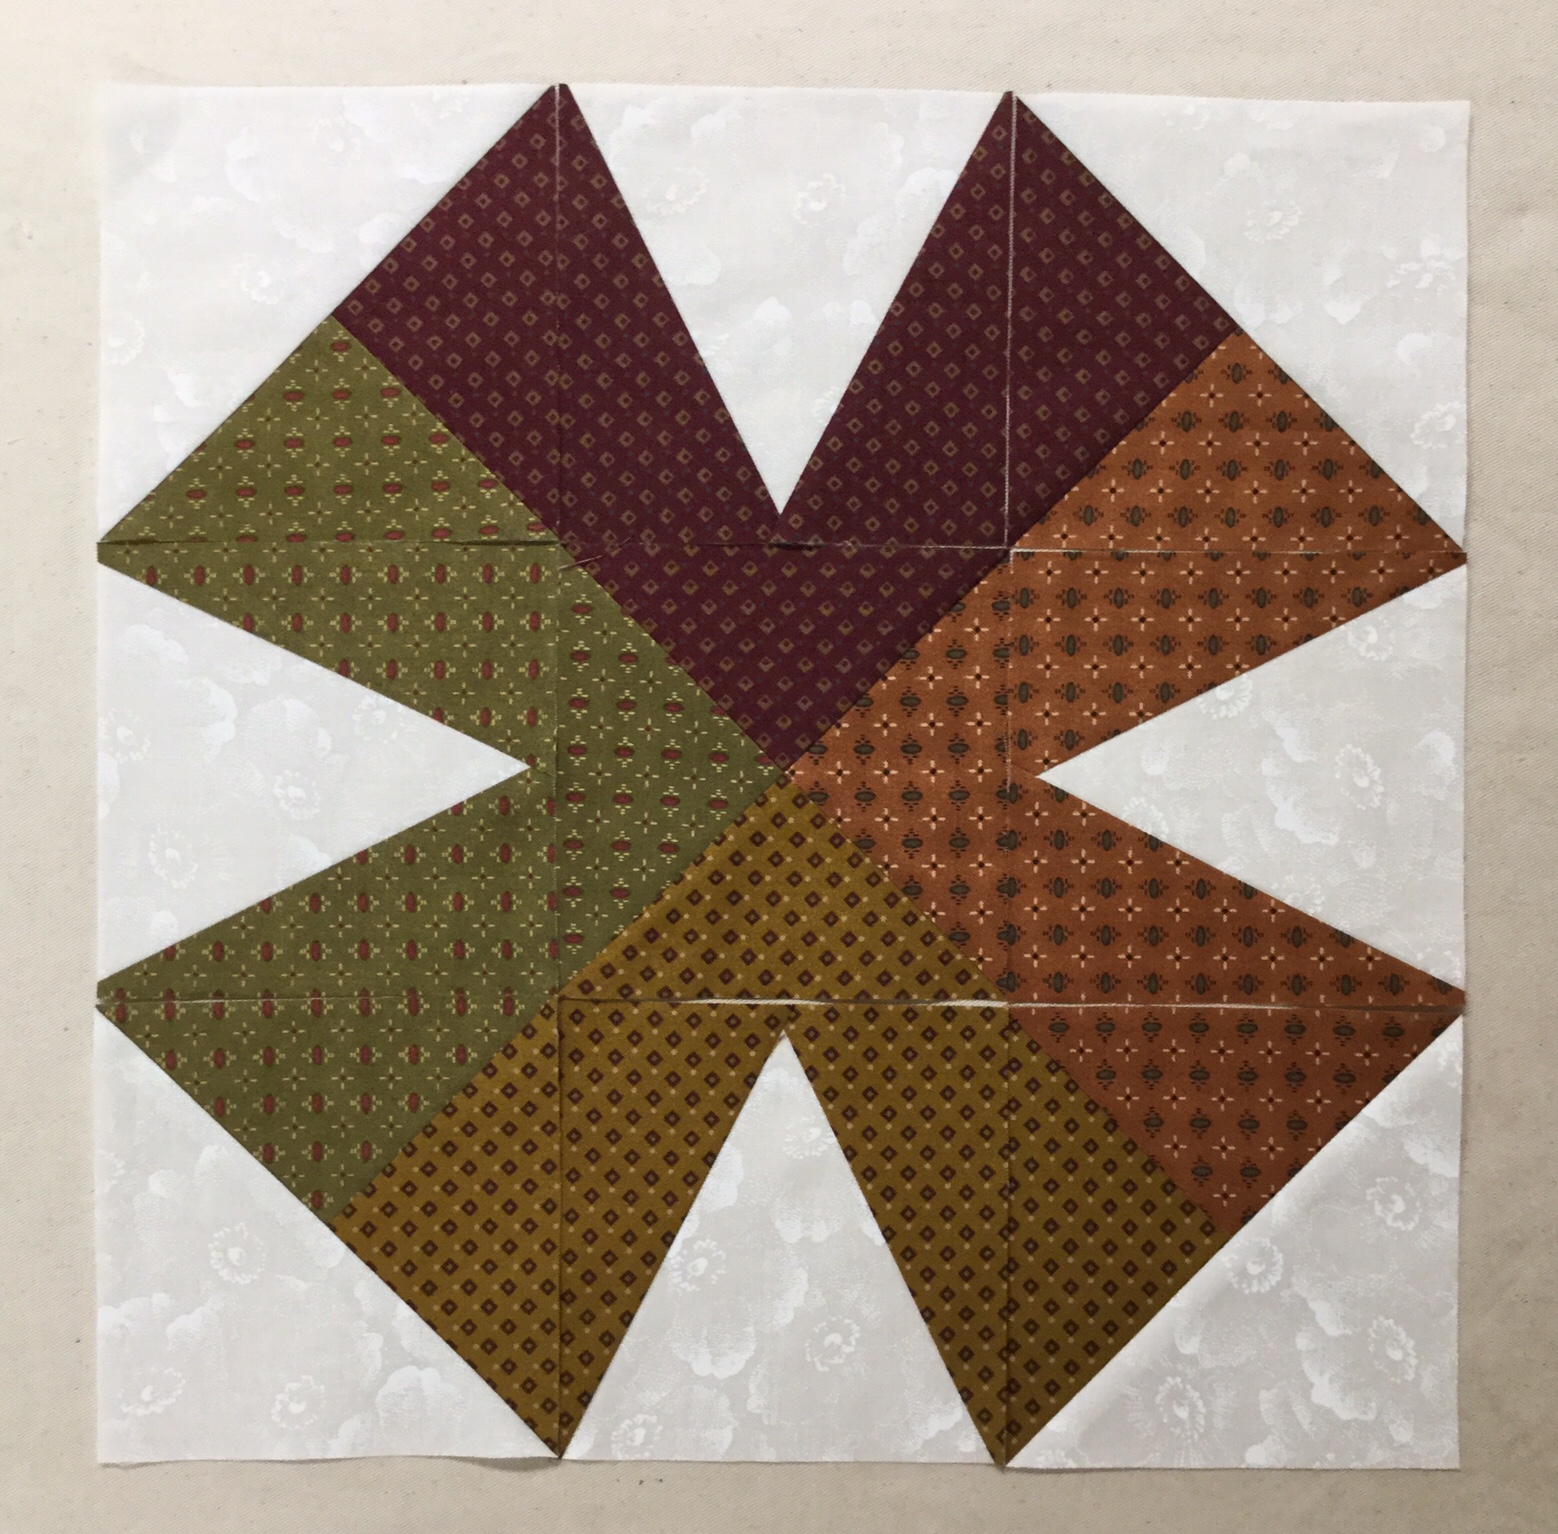
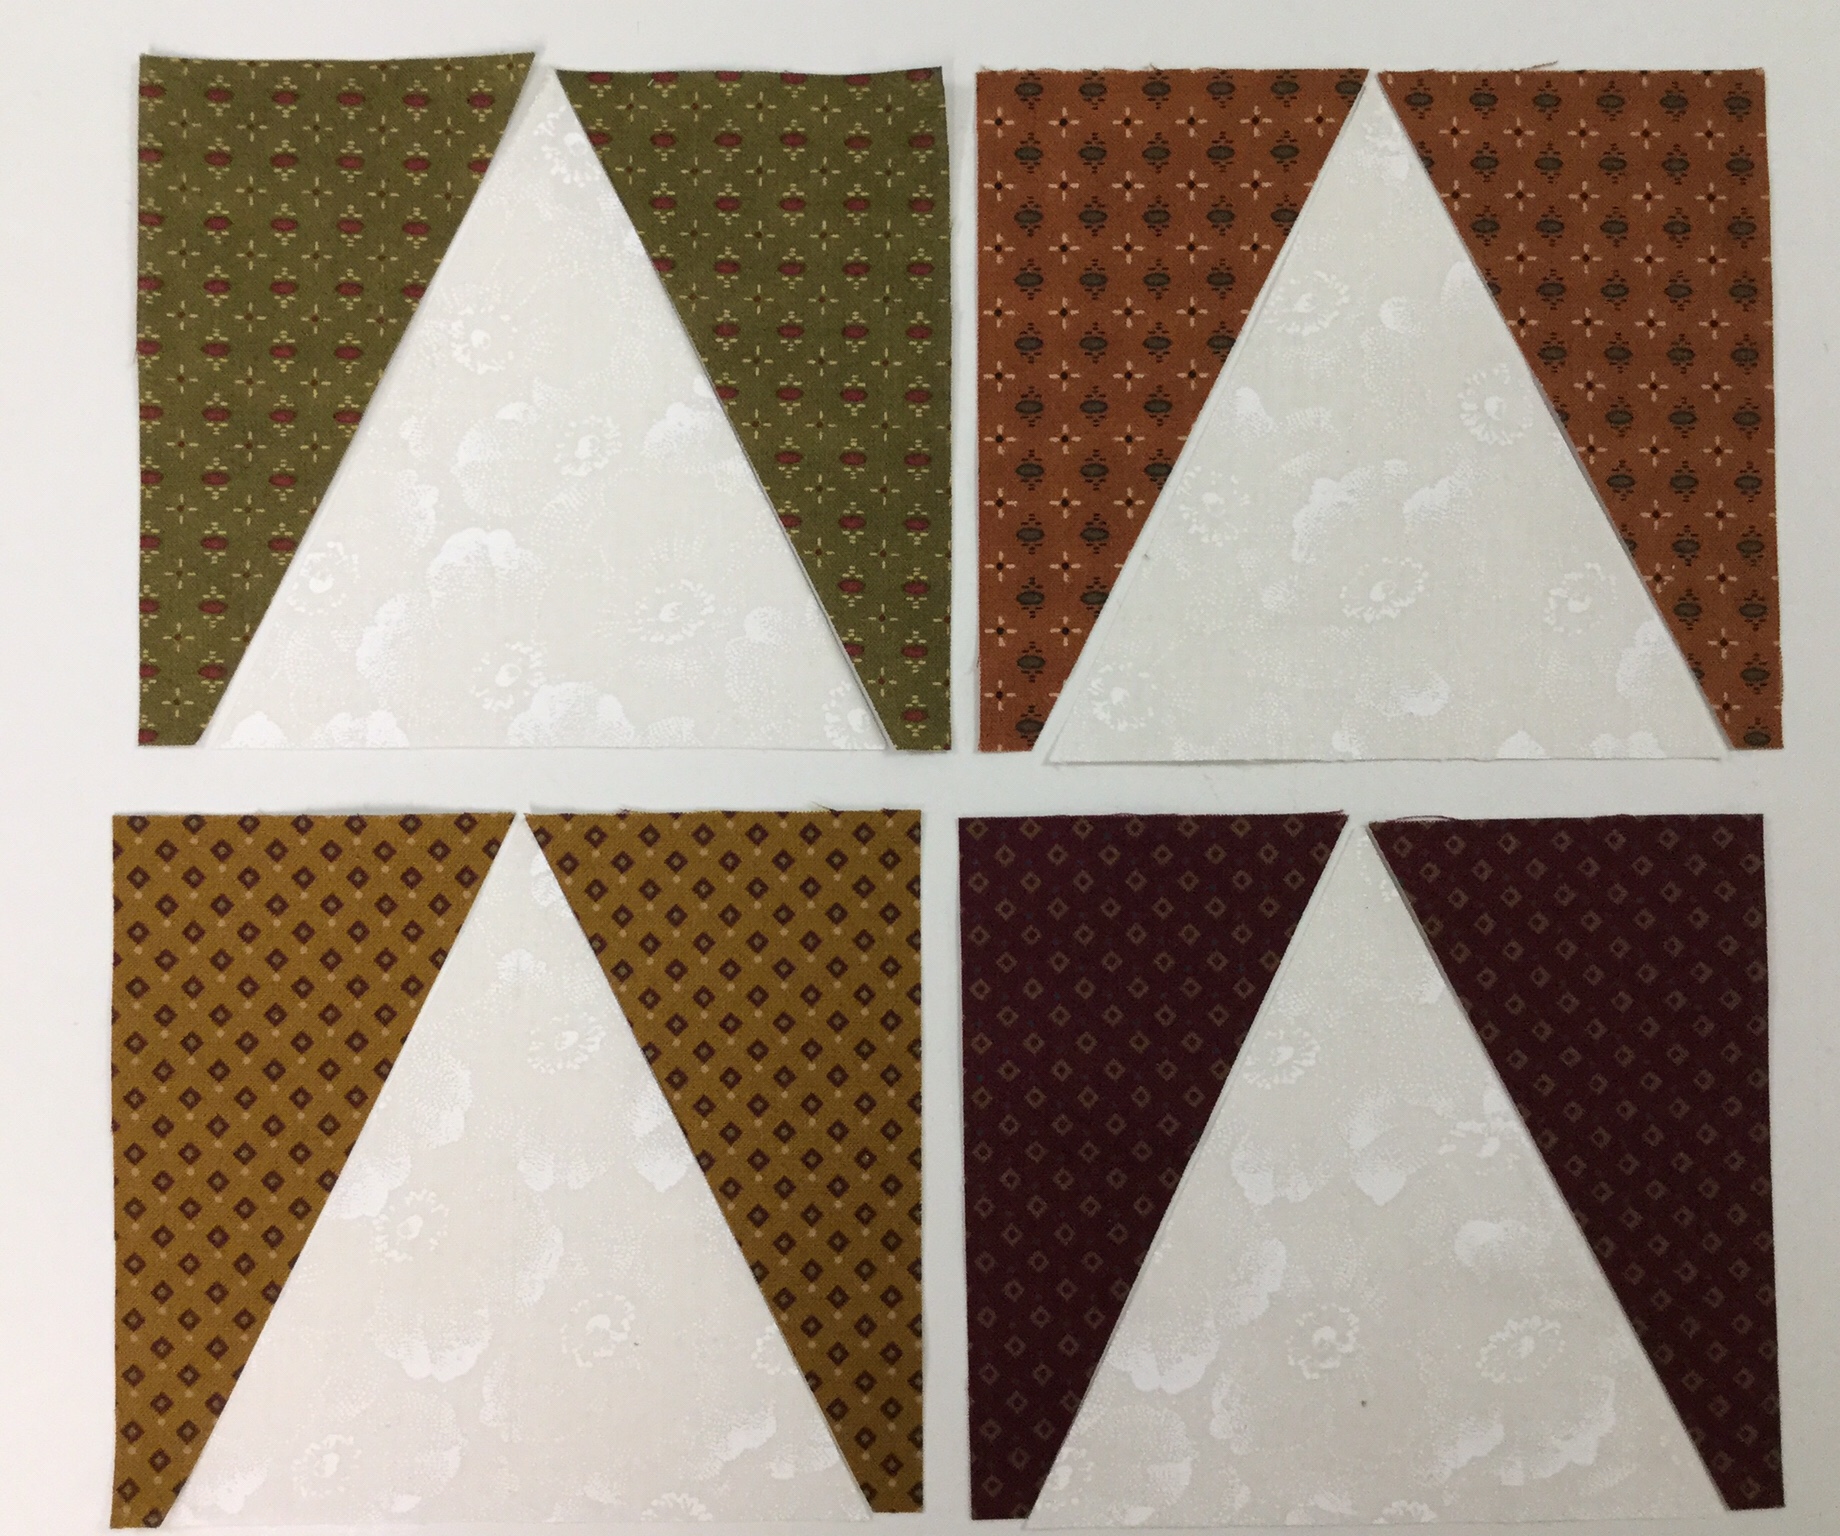
Layout your Lemoyne quarters with your mirror image split rects units and stitch together.

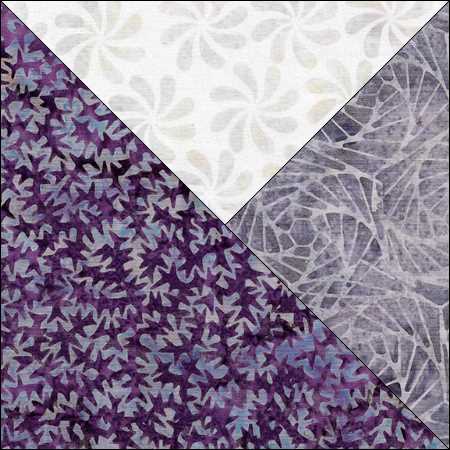
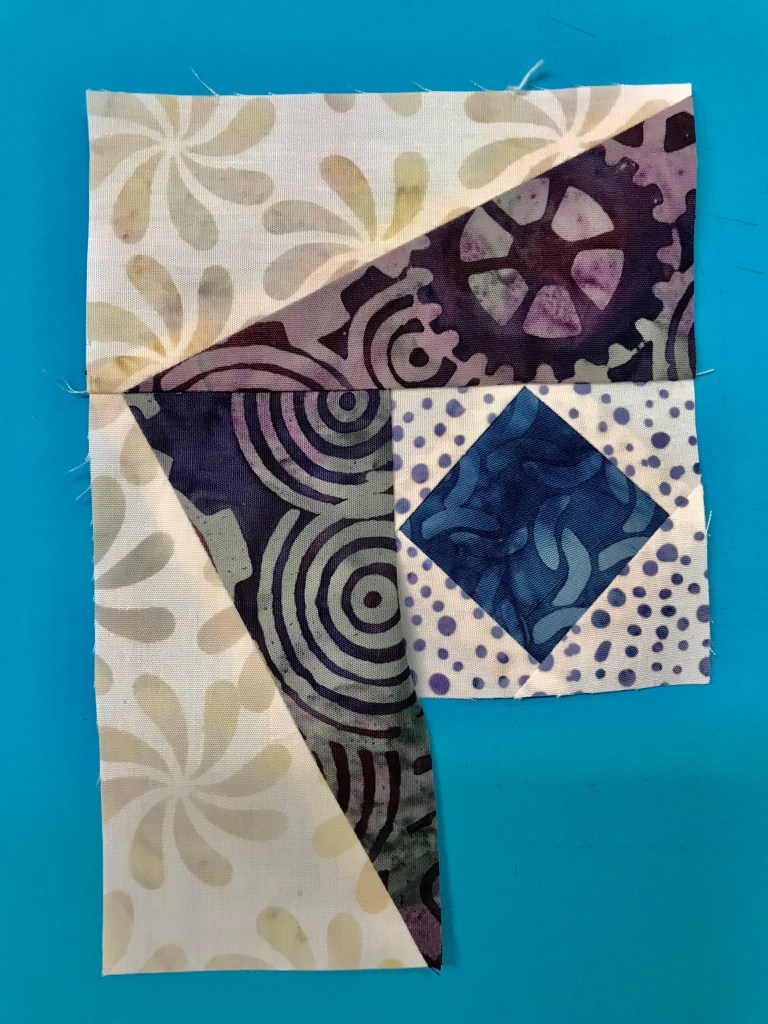
Press seams as shown above.

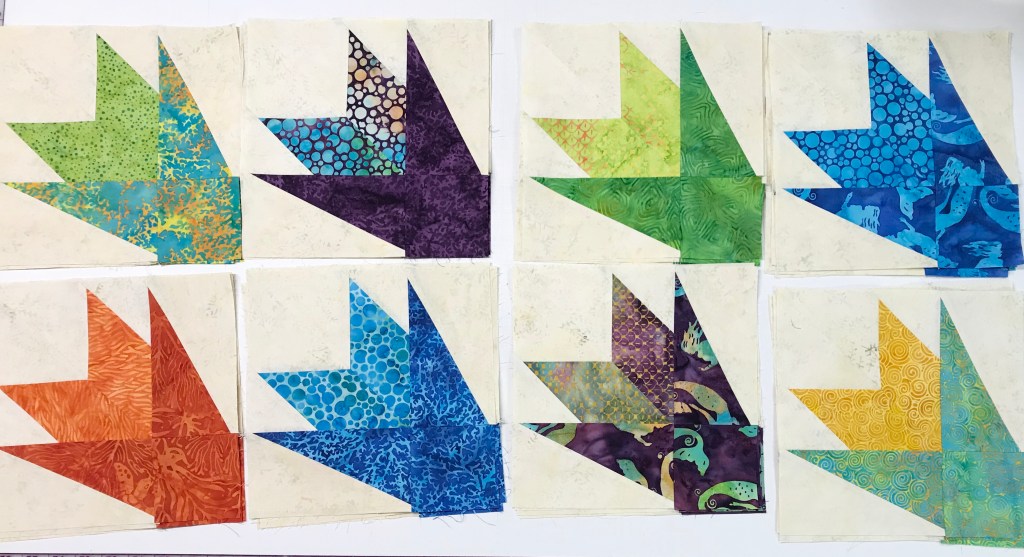
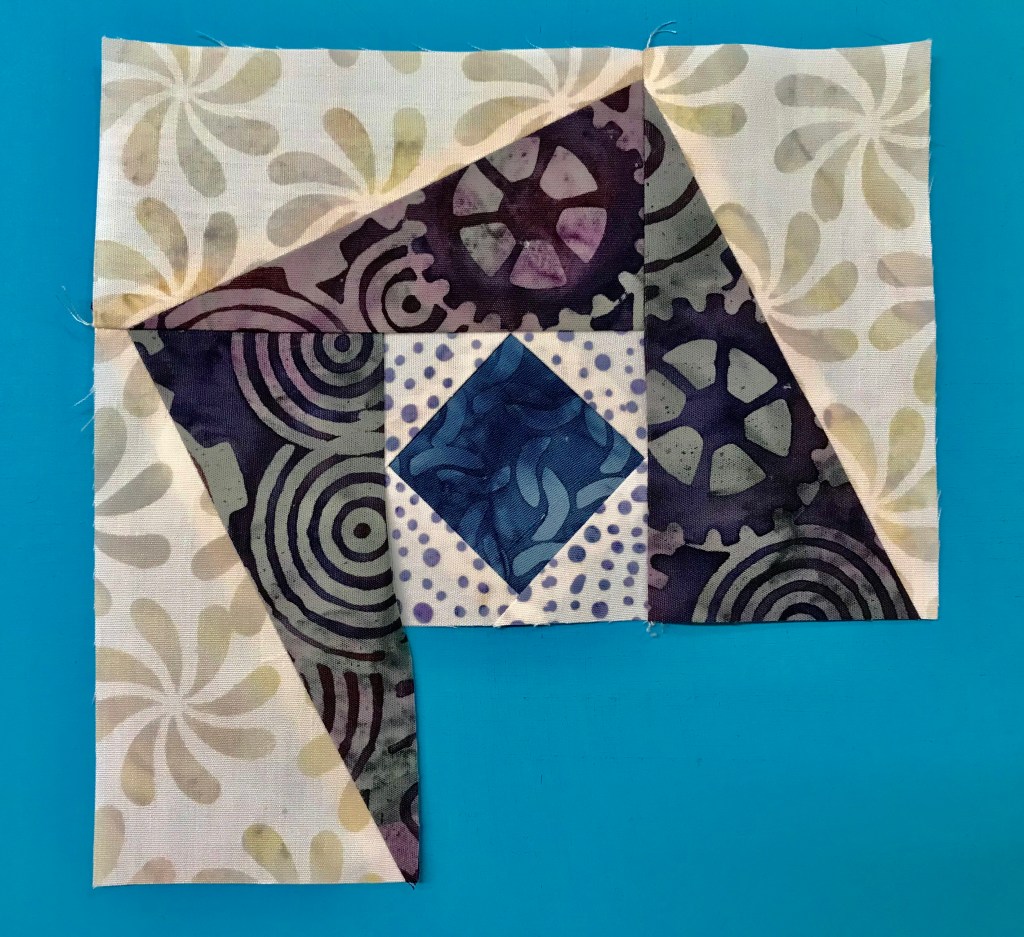
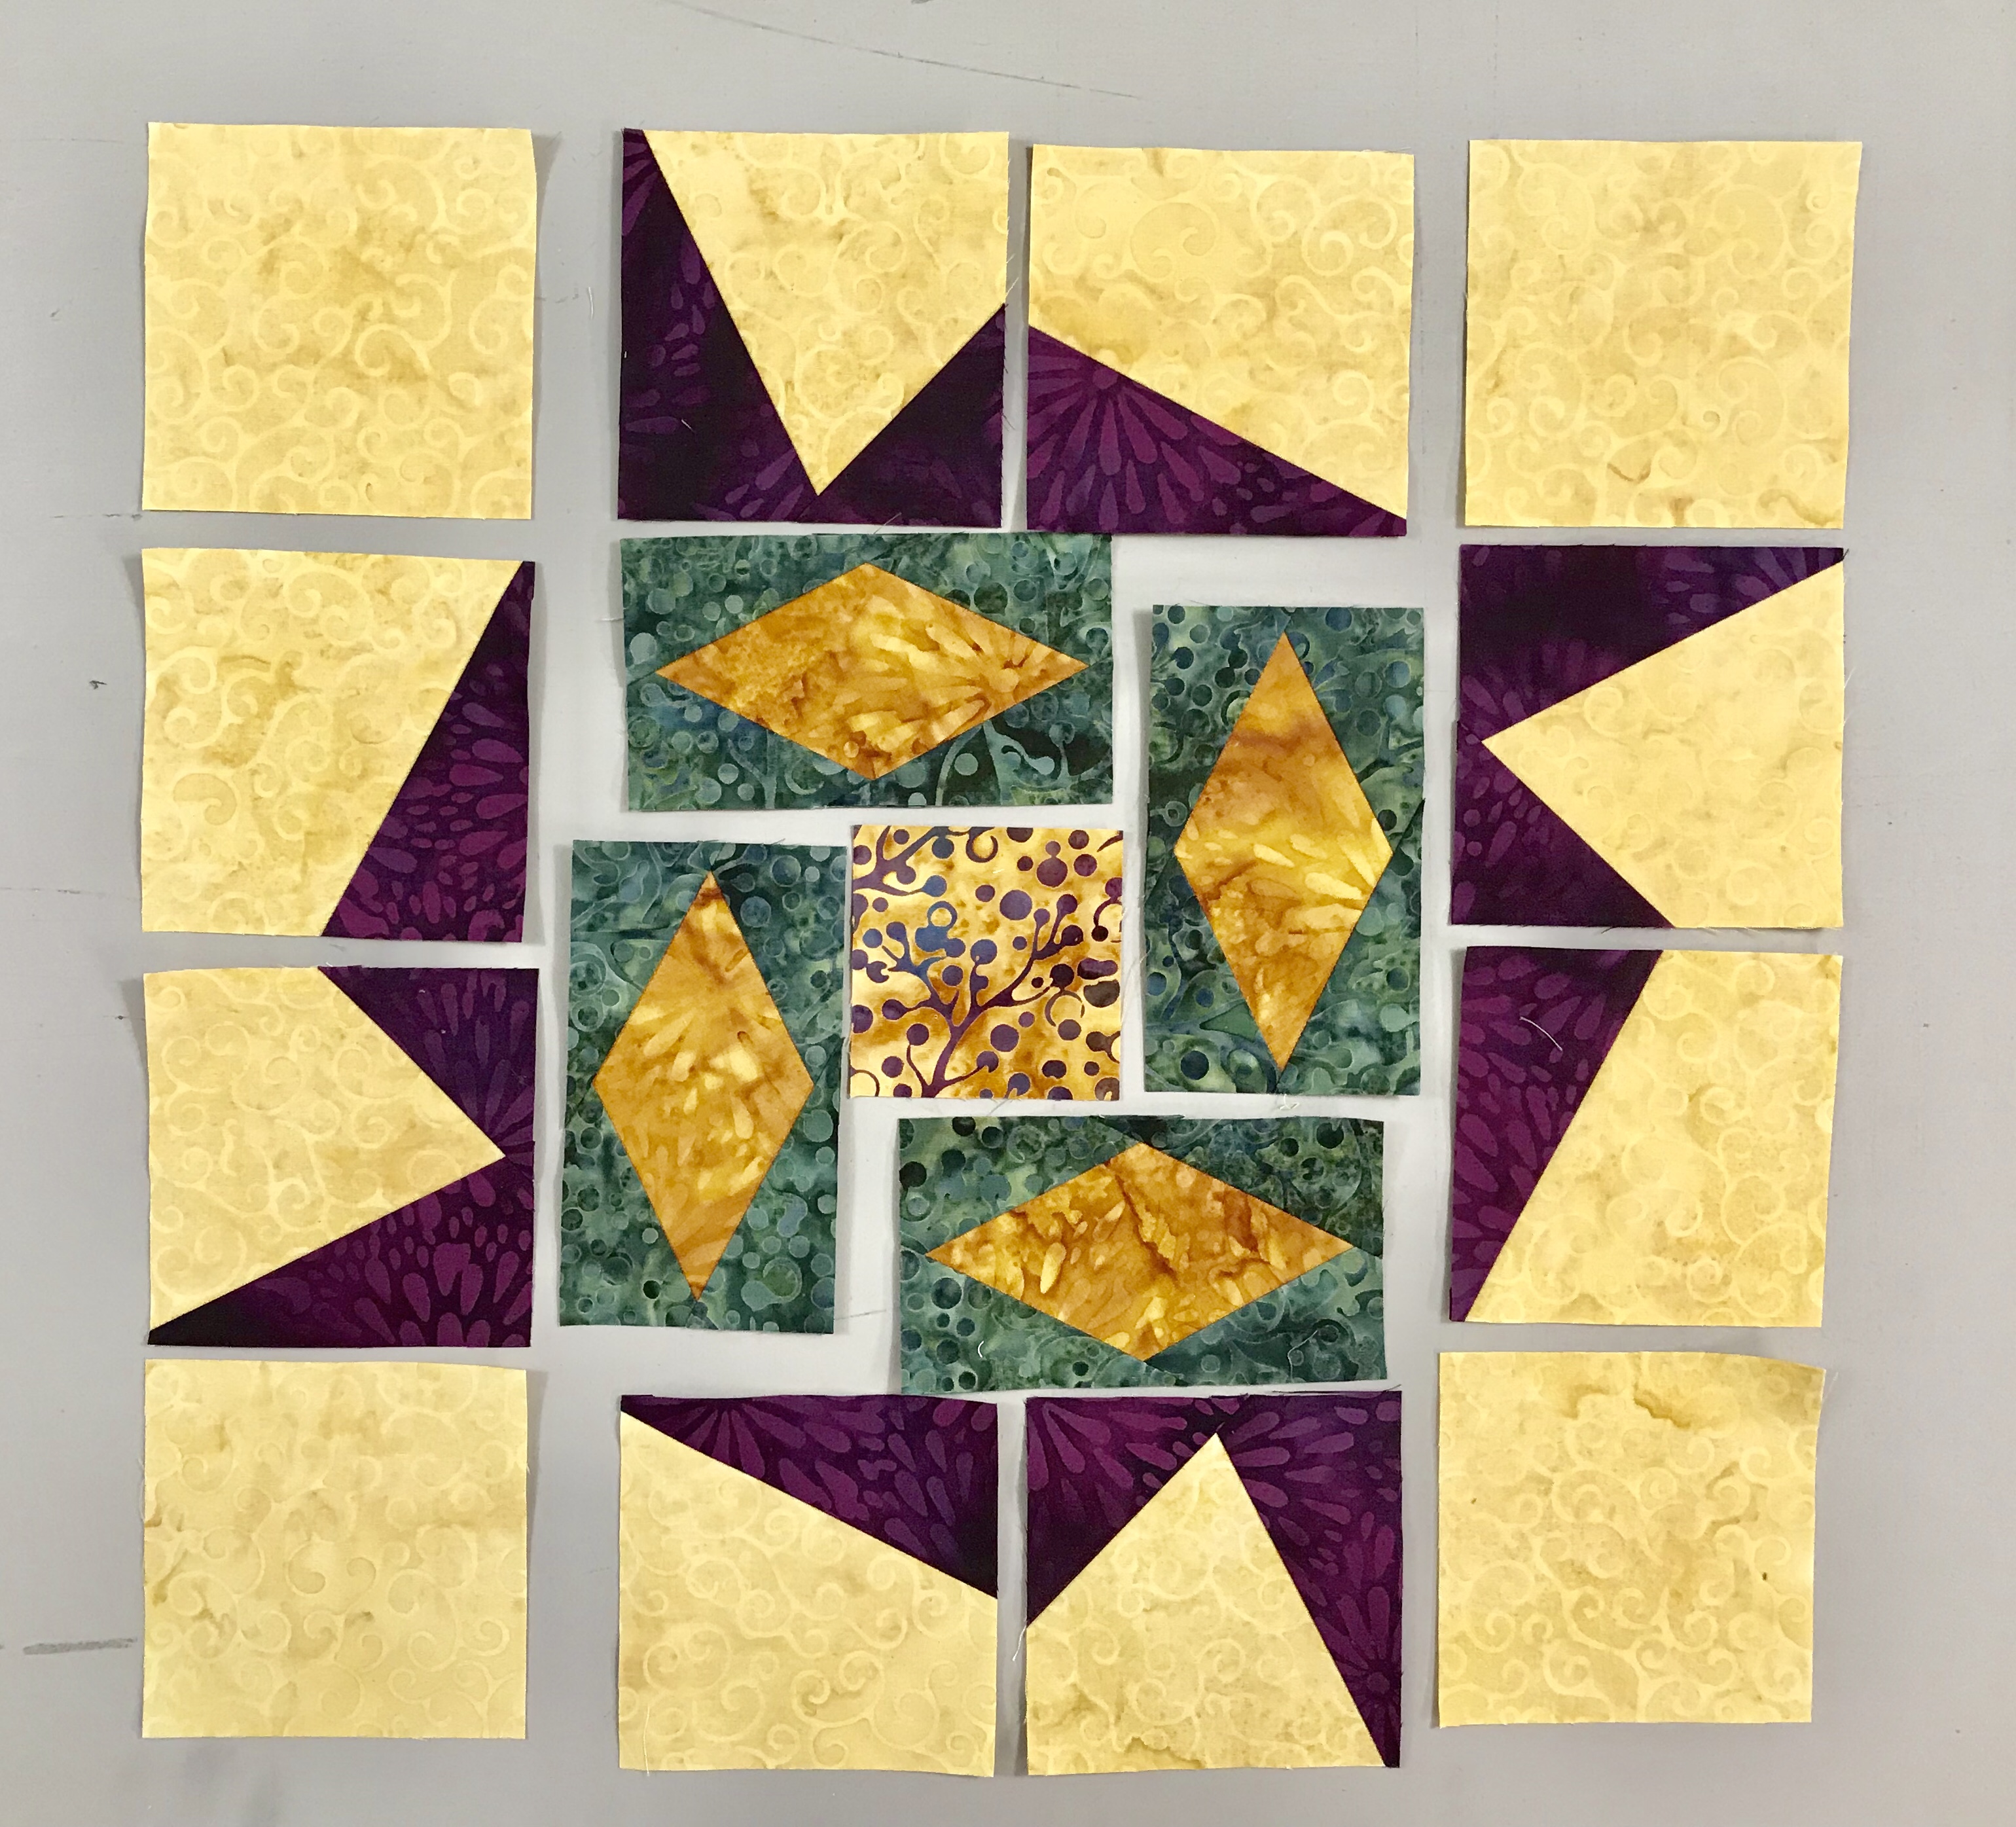
Continue making your Lemoyne star quarters/split rects units. They are all constructed the same way.

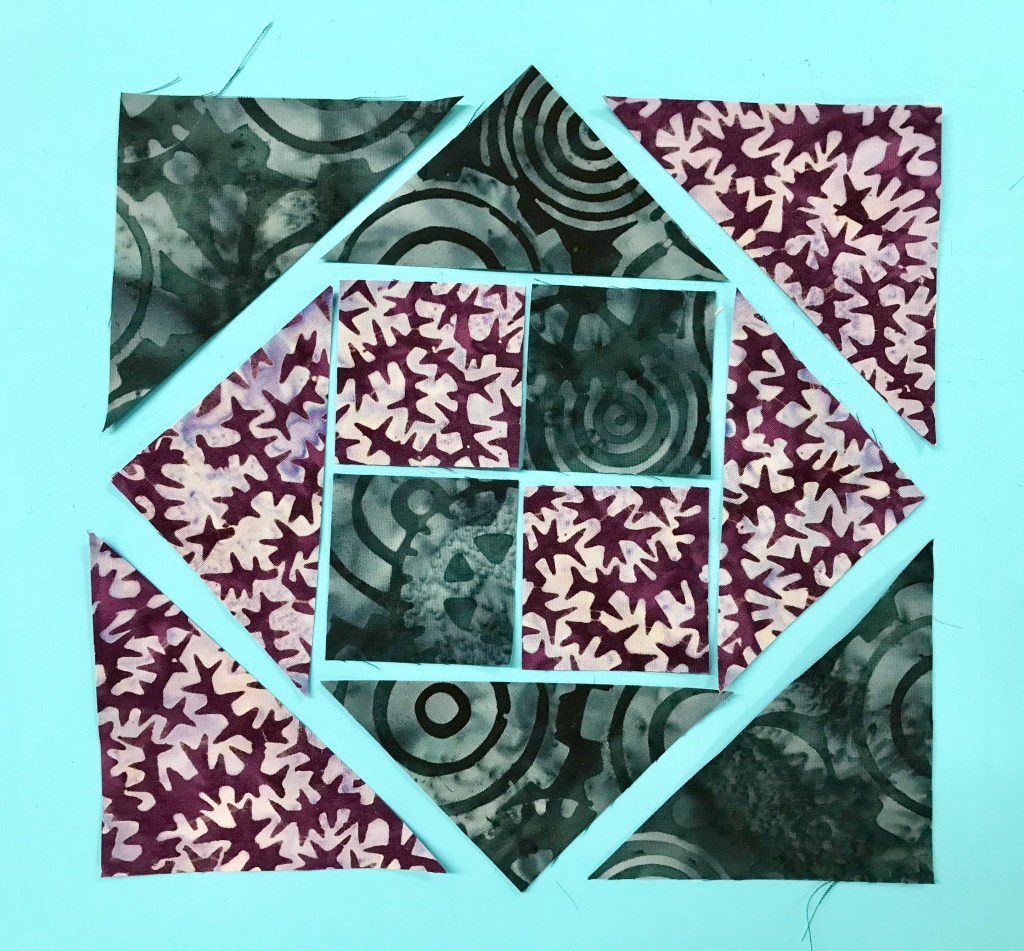
Stitch a background rectangle with each Lemoyne quarter/split rects unit as shown. Follow block assembly instruction in the BlockBuster #29 pattern.

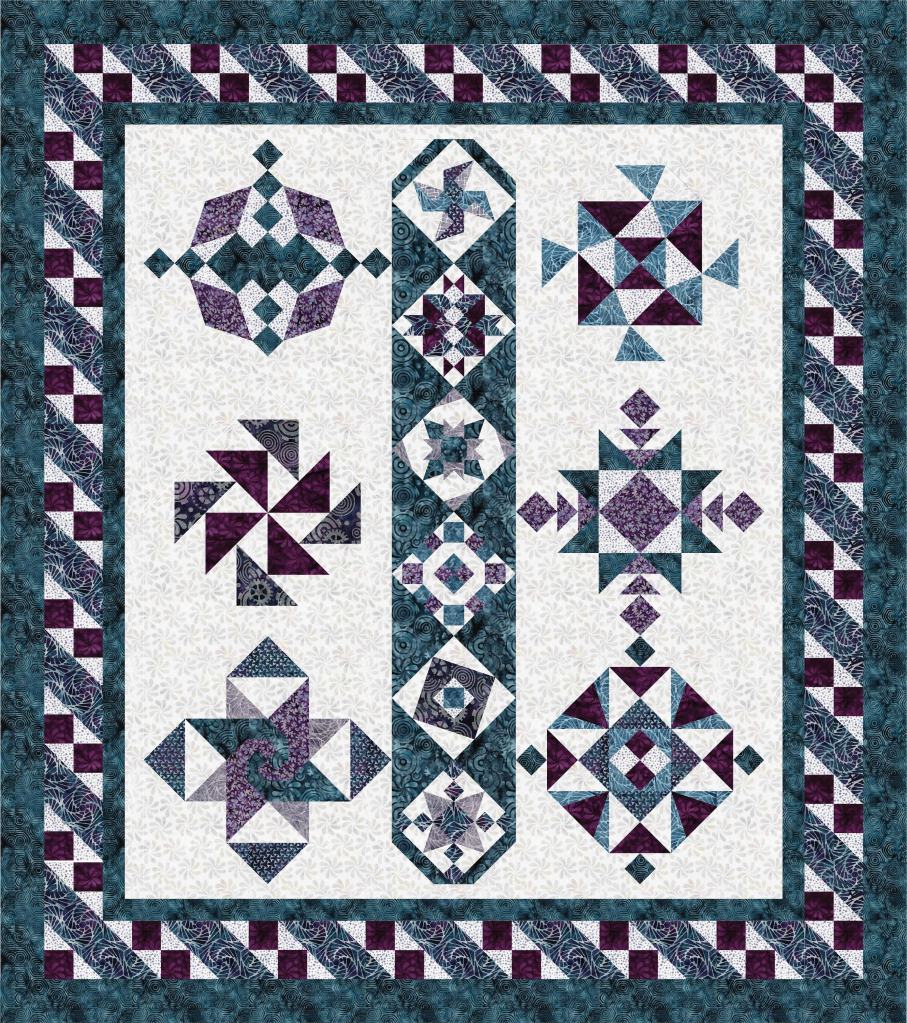
At first I decided to make 6 – 21″ blocks measuring 60″ x 83″.

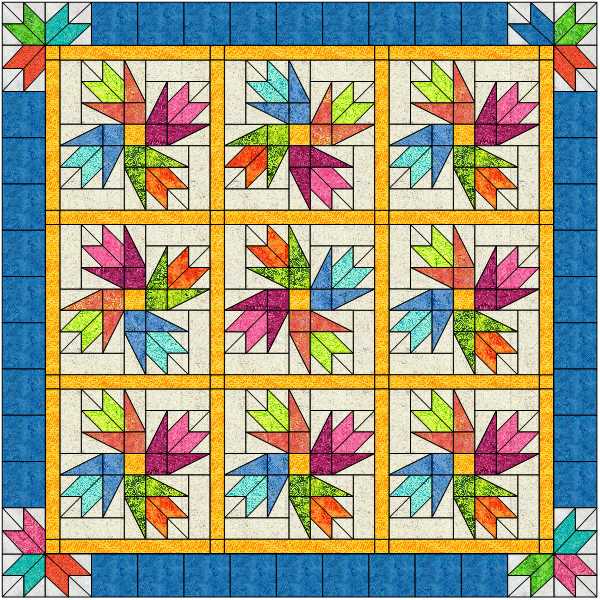
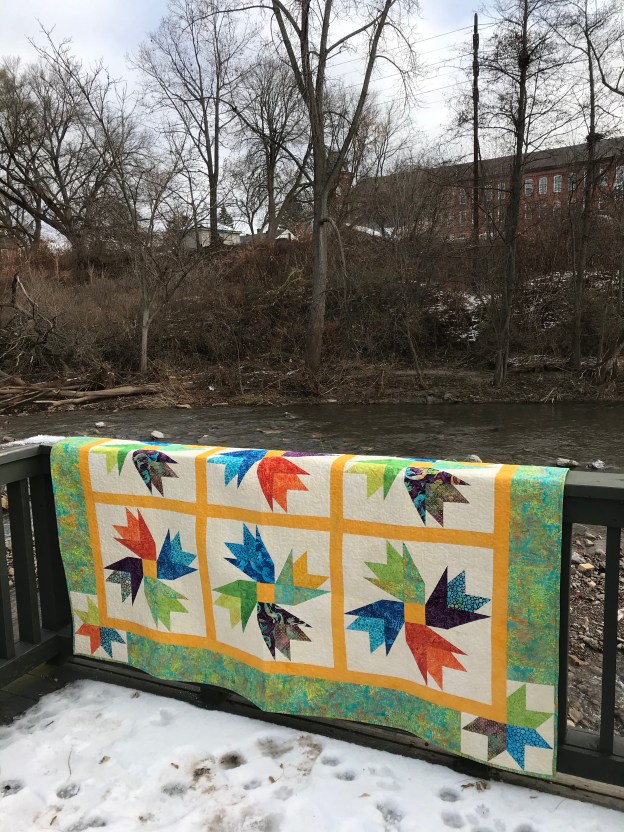
But I discovered I had enough units to make 9 blocks with left over Lemoyne quarters for the use in the outer border. Quilt measures 83″ x 83″.

It’s funny how this quilt came about. It stared with Island Batik’s fabric line: Tropical Escape; BlockBuster’s Pointsettia block (a Christmas flower); and it is named after a canyon in Arizona. I named this quilt Copper Canyon Blooms as I think they look like desert blooms! In the supply list below I’ve given you fabric requirements for both the 6 block top and the 9 block top.

#islandbatik #bestofbali #tropicalescape #studio180design #blockbusters #EQ8

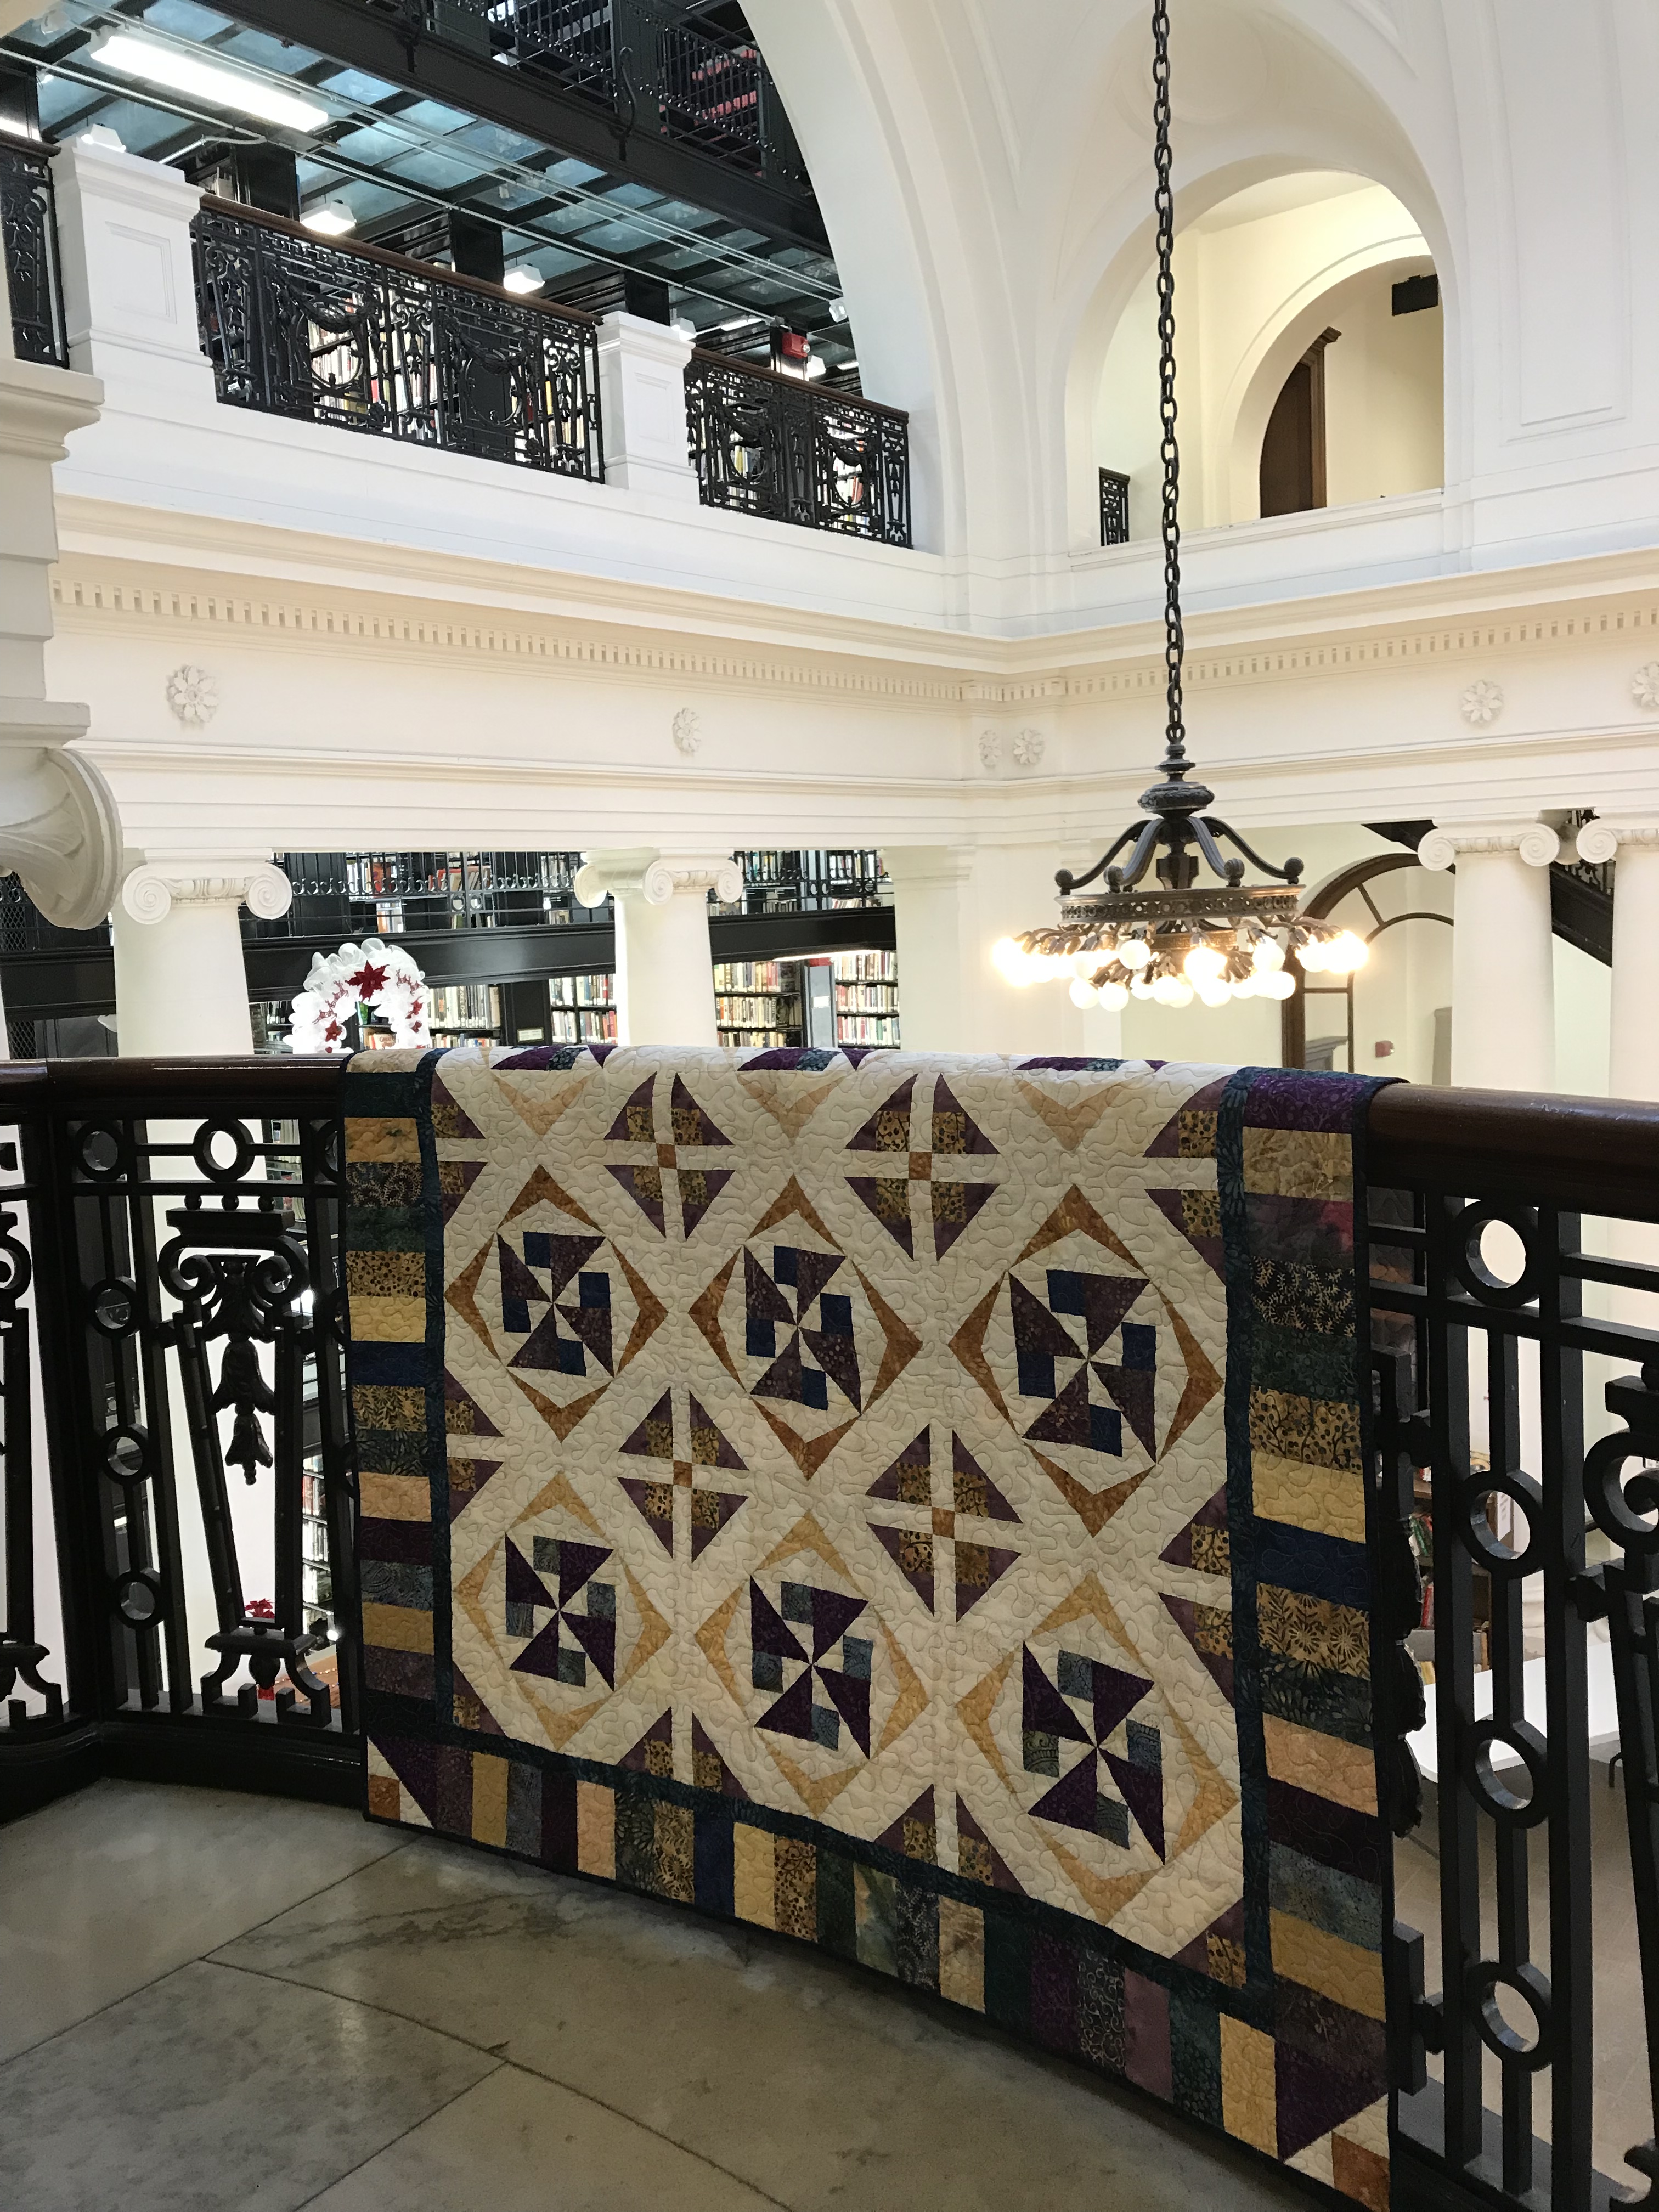
I visited the Oneida County Historical Society to take this photo on the steps.

Whistle Stop Tour – Steam Engine

Deb Tucker’s “Steam Engine” fabric line from Island Batik is simply Gorgeous.

Card Shark: what a great block, made with Half Square Triangles, Non Mirror Combo units & a Stacked Square. Constructed using Studio 180 Design Tucker Trimmer I & Square Squared tools with Stacked Squares & Non Mirror Combo Units Technique Sheets.

Download your Cutting instructions here:

Half Square Triangles:

Your Tucker Trimmer Tool Instructions give you the information you need to complete your Half Square Triangles. Cut your squares and using your Magic Wand draw two diagonal lines. Match up your dark and light fabric squares aligning the raw edges. Stitch on the lines, cut apart and press to the dark fabric. Remember: whatever you are pressing toward, goes on top. Trim your Half Square Triangle units to 4 1/2″.

Non Mirror Combo Units: Past construction methods would result in mirror image units. Sometimes we need combination units that are the same as in Card Shark which requires two of each units below:

Determine your color placement. Follow the instructions in the Non Mirror Combo Units Technique Sheet.

Make the half square triangles first by using the Magic Wand and mark 4 diagonal lines from corner to corner. Follow the stitching instructions in the technique sheet. Cut apart.

Press toward the dark triangle.

Cut squares for large triangles once diagonally.

Pair small triangles with the large triangles, center and stitch. Press toward the large triangle.

Trim units to 4 1/2″.

Stacked Square:

Layout your Stacked Square unit pieces.

Start by making a four patch and swirl the center. Our Stacked Square is a 4″ finished unit. Check the chart on the Stacked Square Technique sheet to find the Cut size for the center square, which is 2 1/2″. Using my my Tucker Trimmer I trimmed the four patch to 2 1/2″.

Check your color placement and stitch two triangles. Press toward the triangle and add the two more triangles pressing toward the triangles as before.

The Large Square Squared Tool is broken up into two different parts. Part “A” & Part “B” to include guidelines for making 12 different sizes. The chart in the Stacked Squares Tech sheet tells us what size to cut our side triangles and how line up for trimming. The first trim uses Part “A” to trim before adding the second round of triangles.

After adding the second round of triangles, use Part “B” to trim the stack square to a cut size of 4 1/2″.

Lay out your units, stitch together in to rows.

Card Shark is now ready to add the quilt!

I use my Groovy Seam Rippers made by fellow quilter Nancy Townsend as my little helpers while quilting.

The Whistle Stop Quilt is made up of 12″ blocks and 6″ finished blocks.

This is “Roll the Dice”. It is made with Studio 180 Design Square Squared and Split Rects tools. Click below to download the cutting instructions.

Using your Split Rects tool, cut 4 side triangles for Type 1 units, per your tool instructions from your two fabrics making sure your fabrics are right side up. Stitch triangles together and press seams open.

Trim your Split Rects to 2 1/2″ x 4 1/2″, rotate and trim again.

Square Squared

Cut your center square using Part “A” for a 2″ finished unit.

Trim to the cut size of 2 1/2″ using Part “B” of your Square Squared tool. Rotate and trim again.

Layout your block units.

Place the center square/squared unit right sides together with a Split Rects unit aligning the raw edges of the top and sides. Stitch a partial seam along the dark fabric of the Split rects stopping just past the center of the Square/Squared unit.

Now add a Split Rects unit across the top. Be sure the dark fabric of the Split Rects Units are against the center square/squared unit. Press toward the split rects unit.

Add a third split rects unit and press as before.

Add the fourth Split Rects units.

Fold over the split rects unit with the partial seam and align the raw edges. Stitch meeting up with the partial seam.

Below is the complete schedule for the Whistle Stop Tour:

Monday September 9th

Tuesday September 10th

Wednesday September 11th

Thursday, September 12th

Friday, September 13th

Saturday, September 14th

Sunday, September 15th

Monday, September 16th

#studio180design #SteamEngine #Islandbatik #WhistleStopTour

Island Batik Getaway Blog Hop

The fabrics shown in this post were given to me by Island Batik
Deb Tucker’s Twilight Chic by Island Batik

Well, if you can’t getaway, go to the library for a good book! The Utica, NY Public Library opened in 1904. I love the inside of this Library.

Shaded Chic

The upper floors of the Utica Library are made of thick glass. I used to love coming here as a child.

In every box of fabric we Island Batik Ambassador’s receive, there is a secret bundle of the newly released batiks. I was lucky enough to be assigned Twilight Chic by Deb Tucker for Studio 180 Design. This is my third quilt from the Twilight Chic line.

Shaded Chic is based on BlockBuster # 35 Hidden Blossoms.

Shaded four & Mirror Image Sliver Units

Each block has 8 Shaded Four Patch units and 8 Sliver units.

This block is made using Studio 180 Design’s Tucker Trimmer I & Corner Beam tools with the Shaded Four Patch & Sliver Technique Sheets.

Shaded Chic Block
Shaded Chic

Shaded Chic consists of nine 12″ blocks and measures 50″ x 50″.

Be sure to visit Island Batik to enter their give away of 20 fat quarter bundle. 


Here is the list of all the ambassadors for this month-long hop!

WEEK 1

Monday, January 7 – Crystal Ball

Maryellen McAuliffeMary Mack’s Blog

Sandra Walker- mmm! quilts

Tuesday, January 8  – Ditty

Stephanie JacobsonSteph Jacobson Designs

Michelle RobertsCreative Blonde

Wednesday, January 9 – Elk Lodge

Connie CampbellFree Motion by the River

Anna BranchArk Angel Creations

Thursday, January 10 – Feline Fine

Bea LeeBea Quilter

Sharon ParcelYellow Cat Designs

Friday, January 11 – Flea Market

Geraldine WilkinsLiving Water Quilter

Jessica CaldwellDesert Bloom Quilting

WEEK 2

Monday, January 14 – Fortune Teller

Sarah GoerSarah Goer Quilts

Sherry ShishPowered by Quilting

Jennifer FultonThe Inquiring Quilter

Tuesday, January 15  – Gypsy Rose

Jen StrauserDizzy Quilter

Janet YamamotoWhispers of Yore

Wednesday, January 16 – Paisley Park

Dione Gardner-StephenClever Chameleon

Nancy ScottMasterpiece Quilting

Thursday, January 17 – Soul Song

Carole Lyles ShawCarol Lyles Shaw

Toby LischkoGateway Quilts & Stuff  

Friday, January 18 – Twilight Chic

Jackie OBrienIf These Threads Could Talk

Tina DillardQuilting Affection

WEEK 3

Monday, January 21 – Winter Park

Jennifer ThomasCurlicue Creations

Anita SkjellangerQuilt In a Not Shell

Tuesday, January 22  – Bazaar

Karen OvertonThe Quilt Rambler

Alison VermilyaLittle Bunny Quilts

Turid BakkenDen syende Himmel

Wednesday, January 23 – Blossom

Karen NearySew Karen-ly Created

Leanne ParsonsDevoted Quilter

Thursday, January 24 – Boho

Laura PilandSlice of Pi Quilts

Suzy WebsterAdventurous Applique and Quilting

Myra BarnesBusy Hands Quilts

Friday, January 25 – Brookview

Vicki SchlimmerVicki’s Crafts and Quilting

Amy WarnerSew Incredibly Crazy

WEEK 4

Monday, January 28 – French Blue

Pamela BoatrightPamelaQuilts

Joyce MullisHearts Creations

Tuesday, January 29  – Midsummer Night

Kathleen McCormickKathleen McMusing

Connie KauffmanKauffman Designs

Wednesday, January 30 – Oh Deer

Jen ShafferPatterns by Jen

Jeanette JonesInchworm Fabrics

Thursday, January 31 – Snow Berry  

Sally MannkeSally Manke Fiber Artist

Joan KawanoMoosestash Quilting

Friday, February 1-  Candy Cane Lane and Icicle

Terri Vanden Bosch Icicle – Meanderings along Lizard Creek

Anne Wiens- Icicle – Sweetgrass Creative Designs

Mania Hatziioannidi Candy Cane Lane- Mania For Quilts

Barbara Gaddy – Candy Cane Lane  –Bejeweled Quilts by Barb

# Islandbatikgetawaybloghop  #islandbatik #twilightchic #debtucker #studio180design #bestofbali

Whimsical and Wonky

Whimsical and Wonky

The Island Batik Ambassador’s December challenge was to create a project that is Whimsical & Wonky”.   Well, I settled on Tipsy!  My Holiday Tipsy Tree is based on BlockBuster pattern # 27 Roll the Dice .  This year I have made many quilt projects using Split Rects Units so it is only fitting I end the year with Split Rects.

img_2060

For this quilt I used Island Batik’s “Alpine Jungle” line of beautiful batiks.  I also used Studio 180 Design Split Rects, Square/Squared, Wing Clipper I & Lemoyne Star tools.  I chose four different green fabrics, 9 for block centers.

Cut your elongated triangles according to the Split Rects tool instructions.

Cut your background side triangles the same way.

Lay out your split rects, align and center the two pieces with just a bit of overlap at the ends. Stitch and press seams open.  I love using my “Stick Strip” for pressing seams open.

Following the tool instructions trim, rotate & trim again.

img_2047

Make the 9 Square/Squared units following the Square Squared tool instructions.  I chose 9 different unit centers but you could make them all one color if you like.  Each side of the square/squared unit will be different to match the fabric used for the split rects units.

Lay out your units as they will be stitched.  Choose a square/squared unit for the center, rotating the square/squared unit so the side triangle matches the same fabric used in the split rects unit.

img_2053

This block is constructed using a partial seam.  Place the square/squared unit right sides together with one of the split rects units being sure to match the fabrics and stitch half way down the square/squared unit.

This gives you the next complete edge to stitch another split rects to, again matching the square/squared unit fabric with the split rects fabric.

img_2063

When stitching the split rects to the square/squared unit, always place the precision cut square/squared unit on top be careful to stitch using the unit center as a guide.

Continue stitching the split rects units and complete the partial seam, pressing toward the split rects units.  Make the other 8 blocks the same way.

img_2048

Tree Trunk:  Make one set of 2″ x 4″ finished flying geese using the Wing Clipper I tool instructions.  Only 3 flying geese units will be needed.

img_2049


Tree Star:  Make the 6″ finished lemoyne star using the Lemoyne Star tool instructions.

Lay out your quilt blocks and construct the quilt center.  Once the borders are added the finished quilt measures 38″ x 38″.

Happy Holidays!

#islandbatik #thebestofbali #islandbatikambassador #alpinejungle #iloveislandbatik #debtucker #studio180design #whimsicalandwonky

My Evening Elegance Revealed

img_1957

Evening Elegance measures 60″ x 60″.  The blocks are finished at 12″.

This is one version of Deb Tucker’s Evening Elegance quilt.  Go to Deb Tucker’s blog  to see version 1 and to download both quilt settings.  It was designed using BlockBuster Patterns:   1 Ohio Star, 7 Whimsy Turndash, 9 Three in One, 16 Peaks & Valleys, 20 Stellar Collision, 21 Around the Block, 22 Square Dance, 26 Cactus Blossom and  34 Evening Shadow.

I really had fun making this quilt.  I love the “Circle of Nine” layout.

These beautiful fabrics from Island Batik are gorgeous.

#islandbatik #thebestfrombali  #debtucker #studio180design #twilightchic #Blockbusters

Evening Elegance Blog Hop

This is day 3 of Studio 180 Design’s Evening Elegance Blog Hop.  Deb Tucker has launched her own fabulous signature fabric collection, Twilight Chic, with Island Batik and fabric designer Kathy Engle.

Twilight_Chic_Swatches_1024x1024

Below are the links to everyone participating in the blog hop:

Monday November 5th – Karen Overton – The Quilt Rambler” https://thequiltrambler.com/blog/

Tuesday November 6th – Tammy Silvers – Tamarinis – http://www.tamarinis.typepad.com/

Wednesday November 7th – Jackie OBrien – If These Threads Could Talk – https://ifthesethreadscouldtalk.com/blog-posts/

Thursday November 8th – Tina Dillard – Quilting Affection Designs – http://quiltingaffection.blogspot.com/

Friday November 9th – Studio 180 Design – https://deb-tuckers-studio-180-design.myshopify.com/blogs/news

Check back on Friday to see one version of the  Evening Elegance quilt completed.  The quilt was designed using BlockBuster Patterns:   1 Ohio Star, 7 Whimsy Turndash, 9 Three in One, 16 Peaks & Valleys, 20 Stellar Collision, 21 Around the Block, 22 Square Dance, 26 Cactus Blossom and  34 Evening Shadow.

img_1936

I was assigned BlockBuster 9 – Three in One, using the V Block and Tucker Trimmer I tools.

Unit A. V Blocks:  Make 4 V Blocks.

Unit C. Quarter Square Triangle:  Make a Quarter Square Triangle with the fabrics that match the V Blocks, remember to swirl the center.

Unit B. Combination Units:  Combination units begin by making half squares triangles (HSTs). The fabric for the HSTs must match the side triangles in the v blocks, so I began by laying out the starter squares next to the V Blocks and then making them into the combination units.

When making Combination units, you are making two at a time, a left & a right.  Choose the units that will match the side triangles in the V Blocks as shown above.

Sew the units into rows then join the rows into the block.

img_1903

My second BlockBuster was 16 Peaks & Valleys using the Diamonds Rects Tool and V Block Tool & the  Sidekick, High Low Technique Sheet.

Unit A. Diamond Rects:  Cut your precision diamonds & side triangles per the Diamonds Rects instructions.  Stitch opposite side triangles, press toward the side triangles.  Stitch the other opposites side triangles.

Make 4 diamond rects units and trim.

Stitch using a partial seam to the center square.  Stitch the second diamond rects unit and so on to finish the block center.

Unit B. High Low Left:  Following the instruction the in technique sheet cut your squares and trim, add the replacement side triangle.  Mark and stitch the square for the low point and trim.

img_1888

Make four High Low Left Units.

img_1871.jpg

Unit C Sidekick Right:  When making a Sidekick Right, position fabrics face down for cutting.  Cut and stitch replacement side triangles.

img_1892

Peaks & Valleys block unit layout.

img_1900

Stitch units into rows.

img_1903

Join the rows to complete the block.

I love the Twilight Chic fabrics from Island Batik and I can’t wait to show you one of the finished quilts!

#islandbatik #debtucker #twilightchic #studio180design #blockbusters

Great Outdoor Blog Hop Week 4

Wow, the last week in August gets so busy!  Have you visited Island Batik for week 4’s project reveals?  There are two more days to go next week then it is over.  Here are links to this weeks reveals:

Monday, August 27 – Globetrotter
Pamela Quilts, Curliecue Creations

Tuesday, August 28 – Jungle Cruise
Vicki’s Crafts and Quilting, Little Bunny Quilts

Wednesday, August 29 – Lavendula
Carole Lyles Shaw, Masterpiece Quilting

Thursday, August 30 – London Calling
Quilt in a Not-Shell, Lizard Creek Quilting

Friday, August 31 – Spirit Rhythm
Steph Jacobson, Whispers of Yore

If you follow my blog you know I have a female chihuahua named “Tucker”.  Tucker is definitely in charge!img_1598

Tucker keeps a close eye on everything I’m doing.  All that supervision makes her sleepy.  She will climb on my head to get me to go to bed by 7:30 at the latest.  I’m not ready to sleep that early, so I am usually on my laptop.  Last night I was playing with EQ8. I was drawing the BlockBuster patterns by Deb Tucker.  It is so much fun seeing what the blocks will look in quilt.

BB10 Twisted Pinwheel Blue Background

One of the blocks I was playing with last night BlockBuster 10 Twisted Pinwheel.  This block has a 4 patch in the center, High/Low units & Sidekick units made with the V Block tool and Sidekick High\Low Technique Sheet.  I was able to load fabric scans of Island Batik fabrics into the EQ8 software.

BB10 Twisted Pinwheel Quilt

I decided to design the quilt with 12″ finished blocks, on point, adding sashing with 6″ Twisted Pinwheels as cornerstones and Piano key outer borders.  What a nice way to end summer!  Have a great weekend everyone!

#greatoutdoorbloghop #islandbatik #Iheartislandbatik #DebTucker #Studio180Design #EQ8 #BlockBusters

Great Outdoor Blog Hop Week 3

I love Island Batik fabrics, Studio 180 Design Tools & EQ8!  So I wanted to share some of my Sunday morning creativity.

I started with BlockBuster 19 Exploding Lemoynes (you can find all the BlockBuster patterns on http://www.ifthesethreadscouldtalk.com).  There are 3 different color versions of this block.  These blocks require the Rapid Fire Lemoyne Star tool.

BB19 Version 1 block

This is Exploding Lemoynes version 1

BB19 version 1 quilt

This is what happens when you put 4 version 1 blocks together.

BB19 version 2 block

Exploding Lemoynes version 2 block.

BB19 Version 2 quilt

Exploding Lemoynes Version 2 with 4 blocks.

BB19 Version 3 block

Exploding Lemoynes version 3 block.

BB19 version 3 quilt

Exploding Lemoynes version 3 with 4 blocks put together.  These are so cool and easy to make with the Rapid Fire Lemoyne Star tool that makes Lemoyne stars in 10 sizes from 3″ to 12″ blocks!

I want to share links to Island Batik’s Great Outdoor Blog Hop for week 3:

Monday, August 20 – Ocean Odyssey
Toby Lischko, Karen Overton

Tuesday, August 21 – British Rose
Busy Hands Quilts, Mania for Quilts

Wednesday, August 22 – Dear William
The Inquiring Quilter, MMM Quilts, Living Water Quilter

Thursday, August 23 – Dragonfly Dreams
Inchworm Fabrics, BeaQuilter

Friday, August 24 – Fur-ocious Friends
Quilting Affection Designs, Dizzy Quilter

Be sure to visit all the links and enter to win “Give Aways”.

#iheartislandbatik #islandbatikfabrics  #studio180design #debtucker #EQ8 #electricquilt

Scrapodopolis – BlockBuster’s #1 – #9

I just finished my quilt containing Deb Tucker’s BlockBuster patterns #1 through #9!  Scrapodopolis seems like a pretty good name.

img_6002

I used the Tucker trimmer 1, Wing Clipper 1, Square/Squared, V Block & Four Patch Square up tools from Studio 180 Design.  I was encouraged by fellow Certified Instructor Sarah Furrer to try a block layout a little outside the box, and I totally did!

01 Layout

This is the layout I chose.  I did change it up a little.

02 Square Squared

My blocks are 12″ when finished.  that indicated that my Square/Squared units would finish at 6″.  I Needed 16 square/squared units and decided the center squares would be cut from 16 different fabric pulled from the blocks & the side triangles would be the same background fabric used in the blocks.  The 3″ rectangles on either side of the square/squared units would match the border fabric.  The outer borders would finish at 6″ also.  I added a 3″ border outer border to enhance the four square/squared units in the border.

03 dont do this

Don’t do what I did.  I started in the center and stitched the outer square/squared units to the center blocks, (they had to be un-sewed and sewn to the borders pieces). In each of the corners, I stitched a 12″ block to a square/squared unit & stitched a square/squared unit to a 6.5″ square and then stitched it to the block.  The two blocks on either side of the center were stitched to a square/squared unit

04

This is much better. Now there are 3 rows of blocks in the center ready to be stitched together & the border square/squared units are pieced to the border strips.

Once all the pieces were stitched together I decided I needed to add a 3″ outer border so all the units appear to be floating.

09 quilted

I am so pleased with how it came out!  My finished quilt measures 67″ x 67″.

10 a different view

I can’t wait to start the next quilt with BlockBuster  #10!

BlockBuster #9 – Three In One

This block requires your Tucker Trimmer I and V Block tools.  BlockBuster 09 Three in One provides 3 different possible block layouts.  The block is made up of V Block, Combination & Quarter Square Triangle units.  I’m making Block 1 as a 12″ block, with 4″ finished units.

BlockBuster 9 blocks

All of the units in these three blocks are the same (and placed in the same location), yet just by rotating the units and changing your fabric placement, you’ll get three very different blocks.

img_5956

These are my fabric choices.  I will be making Block 1.  I decided where I wanted my fabrics in the block by looking at the colors in block 1 and assigned my fabric choice for the units.

img_5993

I need four V Block units with the center triangle cut from the background fabric and the side triangles cut from each of my four fabric colors.  For a 4″ finished unit I cut a 5″ WOF strip of the background and each of the four fabric color groups.  (check the Size Cutting Chart in the tool instructions and on the tool itself.)

img_5966.jpg

The center unit is a Quarter Square Triangle made from each of the four fabrics.  I cut a 5 1/2″ square from each of my four fabrics. ( Check the Size Cutting Chart in the tool instructions.)

img_5964

The corner units are Combination Units.  Each combo unit is made from fabrics that match the side triangles on either side of the V Block units and the background fabric. Cut 2 each 5 1/2″ squares from each of the four fabrics and four 5 1/2″ squares from the background fabric.

V Bock Units

Everything you need to know for making V Block units is in the tool instructions.  I’m starting with the V Block center triangles.  To cut the center triangles, layer no more than two layers deep.  Fold the ends deep enough to accommodate the slanted cut for a 4″ finished unit and finger press it.

Position the tool on the strip so that the dashed line labeled “Fold Line for Center Triangle” is aligned with the fold and the correct size line of the tool is against the bottom edge of the strip. Trim along the slanted edge of the tool and unfold to reveal the center triangle pieces.

Move the cut triangles to the side and flip the strip over from top to bottom.  Align the center triangle trim line with the previously trimmed edge and cut your next pair of center triangles.  For this block you need four center triangles.

For the Side triangles. place the strips facing each other, either right sides or wrong sides together on the cutting mat.  Locate the bold solid line on the tool that reads “Cut Line for Side Triangles”.  Position that line against the trimmed end of the strip and the proper size line against the bottom of the strip.  Trim along the slanted edge of the tool. 

img_5963

Cut one set from each of the four fabrics. 

Lay out the V Block units, making sure you are lining up the long edge of the side triangles with the edges of the center triangle.  Position pieces right sides together lining up the slanted cut edges “tip to tip” and stitch one side triangle to the unit. Press toward the side triangle.  Position second triangle, stitch & press as shown.  Repeat with the other V Blocks.

Lay the V Block unit on the cutting mat with “V” pointing toward you.  Lay the tool on the unit aligning the “Finished Size” measurement with the seam lines. Trim up the right side and across the top.  (For left hand cutting directions see tool instructions.)

Lift the tool and rotate the unit. Reposition the tool on top aligning the correct “Cut Size” measurements with the previously trimmed corner and “X” with the sewn seam intersection.  Trim up the right side across the top.

Quarter Square Triangle – Center Unit

Check the Size Cutting Chart to determine size of the starter squares.  For 4″ finished units cut one 5 1/2″ square from each of the four colors.  Make half square triangles (HST) by marking two diagonal lines on the back of 2 of the fabric squares with your Magic Wand, stitch on the lines and cut apart.  Press seams toward the darker fabric.  Do Not Trim. Check your fabric placement choices to determine which fabrics to make HST’s out of.

Note:  When making half square triangles, combination units and quarter square triangles, you will be making two units at a time.  You can make two blocks or save the units for something later.

On the back of one of the HST’s, use your Magic Wand  and mark two diagonal lines. Position the HST units right sides together, carefully nesting the sewn seams.   Stitch on the lines, cut apart and press swirling the center.

Position your Tucker Trimmer over the pieced unit. Carefully align both the common diagonal and the size diagonal lines over the sewn seam lines.  Trim up the right side and across the top.  Lift the Tucker Trimmer tool and rotate the unit.  This time be sure to position both the common diagonal, the size diagonal lines and the outline of the square to the exact measurement desired. Right hander’s trim up the right side and across the top, while left hander’s will trim up the left side and across the top.

Combination Units

Check you fabric placement choice to group your fabrics for making the combo units.  There are three 5 1/2″ squares (one background & 2 darker fabrics) for each combo unit.  Start by making half square triangles (HST) by marking two diagonal lines on the back of one of the darker fabric squares and placing it right sides together with the other dark fabric square.  Stitch on the lines and cut apart and press.  Do Not Trim.  Do this for each color group.

img_5972

Mark two diagonal lines on the back of one HST. Place one HST on one background square centering it and stitch on the lines.

Cut apart and press toward the large triangle.  When you make combination units with this process, you are making mirror image  combo units.  You will only need one set of combo units for one block.  Deb Tucker has a Non Mirror Combo Technique Sheet that shows you how to make only the combo units you need.

Position the Tucker trimmer over the unit, carefully aligning both the common diagonal and the size diagonal with the stitched seams.  Right hander’s trim up the right side and across the top, while left hander’s will trim up the left side and across the top.  Lift the tool and rotate the unit.  This time line up both diagonal lines and the outline to the exact measurement desired and trim as before.

Lay out your units and stitch into rows, pressing as shown.

Stitch your rows to make your block.  I now have BlockBuster’s #1 – #9 completed!  Time to make a quilt!