Tag Archives: Island Batik Ambassador

A Field of Popped ‘V’s”

Secondary-Pattern-Graphic

The Island Batik Ambassador’s Challenge for July is “Pattern Play, Secondary Pattern”.  I chose a simple design using BlockBuster  18 A Popped V  pattern from Deb Tucker which uses Studio 180 Design V Block & Corner Pop tool and the Side Kick High/Low technique sheet.

img_5382-1

Last year I made four Popped V blocks and loved the secondary pattern that came from putting together the blocks.  Notice the nice sharp points?

img_1261

I love my bright orange & green Island Batik fabrics.  But, this time my blocks looked a little different…there’s a story there!  I don’t know about you, but when I’m at a quilting retreat with my quilting buddies I’m usually  talking way too much and that’s how mistakes are made!  My in-attention to detail led me down the primrose path of error!

img_1262

I was organizing my fabrics, I decided to make twelve 12″ blocks.  When making a quilt block, we refer to Finished & Cut size units.  The Finished size is the what the unit measures after it is sewn into the block,  the Cut Size measurement is the size of the unit before it is sewn into the block.  The Cut Size is what size you trim the unit to before sewing it into the block. 

img_6315

Checking the size chart in my V block instructions, I needed to cut 5″ strips to make 4″ finished V Block units.  So far no problem.  I pop off the corners of my V Block units with my Corner Pop tool and replace the corners with my beautiful orange Island Batik.  I popped off the corners of the center squares and continue on.

Here was my downfall, I had not cut the starter strips for the Sidekick units.  Instead of checking the technique sheet, I grabbed the Blockbuster pattern and looked at the “Cut Size” of 4 1/2″!  Drat!!!!  I cut all the background squares smaller than they needed to be.  I continued to trim the squares for the replacement side triangles.  I stitched the side triangles to squares, thinking “this doesn’t look right”, but I still kept yapping away, going down the primrose path of error.

img_1297

Needless to say my sidekicks lost their points!  That makes me “Pointless”, something I try to avoid at all costs!  I did not have enough fabric to make new sidekick units.  My secondary design has dull points, but it is a lesson learned to pay attention!

img_1272

The moral of this story is, when you find yourself wandering through “A Field of Popped V’s”, don’t end up pointless!

These beautiful fabrics are all from Island Batik and stitched with Aurifil thread.  Quilt measures 45″ x 57″.

#islandbatik #aurifilthread #Debtucker #studio180design #VBlocks #CornerPop #Quiltersdreambatting

Blast From The Past

The fabrics featured in this post were given to me by Island Batik. 

Modern Batik Challenge 39

The Island Batik Ambassador’s challenge for June is “Modern Batik”.  Lord have mercy!  I had no idea what to do.  I love all types of quilts.  For some reason I wondered……what colors were popular in 1953?  A search on Pinterest revealed an O’Brien Paints Color Card from 1953!  It must be a sign!

I racked my brain.  I had these really cool precut rolls of 5″ WOF strips I’d received in my box “O” fabric from Island Batik.

Last year I was constantly looking for quilt blocks containing Shaded Four Patch units. This year it seems to be Split Rects units that have my mind whirling.

2 TU SR Unit Types

3 TU SR 5 thru 8

5 TU SR 12 thru 16

The above photo’s are my teaching step outs that explain the process of making Spilt Rects Units in case you weren’t sure what I was talking about.

img_6178

I chose 8 – 5″ WOF strips of color & cut 8 – 5″ strips of neutral.  Each strip yielded 12 pair mirror image elongated triangles for a total of 192 – 2″ x 4″ finished Split Rects Units that I will put together to make a multi-faceted Diamond unit.

I Combined the Split Rects units to make multifaceted diamonds.

img_1210

img_6180

I was very closely supervised during this part.

I had an idea of what I wanted, but wasn’t sure how to get there.  I had 48 diamond units but needed to add something more.  I decided on Rapid Fire Lemoyne Stars.

img_6193

I went to Island Batik stash and used 2 1/2″ strips from Spoolin’ Around.  These beautiful pieces of batik have been hand dyed by skilled fabric artists in the garden village of Sanur, Bali.

img_6210

This is what I came up with.  Is it modern?  The challenge description was “must incorporate ONE of the characteristics of modern quilts as defined by the Modern Quilt Guild:  the use of bold colors & prints, high contrast & graphic areas of solid color, improvisational piecing, minimalism, expansive negative space, alternate grid work”.

I may have hit one or two points!  But if you look to the past for inspiration what can you expect!  “Blast From The Past” measures 42′ x 62″.

img_6206

img_6211

As always, my quilts are lovingly pieced with Aurifil thread!

#islandbatik #debtucker #studio180design #aurifilthread

Pillow Possibilities

The products featured in this post were given to my by Island Batik.

Playful Pillows

The Island Batik challenge for May is “Playful Pillows”.  As I was thinking about what pillow design I would choose, it occurred to me I had a wealth of ideas at my fingertips.  So many of my favorite quilt patterns have blocks large enough for a pillow.  I decided I would make the center block from Deb Tucker’s “Carolina Lily: One Block” wall quilt pattern.

DTP005_-_No_Y_Carolina_Lily_-_One_Block_1024x1024Carolina Lily is a companion pattern for the Wing Clipper I.

My fabrics from Island Batik & threads from Aurifil.

img_6145

For each of the 3 flower blocks you will need 4 flying geese units.  Two of the flying geese units will have one pink point & one green point as shown above.  Deb Tucker’s method for constructing flying geese requires one large square and 4 small squares.  The large square is my background fabric. Three of the small squares are my pink fabric, and one is the green fabric.  Using your Magic Wand draw two diagonal lines on the back of your small squares.

To make a flying geese units position one green square and one pink square right sides together in diagonally opposite corners of the one large square.  Do Not align the raw edges, instead nudge them in toward the center just a few threads & overlapping the two small squares.  Stitch on the lines and cut apart.

img_6148

Press the seams toward the smaller triangles.

Position the remaining pink squares in the corner of the previously pieced units.  Nudge the squares as you did before.  Stitch on the lines and cut apart as before.

img_6151

You now have four flying geese units, two with pink points and two with one green & one pink point.  For Right handed cutting position your geese unit horizontally on the cutting mat so it points toward you.  Align the diagonal guide lines of the Wing Clipper with the sewn seams of the flying geese unit.  Trim up the side and across the top.  (See your tool instructions for left handed cutting.)

img_6152

Rotate the unit and reposition the Wing Clipper to align cleanup guidelines with the previously trimmed raw edges and the “X” at the top with the intersection of the seams.  Trim up the side and across the top.  Do this for all your geese units.

img_6153

Construct your lily block according to pattern instructions.  The lily block measures about  a 16 1/2″, I added 2 1/2″ borders all around it.  I like the inside of the pillow to be neat with no raw edges showing.  I want to quilt this block so I cut a backing and batting larger than my block and pin basted it.

I used my walking foot and cross hatched the basket portion of the block.

I was carefully supervised during this process.

img_6159

Once I finished with the basket, I outlined the flower parts and squared up the pillow top.

img_6161

My pillow top now measures 20 1/2″.  I cut two pieces of fabric 12″ x 20 1/2″.  On each piece, along one of the 20 1/2″ edges fold it over about 1/4″, press it & fold it over again and press it.  Stitch on the pressed over edges for a nice finish.  Position these two pieces on the pillow with WRONG sides together aligning the raw edges so the finished edges overlap in the middle.  Pin in place and stitch around the outside edges of the pillow using a 1/4″ seam allowance.

img_6162

Now you have a pillow with raw edges around the outside edge.  I like to add a binding just like it was a quilt.  That way the inside of the pillow is completely finished with no unfinished edges, which is nice for washing the pillow case.

img_6166

I made this pillow for my sister Mary, but I think Tucker & Zoey are claiming it!

#islandbatik #Aurifilthread #islandbatikambassador #debtucker #studio180design

Vintage Quilts Inspiring New Creations

img_5893

The April challenge for the Island Batik Ambassador’s is to “Look Back” and get inspired!  Not a problem for me.  My inspiration stems from the Hunter Star quilt.  This quilt is on many quilter’s bucket lists.   The quilt shown below represents a traditional hunter star layout.img_5895

I love Deb Tucker’s Rapid Fire Hunter Star tools.  Once you learn the Rapid Fire Process you will be able to make any version of the Hunter Star Quilt.  I went to Deb Tucker’s new book “Hunter Star Royal Treasures” for my inspiration.  This book contains 40 different king & queen size hunter star layouts, including one from me “Waves of Joy”.  But what got my attention were the “Alternative” layouts.  Wow what a difference a little change can make.  Instead of the traditional piecing of the dark trapezoid to the dark triangle or a light trapezoid to a light triangle, do the reverse and piece a dark trapezoid to a light triangle and vice versa.

I chose “Baths of Tortola”, designed & pieced by Studio 180 Design Certified Instructor Heidi Chase (Running With Scissors Quilters).  Heidi’s quilt is a queen size, 8 x 10 block layout, made with the Large Hunter Star tool & 9″ finished blocks.  (The photo on the left of my smaller version of Baths of Tortola (50″x60″) was taken on one of the many trees we lost during one of the many nor’easters this winter.)

img_5891

I wanted to make a smaller quilt, so I pulled out my Petite Hunter Star tool, and my Field Guide. This fabulous little book gave me the fabric requirements for a 5″ Hunter Star Petite, 8 by 10 block layout in a two color option. Sweeeet!  This book gives you yardage requirements and cutting instructions for 213 projects in 2, 3 & 4 color options for 5″, 6″ 7″ and 8″ block sizes from wall hanging to king size projects.

img_5848

I pulled my  Crystal Cove Water Aqua & Cotton Egg-white Island Batik fabric choices from my stash.

img_5849

I start by cutting my triangle, star point & trapezoid strips in both colors.

From my 5″ triangle strips I cut 5″ squares and cut them once diagonally and set them aside for later.

As a righty, I lay my trapezoid strip horizontally on my cutting mat with the selvedges to the left. (Left handed cutting options are included in the tool instructions.)  The strip can be either right or wrong sides together.   I’m making 5″ finished blocks so I place the 5″ line on my hunter star tool on the bottom of the strip and begin cutting my trapezoids for both colors.

I cut my star point strips in half and divide them into 4 piles.  The two aqua piles will be the star points on both ends of the light trapezoids and the two light piles will be the star points on both ends of the aqua trapezoids.   Begin by positioning the trapezoids right sides together with the star point strip, staggering down from the top 2 1/4″, spacing the trapezoids about 1/4″ apart and stitch.  The hunter star tool instructions give detailed guidance. 

Once the trapezoids are stitched to the star point strip, place the strip set on the ironing board with star strip on the bottom and the trapezoids on top and carefully press as shown.  Lay the strip vertically on the cutting mat and trim using the Hunter Star tool.

This slideshow requires JavaScript.

I now have an oversized star point on one end of my trapezoid.  This time I add my trapezoids starting from the bottom and spacing them about 1/4″ apart and stitch them.  Lay the strip on the ironing board with the trapezoids on the bottom and the star strip on top and carefully press toward the star strip.  (Remember: whatever you are pressing toward, goes on top.)

img_5865

Lay the strip horizontally on the cutting mat and trim according to the instructions.  Repeat this process for both colors.

img_5868

The light and the aqua trapezoids have oversized star points on each end.  One of Deb Tucker’s great tips is to lay about 5 strips of painter’s tape layered on top of each other on your cutting mat.  Trim off a little on one side evening up the edges.  Peel up the tape and place it on ruler line to aid in making repetitive cuts. Our trapezoids were precision cut from 1 3/4″ strips. By placing the built up tape edge on the 1 3/4″ line it will make it much easier to trim the sewn units to 1 3/4″.  Trim all the units.

Each hunter star block contains 2 triangles, 2 trapezoids & 4 star points.  Remember, we are breaking the rules by centering and stitching a light trapezoid to a dark triangle & a dark trapezoid to a light triangle.

Match the triangle halves, nest the seams and stitch.  Press the diagonal seam open.

Carefully align the center line of the tool with the center seam of the block. Carefully aligning the diamonds on the tool with the seam lines of the diamonds on the pieced block, trim up the right side and across the top.  Lift the tool and rotate the block and carefully trim the other two sides, using the dashed lines along the side of the tool on the previously trimmed edges.  Trim all the blocks to the cut size.

img_5881

Layout the blocks and stitch them together into rows.  I added 5″ borders.

I Loaded it onto the quilt frame and started meandering.  Just remember, “All that Meander are Not Lost”!  I bought Jamie Wallen’s wonderful quilting tools, but I haven’t learned to use them yet! (As you can see, they are still in the original packaging, sigh.)

img_5890

This is definitely NOT your grandmother’s Hunter Star Quilt!

#islandbatikambassador  #Islandbatik  #iheartislandbatik

What a Big Pin Cushion You Have My Dear!

The March Island Batik Challenge is to try a technique that is new to me.  As a person totally addicted to all things quilting I was having a hard time coming up with an idea.

Try a Technique

Early in February I was at a quilt retreat with gal pals at Needle in a Haystack Retreat Center in Findley Lake, NY (fabulous retreat center).  In their fabric store I spotted something high on a shelf.

img_5816

I asked “is that a mini tuffet kit”?  the answer was “yes”.  “What would you do with a 8″ tuffet” I asked?  She said “it could be for an American Girl Doll”.  Then it struck me….it could be a pin cushion on steroids!  I have never tried to make a tuffet before, so that was my choice for “try a technique new to me!!!

img_5815

I had these beautiful 2.5″ inch strips from Island Batik’s “Spoolin Around” collection.  I love how accurate and clean the edges are on Island Batik pre-cuts!

img_5817

First task was to staple the batting around the foam, to round the edges and attach it to the wooden base.  I’m already in trouble because apparently I tugged too hard on the batting, more about that later.

img_5818

I had to pick 9 strips, trim them to 1.25″ wide, and sew them together pressing the seams open.  So far so good.

img_5819

Cut them into four units 9.5″ wide.

img_5820

Sew the four units together forming a tube.  Here is where things start to go astray.  I placed the form into the tube to check on the fit.  It seemed a little loose to me.  I guess I tugged too hard on the batting when stapling it to the wooden base.

img_5821

Next I had to zig-zag a gathering cord on both ends of the tube.  My computerized sewing machine couldn’t handle the job so I had to break out “Libby” my Free-Westinghouse, 60’s era sewing machine to get the job done!  This was the hardest part to accomplish, many expletives were flying around Tuckerville!

img_5823

First attempt showed that the tube was way too big.  I had to remove 2 strips to make it smaller, (again, I tugged too hard on the batting while stapling it to the wooden base)!  I don’t think mine looks anything like the pictures in the instructions.

Tuffet Source

I don’t know how they got theirs so smooth!  I used a glue gun to attached the button and cover the bottom.  I got glue every where, not to mention burns from dripping it on my fingers.

Tucker is not sure what to think of it.

img_5829

I think I would rather make a King Size quilt than make another tuffet!  But I will smile every time I look at it, and aren’t the colors lovely?

img_1057

Mini Love

As an Island Batik Ambassador the products featured in this post were given to me by Island Batik.

Do you like mini quilts?  Part two of Island Batik’s Ambassador February assignment was to make a mini quilt 24″ square or smaller.  I chose a simple block.

I used Island Batik Neutral Buttermilk & Mini Flower Carnation Pink, plus 2 fat quarters from  the Galentine Day Bundle, one red for the star points and another red for the border.

24 Block front

I decided to make 4 blocks.  Each block has a center square, 4 two color quarter square triangles for the star points and 4 half square triangles.  My block units are 2 1/2″ finished, and the block measures 7 1/2″ finished.  I decided to start with the half square triangles (HST).  For four blocks I would need 16 HST.  With my Tucker Trimmer I,  I can make two at a time.  Deb Tucker has a new Technique Sheet called “Eight at Once”.  This technique sheet has a chart that gives you the fabric requirements for oversized HST in 11 sizes.  For 16 – 2 1/2″ finished HST I would need two 7″ squares of the Mini Flower Carnation Pink and two 7″ squares of Neutral Buttermilk.

03 layer


Using my Magic Wand, draw diagonal lines on the wrong side of the lightest fabric.  I also marked the vertical halfway mark & the horizontal halfway mark.

02 Mark

Stitch on all four diagonal lines only.

First trim  the vertical halfway mark & then the horizontal halfway mark.  Then trim in between the stitched diagonal lines. And, all at once you’ve got 8 HST.

06 Press

Press toward the pink.  Do you know that “what ever you are pressing toward…goes on top”?  That means lay your units with pink fabric on top.  Set your seams, then push over the pink fabric and press.

Lay your unit on the cutting mat.  We always trim our units to the cut size.  My units are 2 1/2″ finished, that means the cut size is 3″.  Find the whole circle on your Tucker Trimmer, align the 3″ diagonal line on the HST’s diagonal line and center it.  Trim up the right side and across the top.  Rotate the unit, align the just trimmed edge with the 3″ clean up line, again align the 3″ diagonal, trim up the right side and across the top.  If you are left-handed, position your unit to the left and the whole circle on your Tucker Trimmer would be positioned to the left also. You woud trim up the left side and across the top.

Now we will make our Quarter Square Triangles (QST).  I check the chart in my Tucker Trimmer instructions.  For 2 1/2″ finished units, my starter squares should be 4″.  For all four blocks I need Eight Red 4″ squares & Eight Pink 4″ squares.  Using my Magic wand I draw 2 diagonal lines on each pink square.  Layer one pink square with one red square aligning the raw edges.  Stitch on both diagonal lines and cut apart.

We are going to press toward the red , so lay your units red side up and press as before.  Divide your HST’s into two even piles.  Using your Magic Wand draw two diagonal lines as shown above on half of your HST’s.

Position one HST marked with the stitch lines with a HST without the stitching lines, right side together, and opposite colors facing each other.  Align and nest the center seams.

Stitch on the lines and cut apart.  Swirl the center as shown above and press.

Position the Tucker Trimmer over the pieced square.  Carefully align both the common diagonal and the 3″ size diagonal lines over the sewn seam lines.  Trim up the right side and across the top.  Rotate the unit, line up the Tucker trimmer again.  This time be sure to position both the diagonal lines and the outline of the square to the exact measurement of 3″, trim up the right side and across the top.

Cut four 3″ red squares for the block centers.  Lay out the block as shown above.

Stitch the units into rows, press the seam as shown.

Stitch the rows together and press as shown.

Make all four blocks.  I added sashing.  I cut two 1 1/2″ x 8″ strips and joined the two blocks on top row, and then the two blocks on the bottom row.  I cut three strips 1 1/2″ x 16 1/2″.  I joined the top row to the bottom row and added a strip on either side of the square.  Cut two strips 1 1/2″ x 18 1/2″ for the top and bottom of the square.  Note:  Always measure your blocks for accurate sashing measurements.  

From another Galentine Day fat quarter  I cut 3″ outer borders.  I finished it with my Hobbs Cotton Batting.  I stitched in the ditch and bound it with some Island Batik Neutral Buttermilk.  It was pieced & quilted with Aurifil Mako 50 thread.

28 Top (2)

This is a sweet simple quilt.  Reminds me of Forest Gump, “Life is like a box of chocolates, you never know what you’re going to get”, these blocks look like nicely wrapped chocolates.  Happy February!


The Island Batik Box Has Arrived!

As an Island Batik Ambassador the products featured in this post were given to me by Island Batik.

My box from Island Batik has finally arrived.  I’m so excited to see and share the contents with you.

01 Tucker

My box is so special, I got a chihuahua !  No, that is my girl Tucker, she helps me with everything I’m doing whether I want help or not!

02 Surprise

First up is the wrapped bundle.  It is wrapped because it contains fabric from Island Batik’s new line to be launched at Spring Market.  I haven’t even opened it yet.

03 Batting

To help us create our projects Hobbs Batting has given us Premium Cotton Batting & Hobbs Thermore, it is a polyester batting that eliminates fiber migration.

04 Aurifil

Aurifil, my absolute favorite thread.  They are so pretty lined up like little soldiers waiting for their orders.   If you haven’t tried Aurifil thread you should.  This thread is thinner, stronger & produces less lint in the bobbin case.

05 Rayon

Island Batik’s product line also includes batik rayon for apparel use.  I was given 2 yards of Pomegranate Seeds Red and a rayon scarf in a beautiful blend of greens and purple!  Should look good with my white hair!

06 Neutral

3 yards of Switzerland, I mean Neutral.  You can never have too much neutral!

07 Batik Foundations Bundle

Batik Foundations 1/2 yard Bundle!  Wowza, those colors are yummy!

08 Alpine Jungle

Alpine Jungle Fat Eighth Bundle with 1.5 yards of coordinating fabric.  I love this bundle.  I can’t wait to make something out it.

09 5 inch strips

These little bundles of 5 inch strips will come in handy, I’m sure of it!


This fat quarter bundle was for Galentine’s day, which is today.  But I didn’t want to be late so I made mine from Island Batik’s Drizzle Collection.

11 City Culture 2

And last but not least, this is a layer cake from the City Culture 2 line & 1.5 yards of coordinating light and dark fabric.

So join Tuck & me on this year long adventure of discovering new fabrics and fun projects!

As I finish this post, Tucker is trying to put her scent all over my Island Batik’s!

#islandbatik #islandbatikambassador

Celebrating GALentine’s Day

300px - I'm-an-Island-Batik-Ambassador - Blue-Ribbon

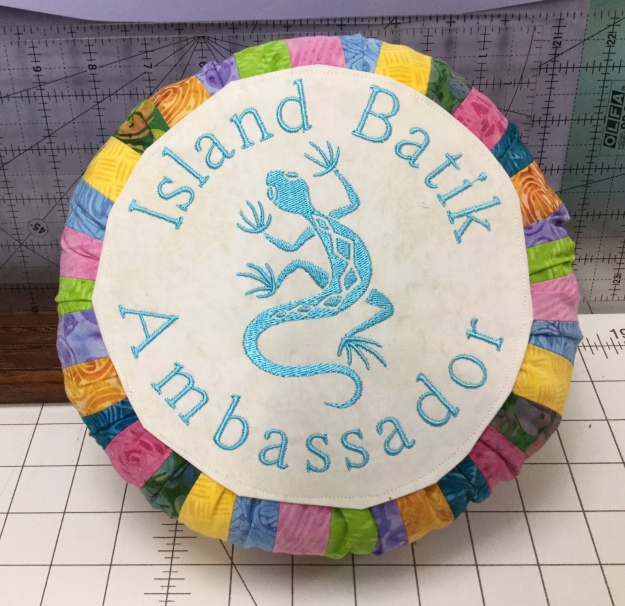
First things first… I am an Island Batik Ambassador!!!  I am so excited to have been accepted as apart of this talented group of quilters.  Island Batik Company has been around for over 15 years providing quality products and outstanding customer service.

Island Batik Ambassador’s are from all over the world.  As an Island Batik Ambassador, I will be sharing their fabric lines and projects to help inspire you.  Every month there will be something new to share.

I am one of those people who can’t stand to be late.  Even when I try to not to be the first person at the party, I’m always on time!  The 2017 Island Batik Ambassador’s just ended their year with the Four Season Blog Hop January 31st.  The boxes filled with Island Batik goodies for the 2018 Ambassador’s have been mailed.  Unfortunately mine will be delivered while I’m away at a quilting retreat.  I can’t stand to be late so I pulled out some Island Batik fabric from my stash to share my GALentine’s Day project with you.

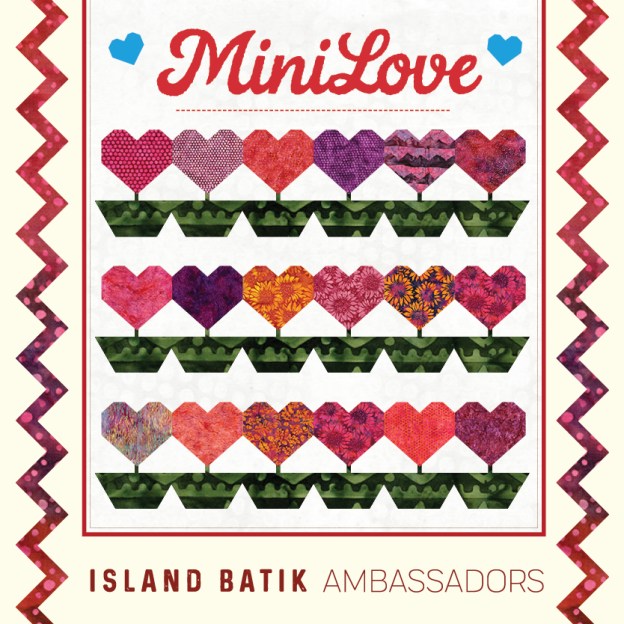
If you were a Parks & Recreation’s fan you’ll remember when Leslie Knope created “Galentine”s Day” as a celebration of our best gal pal’s and lady friends!  So this February 13th (that’s right, the day before Valentines Day) let’s celebrate our fellow females who encourage and inspire us.

I heart you.

img_5696

I am also a Studio 180 Design Certified Instructor, so the way I roll is with Deb Tucker Tools!  This Mug Rug was made with Deb’s Split Rects & Corner Pop Tools.

img_5657

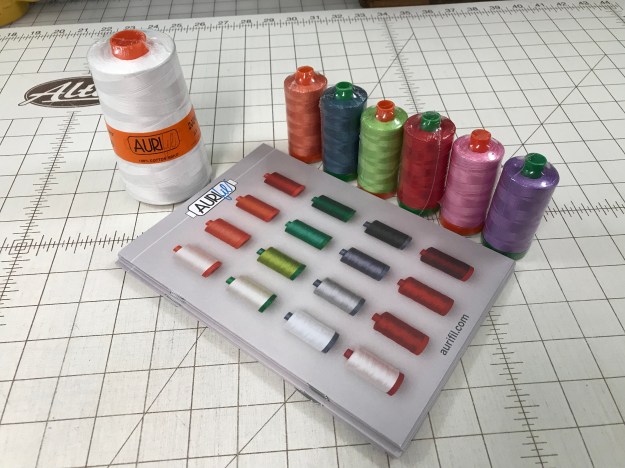
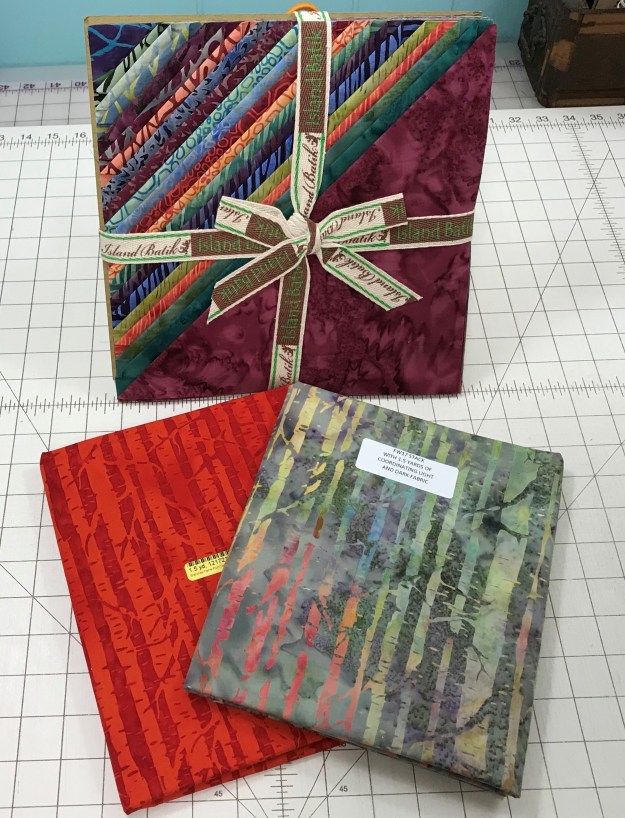
I started by choosing my Island Batik fabrics from the Drizzle Collection and my favorite thread from Aurifil.  I made this Mug Rug by making two  3″ x 6″ finished mirror image Split Rects units.  First thing was to check the size chart in my Split Rects instructions.  I had fat quarters of dark purple & light purple, and yardage of my background  fabric.  The tool instructions will tell you that for 3″x 6″ finished units you will need 7″ wide strips of each color.  I cut a 7″ strip from each of my purple fat quarters, and a 7″ WOF strip from my background fabric.

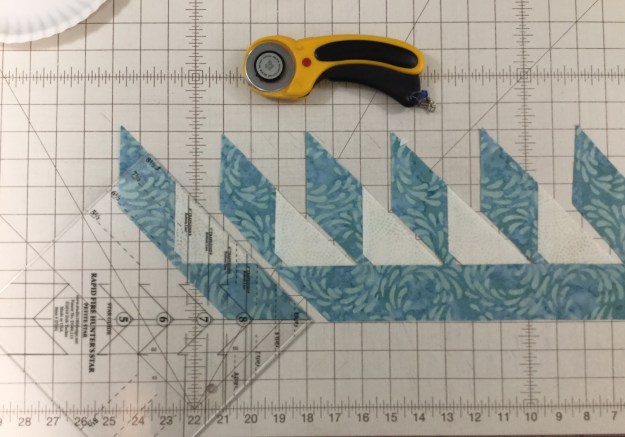
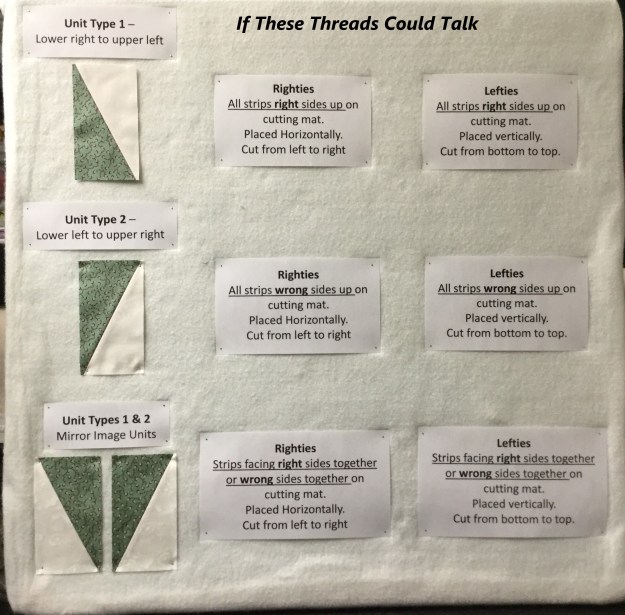
For Mirror Image units I placed my purple 7″ strips right sides together and trimmed off the selvages.

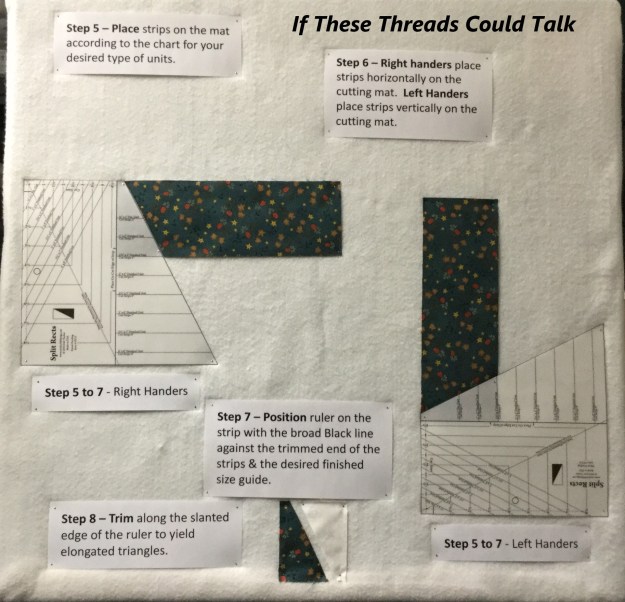
Right handers place strips horizontally on the cutting mat and position the tool on the strip with the broad black line against the trimmed end of the strips and the desired finished size guide line along the raw edge of the strips. Trim along the slanted edge of the tool.  You will now have mirror image elongated triangles. (See tool instructions for left handed cutting.)

Repeat the process and cut two mirror image elongated triangles from your background fabric.  Place the background triangles with purple triangles as shown above.

img_5665

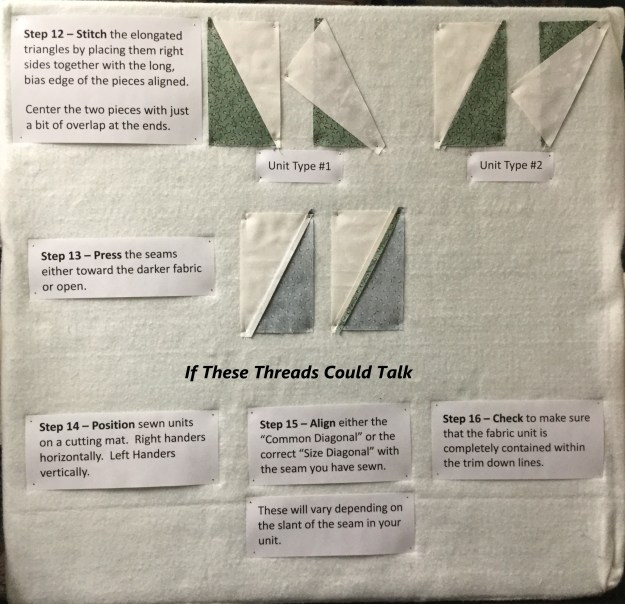
Stitch the elongated triangles by placing them right sides together with the long, bias edge of the pieces aligned.  Because they are oversized there is no need to fuss, just center the two pieces with just a bit of overlap at the ends and stitch.  I press the seams open, but you can press to the dark if you are morally opposed to pressing the seams open.

First trim, for right handers, position the unit horizontally on the cutting mat (see tool instructions for left handed trimming).  Align either the “Common Diagonal” or the correct “Size Diagonal” with the seam you have sewn (this will vary depending on the slant of your unit).  The photo above has the common diagonal lined up with the sewn seam.  Check to make sure that the unit is completely contained within the trim down lines for 3″x6″ unit.  Trim up the right side and across the top.  Lift the tool and rotate the unit.  Reposition the tool over the unit.  Align the cut size measurement with the trimmed corner and the same Common Diagonal line used the first time.  Trim the two remaining edges.

For the second Split Rects unit you will use the “Size Diagonal” line (this will vary depending on the slant of your unit) positioned over the sewn seam making sure the unit is completely contained within the 3″x6″ trim down lines.  Trim up the right side and across the top.  Lift the tool, rotate the unit.  Align the cut size measurement with the trimmed corner and the same Size Diagonal line used the first time.  Trim the two remaining edges.

img_5670

You now have two perfectly trimmed mirror image Split Rects Units.  For the top of our heart I used Deb Tucker’s Corner Pop tool.

Cut two 3 1/2″ squares, one from the dark purple & one from the light purple fabric.  Cut two 2″ squares from the background fabric, and then cut them once diagonally ( the size of the replacement triangle squares varies per cut away size & is found in the chart in the tool instructions).

img_5673

With the  Corner Poop tool you can choose from 22 size options and remove a 90 degree corner from your base unit while leaving the 1/4″ seam allowance.  For this project I popped off a 3/4″ corner from the dark purple  3 1/2″ square.  Place the 3/4″ ruler lines over the corner you wish to remove as shown above and trim.

Center the replacement triangles right sides together with the base shape and stitch.  Press toward the small triangle.

img_5679

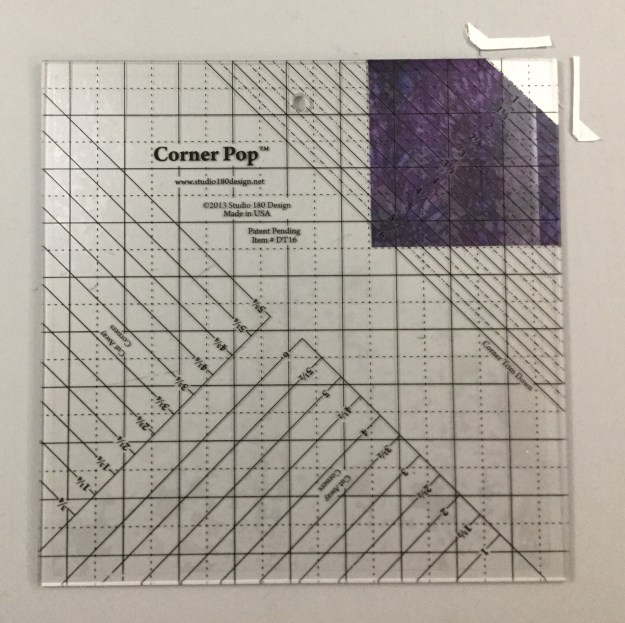
Locate the Trim Down Section on your Corner Pop tool and find the diagonal line that corresponds to the Cut Away Size, which is 3/4″.  Trim away the excess replacement triangle fabric, returning your base square to its original size.

Repeat the process and pop off one more corner as shown above.  Center & stitch the replacement triangle, press toward the replacement triangle.

As before, locate the Trim Down Section on your Corner Pop tool and find the diagonal line that corresponds to the Cut Away Size, which is 3/4″.  Trim away the excess replacement triangle fabric.  Your unit should look like the one above.  Repeat this whole process and pop off the corners of the light purple 3 1/2″ square.

img_5685

You should end up with the four units above.

Stitch the light purple heart top to the dark purple split rects unit and Stitch the dark purple heart top to the light purple split rects unit.  Press one seam towards the split rects unit and press the other towards the heart top.  Re-Press one seam of the heart top unit that was pressed toward the split rects so the seams will nest when the unit halves are sewn together.

I pressed the center seam open to avoid bulk.

Measure your heart.  Mine measures 6 1/2″x 9 1/2″.  I cut two strips 1 1/2″x 9 1/2″ and sewed them on either side.  Measure your heart gain.  I needed 2 strips 1 1/2″ x 8 1/2″ and stitched them on the top and bottom of my heart.

img_1013

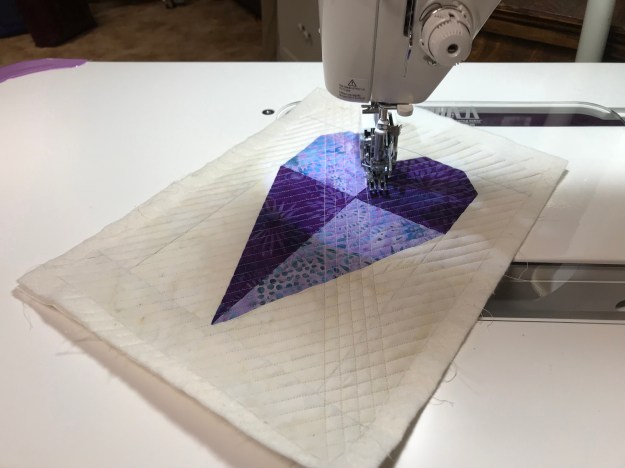
My mug rug top measures 8 1/2″ by 11 1/2″  so I cut a piece of scrap batting & backing one inch larger, 9 1/2″ by 12 1/2″.  Using my walking foot I quilted the 3 layers using a simple cross hatch design with Ivory Aurifil thread.

img_5696

I finished it with 2 1/4″ binding cut from my left over fat quarter.

Tucker tried her best to keep me from finishing my GALentine’s Day Mug Rug, but I am pleased with the finished product.

#islandbatikambassador #islandbatik #iheartislandbatik #happygalentinesday #happyvalentiesday #galentinesday #valentinesday  #thebestfrombali
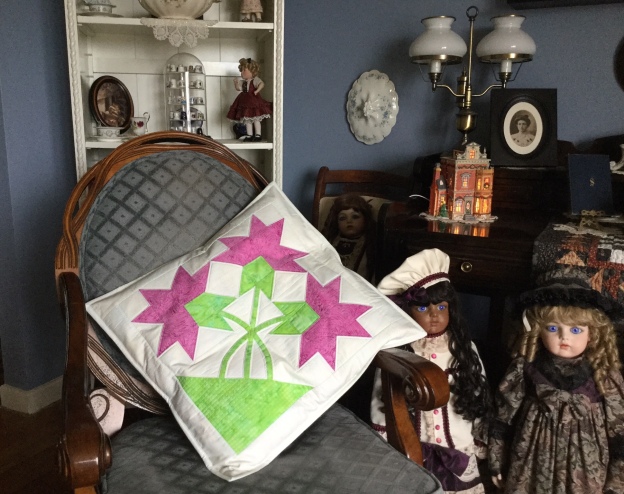