Tag Archives: Studio 180 Design Tools

Calm Seas

The fabrics featured in this post were given to me by Northcott Fabrics.

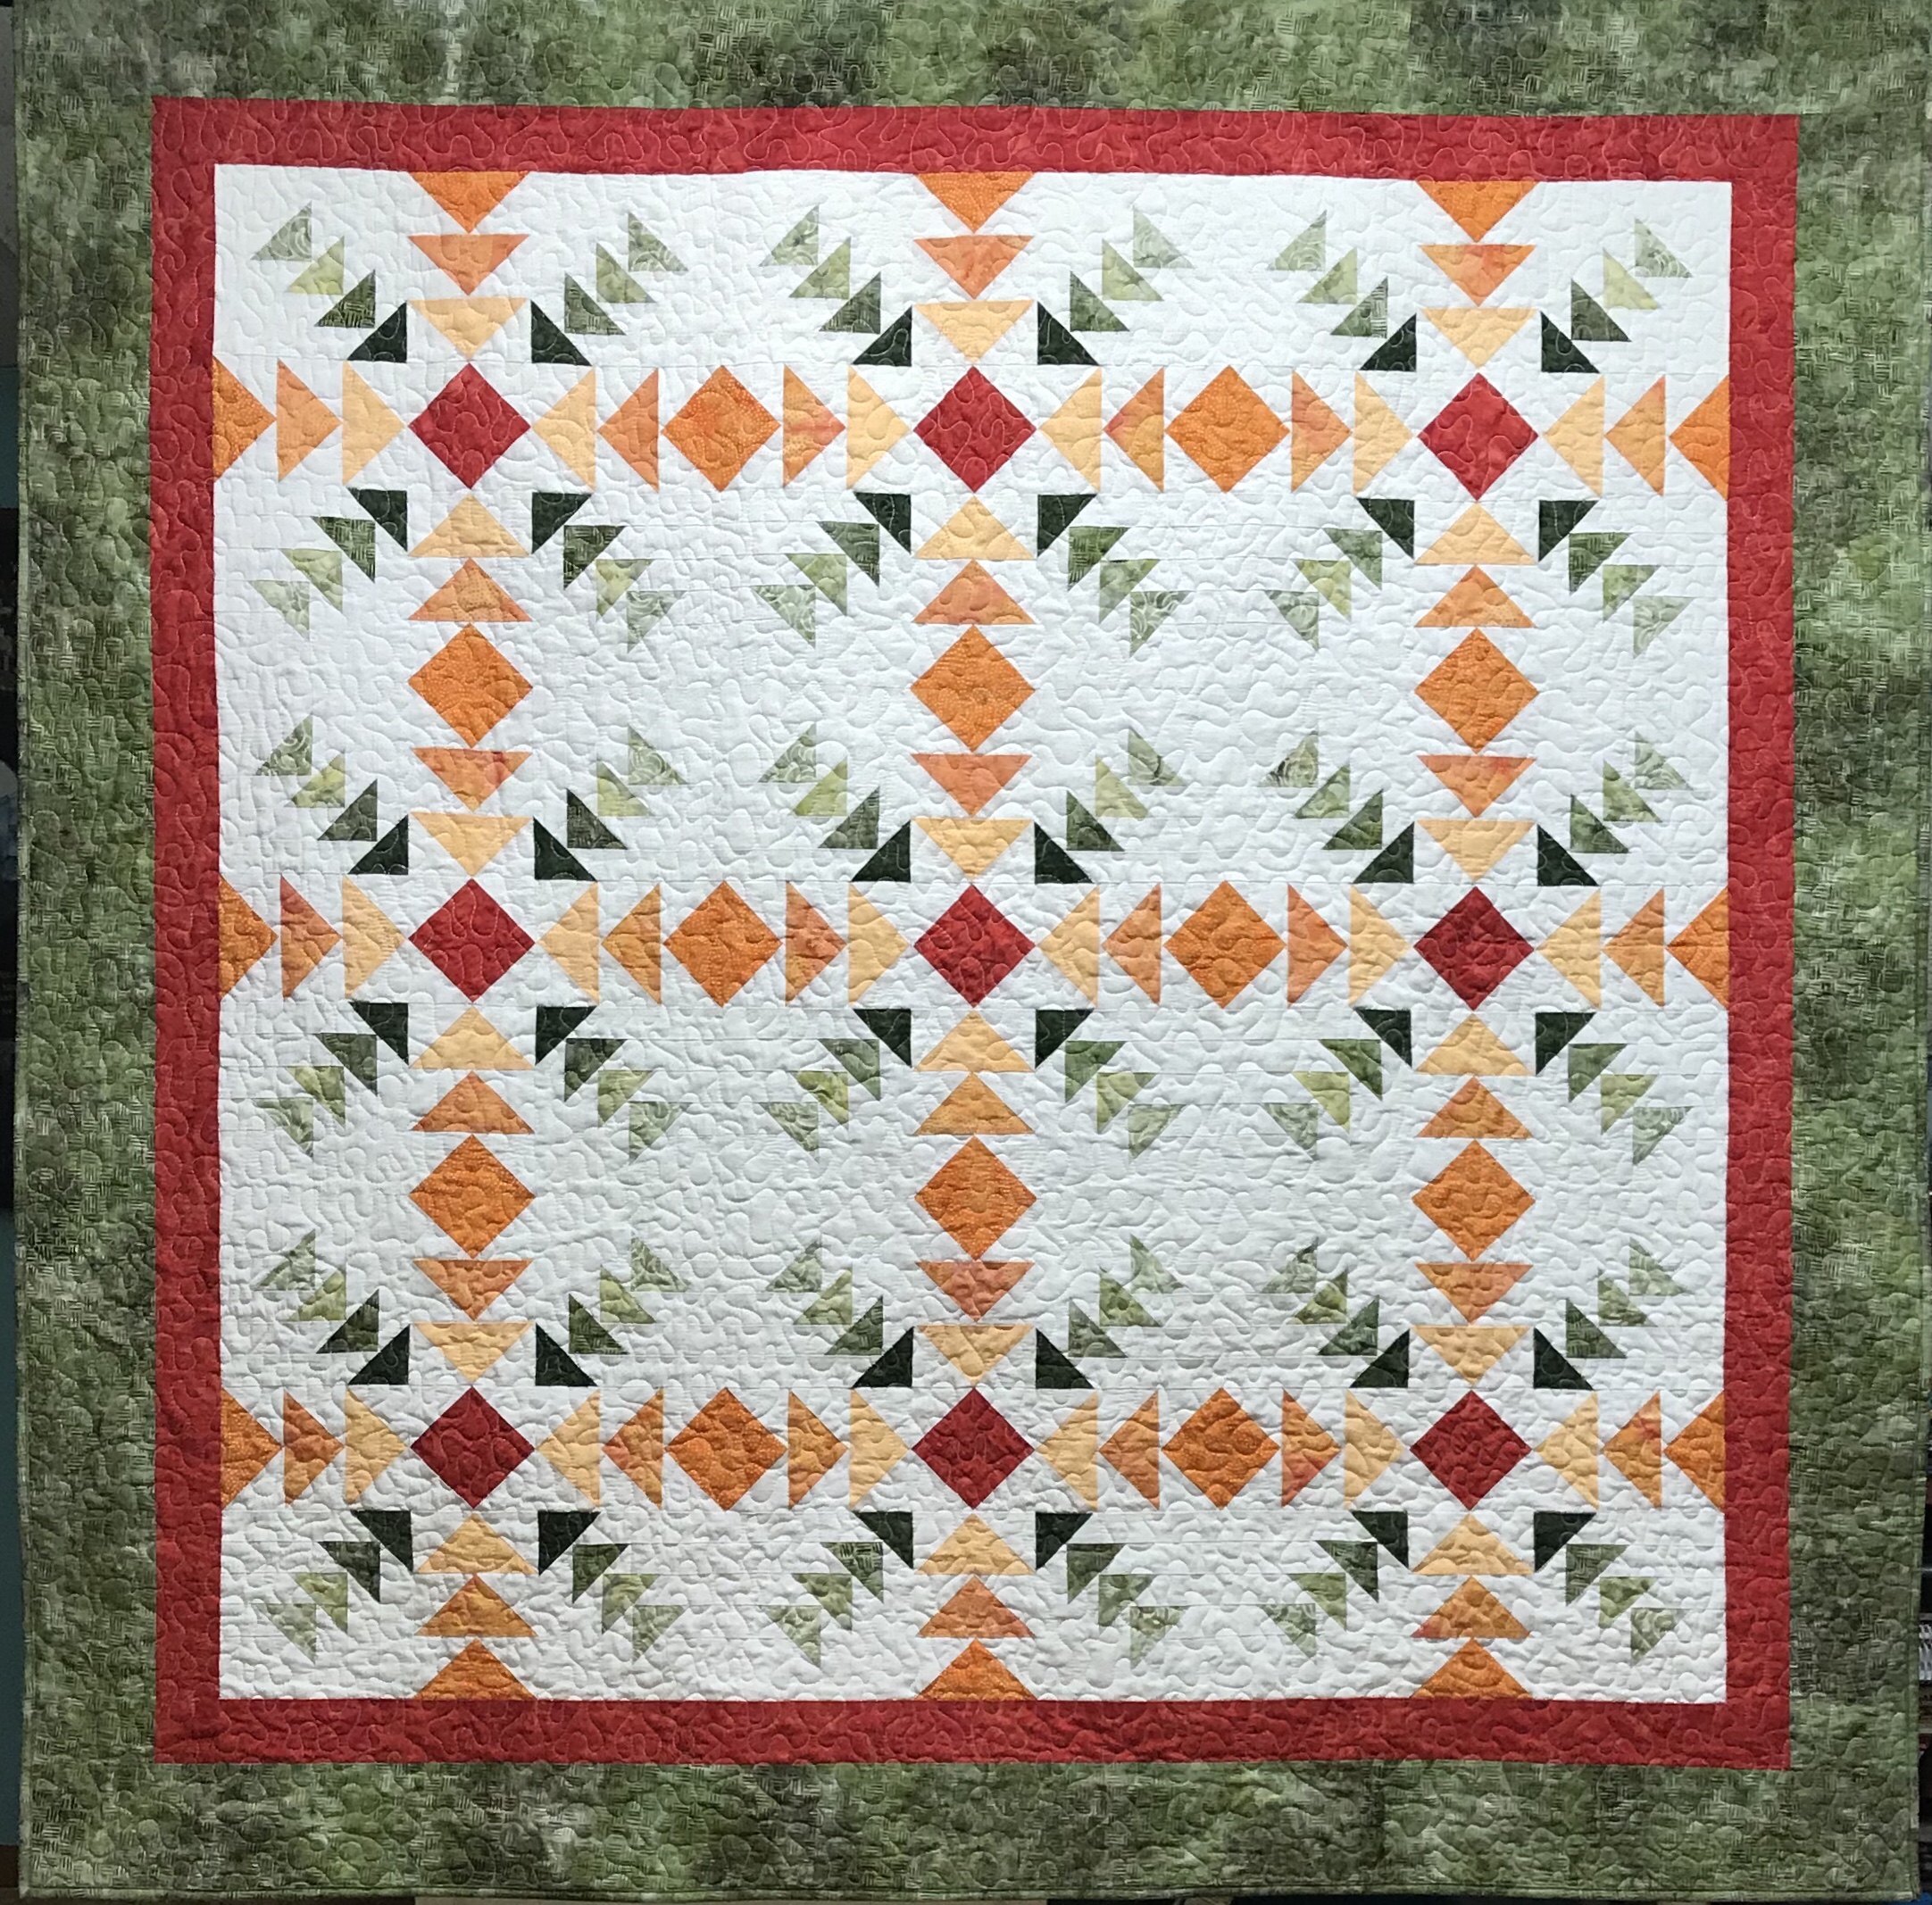
A Storm at Sea quilt has been on my “need to make list” for a long time.  I especially love the kind that use graduating colors.  Lucky for me, fellow Studio 180 Design Certified Instructor Michelle Hiatt created her pattern “Calm Seas“.  This fabulous pattern offers you a choice of 3 sizes; Throw, Double or King.  I chose to make the Throw size (62″ x 72”).  Calm Seas is a companion pattern for Studio 180 Design’s Large Square/Squared, Diamond Rects & V Block Tools.

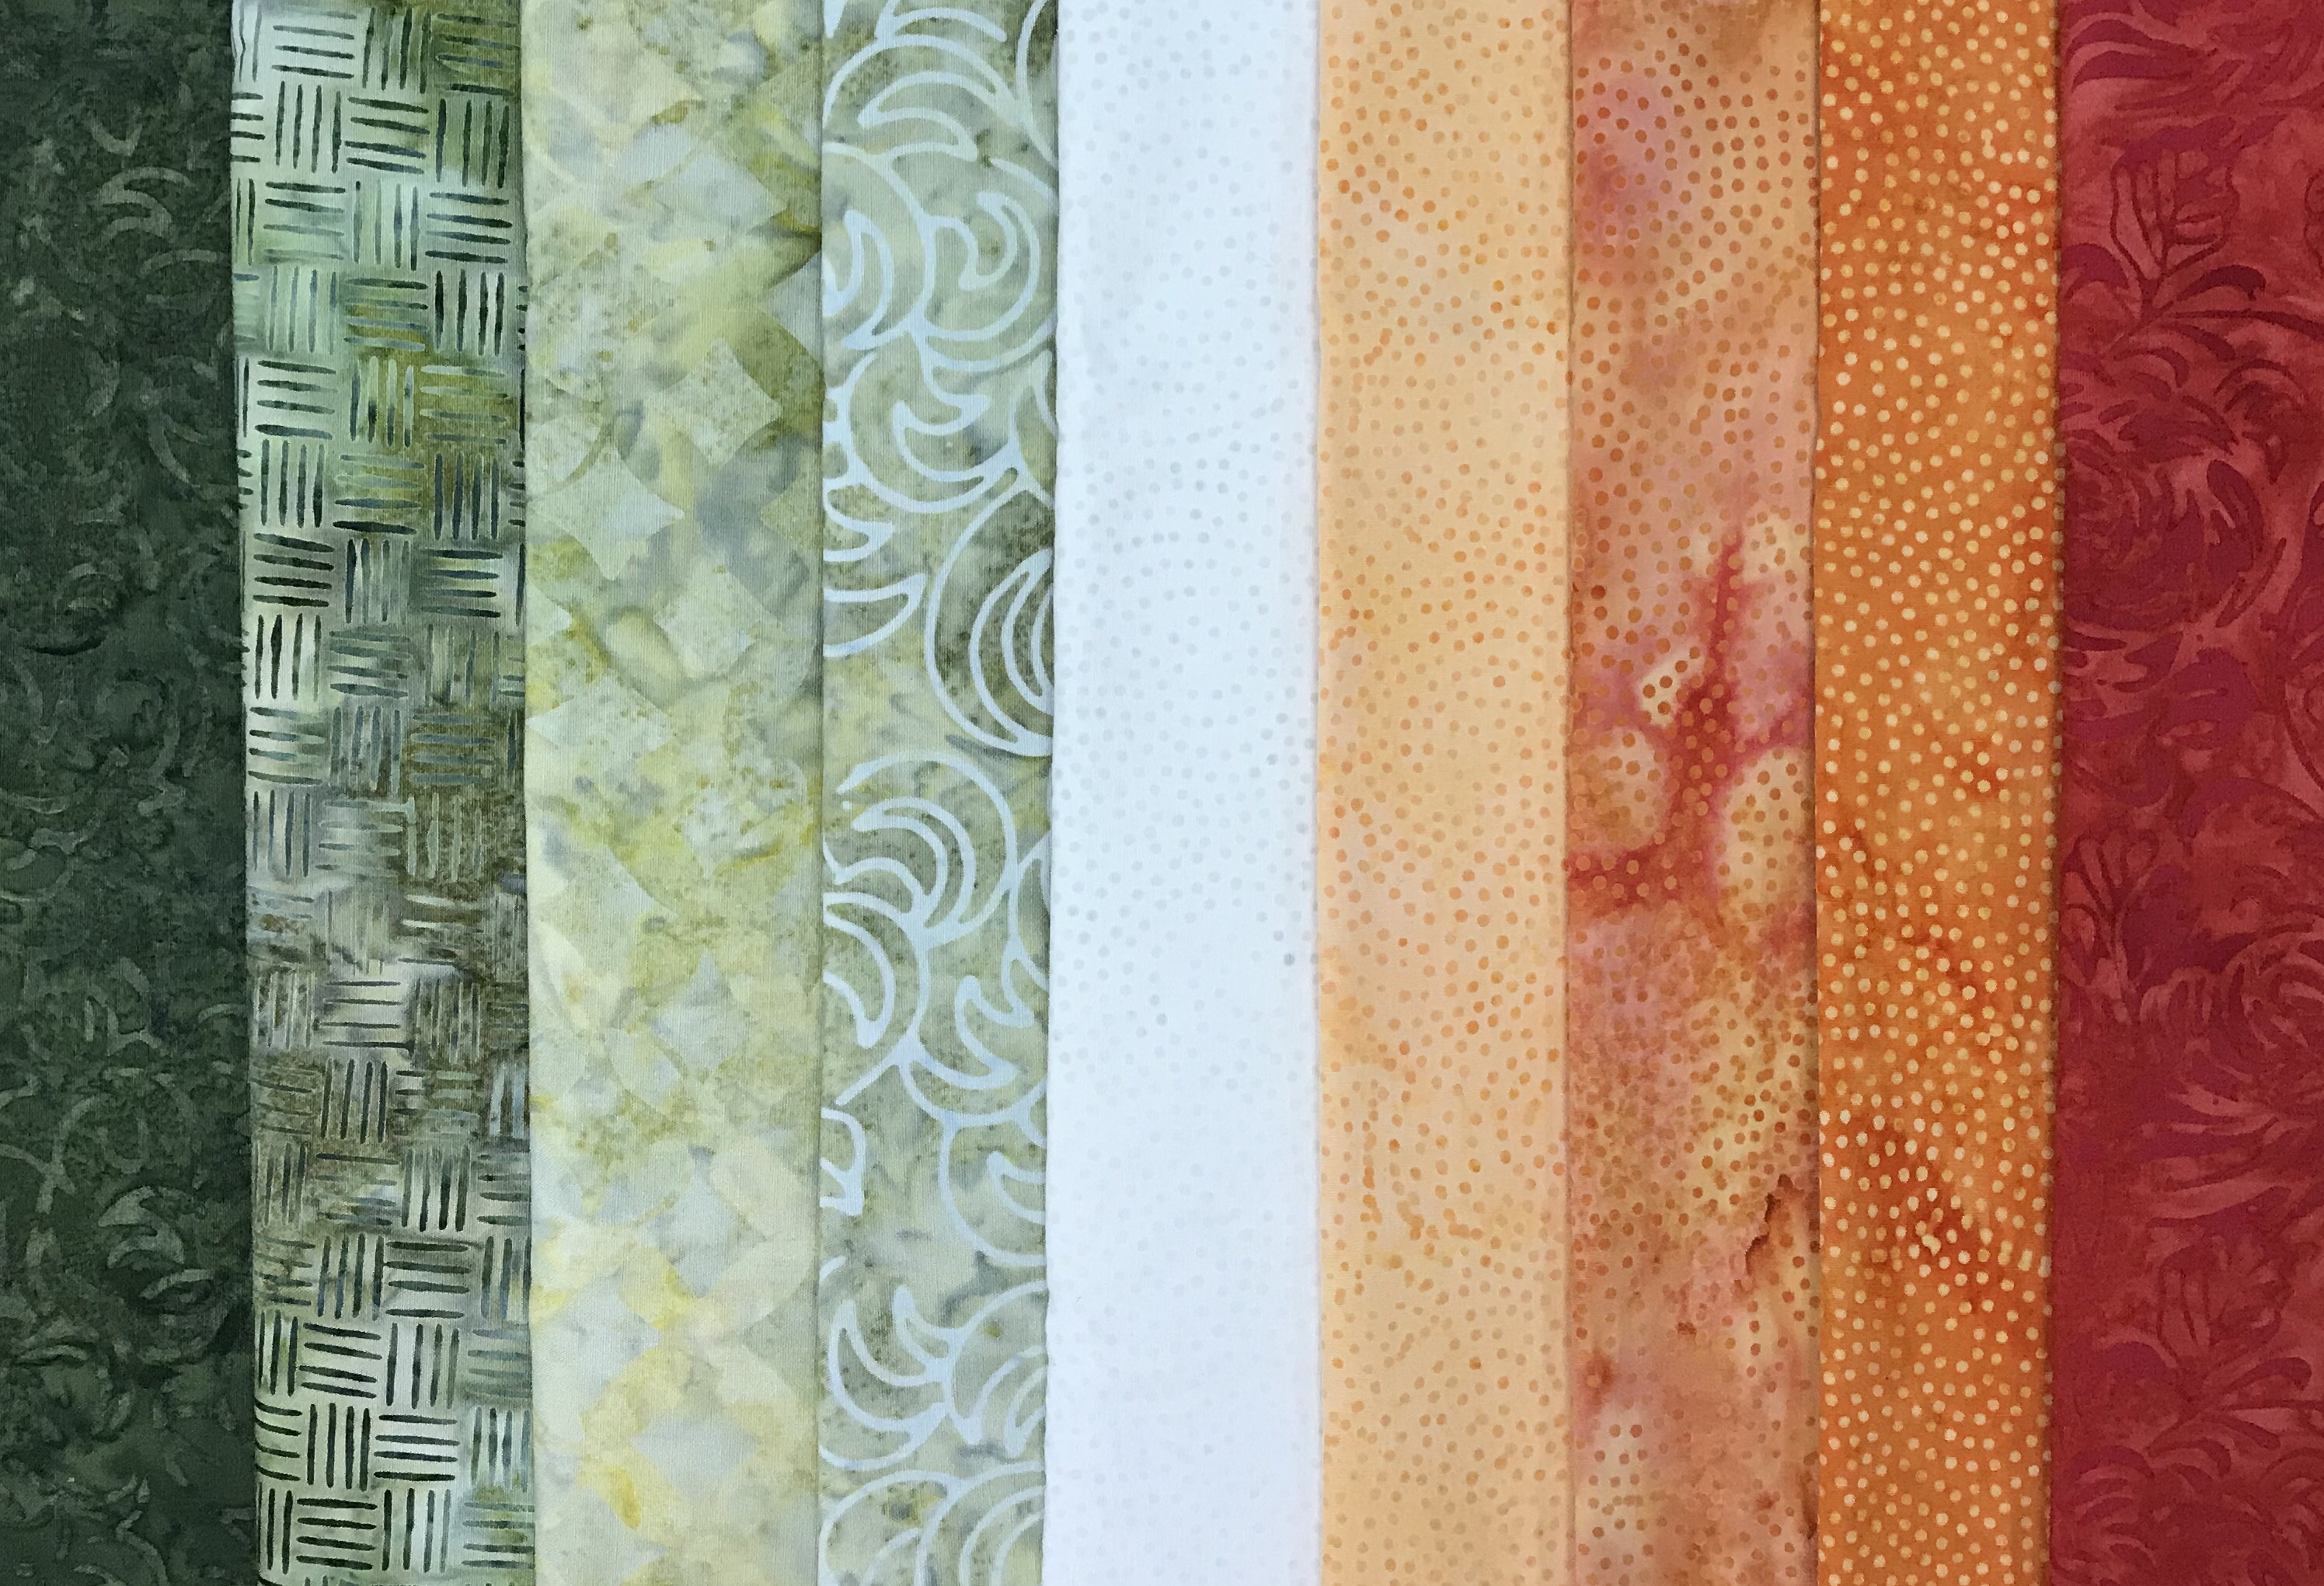
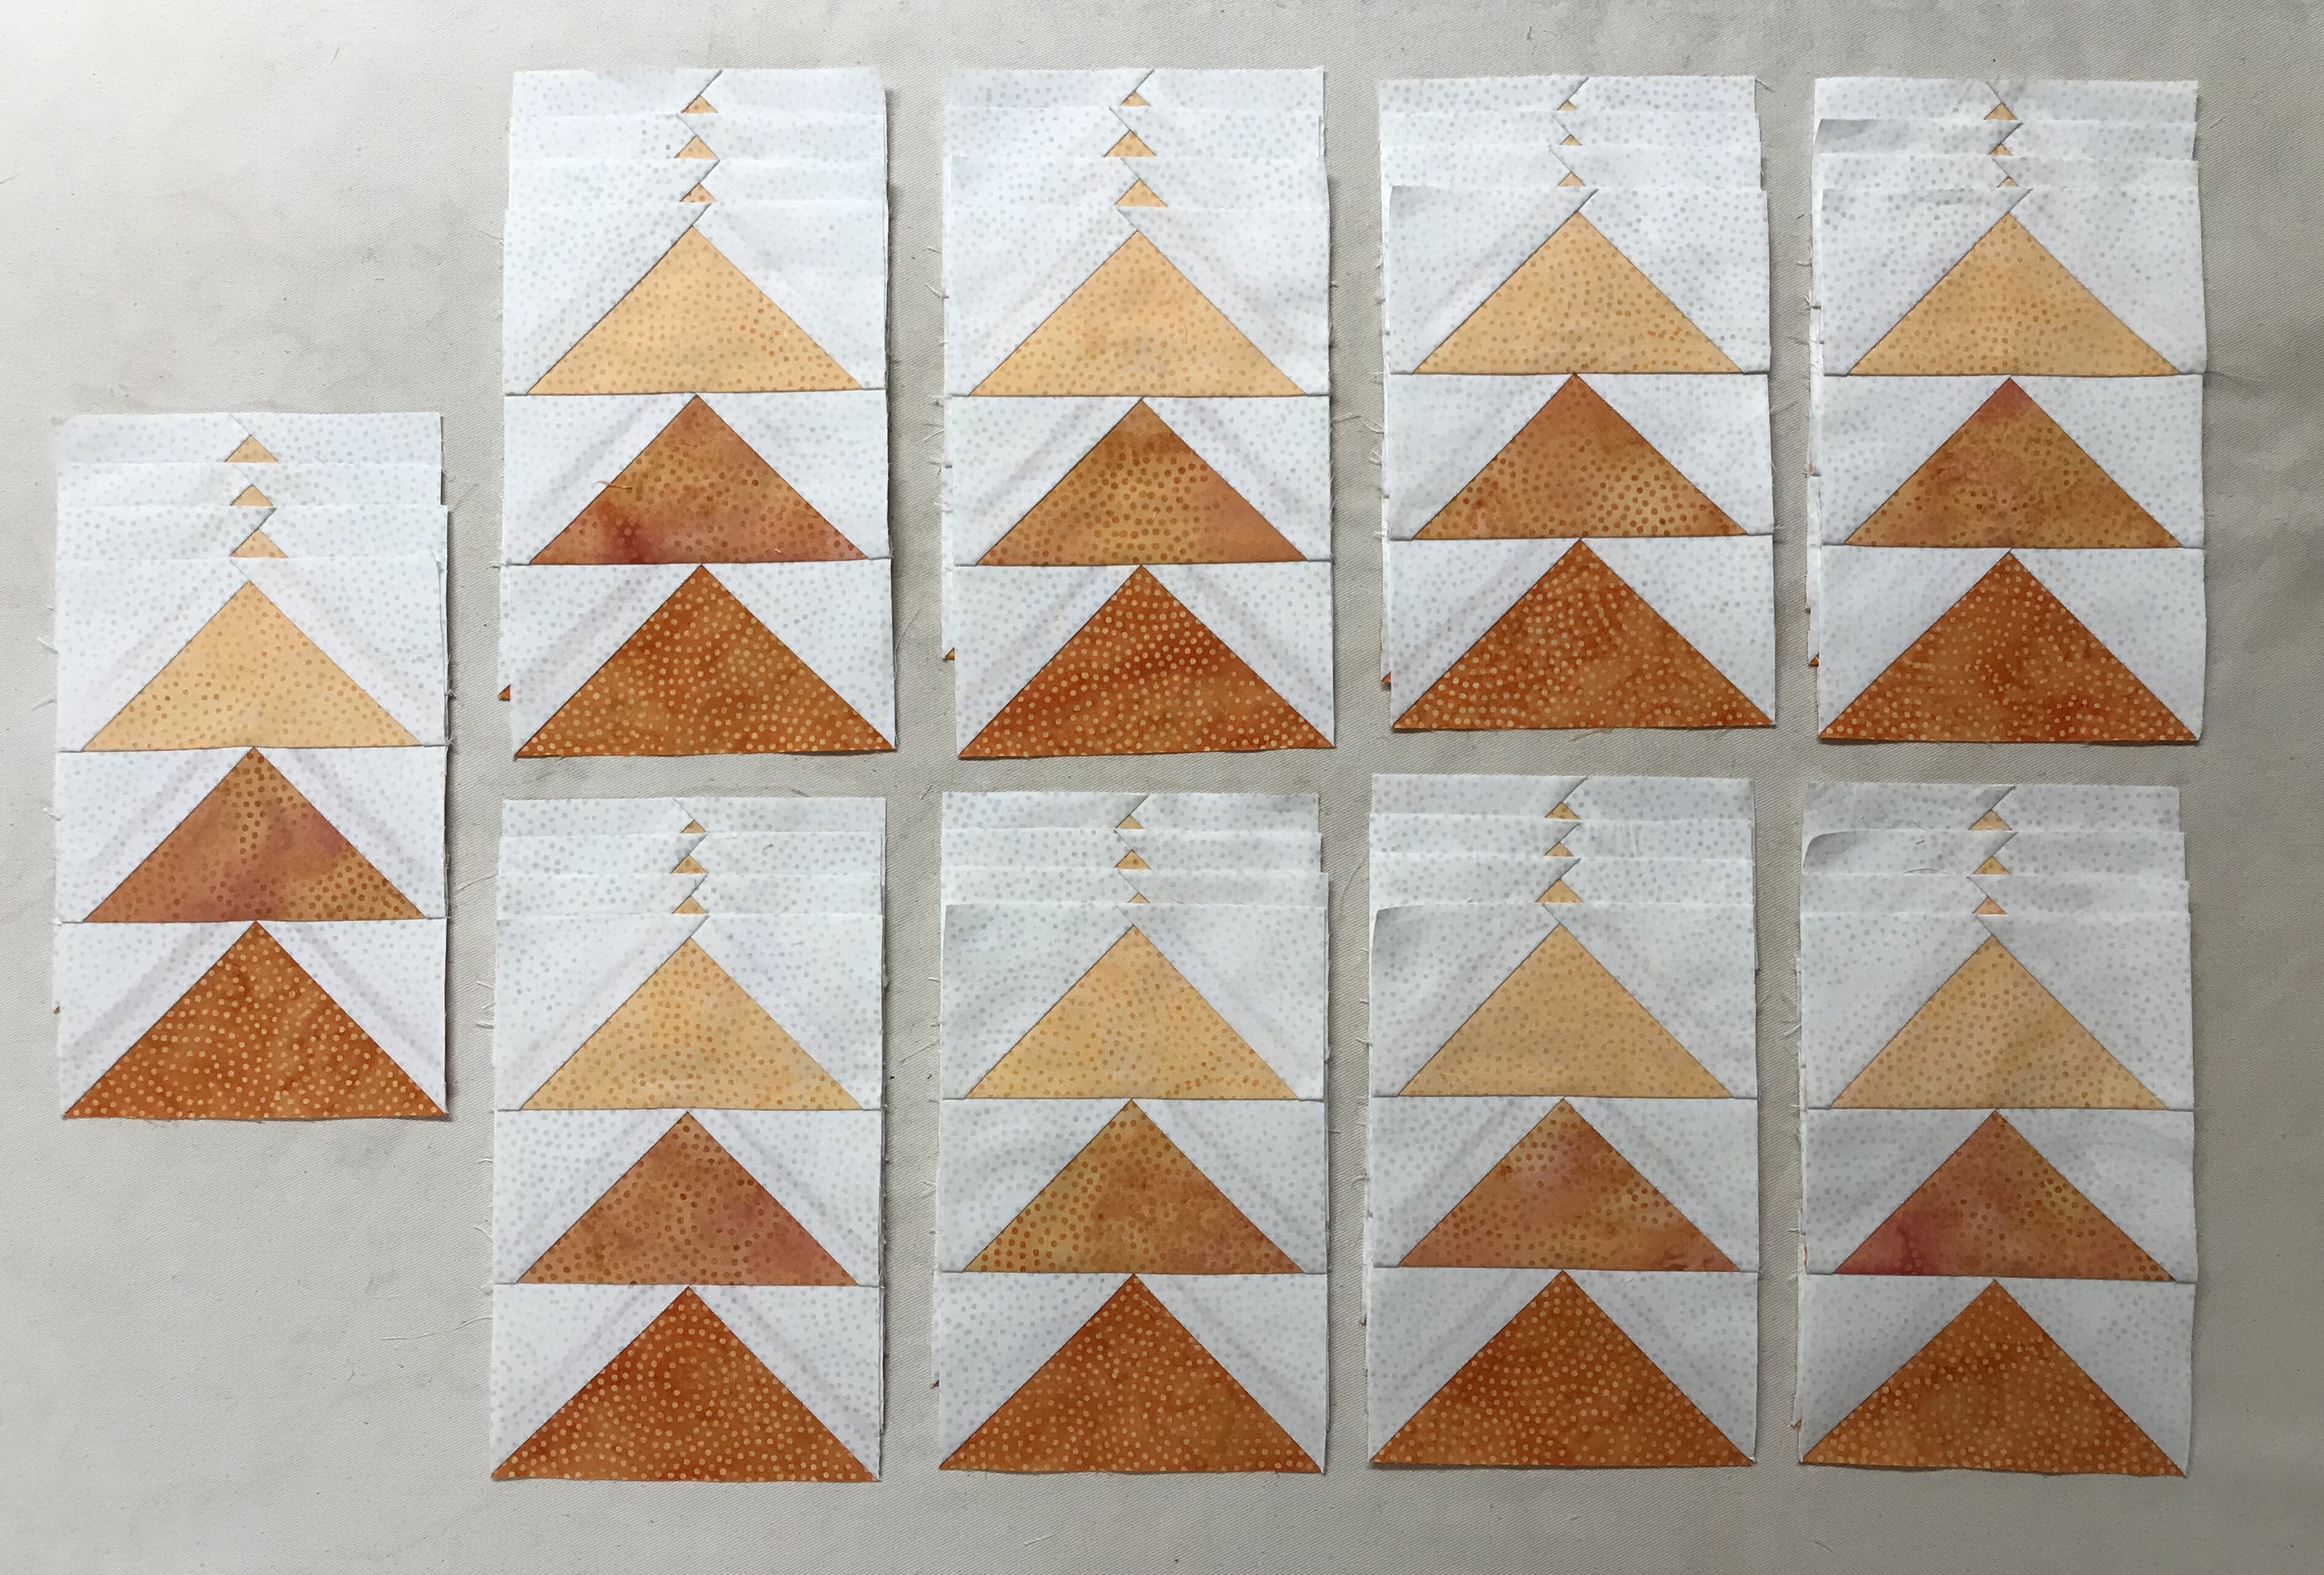
I chose to use the fabulous fabrics from Northcott’s Canvas line.  I needed 12 graduating colors in 2 different values each.  Canvas is richly textured and has a depth of color that is gorgeous!  

Definitely use your best organizational skills when making this pattern.  Michelle has made it much easier for us to conquer a storm at sea.

If you know me…you know I use paper plates to keep myself organized.  I snipped a piece of each fabric and pasted it to the paper plate, writing down all pertinent info to keep my brains from falling out.

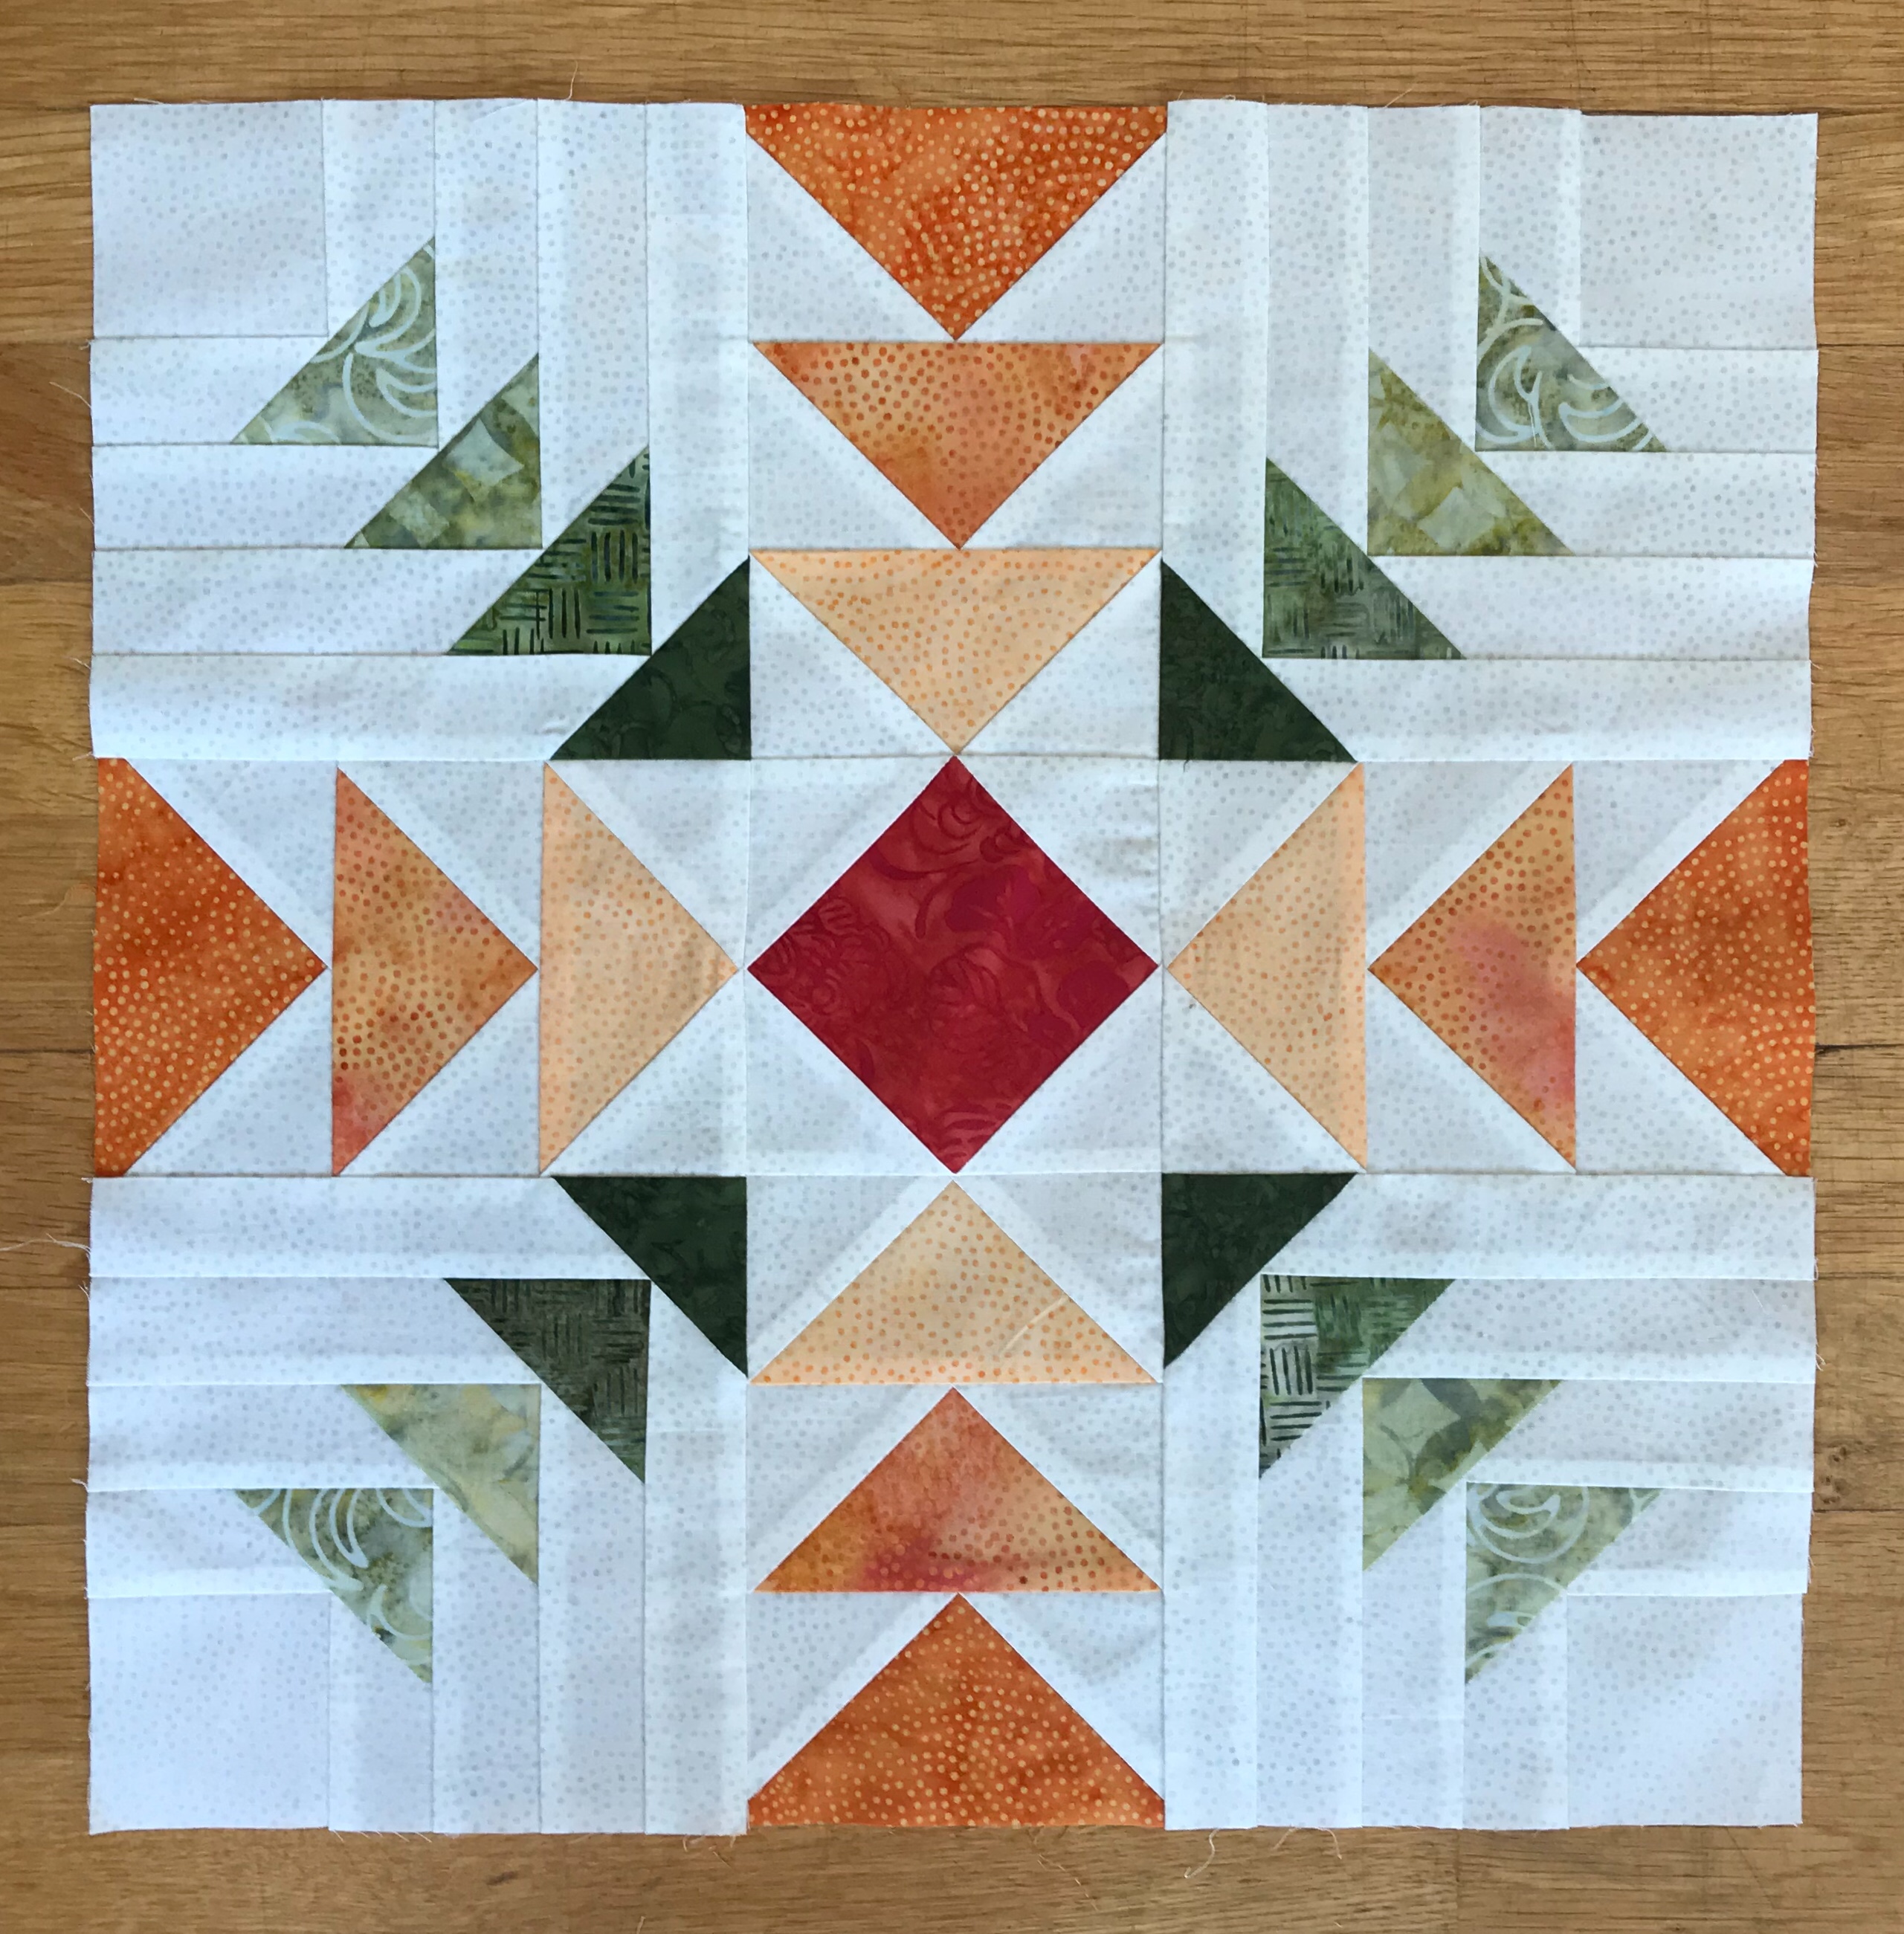
I was very fortunate to spend a few days at Bridle Creek Bed & Breakfast for an annual  mini quilt retreat with friends.  I managed to get all my diamond rects, large square/squared and small square/squared units done!

Following the pattern instructions, I laid out my units in the proper color order to achieve this beautiful flow.

I numbered my rows and pinned them together to begin stitching them together,

A little precision pinning goes a long way when it comes to nice crisp points.

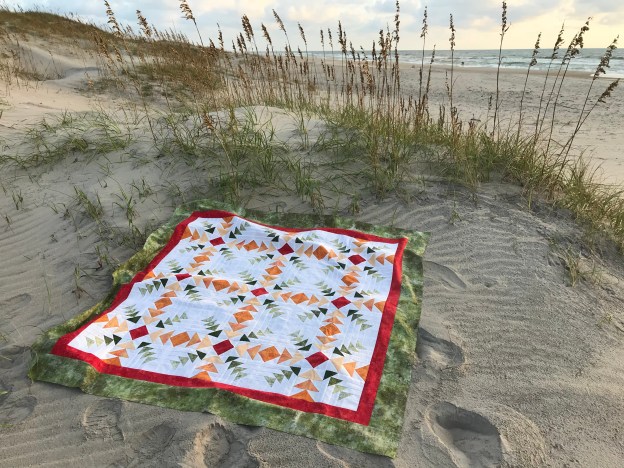
After four days of hard work I finished the top.  Thanks to Michelle’s pattern Calm Seas & Deb Tucker’s Studio 180 Design tools I have checked another awesome quilt off my bucket list!

#northcottfabrics  #NorthcottCanvas #debtucker #studio180design

Log Cabin Challenge

2a8528e9-15bc-499d-9f48-f0125510a612

The Island Batik challenge for November is to incorporate a log cabin block or variation into my project.  I decided to use Studio 180 Design’s Geese on the Edge Technique Sheet.  This is a variation on the Log Cabin block and is a fun way to use your Square/Squared tool, Tucker Trimmer I & Wing Clipper I.

img_1664

My beautiful Island Batik fabrics from left to right:  Mr. T Blocks: Arc Pine Needle, Dash-Grasshopper, Seed Circle Custard, Arc Waves Grasshopper, & Sprinkles Playful Pachyderm, & Paisley Dot: Apricot, Candy Corn, Nasturtium, & Item number 121412189.

I have named my original design “Converging Geese” because each block has Flying Geese & Geese on the Edge units, along with Square/Squared units.

img_1725

Each 16″ block contains 12 – 2″ x 4″ finished flying geese, 4 – 6″ finished geese on the edge & 1 square/squared unit.  These Geese on the Edge units are soooo much fun to make!  The technique sheet gives instruction for making geese on the edge in 10 sizes from 3″ to 12″!

You begin with starter squares, add logs by chain stitching, square up two sides with your Tucker Trimmer.

Trim apart.

Using your Wing Clipper trim the corner leaving a 1/4″ seam allowance.

Add a replacement triangle and press toward the triangle.

Trim after every addition of a replacement triangle.  Add more logs.

The final trim down is performed when I have four rounds of logs for a  6″ finished geese on the edge unit.

img_1667

Stitch the flying geese units into sets containing 3 each.

img_1708

Block layout.

img_1815

I have created a down loadable pattern for Converging Geese (measures 60″ x 60″) that can be purchased on my If Threads Could Talk Etsy Shop.

#islandbatik #bestofbali #studio180design #debtucker #geeseontheedge

BlockBuster #6 Rolling Stone

The Rolling Stone block is fun and easy.  You will need the 06 Rolling Stone Supply List and your Studio 180 Design Square/Squared tool.  All the instructions you need to make Square/Squared Units required for this block came with your Square/Squared tool.

img_5521

The Rolling Stone supply list gives you 3 different color layouts, a black line master & 3 block size choices, I decided to make a 12″ block.  Above are the 3 colors and a background fabric I chose.

Square┬▓ Ruler

Your Square/Squared tool has three different sections:  1. Size Chart for Triangles, 2.  Center Square Trim Down Section & 3. Unit Trim Down Section.

img_5524

Unit A:  I am making 4″ finished units, so I checked my tool (The newer Square/Squared tools has Center Square strip width requirements based on the finished size of your chosen unit). I cut one strip 3 1/2″ wide ( this is slightly wider than needed).  I’m right handed so I laid my strip horizontally on the cutting mat with the selvages to the left.  Find the correct size square in the Center Square Section.  Lay the tool on the fabric so the bottom line for a 4″ finished unit is even with the bottom edge of the strip.

img_5525

Make two cuts, once up the right side, them across the top.

img_5526

Rotate your square so it is aligned with the 4″ finished clean up lines on the tool and make one more cut up the right side as shown above. Cut four precision center squares.

img_5523

Find the Size Chart for Triangles on your tool.  For a 4″ finished unit I cut a strip 3 1/4″ wide. Cut 2 – 3 1/3″ squares for each Square/Squared unit, then cut them each once diagonally as shown above.


Position two triangles on opposite sides of the center square.  No need to fuss with matching the middles as the triangles are larger than they need to be.  Just lay the triangle down right side up and then center the center square over it eyeballing it to see if it is even on both sides.

img_5535

Stitch & press toward the triangles.

Position the two remaining triangles on the two remaining sides of the center square as shown above.  Press triangles away from the center square.

Position the Trim Down Section of your tool over the pieced unit.  Focus on aligning the “X’s” for your particular size unit over the sewn seams.  Trim two sides, then lift the tool and rotate the unit on the cutting mat.  For the second cut, position the tool on top of the unit lining up the “X’s” and also lining up the cleanup lines on the tool with the edges previously trimmed.  Repeat the steps to make 3 more Square Squared units.

Unit B:  These are basically 2 1/2″ squares sewn together.  I cut two 2 1/2″ strips of fabric and sewed them together along the length of the strips.  For this block we need four 2 patch units and one 4 patch unit. Trim the selvage off and cut 2 1/2″ wide units.  We need 6 units.

Take two units, and with right sides together, nest the seams and stitch. Swirls the center seams and press to make your 4 patch unit.

img_5522

Unit C:  For a 12″ clock cut a 2 1/2″ strip of fabric.  Then sub-cut into four 2 1/2″ x 4 1/2″ rectangles.

img_5544

Lay out your block units.

img_5545

Sew the Unit B – 2 Patches together with the Unit C – rectangles, press toward the rectangle.  Now all your units are 4 1/2″.

img_5546

Sew your Square/Squared units to your 2 Patch/Rectangle units and your 2 Patch/Rectangle units to your center 4 patch unit as shown above.

img_5549

The back of the block shows I pressed the square/squared units toward the 2 patch units, and when I joined the rows i pressed the center out towards the sides of the block.

img_5548

BlockBuster #6 – Rolling Stone.  Nice block!

Follow my blog with Bloglovin

Trim Your Trees With Tucker Tools

I love Christmas Tree quilts and wall hangings.  I’m always looking for ways to make Christmas tree quilts.  Two years ago I made “I Believe” for my youngest Granddaughter Sam’s first Christmas.

OLYMPUS DIGITAL CAMERA

I Believe

I Believe Christmas tree Quilt was made using the Studio 180 Design V Block tool and of course I had to add machine embroidery.

This year I wanted to try some new techniques.  I absolutely love this wall hanging made with the Studio 180 Design Split Rects tool.

OLYMPUS DIGITAL CAMERA

Split Rect’s Christmas Tree

This Split Rects Christmas Tree was made with 1 1/2″ x 3″ finished units, but you can change the size of this quilt by using any of the 8 sizes provided in the Split Rects instructions.

I had some lime green dupioni silk and decided to make Kermits Swamp Spruce by using all 10 sizes of my Studio 180 Design Wing Clipper 1 tool.

OLYMPUS DIGITAL CAMERA

Kermit’s Christmas Tree

As you know when making flying geese with the Wing Clipper you make 4 at a time.  So I only needed to make 3 size groups to get all 10 flying geese for Kermits Christmas Tree. These wall hanging can embellished easily by adding beads or costume jewelry. Don’t we all have Christmas pins collected over the years.

Of course if you need to whip up a gift quickly just make one set of the 5″ x 10″ flying geese and trim them down.

OLYMPUS DIGITAL CAMERA

Wing Clipper Christmas

The Wing Clipper Christmas Tree wall hanging is very quick and easy.

Just click on any of the links provided and start trimming your trees.  Please let me know if you have any questions.