Category Archives: Flying Geese

Converging Geese Zoom Class

Join me for a Converging Geese Zoom class September 15th at 11:00 AM. Sign up and download the supply list here (pattern is included with the class fee):

Register for Converging Geese Zoom Class

Converging Geese Block

I created this pattern November 2018 for an Island Batik Log Cabin Challenge. It has been a popular pattern in my Etsy Shop ever since. This is a variation on the Log Cabin block and is a fun way to use your Square/Squared, Tucker Trimmer I & Wing Clipper I tools.

I named my original design “Converging Geese” because each block has Flying Geese & Geese on the Edge units, along with Square/Squared units.

Each 16″ block contains 12 – 2″ x 4″ finished flying geese, 4 – 6″ finished geese on the edge & 1 square/squared unit. 

Converging Geese – Measures 60″ x 60″

Journeys Month 12 – Quilt Assembly

Welcome, Welcome, Welcome to Stitchin Heaven’s Journey’s BOM – Month 12! This has been a spectacular year. You all have worked so hard. Thank you to Deb Luttrell, Founder of Stitchin Heaven, Deb Tucker, Creative Kingpin of Studio 180 Design, Marie Bostwick New York Times best selling author and Jason Yenter Fabric Designer & President of In the Beginning Fabrics for making this all possible. Now to assemble your quilts!

Note: WOF stands for width of fabric. This month you will assemble your quilt top and add the borders.

Gather the following pieces:

4 Corner Sections from Month 6

Block K from Month 7

4 Middle Edge Sections from Month 9

4 Pieced Border sections from Month 11

Finishing Instructions

Step 1 – Lay out the Corner Sections, Middle Edge Sections, and Block K as shown in the diagram on page 35.

Step 2 – Stitch the sections together into rows, press the seams open. Stitch the rows together to create the quilt center.

Step 3 – Attach the 72½” Print 11 inner border strips. Find the center of the quilt and the center of the 72½” border strip. Match the center points with right sides together, pin. Match both ends of the strip with the ends of the quilt and pin in place. Ease the quilt top to match the border strip and add more pins between the others to hold the border in place as you stitch. Attach the other 72½” border to the opposite side in the same manner and press toward the inner border strip.

Step 4 – Repeat step 3 for the 75½” Print 11 border strips.

Step 5 – Attach the 75½” Print 6 middle border strips. Using two of the border strips, stitch them to the quilt in the same manner as in step 3. Press toward Print 6.

Step 6 – Stitch a Print 4 middle border corner stone to each end of the remining 2”x 75½” Print 6 borders. Press toward the middle border.

Step 7 – Attach the remining two middle border strips to the quilt as described in step 3. Make sure to nest the seams. Press toward the middle border.

Step 8 – Add the pieced borders. Start with the borders that do not have the N Units on the ends. Orient the pieced borders so that the Corner Pops are against the middle border and the points of the V Blocks are pointing away from the quilt center. Refer to the diagram. Find the center of the quilt top and the center of the pieced border. Match the centers and pin. Match each end and pin. Ease the border to match the quilt top and add more pins between the others to hold the border in place as you stitch. Stitch in place. Press toward the middle border.

Step 9 – Repeat step 8 for the other pieced borders with the N Units attached to the ends. After you have matched the centers and the ends, make sure that you nest the Corner Beam seam with the seam attaching the pieced border.

Note: We recommend that you wait to cut your outer borders to length until you can measure your quilt top. To determine your specific border length, measure the longest side of your quilt in three different places. If those measurements are different, add the three measurements together and divide by three. That will be the length that you need to cut your first two borders. Once the first two borders are attached to the quilt repeat the process for the remaining two sides.

Step 10 – Add the outer borders. Find the center of the quilt and the center of the 90½” outer border strip. Match the center points with right sides together, pin, match either end of the strip with the ends of the quilt, and pin in place. Add more pins between the others, about every 4”, to hold the border in place as you stitch. Attach the other 90½” border to the opposite side in the same manner and press toward the outer border strip.

Step 11 – Repeat step 10 for the 102½” outer border strips.

Step 12 – Finish with Batting, Backing, Quilting, and Binding! Layer quilt top with batting and backing. Baste and quilt. Bind and Enjoy!

Journeys

Thank you all so much for joining us on this Journey! Congratulations on a job well done!

Journeys Month 3 – Flying Geese

Welcome to Stitchin Heaven’s Journeys BOM Month 3. This month you will be learning to make flying geese the Deb Tucker way, using your Wing Clipper I. My helper this month is Deb Tucker herself! As always use your best cutting, stitching and pressing skills. We will be using prints 1, 2 & 5. Carefully cut your starter squares and let’s go!

Prints 1, 2 & 5

Piecing Instructions Flying Geese Construction

Step 1 – Mark Squares. Begin with one large Print 1 square and two Print 2 and two Print 5 small squares. On the wrong side of each small square, mark two stitching lines ¼” on either side of the center diagonal. I like to use my Quilter’s Magic Wand™ for this task.

Step 1

Step 2 – Position the two Print 2 small squares in opposite diagonal corners of the large square, right sides together. Nudge the small squares in toward the center a few threads from the edge of the large square and align the drawn lines.

Nudge the small squares toward the center of the large square.
Step 2

Step 3 – Stitch on the two marked lines, then cut between the stitching lines along the center diagonal of the squares. Press your seams toward the small triangles.

Tip: Stitch just inside of the drawn lines. This will give you more to trim later.
Step 3
Step 3 Cont.

Step 4 – Position two Print 5 small squares, one in each corner of your heart shaped units. Nudge these squares a few threads in from the edge of the large triangle.

Step 4

Step 5 – Stitch along the two marked lines.

Step 5

Step 6 – Cut between the stitched lines along the center diagonal of the small squares and press toward the small triangle.

Step 6
Step 6

Step 7 – Position your Wing Clipper® I tool over your unit, aligning the correct diagonal guidelines of the ruler with the seams of your unit and trim two sides. Rotate the unit 180° and align the 3½”x 6½” horizontal and vertical guide lines with the edges of the unit. Align the “X” on the Wing Clipper® I with the seam intersection of your unit and trim again. Repeat for the remaining units. You will end up with 24 geese that have print 2 on the left, label these as Unit E, and 24 geese that have print 2 on the right, label these as Unit F.

First Trim
Second Trim
4 Flying Geese

Congratulations! You have now learned to make flying geese using the Wing Clipper I.

It’s December! Time for Christmas Tree Quilts

I love Christmas & I love Christmas Tree Quilts! Over the years I have made several and decided to share some with you. Studio 180 Design tools gives you several ways to easily make Christmas Trees.

I Believe

I made this 7 years ago for my Granddaughter Samantha. I Believe uses the V Block tool. Below is the supply list:

Deck the Halls

I made Deck the Halls for Northcott Fabrics in 2019. It is made with Tucker Trimmer I & Wing Clipper I. Below is the supply list:

Split Rects Christmas Tree

The Split Rects Christmas Tree wall hanging is made with the Split Rects tool. The supply list is below:

Wing Clipper Wall Hanging

The Wing Clipper wall hanging is made with 4 Flying Geese using the Wing Clipper I. The supply list is below:

Kermits Christmas Tree

This Skinny Christmas Tree was made using all 10 sizes the Wing Clipper I makes. Supply List is below:

Happy Holidays everyone!

Deck the Halls

I love Christmas Tree Quilts. I’m always looking for quilt blocks that look like Christmas Trees.

With this block and the Deck the Halls fabric that Northcott gave me to make this quilt, I have a winner.

What can be easier than Half Square Triangles made with Studio 180 Design’s Tucker Trimmer I & Flying Geese made with the Wing Clipper I!

I love designing with EQ8. Having the option of auditioning the actual fabric I will be using is awesome!

Perfect for cuddling up under in front of a warm fire. You can make this quilt using your Studio 180 Design Tucker Trimmer I & Wing Clipper I tool instructions and these fabric requirements:

#northcottfabrics #studio180designtools #Aurifilthread #quiltersdreambatting

Whimsical and Wonky

Whimsical and Wonky

The Island Batik Ambassador’s December challenge was to create a project that is Whimsical & Wonky”.   Well, I settled on Tipsy!  My Holiday Tipsy Tree is based on BlockBuster pattern # 27 Roll the Dice .  This year I have made many quilt projects using Split Rects Units so it is only fitting I end the year with Split Rects.

img_2060

For this quilt I used Island Batik’s “Alpine Jungle” line of beautiful batiks.  I also used Studio 180 Design Split Rects, Square/Squared, Wing Clipper I & Lemoyne Star tools.  I chose four different green fabrics, 9 for block centers.

Cut your elongated triangles according to the Split Rects tool instructions.

Cut your background side triangles the same way.

Lay out your split rects, align and center the two pieces with just a bit of overlap at the ends. Stitch and press seams open.  I love using my “Stick Strip” for pressing seams open.

Following the tool instructions trim, rotate & trim again.

img_2047

Make the 9 Square/Squared units following the Square Squared tool instructions.  I chose 9 different unit centers but you could make them all one color if you like.  Each side of the square/squared unit will be different to match the fabric used for the split rects units.

Lay out your units as they will be stitched.  Choose a square/squared unit for the center, rotating the square/squared unit so the side triangle matches the same fabric used in the split rects unit.

img_2053

This block is constructed using a partial seam.  Place the square/squared unit right sides together with one of the split rects units being sure to match the fabrics and stitch half way down the square/squared unit.

This gives you the next complete edge to stitch another split rects to, again matching the square/squared unit fabric with the split rects fabric.

img_2063

When stitching the split rects to the square/squared unit, always place the precision cut square/squared unit on top be careful to stitch using the unit center as a guide.

Continue stitching the split rects units and complete the partial seam, pressing toward the split rects units.  Make the other 8 blocks the same way.

img_2048

Tree Trunk:  Make one set of 2″ x 4″ finished flying geese using the Wing Clipper I tool instructions.  Only 3 flying geese units will be needed.

img_2049


Tree Star:  Make the 6″ finished lemoyne star using the Lemoyne Star tool instructions.

Lay out your quilt blocks and construct the quilt center.  Once the borders are added the finished quilt measures 38″ x 38″.

Happy Holidays!

#islandbatik #thebestofbali #islandbatikambassador #alpinejungle #iloveislandbatik #debtucker #studio180design #whimsicalandwonky

BlockBuster 4 – Capital T Variation

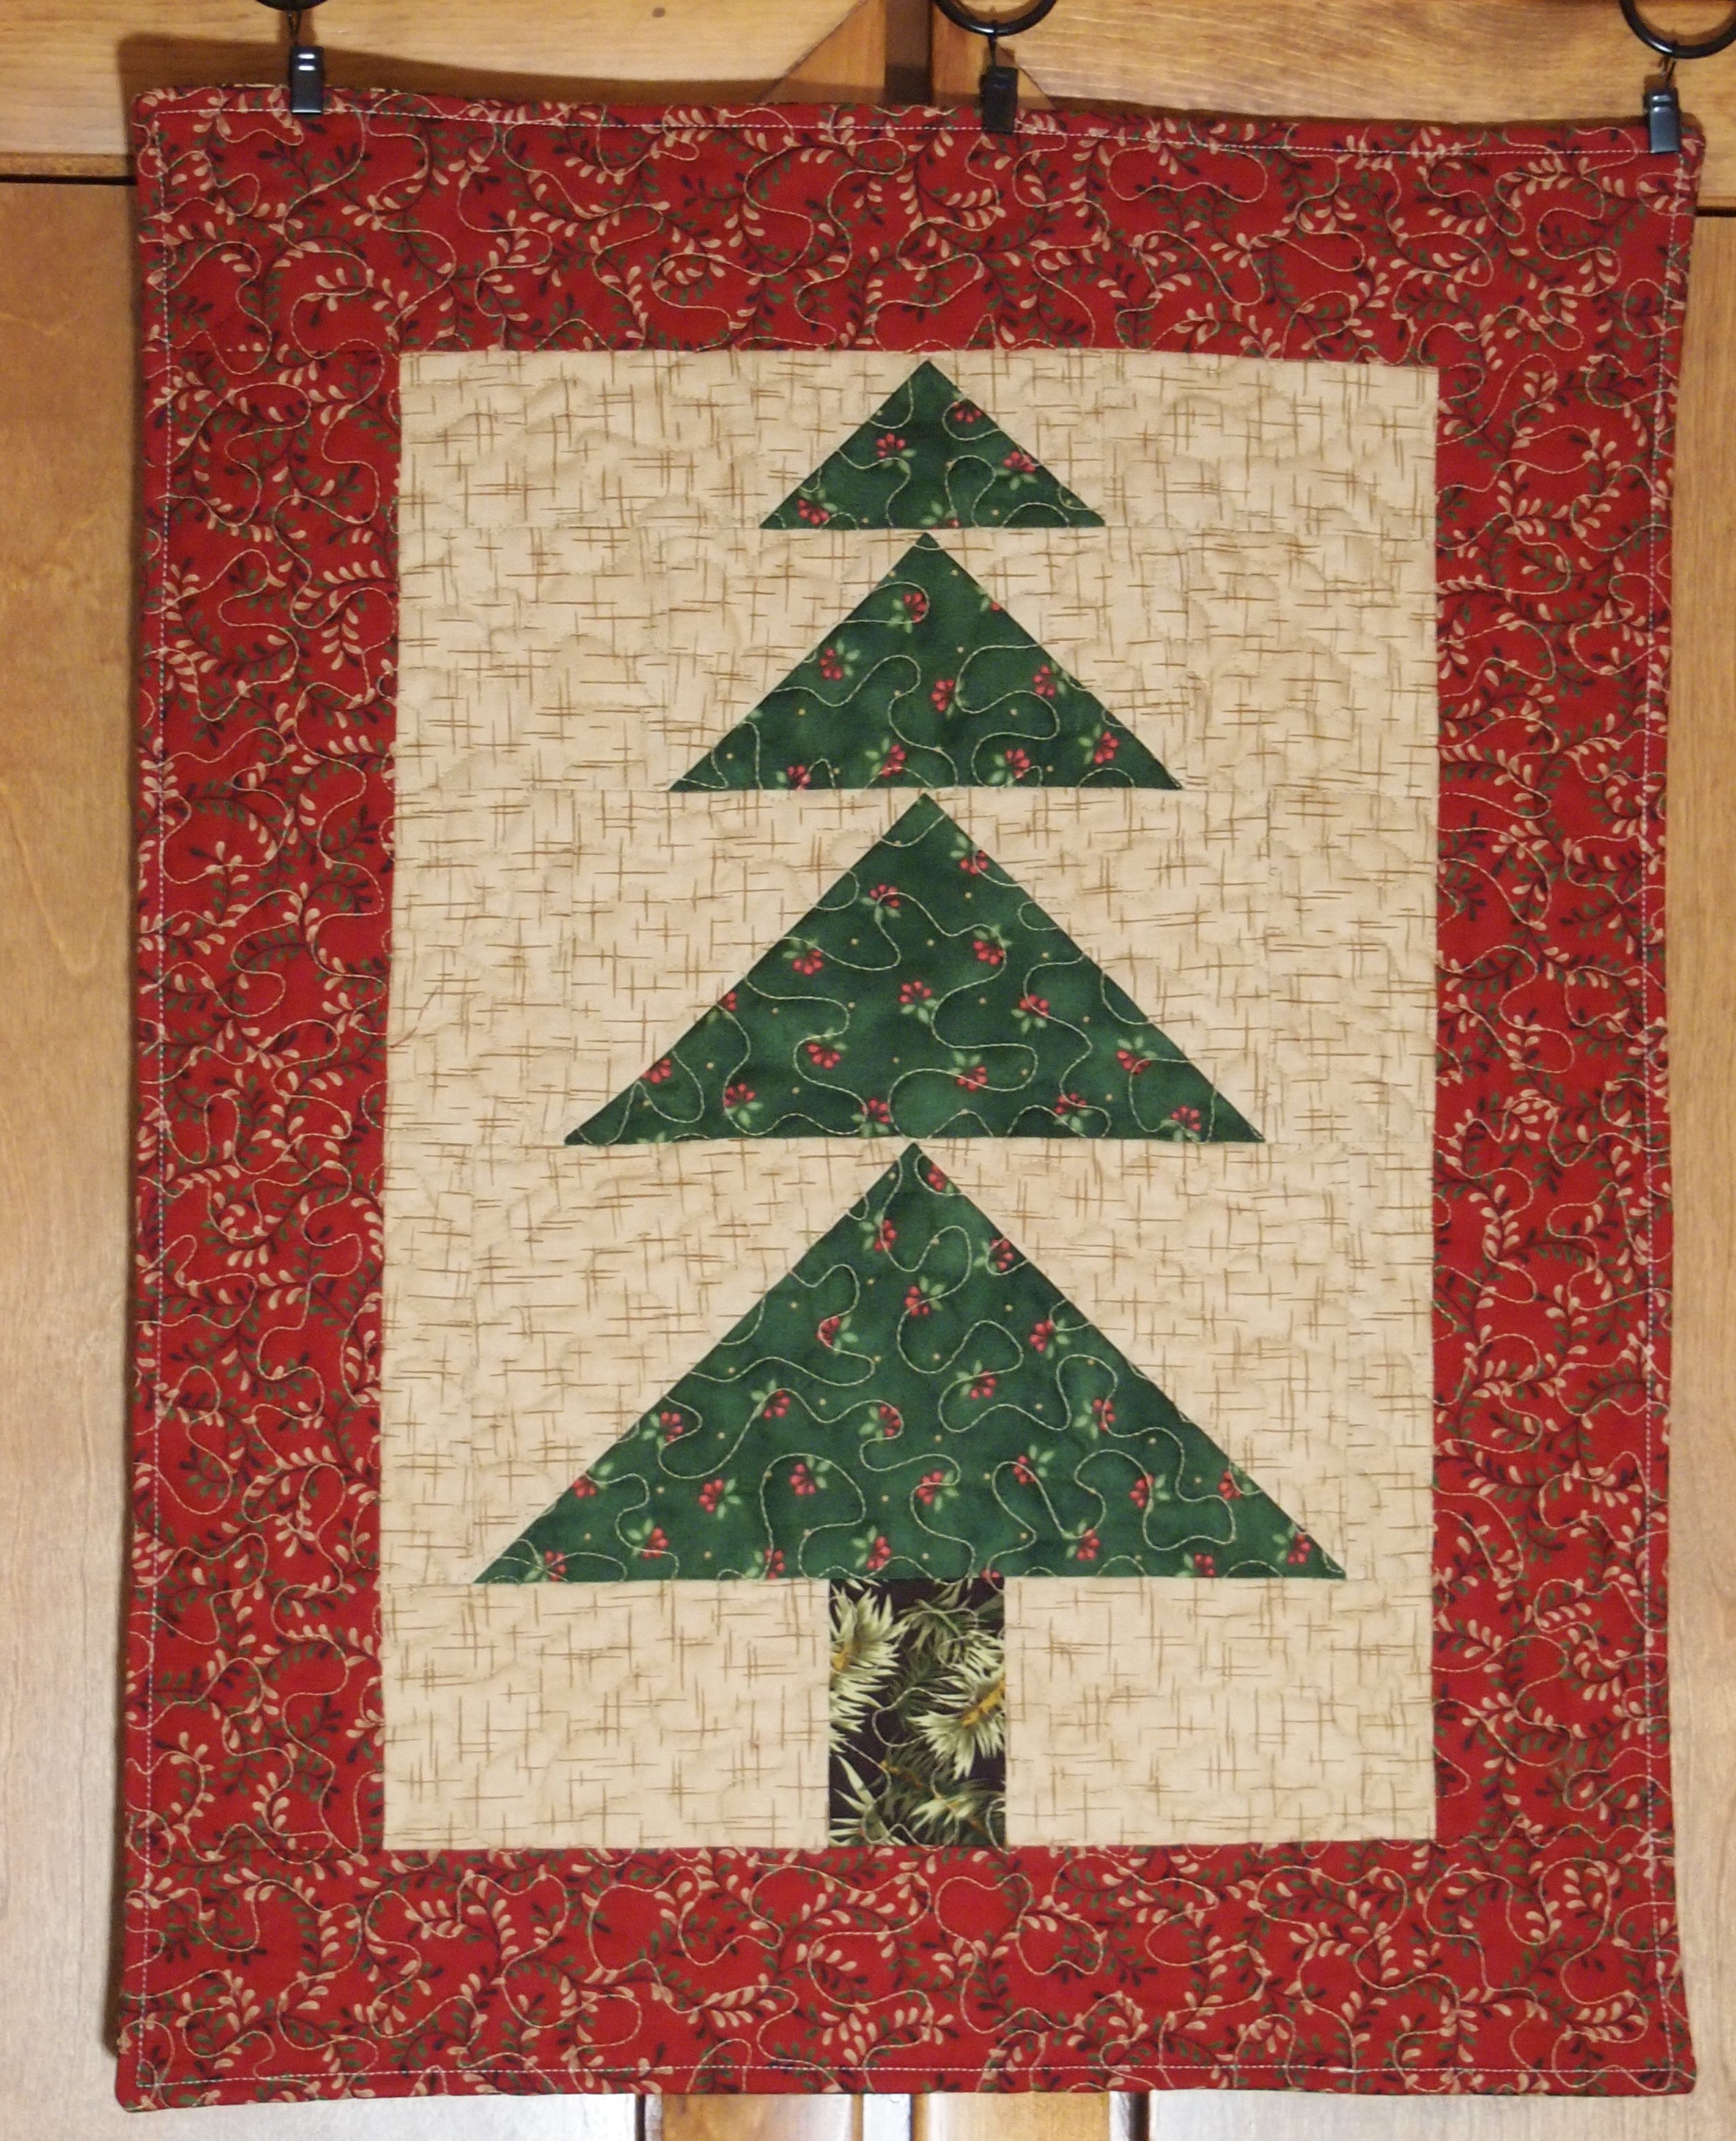
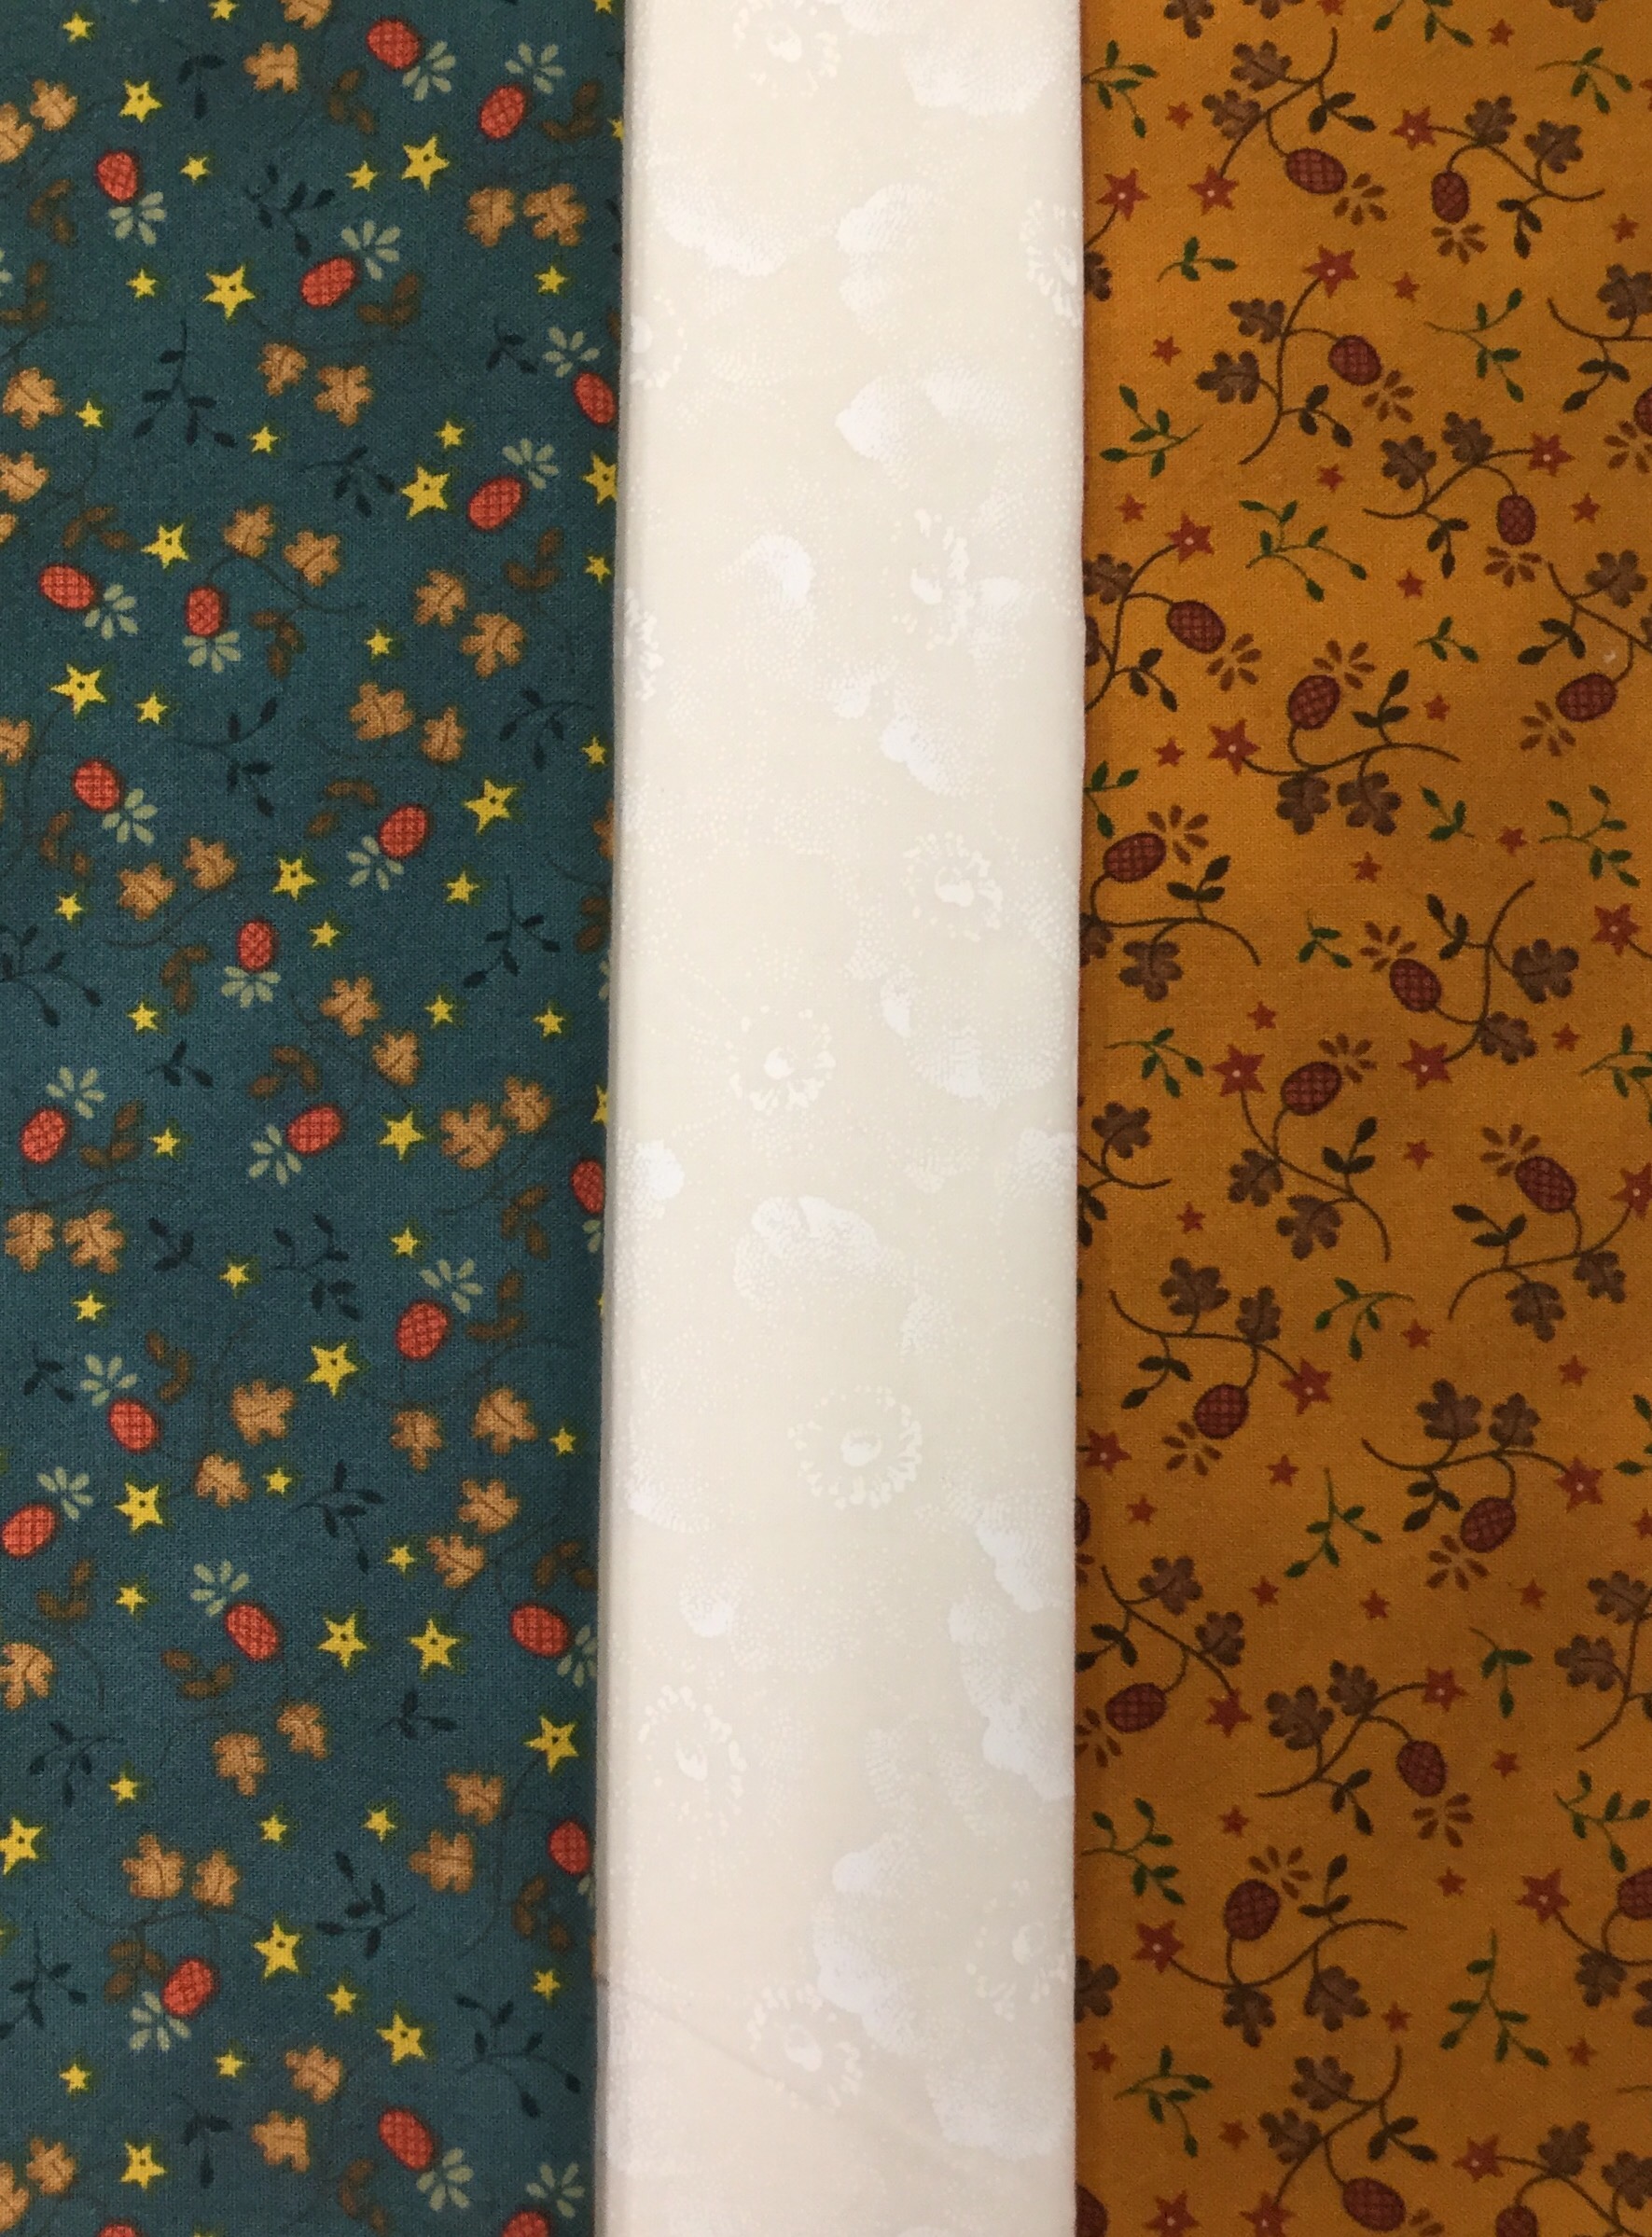
This is a great block.  04 Capital T Variation requires the use of your Wing Clipper I, & Tucker Trimmer I.  You’ll be making flying geese, combination units and quarter square triangles.  The supply list shows 3 block options. I chose the first 3 color combination because I’m using some Kim Diehl fabric with a cream background for all my BlockBuster’s so I can make them into a cohesive quilt when I’m done.  You have 3 size choices.  I chose to make mine 12″ blocks with 4″ finished units.

img_4817

All the instructions you need to make the units required for this block are with your Wing Clipper & Tucker Trimmer.  In both there are size charts that tell you what size to cut your starter squares depending on the finished or cut size of your units.  When making your block you will want to pay close attention to your color placement.

img_4818

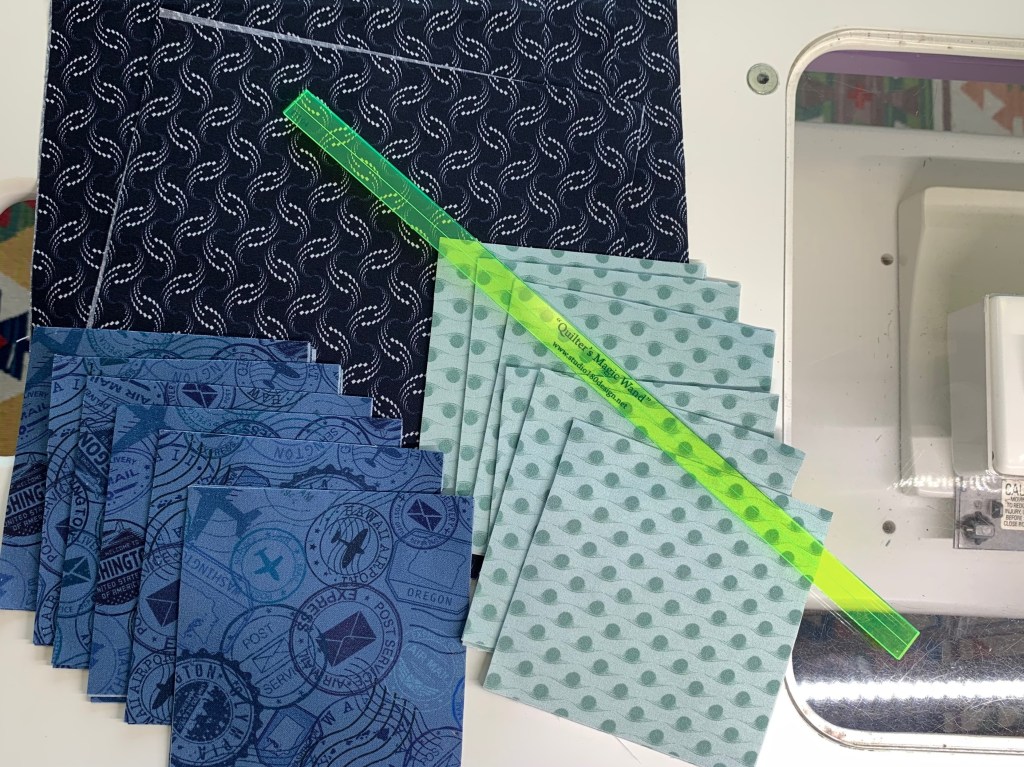
Remember when making your flying geese, your large square  becomes the body and small squares become the small triangles in your geese.  I have cut my starter squares to make 4 geese with a blue body and gold wings, and 4 geese with a gold body and blue wings.

img_4819

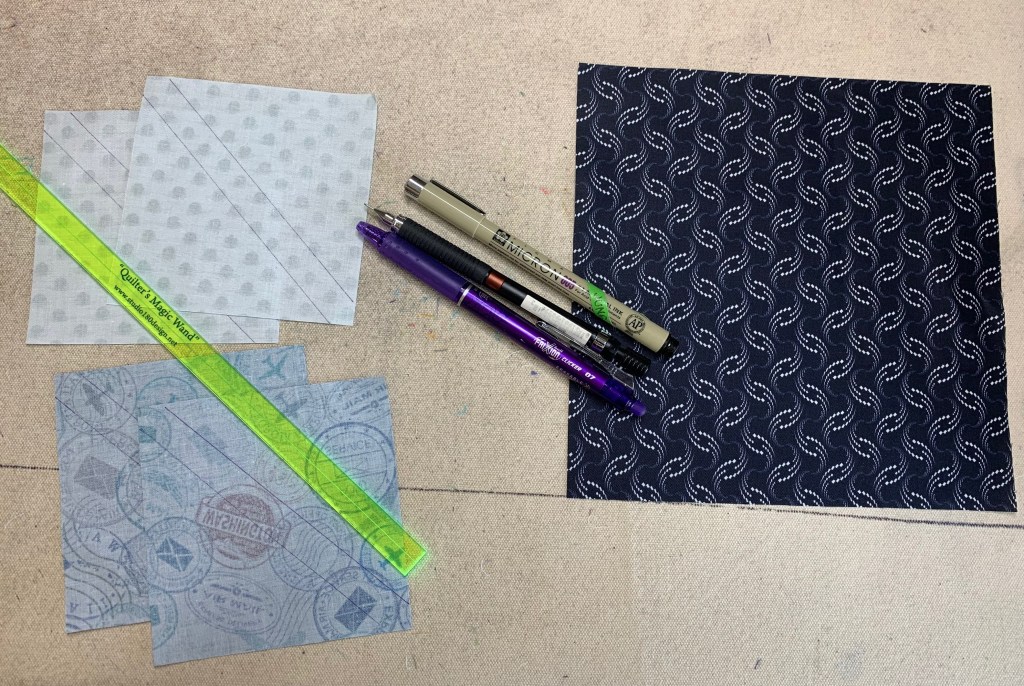
On the backs of my small squares draw 2 diagonal lines using your Magic Wand.

img_0673

Position two small squares on your large squares right sides together as shown above paying attention to your fabric choices.  Nudge your small squares in toward the center just a thread or two (about a 1/16″).  This will give more to trim off later.

img_0674

Stitch using a scant 1/4″ seam allowance.

img_0675

After stitching, cut apart.

img_0676

Press toward the small triangles. Remember “what you are pressing toward – always goes on top”!

img_0677

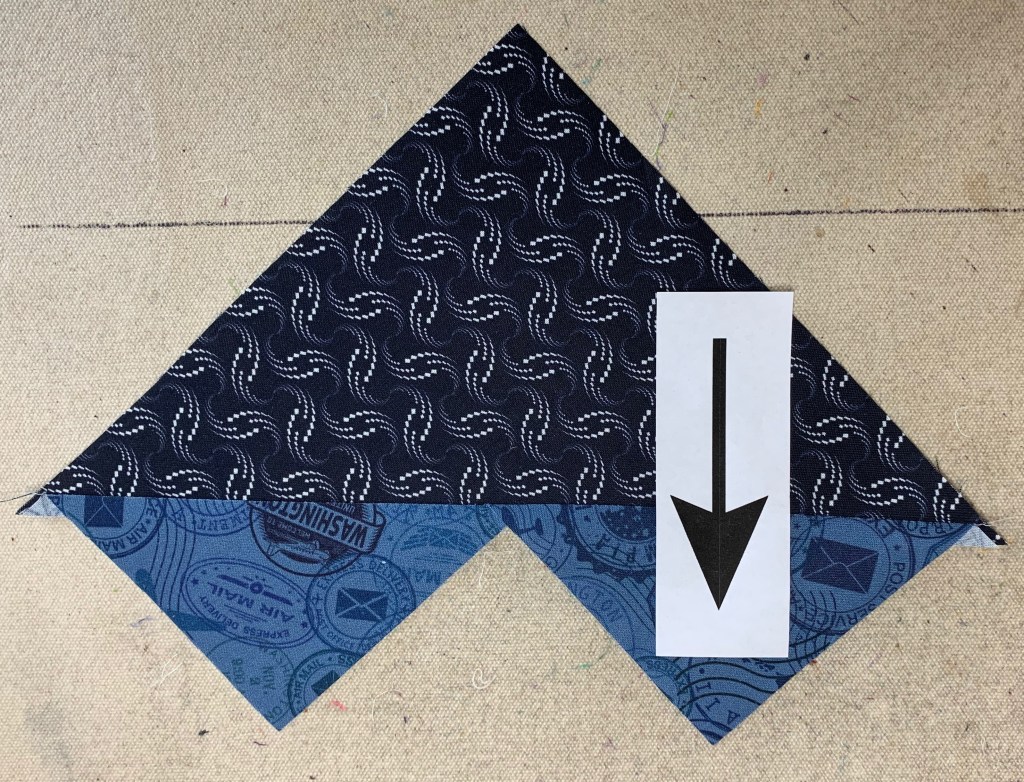
Position one small squares on the corners of the previously pieced units, nudging the squares away from the edges as before.

img_0679

Stitch using a scant 1/4″ seam allowance. Cut apart.

img_0680

Press toward the small triangles.

img_0683


Position your flying geese unit pointed toward you (left handers see your Wing Clipper instructions).  Align the diagonal lines on your tool with the seams in your unit.  As you can see I’m am making a 2″x4″ finished flying geese, so the cut size is 2.5″x 4.5″.  Trim the two sides as shown.

img_0684


Rotate your unit and reposition the Wing Clipper to align the previously trimmed edges and the X at the top with the intersection of the seams and trim again.

img_0685

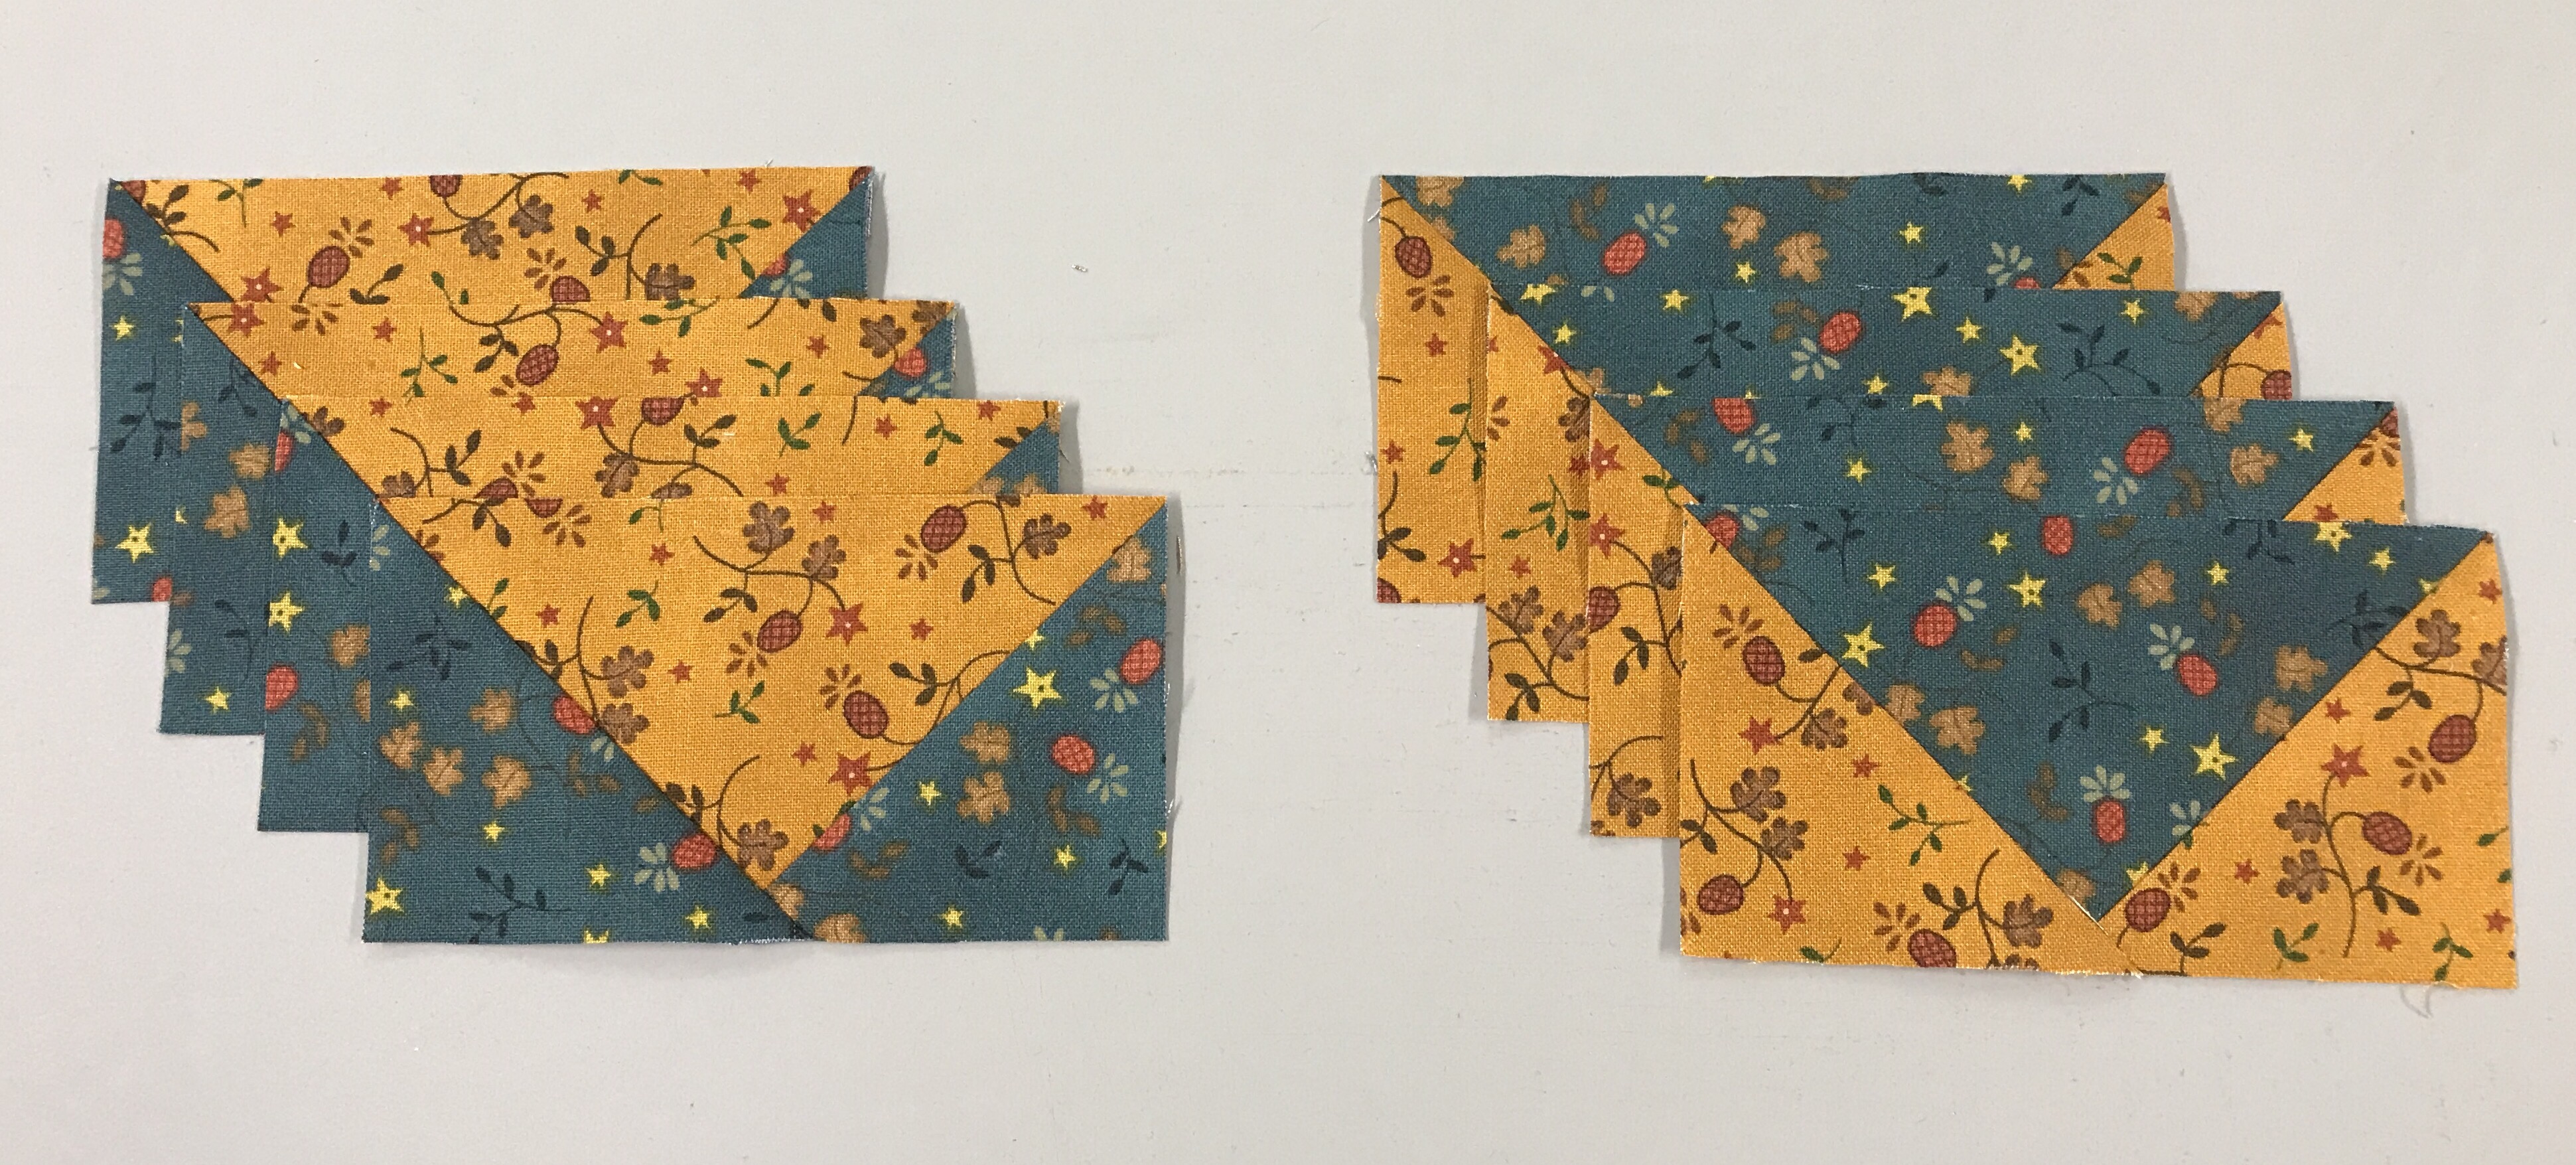
Repeat with all your flying geese units.  I now have two sets of 2.5″ x 4.5″ flying geese.

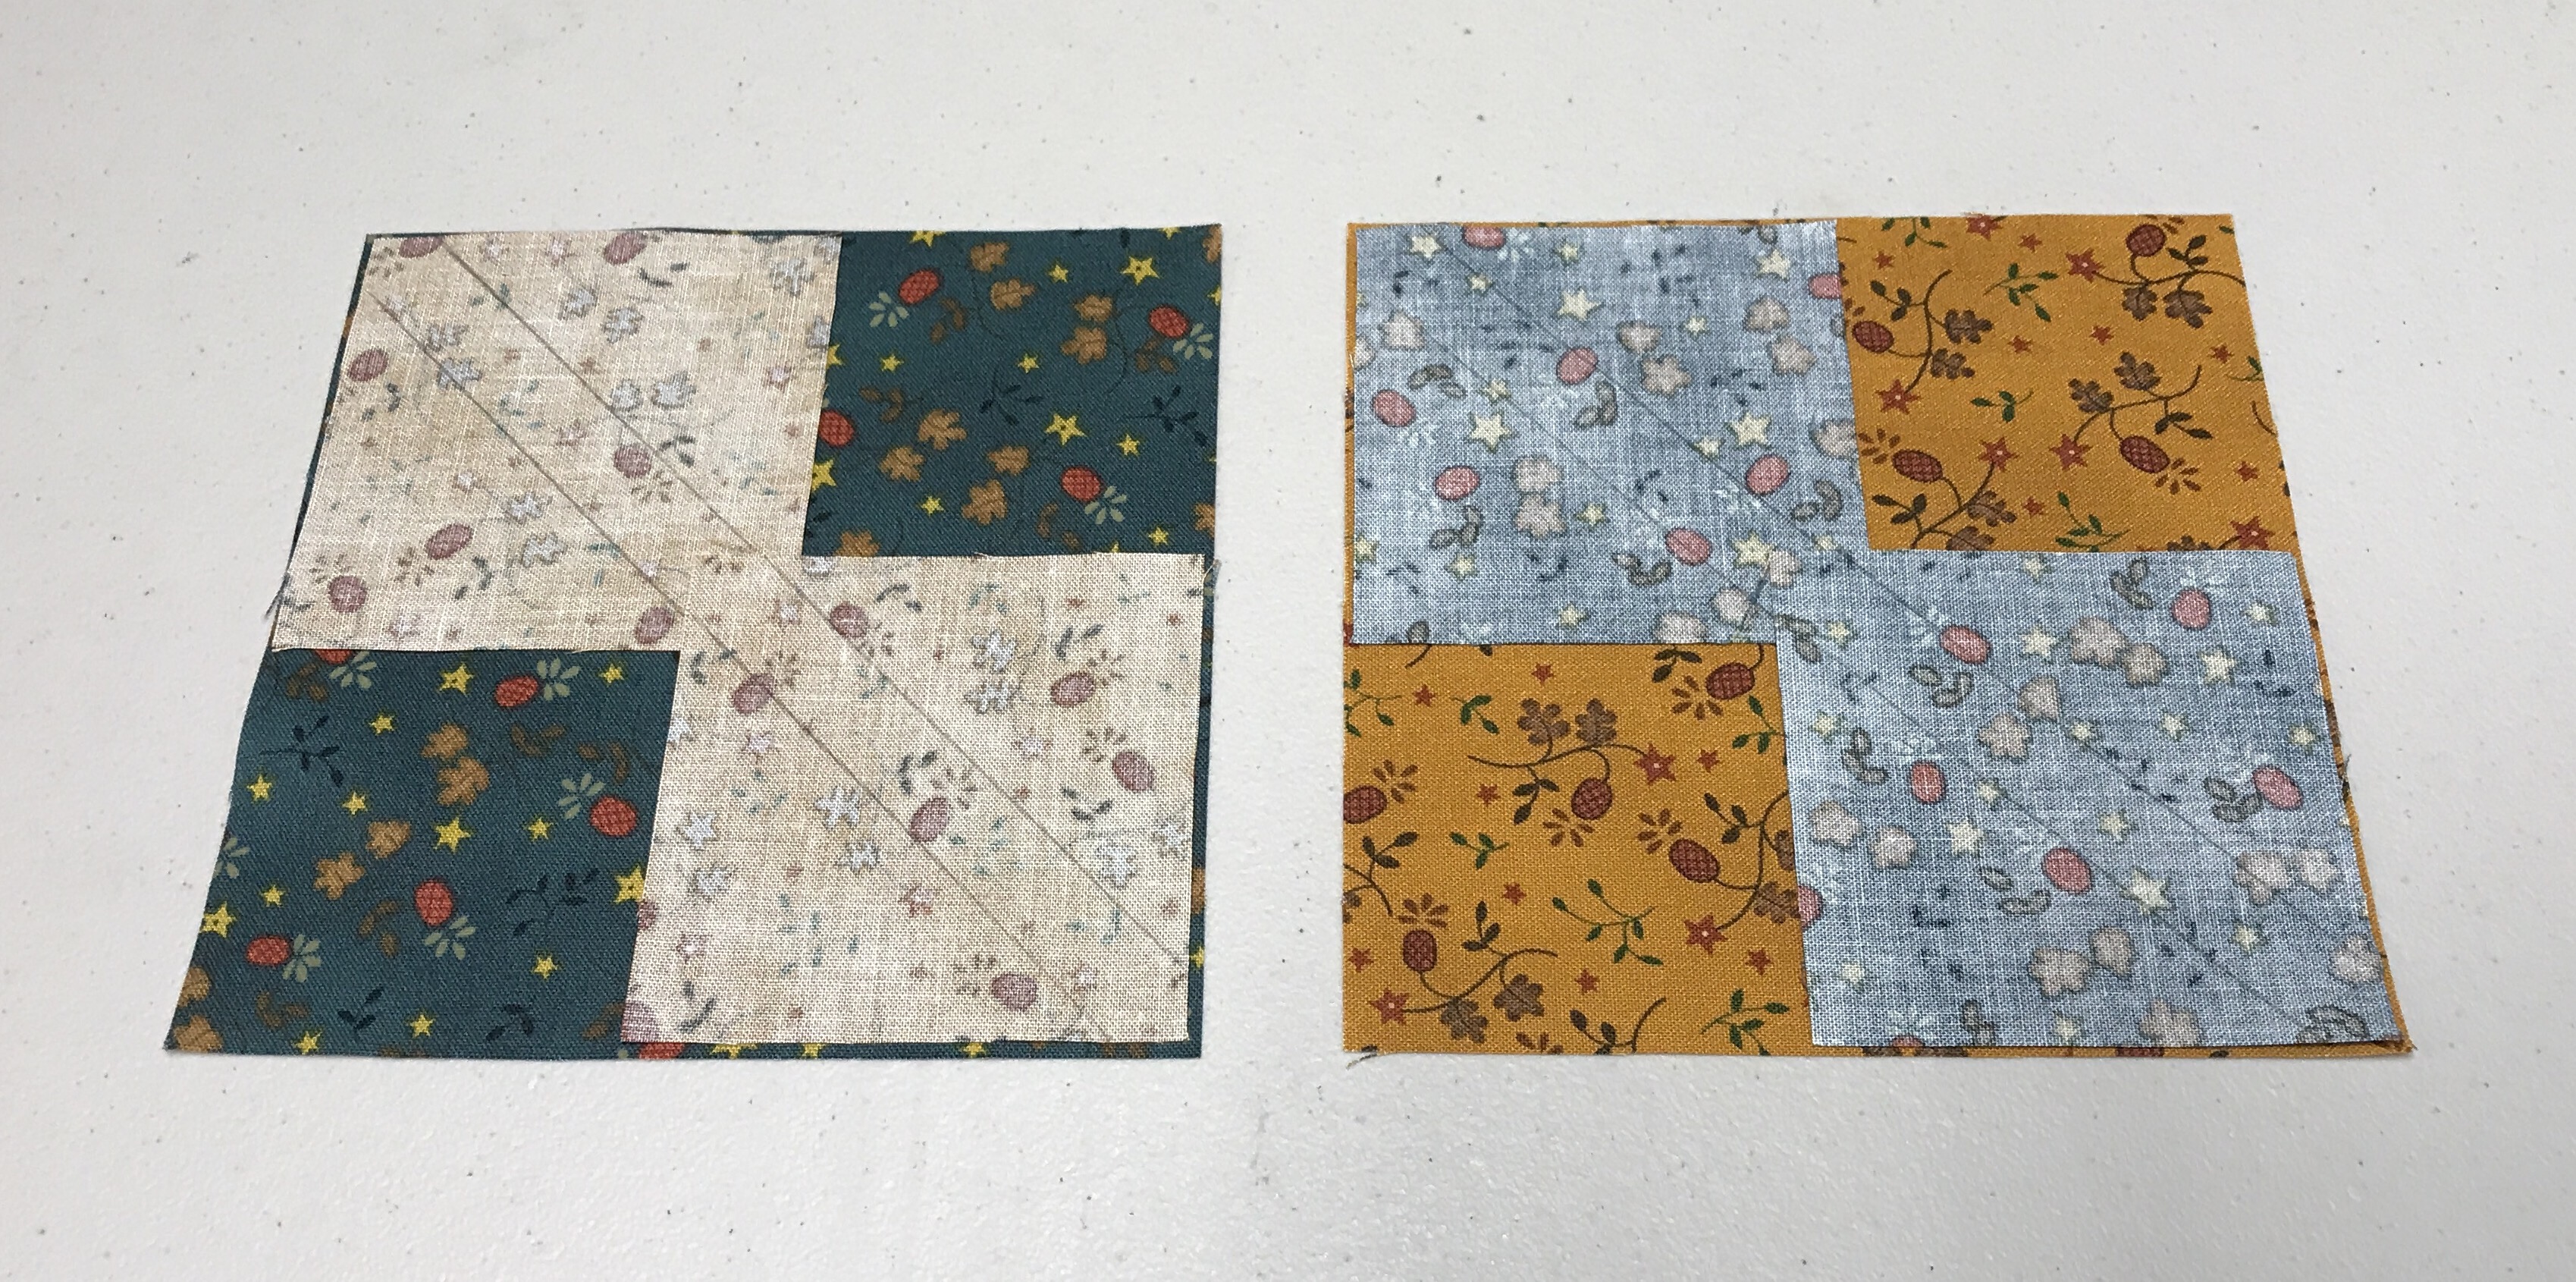
Combination Units:  after checking my size chart I know my starter squares for 4″ finished units are 5.5″.  I cut one gold, one blue and two background squares, all 5.5″.

img_0688

Combination Units start by making half square triangles.

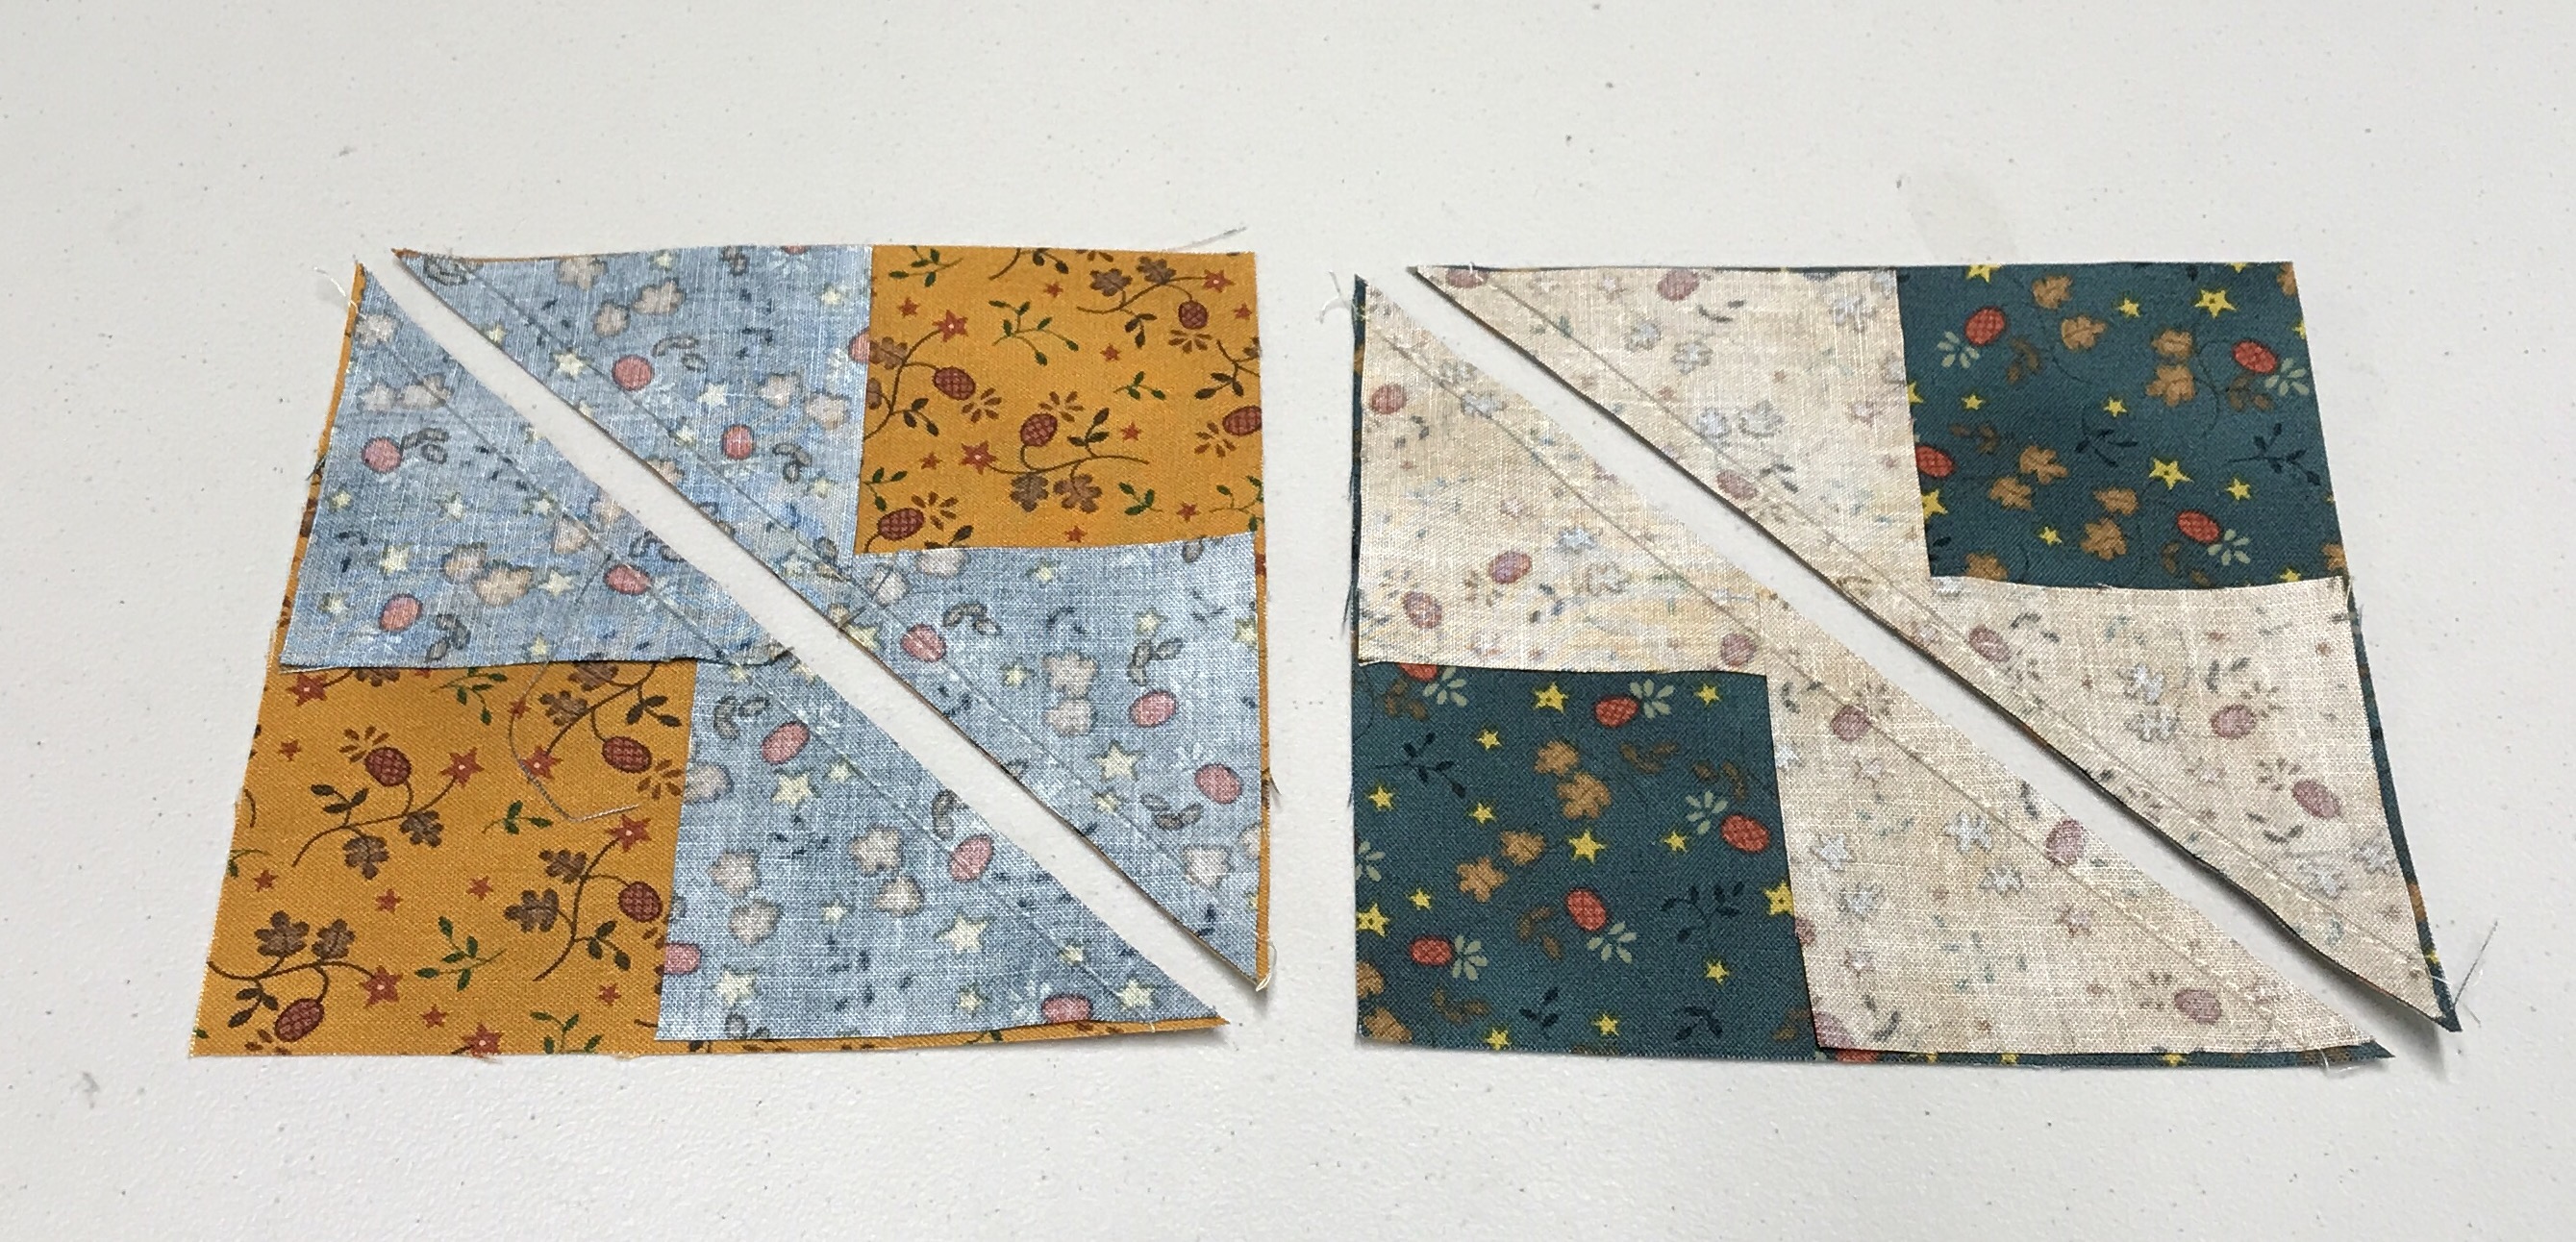
I grabed my Magic Wand and drew two diagonal lines on the back of one of my gold 5.5″ square.  Position the gold square on the blue with right sides together and align the edges.  Stitch on both lines using a scant 1/4″ seam allowance. and cut apart.

img_0691

Press toward the dark triangle.  Grab your Magic Wand again and draw two diagonal ines on the back of both Half Square triangles.


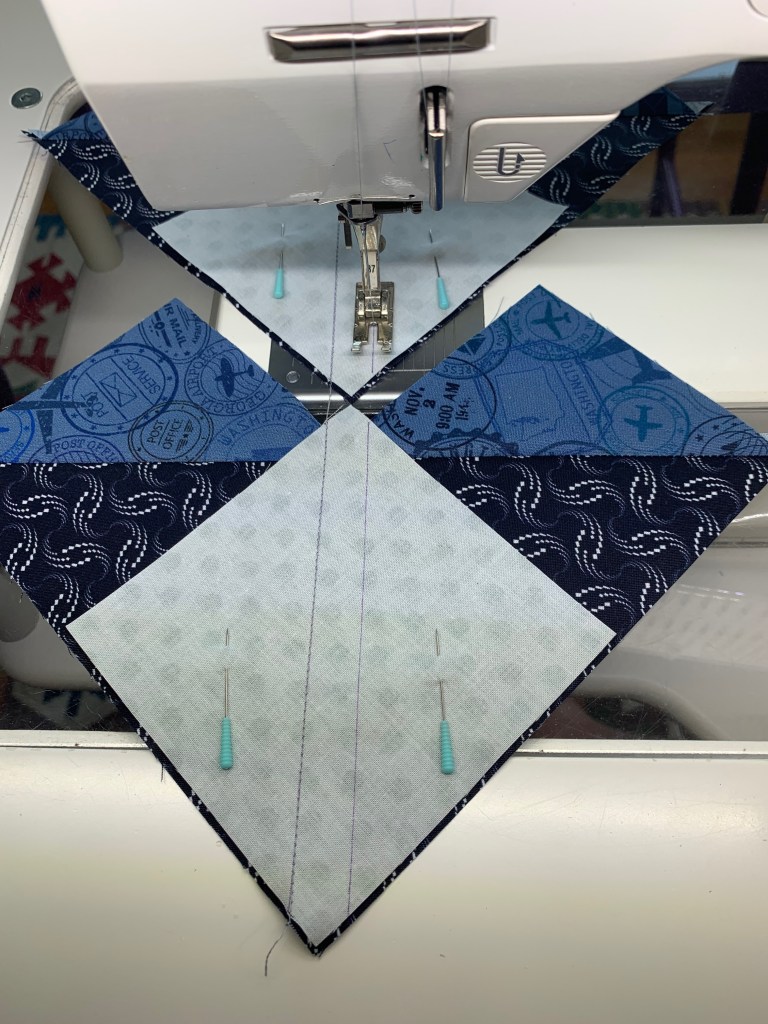
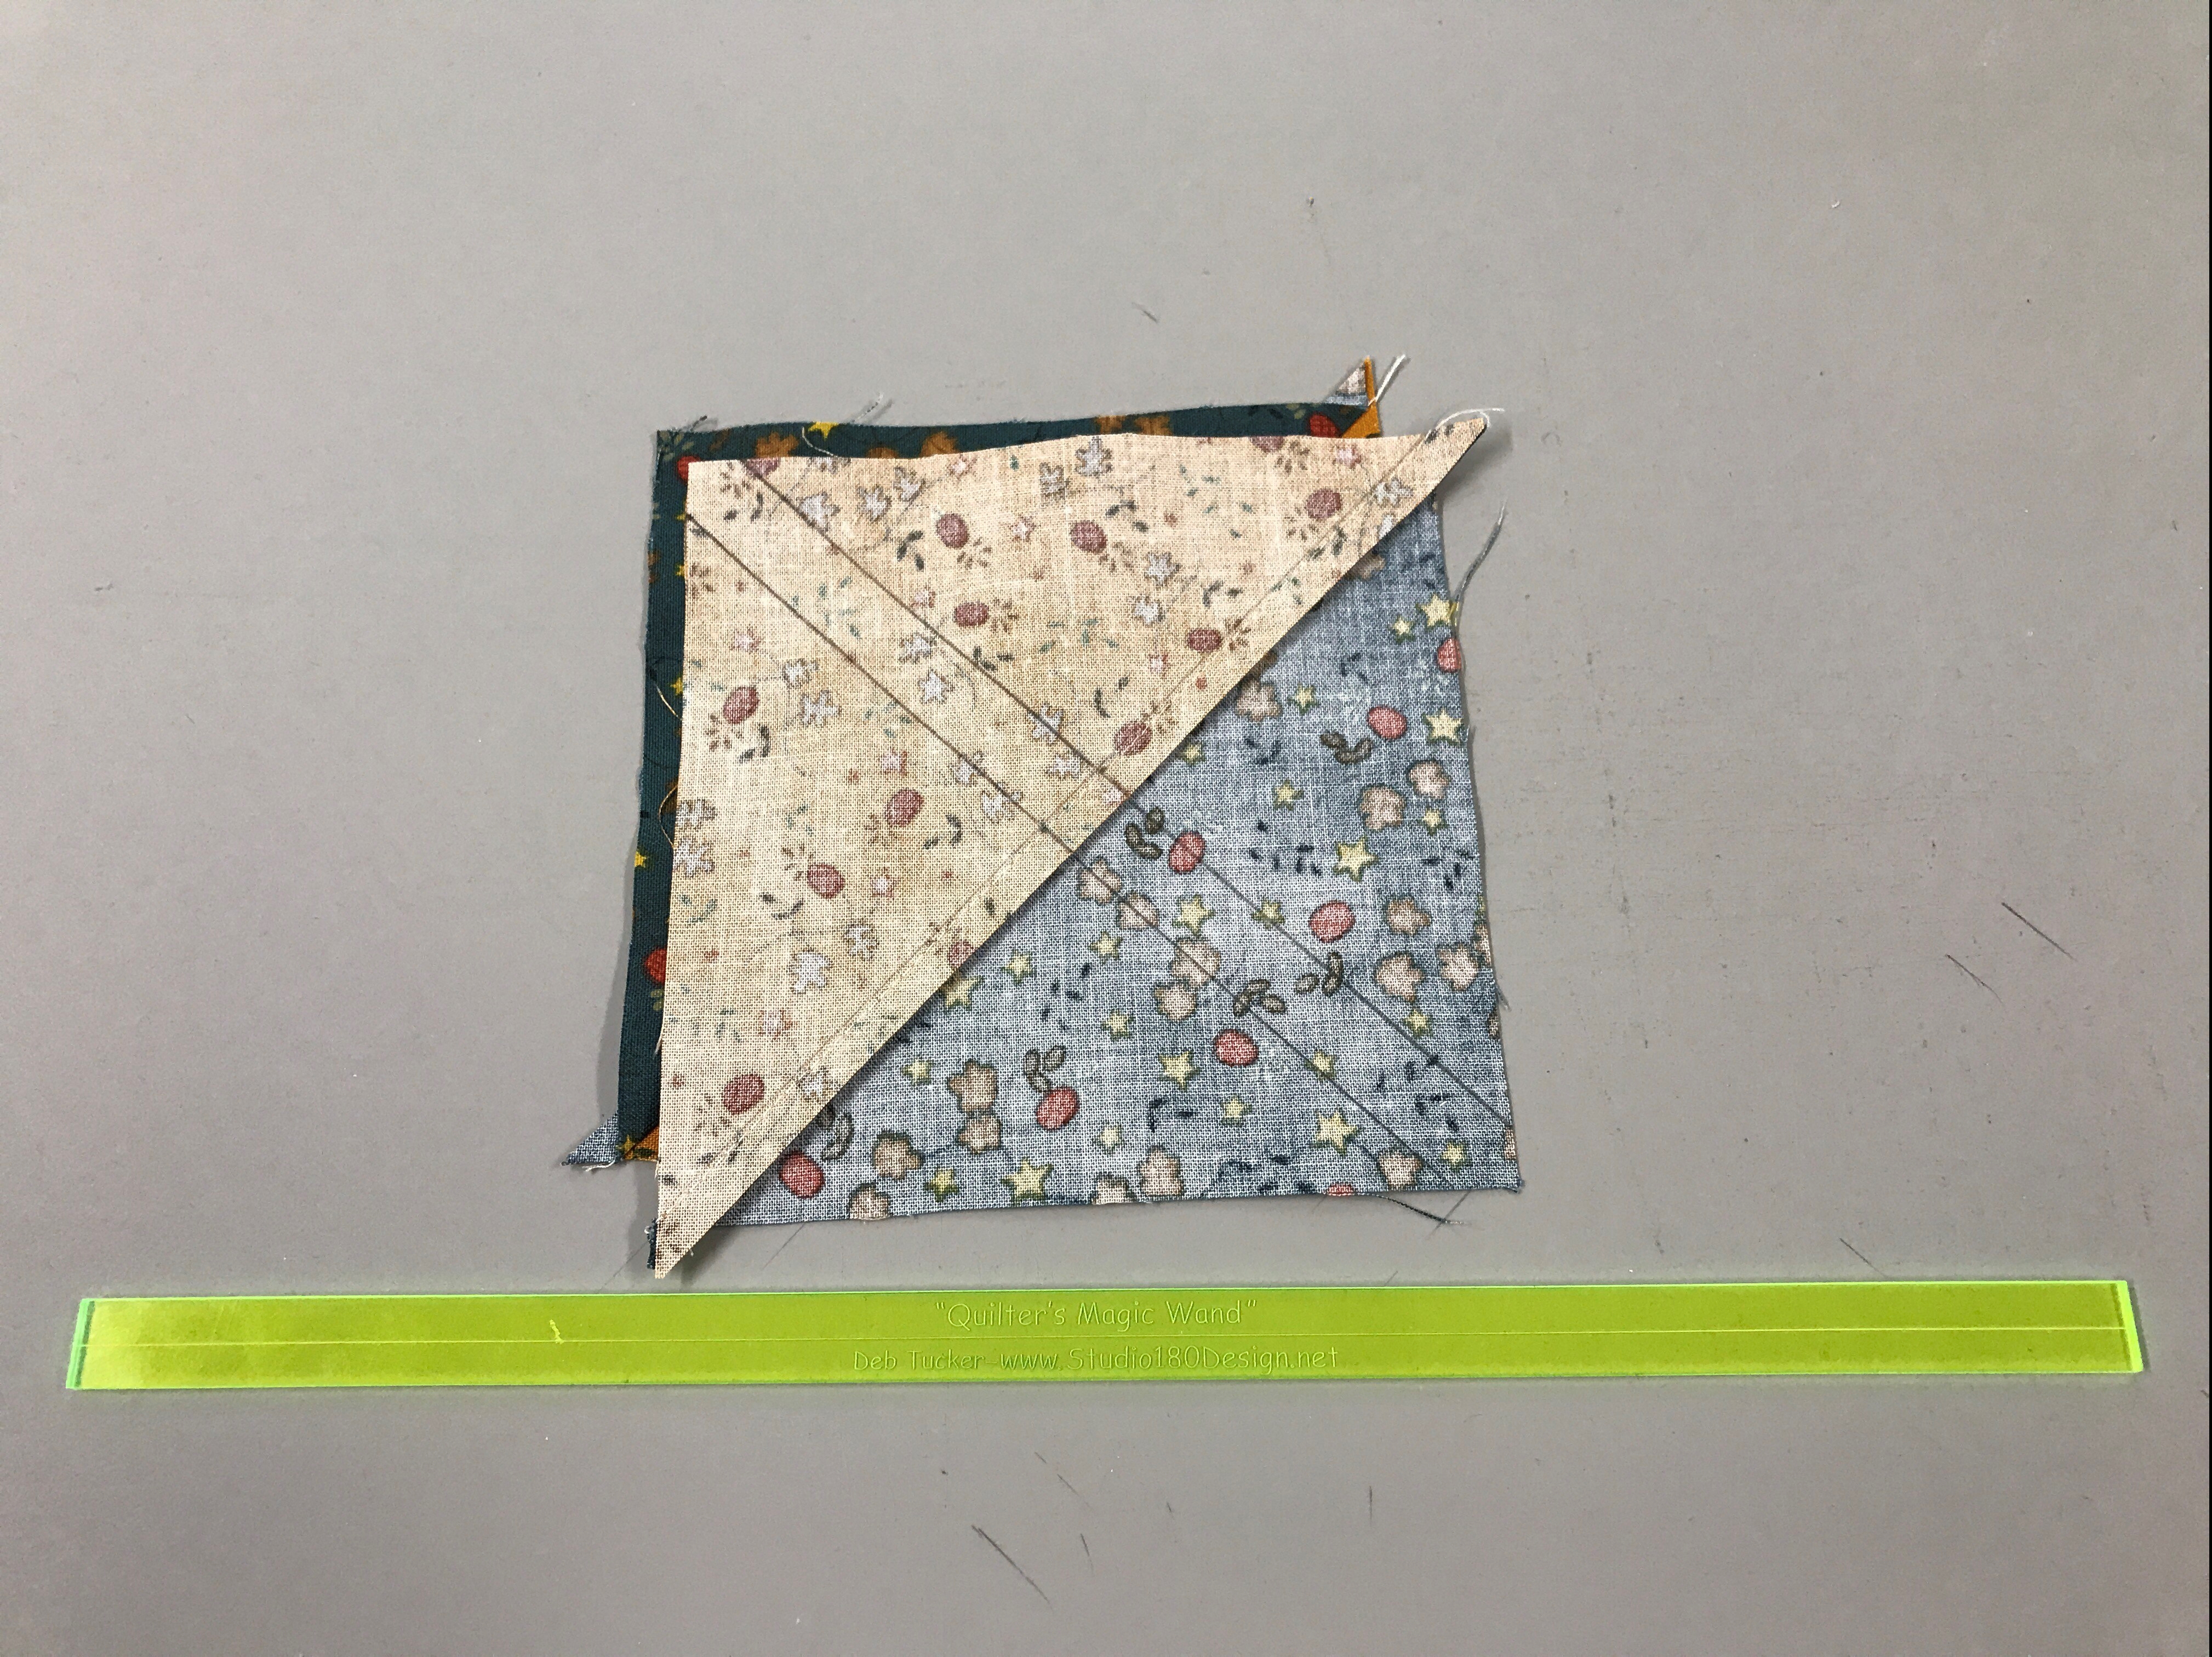
Position each half square triangle on a 5.5″ background square, right sides together centering it.  Stitch using a scant 1/4″ seam allowance. Cut apart as shown above.

img_0694


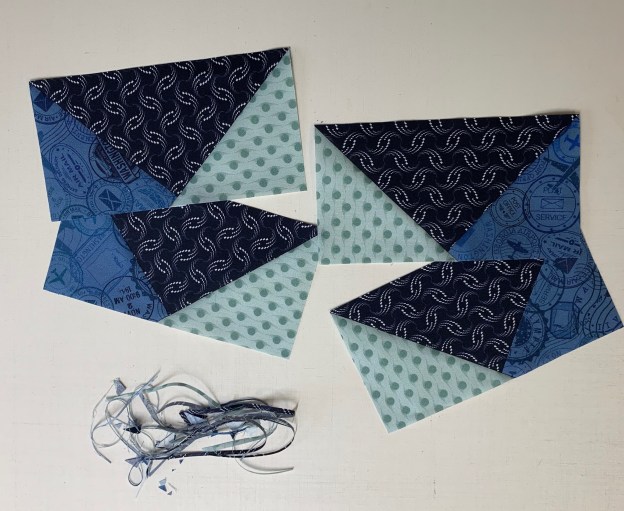
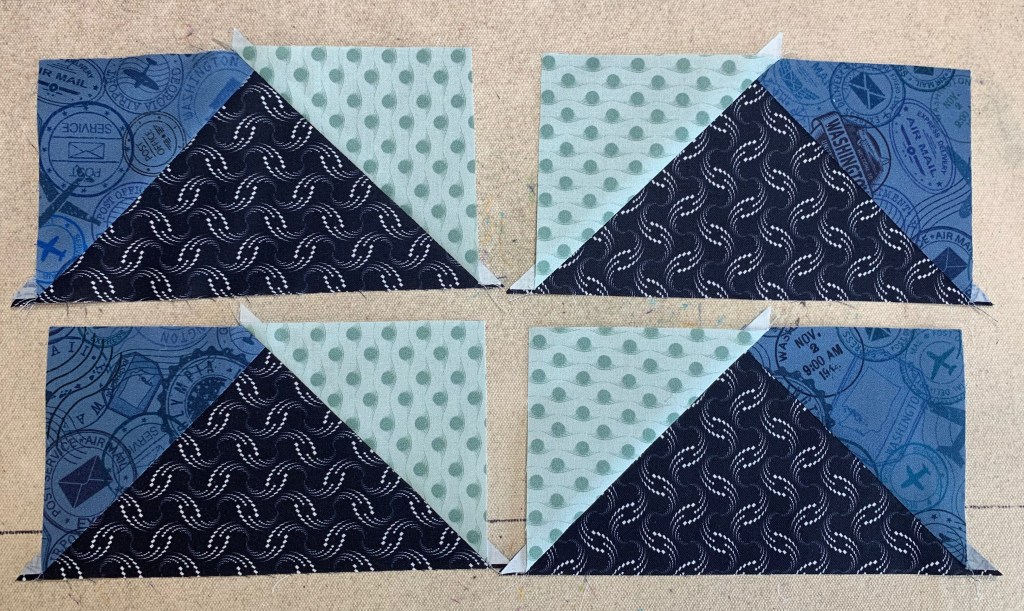
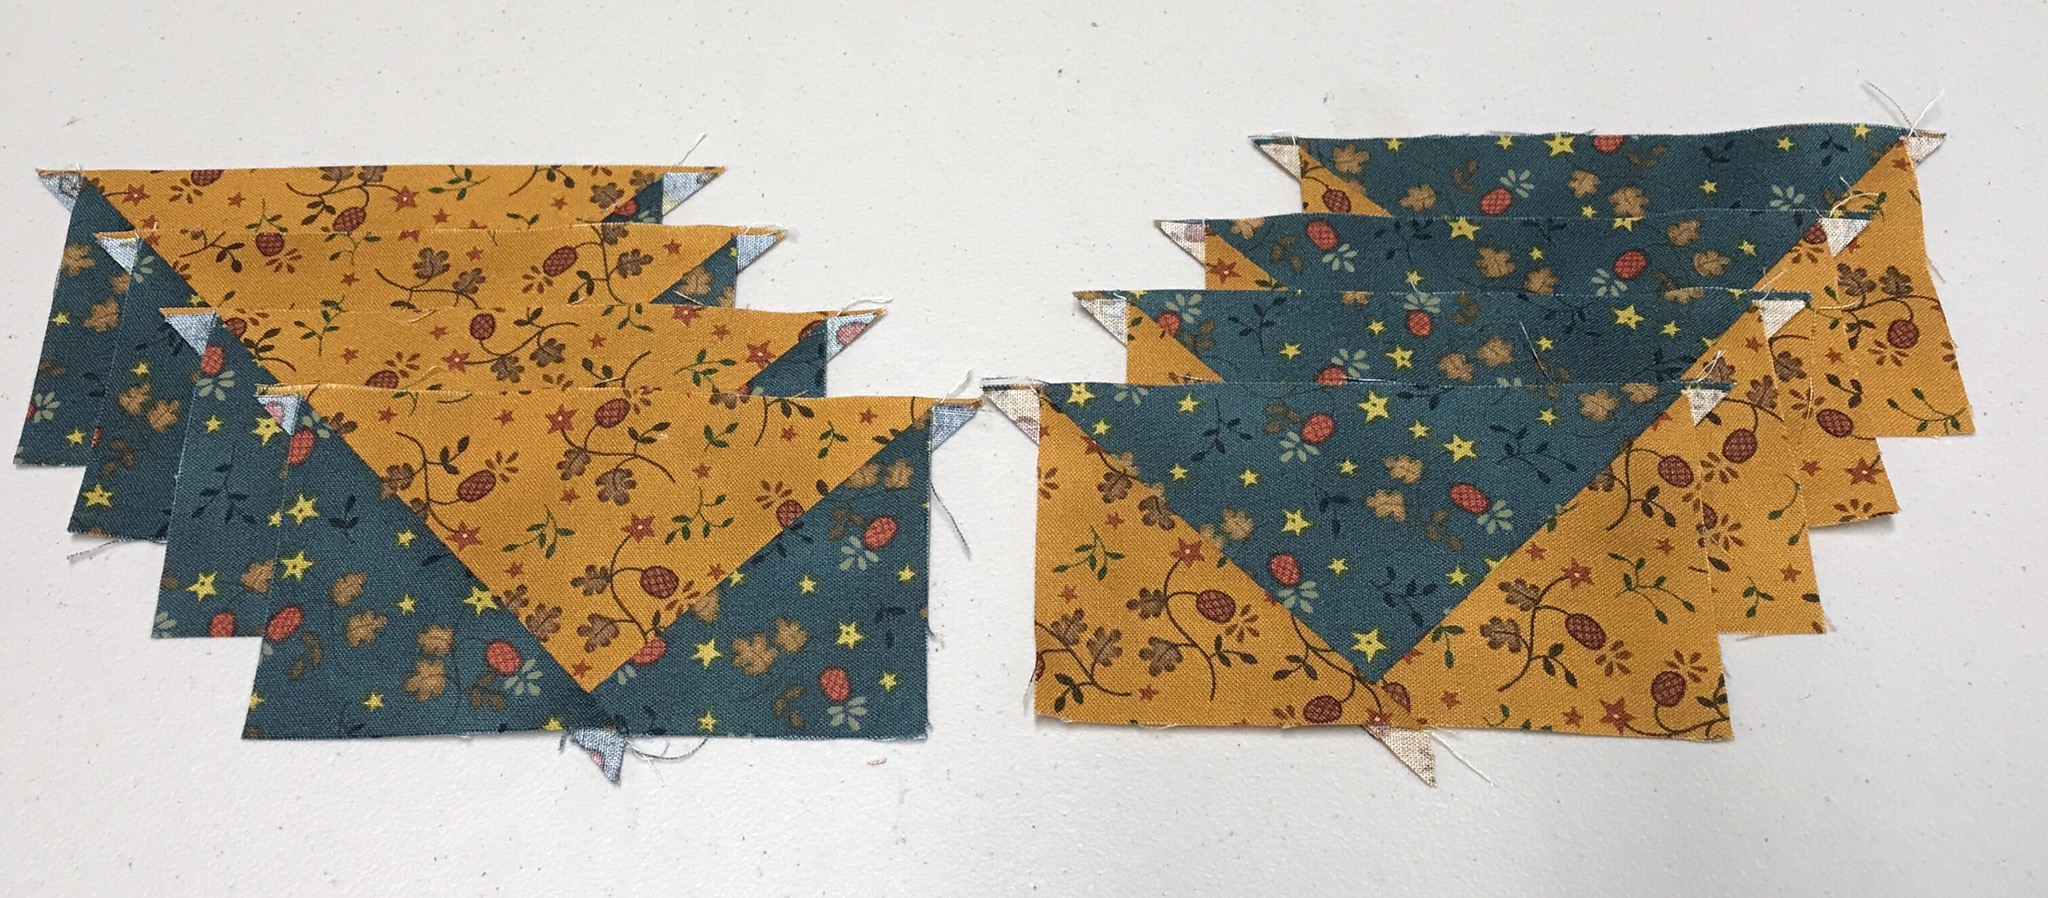
You now have 4 combination units.  Note: this process creates units that are “mirror images”.

img_0695

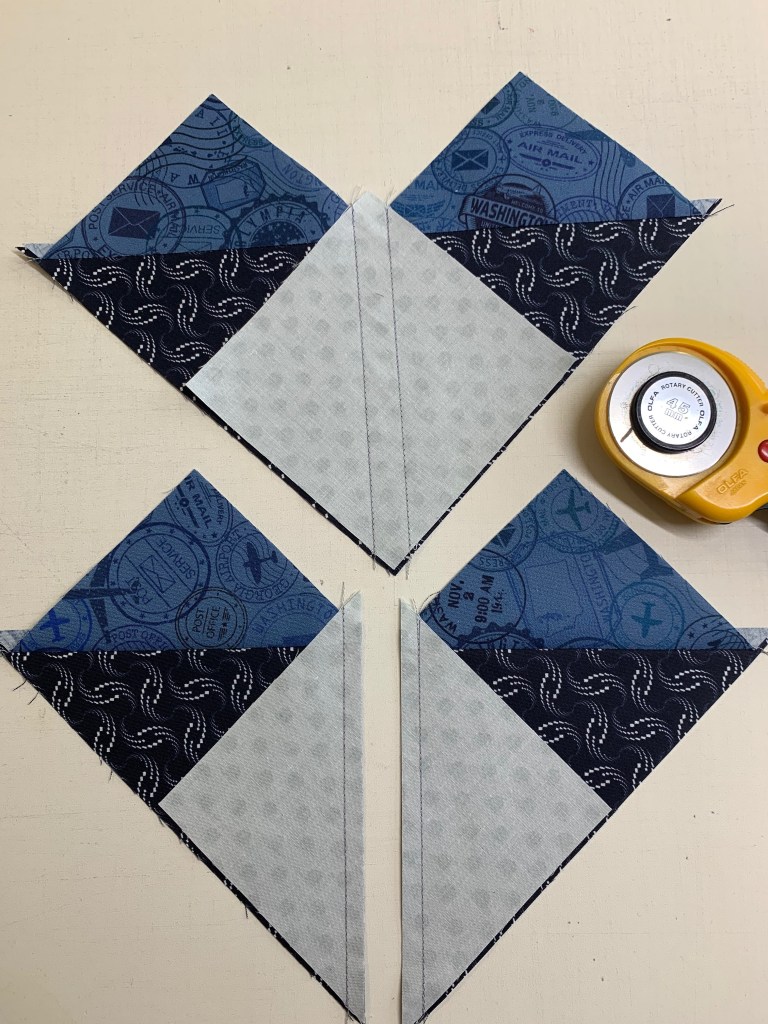
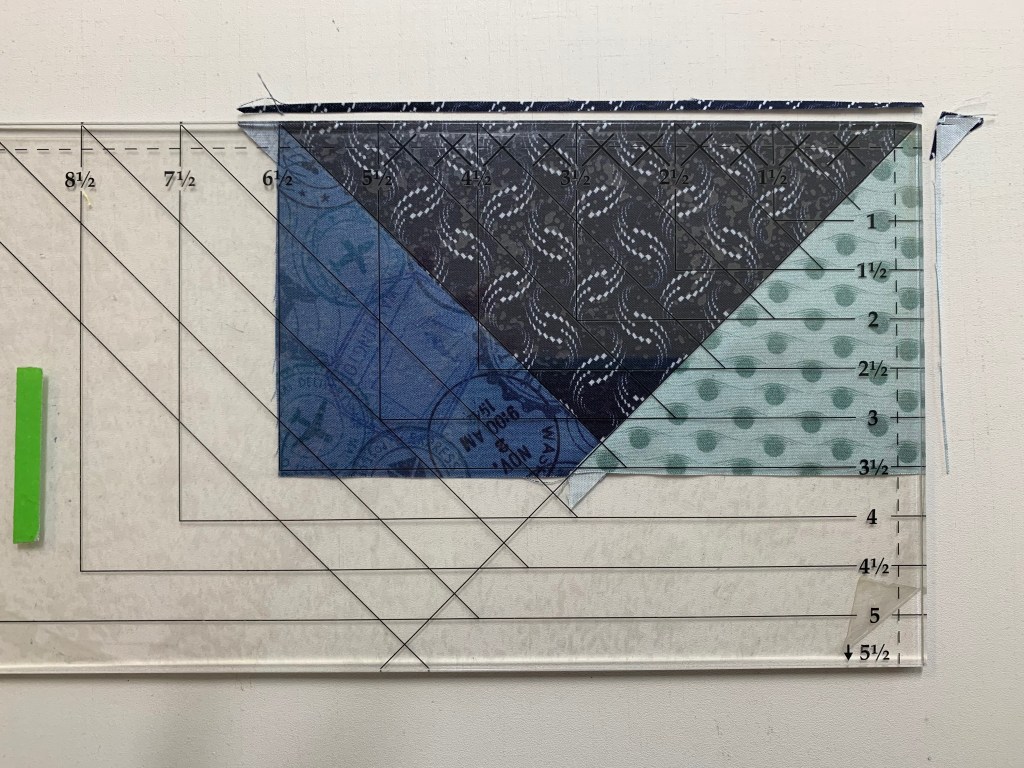
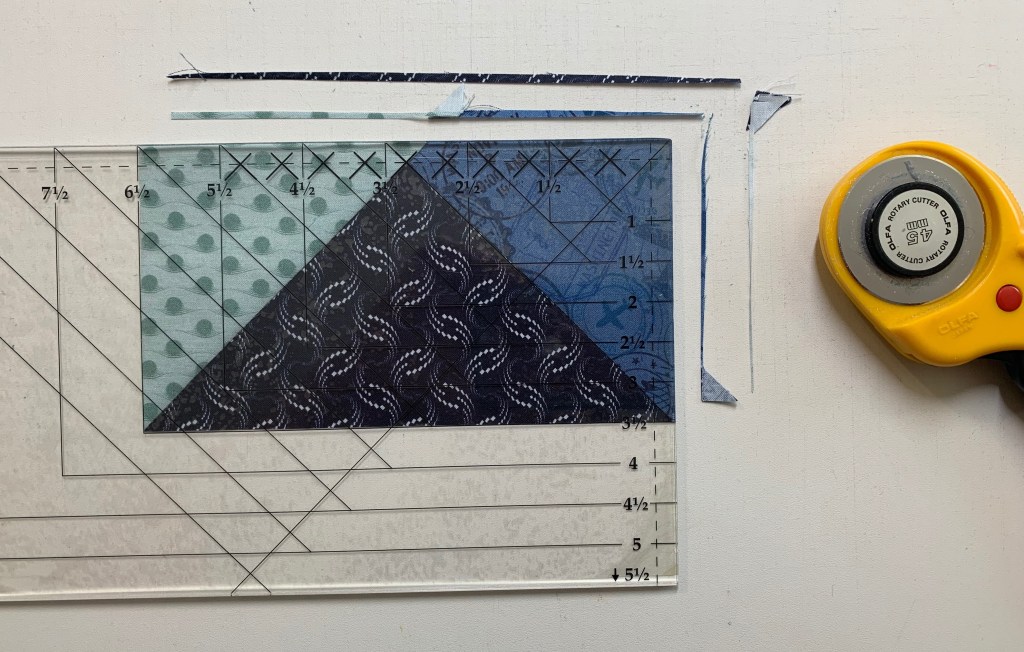
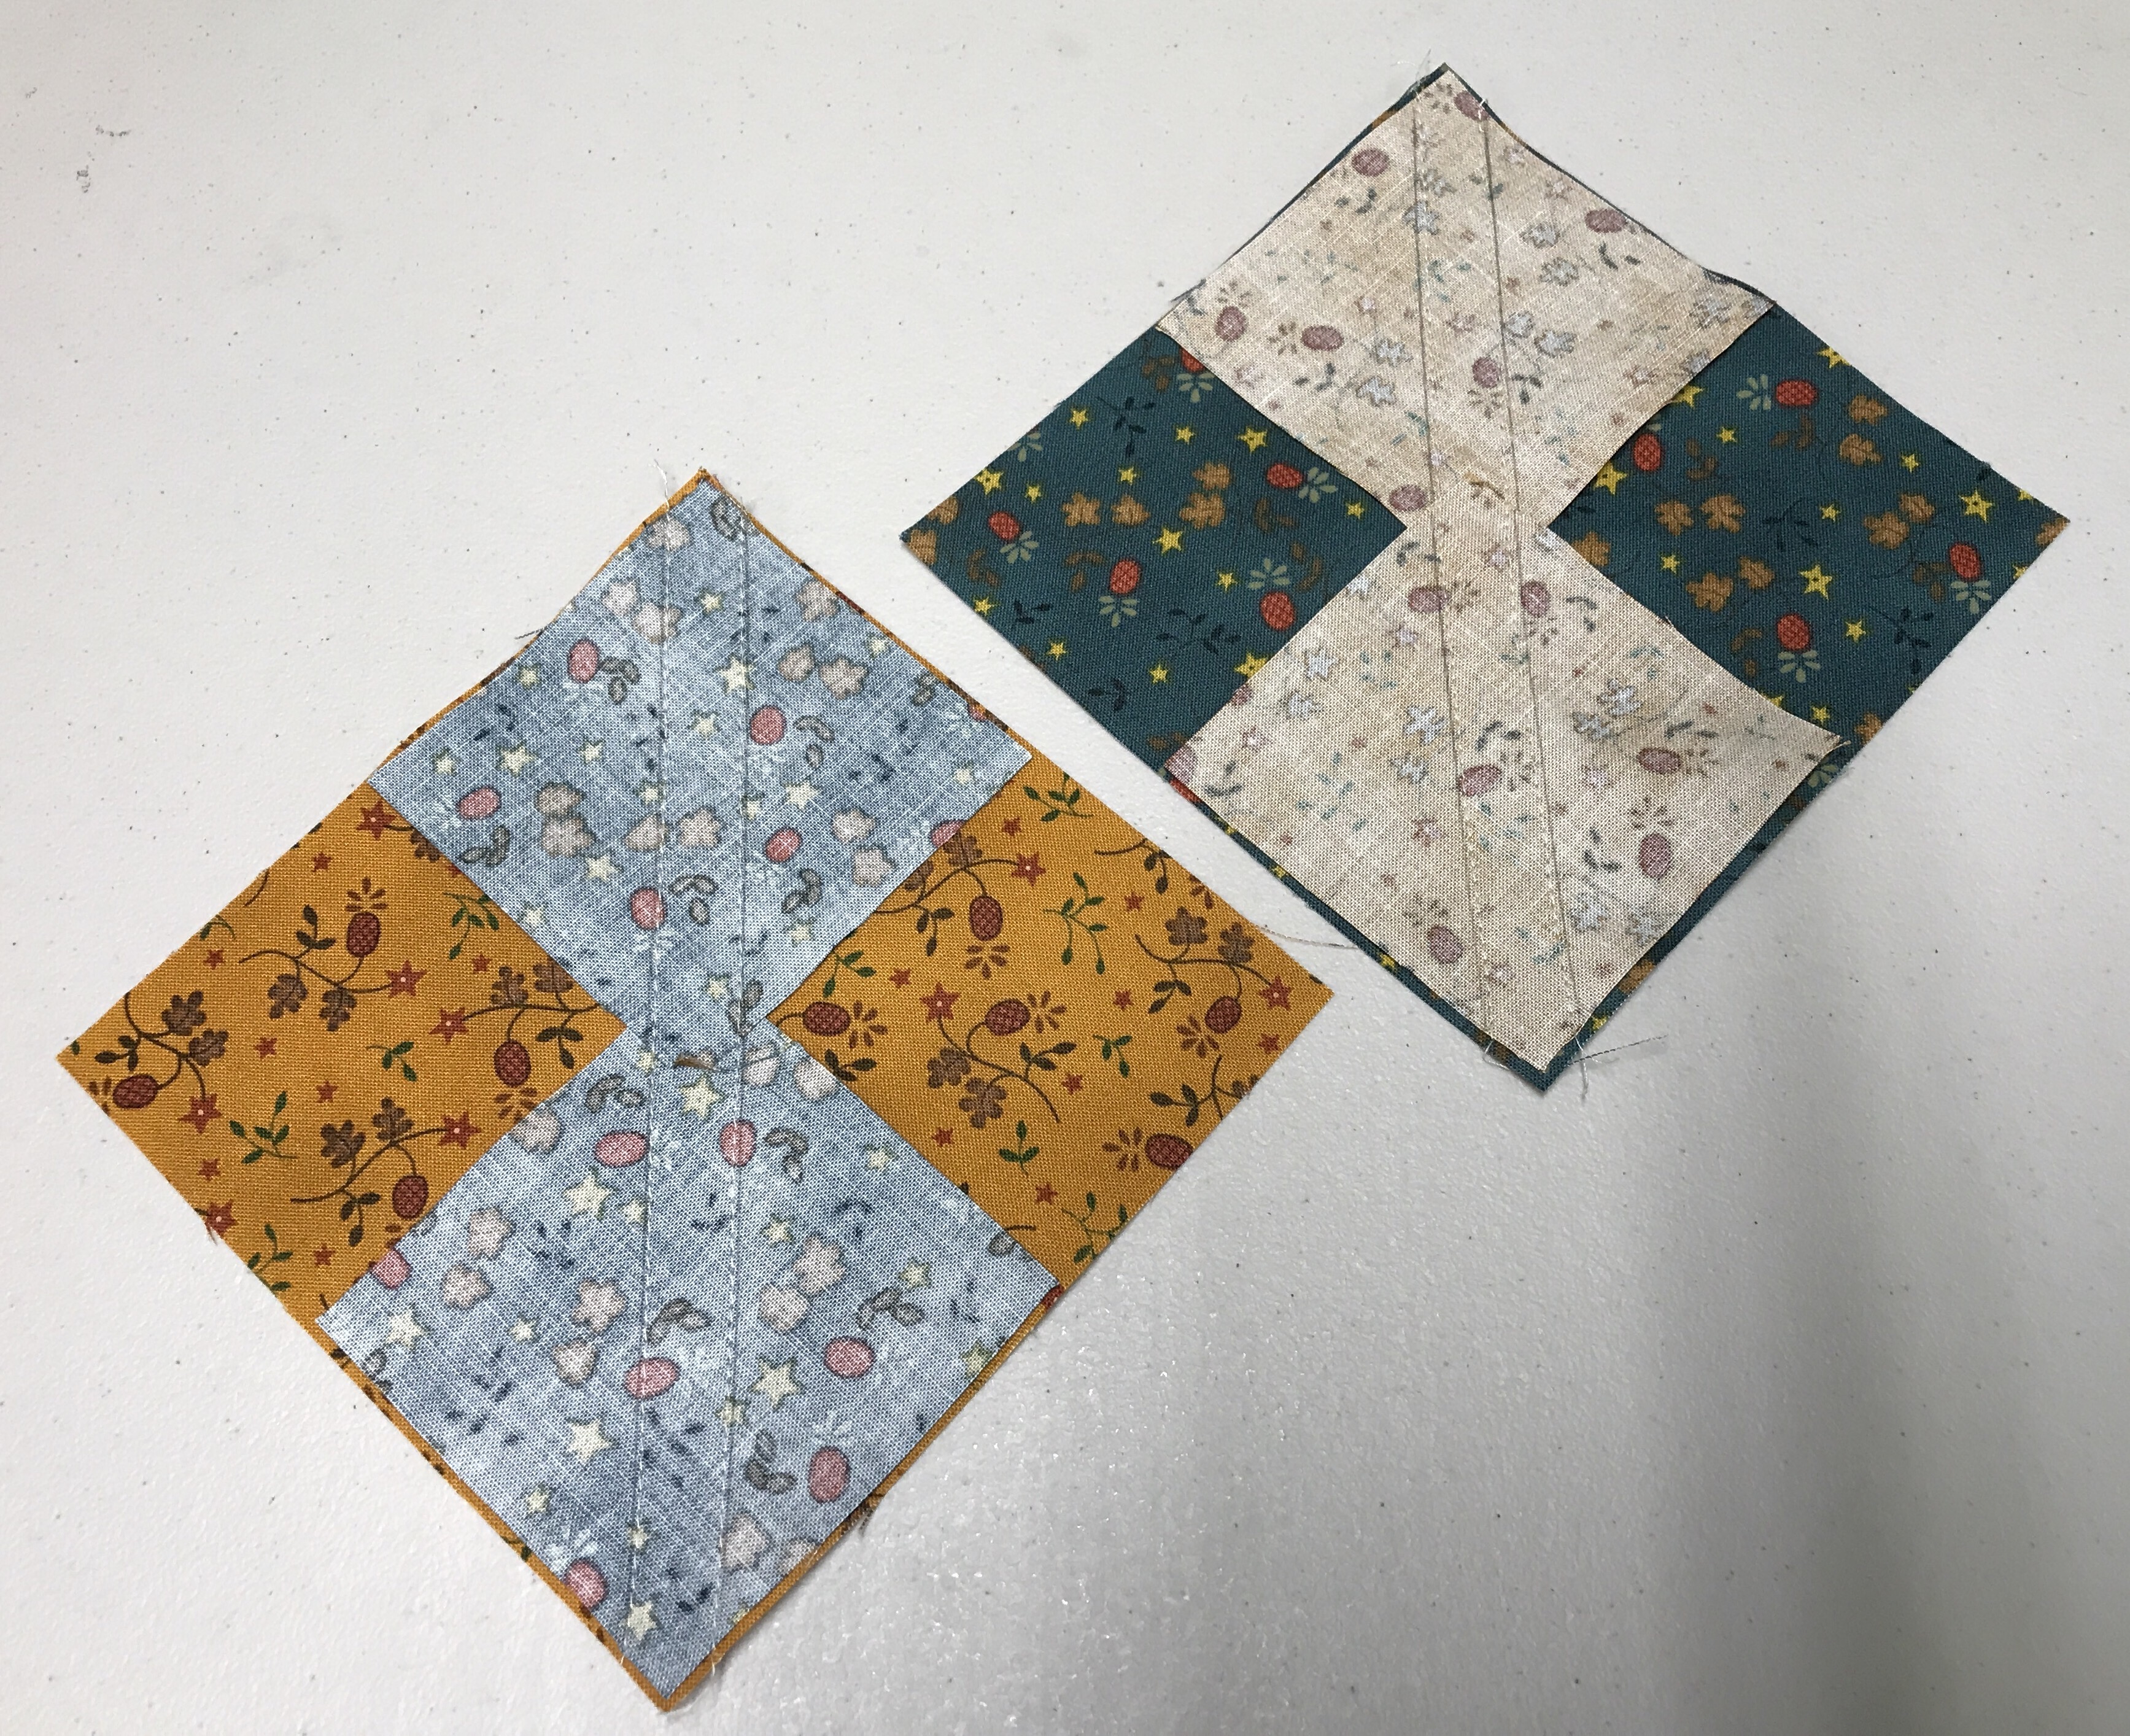
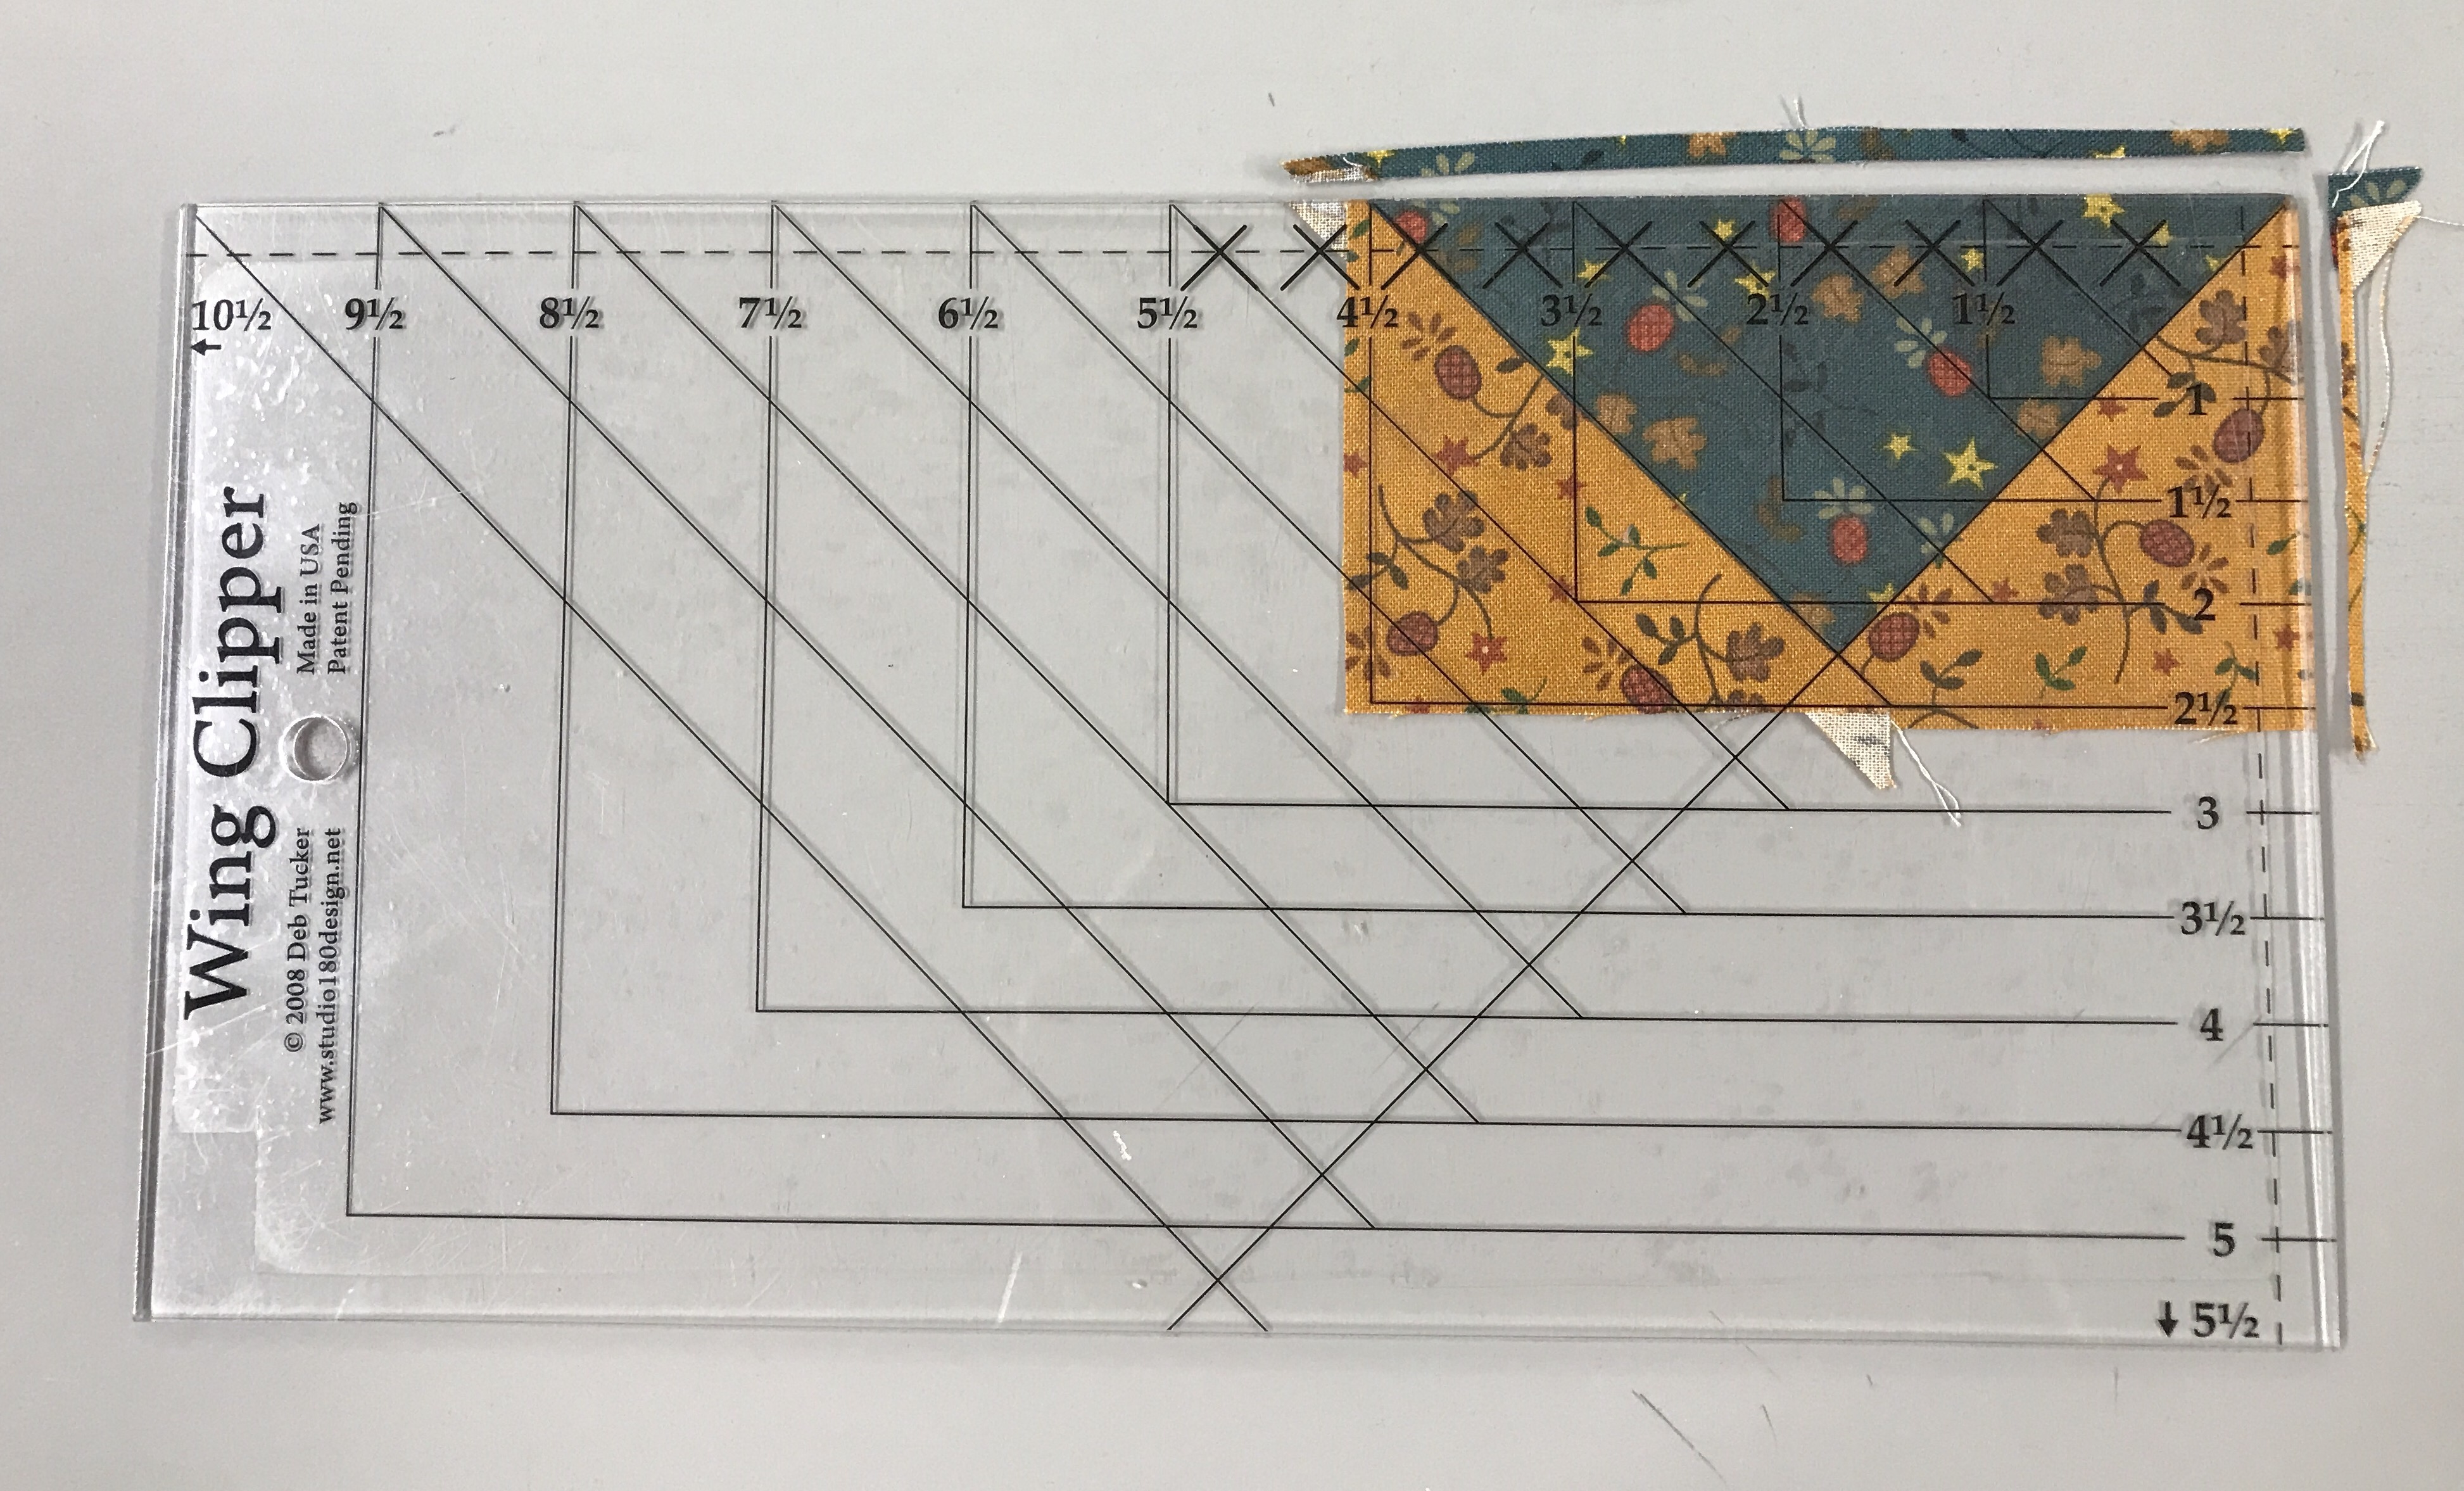
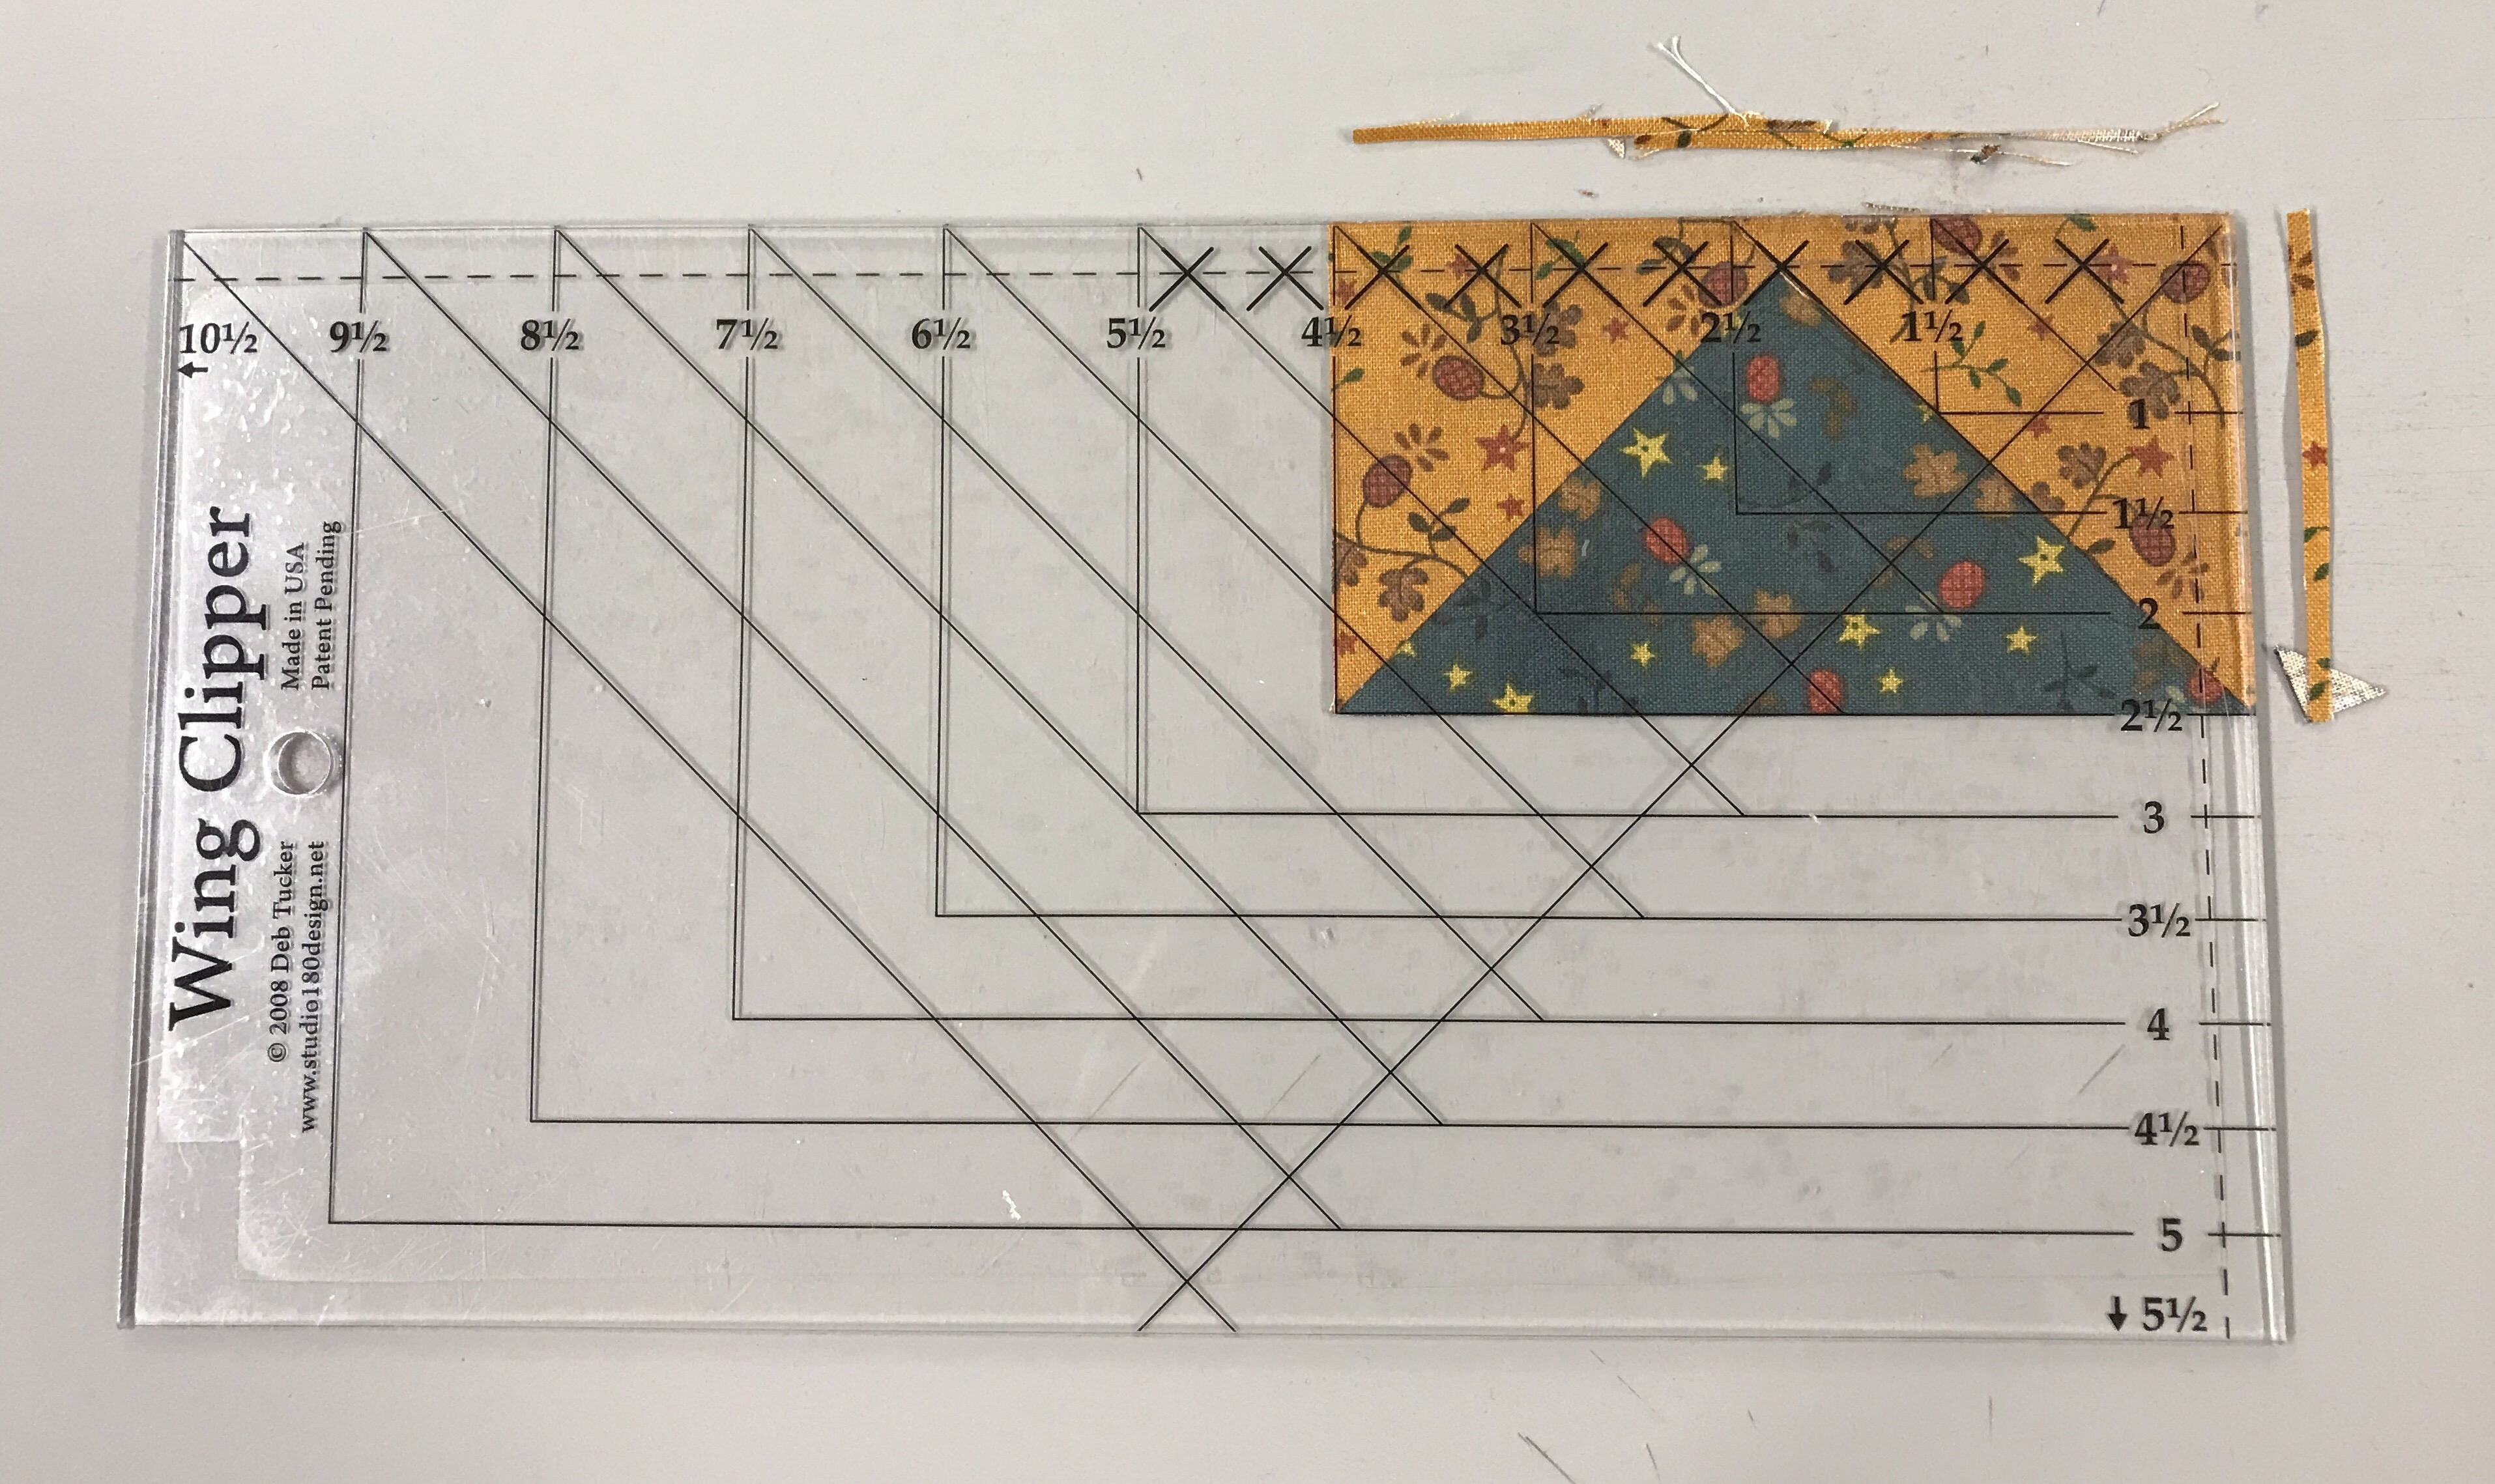
Position the Tucker Trimmer over the unit, carefully aligning both diagonal lines with the stitched seams as shown and trim.

img_0696

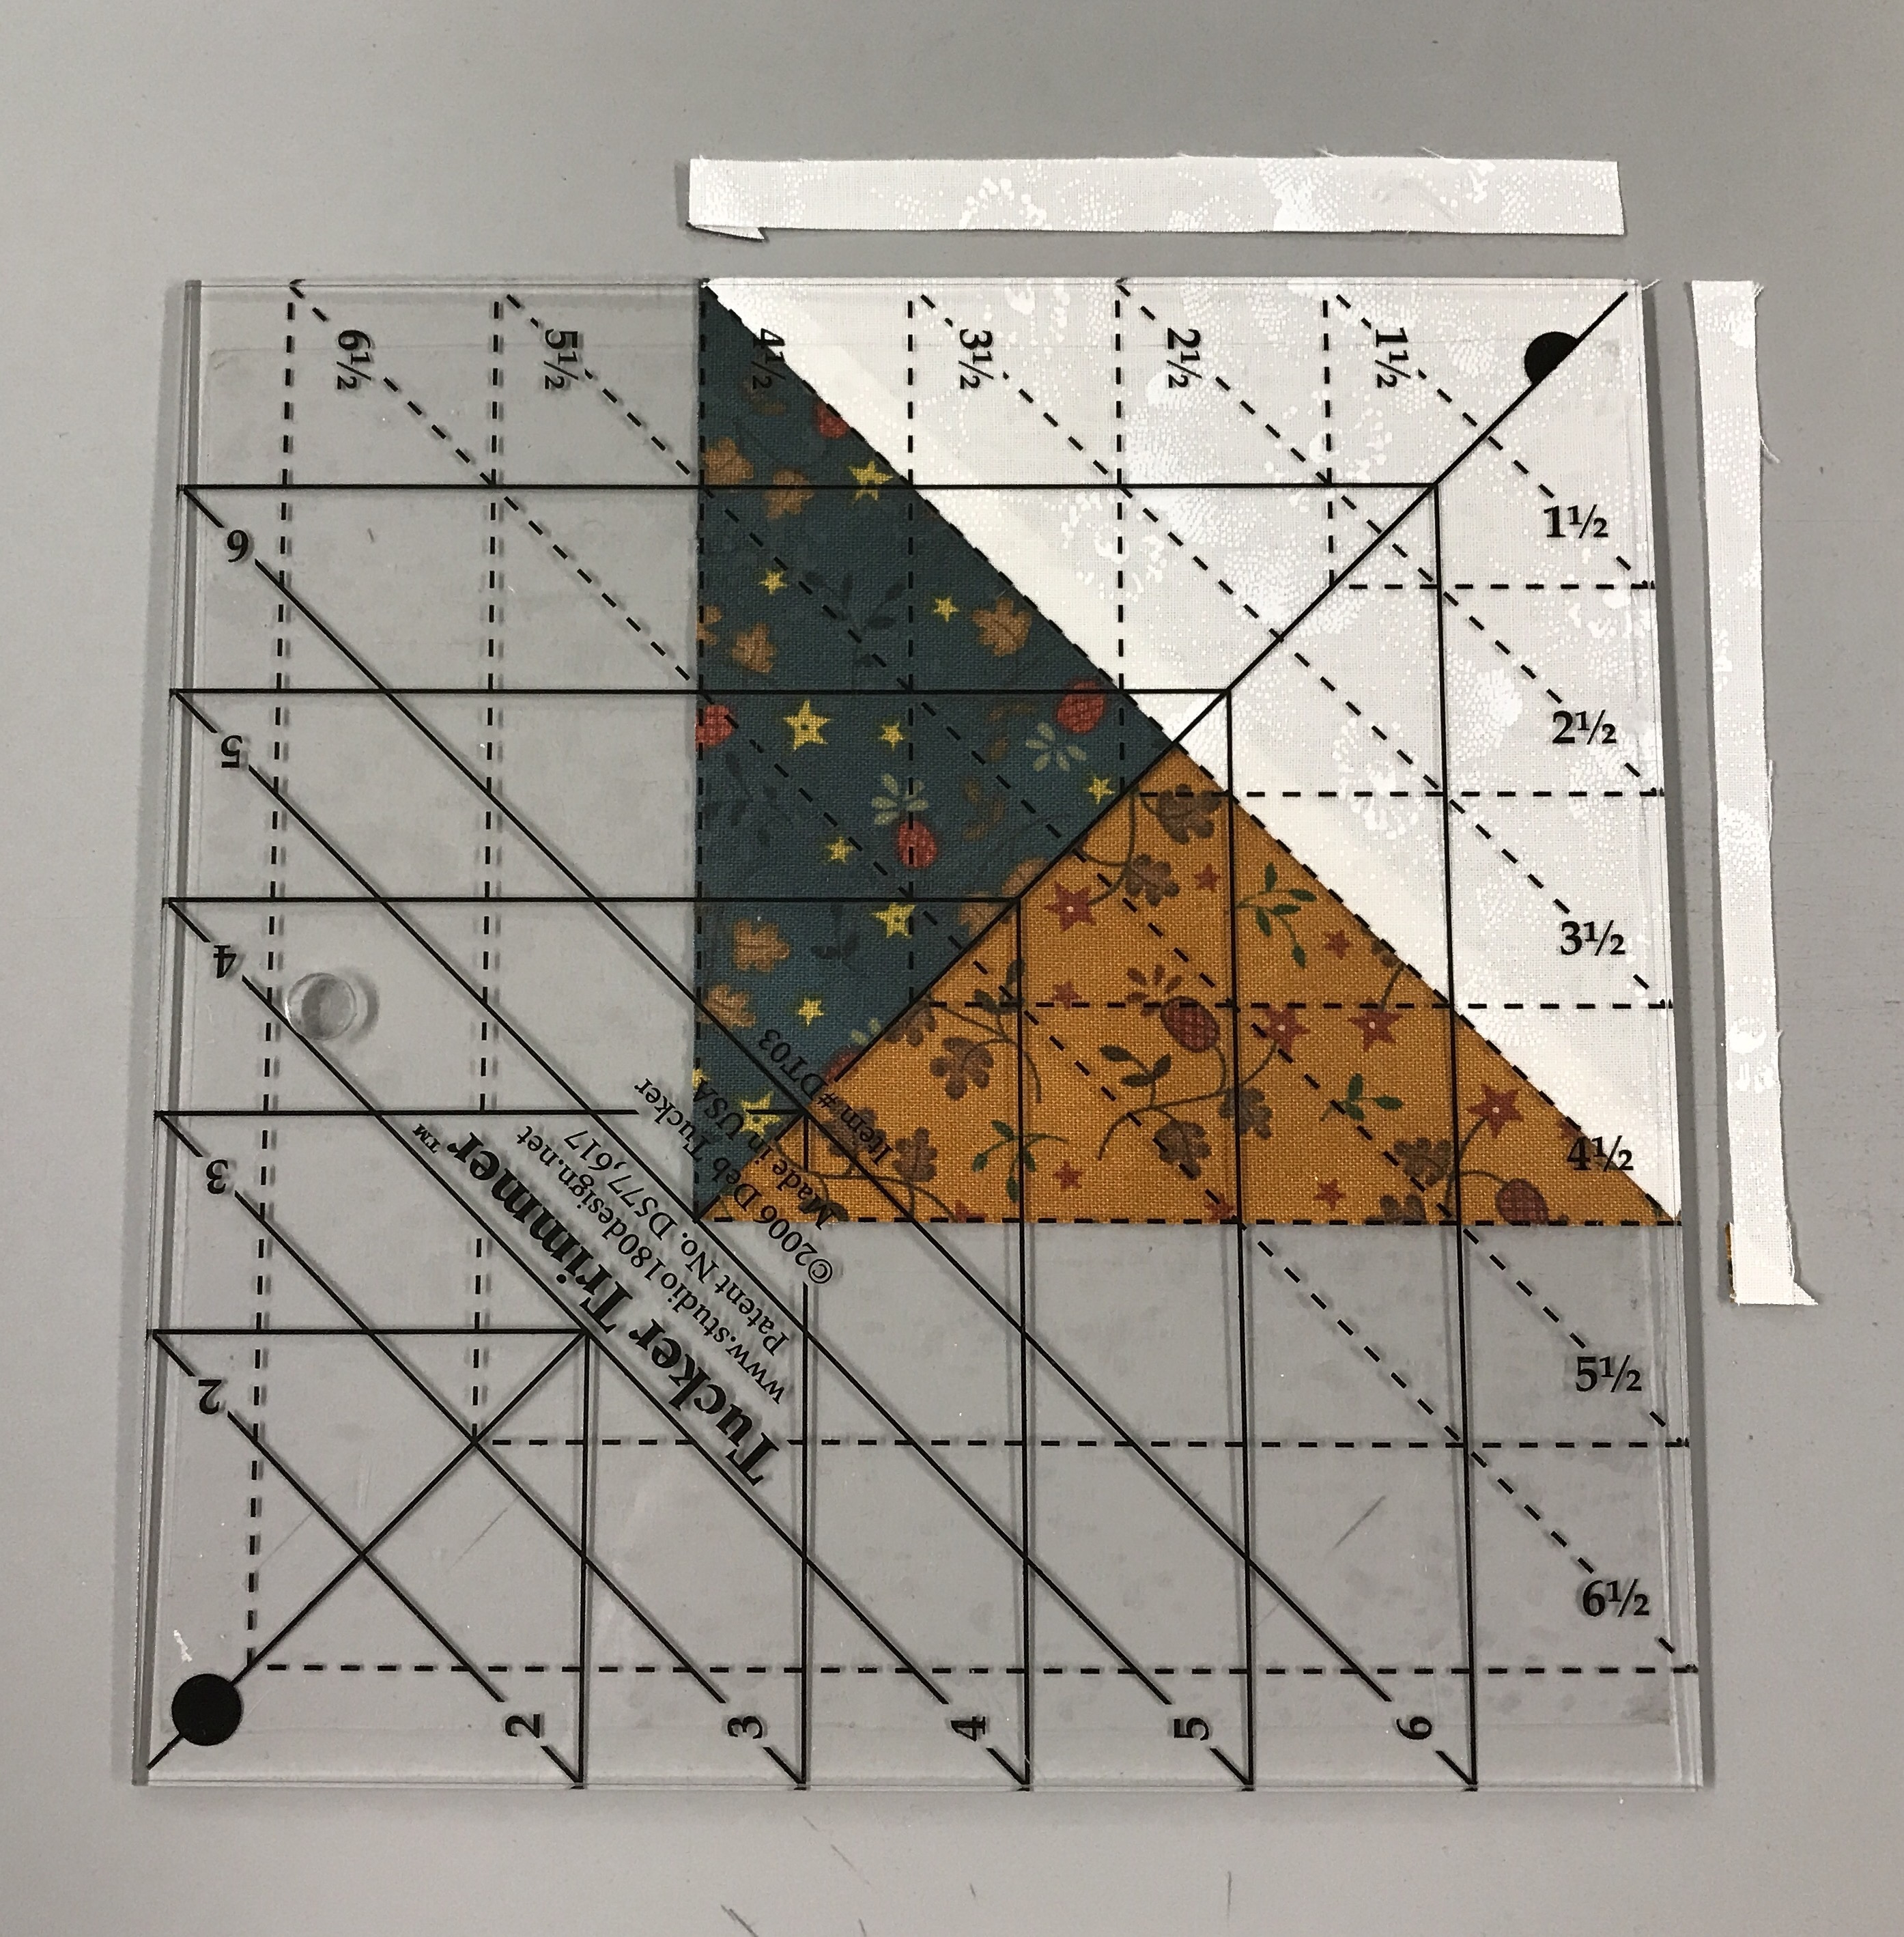
Rotate the unit and line up the Tucker Trimmer again.  This time be sure to position both diagonal lines and the outline of the square to the exact measurement desired and trim again.

img_0697


Four beautifully trimmed combination units for the corners of our block.

Quarter Square Triangles:  Check your size chart.  These are 5.5″ starter squares.

On the back of my gold square I have again used my Magic wand to draw to diagonal stitching lines.

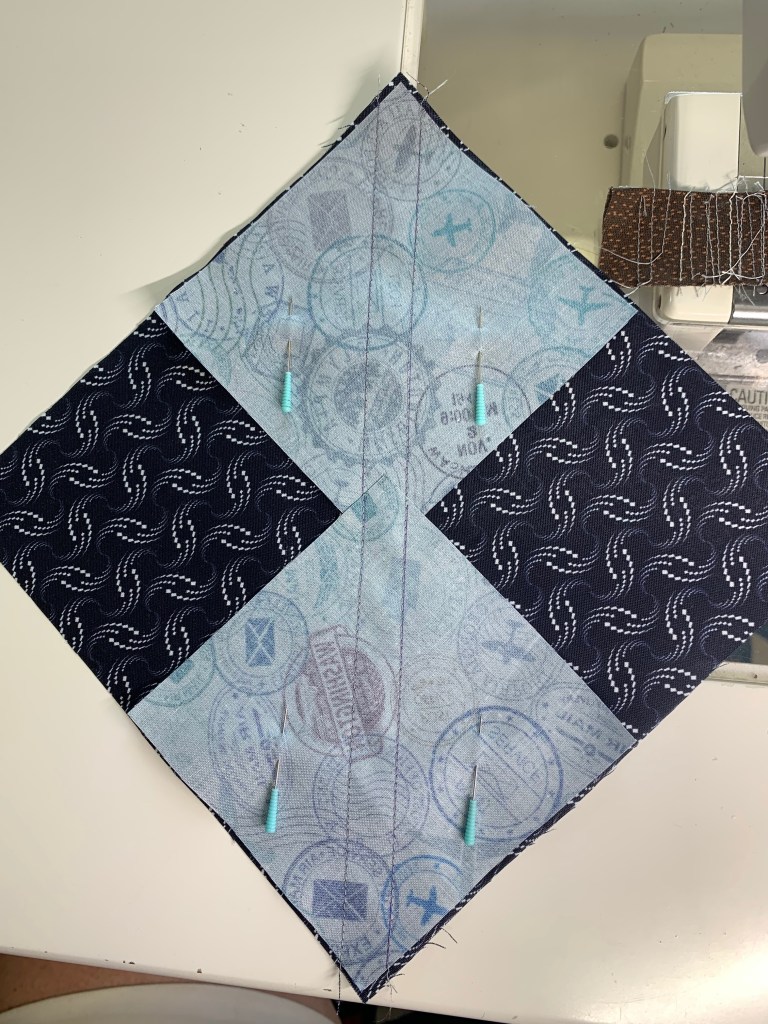
Position the gold square over the blue square, right sides together, aligning the edges.  Stitch using a scant 1/4″ seam allowance and cut apart.

img_0702

Press toward the dark triangles. Using your Magic Wand Draw 2 diagonal lines on the back of one half square triangle.

img_0703

Position the two half square triangles right sides together, making sure the colors are opposite each other (my gold is against the blue and vice versa) carefully nesting the seams as shown above.

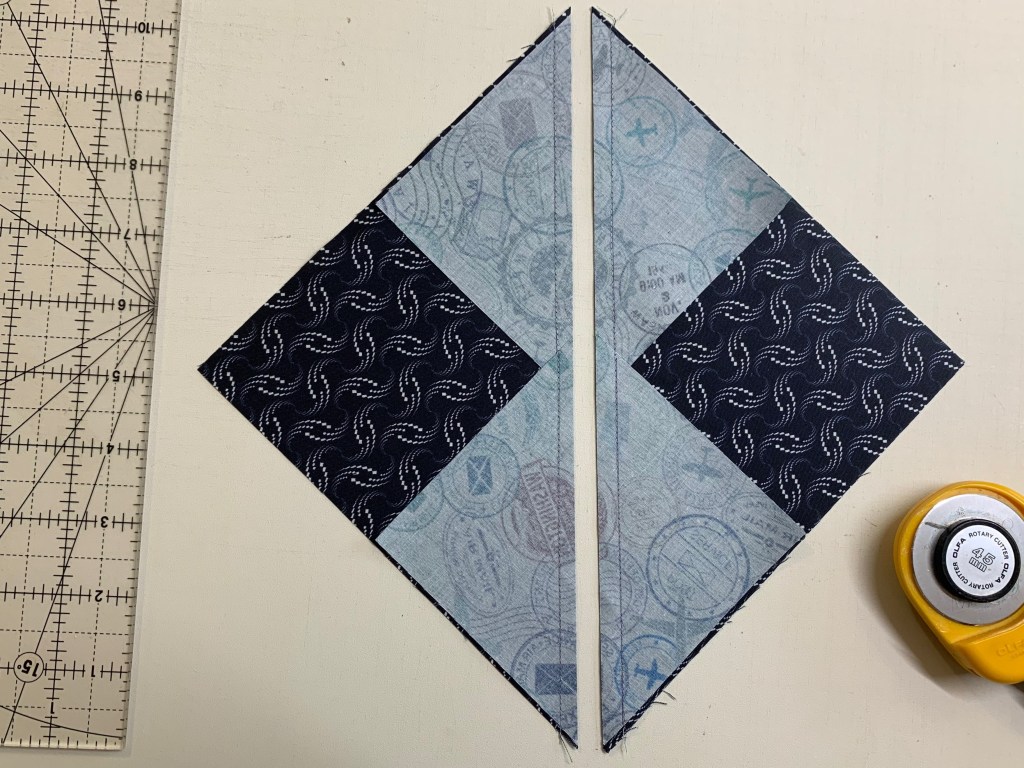
Stitch using a scant 1/4″ seam allowance. Cut apart and press swirling the centers as shown above.

img_0706

Position the Tucker Trimmer over the unit carefully aligning both diagonal lines over the seams lines of the unit.  Trim two sides as shown.

img_0708

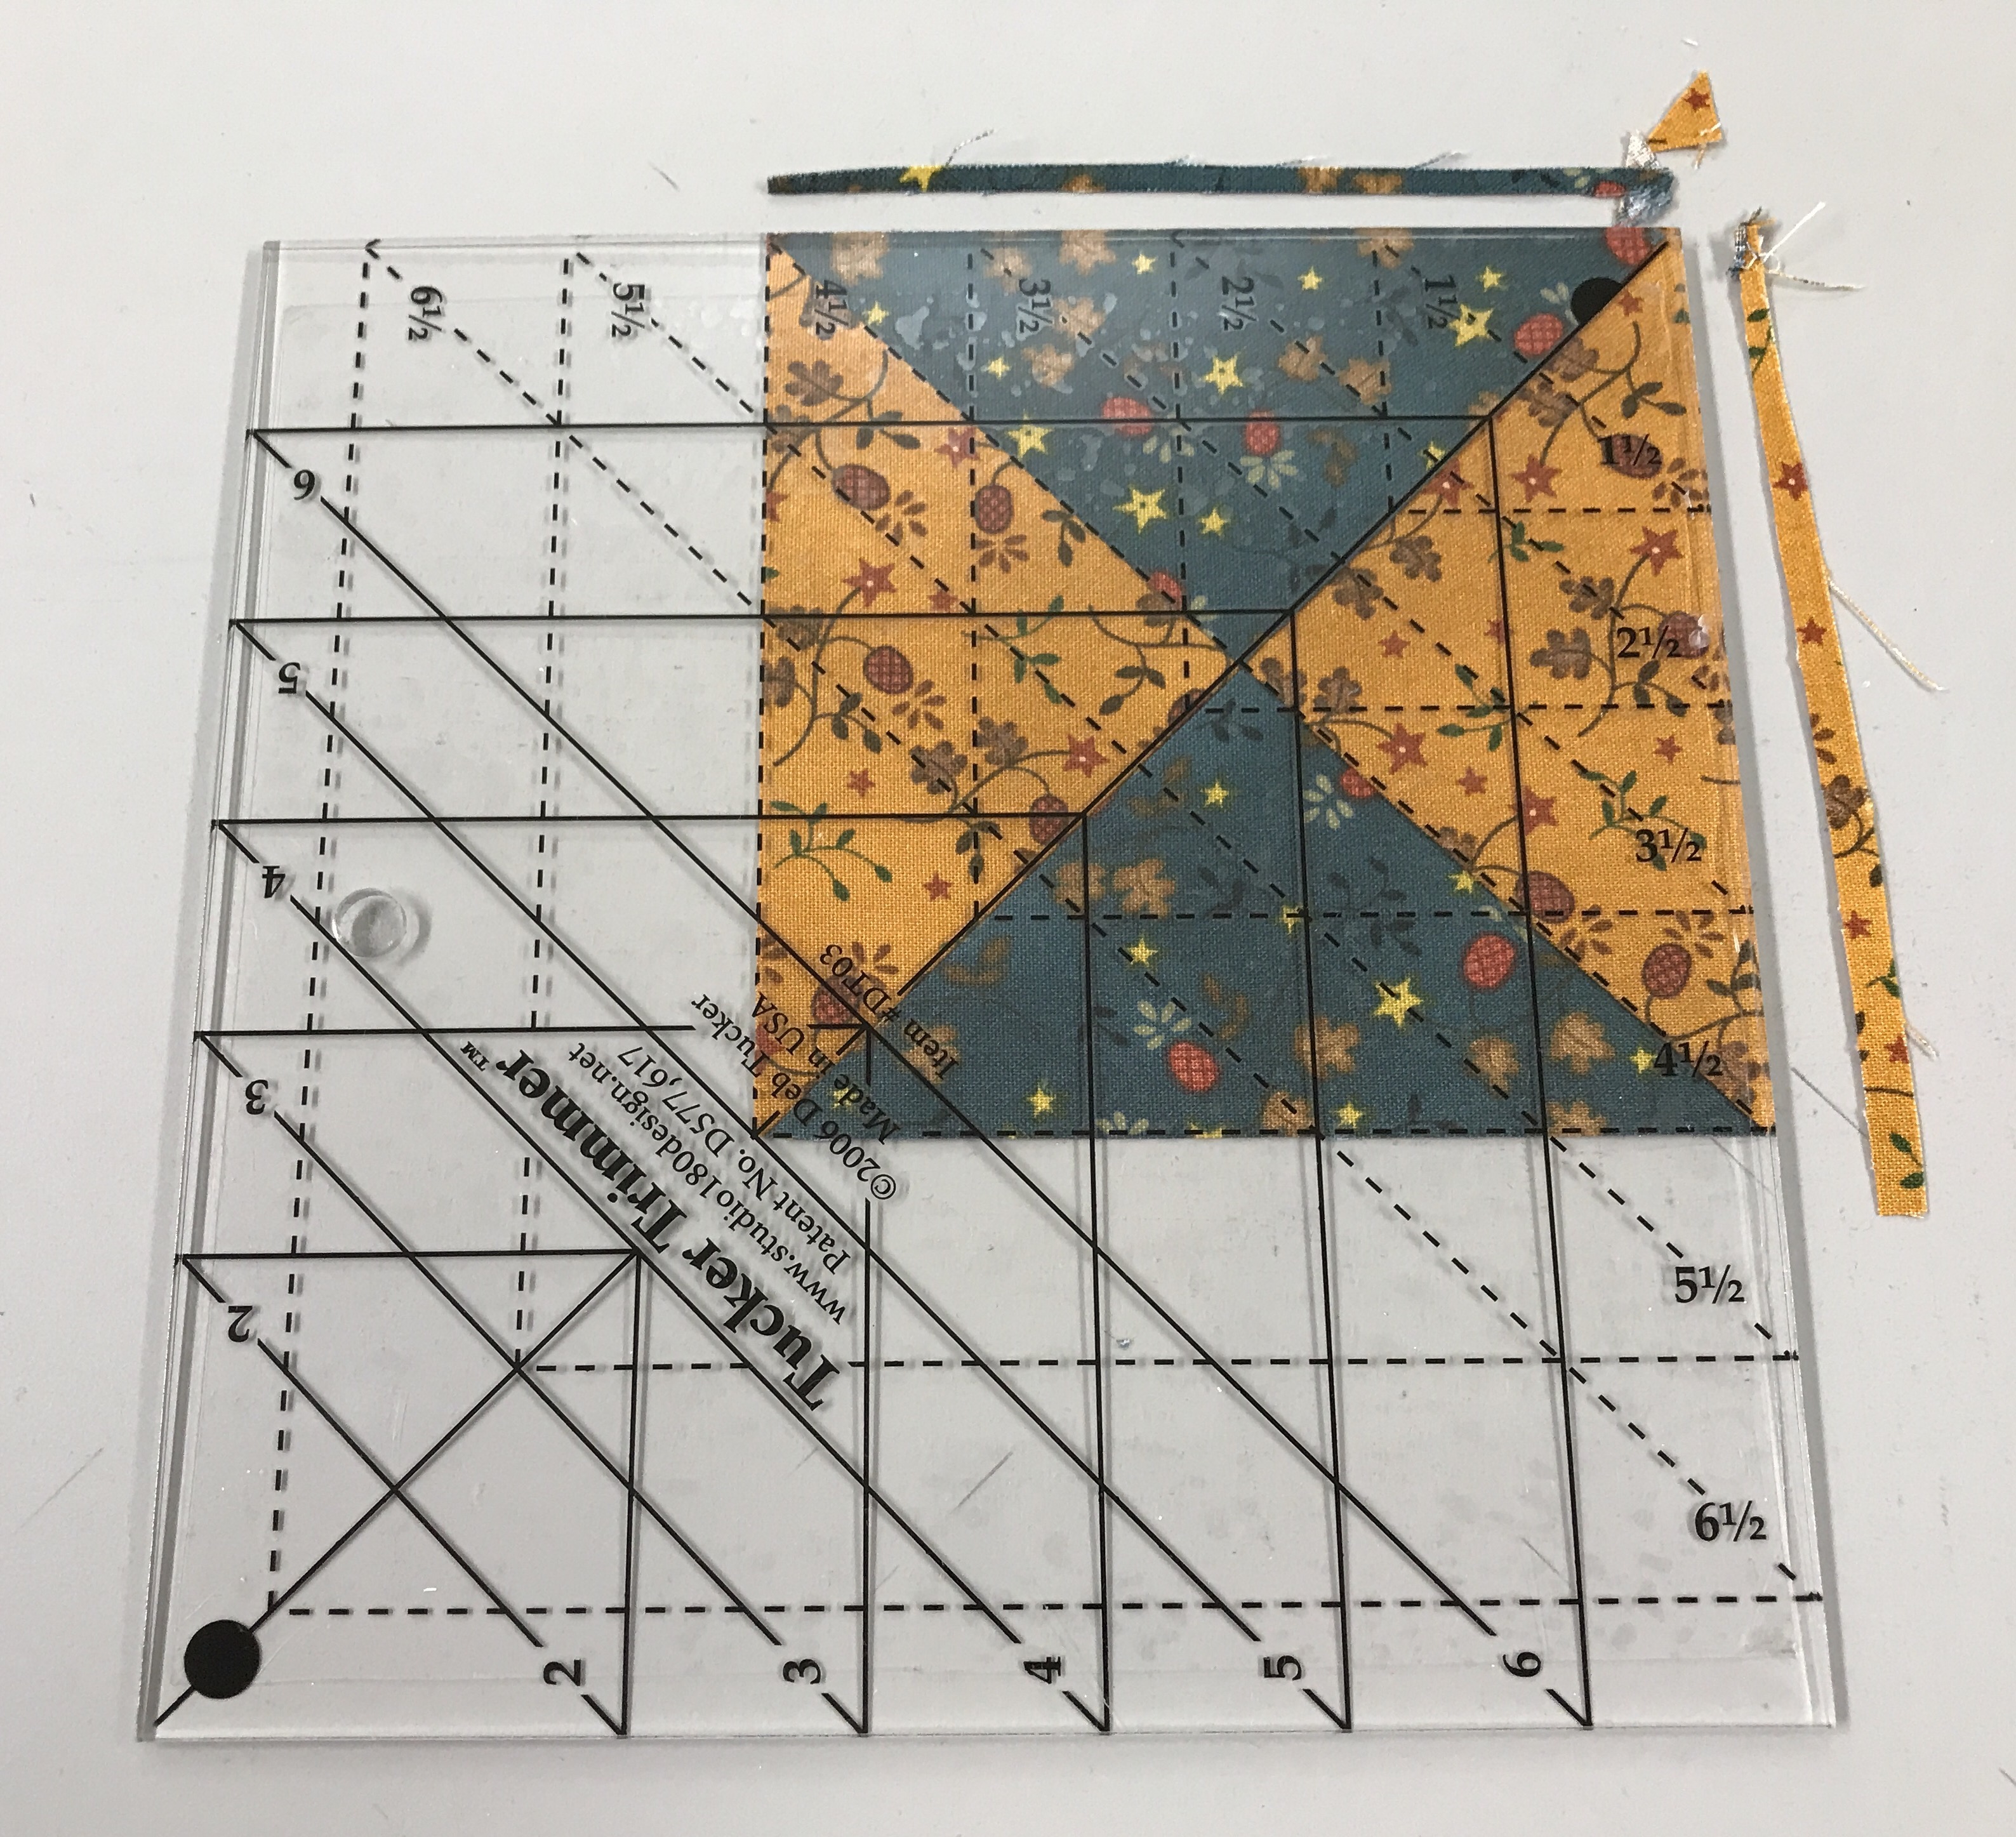
Rotate the unit and line up both diagonal lines again along with the outline of the unit to the exact measurement desired and trim. Only one quarter square triangle is needed for this block center.

img_0709

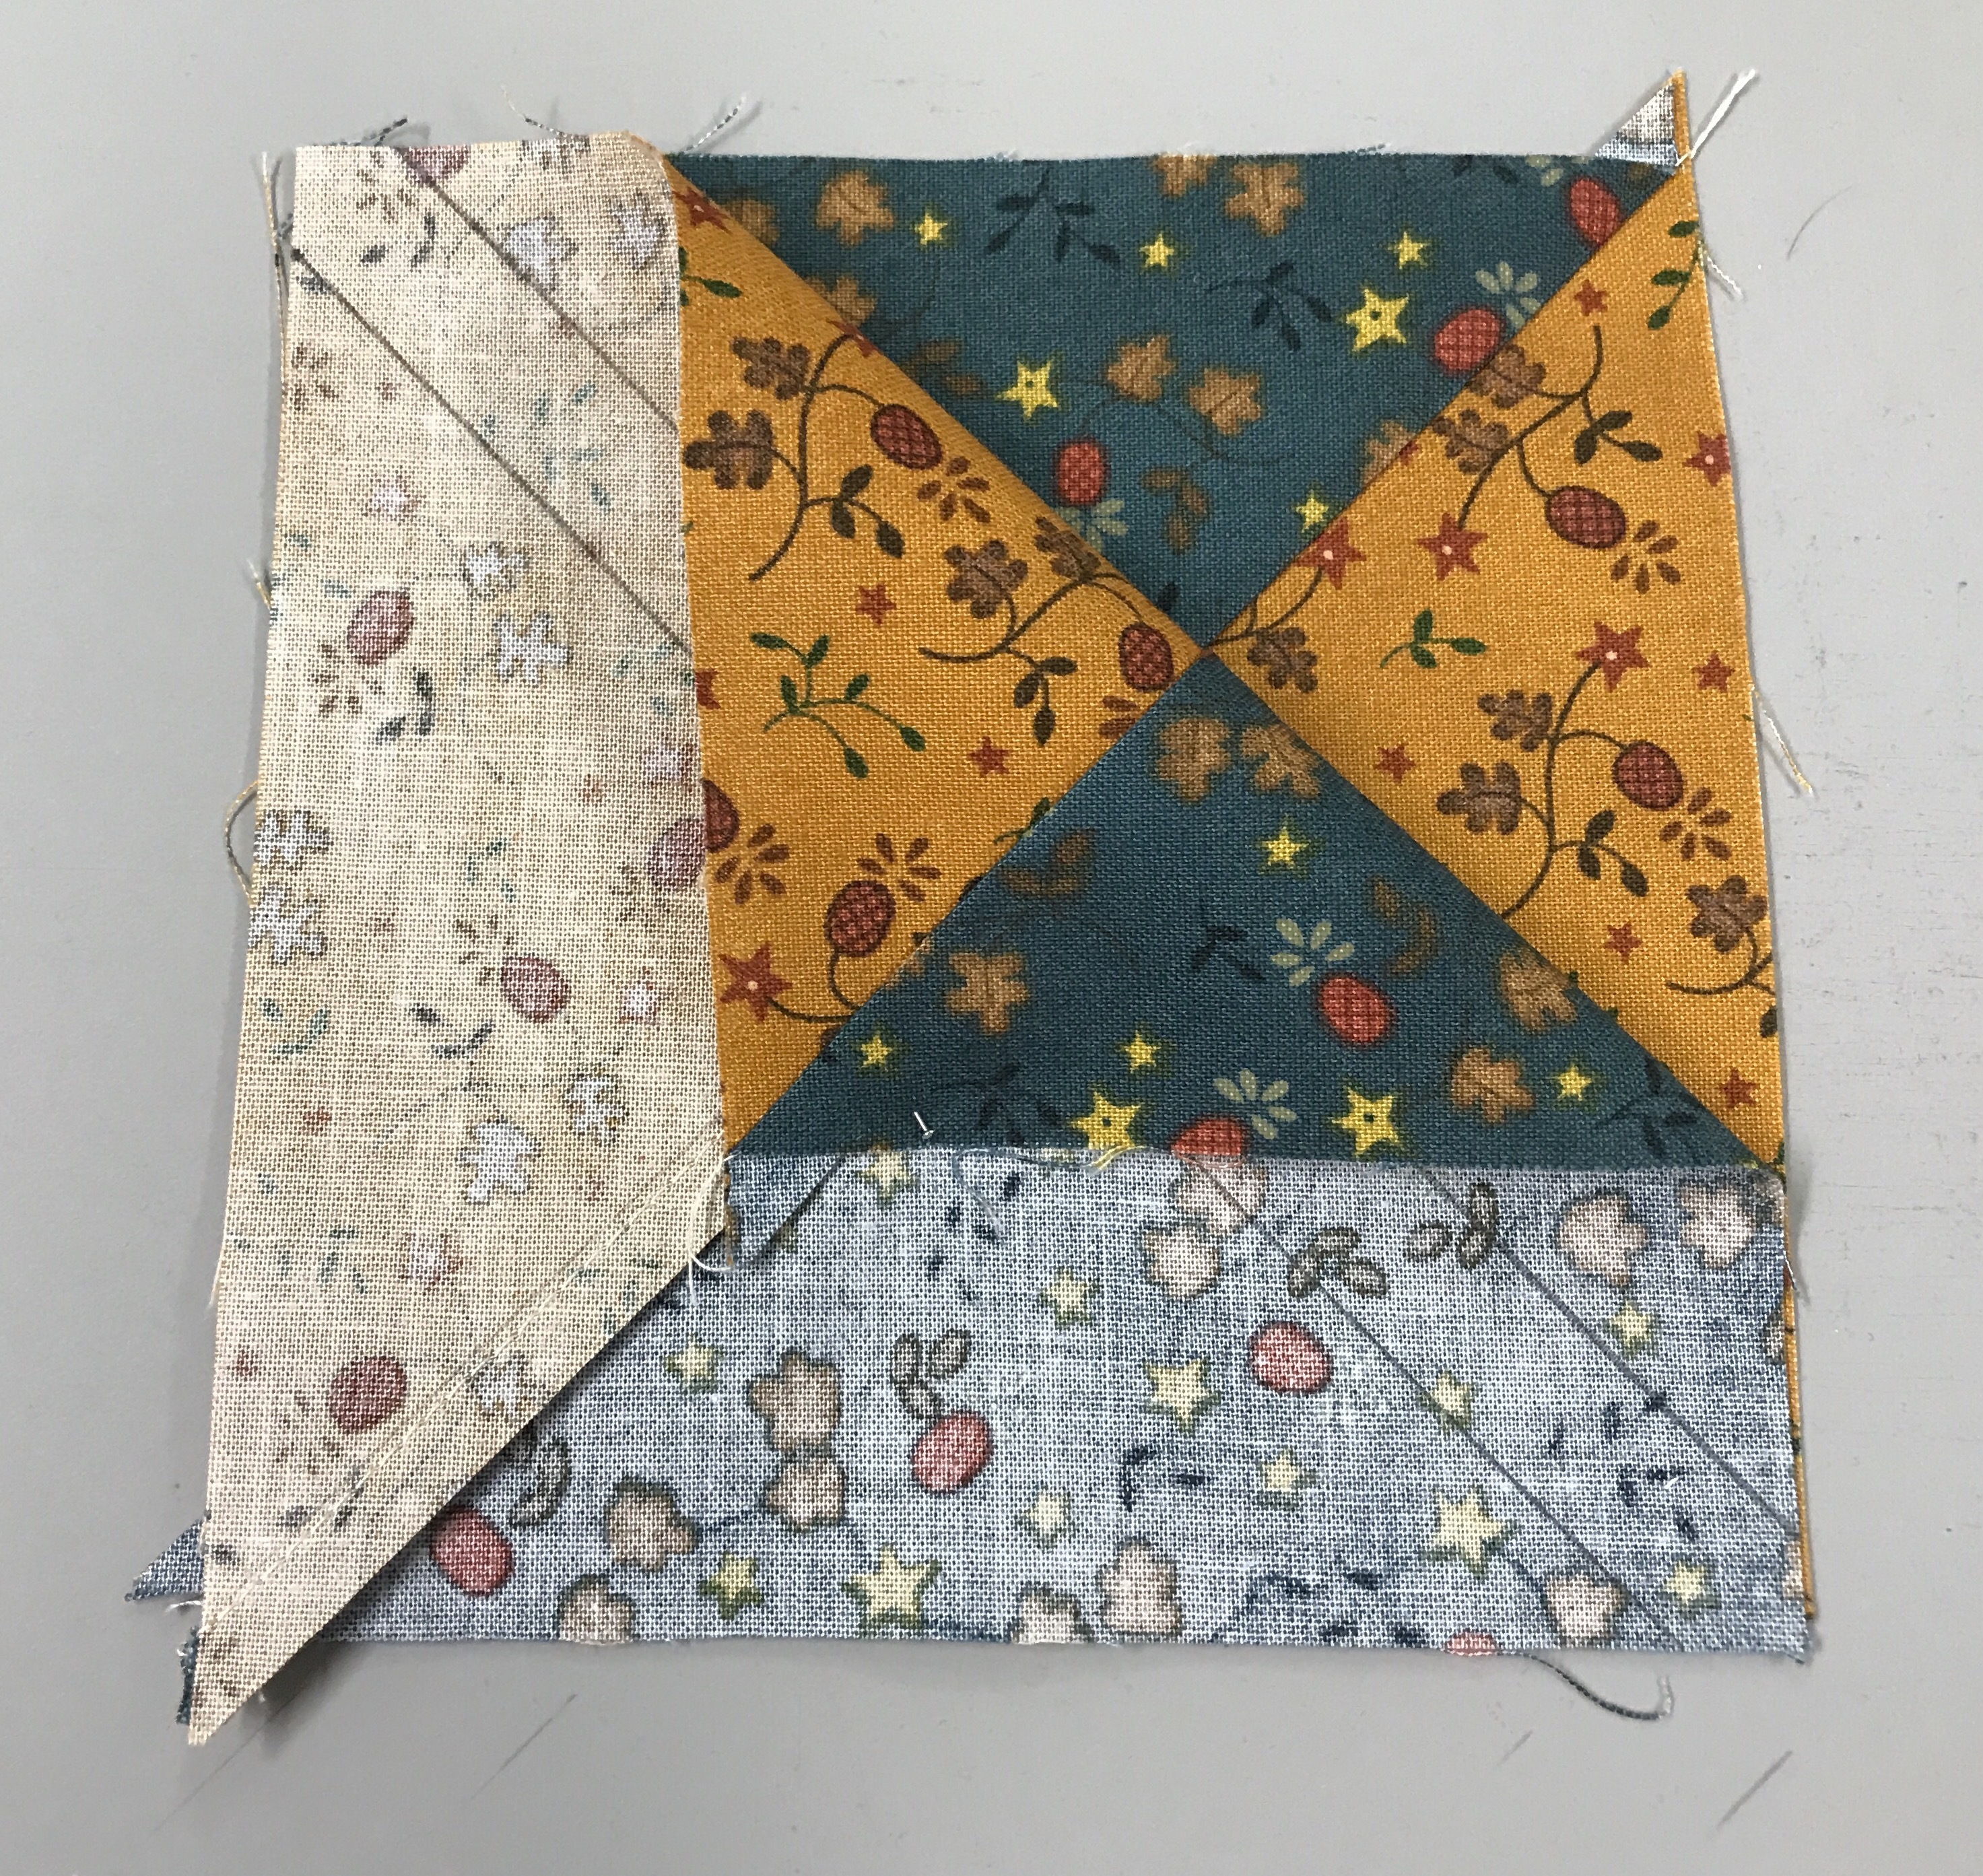
Layout your units as shown above being careful of color placement.  Notice the body of my geese follow the colors in the quarter square triangle.  And the colors in the combination units are the same as the wings on the geese.

img_0711

Stitch your geese together in pairs as shown above.

img_0712

Stitch 3 units into a row as shown above.

img_0713

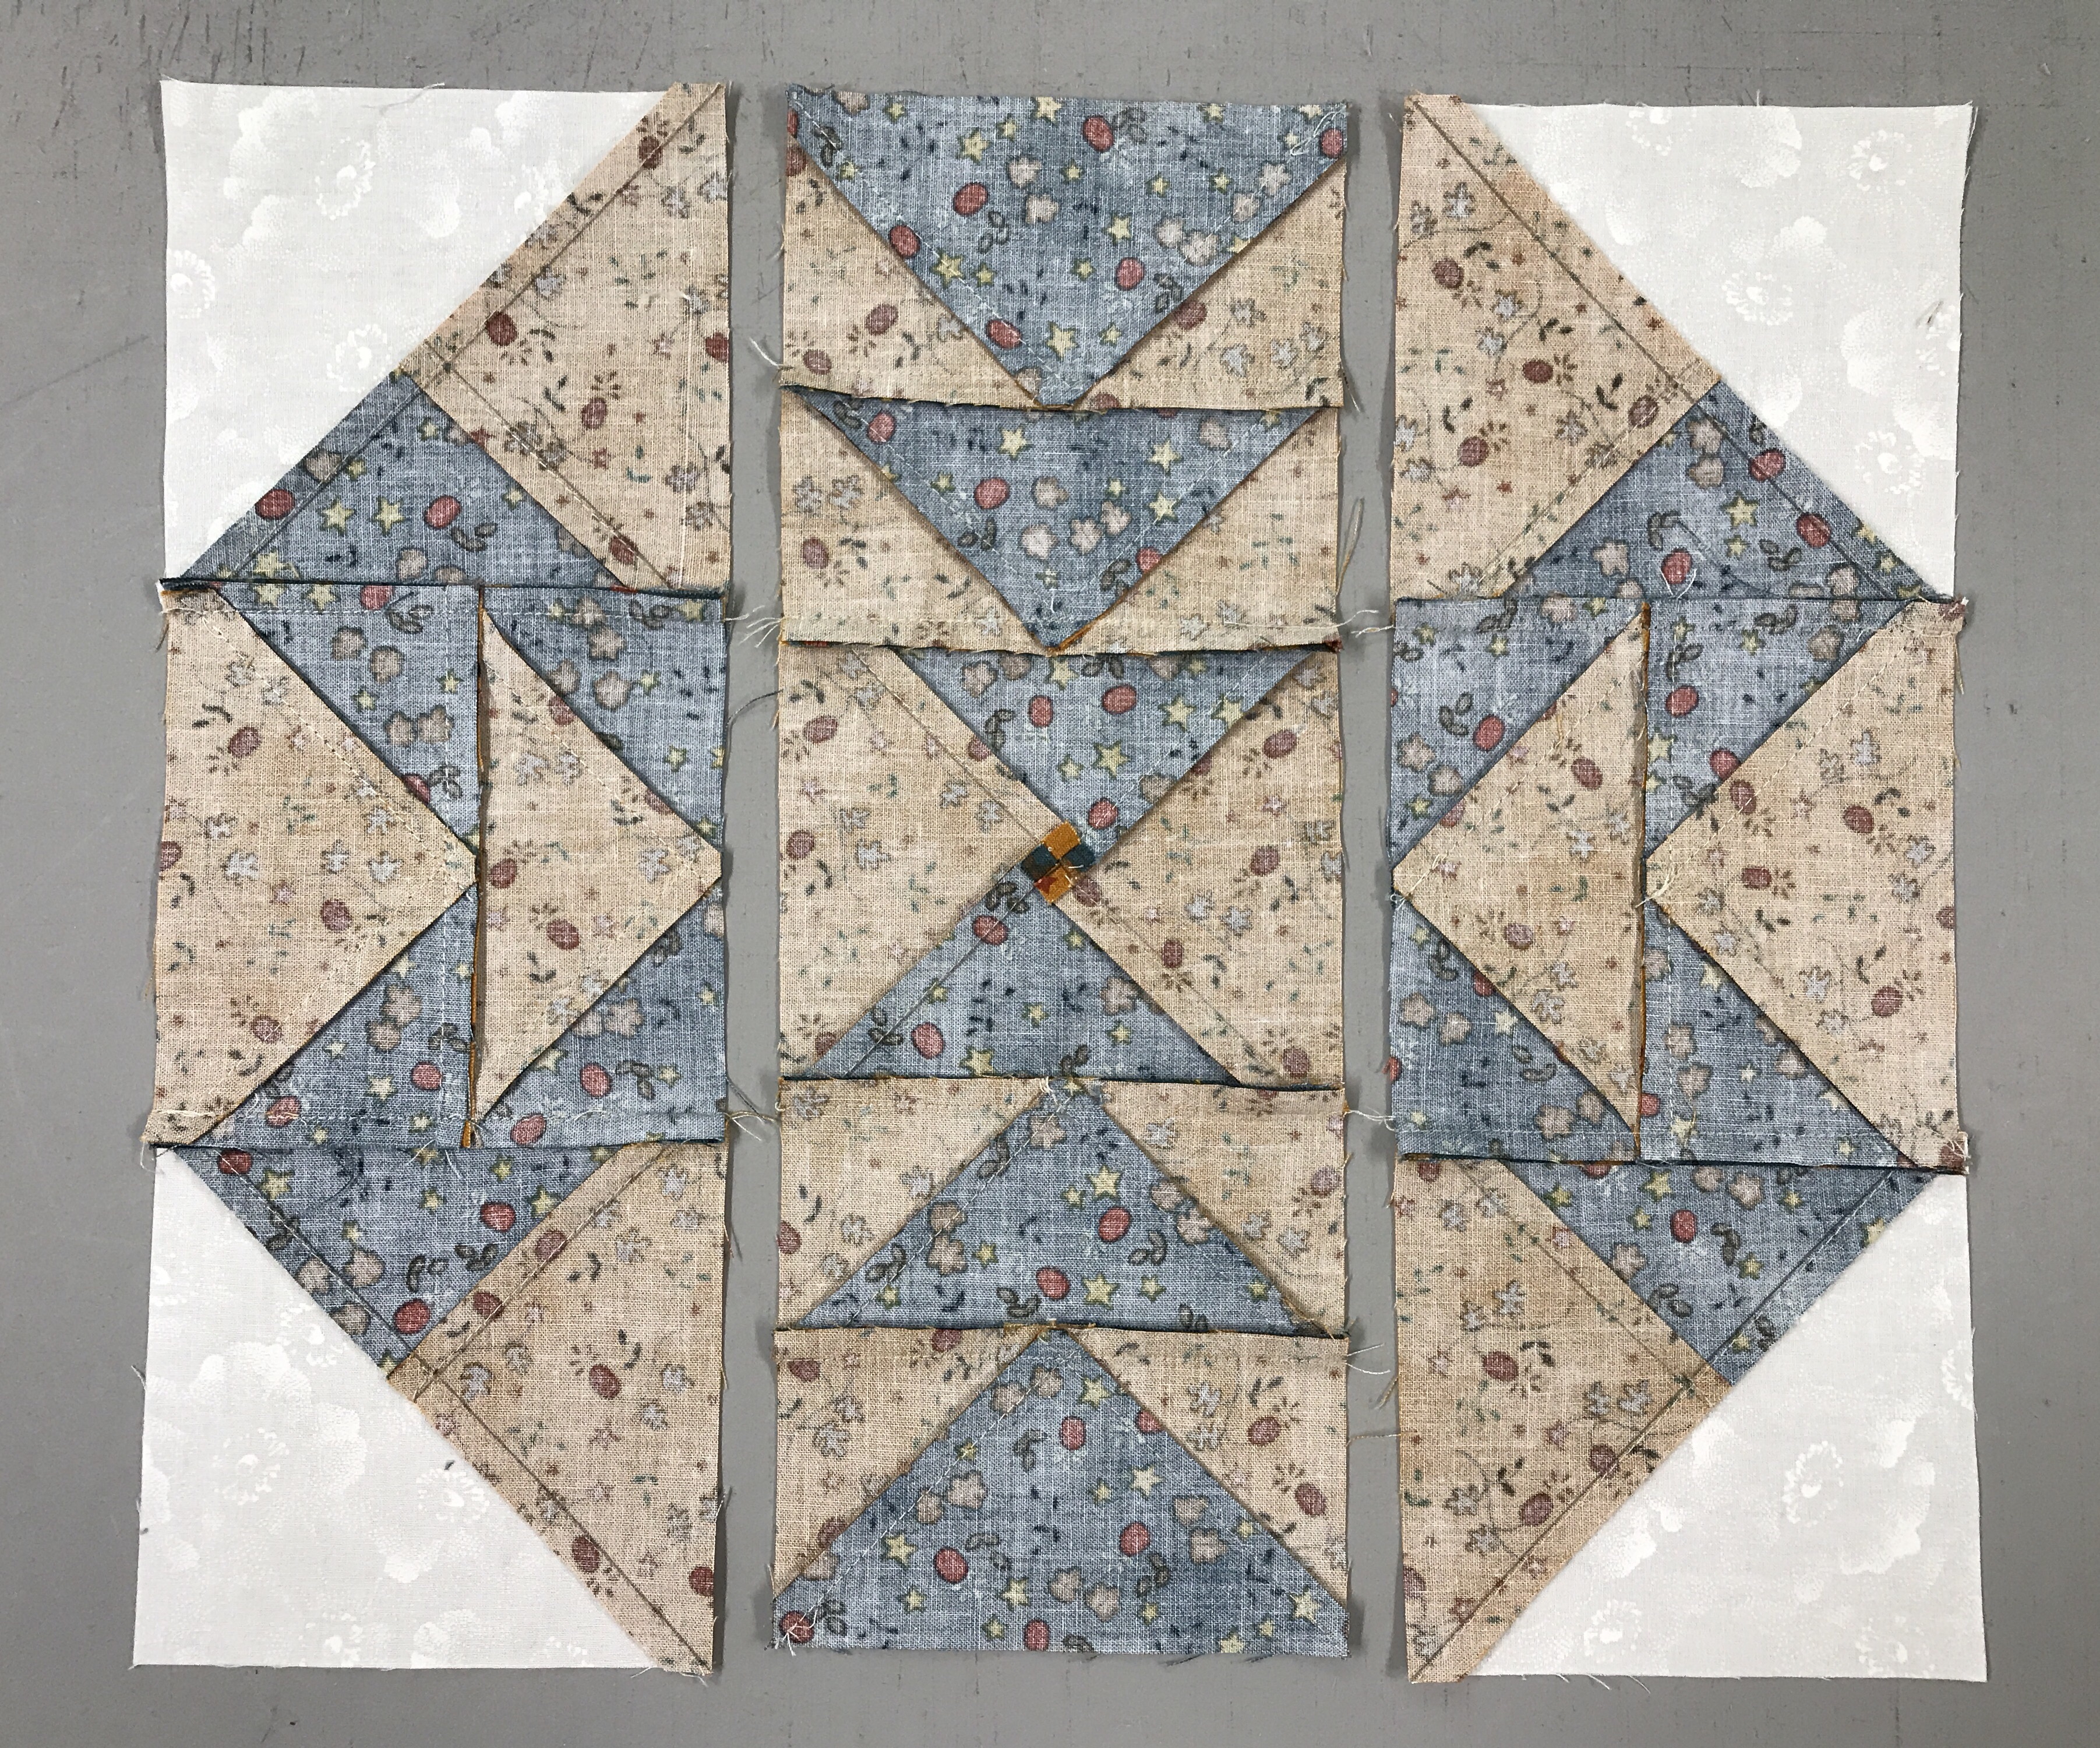
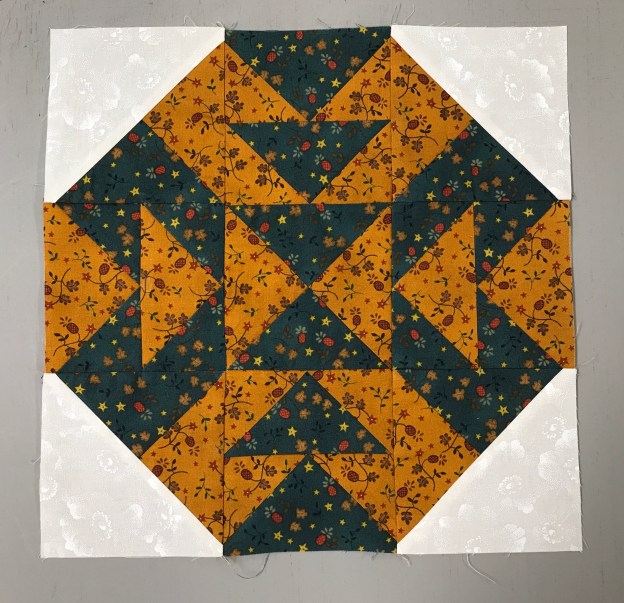
This shows how I pressed the block.  The outside rows were press toward the combination units, while the center row was press toward the quarter square triangle.  This allows the rows to nest nicely.

img_0714

The finished 12″ Capital T Variation block! I love It!

BlockBuster 3 – Flying Dutchman

Flying Geese are fun to make when you know how!  When you learn to use Deb Tucker’s Wing Clipper, you will make 4 flying geese at once.  With the Wing Clipper you can make finished size flying geese in 10 sizes from 1/2″ X 1″ to 5″ X 10″.  This block is called the 03 Flying Dutchman and consists of 8 flying geese.  All the instructions you need to make the flying geese units required for this block came with your Wing Clipper’s instructions.  There is a chart with step by step graphics and directions.

I chose the third option in the supply list.  Remember the large square becomes the large triangle or body in your flying geese, and the small squares become the side triangles or wings in your units.

I am making my BlockBuster blocks 12″ finished size.  That way when I’m done I can make a quilt.  When using the Wing Clipper you start with one large square and 4 small squares.  IMG_0575

For a 12″ block, my units need to be 3″ x 6″ finished size.  According to the chart in my instructions my large square should be cut 7 1/2″ and my small squares should be cut 4″.  Because I need 8 flying geese units I cut 2 large squares and 8 small squares.

IMG_0576

Take your Magic Wand and on the back of your small squares draw lines diagonally corner to corner as shown above.

IMG_0577

Position two small squares on one large square as shown.  When positioning, nudge the small squares toward the center a thread or two.  This gives you a little more to trim off.

IMG_0578

Sew on lines and cut apart as shown above.

IMG_0580

Press toward the small triangles.  Position another small square as shown above, again nudging the small square away from the edge about 1/16th of inch.

IMG_0581

Sew on the lines and cut apart, and press.

IMG_0582

You now have 4 oversized flying geese units.  Repeat the same process with the second large square and 4 small squares.

IMG_0583

You now have 8 oversized flying geese units.

IMG_0585

Position your oversized flying geese unit horizontally on your cutting mat, with unit pointed toward you as shown above.  Align the diagonal guide lines of the Wing Clipper with the sewn seams of the flying geese unit. Trim the two sides.

IMG_0587

Rotate your unit and reposition your Wing Clipper to align clean-up guidelines with the previously trimmed raw edges and trim.  Check your instruction for Left-handed trimming.

Lay out your units and sew 2 together to make 4 quarters, pressing your seams in the directions the geese are flying.

IMG_0591

Sew your 4 quarters together.

OBW #60 and so much more…..

It’s December 15, 2016.  I haven’t blogged in 3 months as there was an illness in my family that took precedence.  My family has received quilts from me for Christmas for many years.  I hadn’t done that in a while, but this year I wanted to show my love for them.   I made my son Josh a One Block Wonder (OBW).  Josh is my very own Grizzly Adams.  This is my 60th One Block Wonder and is named “Camping with Friends”.  Camping with Friends was made with Alexander Henry Fabric with a 12″repeat .

Camping with Friends

Camping with Friends


Josh called me last night.  He loves the quilt.  It has grizzly bears on the back.

I finally completed a King size “Yellow Brick Road” or my oldest son Jason.  He was thrilled. He waited a long time for this quilt.

OLYMPUS DIGITAL CAMERA

Jason’s King Size Quilt.

As you can see, Tuck is always near by.  I made my youngest Granddaughter Samantha, a Minnie Mouse Quilt.  That prompted my sister Mary to get her a Minnie Mouse.  So, I made Minnie  a smaller scale quilt like Sam’s.  The label says “This quilt made for Minnie Mouse, By Sam’s Grandmother Jackie O’Brien”.  Of course everything fit into a tote with Minnie Mouse embroidered on it.

07-minnie

Sam & Minnie’s Quilt

I had the great pleasure to spend a few days with several Studio 180 Design Certified Instructors at Bridle Creek Bed & Breakfast in Hamilton, NY.  We were hosted by Barb Hipsley, proprietor extraordinaire.  What a wonderful time we had.  the photo below shows us all in our Minion pants.

12-group-shot

The “Minionettes” from right to left: Barb Hipsley, Connie Farland, Debbie Thomas, Diane Marvin, Donna Hanley, ending with myself.

This time was totally devoted to quilting.  I was able to make some small quilts for my sister Mary.  She loves to put them on tables.

This quilt measure 39″ by 49″.  It is from Deb Tucker’s book Hidden Treasures.  I made 5″ blocks using the Hunter Star Petite tool.  This size hunter star makes a great baby quilt.

img_0376

Curveball

OLYMPUS DIGITAL CAMERA

Looks great on this old trunk.

I named this “Mary’s Stars. It is my original design. I’m very pleased with it.  I used Studio 180 Design V Block & Corner Pop  tools.  The 6″ finished star blocks are the same block, I just reversed the colors.  It measures 39′ by 45”.

img_0378

OLYMPUS DIGITAL CAMERA

Looks great on this coffee table.

This one is called “Game Board” from a book of antique doll quilts.  It is only 22″ square.  Of course I Tuckerized it and used my Wing Clipper 1 to make all those Flying Geese.

img_0377

OLYMPUS DIGITAL CAMERA

Game Board


OLYMPUS DIGITAL CAMERA

Tucker

Happy Holidays to you all from Tucker and me.

Trim Your Trees With Tucker Tools

I love Christmas Tree quilts and wall hangings.  I’m always looking for ways to make Christmas tree quilts.  Two years ago I made “I Believe” for my youngest Granddaughter Sam’s first Christmas.

OLYMPUS DIGITAL CAMERA

I Believe

I Believe Christmas tree Quilt was made using the Studio 180 Design V Block tool and of course I had to add machine embroidery.

This year I wanted to try some new techniques.  I absolutely love this wall hanging made with the Studio 180 Design Split Rects tool.

OLYMPUS DIGITAL CAMERA

Split Rect’s Christmas Tree

This Split Rects Christmas Tree was made with 1 1/2″ x 3″ finished units, but you can change the size of this quilt by using any of the 8 sizes provided in the Split Rects instructions.

I had some lime green dupioni silk and decided to make Kermits Swamp Spruce by using all 10 sizes of my Studio 180 Design Wing Clipper 1 tool.

OLYMPUS DIGITAL CAMERA

Kermit’s Christmas Tree

As you know when making flying geese with the Wing Clipper you make 4 at a time.  So I only needed to make 3 size groups to get all 10 flying geese for Kermits Christmas Tree. These wall hanging can embellished easily by adding beads or costume jewelry. Don’t we all have Christmas pins collected over the years.

Of course if you need to whip up a gift quickly just make one set of the 5″ x 10″ flying geese and trim them down.

OLYMPUS DIGITAL CAMERA

Wing Clipper Christmas

The Wing Clipper Christmas Tree wall hanging is very quick and easy.

Just click on any of the links provided and start trimming your trees.  Please let me know if you have any questions.