Join me for a Converging Geese Zoom class September 15th at 11:00 AM. Sign up and download the supply list here (pattern is included with the class fee):
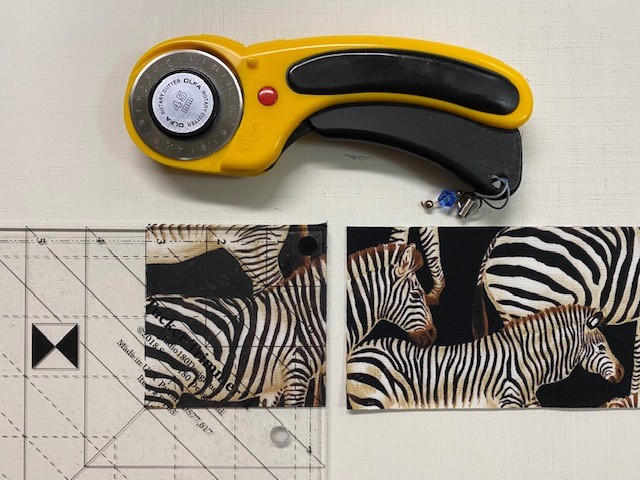
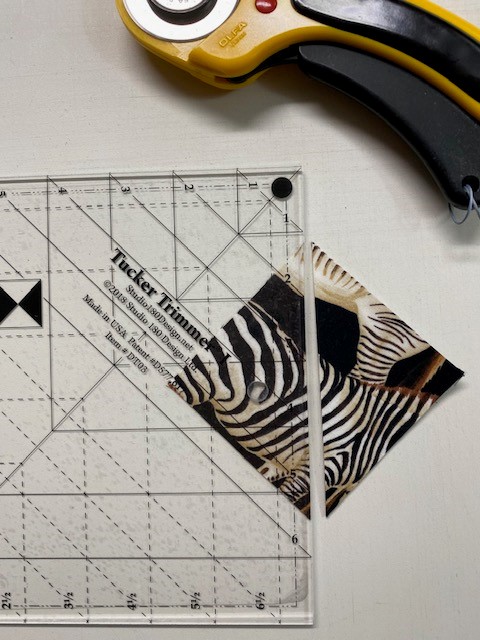
I created this pattern November 2018 for an Island Batik Log Cabin Challenge. It has been a popular pattern in my Etsy Shop ever since. This is a variation on the Log Cabin block and is a fun way to use your Square/Squared, Tucker Trimmer I & Wing Clipper I tools.
I named my original design “Converging Geese” because each block has Flying Geese & Geese on the Edge units, along with Square/Squared units.
Each 16″ block contains 12 – 2″ x 4″ finished flying geese, 4 – 6″ finished geese on the edge & 1 square/squared unit.
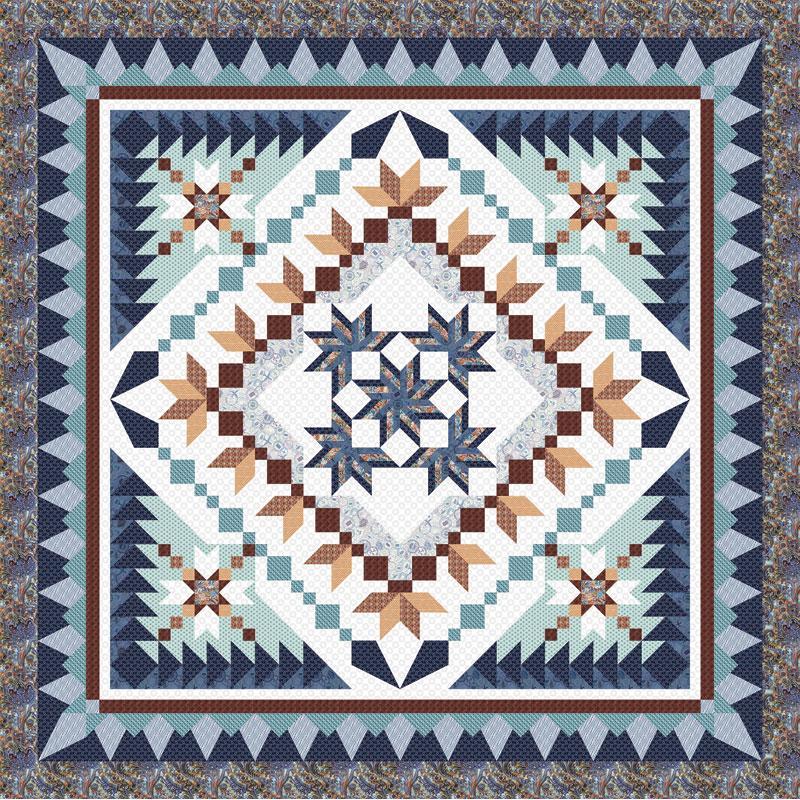
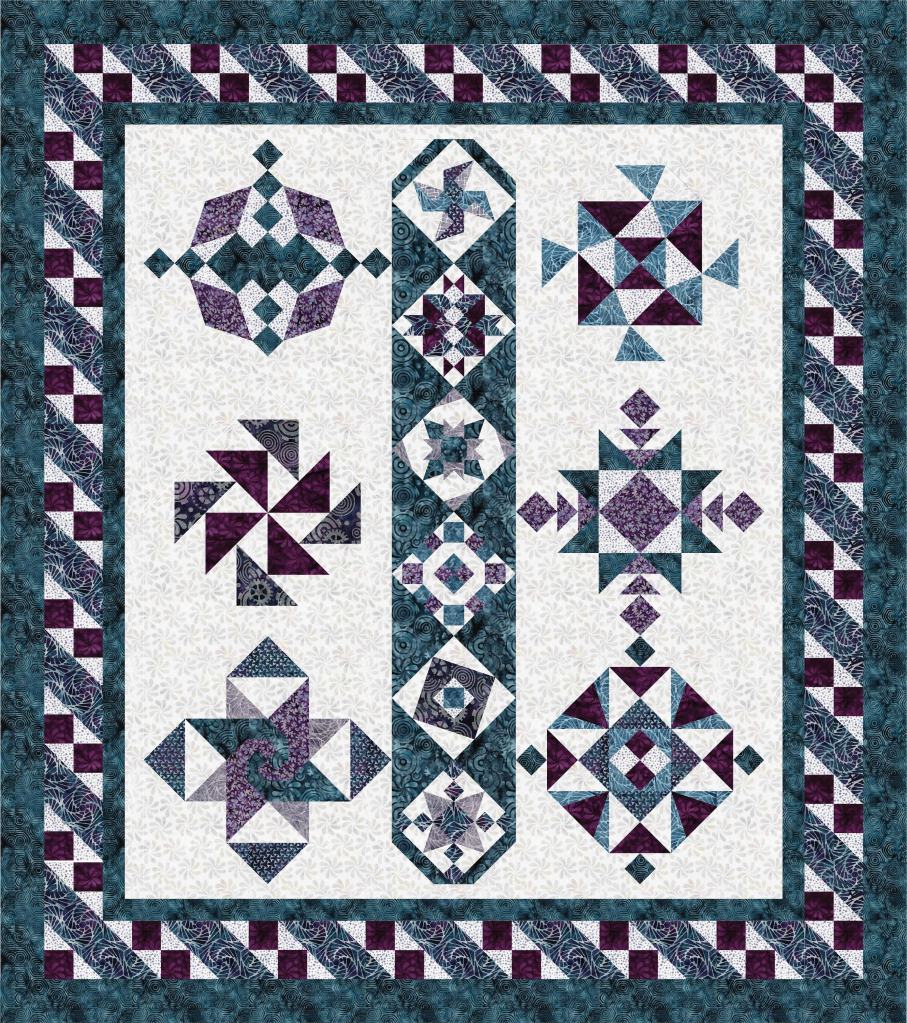
Welcome, Welcome, Welcome to Stitchin Heaven’s Journey’s BOM – Month 12! This has been a spectacular year. You all have worked so hard. Thank you to Deb Luttrell, Founder of Stitchin Heaven, Deb Tucker, Creative Kingpin of Studio 180 Design, Marie Bostwick New York Times best selling author and Jason Yenter Fabric Designer & President of In the Beginning Fabrics for making this all possible. Now to assemble your quilts!
Print 4
Print 6
Print 11
Print 12
Note: WOF stands for width of fabric. This month you will assemble your quilt top and add the borders.
Gather the following pieces:
4 Corner Sections from Month 6
Block K from Month 7
4 Middle Edge Sections from Month 9
4 Pieced Border sections from Month 11
Finishing Instructions
Step 1 – Lay out the Corner Sections, Middle Edge Sections, and Block K as shown in the diagram on page 35.
Step 2 – Stitch the sections together into rows, press the seams open. Stitch the rows together to create the quilt center.
Step 3 – Attach the 72½” Print 11 inner border strips. Find the center of the quilt and the center of the 72½” border strip. Match the center points with right sides together, pin. Match both ends of the strip with the ends of the quilt and pin in place. Ease the quilt top to match the border strip and add more pins between the others to hold the border in place as you stitch. Attach the other 72½” border to the opposite side in the same manner and press toward the inner border strip.
Step 4 – Repeat step 3 for the 75½” Print 11 border strips.
Step 5 – Attach the 75½” Print 6 middle border strips. Using two of the border strips, stitch them to the quilt in the same manner as in step 3. Press toward Print 6.
Step 6 – Stitch a Print 4 middle border corner stone to each end of the remining 2”x 75½” Print 6 borders. Press toward the middle border.
Step 7 – Attach the remining two middle border strips to the quilt as described in step 3. Make sure to nest the seams. Press toward the middle border.
Step 8 – Add the pieced borders. Start with the borders that do not have the N Units on the ends. Orient the pieced borders so that the Corner Pops are against the middle border and the points of the V Blocks are pointing away from the quilt center. Refer to the diagram. Find the center of the quilt top and the center of the pieced border. Match the centers and pin. Match each end and pin. Ease the border to match the quilt top and add more pins between the others to hold the border in place as you stitch. Stitch in place. Press toward the middle border.
Step 9 – Repeat step 8 for the other pieced borders with the N Units attached to the ends. After you have matched the centers and the ends, make sure that you nest the Corner Beam seam with the seam attaching the pieced border.
Note: We recommend that you wait to cut your outer borders to length until you can measure your quilt top. To determine your specific border length, measure the longest side of your quilt in three different places. If those measurements are different, add the three measurements together and divide by three. That will be the length that you need to cut your first two borders. Once the first two borders are attached to the quilt repeat the process for the remaining two sides.
Step 10 – Add the outer borders. Find the center of the quilt and the center of the 90½” outer border strip. Match the center points with right sides together, pin, match either end of the strip with the ends of the quilt, and pin in place. Add more pins between the others, about every 4”, to hold the border in place as you stitch. Attach the other 90½” border to the opposite side in the same manner and press toward the outer border strip.
Step 11 – Repeat step 10 for the 102½” outer border strips.
Step 12 – Finish with Batting, Backing, Quilting, and Binding! Layer quilt top with batting and backing. Baste and quilt. Bind and Enjoy!
Journeys
Thank you all so much for joining us on this Journey! Congratulations on a job well done!
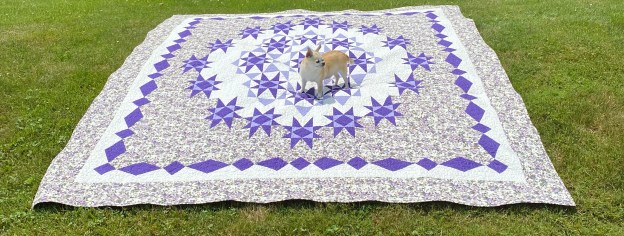
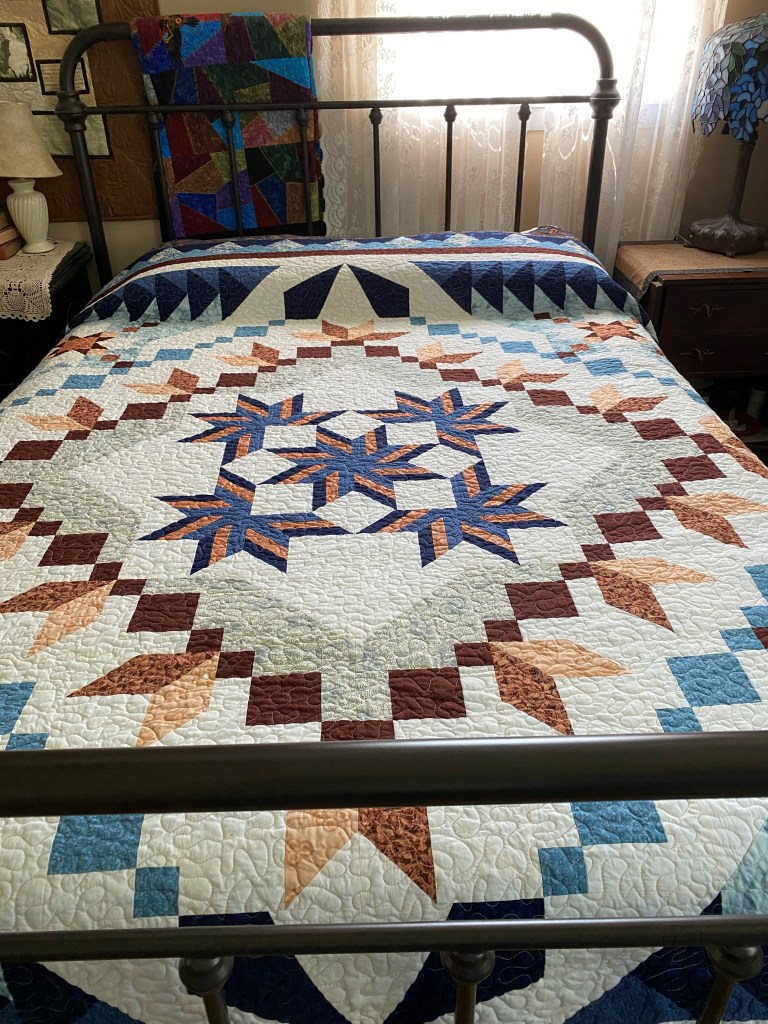
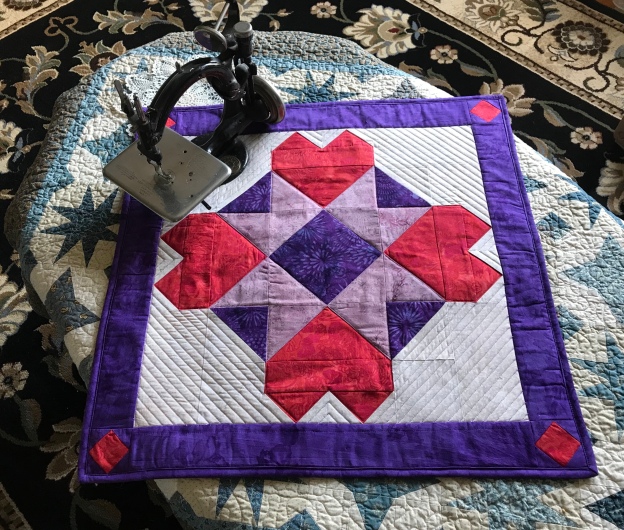
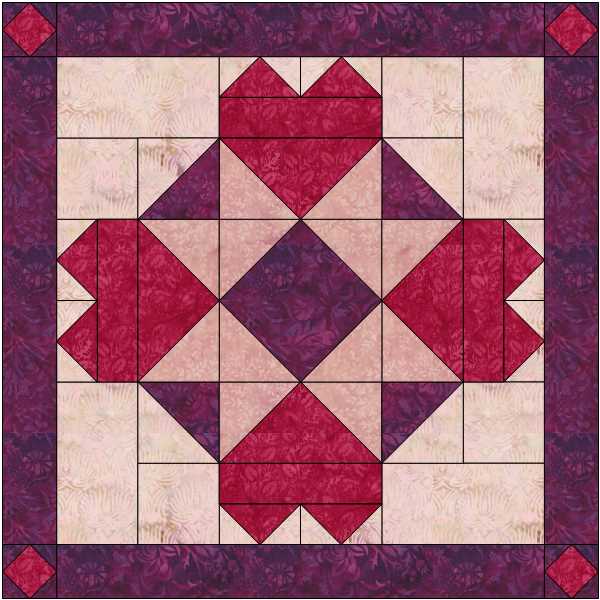
I made this quilt for my sister Mary. She came with me to every doctors appointment and every cancer treatment for nine months. Mary had to wait in the car during these (winter) appointments because of COVID restrictions. She loves this pattern and I was so happy to make it for her.
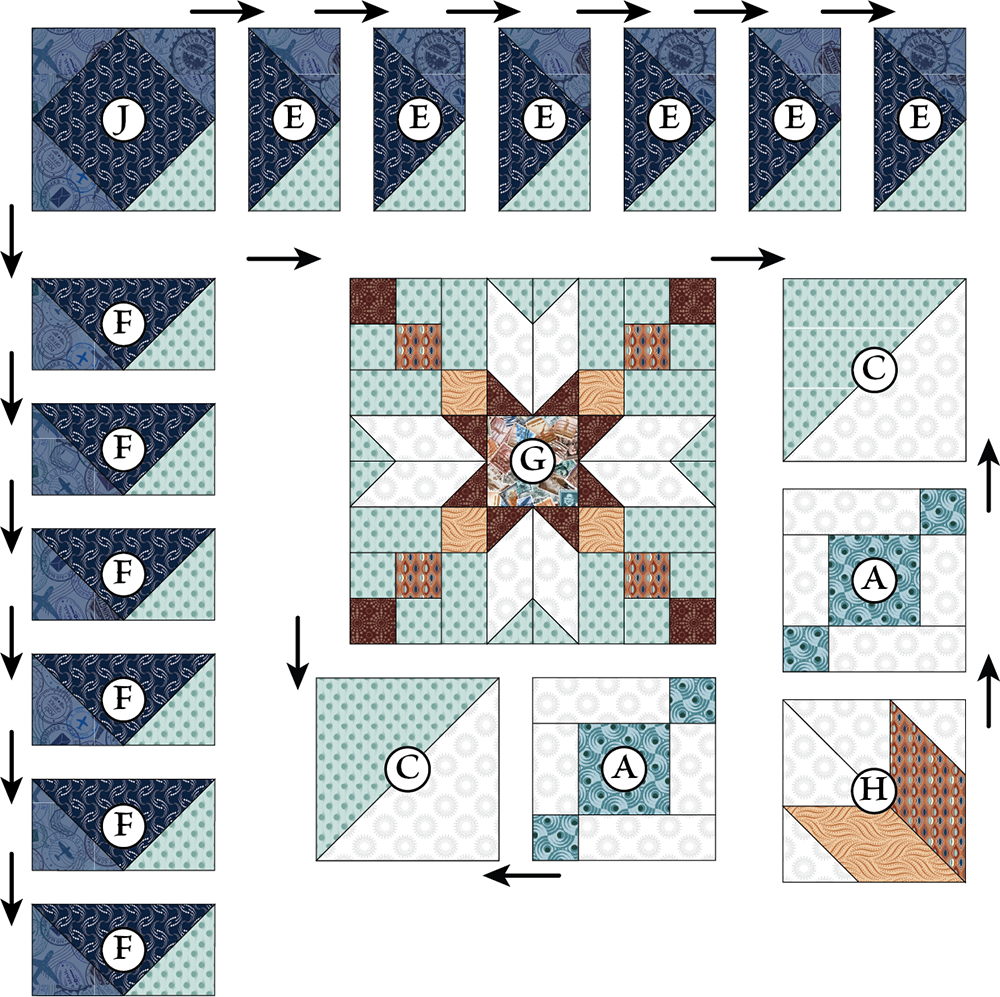
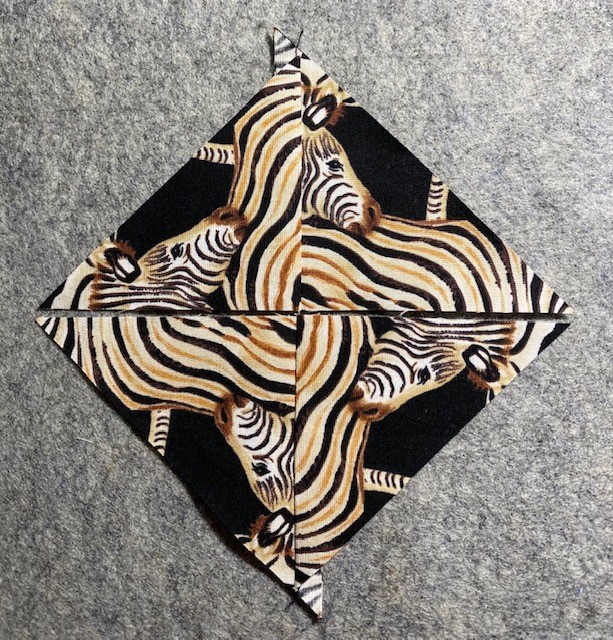
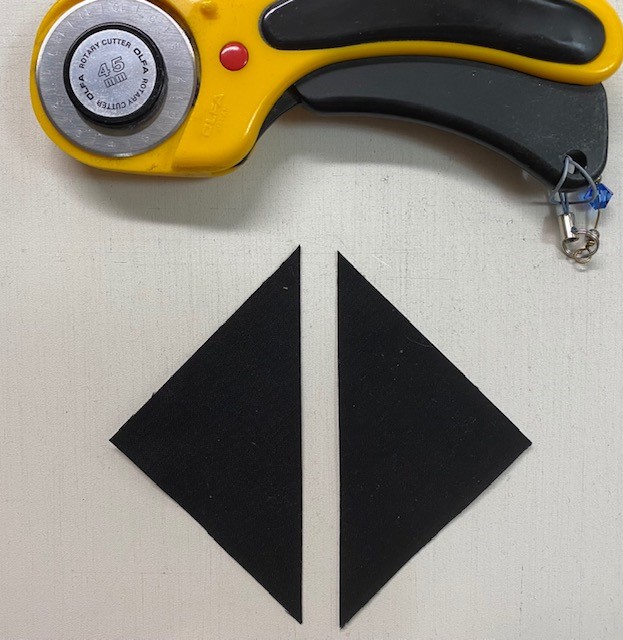
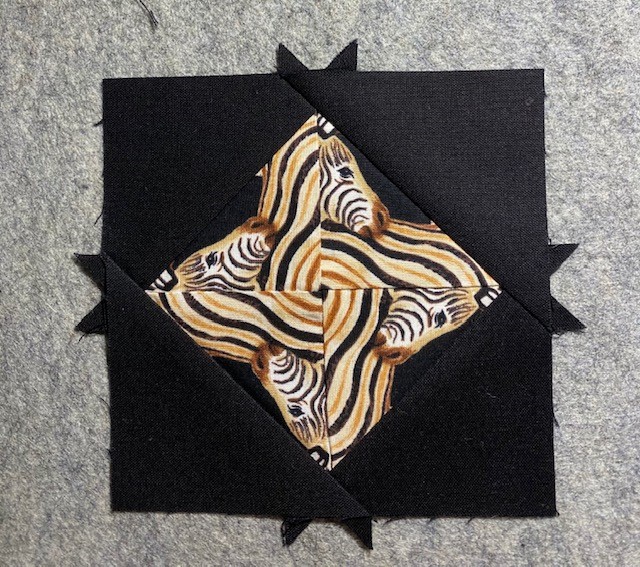
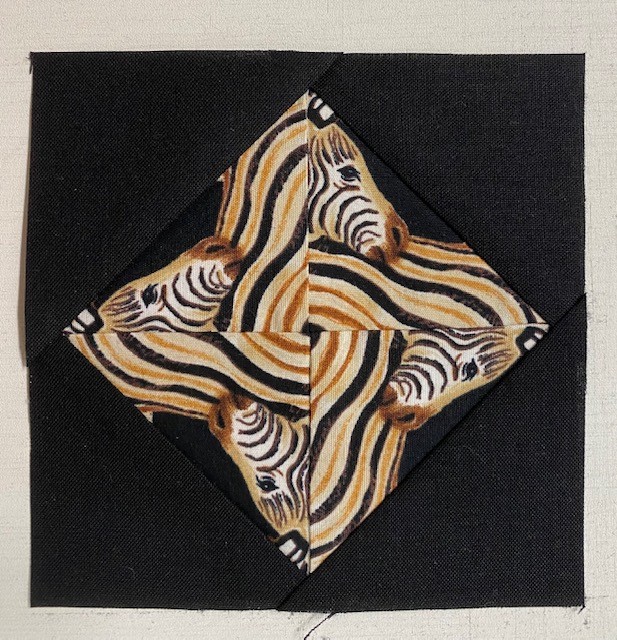
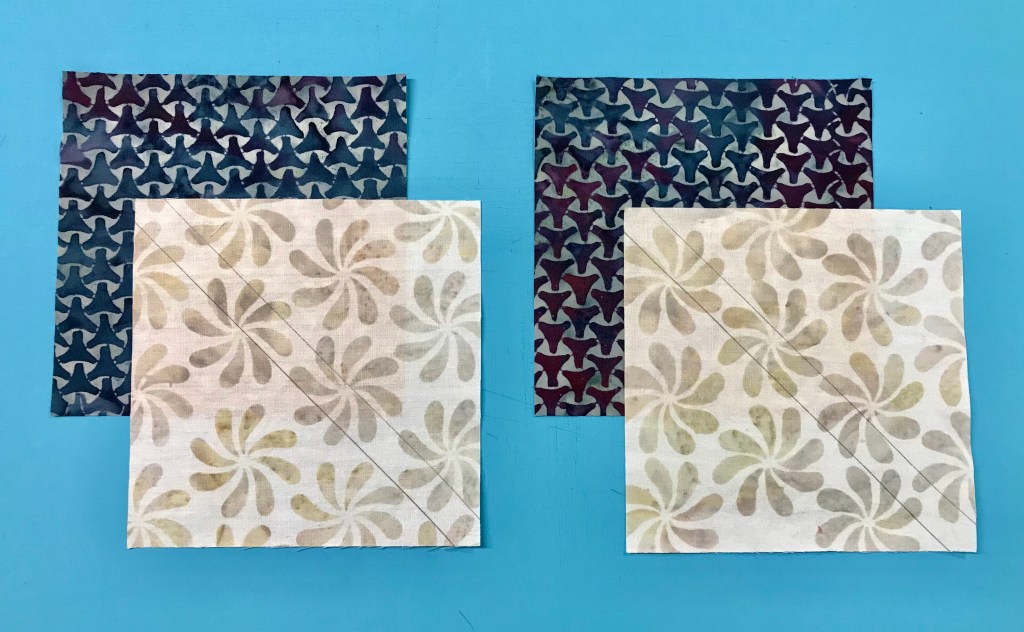
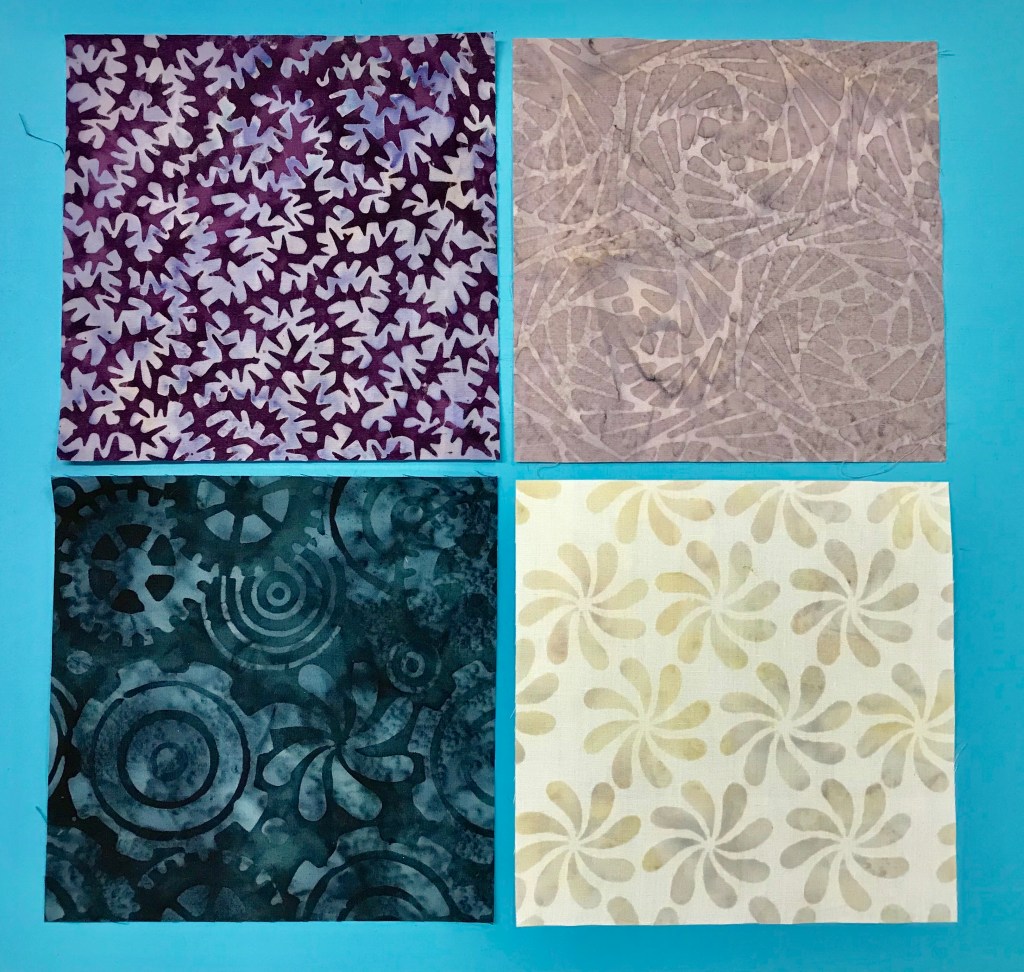
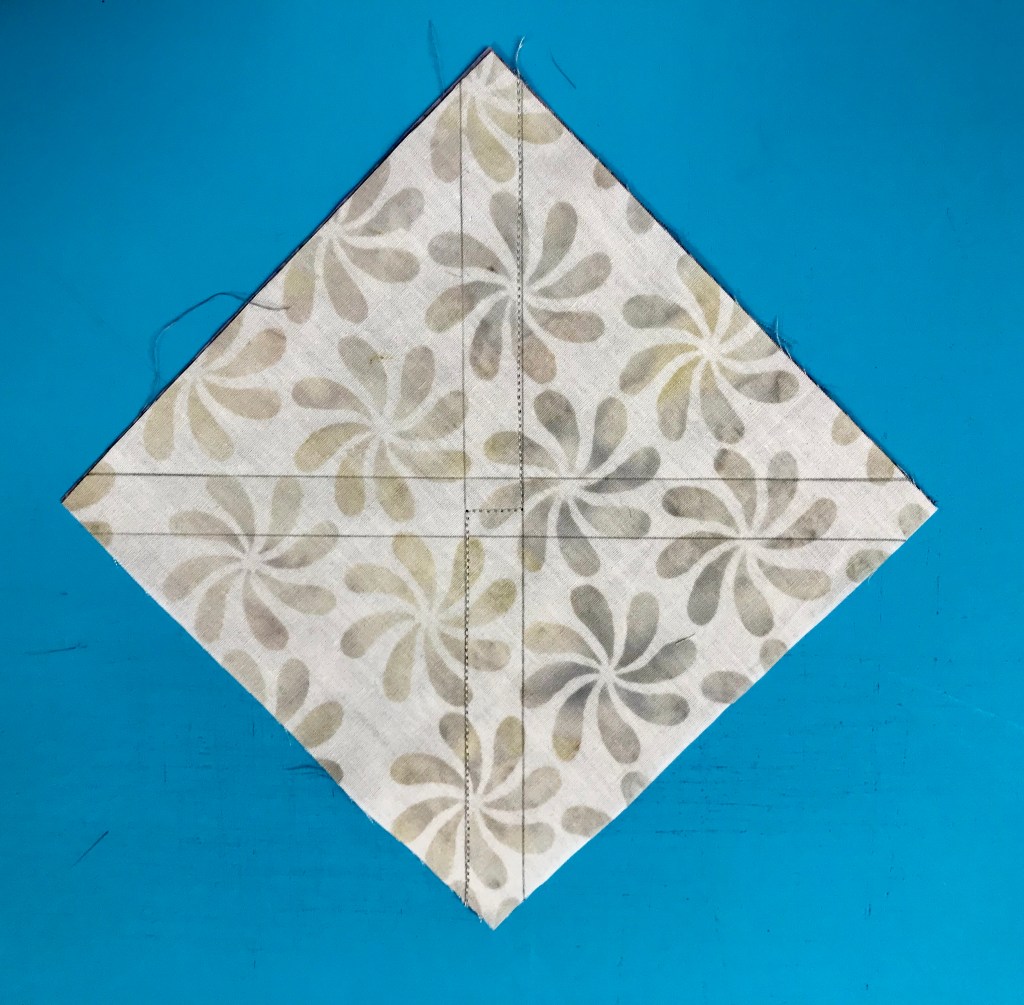
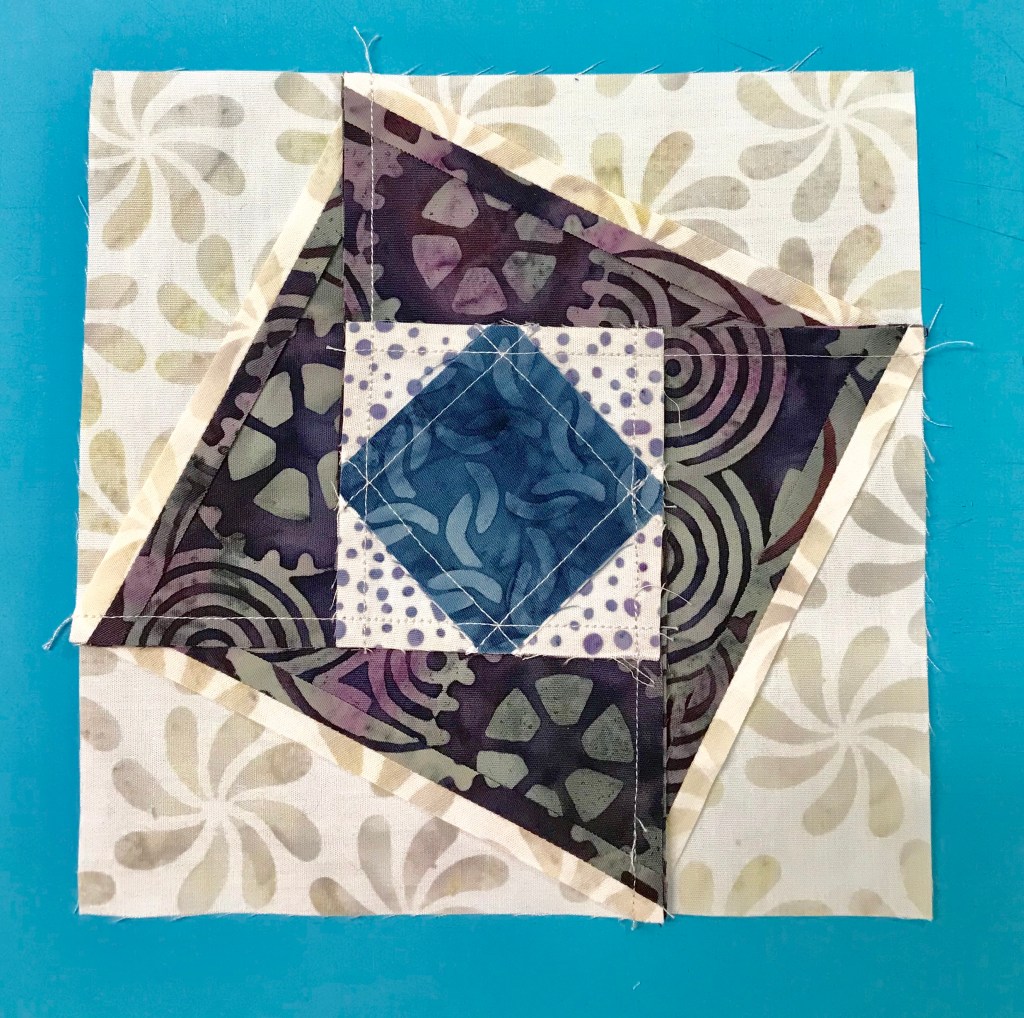
Welcome to Stitchin Heaven’s Journeys Month 6 – Corner Section. My helper for Month 6 is Sue Tucker, of Studio 180 Design. This month you are going to learn to make the Square/Squared unit using the Square/Squared tool. You will be using Prints 1, 2 & 5. Label your fabrics and use your best cutting skills when cutting your starter squares.
Prints 1, 2 & 5
Piecing Instructions
Diamond Squares
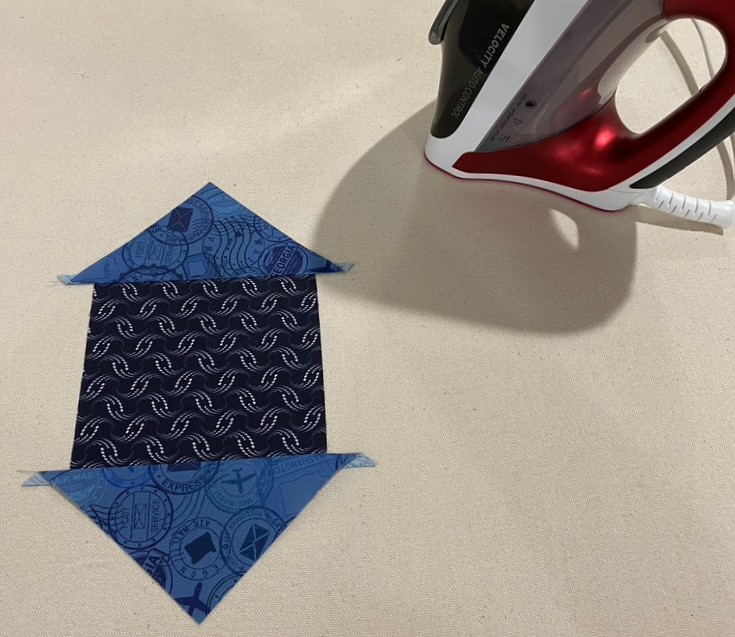
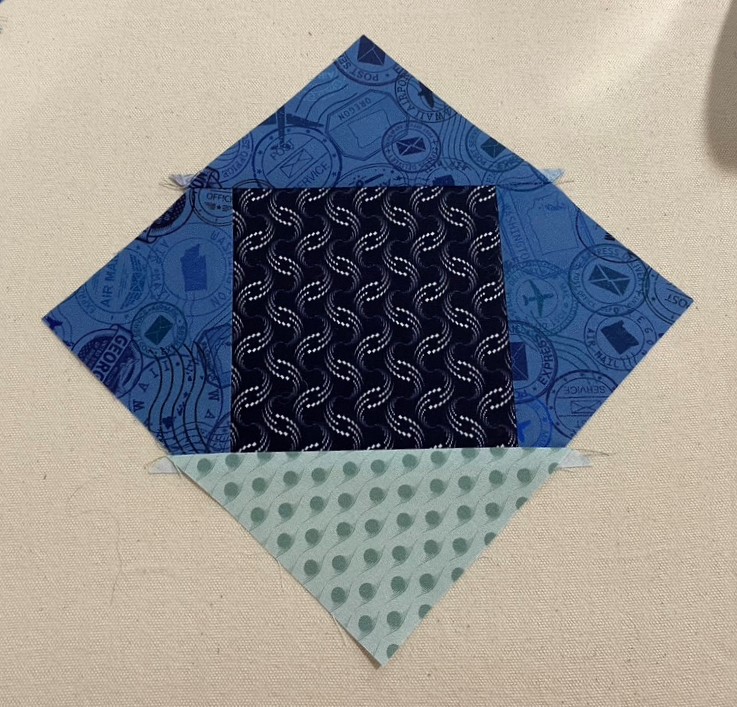
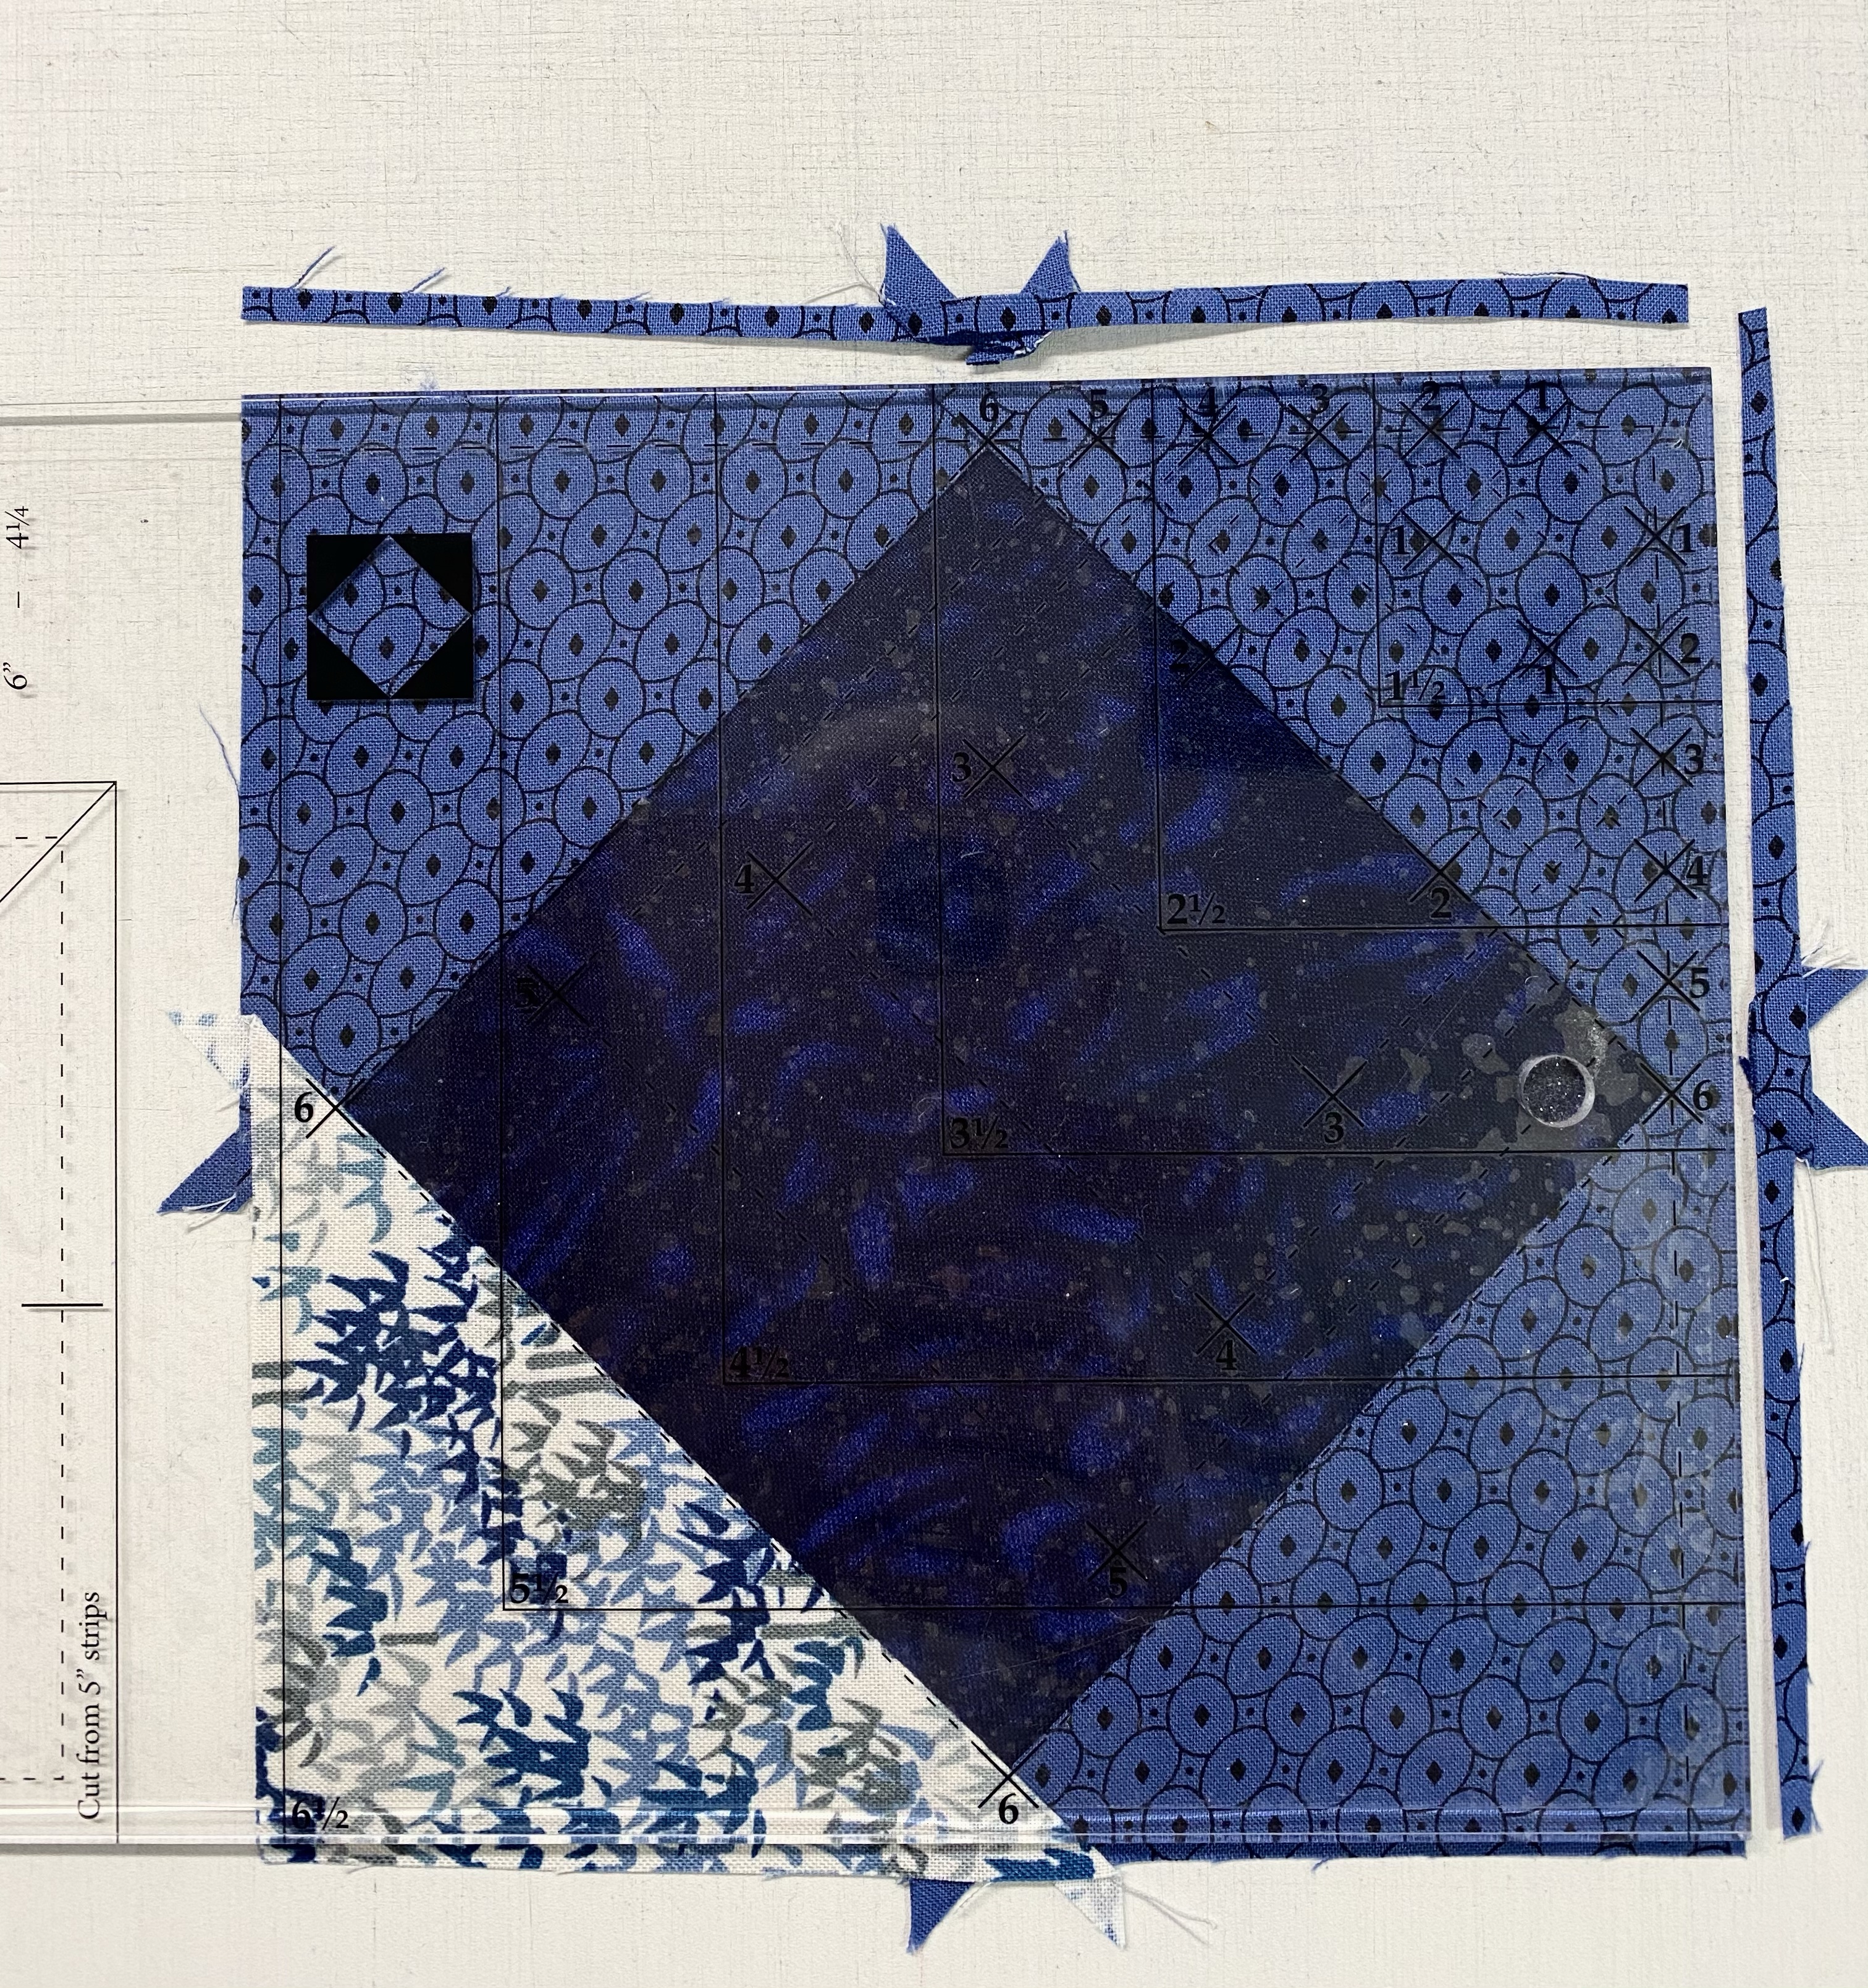
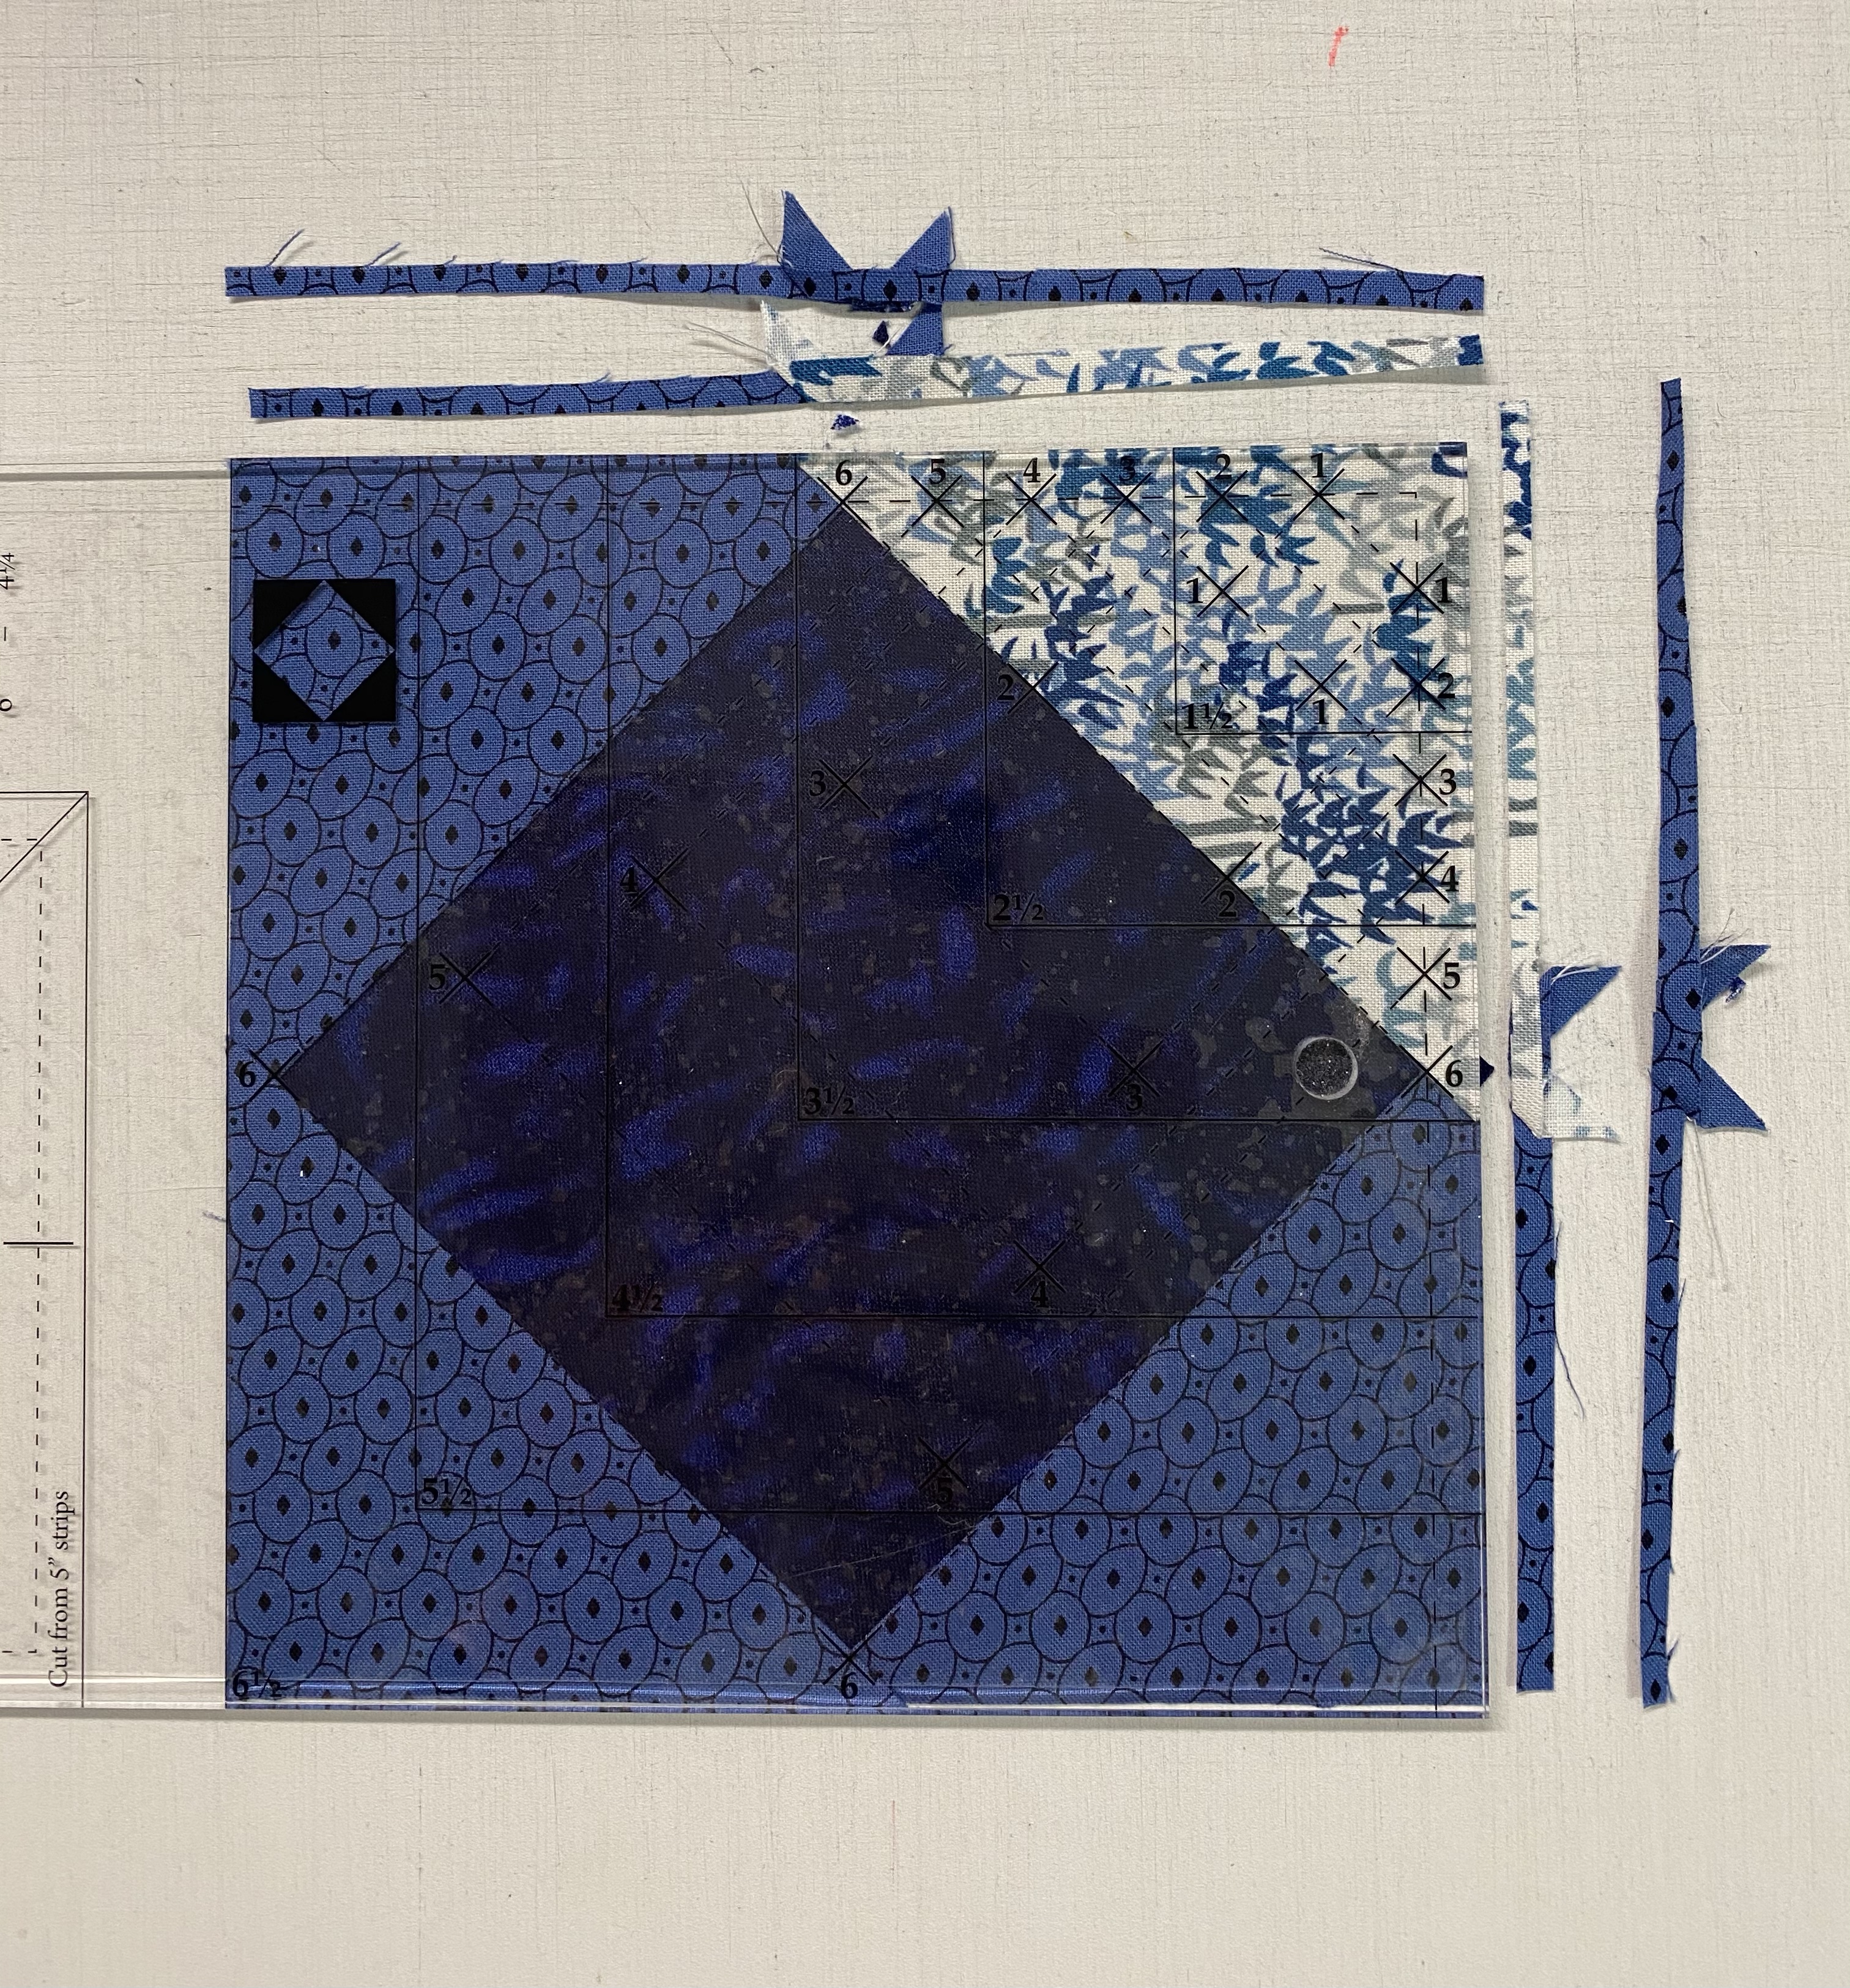
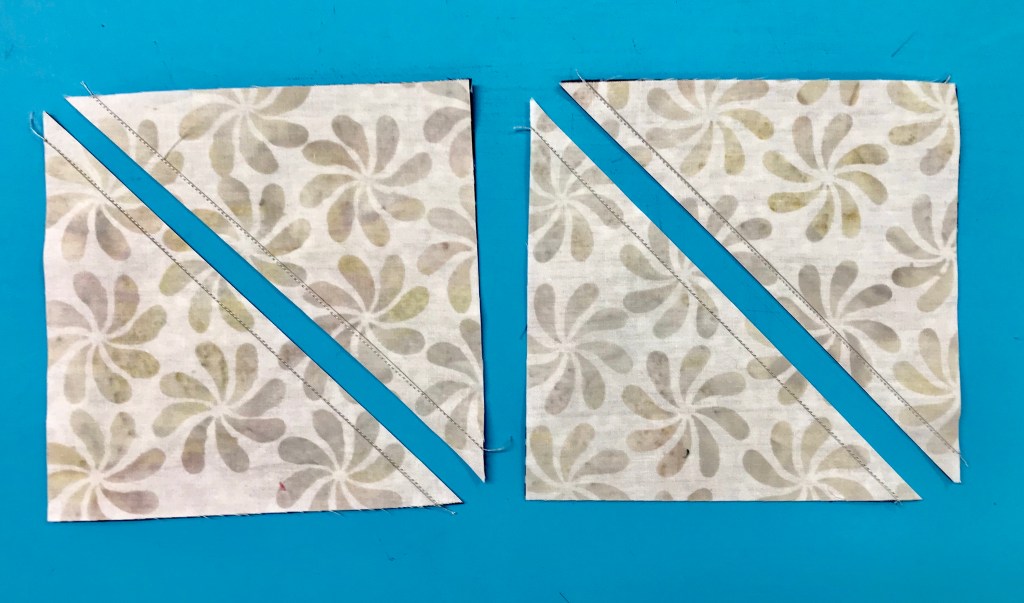
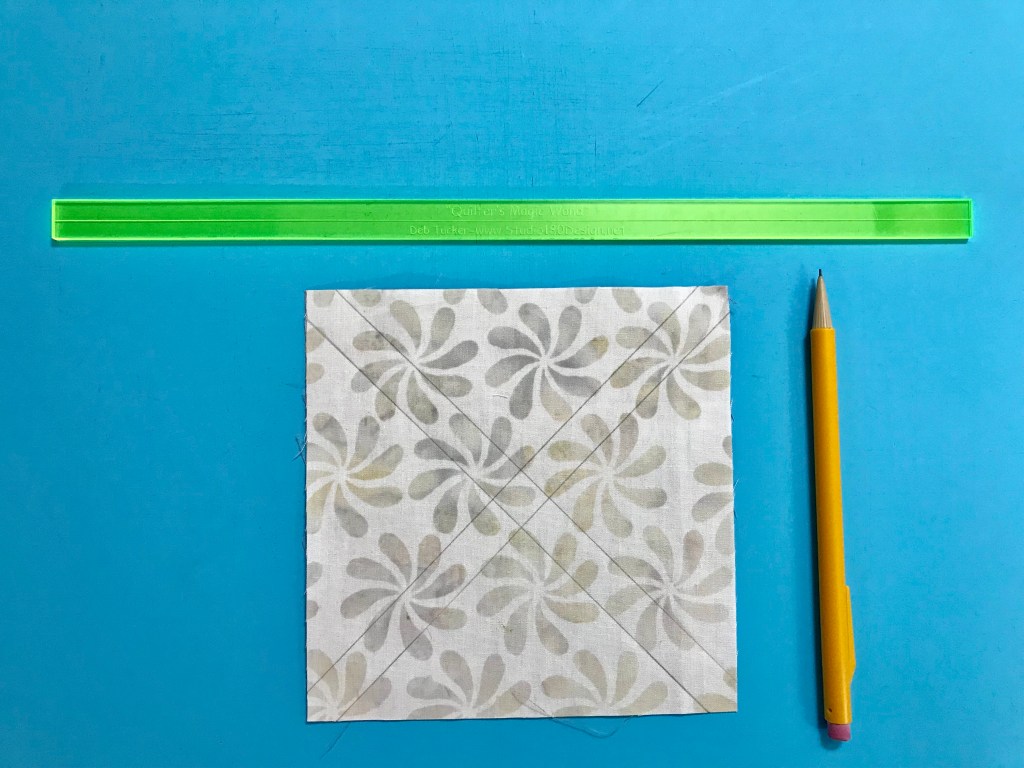
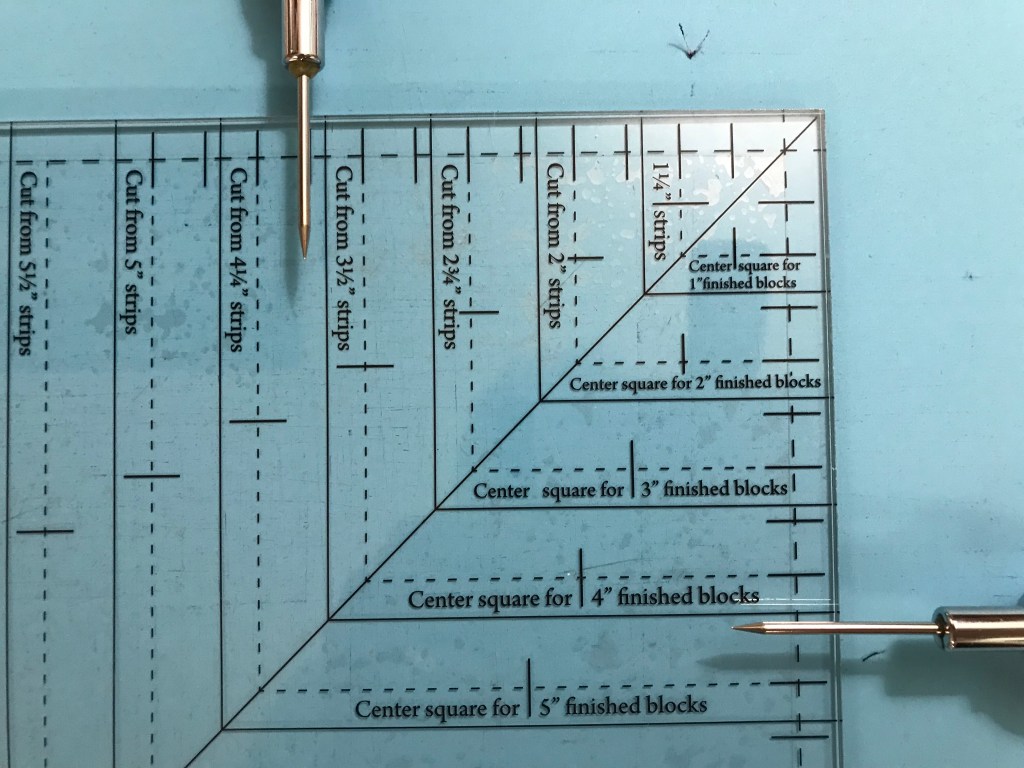
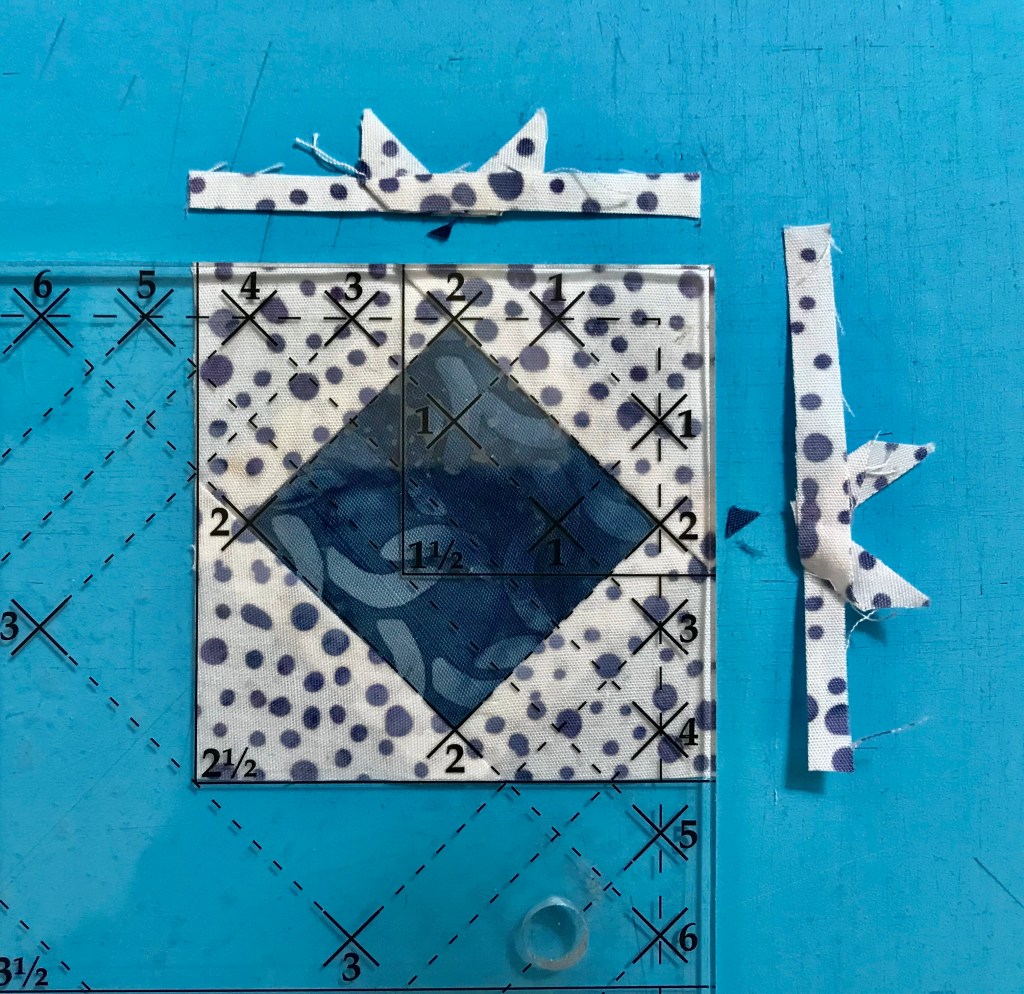
Step 1 – Lay your Print 1 strip on the mat and clean up the short edge. Locate the Center Square window template for a 6” finished unit. Place the solid lines of the window template on the raw edges of the strip end. Cut up the side and across the top to trim each square to a precision size. Cut 4 center squares.
Step 2 – Stitch two Print 2 side triangles to opposite sides of the center square. Stitch with the center square on top. Press the seams toward the side triangles.
Step 3 – Stitch one Print 2 side triangle to one remaining side of the center square and a Print 5 triangle to the other side. Press the seams toward the side triangles.
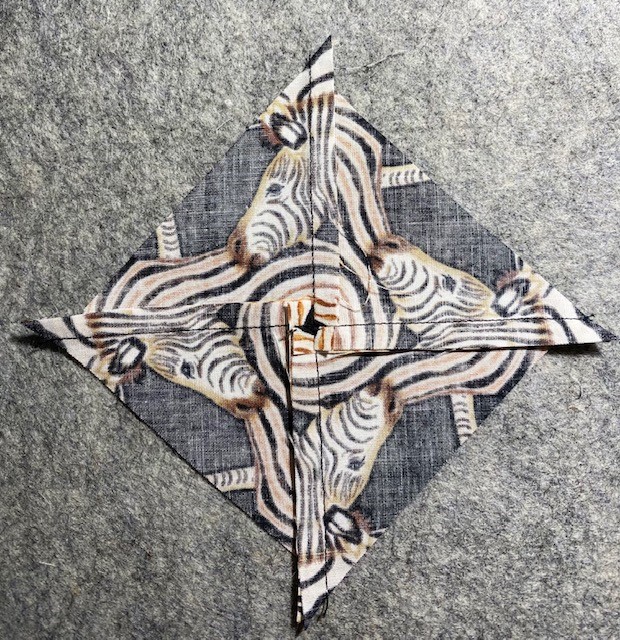
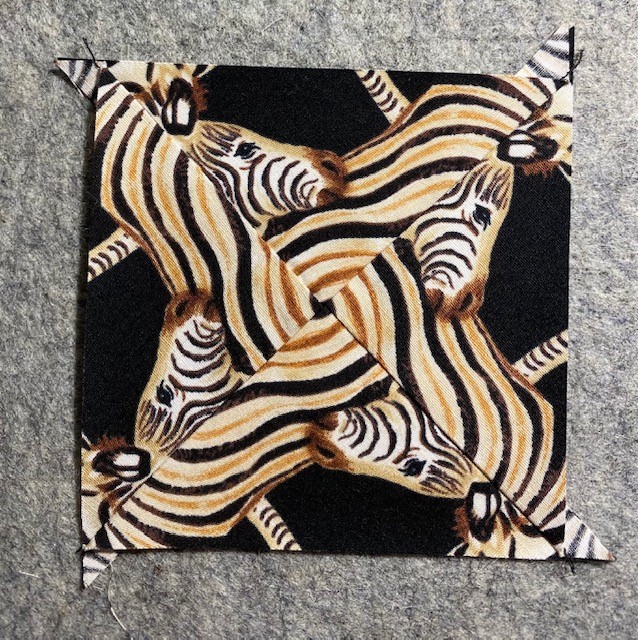
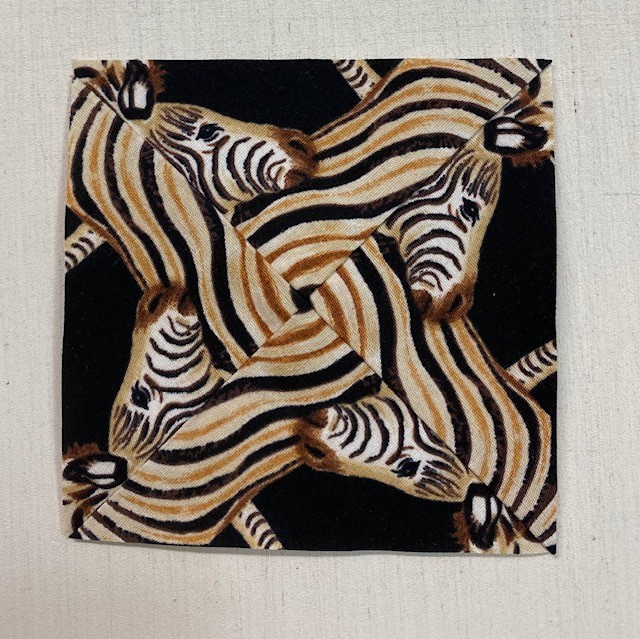
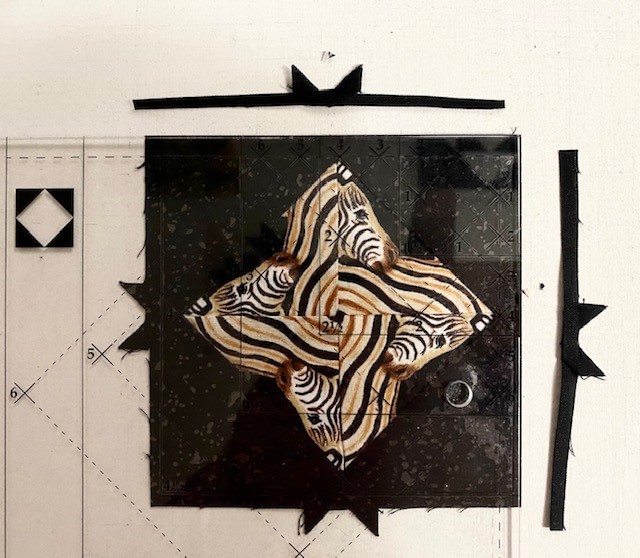
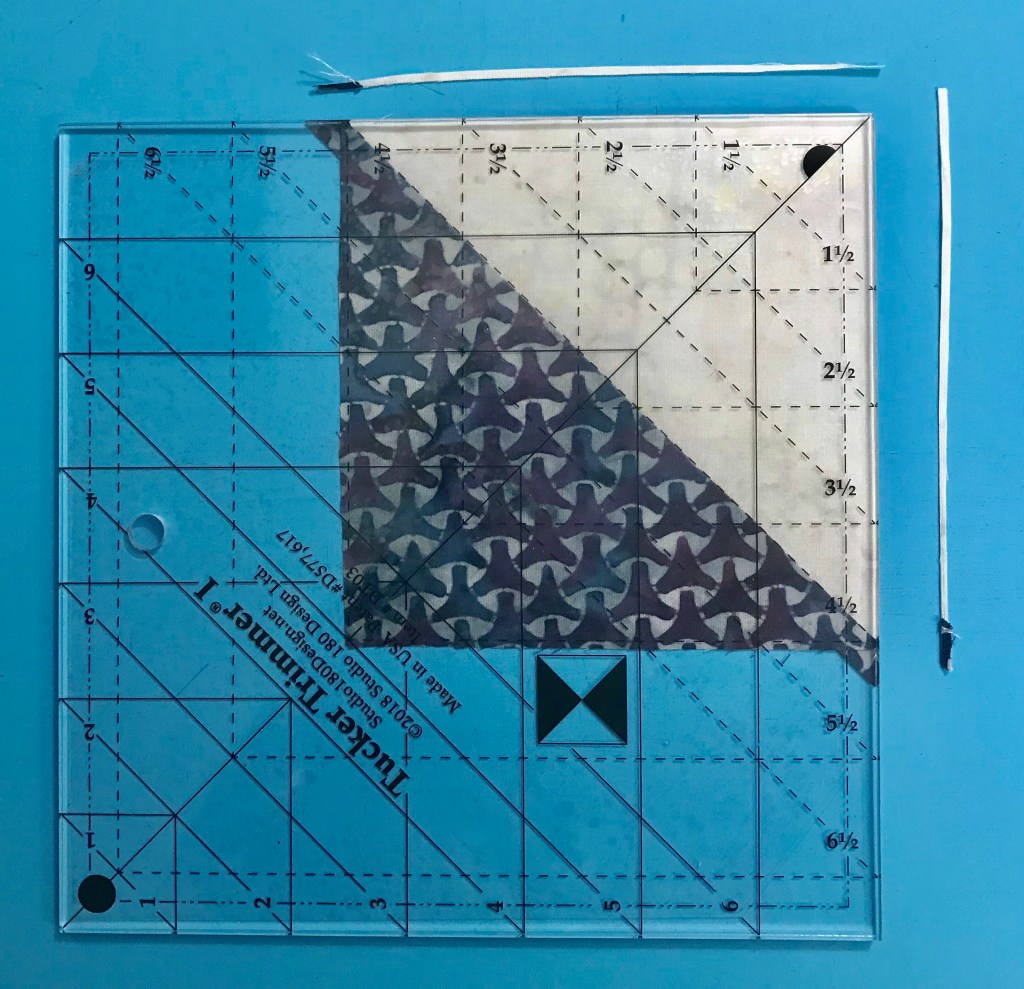
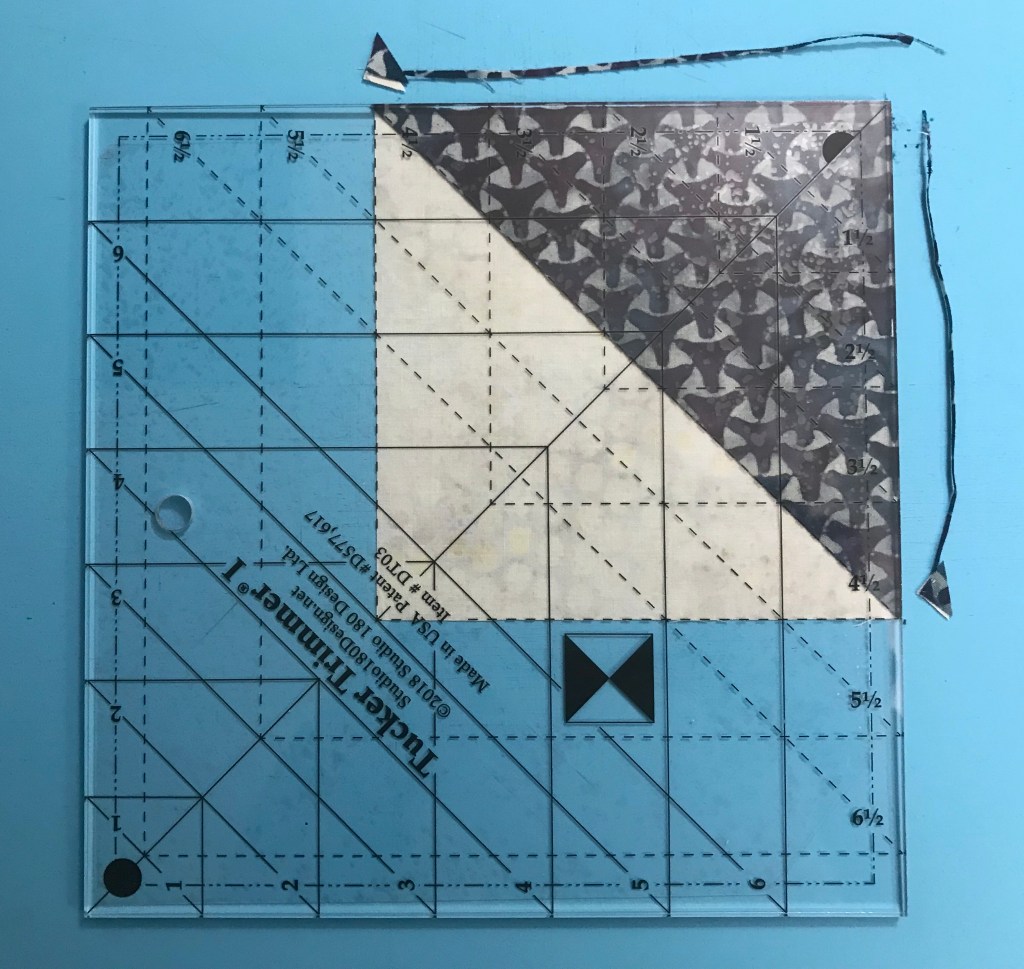
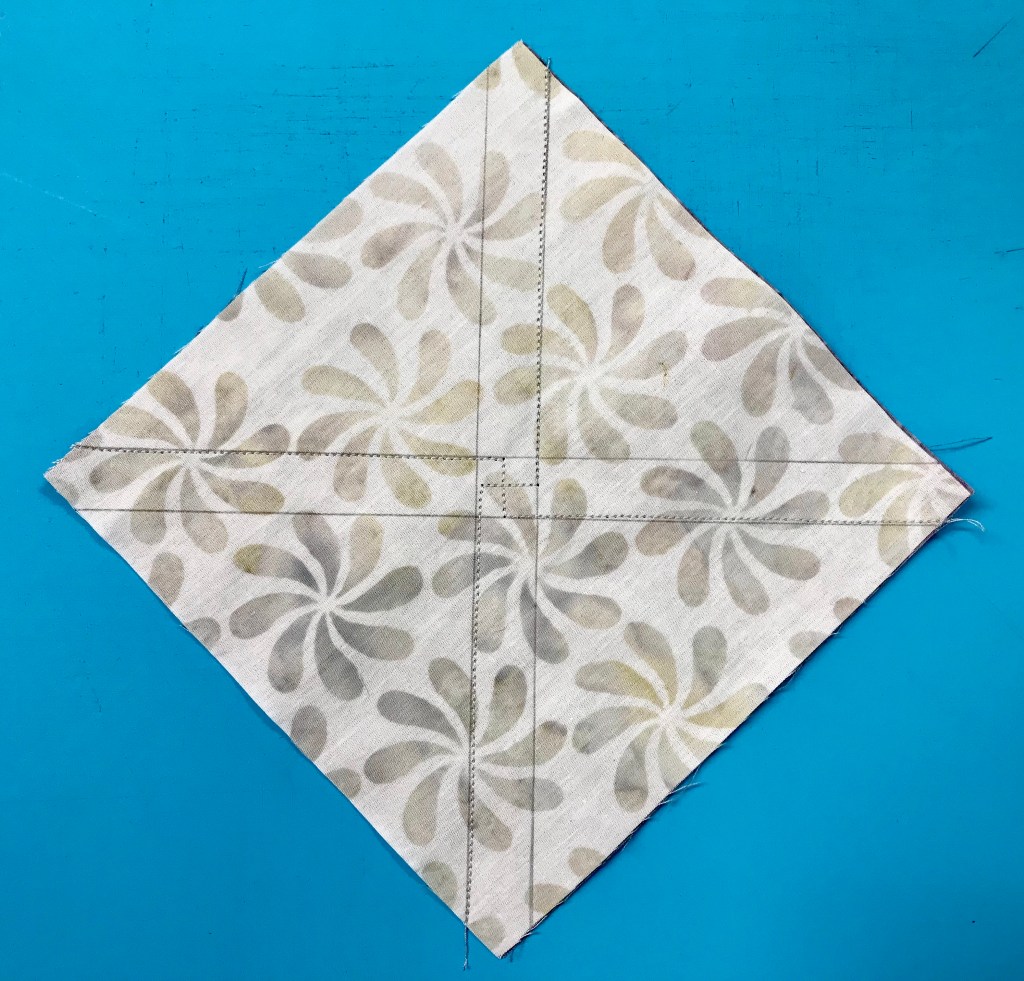
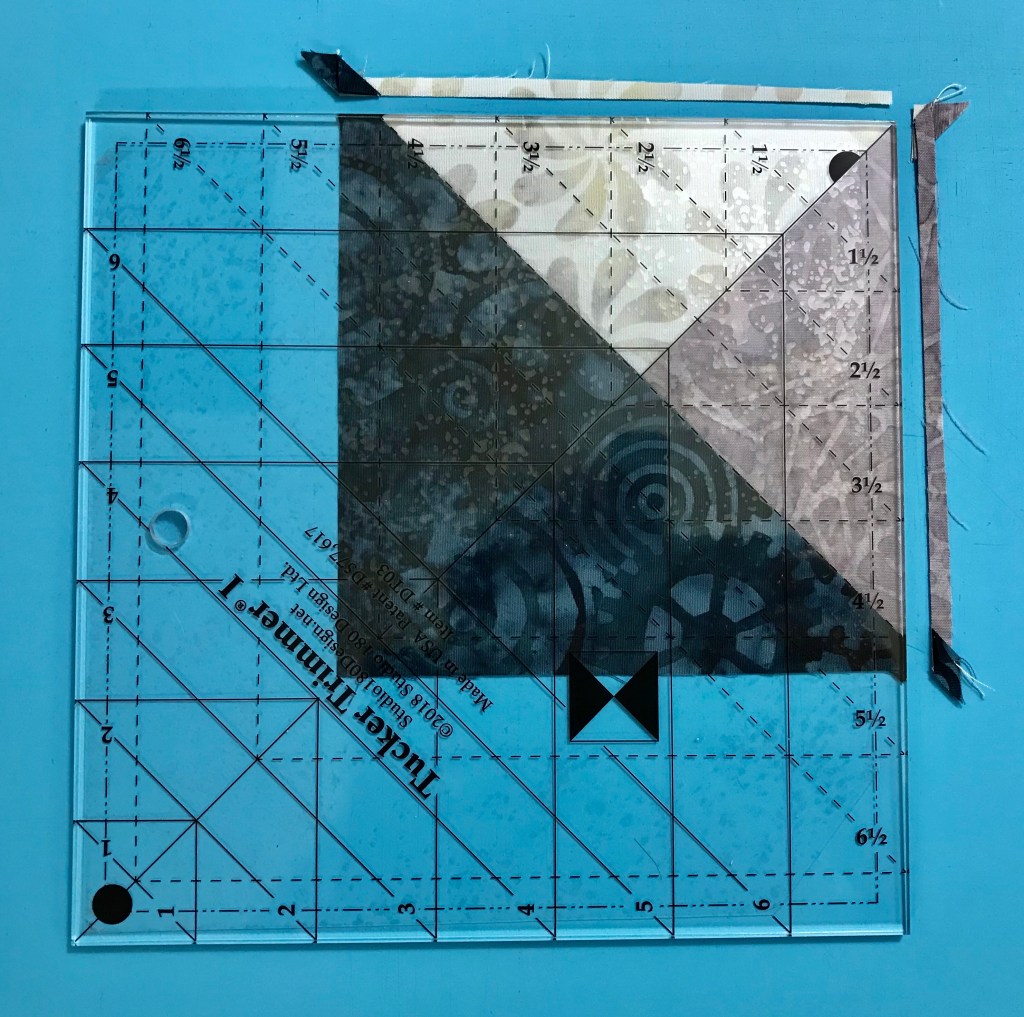
Step 4 – Trim to 6½” with your Square Squared® tool. Align the X’s labeled 6 with the seam intersections and the dashed lines with the seams. Trim. Rotate the unit 180o and align the seam intersections with the X’s labeled 6. Also align the cut edges with the 6½” clean up lines. Trim again. Repeat steps 1-4 to make a total of 4 Diamond Square units. Label the finished Units J.
Below is a correction. The original photo for the second trim showed the Left Hand Trim for Trim 2. I do not have the original fabric so I remade the Square/Squared unit from stash fabric.
Trim 1Trim 2Make 4 Unit J
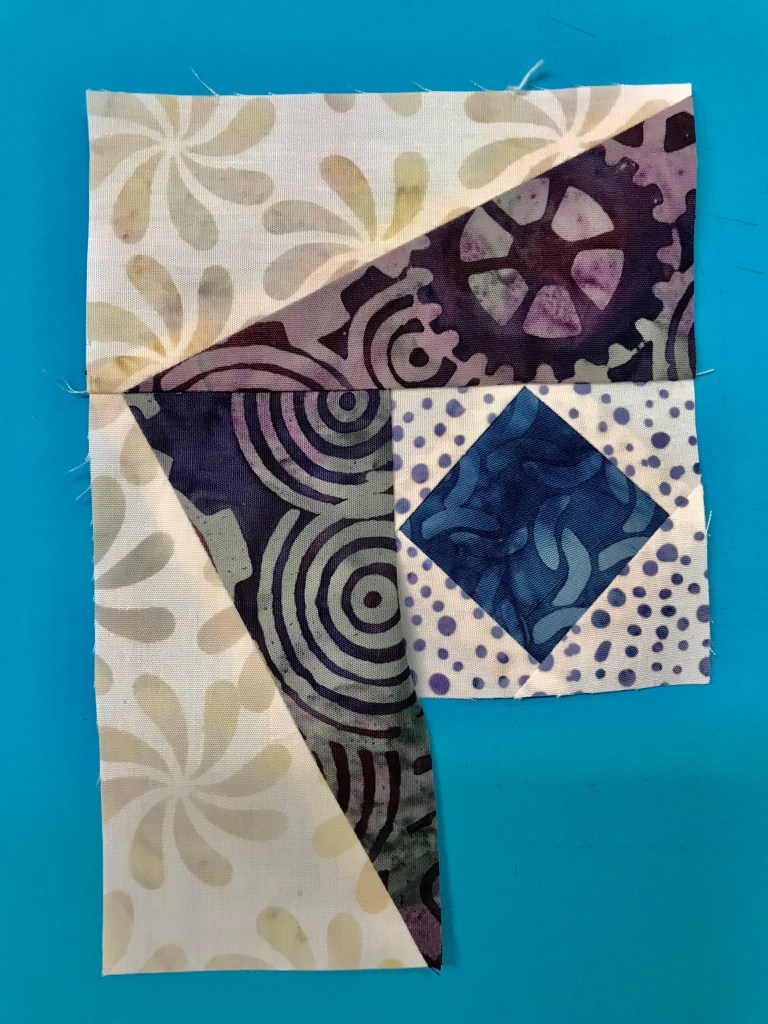
Assemble Four Corner Sections
It is time to assemble the four corner sections of your quilt. To do this you will need the following:
8 Unit A’s from Month 1. 8 Unit C’s from Month 2. 24 Unit E’s and 24 Unit F’s from Month 3. 4 – G Blocks from Month 4. 4 Unit H’s from Month 5. 4 Unit J’s from Month 6.
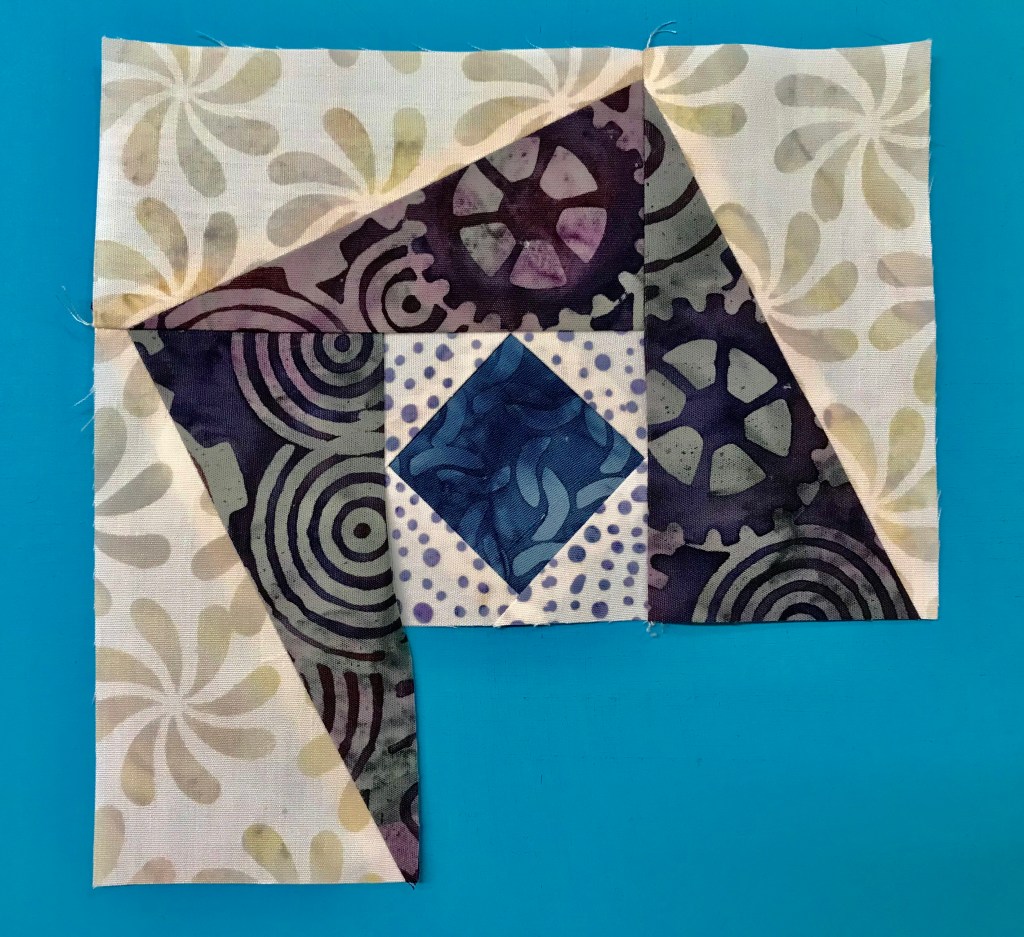
Step 5 – Lay out the gathered units as shown to create one corner section.
Step 6 – Stitch the Unit F Flying Geese together to create the rows of geese. Press the seam away from the point of the goose. Attach Unit J to the end of the Unit E Geese as shown in the diagram.
Step 7 – Sew together Unit C, Unit A, and unit H as shown to create two sections and press as indicated.
Step 8 – Sew Block G, together with the two sections you just created as shown and press as indicated.
Step 9 – Sew the Flying Geese rows to the block and press as shown.
Step 10 – Repeat steps 5-9 to make a total of 4 Corner Sections.
Congratulations! You have learned to use the Square/Squared tool, not mention you are half way through your Journeys Quilt.
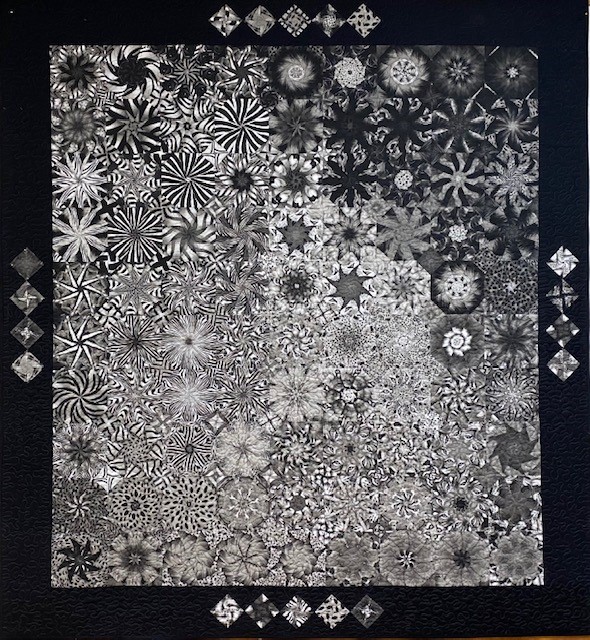
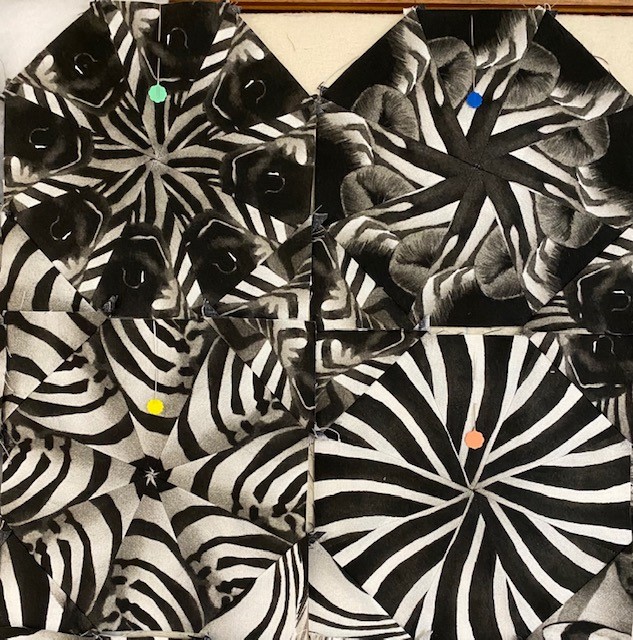
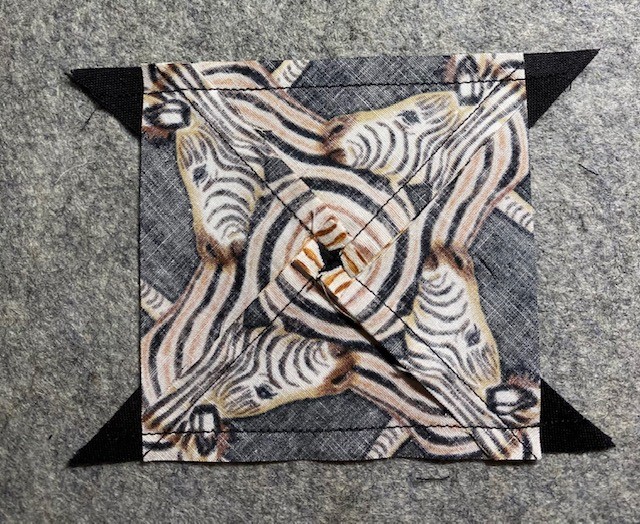
I just finished quilting “Lion Eyes” Octagonal One Block Wonder. I had 18 Sensational Squares sets left over.
Remember, Sensational Squares are the triangles that fill the space between the octagons.
I wanted to add the left over Sensational Squares to the borders of the quilt.
I made my Sensational Squares into Square/Squared units using my Studio 180 Design Square/Squared tool.
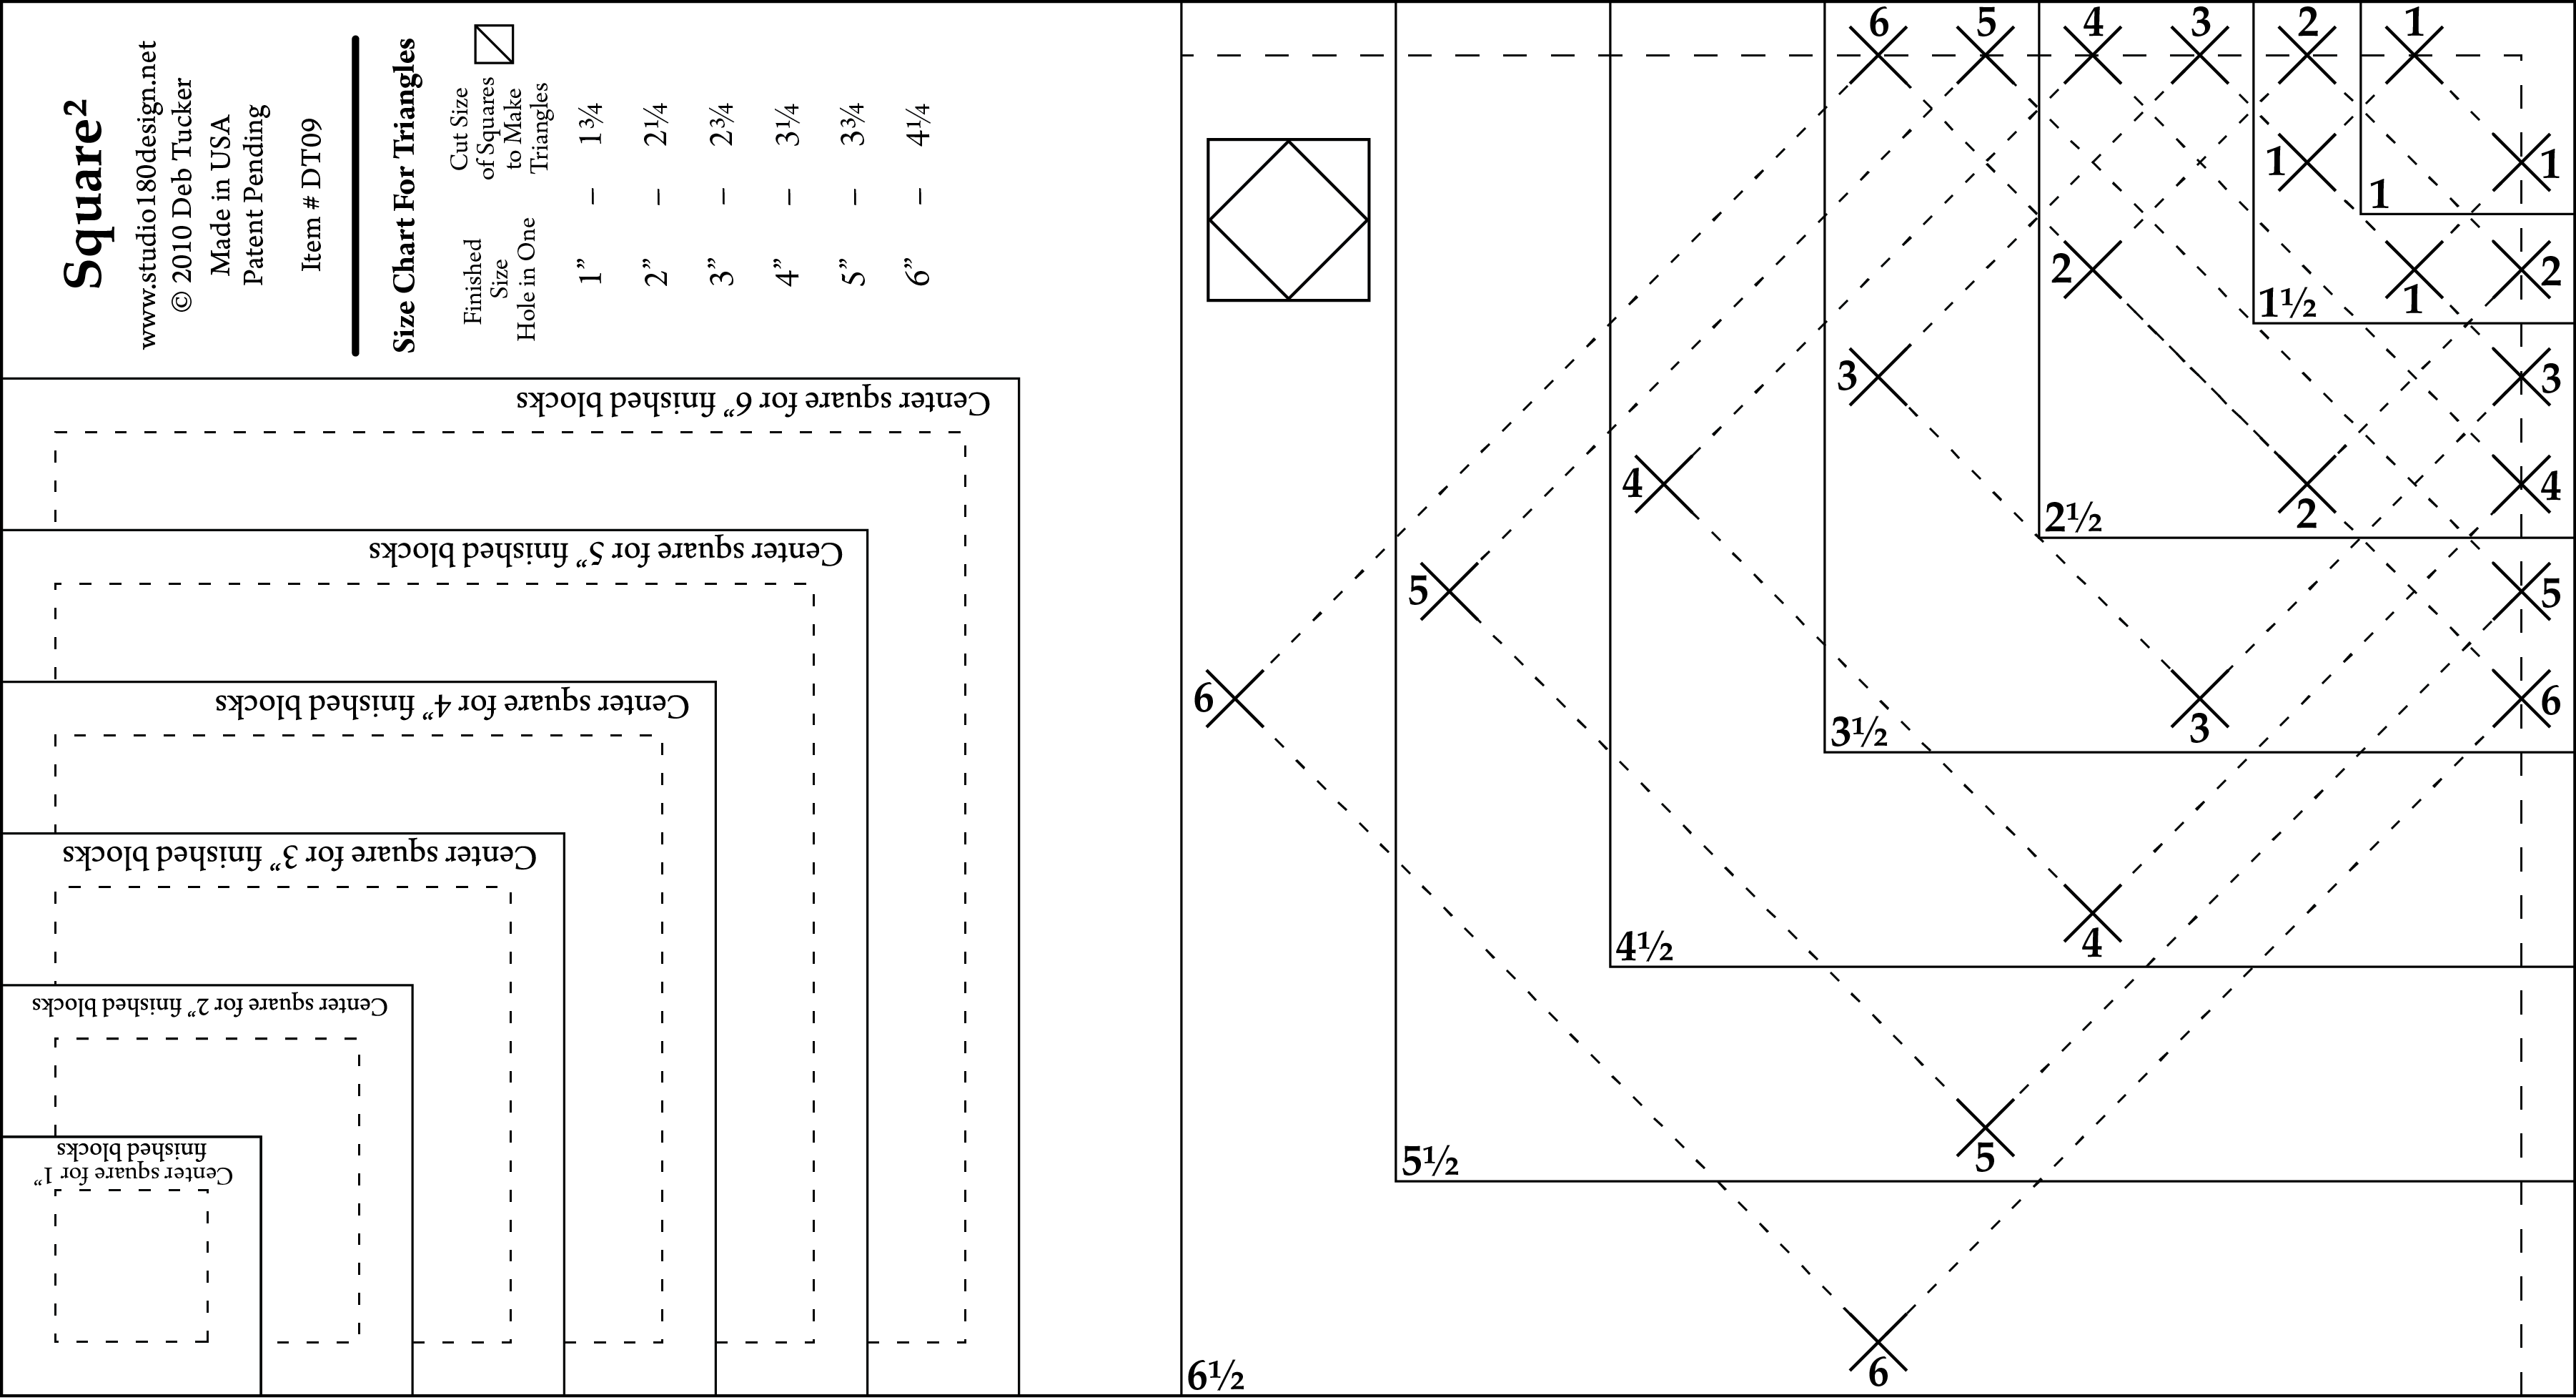
There are 3 parts to this tool.
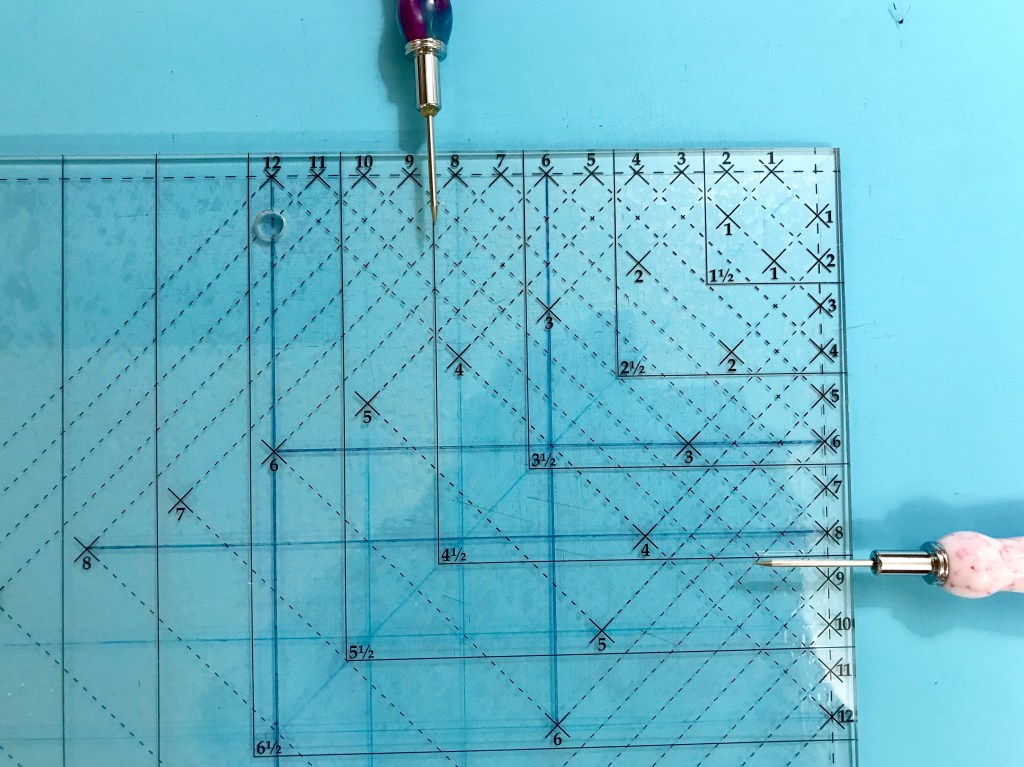
TheCenter Square Section, which gives you a series of squares that are precisely drafted so that their diagonal measurement is exactly the finished size of the Square²™ unit.
The Trim Down Section gives you guide lines to align with the seams of the pieced Square²™ unit so you can trim each to a precise size with a proper ¼” seam allowance on all sides.
The Size Chart for Triangles gives the recommended size squares to cut that when cut in half diagonally will yield two slightly oversized triangles for constructing the unit.
Note: The fabric in the photo is different from the Lion Eyes.
Per my Wedge Star Instructions I had cut my Large Wedges from 4″ strips and my Corner Squares from 3″ strips (you must have at least 4 aligned repeats). Cut 3″ square sets.
Cut your square sets once diagonally.
Each stack of 4 half square triangles will give you one 4 Patch Posie.
Stitch 2 triangles together and press the seams the same way on both halves.
The seams will nest when stitching the halves together.
Swirl the seams and press.
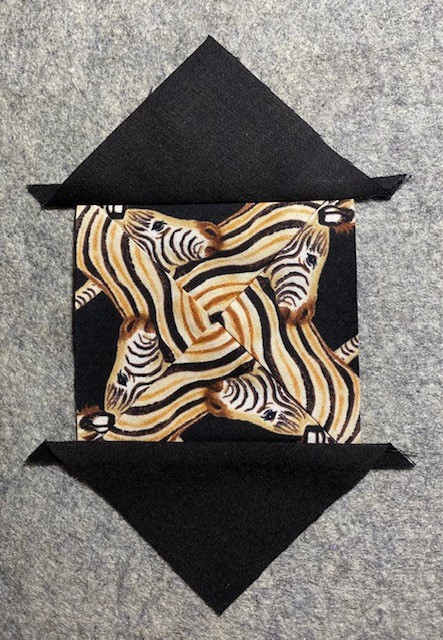
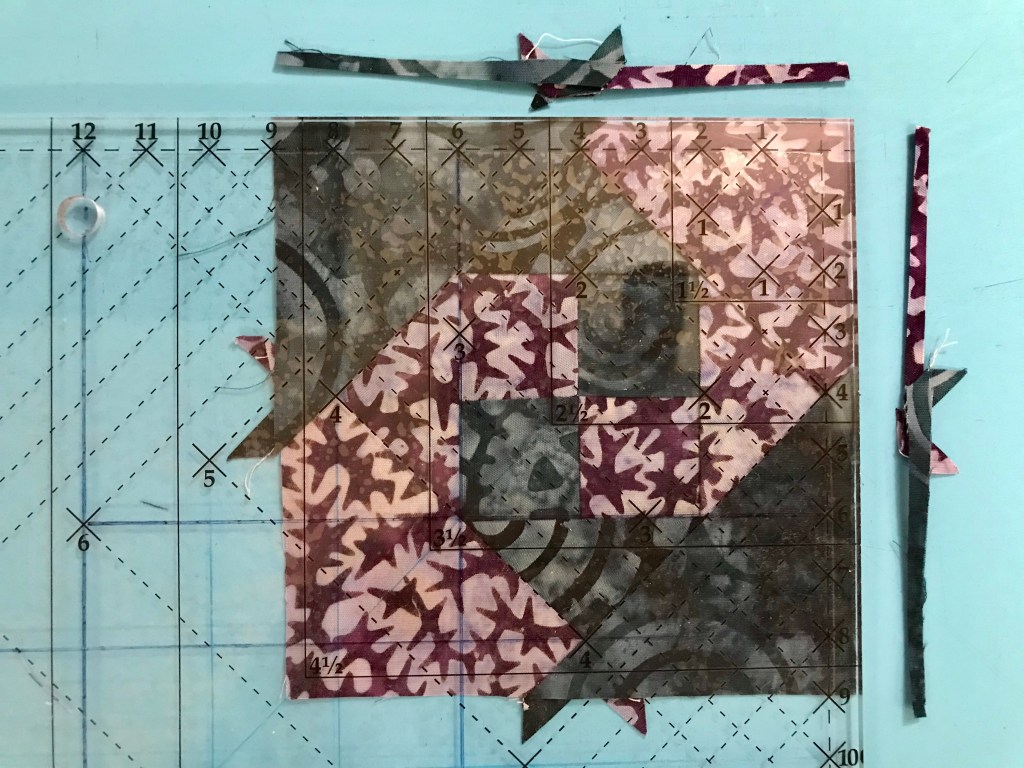
Use your Square²™ ruler to precision cut your center squares from your 4 Patch Posie. I lined up the diagonal line on the tool with the diagonal seam centering the lines for a 4″ finished square making sure I had fabric to trim on all 4 sides. Trim up the side and across the top. Rotate the unit lining up the just trimmed sides with the size lines and the diagonal line with the diagonal seam and trim up the side and across the top. The Square²™ unit looks great with a fussy cut square in the center or simply cut chosen fabric as usual. Just remember that this square will be diagonal in the pieced unit.
The 4 Patch Posie is now trimmed and ready for oversized triangles.
Check the chart on the Square/Squared Tool for strip size to cut squares for side triangles. I’m making 4″ finished units so I cut my strips from a folded strip 3 1/4″ wide.
Cut once diagonally.
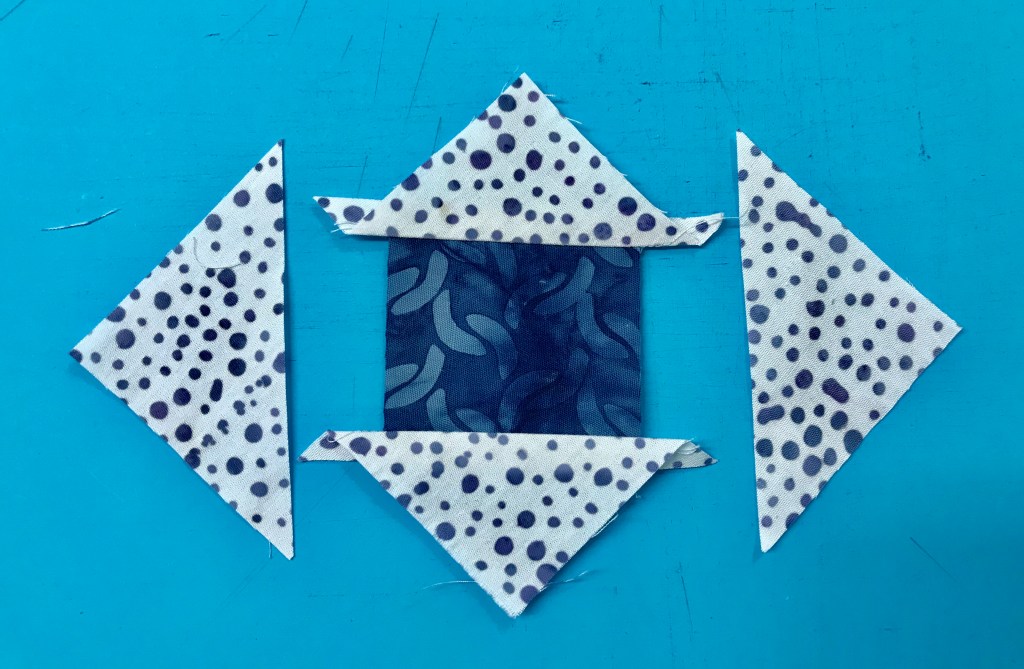
Position two triangles on opposite sides of the center square. No need to fuss with matching the middles as the triangles are larger than they need to be. Just basically center them and try to keep the raw edges aligned.
Press seams away from the center square.
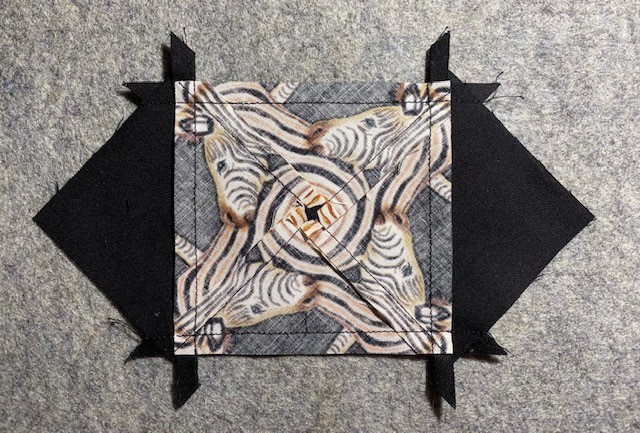
Position remaining two triangles on the remaining two sides of the center square. Again, don’t fuss too much with aligning the centers, just get them close. Stitch and press the triangles away from the center square.
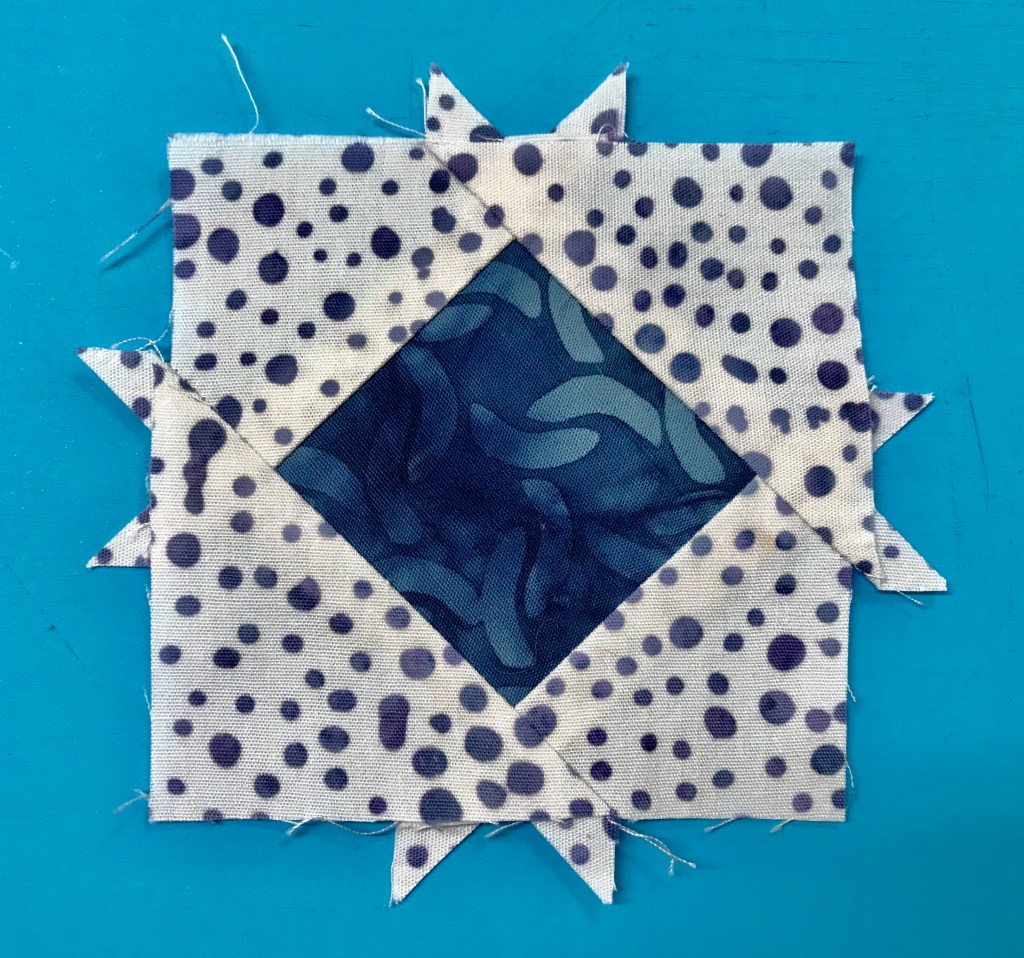
Ready for the trim.
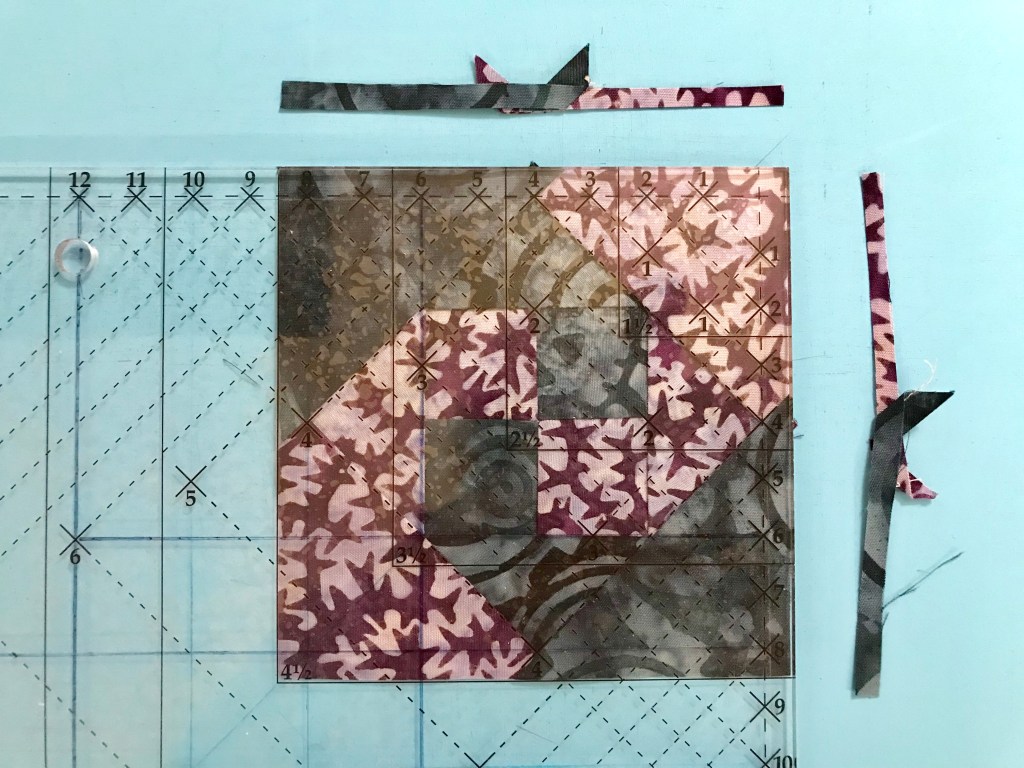
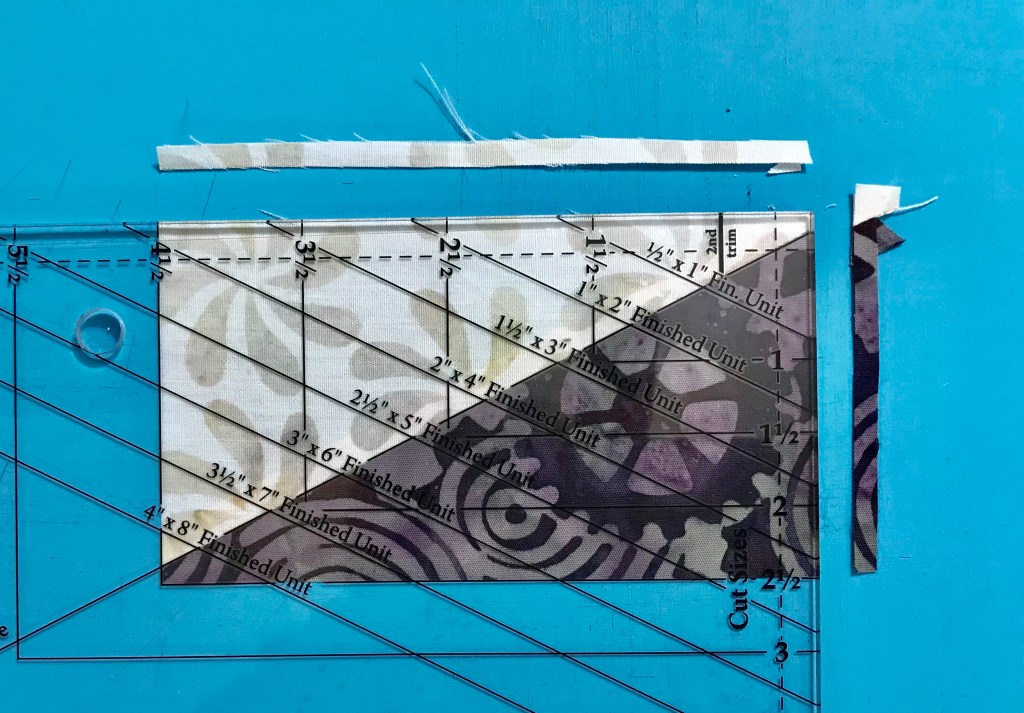
Position the Trim Down Section of the Square²™ ruler over the pieced unit. Focus on aligning the “X’s” for your particular finished size unit over the sewn seams. If they do not line up exactly, simply center the ruler over the area by finding the middle ground of all four marks. Trim up the side and across the top. For the second cut, rotate the unit, position the ruler on top of unit again lining up the “X’s”, and also lining up the cleanup lines on the ruler with the edges previously trimmed.
This ensures that you end up with a square that has proper ¼” seams on all sides and is exactly the correct size to use in your quilt project. I added 1″ strips to two sides of the units to make the units measure 4 1/2″ by 6 1/2″. I did this so when I add the binding I won’t lose the points on my square/squared unit. Measuring the correct lengths I cut the 6 1/2″ strips to add to my border additions.
The Square/Squared tool makes finished diamond in square units in six sizes from 1″ to 6″. If you require mores sizes you can purchase the Large Square/Squared Tool which can make them in sizes from 1″ to 12″.
Stitchin Heaven Quilt Shop is excited to announce a new collaboration of a unique BOM program from Deb Tucker (Studio 180 Design), NYT and USA Today best-selling author Marie Bostwick (Between Heaven and Texas, Hope on the Inside, and the Cobbled Court Quilt Series, including A Single Thread), Deb Luttrell (Stitchin’ Heaven), and Jason Yenter (In the Beginning Fabrics). In this 12-month program you will take your own Journeys through an exclusive novella written by Marie Bostwick. Each month you will receive a chapter from the book which is exclusive to this program. It is a page-turning tale of love, loss, and new beginnings for PJ Lloyd, an adventurous young woman who defies her family and risks her future to make a difference after the attack that plunged America into the second World War.
I will be your guide on this “Journey”. Every month I will post a tutorial showing you how to use the tools required for this beautiful quilt and answering your questions.
Throughout the Journeys BOM you will be on your own journey to learn how to use 8 of the tools from Studio 180 Design. Tools include: V Block, Corner Pop, Four-patch Square Up, Tucker Trimmer, Rapid Fire Lemoyne Star, Square Squared, Wing Clipper, Corner Beam. The final quilt measures 102″ x 102″. A beautiful collection of fabrics have been designed by Jason Yenter of In The Beginning Fabrics, that will make this project an heirloom favorite.
I tested the pattern with fabrics from Deb Tucker’s stash. It is truly a beautiful quilt I can’t wait for you to make your own! The Journey’s BOM program is due to start in September 2020. We will be sure to keep you up to date and informed on all the details.
A conversation with Deb Luttrell, Deb Tucker & Marie Bostwick
I’m sitting here in Tuckerville, watching TV, looking at my ceiling. I pin orphan blocks on my drop ceiling.
Two of a Kind
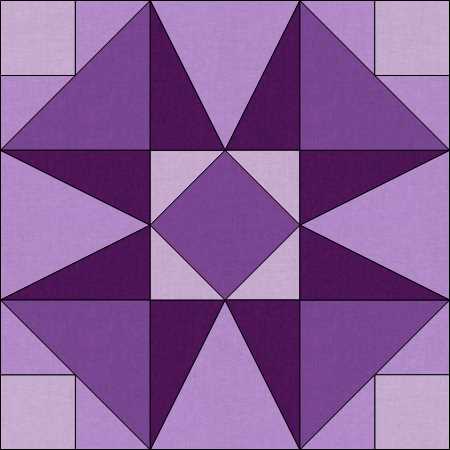
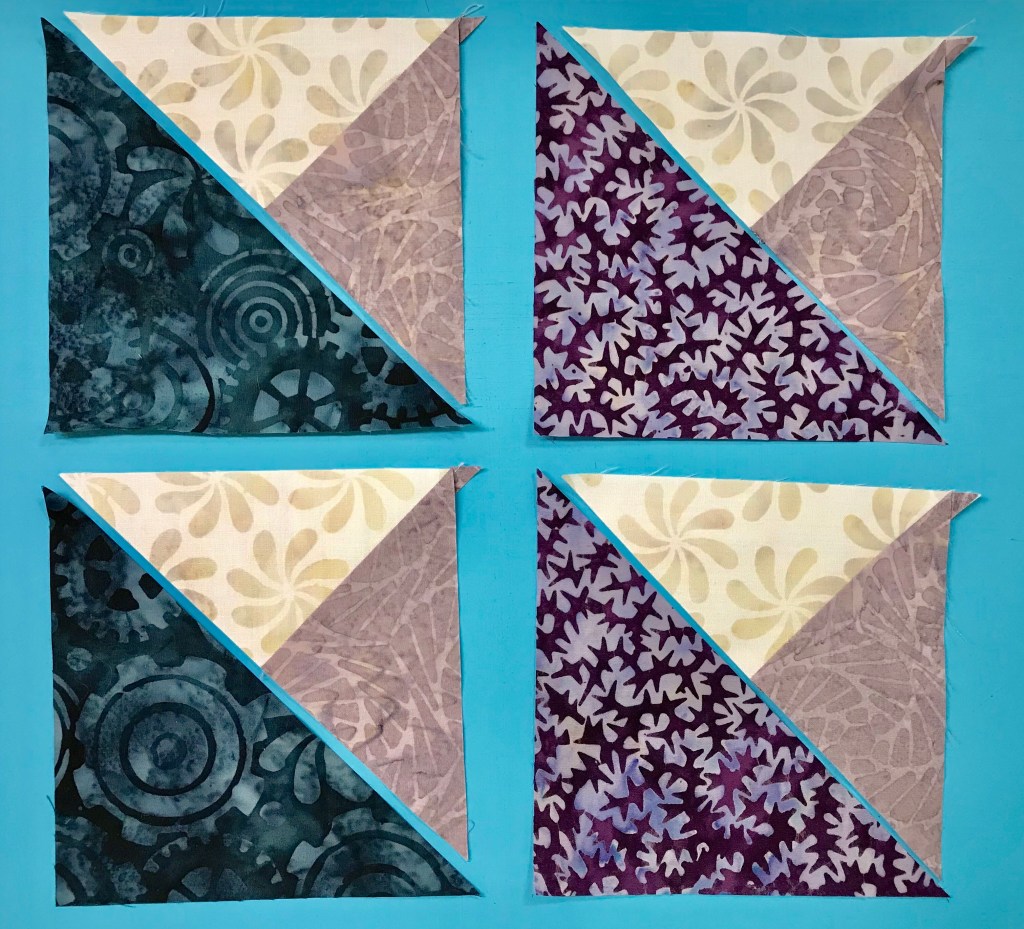
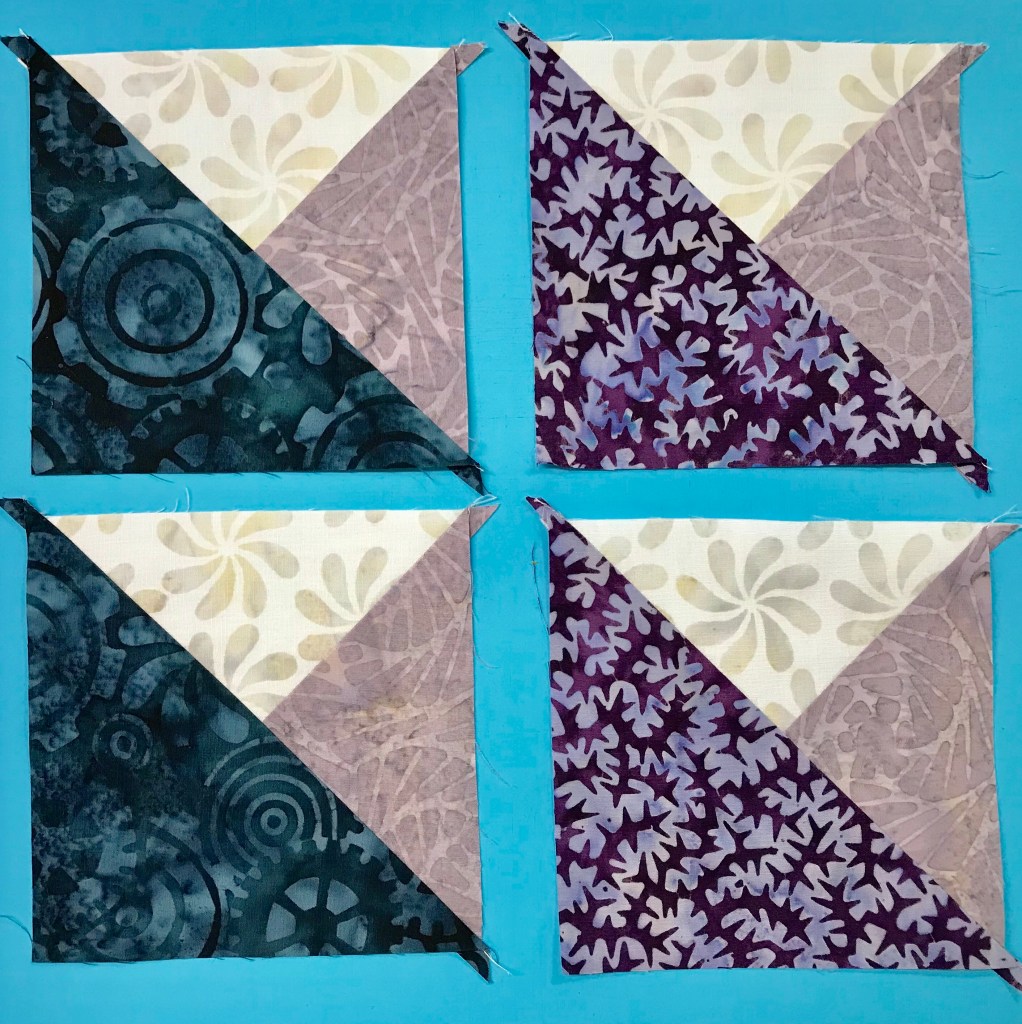
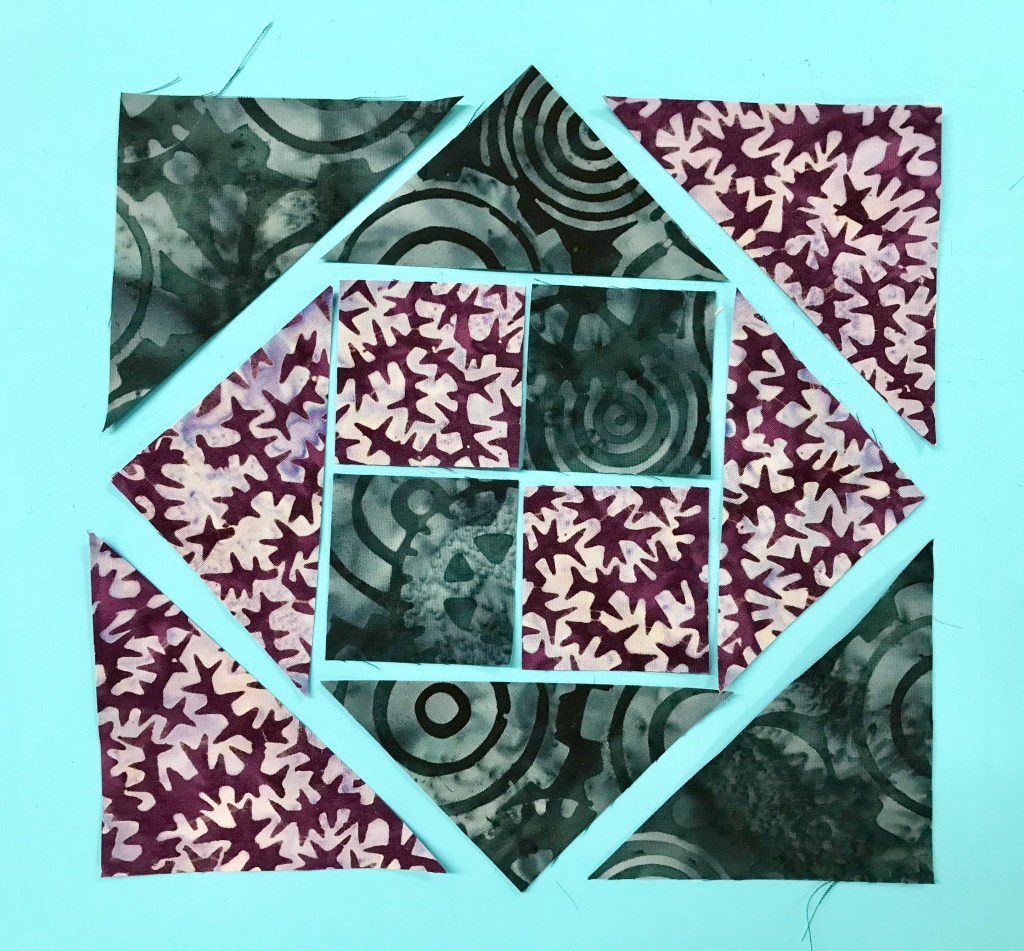
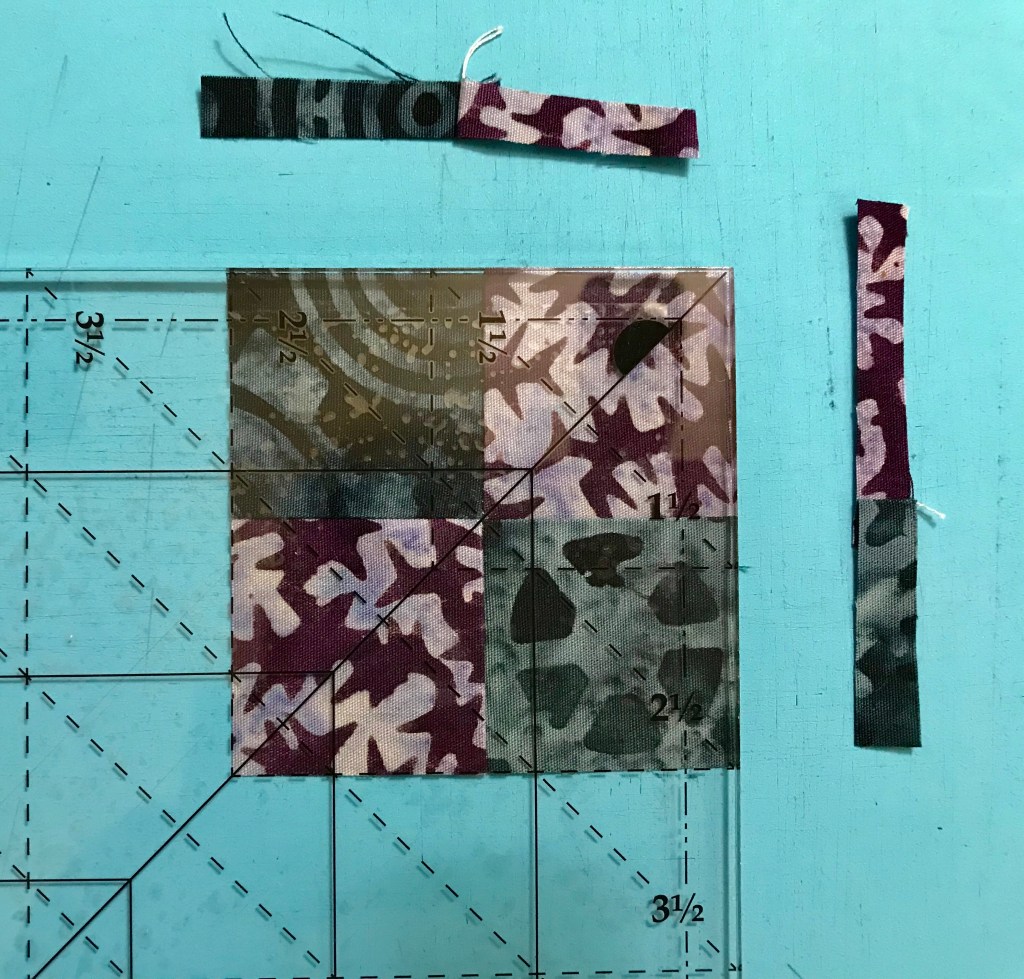
These two blocks are made from the same fabric and units. They both have a Square Squared for the block center, 4 V Block units for the star points and 4 Shaded Four Patch Units (with the Tucker Trimmer I) in the block corners. The top block has the Shaded Four Patch unit small square facing out, while the bottom block has the Shaded Four Patch unit small square facing in. Two very different looks from the same block.
As I stared at these blocks on the ceiling I wondered what the secondary design would be if I put them in a quilt. Time to break out EQ8!
I used shades of purple and lavender because I thought my sister may like it. This is pretty cool. EQ8 is fun to use and brings quilt designs to life. Time to break out my Studio 180 Design tools get busy!
Your Tucker Trimmer Tool Instructions give you the information you need to complete your Half Square Triangles. Cut your squares and using your Magic Wand draw two diagonal lines. Match up your dark and light fabric squares aligning the raw edges. Stitch on the lines, cut apart and press to the dark fabric. Remember: whatever you are pressing toward, goes on top. Trim your Half Square Triangle units to 4 1/2″.
Non Mirror Combo Units: Past construction methods would result in mirror image units. Sometimes we need combination units that are the same as in Card Shark which requires two of each units below:
Determine your color placement. Follow the instructions in the Non Mirror Combo Units Technique Sheet.
Make the half square triangles first by using the Magic Wand and mark 4 diagonal lines from corner to corner. Follow the stitching instructions in the technique sheet. Cut apart.
Press toward the dark triangle.
Cut squares for large triangles once diagonally.
Pair small triangles with the large triangles, center and stitch. Press toward the large triangle.
Trim units to 4 1/2″.
Stacked Square:
Layout your Stacked Square unit pieces.
Start by making a four patch and swirl the center. Our Stacked Square is a 4″ finished unit. Check the chart on the Stacked Square Technique sheet to find the Cut size for the center square, which is 2 1/2″. Using my my Tucker Trimmer I trimmed the four patch to 2 1/2″.
Check your color placement and stitch two triangles. Press toward the triangle and add the two more triangles pressing toward the triangles as before.
The Large Square Squared Tool is broken up into two different parts. Part “A” & Part “B” to include guidelines for making 12 different sizes. The chart in the Stacked Squares Tech sheet tells us what size to cut our side triangles and how line up for trimming. The first trim uses Part “A” to trim before adding the second round of triangles.
After adding the second round of triangles, use Part “B” to trim the stack square to a cut size of 4 1/2″.
Lay out your units, stitch together in to rows.
Card Shark is now ready to add the quilt!
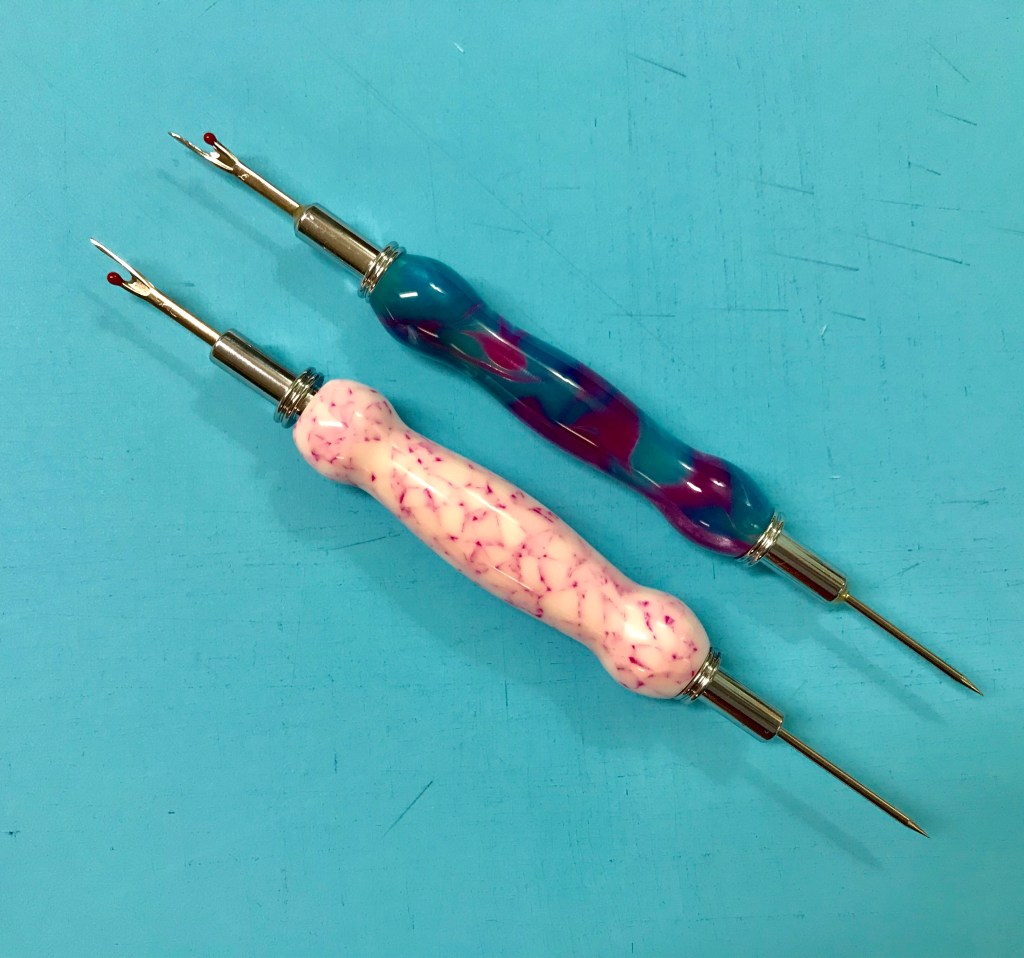
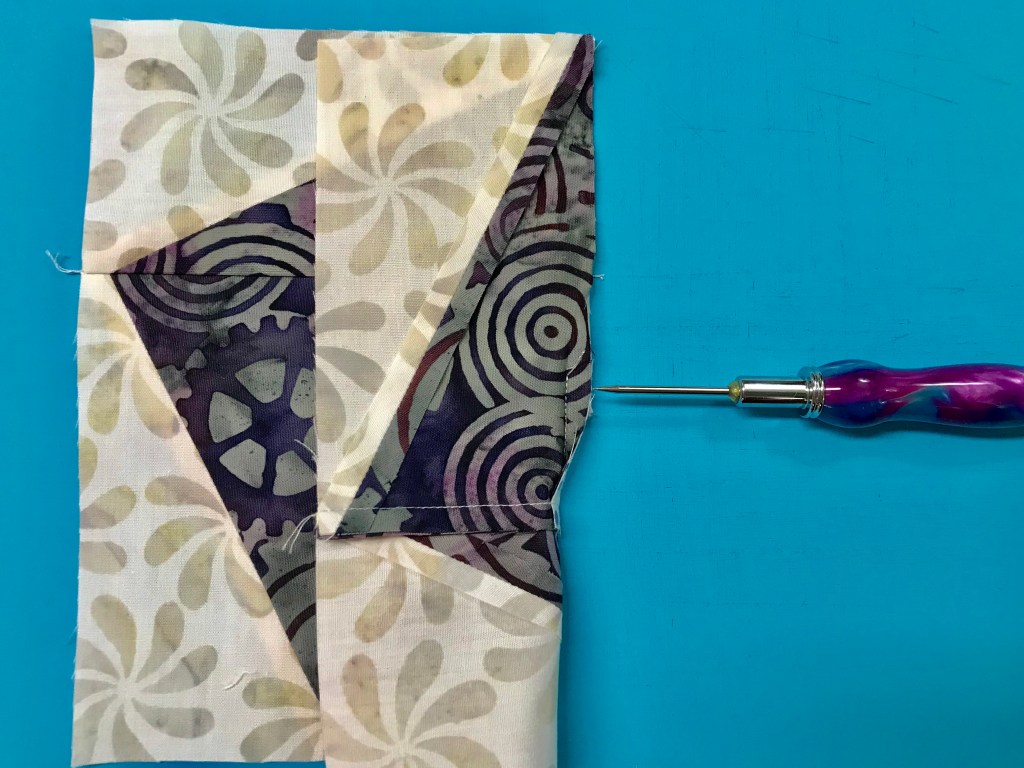
I use my Groovy Seam Rippers made by fellow quilter Nancy Townsend as my little helpers while quilting.
The Whistle Stop Quilt is made up of 12″ blocks and 6″ finished blocks.
This is “Roll the Dice”. It is made with Studio 180 Design Square Squared and Split Rects tools. Click below to download the cutting instructions.
Using your Split Rects tool, cut 4 side triangles for Type 1 units, per your tool instructions from your two fabrics making sure your fabrics are right side up. Stitch triangles together and press seams open.
Trim your Split Rects to 2 1/2″ x 4 1/2″, rotate and trim again.
Square Squared
Cut your center square using Part “A” for a 2″ finished unit.
Trim to the cut size of 2 1/2″ using Part “B” of your Square Squared tool. Rotate and trim again.
Layout your block units.
Place the center square/squared unit right sides together with a Split Rects unit aligning the raw edges of the top and sides. Stitch a partial seam along the dark fabric of the Split rects stopping just past the center of the Square/Squared unit.
Now add a Split Rects unit across the top. Be sure the dark fabric of the Split Rects Units are against the center square/squared unit. Press toward the split rects unit.
Add a third split rects unit and press as before.
Add the fourth Split Rects units.
Fold over the split rects unit with the partial seam and align the raw edges. Stitch meeting up with the partial seam.
Below is the complete schedule for the Whistle Stop Tour:
The products shown in this post were given to me by Island Batik.
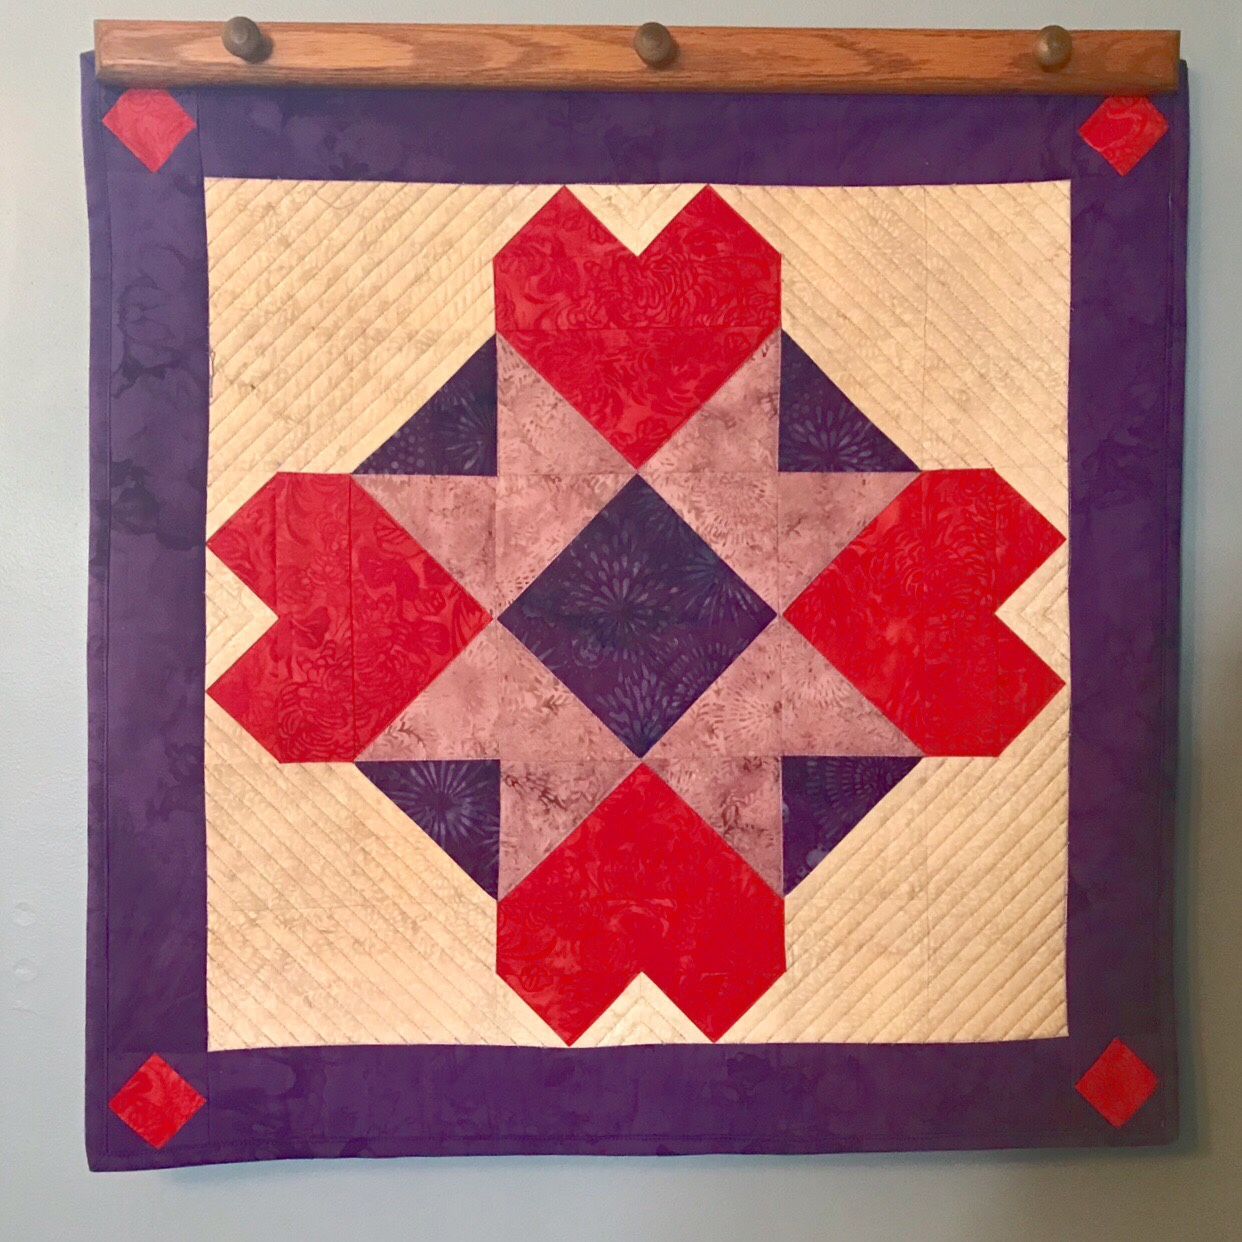
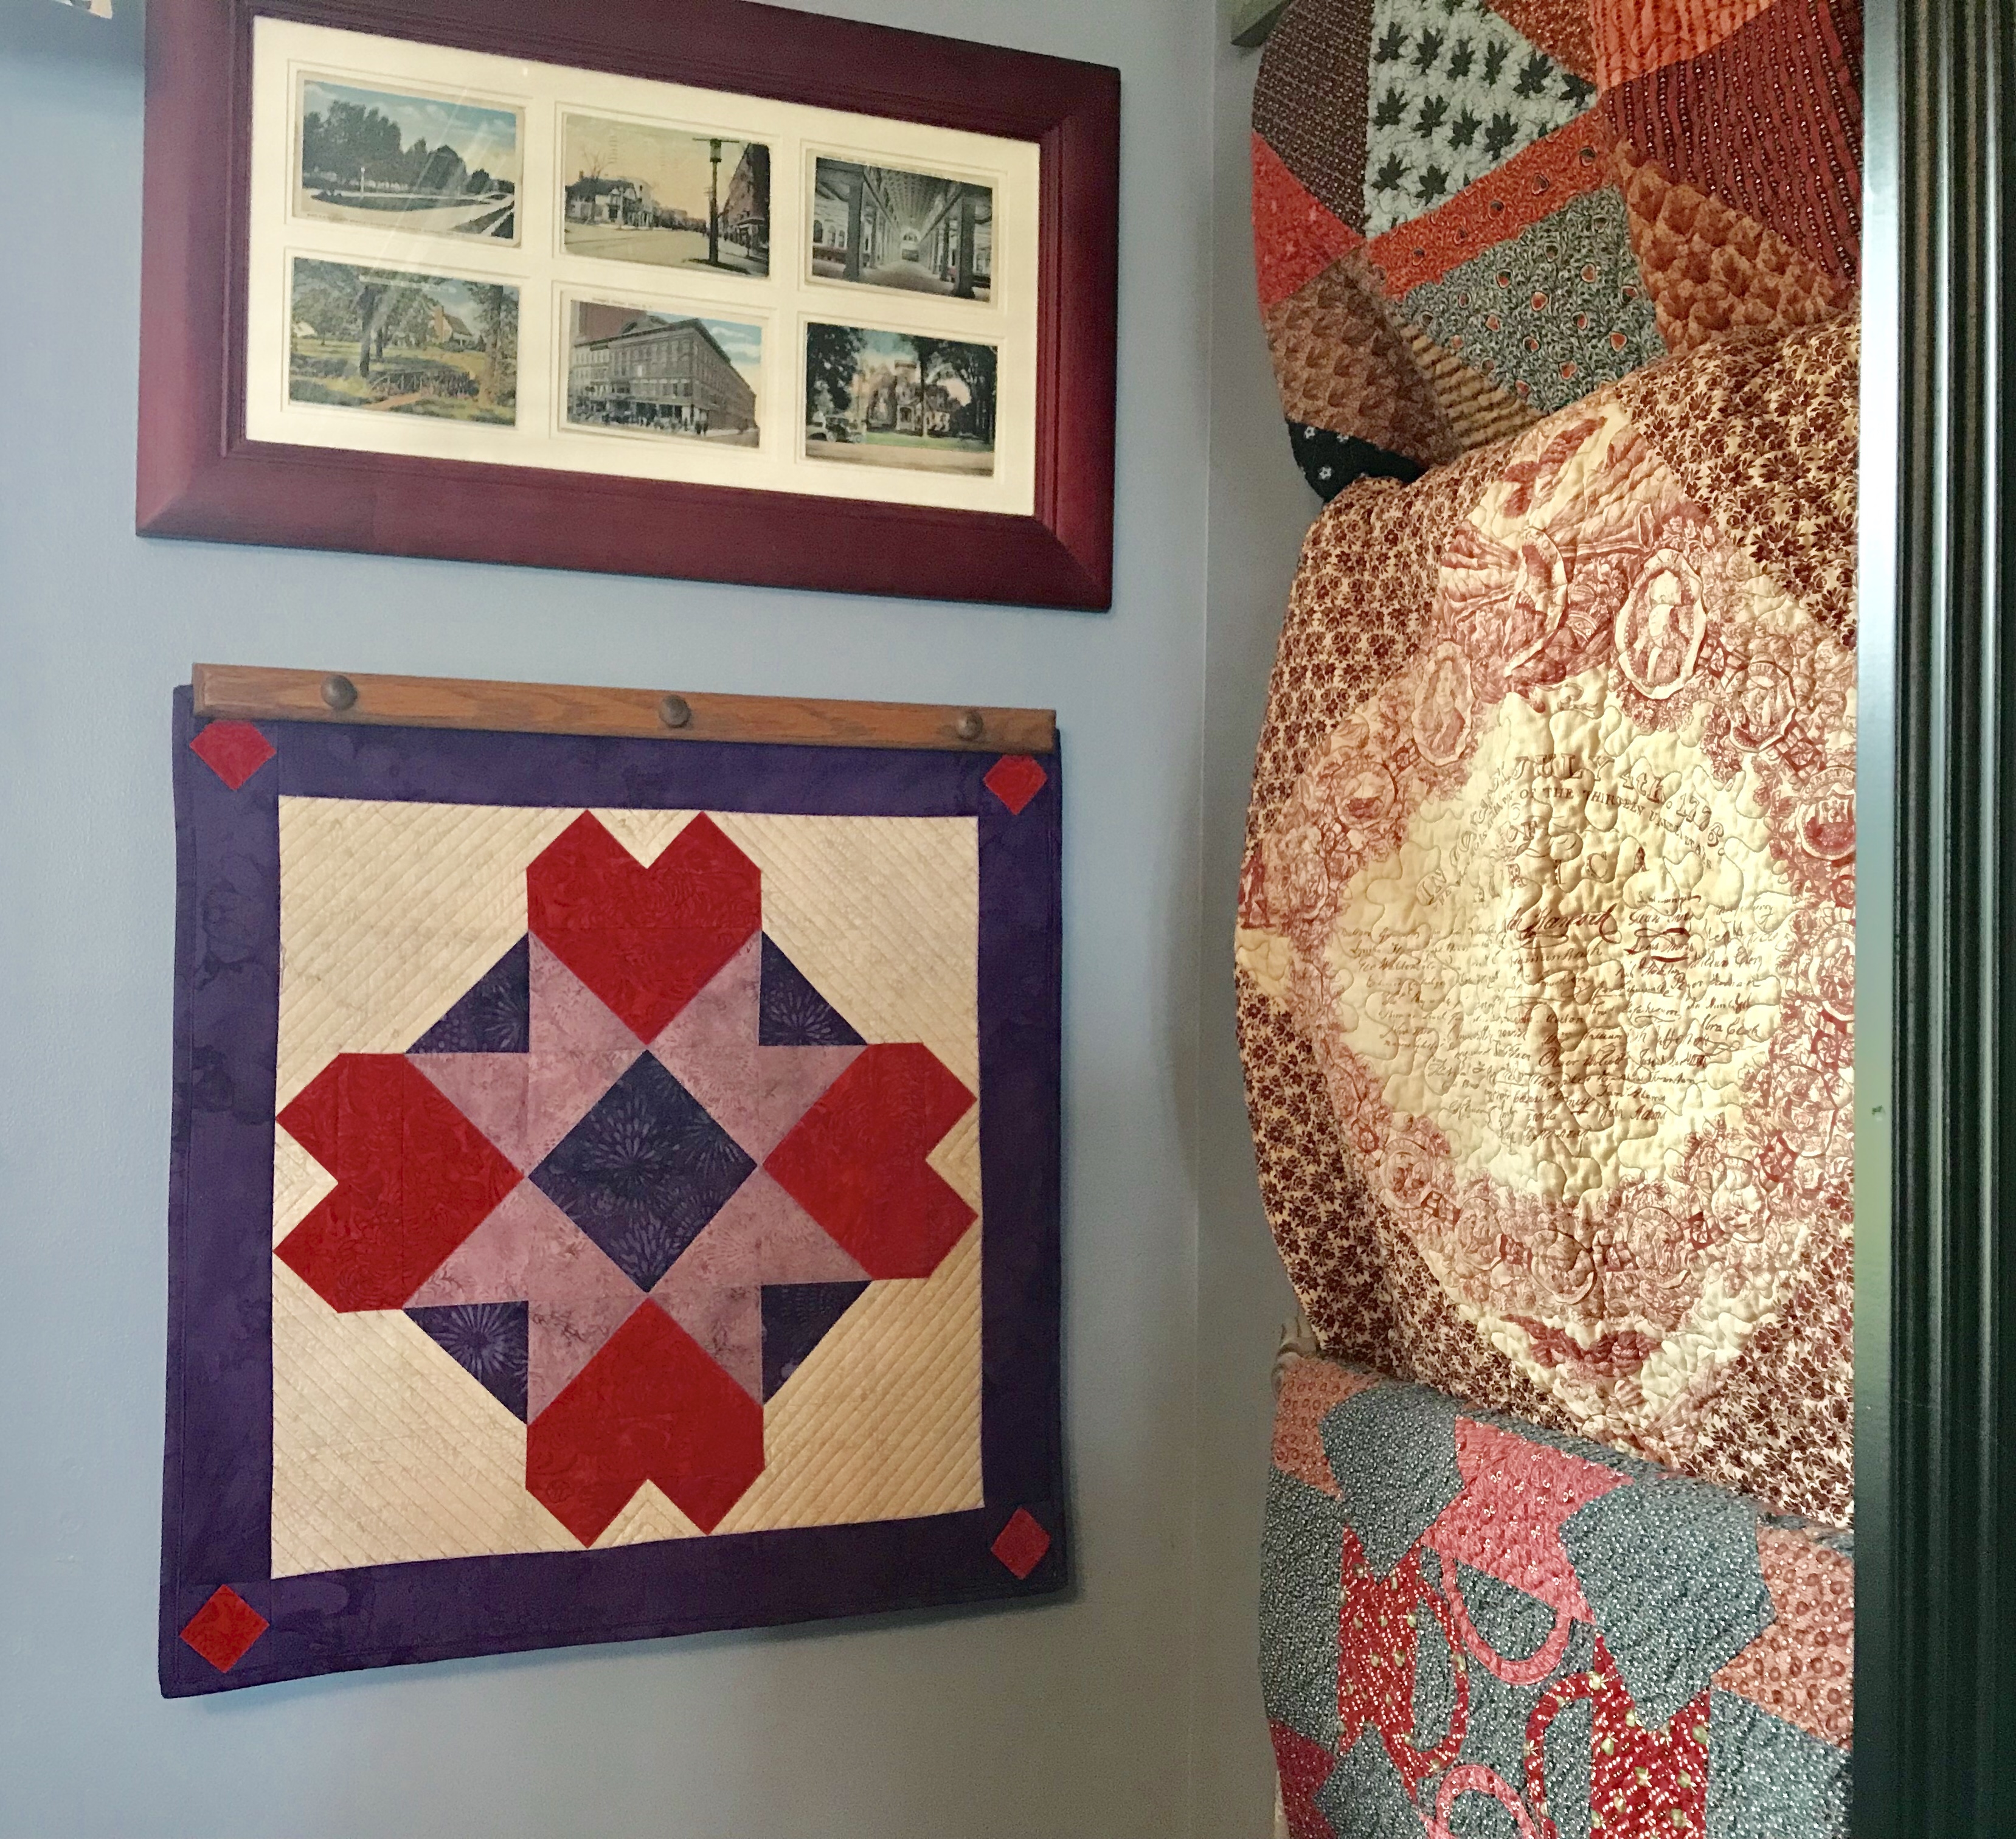
Our assignment for February was to create a “Magnificent Mini” using any technique we chose. The only criteria was the size: 24″ x 24″ or smaller. It seems I’m always collecting quilt blocks for hearts and Christmas Trees. The first thing I do is fire up my EQ8 and start drawing.
Last year I made a heart mug rug. The drawing above consists of mirror image split rects and two squares that have had the corners popped using Studio 180 Design Split Rects & Corner Pop tools.
The Island Batik Ambassador’s December challenge was to create a project that is Whimsical & Wonky”. Well, I settled on Tipsy! My Holiday Tipsy Tree is based on BlockBuster pattern # 27 Roll the Dice . This year I have made many quilt projects using Split Rects Units so it is only fitting I end the year with Split Rects.
Cut your elongated triangles according to the Split Rects tool instructions.
Cut your background side triangles the same way.
Lay out your split rects, align and center the two pieces with just a bit of overlap at the ends. Stitch and press seams open. I love using my “Stick Strip” for pressing seams open.
Following the tool instructions trim, rotate & trim again.
Make the 9 Square/Squared units following the Square Squared tool instructions. I chose 9 different unit centers but you could make them all one color if you like. Each side of the square/squared unit will be different to match the fabric used for the split rects units.
Lay out your units as they will be stitched. Choose a square/squared unit for the center, rotating the square/squared unit so the side triangle matches the same fabric used in the split rects unit.
This block is constructed using a partial seam. Place the square/squared unit right sides together with one of the split rects units being sure to match the fabrics and stitch half way down the square/squared unit.
This gives you the next complete edge to stitch another split rects to, again matching the square/squared unit fabric with the split rects fabric.
When stitching the split rects to the square/squared unit, always place the precision cut square/squared unit on top be careful to stitch using the unit center as a guide.
Continue stitching the split rects units and complete the partial seam, pressing toward the split rects units. Make the other 8 blocks the same way.
Tree Trunk: Make one set of 2″ x 4″ finished flying geese using the Wing Clipper I tool instructions. Only 3 flying geese units will be needed.
Tree Star: Make the 6″ finished lemoyne star using the Lemoyne Star tool instructions.
Lay out your quilt blocks and construct the quilt center. Once the borders are added the finished quilt measures 38″ x 38″.