Category Archives: BlockBuster’s

BlockBuster #8 54-40 or Fight

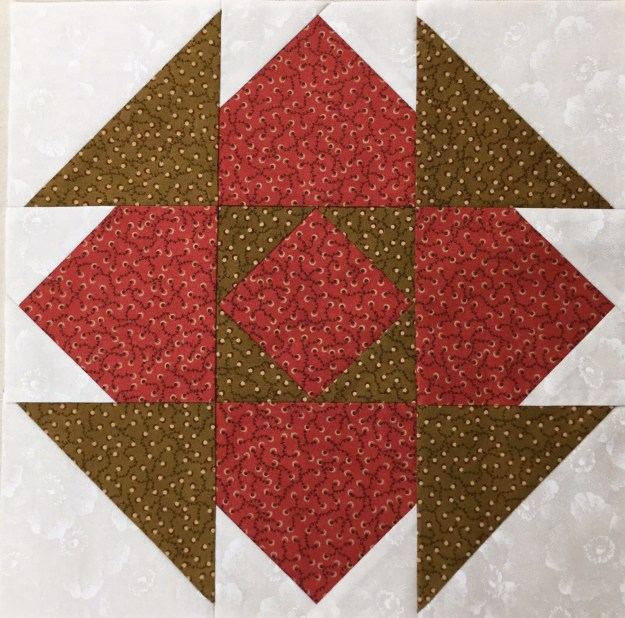
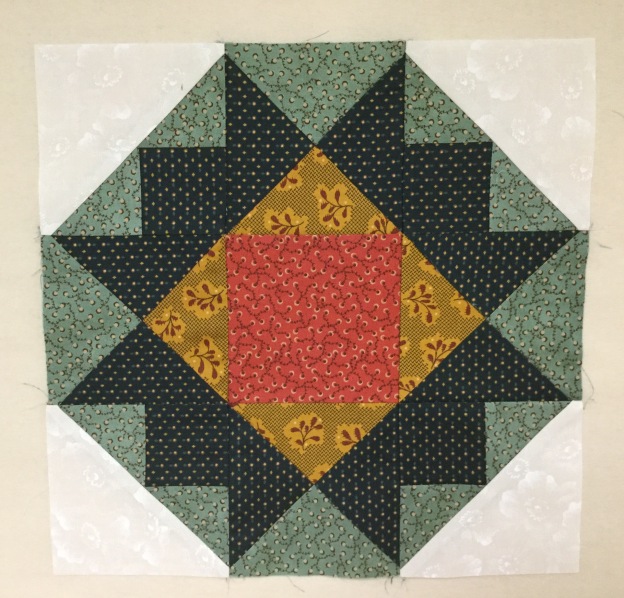
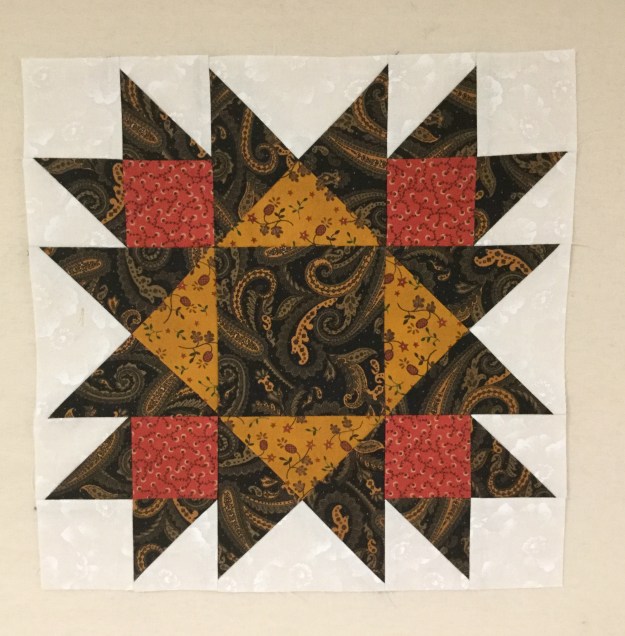
BlockBuster # 08 54 – 40 or Fight is a fun & easy block.  It requires Deb Tucker’s  V Block tool.  This block also has four patch units, which you can make by cutting individual squares.  I made my four patch units by using Deb’s Tucker’s new Four Patch Square Up tool.  The cutting chart gives you options for making a 6″, 9″ or 12″ block.  I made a 12″ block.

img_5916

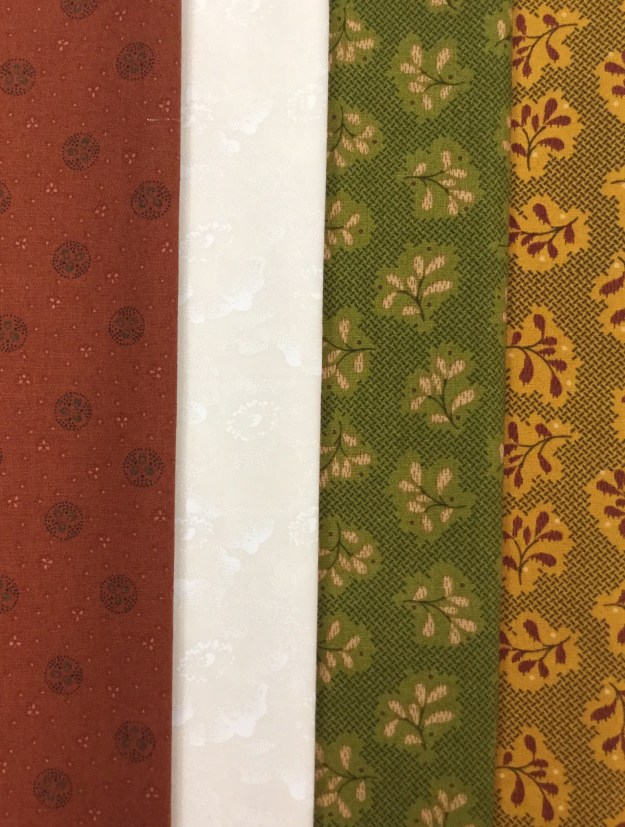
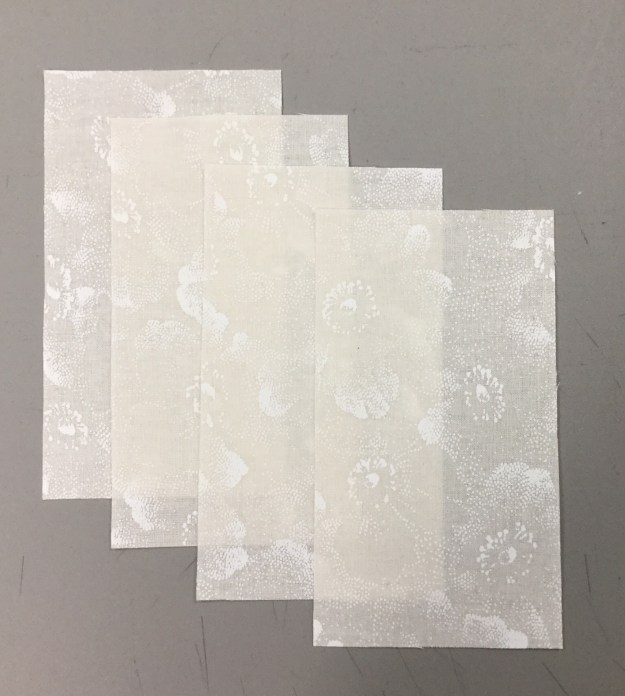
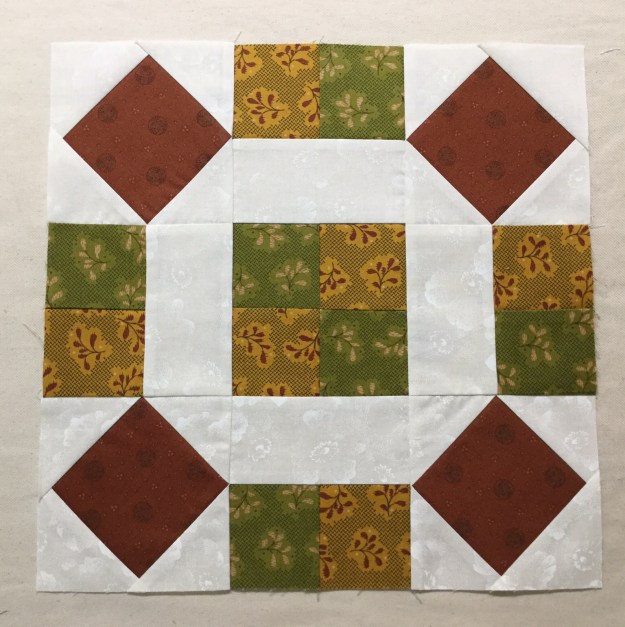
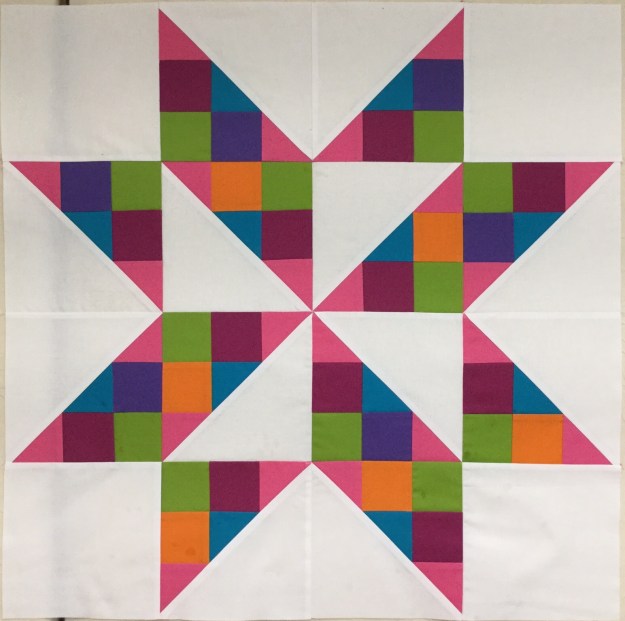
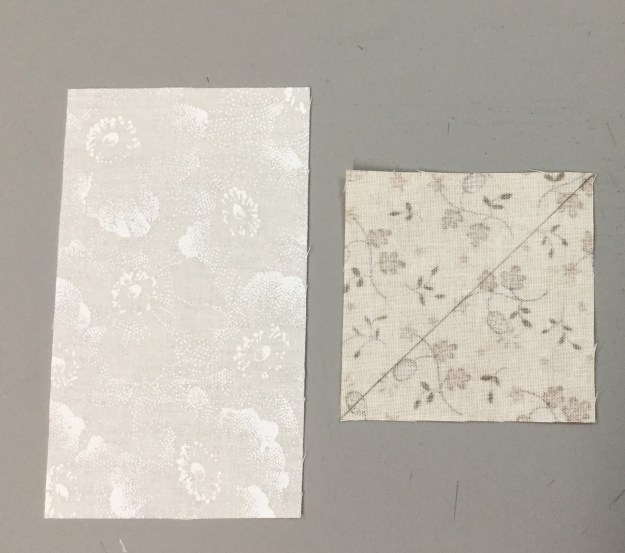
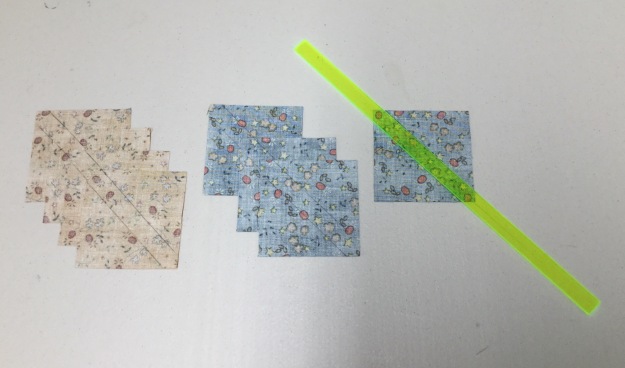
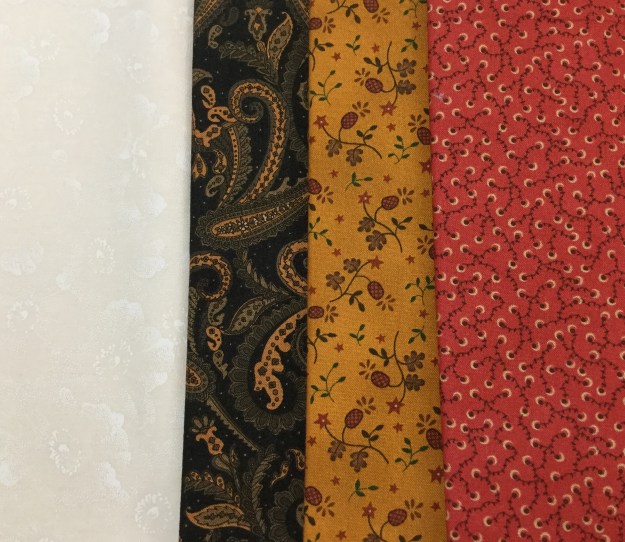
I chose the 3 fabric colors shown above.

V Block Units

img_5917

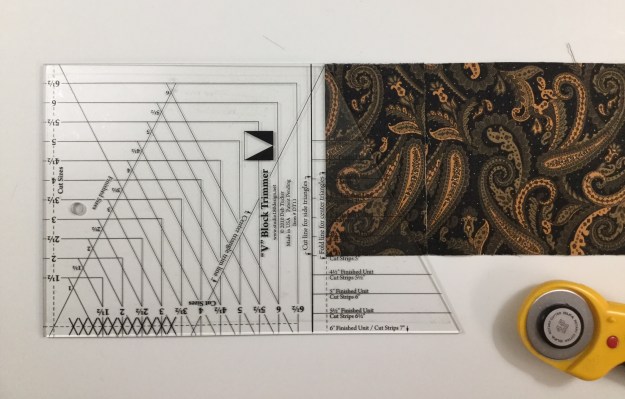
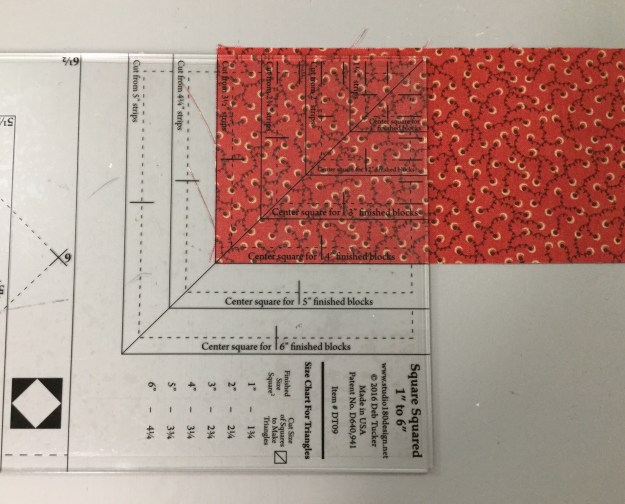
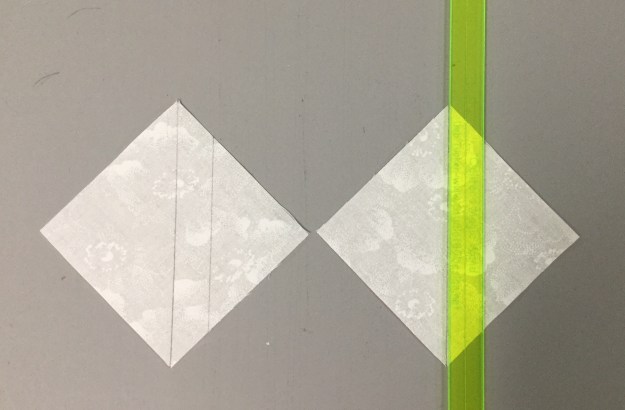
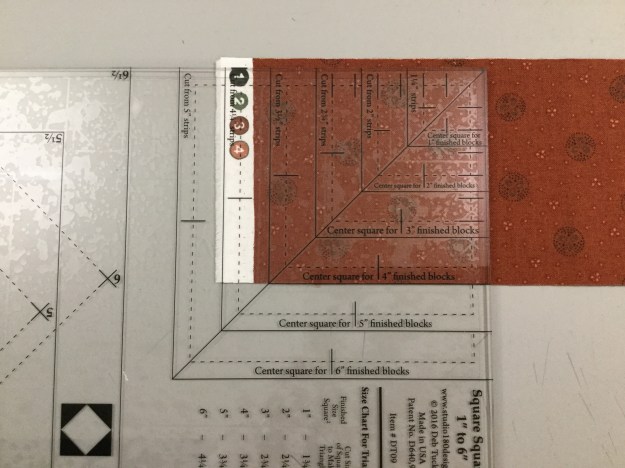
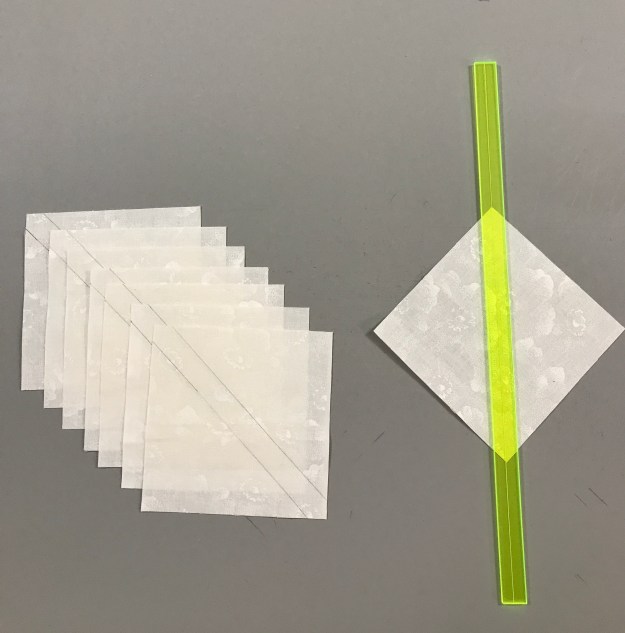
Everything you need to know for making V Block’s is in the tool instructions.  I’m starting with the V Block center triangles, I chose a dark fabric for my star.  For a 12″ block the cut size of my units will be 4 1/2″.  The  Size chart and/or the tool itself tells me that for a 4″ finished unit, I need to cut a 5″ strip.  To cut the center triangles, layer no more than two layers deep.  Fold the ends deep enough to accommodate the slanted cut for a 4″ finished unit and finger press it.

Position the tool on the strip so that the dashed line labeled “Fold Line for Center Triangle” is aligned with the fold and the correct size line of the tool is against the bottom edge of the strip.

img_5918

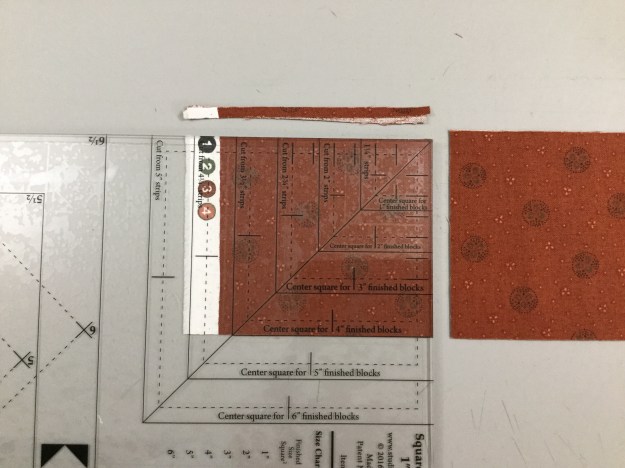
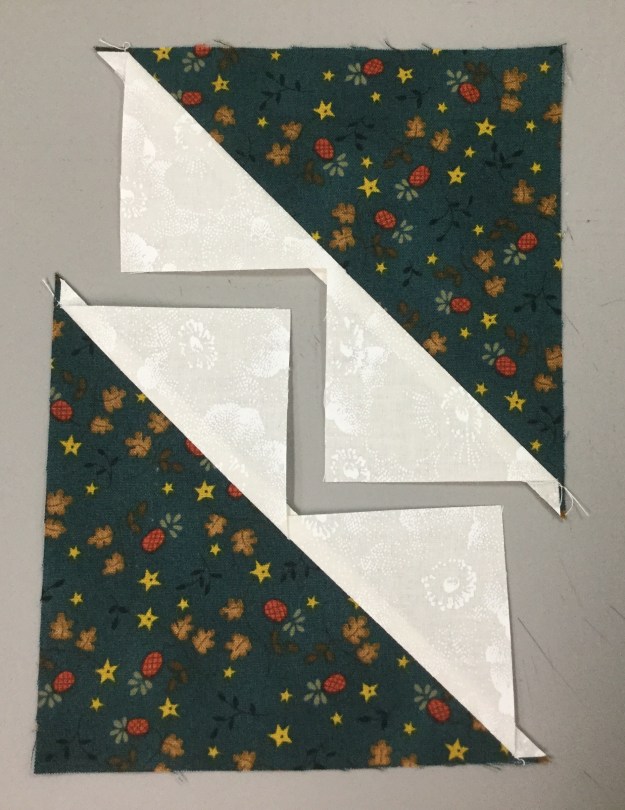
Trim along the slanted edge of the tool and unfold to reveal the center triangle pieces.

img_5920

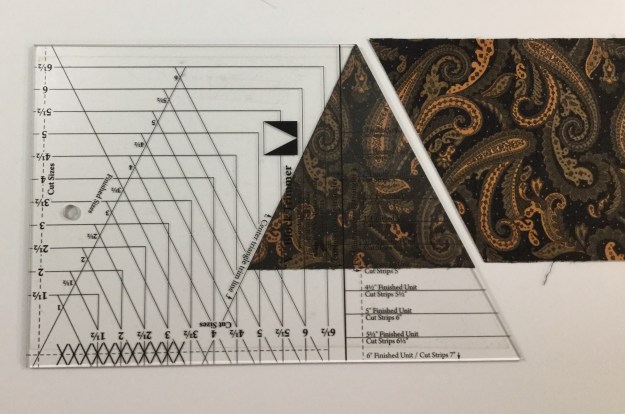
Move the cut triangles to the side and flip the strip over from top to bottom.  Align the center triangle trim line with the previously trimmed edge and cut your next pair of center triangles.  For this block you need four center triangles.

img_5921

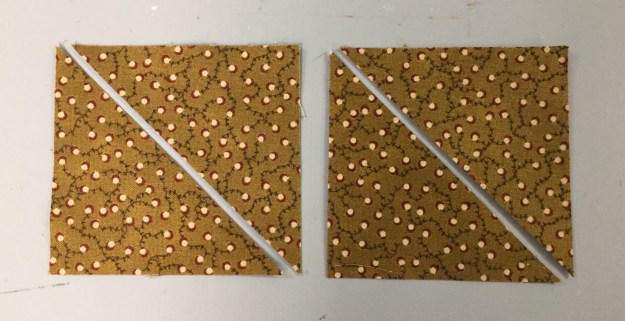
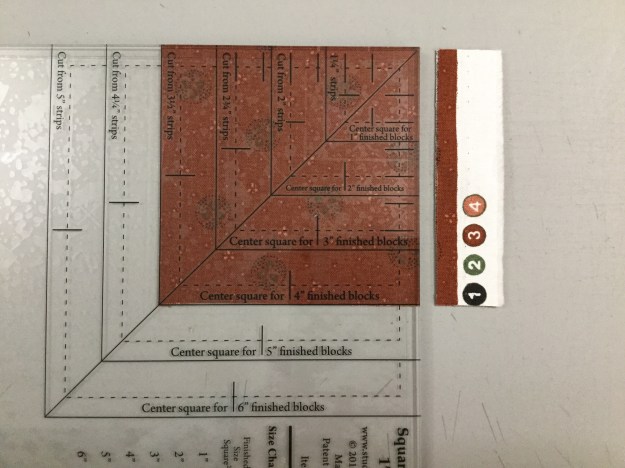
Place the strips facing each other, either right sides or wrong side together on the cutting mat.  Locate the bold solid line on the tool that reads “Cut Line for Side Triangles”.  Position that line against the trimmed end of the strip and the proper size line against the bottom of the strip.  Trim along the slanted edge of the tool.

img_5922

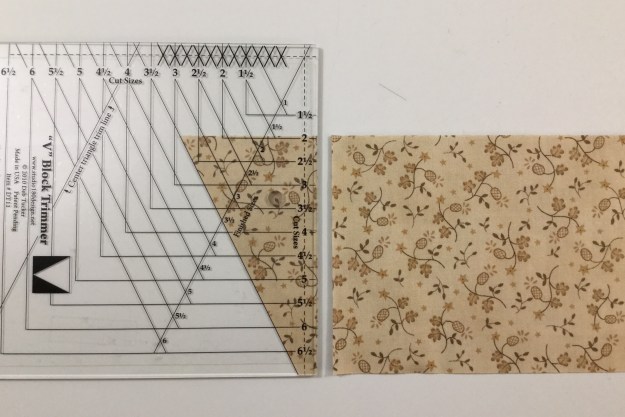
To make the next cut, keep the fabric in the same position on the mat and rotate the tool as shown above and cut.  Rotate the tool back to the first position and cut again.  You will need four mirror image sets of side triangles for this block.

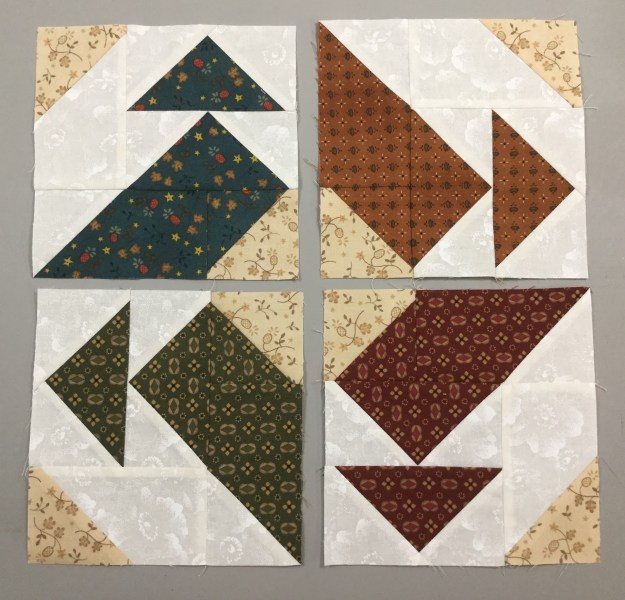
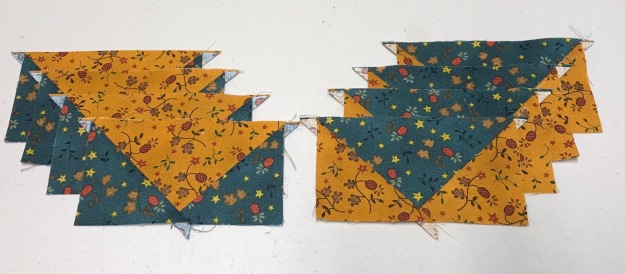
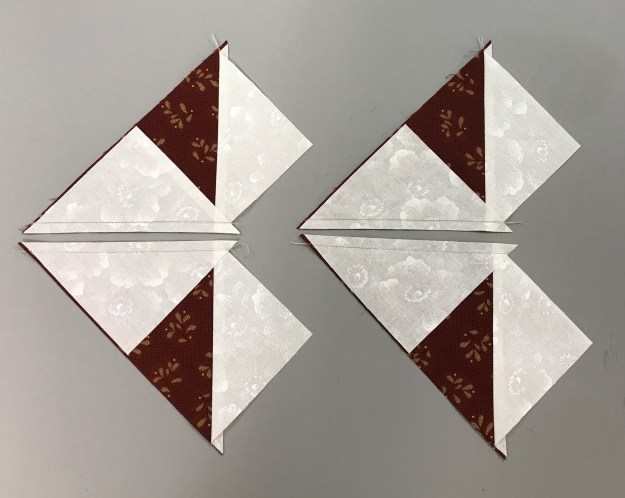
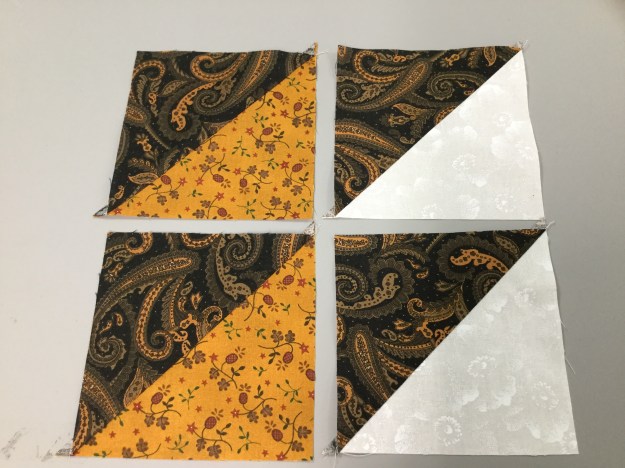
Lay out the V Block units, making sure you are lining up the long edge of the side triangles with the edges of the center triangle.  To sew position pieces right sides together lining up the slanted cut edges “tip to tip” and chain stitch one side triangle to each unit.

Press all seams toward the side triangles.

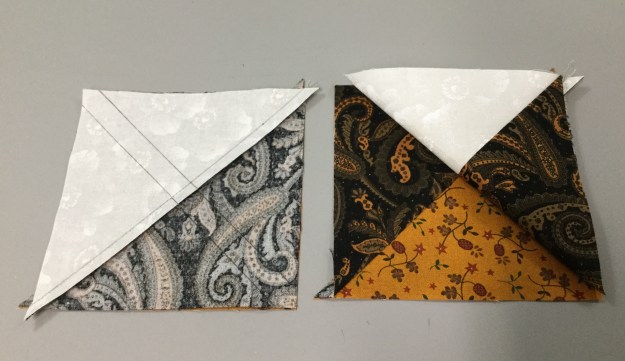
Position the second side triangles and stitch onto each unit as before.

Have you ever tried to sew with a Chihuahua on your lap?  I don’t recommend it.


img_5937

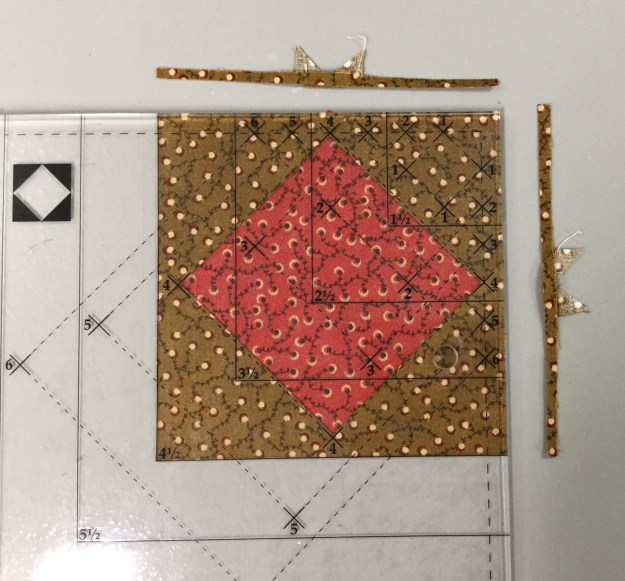
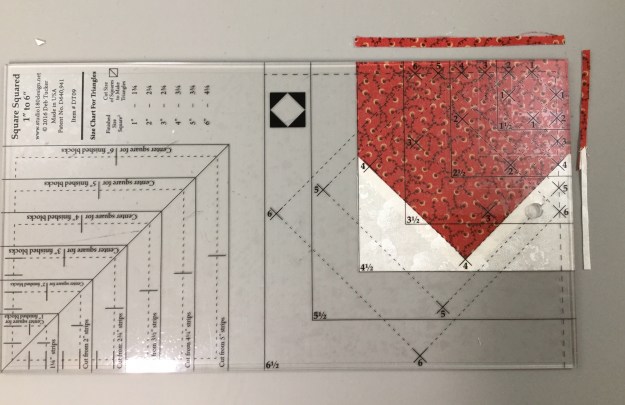
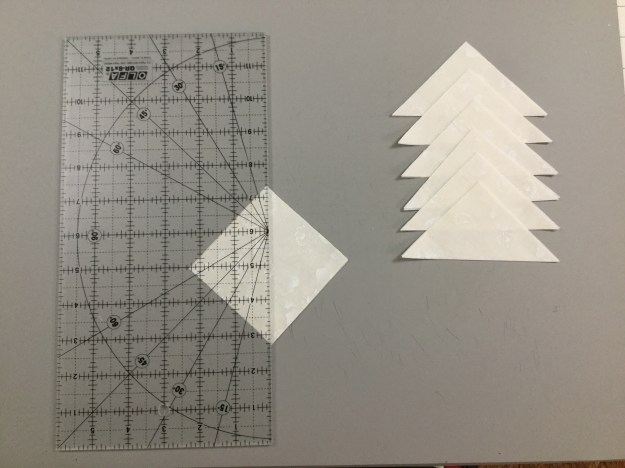
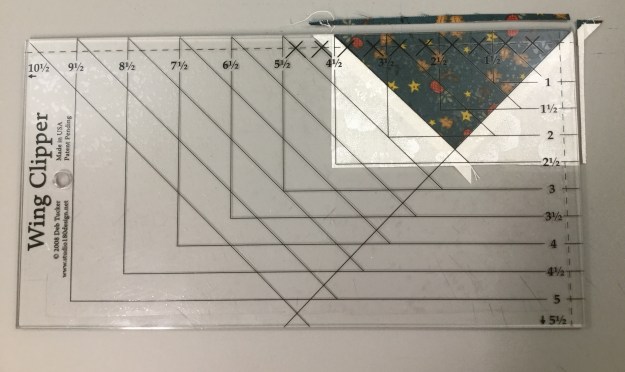
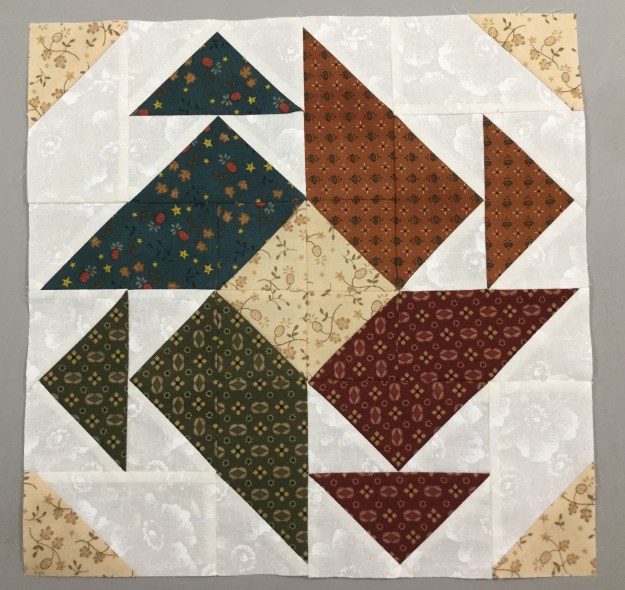
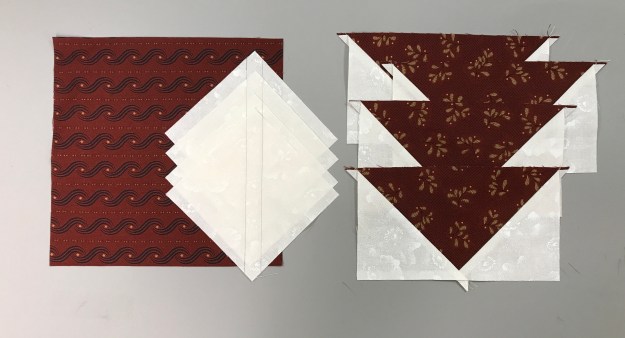
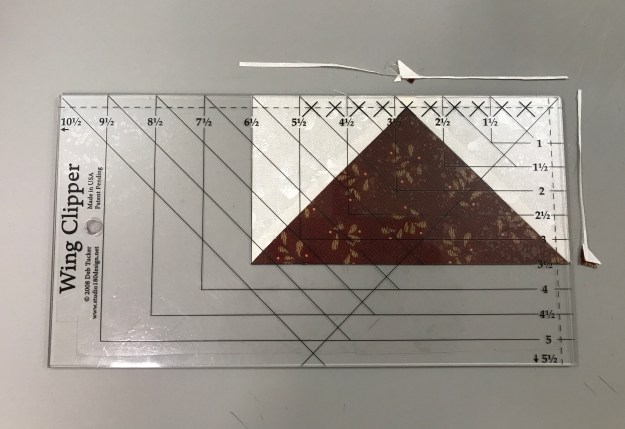
Press toward the side triangle.  Lay the V Block unit on the cutting mat with “V” pointing toward you.  Lay the tool on the unit aligning the “Finished Size” measurement with the seam lines. Trim up the right side and across the top.  (For left hand cutting directions see tool instructions.)

img_5938

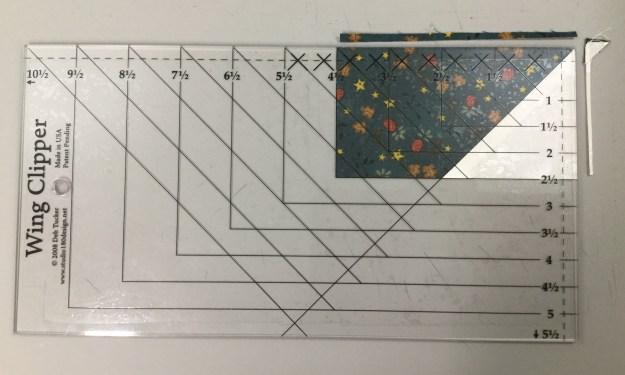
Lift the tool and rotate the unit. Reposition the tool on top aligning the correct “Cut Size” measurements with the previously trimmed corner and “X” with the sewn seam intersection.  Trim up the right side across the top.

img_5939

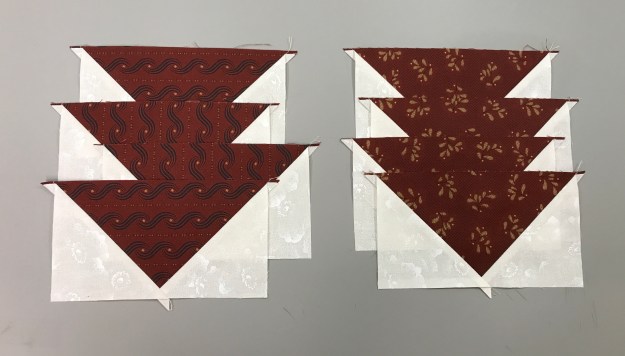
Trim all four V Block units.  Remember for more help, there are free video’s for each of Deb’s tools at Studio 180 Design.

Four Patch Units

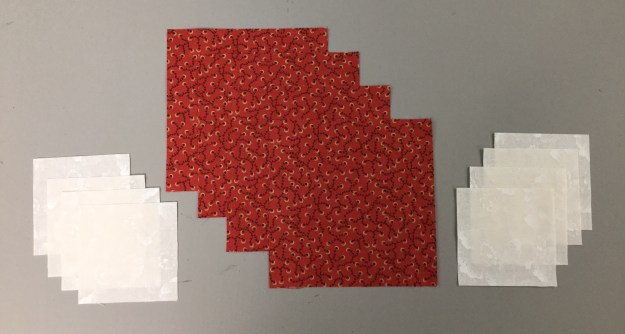
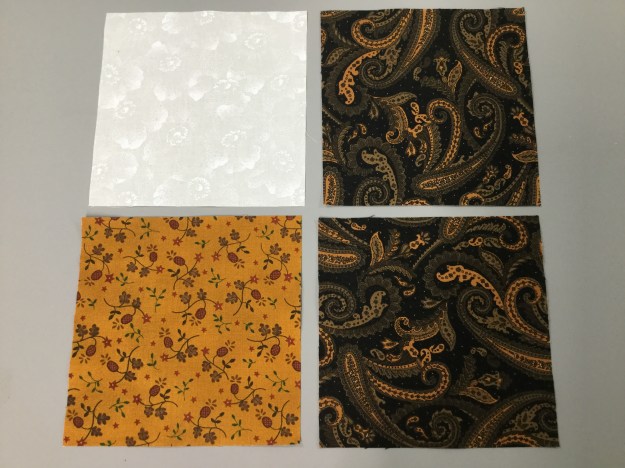
I love Deb Tucker’s new Four Patch Square Up tool, because four patch units are easy to make, so I save them for last.  By then I’m tired and my brains have fallen on the floor somewhere.  I know for this block I need four 4″ finished four patch units.  I simply go to the size cutting chart that came with the tool.  I cut one WOF 2 3/4″ strip from each of my two color choices.  Position the strips right sides together and stitch them together along the long edge.  Cut the sewn strips in half crosswise and press toward the darker fabric.  Reverse one half of the strip over the other so each color is opposite the other color.  Nest the seams well.

Sub-cut into units the same size as the width that you cut  the strips.  In this case my strips were 2 3/4″ wide.  Chain stitch down the long side of the layered pair.

Swirl the centers and press.

img_5948

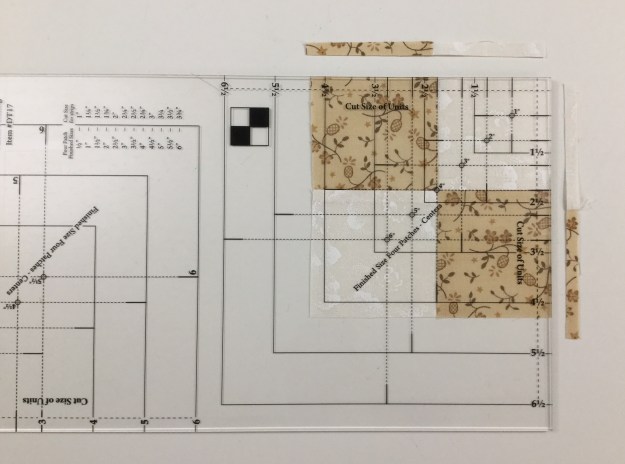
Locate the desired Finished Size circle on your Four Patch Square Up tool and position this circle over the seam intersection of your four patch unit.  Line up the dashed lines radiating from the center with your seams.  Trim up the right side and across the top.

img_5949

Lift the tool and rotate the unit.  Realign the finished size circle with the center and the dashed lines with the seams.  Also make sure the outside trimmed edges of the unit are aligned with the solid cut size clean up lines.  Trim up the right side and across the top, and presto you have a beautiful perfectly square Four Patch unit!

img_5950

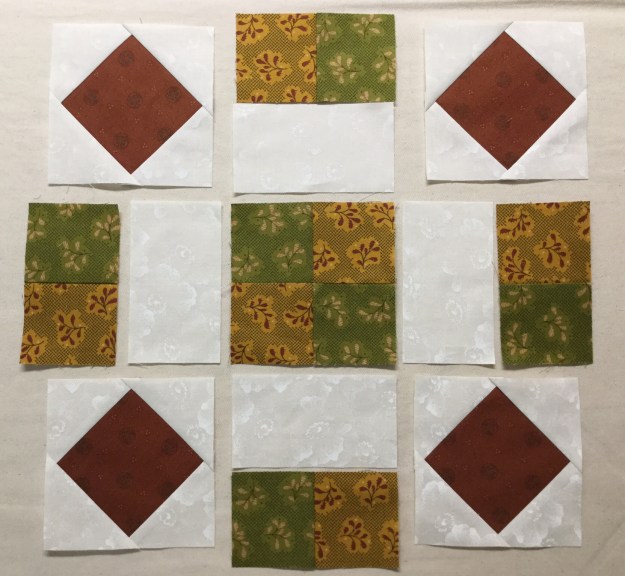
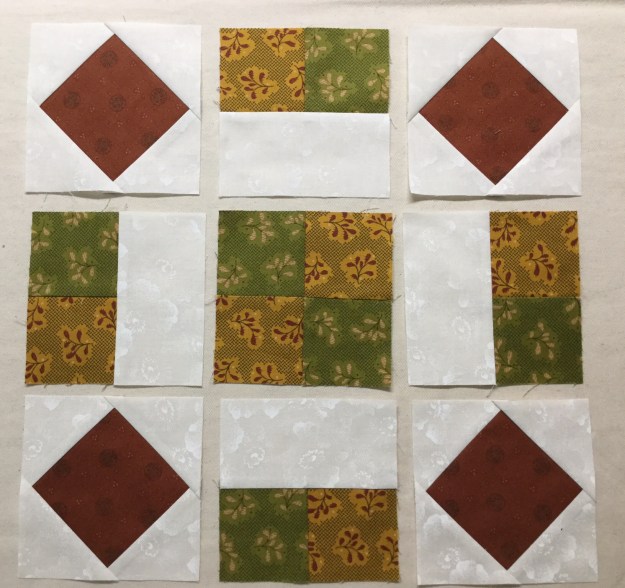
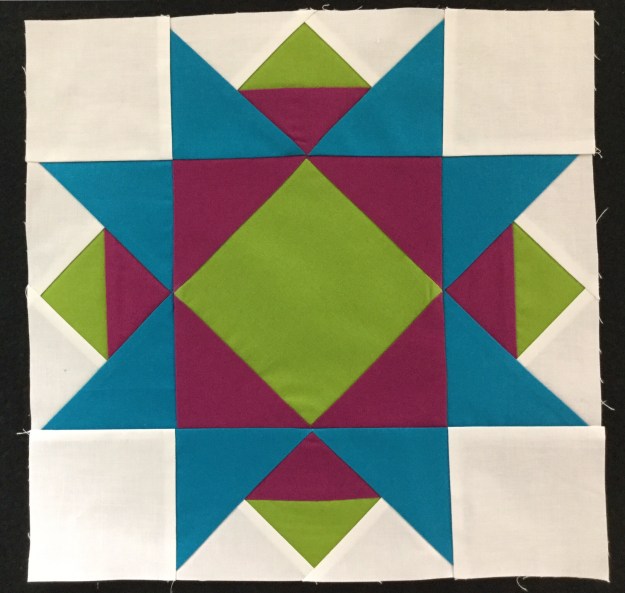
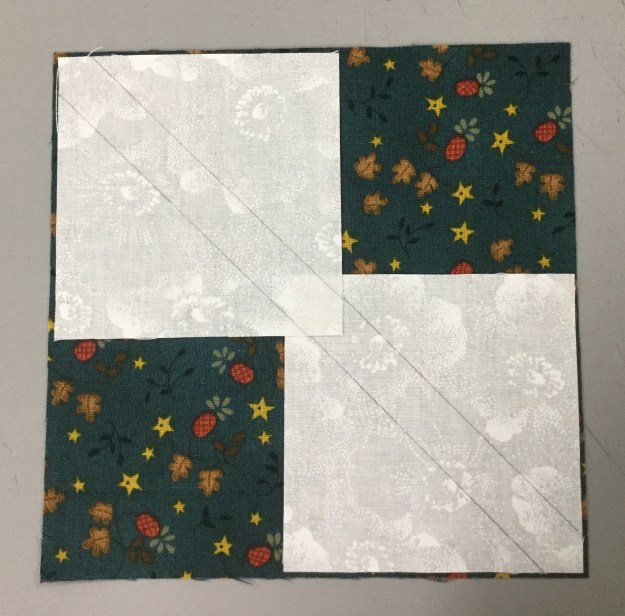
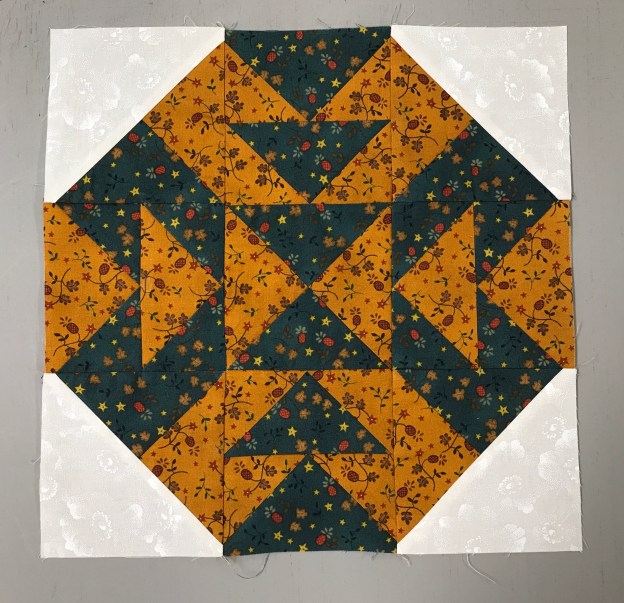
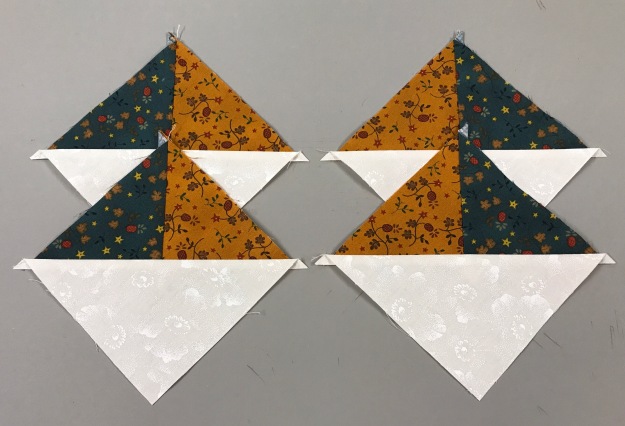
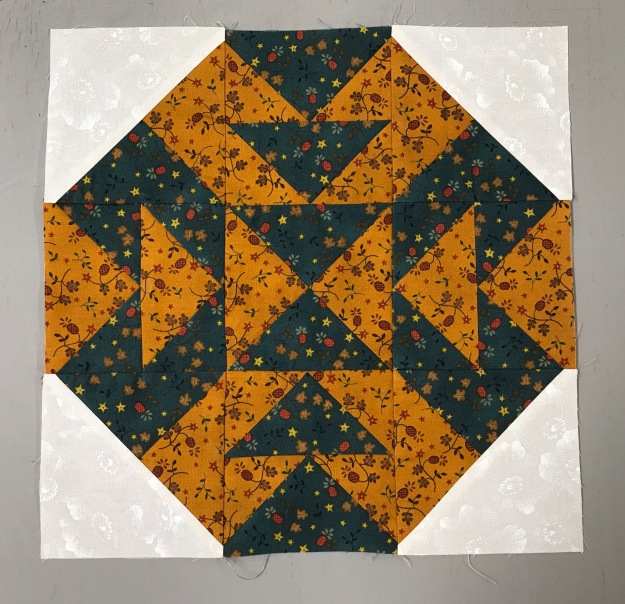
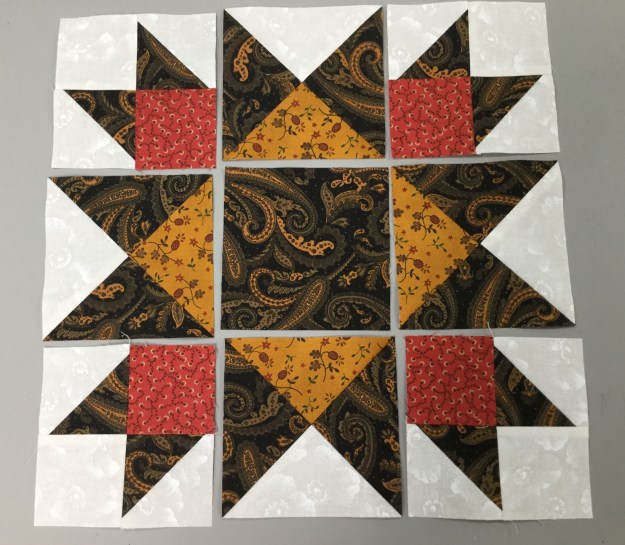
Cut a 4 1/2″ center square that matches your star points.  Lay out your V Block and four patch units.

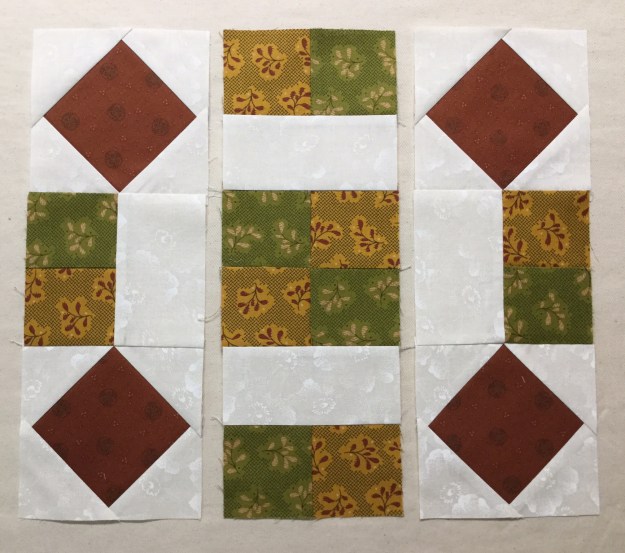
Sew the units into rows and press as shown.  Join the rows, stitch and press away from the center.

img_5953

Check out the other color options on the supply list.  One more BlockBuster block and I will put together my sampler quilt.

BlockBuster #7 – Whimsy Turndash

I love this block So sweet & easy.   All the instructions you will need for BlockBuster # 07 Whimsy Turndash  came with your Square/Squared & Tucker Trimmer I tools which are required to make this block.  You will also need to reference your Little Houses Technique Sheet.

Whimsy Turndash is made up of 3 different units.  Unit A is Square/Squared, one for the block center.  Unit B is Little Houses, 4 are needed.  Unit C is Half Square Triangles (HST), 4 are needed for the block corners.  I made a 12″ finished block containing 4″ finished units.

img_5592-1

The Whimsy Turndash supply list (link in the first paragraph above) offers you 3 different layouts and a black line master to play with.  I chose 2 colors and a background fabric shown above.

img_5595

Unit A – Square/Squared:  Determine the desired finished size of your unit.  Go to the Center Square Section on your Square/Squared Tool.  Mine finished size is 4″, The Center Square Sections tells me to cut a strip 3 1/2″ wide.

img_5596

I already trimmed off the selvage of my 3 1/2″ strip.  Place the line for 4″ finished units on the bottom of the strip up against the trimmed end.  Trim up the left side and across the top.  You now have a perfect precision cut center square for your unit.

img_5597

On your Square/Squared tool find the Size Chart for Triangles.  For 4″ finished units I cut two 3 1/4″ squares and cut them once diagonally.

Center a side triangle over the center square and stitch. Center another side triangle to the opposite side of the center square and stitch.  Press toward the side triangle.

Center another side triangle as before and stitch, repeat on the opposite side so all sides of the center square have a side triangle stitched to it, press toward the side triangle.

Position the Trim Down Section of your Square/Squared tool over the pieced unit.  Focus on aligning the “X’s” for your particular finished size unit.  Mine is 4″ finished, so there is a 4 at each corner of the center square.  Trim up the right side and across the top.  Check your tool instructions for Left handed cutting tool position.

img_5604

For the second cut Lift your tool & rotate your unit.  Position the tool lining up the “X’s” again and lining up the cleanup lines on the tool with edges previously trimmed.  Trim up the right side and across the top.

img_5605

Unit B – Little House:  You will need to make 4 Little Houses.  Each little house is made up of 3 squares, one large and two small.  For a 4″ finished unit cut four 4 3/4″ squares and eight 2 3/4″ squares.

img_5606

Begin by marking a diagonal line on the back of your small squares, this will be a stitching line.

Note:  you may want to mark an additional line 1/2″ from the center diagonal line to use as a secondary stitching line for creating half square triangles out of the left over fabric.

Position one small square in one of the corners of a large square, right sides together, with the marked diagonal line going across the corner of the large square as shown above.  Stitch on both lines and trim apart.

Press toward the triangle.  Position a second small square in the corner next to corner you just stitched.  Stitch on both lines, cut apart press toward the triangle.  Press your half square triangles to the dark.  The small half square triangles are not used in this unit.  If you don’t want to make them for another project just draw the one diagonal line and once it is stitched discard the corner fabric.

img_5611

Using the Trim Down Section of your Square/Squared tool line up the peak of the House with the “X” corresponding with your finished unit size.  Align the seams with the dotted lines extending down from the “X”.  Trim up the right side and across the top.

img_5612

Rotate your Little House around, and line up the two trimmed edges with the cleanup line corresponding to your unit cut size.  This time aligning the peak with the “X” at the bottom.  Trim up the right side and across the top.

img_5614

Repeat with the other 3 large squares.

Unit C – Half Square Triangles:  We need four Half Square Triangles.  Go to the “Starting Square Size Chart” in your Tucker Trimmer instructions.  I am making 4″ finished units, so I need to cut two 5″ background squares and two 5″ squares your color of choice.

Use your Magic Wand and draw to diagonal lines on the back of your background squares as shown above.

Place background squares right sides together with your color of choice squares, stitch on the lines, cut apart and press toward the dark fabric.

We always trim our units to the cut size.  My HST are 4″ finished and 4 1/2″ cut size.  therefore I look for the half circle in the corner of my tool and position the Tucker Trimmer over the unit with the half circle in the upper right hand corner, carefully aligning the solid diagonal line with the stitched seam as shown above.  Trim up the right side and across the top.  If you are left handed, you would position your tool with half circles in the lower left hand corner of the unit.  

Rotate your unit and line up the trimmed edges with the corresponding cut size of your unit, and carefully aligning the solid diagonal line with the stitched seam as shown above.  Trim up the right side and across the top.

Lay out your completed units.  Sew into rows.

This is the back of the block showing how I pressed  the seams.

img_5626

I love the completed Whimsy Turndash and I hope you will too.  This is a great block to practice these easy techniques with.


BlockBuster #6 Rolling Stone

The Rolling Stone block is fun and easy.  You will need the 06 Rolling Stone Supply List and your Studio 180 Design Square/Squared tool.  All the instructions you need to make Square/Squared Units required for this block came with your Square/Squared tool.

img_5521

The Rolling Stone supply list gives you 3 different color layouts, a black line master & 3 block size choices, I decided to make a 12″ block.  Above are the 3 colors and a background fabric I chose.

Square┬▓ Ruler

Your Square/Squared tool has three different sections:  1. Size Chart for Triangles, 2.  Center Square Trim Down Section & 3. Unit Trim Down Section.

img_5524

Unit A:  I am making 4″ finished units, so I checked my tool (The newer Square/Squared tools has Center Square strip width requirements based on the finished size of your chosen unit). I cut one strip 3 1/2″ wide ( this is slightly wider than needed).  I’m right handed so I laid my strip horizontally on the cutting mat with the selvages to the left.  Find the correct size square in the Center Square Section.  Lay the tool on the fabric so the bottom line for a 4″ finished unit is even with the bottom edge of the strip.

img_5525

Make two cuts, once up the right side, them across the top.

img_5526

Rotate your square so it is aligned with the 4″ finished clean up lines on the tool and make one more cut up the right side as shown above. Cut four precision center squares.

img_5523

Find the Size Chart for Triangles on your tool.  For a 4″ finished unit I cut a strip 3 1/4″ wide. Cut 2 – 3 1/3″ squares for each Square/Squared unit, then cut them each once diagonally as shown above.


Position two triangles on opposite sides of the center square.  No need to fuss with matching the middles as the triangles are larger than they need to be.  Just lay the triangle down right side up and then center the center square over it eyeballing it to see if it is even on both sides.

img_5535

Stitch & press toward the triangles.

Position the two remaining triangles on the two remaining sides of the center square as shown above.  Press triangles away from the center square.

Position the Trim Down Section of your tool over the pieced unit.  Focus on aligning the “X’s” for your particular size unit over the sewn seams.  Trim two sides, then lift the tool and rotate the unit on the cutting mat.  For the second cut, position the tool on top of the unit lining up the “X’s” and also lining up the cleanup lines on the tool with the edges previously trimmed.  Repeat the steps to make 3 more Square Squared units.

Unit B:  These are basically 2 1/2″ squares sewn together.  I cut two 2 1/2″ strips of fabric and sewed them together along the length of the strips.  For this block we need four 2 patch units and one 4 patch unit. Trim the selvage off and cut 2 1/2″ wide units.  We need 6 units.

Take two units, and with right sides together, nest the seams and stitch. Swirls the center seams and press to make your 4 patch unit.

img_5522

Unit C:  For a 12″ clock cut a 2 1/2″ strip of fabric.  Then sub-cut into four 2 1/2″ x 4 1/2″ rectangles.

img_5544

Lay out your block units.

img_5545

Sew the Unit B – 2 Patches together with the Unit C – rectangles, press toward the rectangle.  Now all your units are 4 1/2″.

img_5546

Sew your Square/Squared units to your 2 Patch/Rectangle units and your 2 Patch/Rectangle units to your center 4 patch unit as shown above.

img_5549

The back of the block shows I pressed the square/squared units toward the 2 patch units, and when I joined the rows i pressed the center out towards the sides of the block.

img_5548

BlockBuster #6 – Rolling Stone.  Nice block!

Follow my blog with Bloglovin

I Love New York OBW #62

I had a really busy Fall teaching schedule this year.  I am so looking forward to 2018.  I got a jump start by making a quilt for Granddaughter Bailey’s 19th birthday.  She absolutely loves New York City.  We have visited there several times and walked from one end of the city to the other.  I had this fabric from Timeless Treasures for several years.  It just occurred to me that I must have been saving it for Bailey.

img_0983

It is about 9 degrees in Central NY today.  This is my 62nd One Block Wonder.

img_5491

The back also has a New York City themed fabric.  Happy Birthday Bailey!

I Love NY

Deb Tucker had a busy year also, Studio 180 has many new patterns out.  I’m working on one now called Whirling Dervish that is so fun.  I will be posting about it soon.  There are also new Studio 180 Design Technique Sheets to expand our skills.

Stacked Squares

“Stacked Squares” is a technique that will allow you to make the “Economy” block perfectly every time without using paper foundation piecing. Like all Studio 180 Design processes, you’ll be constructing oversized units and then trimming them down.  Above I made a block using the “Stacked Squares” technique sheet and the required Large Square/Squared Tool to make a square in a square, in a square in a square, in a square in a square, in a square in a square, in a square in a square, in a square in a square, in a square! Whew!

img_5349

You have heard of the “Shaded Four Patch”, well here is a sample of what you can do with the “Shaded Nine Patch” units.  The Shaded Nine Patch is an amazing unit that has endless possibilities all by itself or it can be combined with other fundamental units to create even more designs. With the Shaded Nine Patch Technique Sheet you can make this unit in 7 sizes.

img_5352

I made this block using  the Bird of Paradise Technique Sheet.  This techniques requires the Large Square/Squared tool, it is so very cool.  You can make this unit in 6 sizes from 1″x 2″ to 6″ x 12″.

img_5353

I love this new “Eight at Once” technique sheet!  With the Tucker Trimmer I you can make Half Square Triangles (HST) 2 at a time.  With this technique you can make 8 HST’s at a time in 11 different sizes! Wowza!

Deb also gave us a new tool, the Four Patch Square Up.  Four Patches are basic units that seem so simple to make. Just stitch 4 squares together and you’re good to go.  But anyone who attempted these units knows they are notoriously difficult to make.  The Four Patch Square Up tool is the solution.  The tool’s perfectly engineered lines are designed to quickly locate and align with the unit center and sewn seams, allowing for easy trimming on all four sides.  You will be able to make Four Patch Units in 12 sizes!

img_5384

I played with the Four Patch Square up using Deb Tucker’s BlockBuster #24 Compounding Four block pattern. I love the design it makes when you put 4 blocks together.

I wish you all a Happy & Healthy New Year!  Let’s go quilt something!

BlockBuster 5 – Whirligig

This is a very cool block, but be sure to use your best pressing, measuring and cutting skills as this is a 3 out of 4 stars for difficulty.  All the instructions to make this block can be found in the instructions that came with your Wing Clipper I, Tucker Trimmer I and on the Pickets & Quickets technique sheet.

This is a tricky block; you will need to pay attention to your fabric placement and the orientation of your quicket and picket units.  To help you out here is link to the Whirligig Black Line Layout you can print this sheet and use your colored pencils to help choose your fabrics and placement.

01 Fabric Choices

I chose five colors and a background fabric to make 4 different color units, each containing 2 flying geese, a Picket, a Quicket and a half square triangle.

The 05 Whirligig block can be made in 3 sizes:  6″, 9″ and 12″.   I chose the 12″ block.  Check the Cutting Chart, and choose the size block you want to make.  We will start with the Flying Geese Unit.  The cutting chart gives you the finished and the cut sizes of the units.  Check your Wing Clipper instructions to see what size starter squares you need to cut.  As you know when using the Wing Clipper you start with one large square and 4 small squares.

02 Mark for FG

Following the instructions use your Magic Wand and draw two diagonal lines on the back of your small squares.

03 Position

Position 2 of the small squares right sides together in diagonally opposite corners of the large square, nudging them in toward the center by just a few threads

Stitch on both drawn lines, them trim between the lines on the center diagonal.

06 Press

Press the seams toward the smaller triangles.  One of these units will make 2 flying geese, the other will be saved to make a left slanted Quicket.

Position one of the smaller squares in the corner of the previously pieced unit.  Nudge the square in like you did before.  Stitch on the drawn lines and trim between the lines as before.

09 Press

Press the seams toward the smaller triangles.

10 Trim 1

Position your oversized unit horizontally on your cutting mat with the goose pointing toward you.  Align the diagonal guide lines of the Wing Clipper with the sewn seams of the flying geese unit. Trim up the right side and across the top.  (See the Wing Clipper Instructions for left hand cutting.)

11 Trim 2

Lift your Wing Clipper and rotate your flying geese unit 180 degrees.  Reposition your Wing Clipper to align cleanup guidelines with the previously trimmed raw edges and the “X” at the top with the intersection of the seams.  Trim up the right side and across the top.

12 Picket Position

Remember we only used one of the heart shaped units for the flying geese.  We will use the other to make our left slanted Quicket.  Lay the unit on your cutting mat as shown above.  Position your Wing Clipper tool over the unit, the “X” on the tool should align with diagonal seam.  I am making a Quicket with a cut size of 4 1/2″ by 2 1/2″, so I positioned my tool to ensure I can trim all four sides.

13 Picket Trim1

Trim up the right side then across the top.

14 Picket Trim 2

Lift your Wing Clipper tool and rotate your unit 180 degrees.  Align the trim down lines with the just trimmed raw edges and aligning the long diagonal line on the tool with the single diagonal seam.  Trim up the right side and across the top.

15 Quicket

The cut size of my right slanted Picket is 2 1/2″ by 4 1/2″.  Following the instructions on my Pickets & Quickets Technique Sheet, I bump up the size by  1/4″.  My rectangle is 4 3/4″ by 2 3/4″.  My small square is 2 3/4″.  Draw a diagonal line from corner to corner on the small square.

Position the small square right sides together with the rectangle and align the raw edges.  Stitch on the line and trim the excess.  Press toward the small triangle.

17 Quicket

Position your Wing Clipper tool over the unit, the “X” on the tool should align with diagonal seam.  Trim up the right side  and across the top.

18 Quicket

Lift your Wing Clipper tool and rotate your unit 180 degrees.  Align the trim down lines with the just trimmed raw edges and aligning the long diagonal line on the tool with the single diagonal seam.  Trim up the right side and across the top.

Follow the instructions that came with your Tucker Trimmer I for making Half Square Triangles (HST) in the size you chose.  Using your Magic Wand draw two diagonal lines on the back of one of your starter squares.  Place your starter squares right sides together. Stitch on lines and trim down the center.  I pressed toward the dark fabric.

21 HST Trim 1

Trim the oversized HST to the desired cut size.  Mine are 2 1/2″.  (See the Tucker Trimmer Instructions for left hand cutting.)

22 HST Trim 2

Lift your Tucker Trimmer and rotate the HST 180 degrees position the diagonal line and the outline of the square to the measurement desired and trim up the right side and across the top.

23 Unir Layout

We are now ready to sew this unit together.  Layout the  2 flying geese, 1 left slanted Quicket, 1 right slanted Picket and 1 half square triangle as shown above..

First stitch the 2 flying geese together, press in the direct the geese are flying. Then stitch the geese to the right slanted Picket.  Press toward the Picket.

Stitch the HST to the left slanted Quicket, pressing toward the Quicket.

25 Stitch 2 together

Stitch the two sections together.

26 Block Layout

Repeat the process for each of the other 3 sections.  If all of your geese are the same color you can make all your flying geese in sets of four, then make the Pickets & Quickets using the method in the technique sheet.  When I stitched the four sections togehter I pressed the seams open to avoid bulk.

27 Block

As I said in the beginning, “very cool block”!

BlockBuster 4 – Capital T Variation

This is a great block.  04 Capital T Variation requires the use of your Wing Clipper I, & Tucker Trimmer I.  You’ll be making flying geese, combination units and quarter square triangles.  The supply list shows 3 block options. I chose the first 3 color combination because I’m using some Kim Diehl fabric with a cream background for all my BlockBuster’s so I can make them into a cohesive quilt when I’m done.  You have 3 size choices.  I chose to make mine 12″ blocks with 4″ finished units.

img_4817

All the instructions you need to make the units required for this block are with your Wing Clipper & Tucker Trimmer.  In both there are size charts that tell you what size to cut your starter squares depending on the finished or cut size of your units.  When making your block you will want to pay close attention to your color placement.

img_4818

Remember when making your flying geese, your large square  becomes the body and small squares become the small triangles in your geese.  I have cut my starter squares to make 4 geese with a blue body and gold wings, and 4 geese with a gold body and blue wings.

img_4819

On the backs of my small squares draw 2 diagonal lines using your Magic Wand.

img_0673

Position two small squares on your large squares right sides together as shown above paying attention to your fabric choices.  Nudge your small squares in toward the center just a thread or two (about a 1/16″).  This will give more to trim off later.

img_0674

Stitch using a scant 1/4″ seam allowance.

img_0675

After stitching, cut apart.

img_0676

Press toward the small triangles. Remember “what you are pressing toward – always goes on top”!

img_0677

Position one small squares on the corners of the previously pieced units, nudging the squares away from the edges as before.

img_0679

Stitch using a scant 1/4″ seam allowance. Cut apart.

img_0680

Press toward the small triangles.

img_0683


Position your flying geese unit pointed toward you (left handers see your Wing Clipper instructions).  Align the diagonal lines on your tool with the seams in your unit.  As you can see I’m am making a 2″x4″ finished flying geese, so the cut size is 2.5″x 4.5″.  Trim the two sides as shown.

img_0684


Rotate your unit and reposition the Wing Clipper to align the previously trimmed edges and the X at the top with the intersection of the seams and trim again.

img_0685

Repeat with all your flying geese units.  I now have two sets of 2.5″ x 4.5″ flying geese.

Combination Units:  after checking my size chart I know my starter squares for 4″ finished units are 5.5″.  I cut one gold, one blue and two background squares, all 5.5″.

img_0688

Combination Units start by making half square triangles.

I grabed my Magic Wand and drew two diagonal lines on the back of one of my gold 5.5″ square.  Position the gold square on the blue with right sides together and align the edges.  Stitch on both lines using a scant 1/4″ seam allowance. and cut apart.

img_0691

Press toward the dark triangle.  Grab your Magic Wand again and draw two diagonal ines on the back of both Half Square triangles.


Position each half square triangle on a 5.5″ background square, right sides together centering it.  Stitch using a scant 1/4″ seam allowance. Cut apart as shown above.

img_0694


You now have 4 combination units.  Note: this process creates units that are “mirror images”.

img_0695

Position the Tucker Trimmer over the unit, carefully aligning both diagonal lines with the stitched seams as shown and trim.

img_0696

Rotate the unit and line up the Tucker Trimmer again.  This time be sure to position both diagonal lines and the outline of the square to the exact measurement desired and trim again.

img_0697


Four beautifully trimmed combination units for the corners of our block.

Quarter Square Triangles:  Check your size chart.  These are 5.5″ starter squares.

On the back of my gold square I have again used my Magic wand to draw to diagonal stitching lines.

Position the gold square over the blue square, right sides together, aligning the edges.  Stitch using a scant 1/4″ seam allowance and cut apart.

img_0702

Press toward the dark triangles. Using your Magic Wand Draw 2 diagonal lines on the back of one half square triangle.

img_0703

Position the two half square triangles right sides together, making sure the colors are opposite each other (my gold is against the blue and vice versa) carefully nesting the seams as shown above.

Stitch using a scant 1/4″ seam allowance. Cut apart and press swirling the centers as shown above.

img_0706

Position the Tucker Trimmer over the unit carefully aligning both diagonal lines over the seams lines of the unit.  Trim two sides as shown.

img_0708

Rotate the unit and line up both diagonal lines again along with the outline of the unit to the exact measurement desired and trim. Only one quarter square triangle is needed for this block center.

img_0709

Layout your units as shown above being careful of color placement.  Notice the body of my geese follow the colors in the quarter square triangle.  And the colors in the combination units are the same as the wings on the geese.

img_0711

Stitch your geese together in pairs as shown above.

img_0712

Stitch 3 units into a row as shown above.

img_0713

This shows how I pressed the block.  The outside rows were press toward the combination units, while the center row was press toward the quarter square triangle.  This allows the rows to nest nicely.

img_0714

The finished 12″ Capital T Variation block! I love It!

BlockBuster 3 – Flying Dutchman

Flying Geese are fun to make when you know how!  When you learn to use Deb Tucker’s Wing Clipper, you will make 4 flying geese at once.  With the Wing Clipper you can make finished size flying geese in 10 sizes from 1/2″ X 1″ to 5″ X 10″.  This block is called the 03 Flying Dutchman and consists of 8 flying geese.  All the instructions you need to make the flying geese units required for this block came with your Wing Clipper’s instructions.  There is a chart with step by step graphics and directions.

I chose the third option in the supply list.  Remember the large square becomes the large triangle or body in your flying geese, and the small squares become the side triangles or wings in your units.

I am making my BlockBuster blocks 12″ finished size.  That way when I’m done I can make a quilt.  When using the Wing Clipper you start with one large square and 4 small squares.  IMG_0575

For a 12″ block, my units need to be 3″ x 6″ finished size.  According to the chart in my instructions my large square should be cut 7 1/2″ and my small squares should be cut 4″.  Because I need 8 flying geese units I cut 2 large squares and 8 small squares.

IMG_0576

Take your Magic Wand and on the back of your small squares draw lines diagonally corner to corner as shown above.

IMG_0577

Position two small squares on one large square as shown.  When positioning, nudge the small squares toward the center a thread or two.  This gives you a little more to trim off.

IMG_0578

Sew on lines and cut apart as shown above.

IMG_0580

Press toward the small triangles.  Position another small square as shown above, again nudging the small square away from the edge about 1/16th of inch.

IMG_0581

Sew on the lines and cut apart, and press.

IMG_0582

You now have 4 oversized flying geese units.  Repeat the same process with the second large square and 4 small squares.

IMG_0583

You now have 8 oversized flying geese units.

IMG_0585

Position your oversized flying geese unit horizontally on your cutting mat, with unit pointed toward you as shown above.  Align the diagonal guide lines of the Wing Clipper with the sewn seams of the flying geese unit. Trim the two sides.

IMG_0587

Rotate your unit and reposition your Wing Clipper to align clean-up guidelines with the previously trimmed raw edges and trim.  Check your instruction for Left-handed trimming.

Lay out your units and sew 2 together to make 4 quarters, pressing your seams in the directions the geese are flying.

IMG_0591

Sew your 4 quarters together.

BlockBuster 2 – Crowning Glory

The BlockBuster 2 – Crowning Glory block is very much like the Ohio Star Variation.  Both use the Tucker Trimmer I, but the corner units are swapped out for the Shaded Four Patch units.  All the instructions you need for this block can be found in the instructions that came with your Tucker Trimmer I tool and on the Shaded Four Patch Technique Sheet.

Click here for the 02 Crowning Glory supply list.  When making your shaded four patches, remember that the narrow strip is your small square and the wide strip becomes your little triangles, and the rectangle is the large triangle.  I chose to make the middle block layout using 5 fabrics for a 12″ finished block.

IMG_4746

Color 1 – Background, cut 2 – 5″ x 6″ rectangles.

Color 2 – Light Teal, wide strip, cut 1 – 3 3/4″ strip WOF ( if using a fat quarter, cut 2 strips). Cut 1 – 5 1/2″ square.

Color 3 – Dark Teal, narrow strip, cut 1 – 2 3/4″ strip WOF ( if using a fat quarter, cut 2 strips). Cut 2 – 5 1/2″ squares.

Color 4 – Gold, cut 1 – 5 1/2″ square.

Color 5 – Red center square, cut 1 – 4 1/2″ square.

Beginning with the shaded four patch units, cut 2 – 5″ x 6″ rectangles from Color 1 – Background.  Cut 1 – 3 3/4″ strip from Color 2 – Light Teal.   Cut 1 – 2 3/4″ strip from Color 3 – Dark Teal.

IMG_4715

Cut the wide & the narrow strips in half if you cut from WOF.

IMG_4716

Take one narrow strip and one wide strip and with right sides together, sew along one long side. Repeat with the other 2 strips.  Press towards the wide strip.

IMG_4717

Pair two of the pieced strips, right sides together with the narrow strips on opposite sides as show below:

IMG_4718

Trim the end and sub-cut into units the same width as the narrow strip, which is 2 3/4″.  Because we only need 4 shaded four patch units, we only need to cut 2 pairs.

IMG_4719

Stitch each pair of cut pieces along one long side. Fold in half to find the center and snip to the seam line to aid in pressing.

IMG_4720

Press each unit as shown below:

IMG_4721

Position a ruler with a 45 degree angle on your unit as shown below. Draw a 45 degree sewing line from the top to bottom, through the corner of the square where the stitching lines meet.

IMG_4722

Draw a second 45 degree sewing line through the other corner as shown below:

IMG_4723

Center each marked unit over the rectangle. Sew on the lines, Cut apart and press toward the large triangle.

Using your Tucker Trimmer I, trim to the cut size of 4 1/2″.  Rotate the unit and trim again.  You now have 4 shaded four patch units.

As with the Ohio Star Variation we will be making 3 color quarter square triangles.  I chose the dark teal as my star points.  Following the instructions for my Tucker Trimmer  for 4″ finished units, I cut 2 – 5 1/2″ starter squares of my color 3 dark teal, 1 – 5 1/2″ starter square of color 2 light teal. And 1 – 5 1/2″ starter square of color 4 gold.

IMG_4729

We start by making half square triangles.  Using your Magic Wand, draw diagonal lines on the back of 2 of the starter squares.  Position a color 2 light teal square over a color 3 dark teal square, and a color 4 gold square over the other color 3 dark teal square.

Sew on the lines and cut apart.  Press toward the dark triangle.

Again, Using your Magic Wand draw diagonal sewing lines on the back of two half square triangles.

IMG_4734

Position one gold and dark teal half square triangle over one light teal and dark teal half square triangle making sure the dark teal is on opposite sides. Nest the seams carefully.  Sew on the lines, cut apart, swirl the centers and press well.  Repeat with the other two half square triangles.

Trim to the cut size of 4 1/2″ using your Tucker Trimmer I. Rotate and trim Again.  You now have 4 – 3 color quarter square triangles.

Cut 1 – 4 1/2″ square from color 5 for the block center.  Layout your units as shown below:

IMG_4741

Sew the 3 units on the right and press toward the shaded four patch units.  Sew the center 3 units and press toward the center square.  sew the 3 units on the left and press toward the shaded four patch units.  Join the 3 sections, carefully nesting the seams and press.

The finished block:

IMG_4745

Below are Crowning Glory and the Ohio Star Variation side by side .  They look so different for being so similar.

IMG_4747

BlockBuster 1 – Ohio Star Variation

If you have been following Deb Tucker’s Studio 180 Design’s Facebook page then you know that Deb premiered their BlockBuster program series last January, which means they have a full year of exciting blocks to add to your quilting repertoire.

The Ohio Star is one of the most classic quilting blocks, and one that can be easily transformed by playing with the four cornerstone units.  Instead of the traditionally seen solid squares for the corners, they pieced two half square triangle units with two squares to make a more interesting variation.  Click here 01 Ohio Star Variation for the Supply list.  I all have the supply sheets for the BlockBusters on my page or you can go to Studio 180 Design

The supply sheet has a Cutting Chart giving you the option of making 6″, 12″ or 15″ finished blocks, and shows 3 different color ways.  I decided to make 12″ finished blocks.  I chose 4 colors for my block.  Color 1 is a light background.  Color 2 is my dark fabric for my star points.  Color 3 is my gold fabric and Color 4 is my red fabric.  it really helps to assign numbers to your fabric choices.

IMG_4680

We will make four 3 color quarter square triangles using the instructions from your Tucker Trimmer I.  You will need 4 – 4.5″ unfinished quarter Square triangles for your block.  Check your Tucker Trimmer instructions, there is a chart that based on your finished or unfinished size unit tells you what size your starter squares should be.  You will need 1 – 5.5″ (color 1) background square,  2 – 5.5″ (Color 2) black squares & 1 – 5.5″ (color 3) Gold square .

IMG_4681

We  start by making half square triangles.  Position: I placed my background square and my gold square on my 2 dark squares.  Placing my “Magic Wand” diagonally on the squares I drew a line on both sides of the wand.  I sewed on the lines and then cut them apart as shown below.

I then pressed them towards the dark triangle.  When ever you are pressing, remember “whatever you are pressing toward, goes on top”!

IMG_4685

Using your Magic Wand, draw diagonal lines on the back of 2 half square triangles.

IMG_4686

Position your half square triangles right sides together making sure the dark triangles are opposite each other and that the seams are nicely nested.

IMG_4687

Sew on the drawn lines and cut apart.

Swirl the centers and press making sure all the seams completely open.

Trim using your Tucker Trimmer. The cut size of the unit is 4.5″, find the half circle on you Tucker Trimmer and the diagonal 4.5″ line. Using the 4.5″ line and the common diagonal line center it on your unit and trim 2 sides.  Then rotate your unit centering as before but also using the 2 trimmed sides and trim again.  You now have 4 – 3 color quarter square triangles that will be the star points for your Ohio Star.

Make the corner units that are made up of 8 – 2.5″ unfinished half square triangles and 8 – 2.5″ squares (4 from our background fabric and 4 from your color 4 fabric).  We start by checking our chart to find for 2.5″ unfinished half square triangles we cut 4 – 3″ starter squares of both our dark and background fabric. Again using our Magic Wand draw diagonal lines on the back of the background fabric, position and sew on the lines.

Cut apart and press toward the dark triangles. As before trim to 2.5″ using your Tucker Trimmer.

Layout 2 half square triangles, 1 – 2.5″ background square and 1 – 2.5″ square from Color 4 as shown below.  Sew 1 half square triangle to a background square and 1 half square triangle to a color 4 square.  Press toward the square fabric. Place right sides together and nesting the seams and sew together.  You can press the seam to one side or, I chose to press it open to lessen bulk.

Cut 1 – 4.5″ center square  and lay out your block units as shown below:

IMG_4703

Sew units together in 3 sections.  Press the side sections toward the corner units and the center section toward the center square so the seams nest nicely.

Join the 3 sections to make your Ohio Star Variation.

IMG_4708