Smooth Sailing with Sugar & Spice

I tried two new quilt patterns in October.  The first one was Smooth Sailing by Pam Goggans.

OLYMPUS DIGITAL CAMERA

Smooth Sailing

Pam designed this as a companion pattern for Studio 180 Design’s Diamond Rects and Square Squared tools.  I had never made a Storm at Sea before and I was very pleased with this pattern.  Using the Diamond Rects & Square Squared tools made it easy.  The pattern makes two sizes, 49″ x 58″ and 89″ x 107″.  You can buy Smooth Sailing from Studio 180 Design or from Pam Goggans at Sager Creek Quilts

I just finished making Sugar & Spice by Deb Tucker.  I love, love, love the Lemoyne star. This is a companion pattern for the Rapid Fire Lemoyne Star and Tucker Trimmer 1 tools.

OLYMPUS DIGITAL CAMERA

Sugar & Spice

This pattern was easy and fun. It measures 45″ x 62″.

Sew many quilts to make sew little time!

Jackie’s Folly, AKA Country Fair

Has this ever happened to you?  Deb Tucker’s pattern Country Fair was just featured in Fon’s & Porter Love of Quilting Nov/Dec issue.  I have been wanting to make this quilt for quite awhile, so I thought “this is the time”.

image image

image

I make my Square Squared and Flying Geese units (using my Wing Clipper 1 & Square 2 tools of course really makes the process fly).

image

I get one block done. I feel real good, love the block.

image

I get the blocks done and begin making the sashings.  Oops I have them facing the wrong way, out comes the seam ripper.

image

I get the center of the quilt together and begin working on the borders.

OLYMPUS DIGITAL CAMERA

Borders on, feeling accomplished so I post a picture on Facebook…Drat, I put the blocks together wrong and didn’t even notice.  Apparently I’ve had this pattern awhile and did not check to see if there were any corrections.  Deb Tucker always posts any pattern corrections on their website http://www.studio180design.net.

OLYMPUS DIGITAL CAMERA

But I decide to finish it anyway and I’m sure glad I did.  I call it Jackie’s Folly.  I still love it.  This is a great pattern no matter how you finish it.  The quilt measures 72″ by 92″.

How Many Geese in that Formation?

I’m getting ready for some upcoming trunk shows and decided to make some Studio 180 Design Tool samples.  There are 8 Fundamental Tools (not counting Tucker Trimmer 2 & Wing Clipper 2).  The Tucker Trimmer 1 makes Half Square Triangles, Quarter Square Triangles & Combination Units in 11 sizes from 1 inch to 6 inches.

OLYMPUS DIGITAL CAMERA

Above are Quarter Square Triangles in 11 sizes.

OLYMPUS DIGITAL CAMERA

The Wing Clipper 1 makes Flying Geese in 10 sizes from 1 inch to 10 inches.

OLYMPUS DIGITAL CAMERA

The Square Squared Tool makes 6 sizes from 1 inch to 6 inches.

OLYMPUS DIGITAL CAMERA

The Corner Beam Tool makes 11 sizes from 1 1/2 inches to 6 1/2 inches

OLYMPUS DIGITAL CAMERA

The V Block Tool makes 11 sizes from 1 1/2 inches to 6 1/2 inches

OLYMPUS DIGITAL CAMERA

The Split Rects Tool makes 8 sizes from 1 inch to 8 inches.

OLYMPUS DIGITAL CAMERA

The Diamond Rects Tool makes 5 sizes from 2 1/2 inches wide to 10 1/2 inches wide.

With the Corner Pop Tool you can choose from any of the 22 size options and remove a corner from a base shape such as a square, rectangle, pieced unit or block and leave the necessary 1/4″ seam allowance in tact.

OLYMPUS DIGITAL CAMERA

The block above is made from V Block and Corner Beam Units.

OLYMPUS DIGITAL CAMERA

I made 4 of the blocks but this time I popped of corners of the V Block & Corner Beam units before I put the blocks together, making this very interesting wall hanging.

Next I need to make samples for the Rapid Fire Hunters Stars and Lemoyne Star Tools.  Happy quilting!

OLYMPUS DIGITAL CAMERA

The Shaded Four Patch Unit

Lately I have been working on Tech Classes for some of the Studio 180 Design Tools.  I’m getting ready to teach the Shaded Four Patch and Tucker Trimmer.

OLYMPUS DIGITAL CAMERA

I love this basic unit..

Deb Tucker’s Technique Sheet for the Shaded Four Patch gives you fabric requirements for 21 sizes and all the steps needed so you can make these basic units yourself.

OLYMPUS DIGITAL CAMERA

Choose the size you want to make and cut 2 narrow strips and two wide strips. Sew along one long edge of each.

OLYMPUS DIGITAL CAMERA

Press toward the wide strip.

OLYMPUS DIGITAL CAMERA

Pair two of the pieced strips right sides together with the narrow strips on opposite sides.

OLYMPUS DIGITAL CAMERA

Trim into units as wide as the narrow strip.

OLYMPUS DIGITAL CAMERA

Stitch each pair along one log edge.

OLYMPUS DIGITAL CAMERA

Fold each unit in half to find the center and using your scissors snip all the way to the seam allowance.

OLYMPUS DIGITAL CAMERA

Press Open.

OLYMPUS DIGITAL CAMERA

Place a ruler with a 45 degree angle on the bottom of your unit so the edge lines up where the stitching lines meet as shown above and draw a line horizontally.  Rotate your unit and repeat.

OLYMPUS DIGITAL CAMERA

Center each marked unit over a large rectangle, (that you cut per the instructions) with right sides together. Stitch on the lines and cut apart.

OLYMPUS DIGITAL CAMERA

Press toward the large triangle and trim using your Tucker Trimmer.

OLYMPUS DIGITAL CAMERA

Rotate your unit and trim again.

OLYMPUS DIGITAL CAMERA

I made this small quilt measuring 42″ x 50″ using only shaded Four Patch Units.  You could make this any size you wanted with the instructions included in technique sheet.

OLYMPUS DIGITAL CAMERA

I also made this table runner using only Shaded Four Patch Units.

OLYMPUS DIGITAL CAMERA

This table runner was also made using only Shaded Four Patch units.  It’s all about color and how you position your units.

A Goose of a Different Feather

I was going through some magazines from last year and saw a quilt made by Catherine Hughes that had a block in it that contained different kind of Flying Geese units, the background of the geese were half square triangles.  I decided to Tuckerize it, which meant  I would use my favorite Studio 180 Design Tools.

I decided to make a 10″ finished size block containing a 5 1/2″ center square. The Studio 180 Design method of making flying geese using the Wing Clipper 1 uses one large square and four small squares.  For this project the small squares would be half square triangles instead of just squares.  The cut size of the flying geese would be 3″ by 5 1/2″.  To determine what my large square and small squares should be I checked the chart that comes with the Wing Clipper 1. I cut the large square 6 1/2″. The cut size of the small squares should be 3 1/2″.  Now I went to the chart that comes with my Tucker Trimmer I.  For half square triangles that finish 3″ the cut size is 3 1/2″ which meant my starter squares should be 4″. Whew that was a mouthful!  For 3 blocks I cut 6 red – 4″ squares and 6 black – 4″squares.

OLYMPUS DIGITAL CAMERA

On the back of the red squares use your Magic Wand and draw diagonal lines on either side.

OLYMPUS DIGITAL CAMERA

Place 1 red square on each black square.

OLYMPUS DIGITAL CAMERA

Sew on the lines.

OLYMPUS DIGITAL CAMERA

Cut apart between the sewn lines.

OLYMPUS DIGITAL CAMERA

Press toward the dark.

OLYMPUS DIGITAL CAMERA

Square up to 3 1/2″ using your Tucker Trimmer I.

OLYMPUS DIGITAL CAMERA

Using your Magic Wand draw diagonal lines on the wrong side of the half square triangles.

OLYMPUS DIGITAL CAMERA

Place a 6 1/2″ square right side up and position 2 half square triangles wrong sides together as shown nudging the half squares triangles in from the corners about a 1/16″.

OLYMPUS DIGITAL CAMERA

Sew on the drawn lines and cut apart.

OLYMPUS DIGITAL CAMERA

Press toward the small triangles.  Position another half square triangle as shown again nudging away from the corner 1/16′.

OLYMPUS DIGITAL CAMERA

Sew on the lines and cut apart.

OLYMPUS DIGITAL CAMERA

Press toward the small triangle.

OLYMPUS DIGITAL CAMERA

First trim.

OLYMPUS DIGITAL CAMERA

Rotate unit, second trim.

OLYMPUS DIGITAL CAMERA

Block layout. Cut 3″ squares for the block corners.

OLYMPUS DIGITAL CAMERA

Repeat process to make 3 blocks.  Cut one 15 1/2″ square and cut diagonally twice to make the side triangles.  Sew the side triangles to blocks as shown.

OLYMPUS DIGITAL CAMERA

I cut 4 – 1 1/2″ red strips for the inner border and 4 – 2 1/2″ black strips for the outer border.

Michelle Hiatt is “Sew On The Go”

“Sew On The Go” that’s what I say about my friend and fellow Studio 180 Design Certified Instructor Michelle Hiatt.  Michelle is not only an excellent quilt teacher, she is a very talented quilt designer.  Michelle’s designs are featured in Fons & Porter’s Love of Quilting Magazine, Quilter’s Newsletter & Modern Quilting Unlimited Magazine.  Michelle teaches throughout the northeast, including at American Quilt Society’s Quilt Weeks across the country.  Her quilts have been exhibited in several national quilt shows and have received numerous awards.  Most recently, Winter Jewels (patterned as Loco for Lemoyne Stars), took two 1st place, a 3rd place and viewer’s choice at national quilt shows.

Image processed by CodeCarvings Piczard ### FREE Community Edition ### on 2014-02-02 01:26:03Z | http://piczard.com | http://codecarvings.com

Winter Jewels by Michelle Hiatt

I’m so excited to share 4 of Michelle’s newest patterns for Modern 180 and Studio 180 Design.  Below is “Floral Burst” companion pattern for Studio 180 Design’s Rapid Hunter Star & Corner Pop Tools.  It is amazing to see how just popping a corner of the hunter star block and inserting a pop of color adds so much.

FLORAL BURST

Next is “Diamonds in the Sky” companion pattern for the Studio 180 Design’s Corner Beam Tool.  I love the Corner Beam tool and this pattern looks like fun.

DIAMONDS IN THE SKY

Below is “Finley’s Fence” companion pattern to Studio 180 Design’s Tucker Trimmer I and Corner Pop tools.  This would make a great baby quilt.

FINLEYS FENCE

Last but not least is “Zig Zag Zany” companion pattern for Studio 180 Design’s Wing Clipper I and Tucker Trimmer I Tools. It is so much fun to see the many different ways to use flying Geese!

ZIG ZAG ZANY

I purchased all 4 and can’t wait to make them.  Look for these patterns soon at Studio 180 Design and at Michelle’s Etsy Shop Sew On The Go.  You can reach Michelle through her website Sew on the Go.

Hunter Stars & Tucker Trimmer

I have been soooo busy making class samples and life in general.  Last weekend I was helping Deb Tucker at her booth for the Genesee Valley Quilt Guild in Rochester, NY.  They sure put on a great quilt show, they had over 600 quilts and great vendors.  I came home and a few days later taught a beginning Hunter Star class at Sew Wilde in New Hartford, NY.

OLYMPUS DIGITAL CAMERA

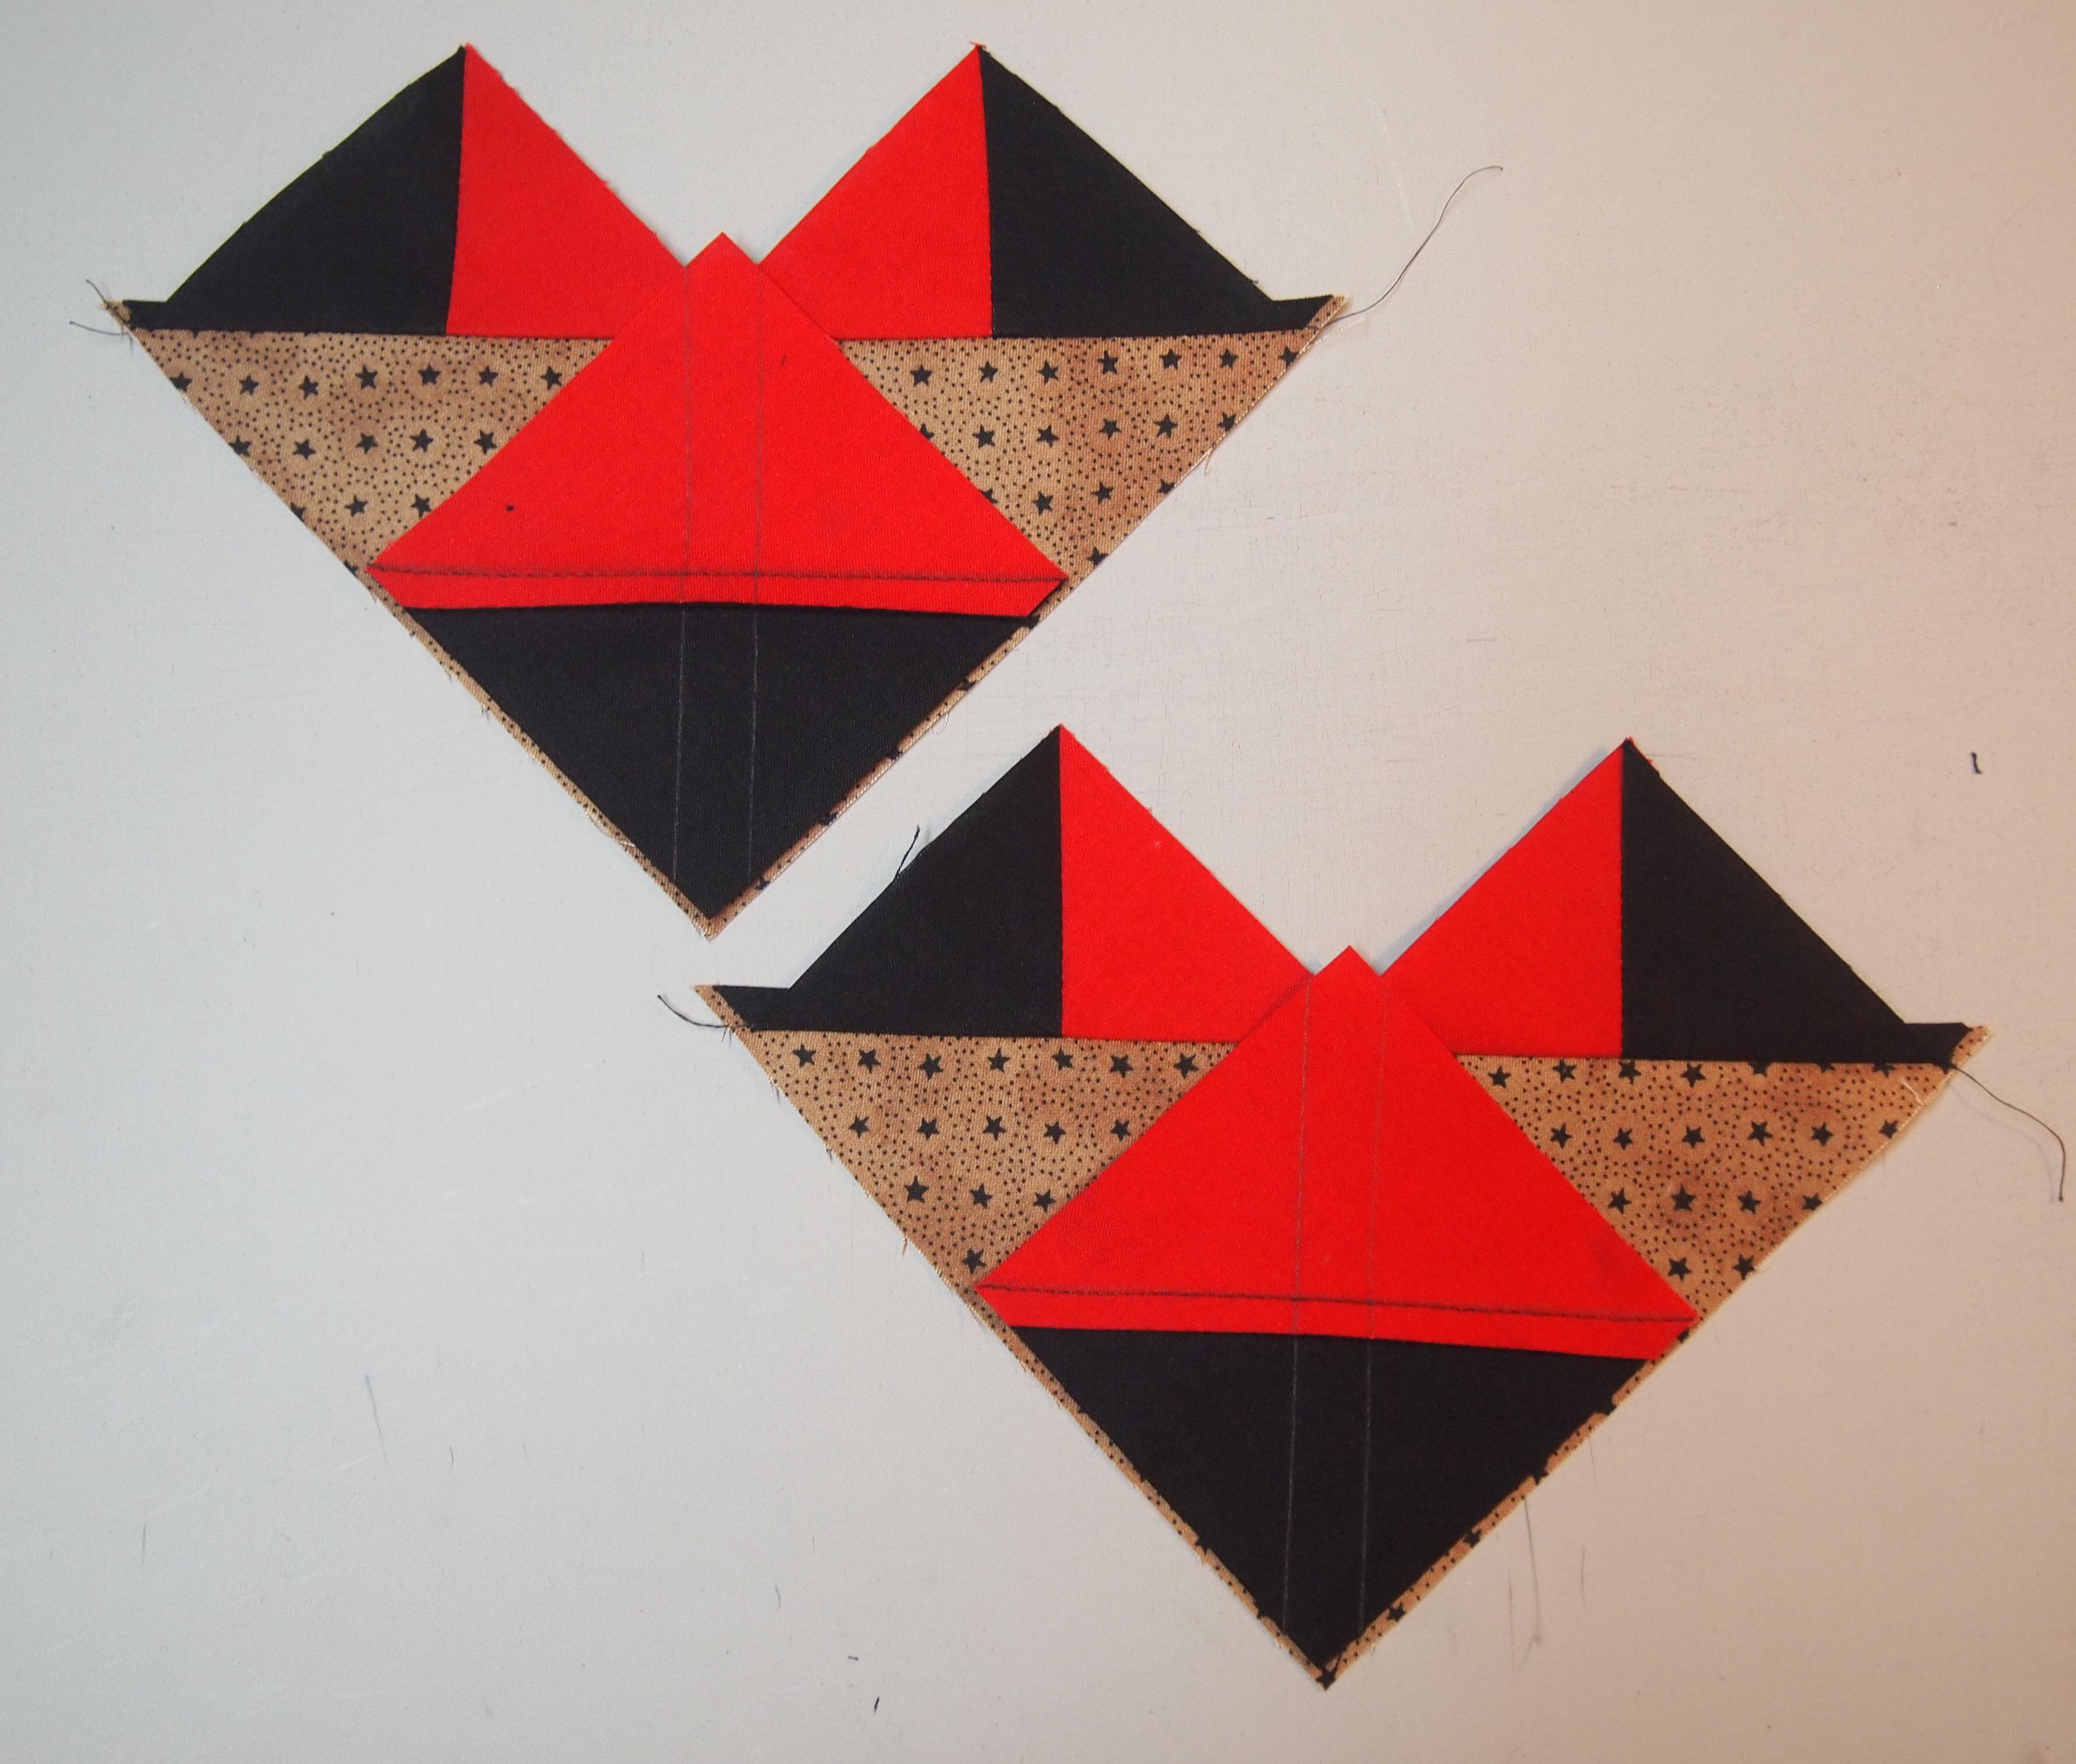
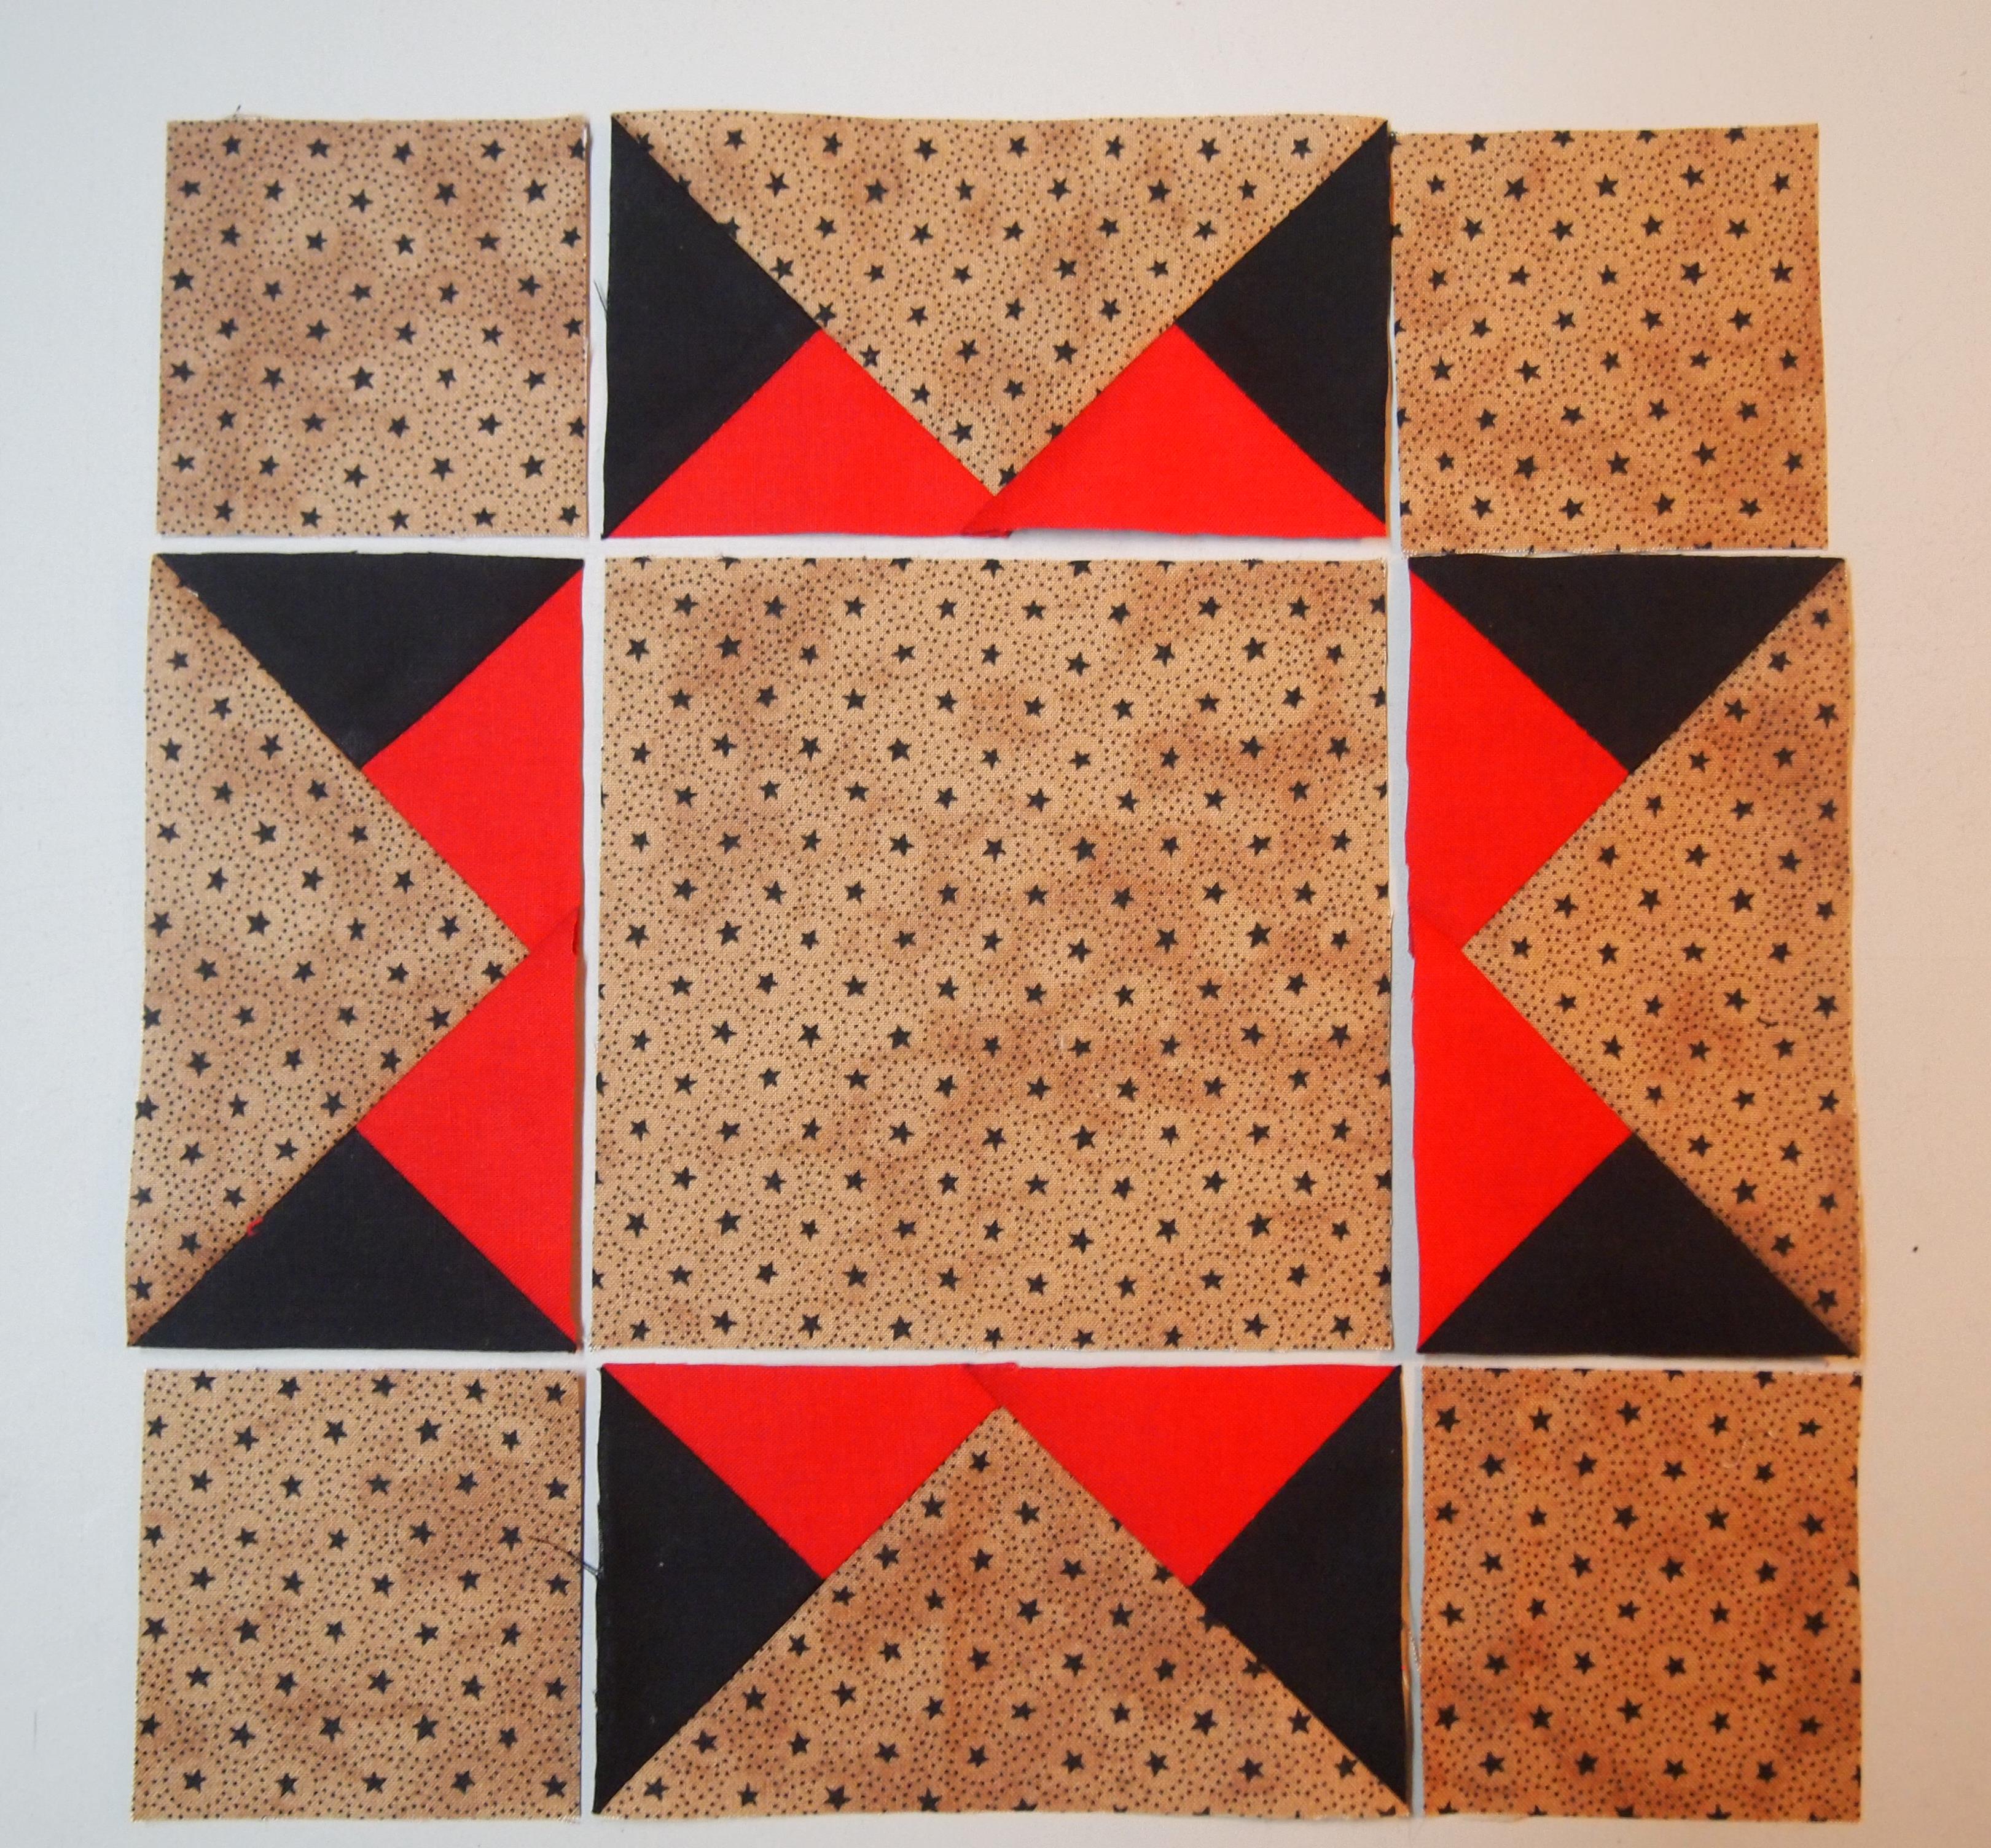
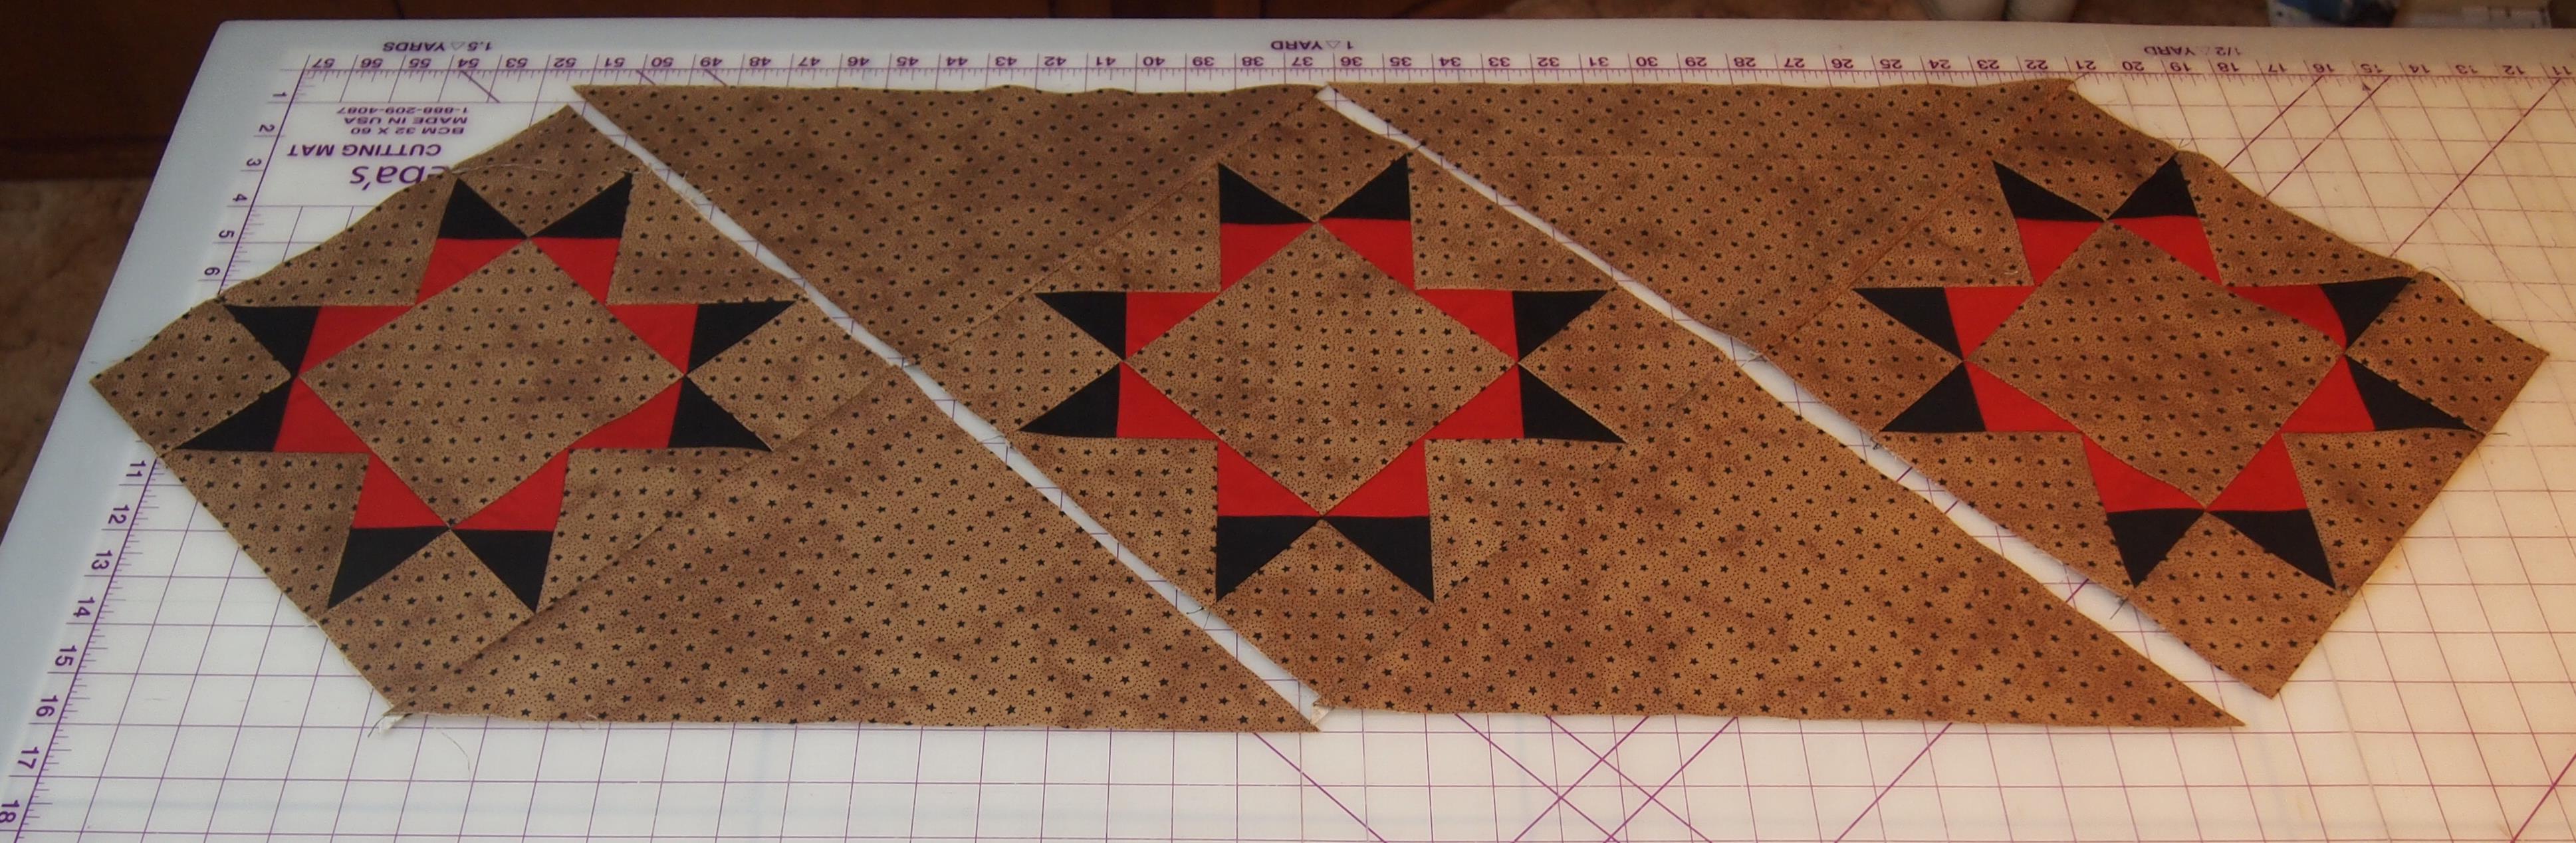
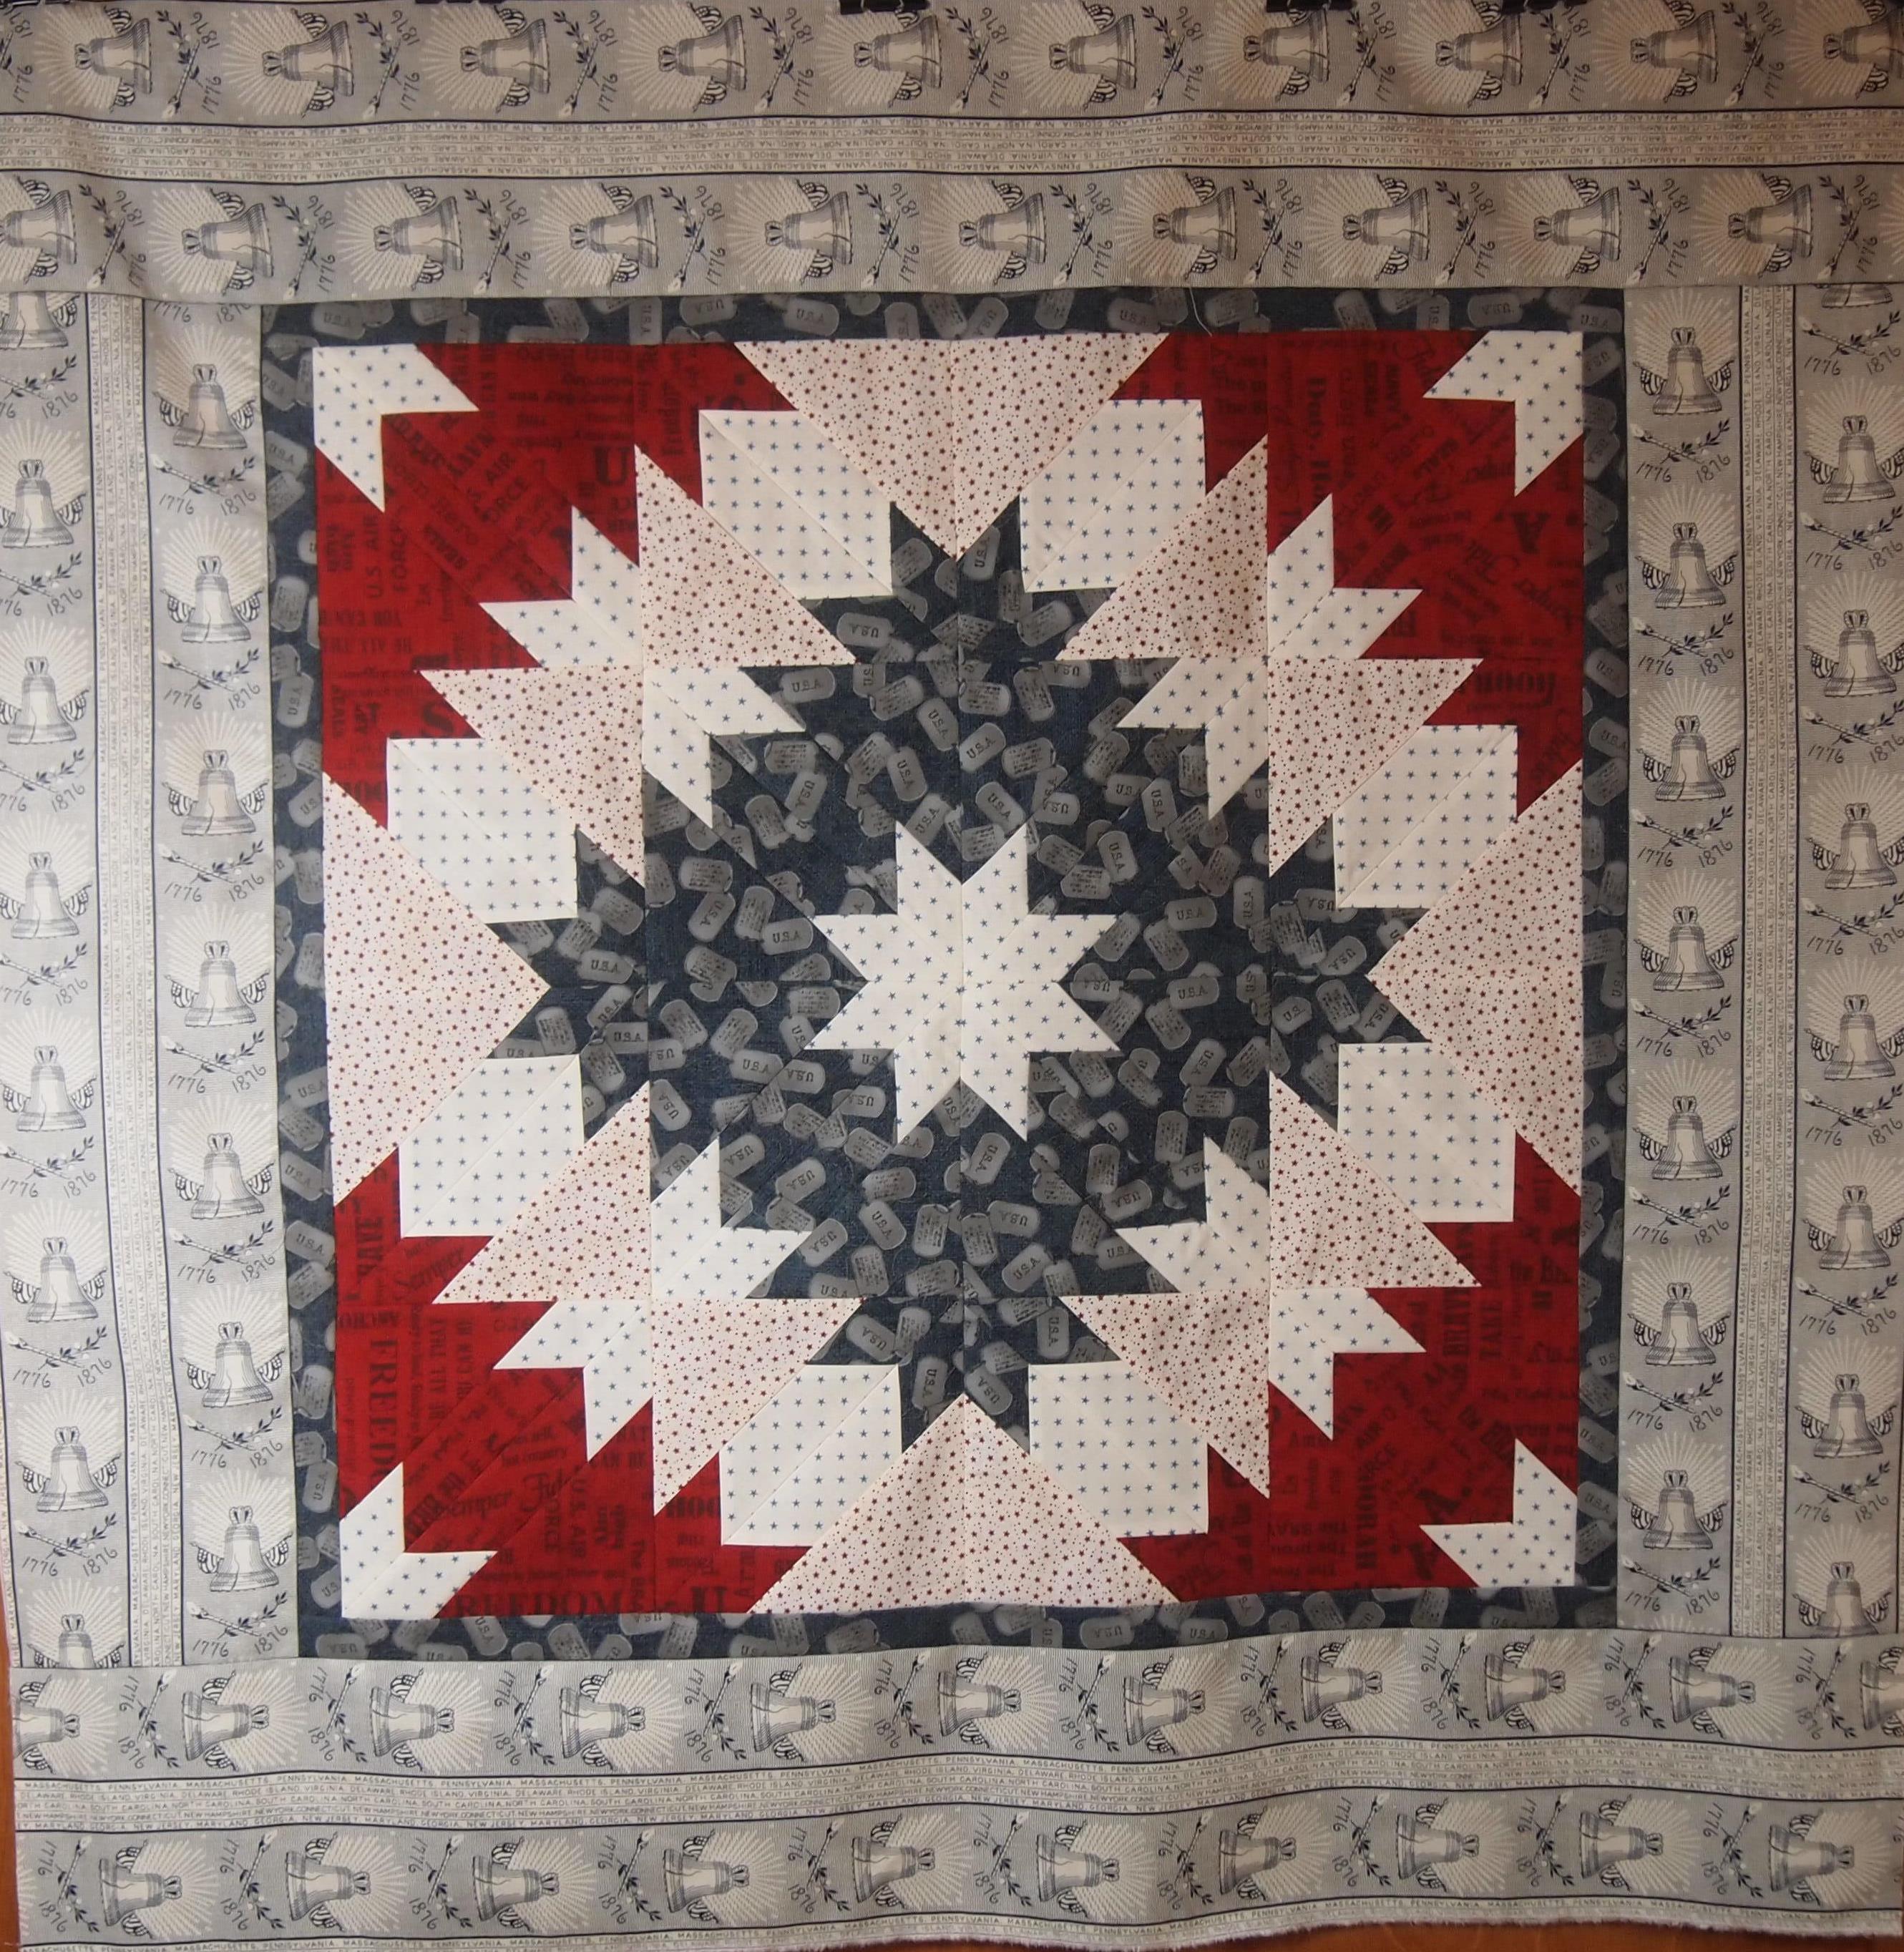
Patriotic Hunter star

Mine is a little scrappy. Students learned how to cut their trapezoids and star points. They also learned the design possibilities when you don’t sew the triangles together.  It was a fun class

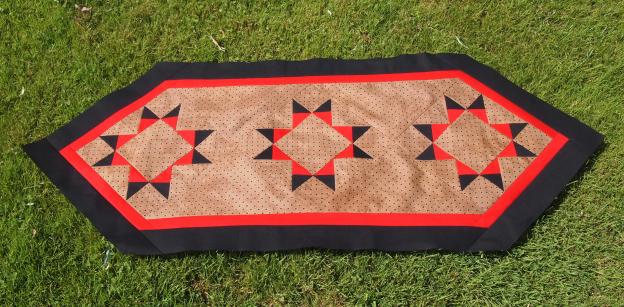
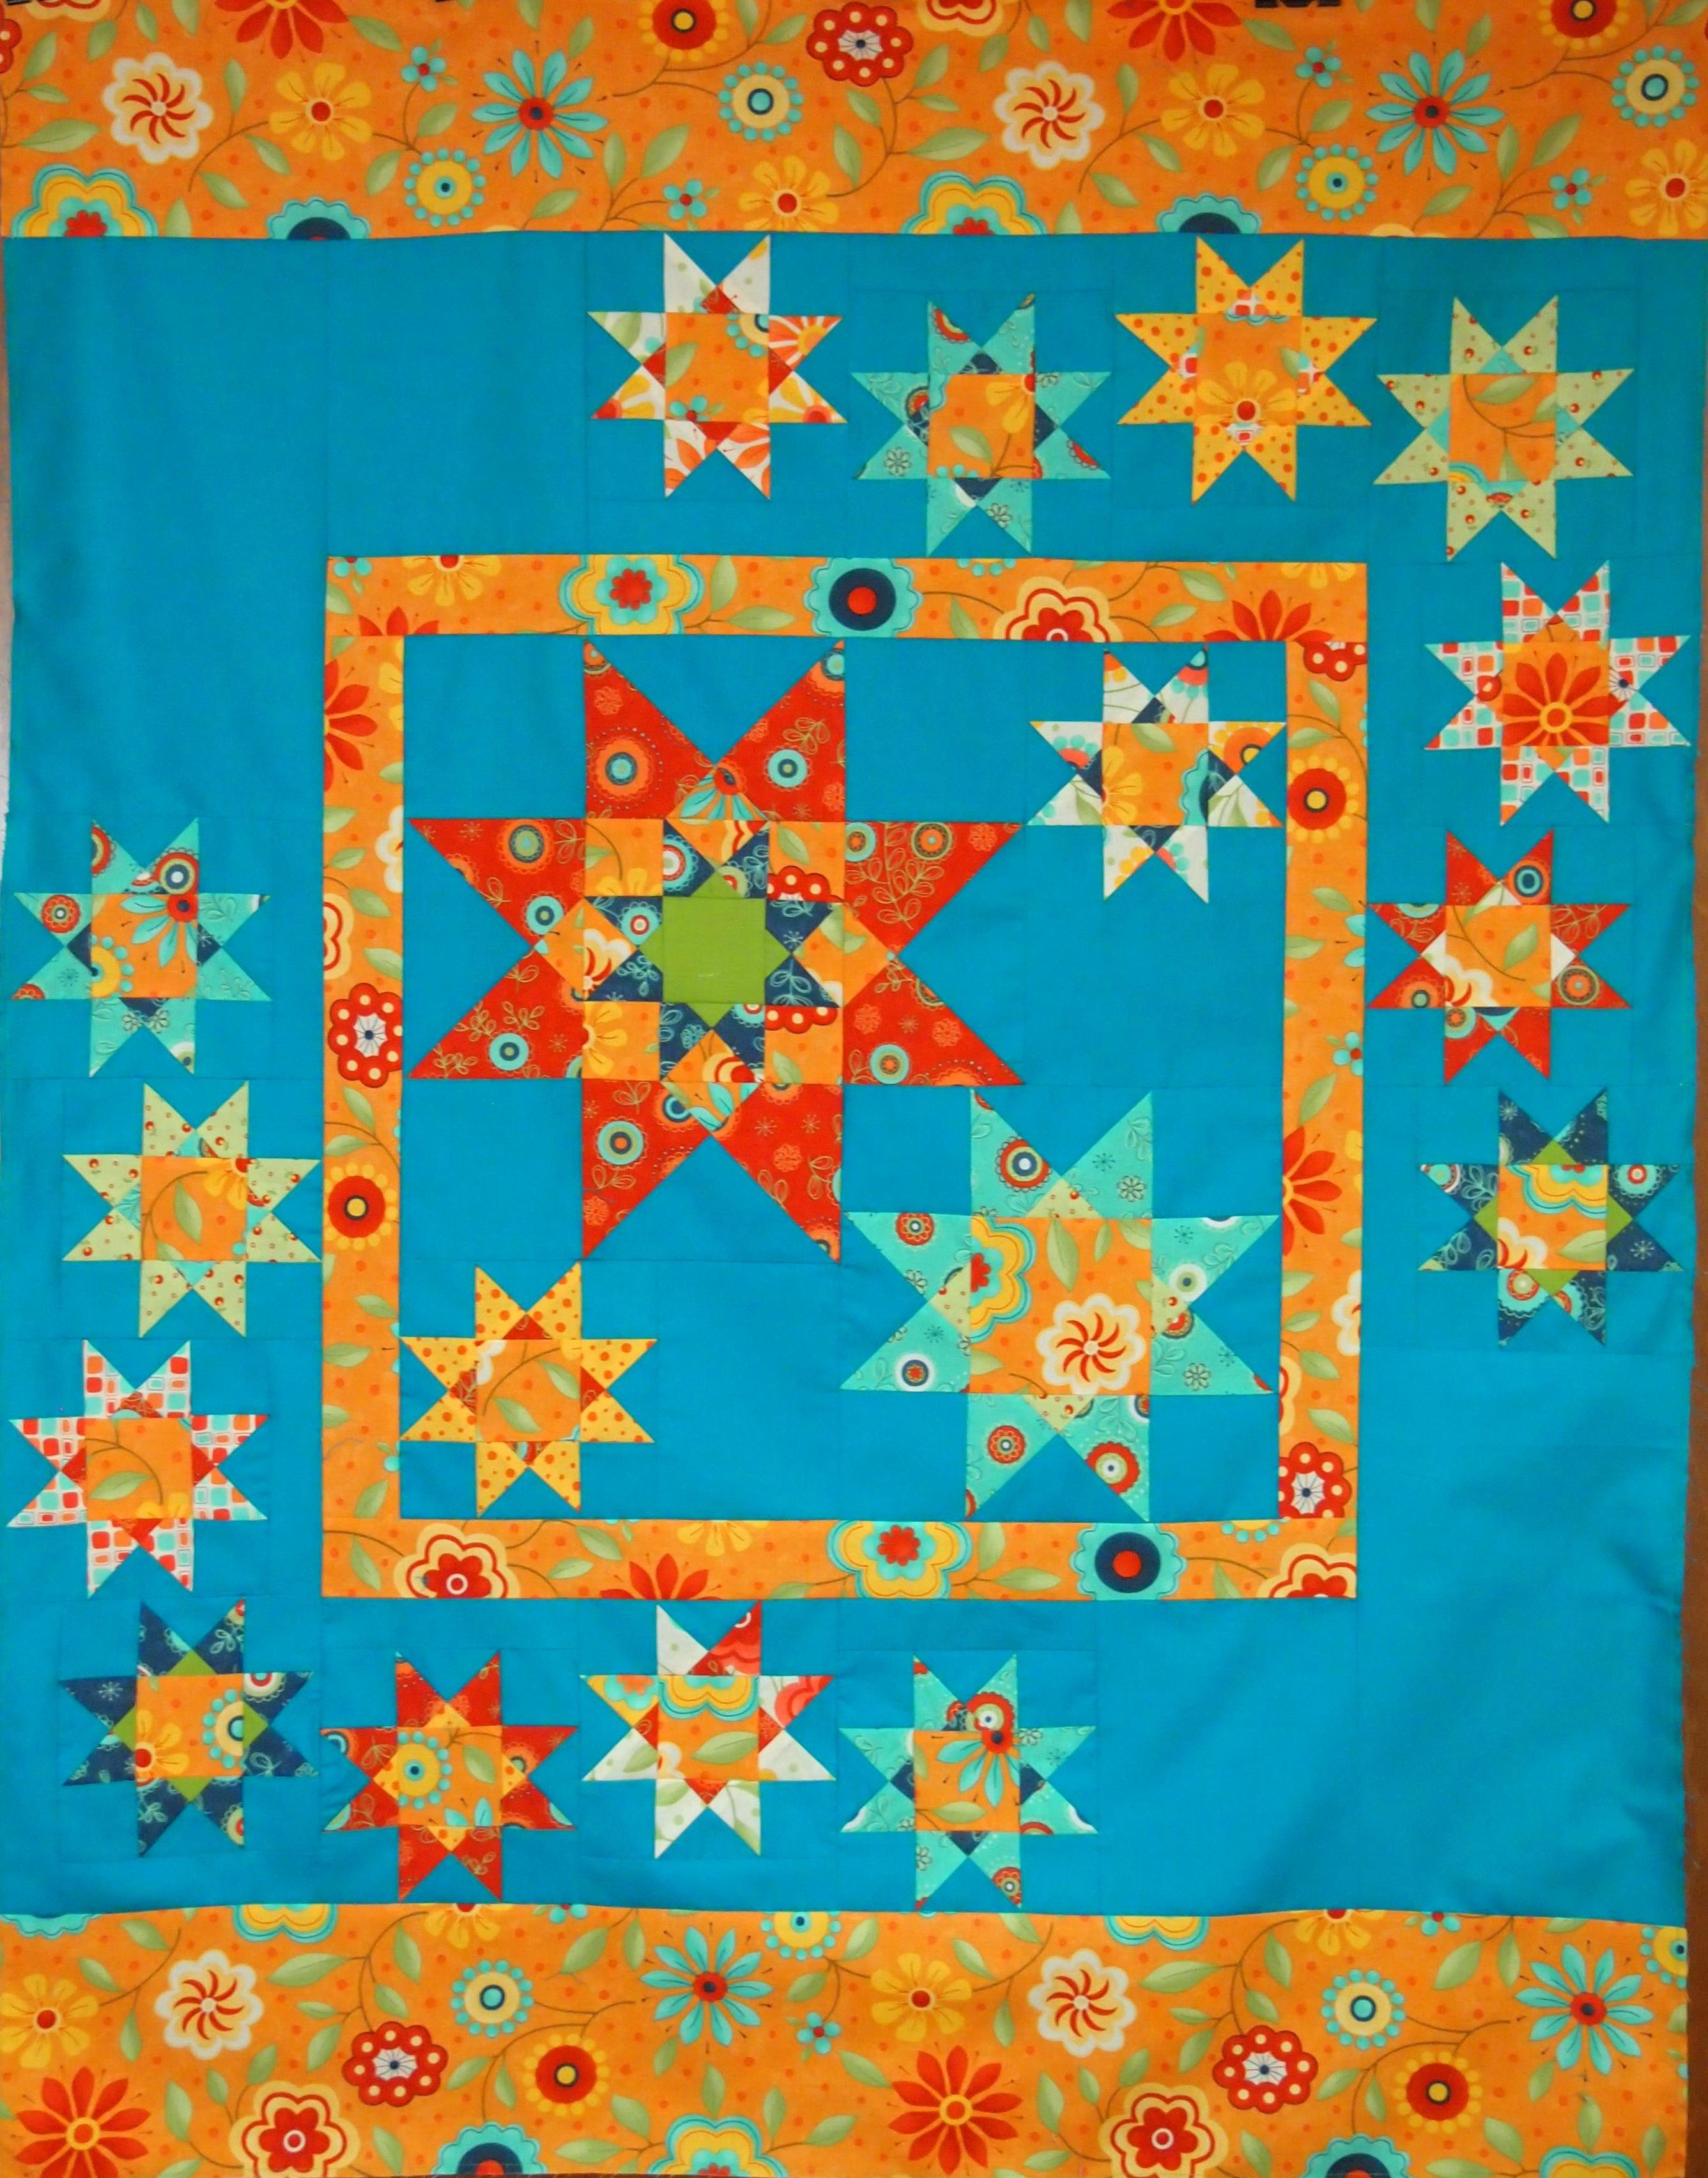
Next week we’re breaking out the Tucker Trimmer I and learning to make Rangeley Stars at Tiger Lily Quilt Company in Utica, NY.

OLYMPUS DIGITAL CAMERA

Rangeley Wall Hanging

This is such a fun and easy star to make. We start with Quarter Square/Hour Glass Units using our Tucker Trimmers.

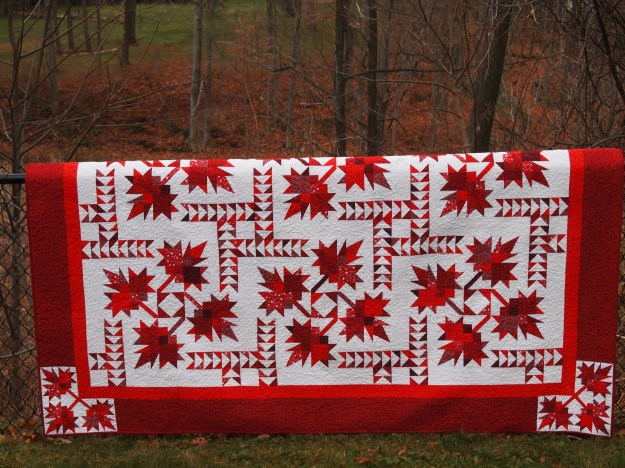
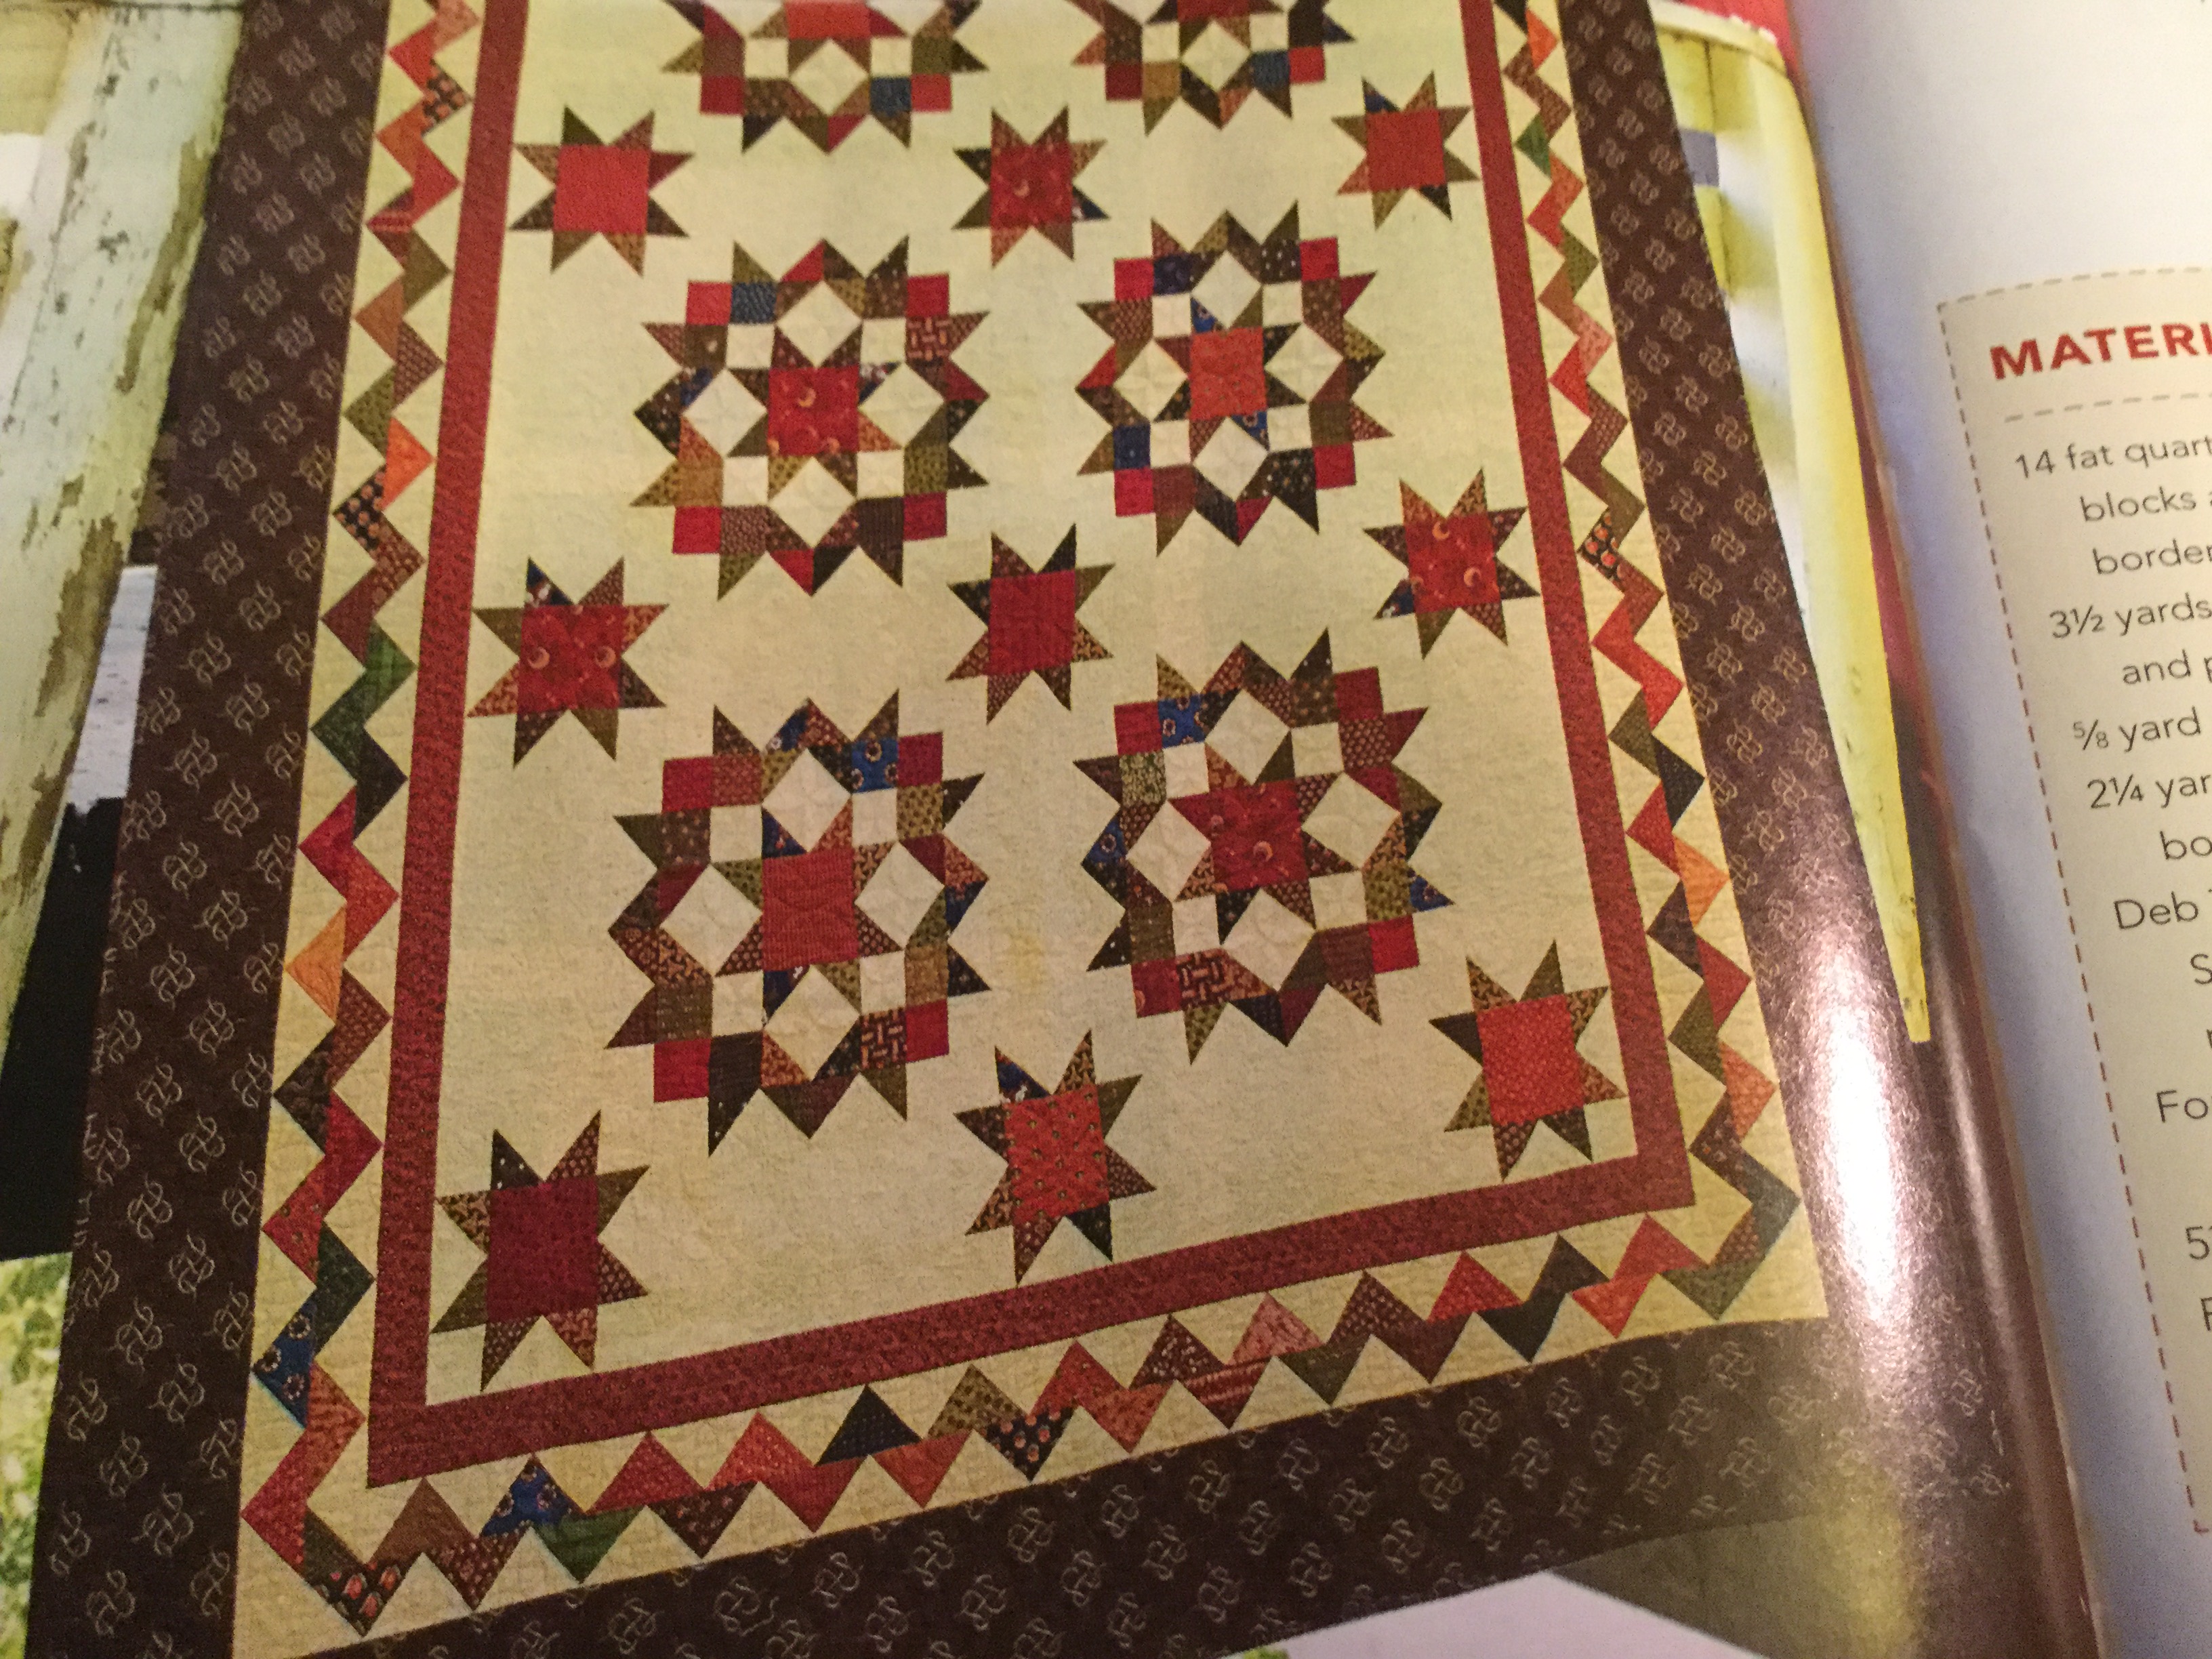
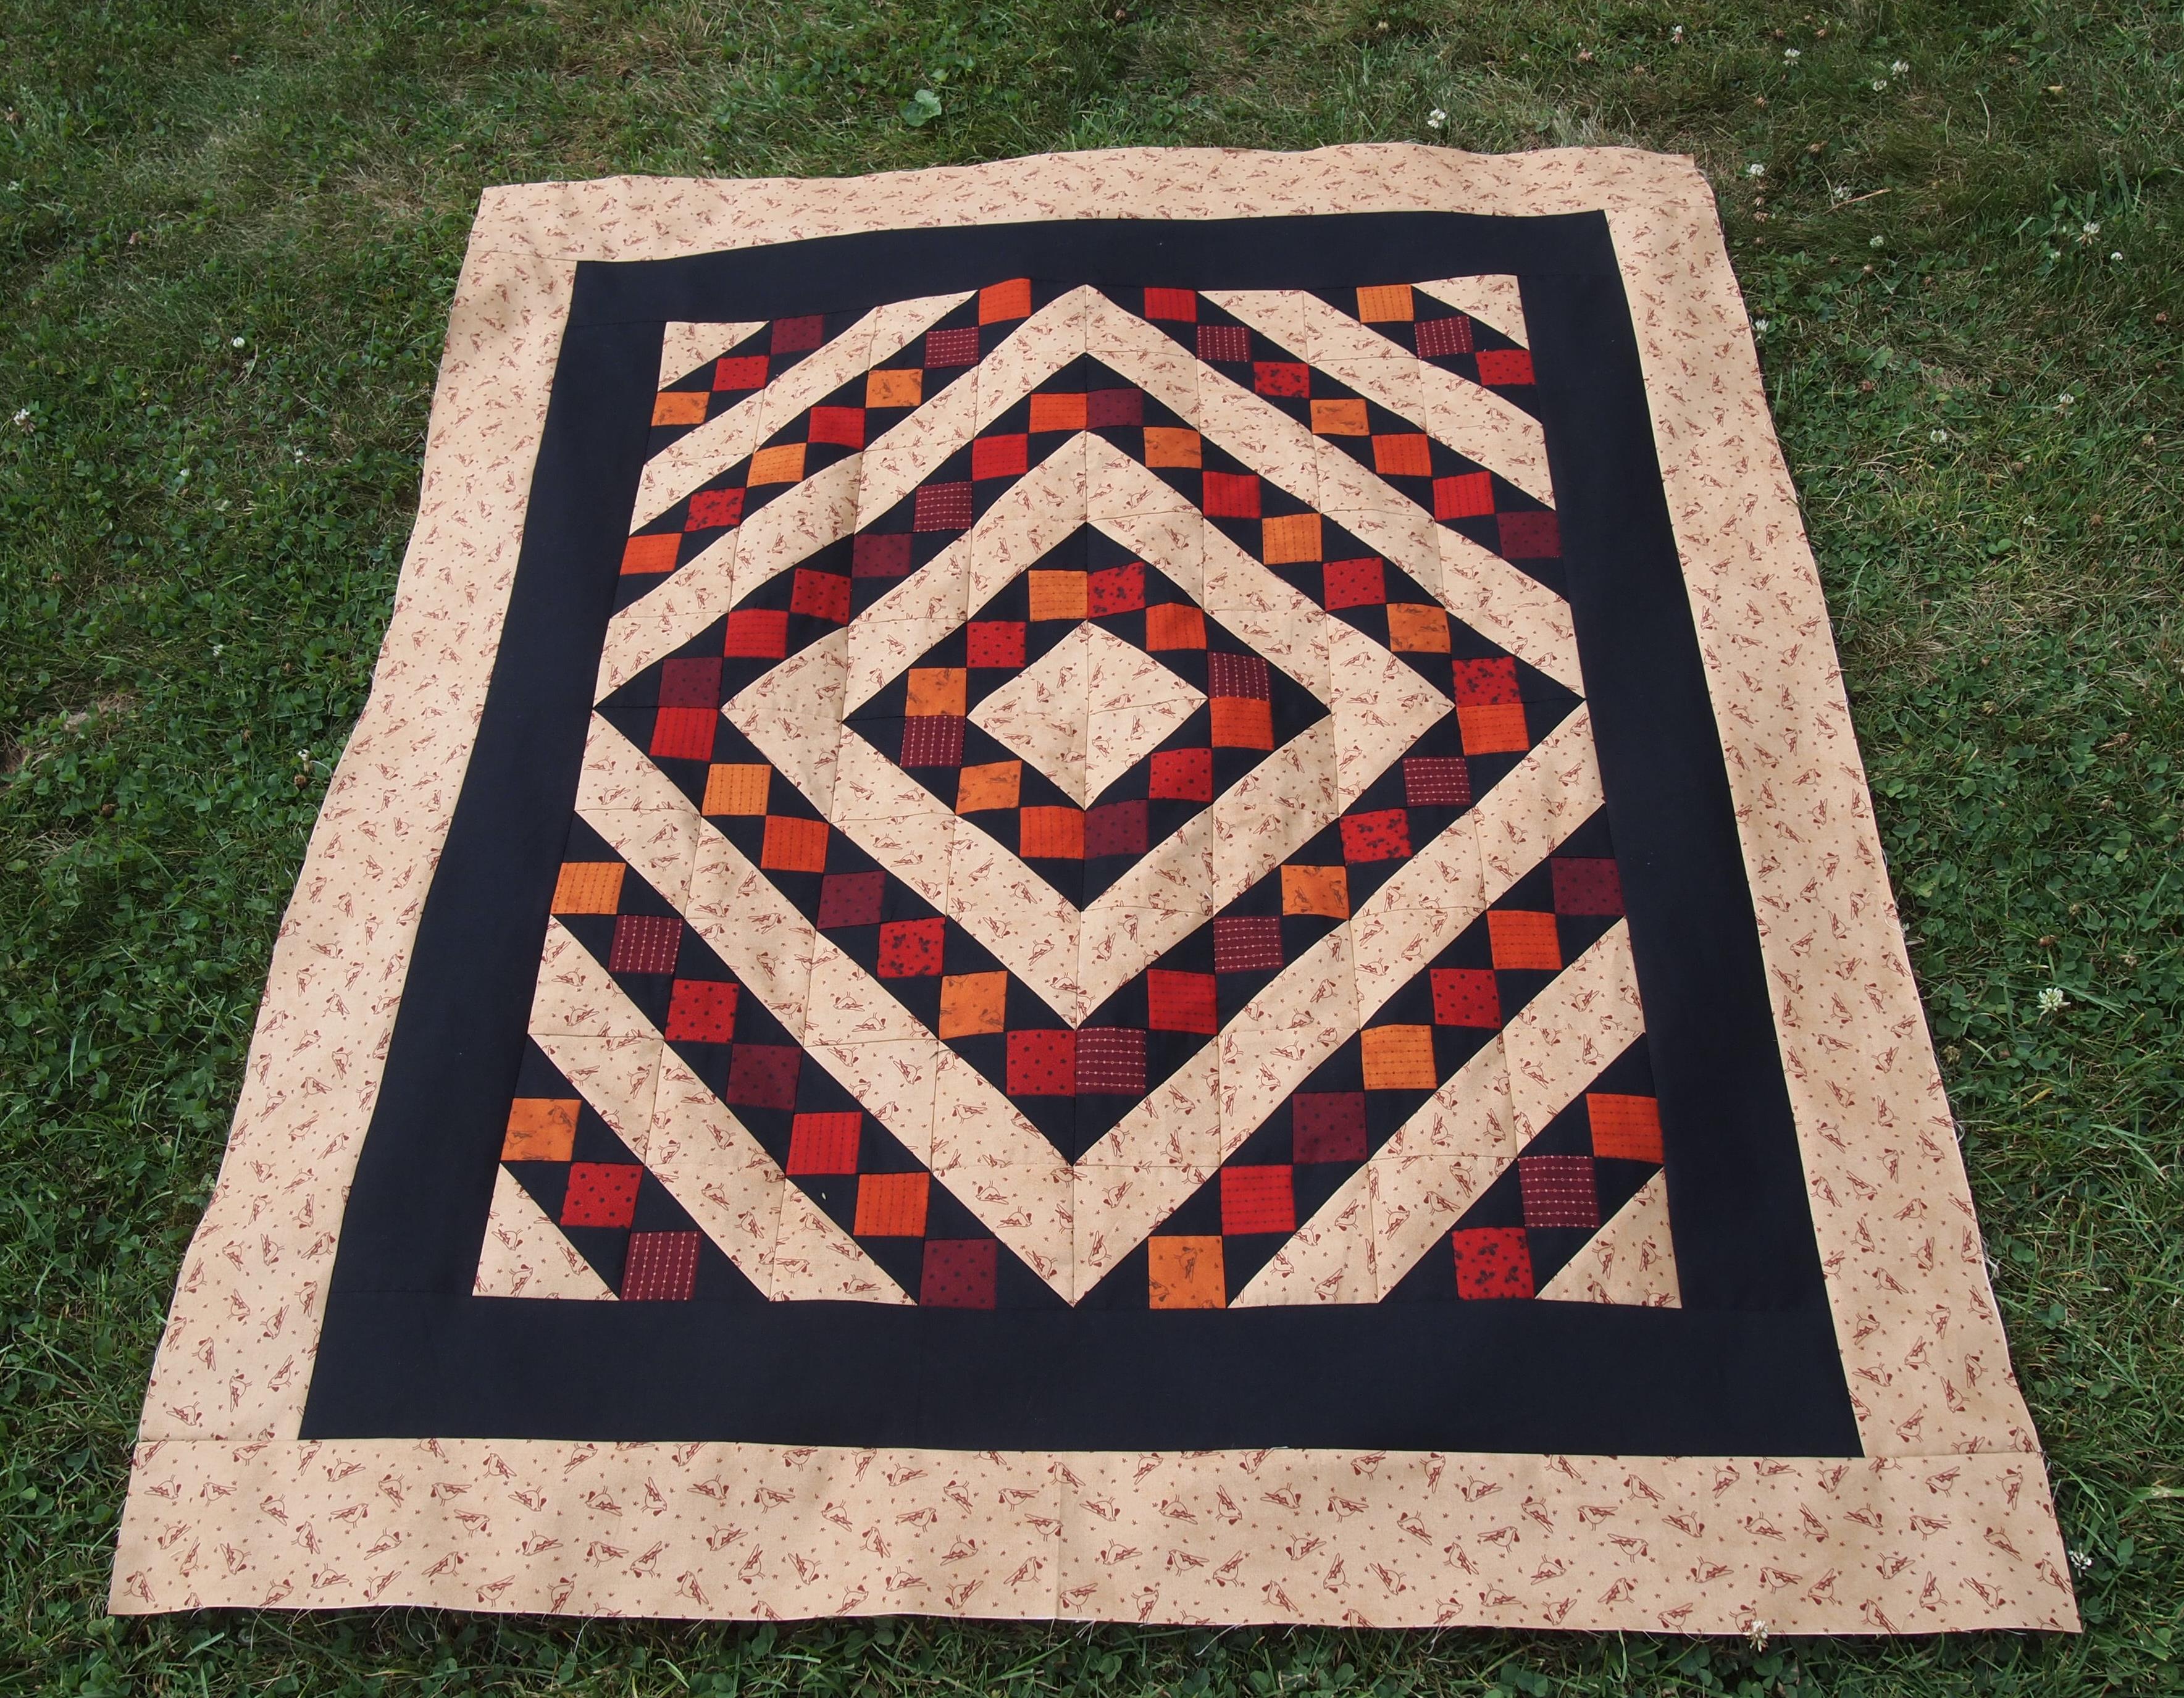
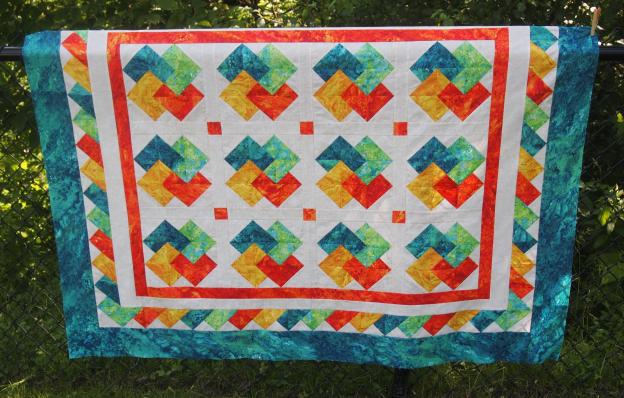
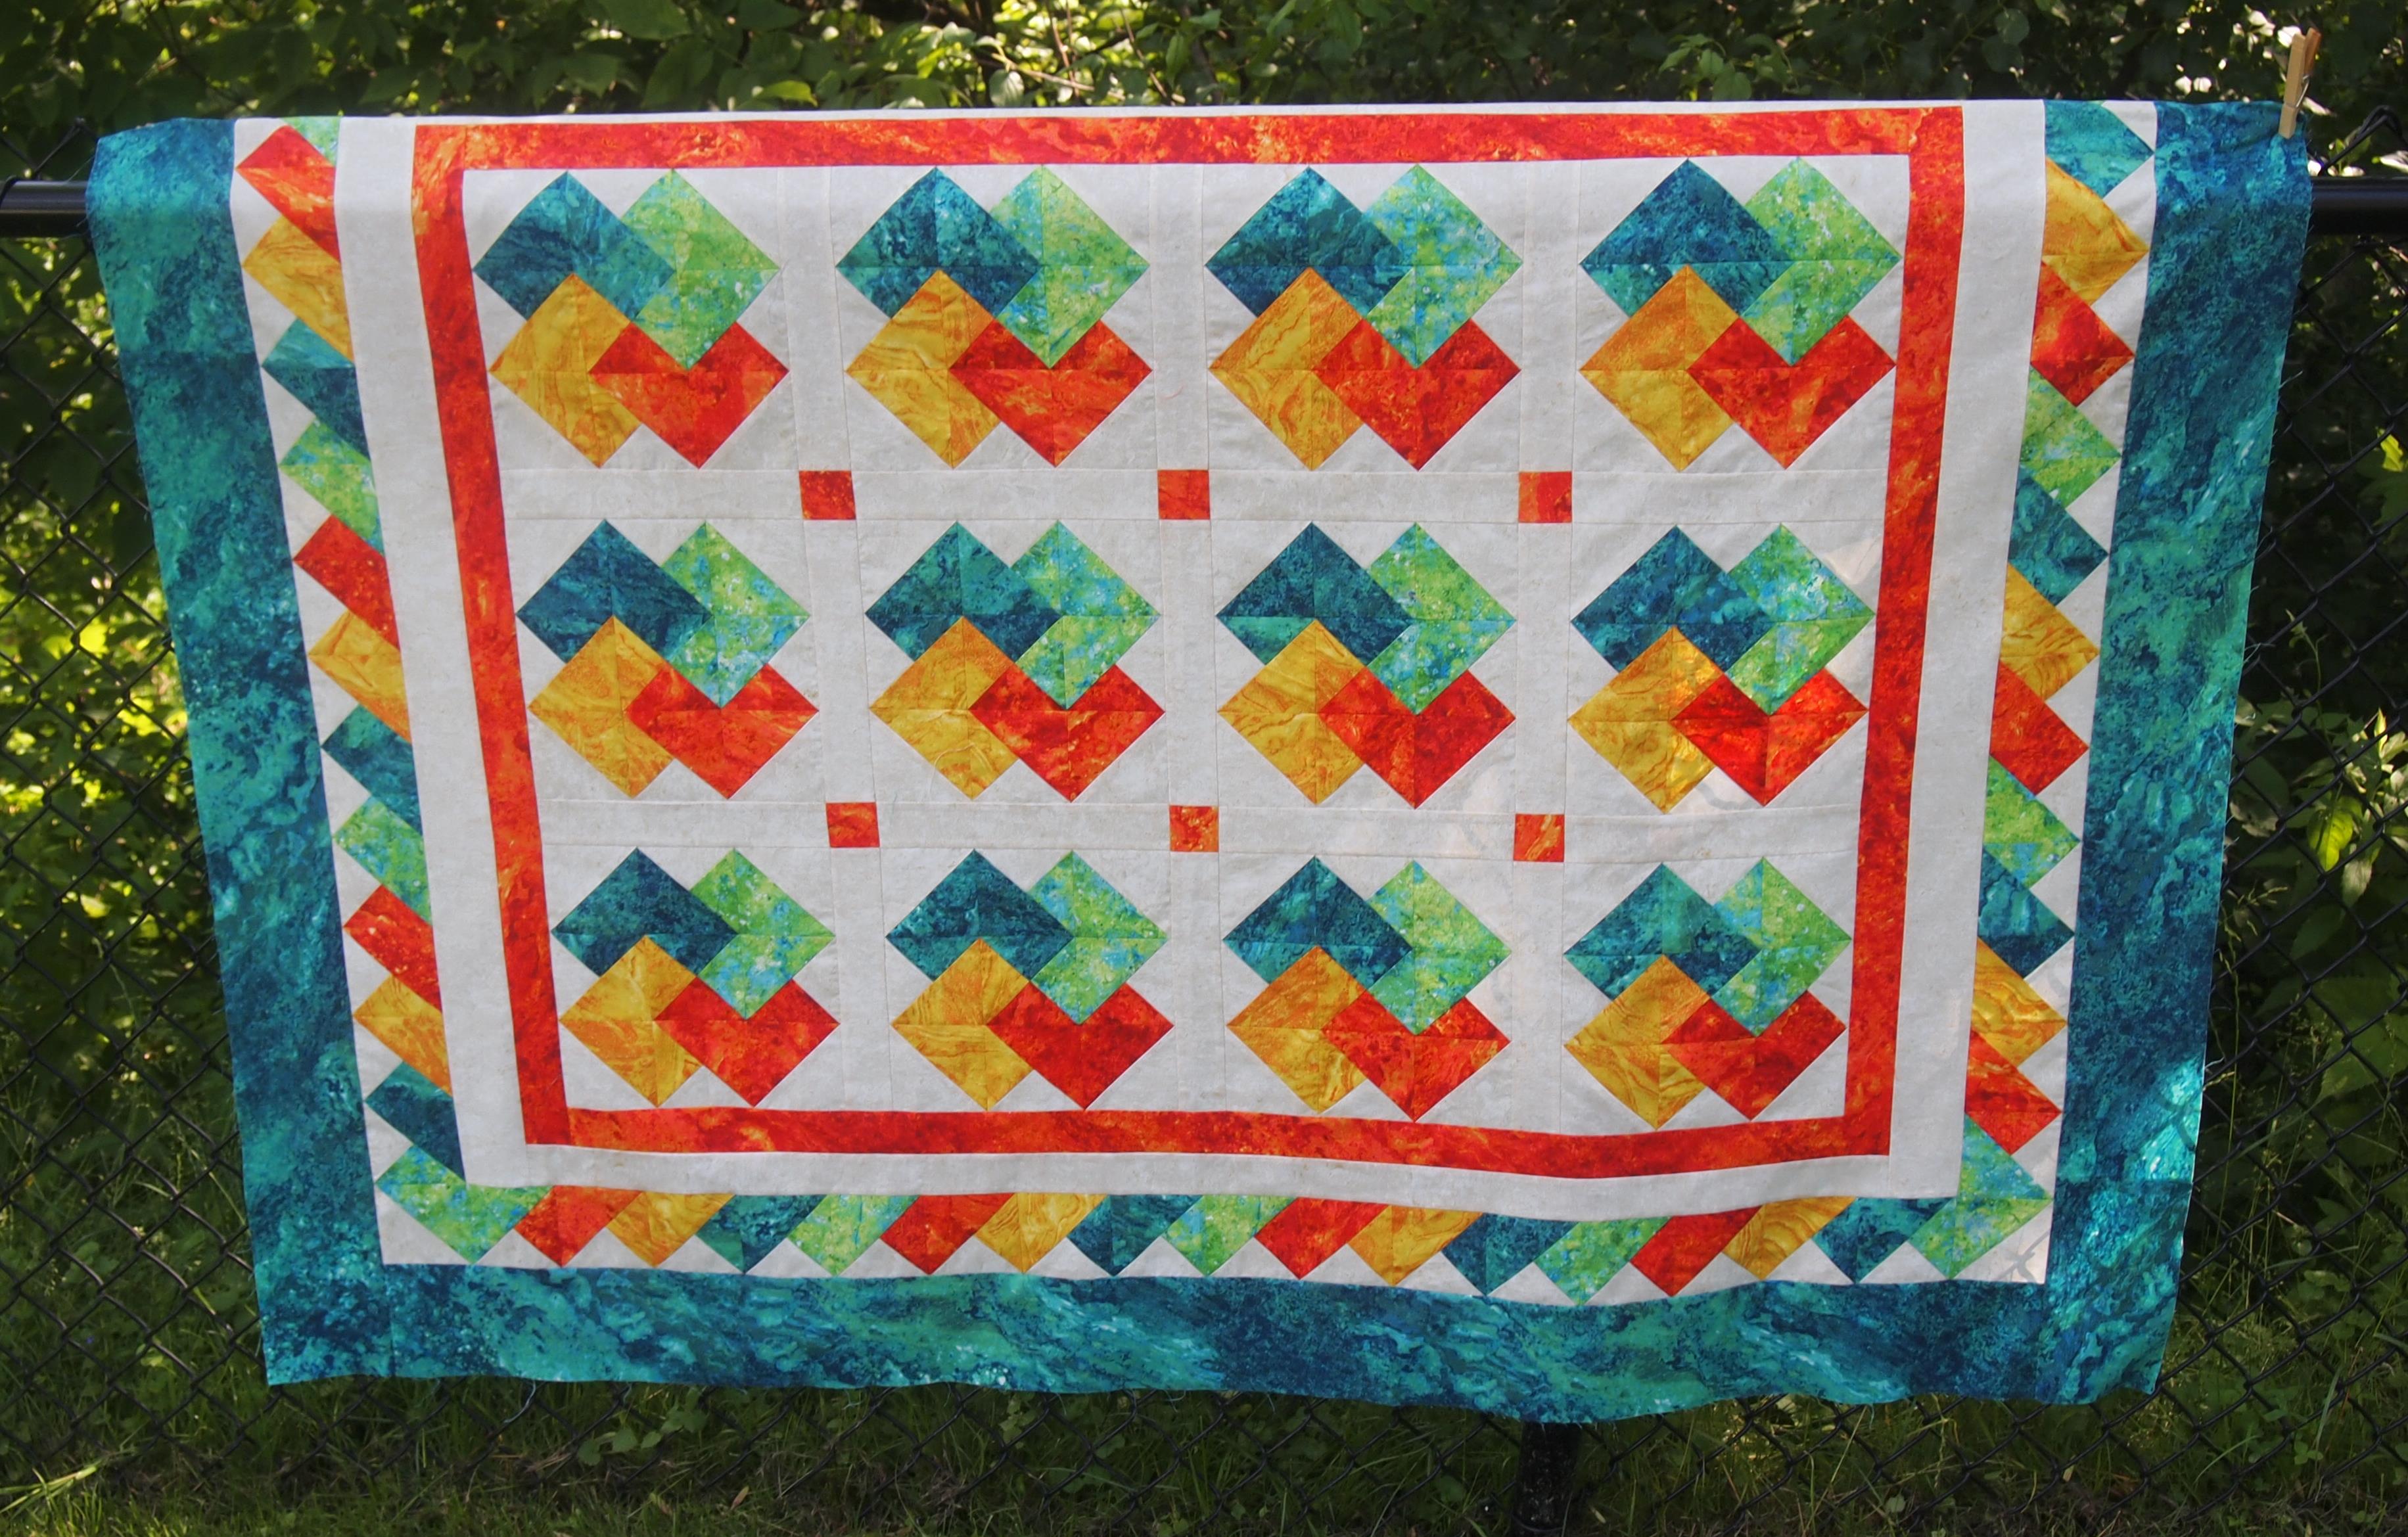
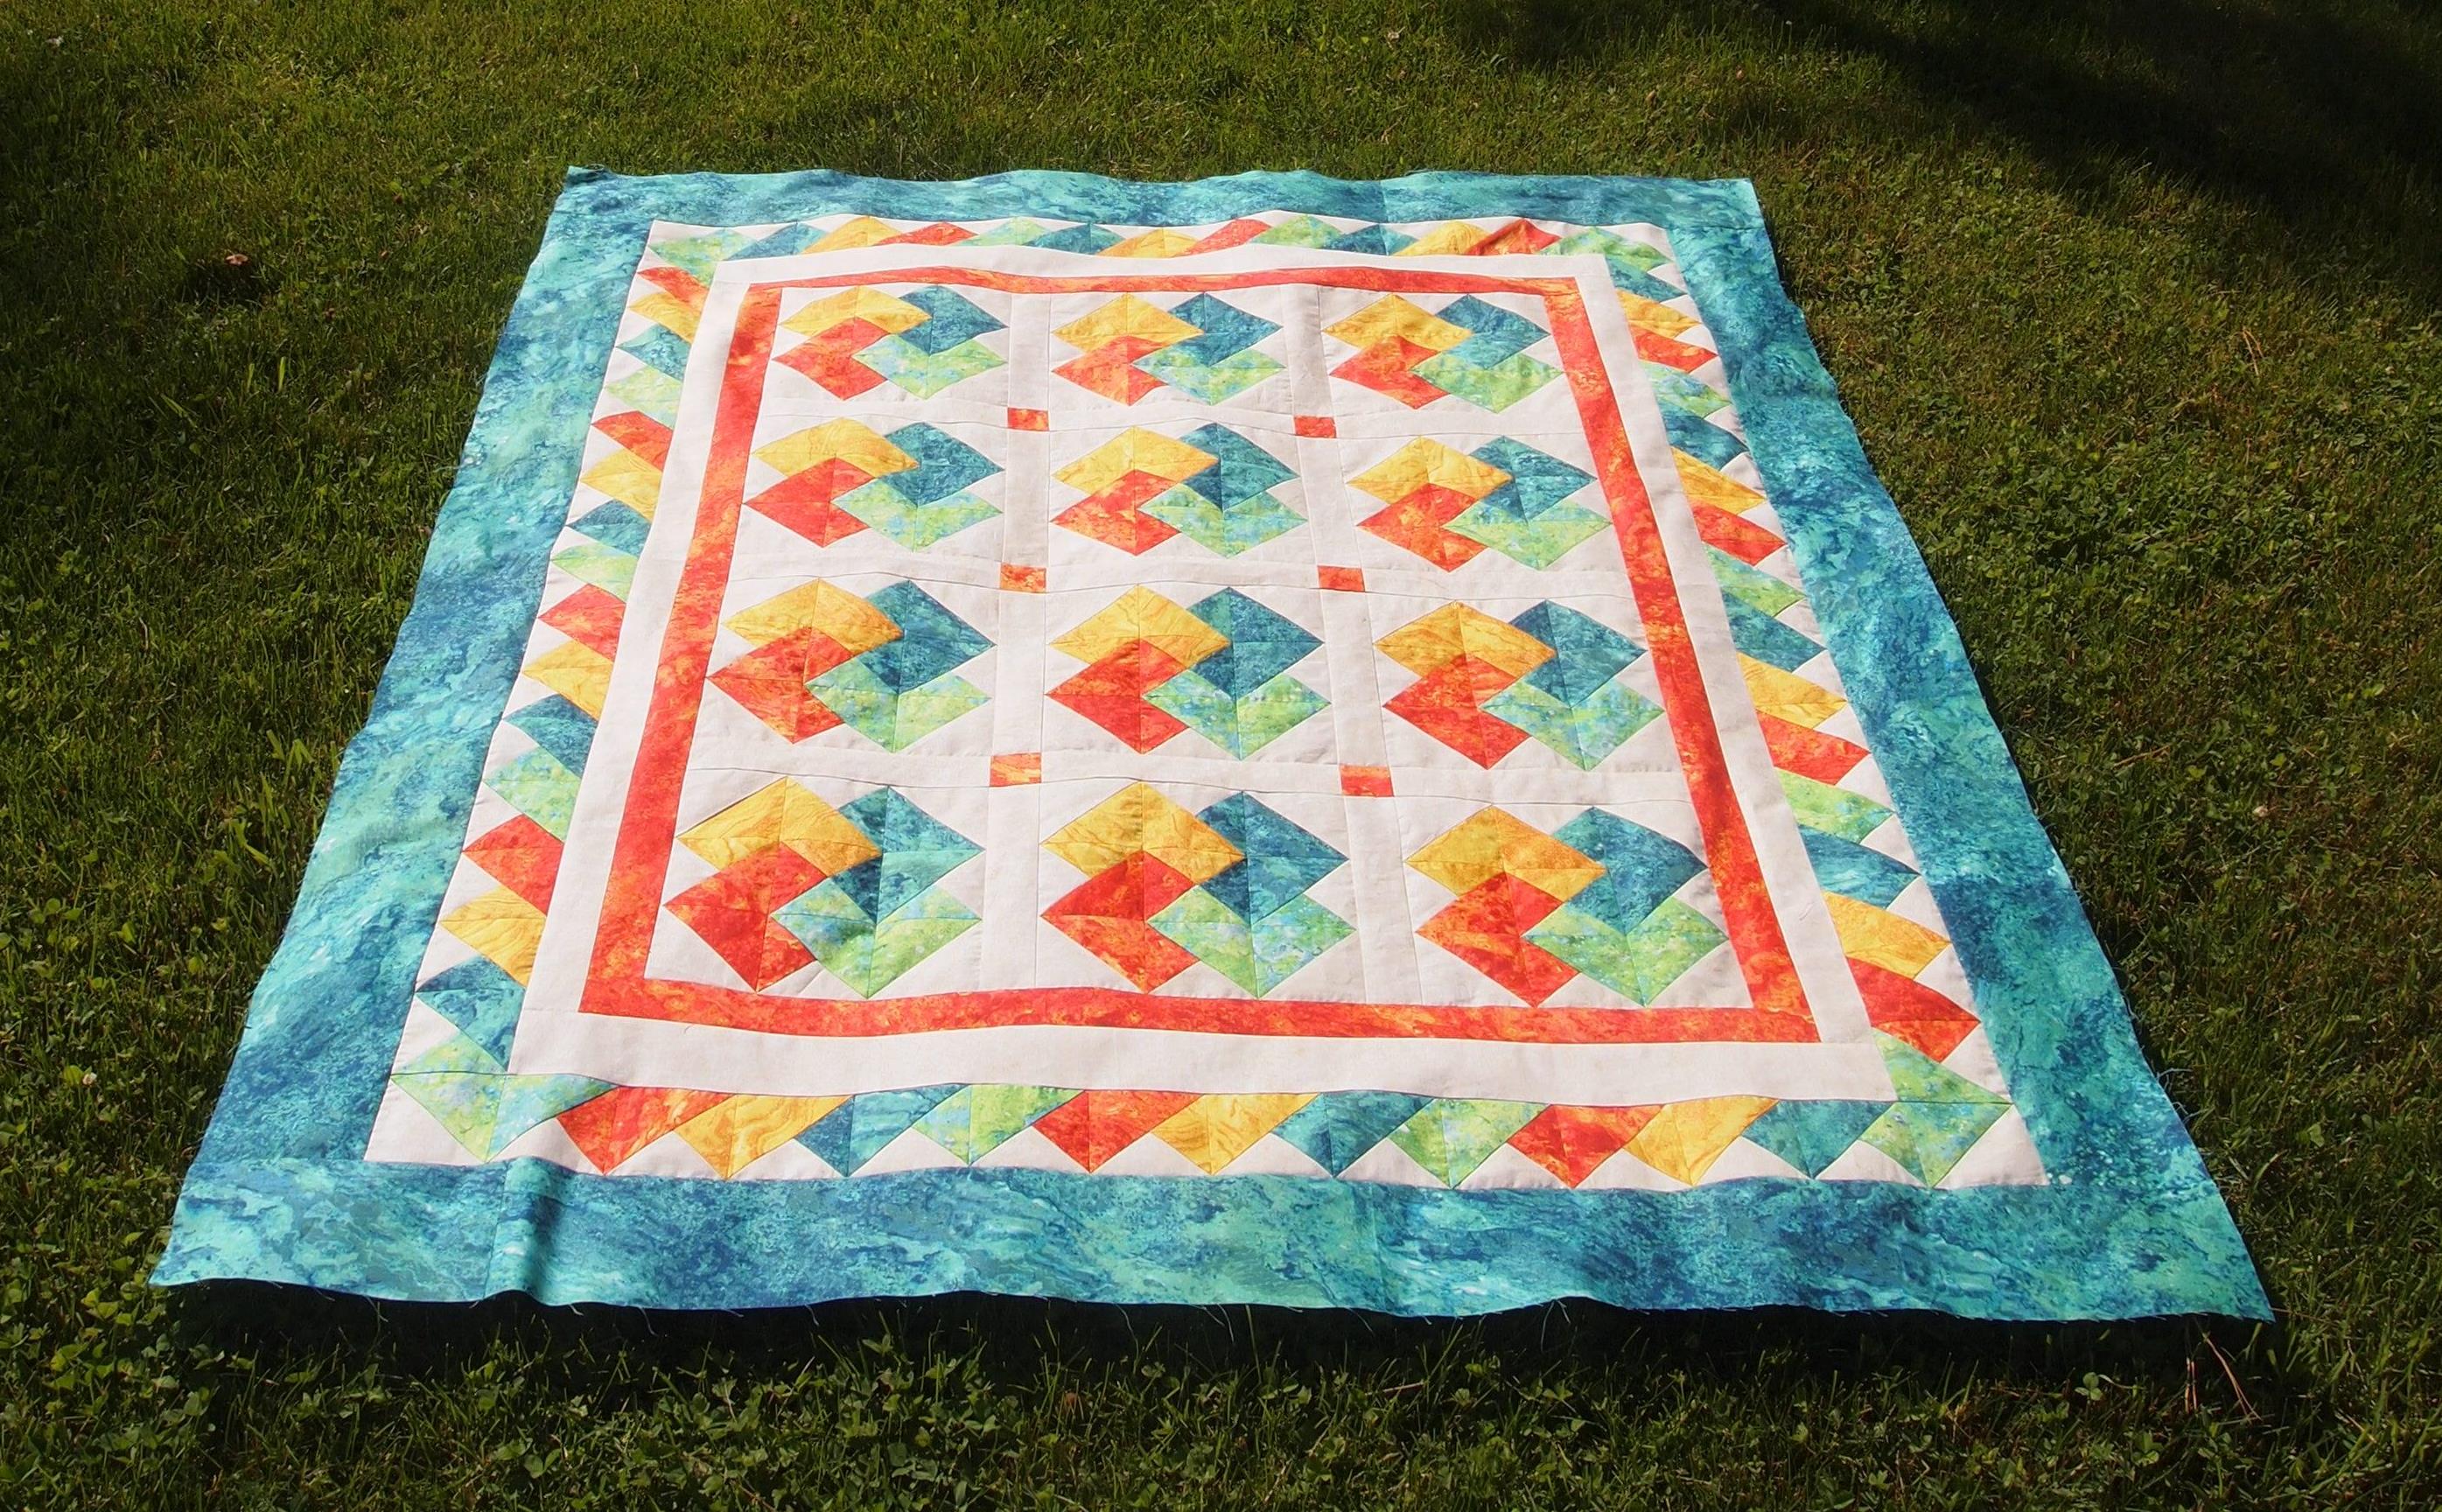
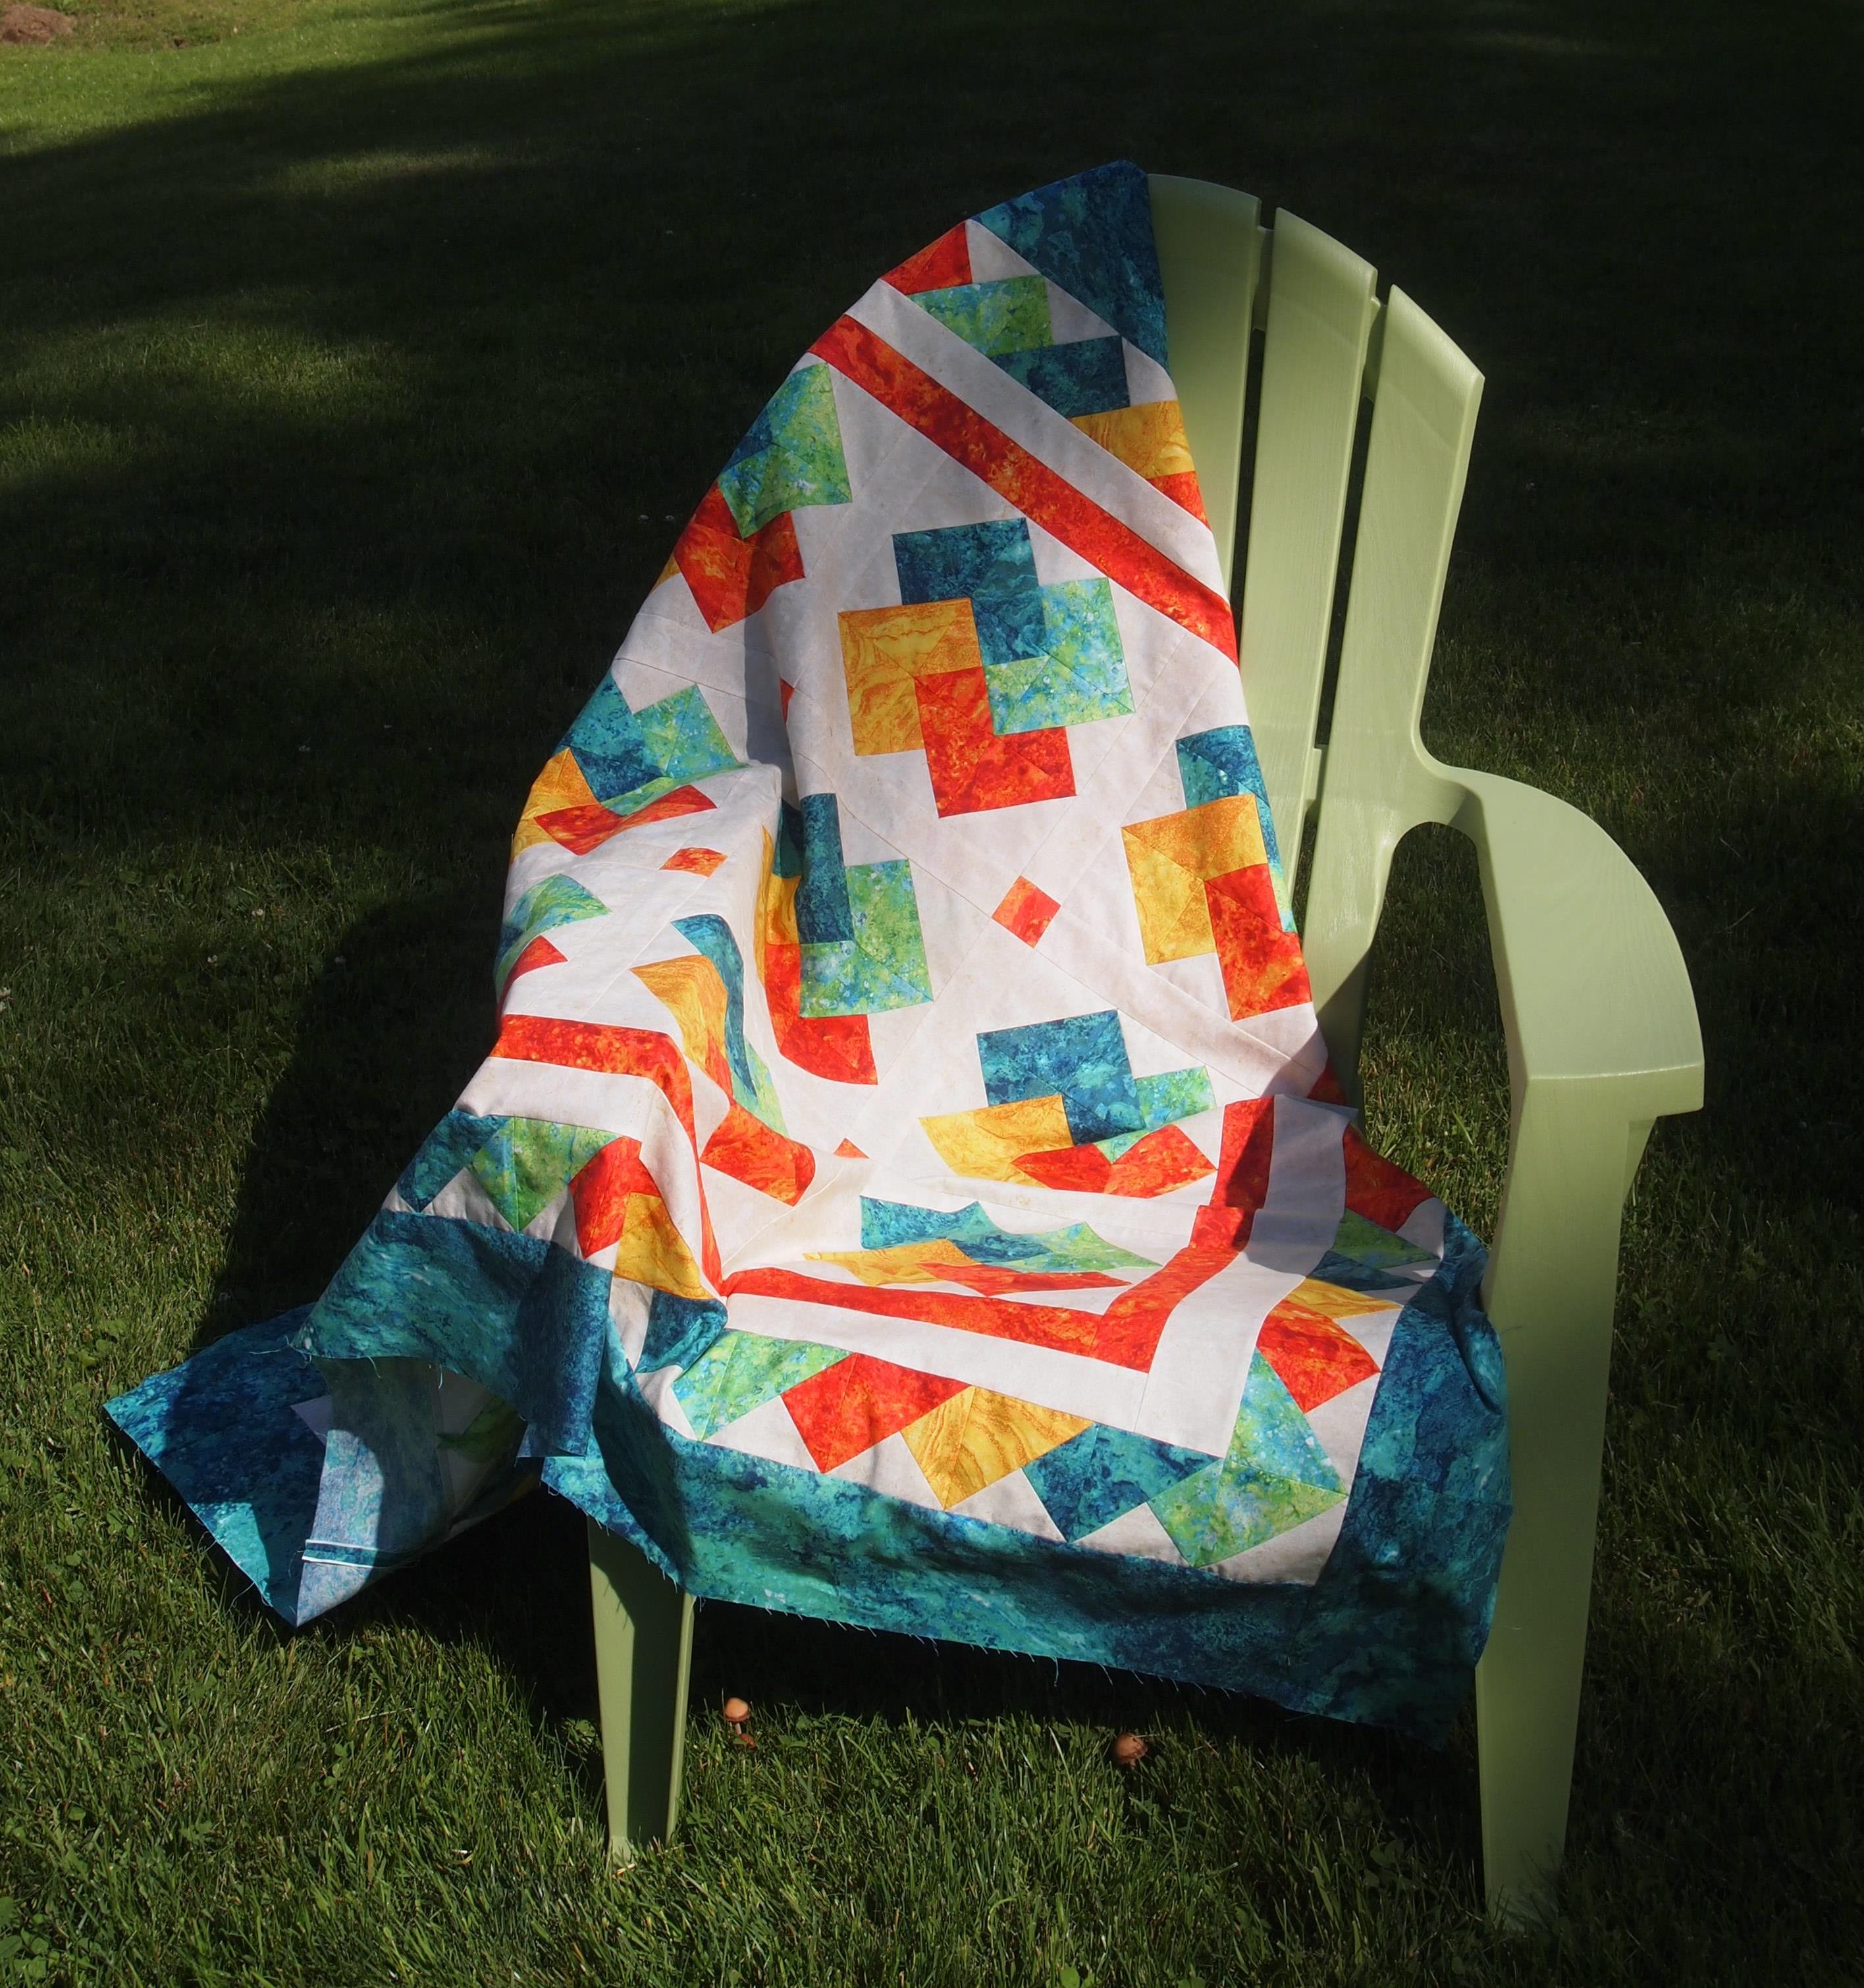
Yesterday I finished Solitaire, a Deb Tucker Quilt that utilizes the Tucker Trimmer also.

OLYMPUS DIGITAL CAMERA

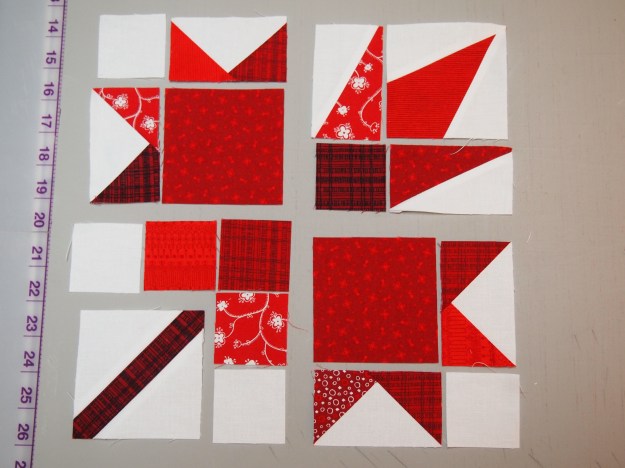
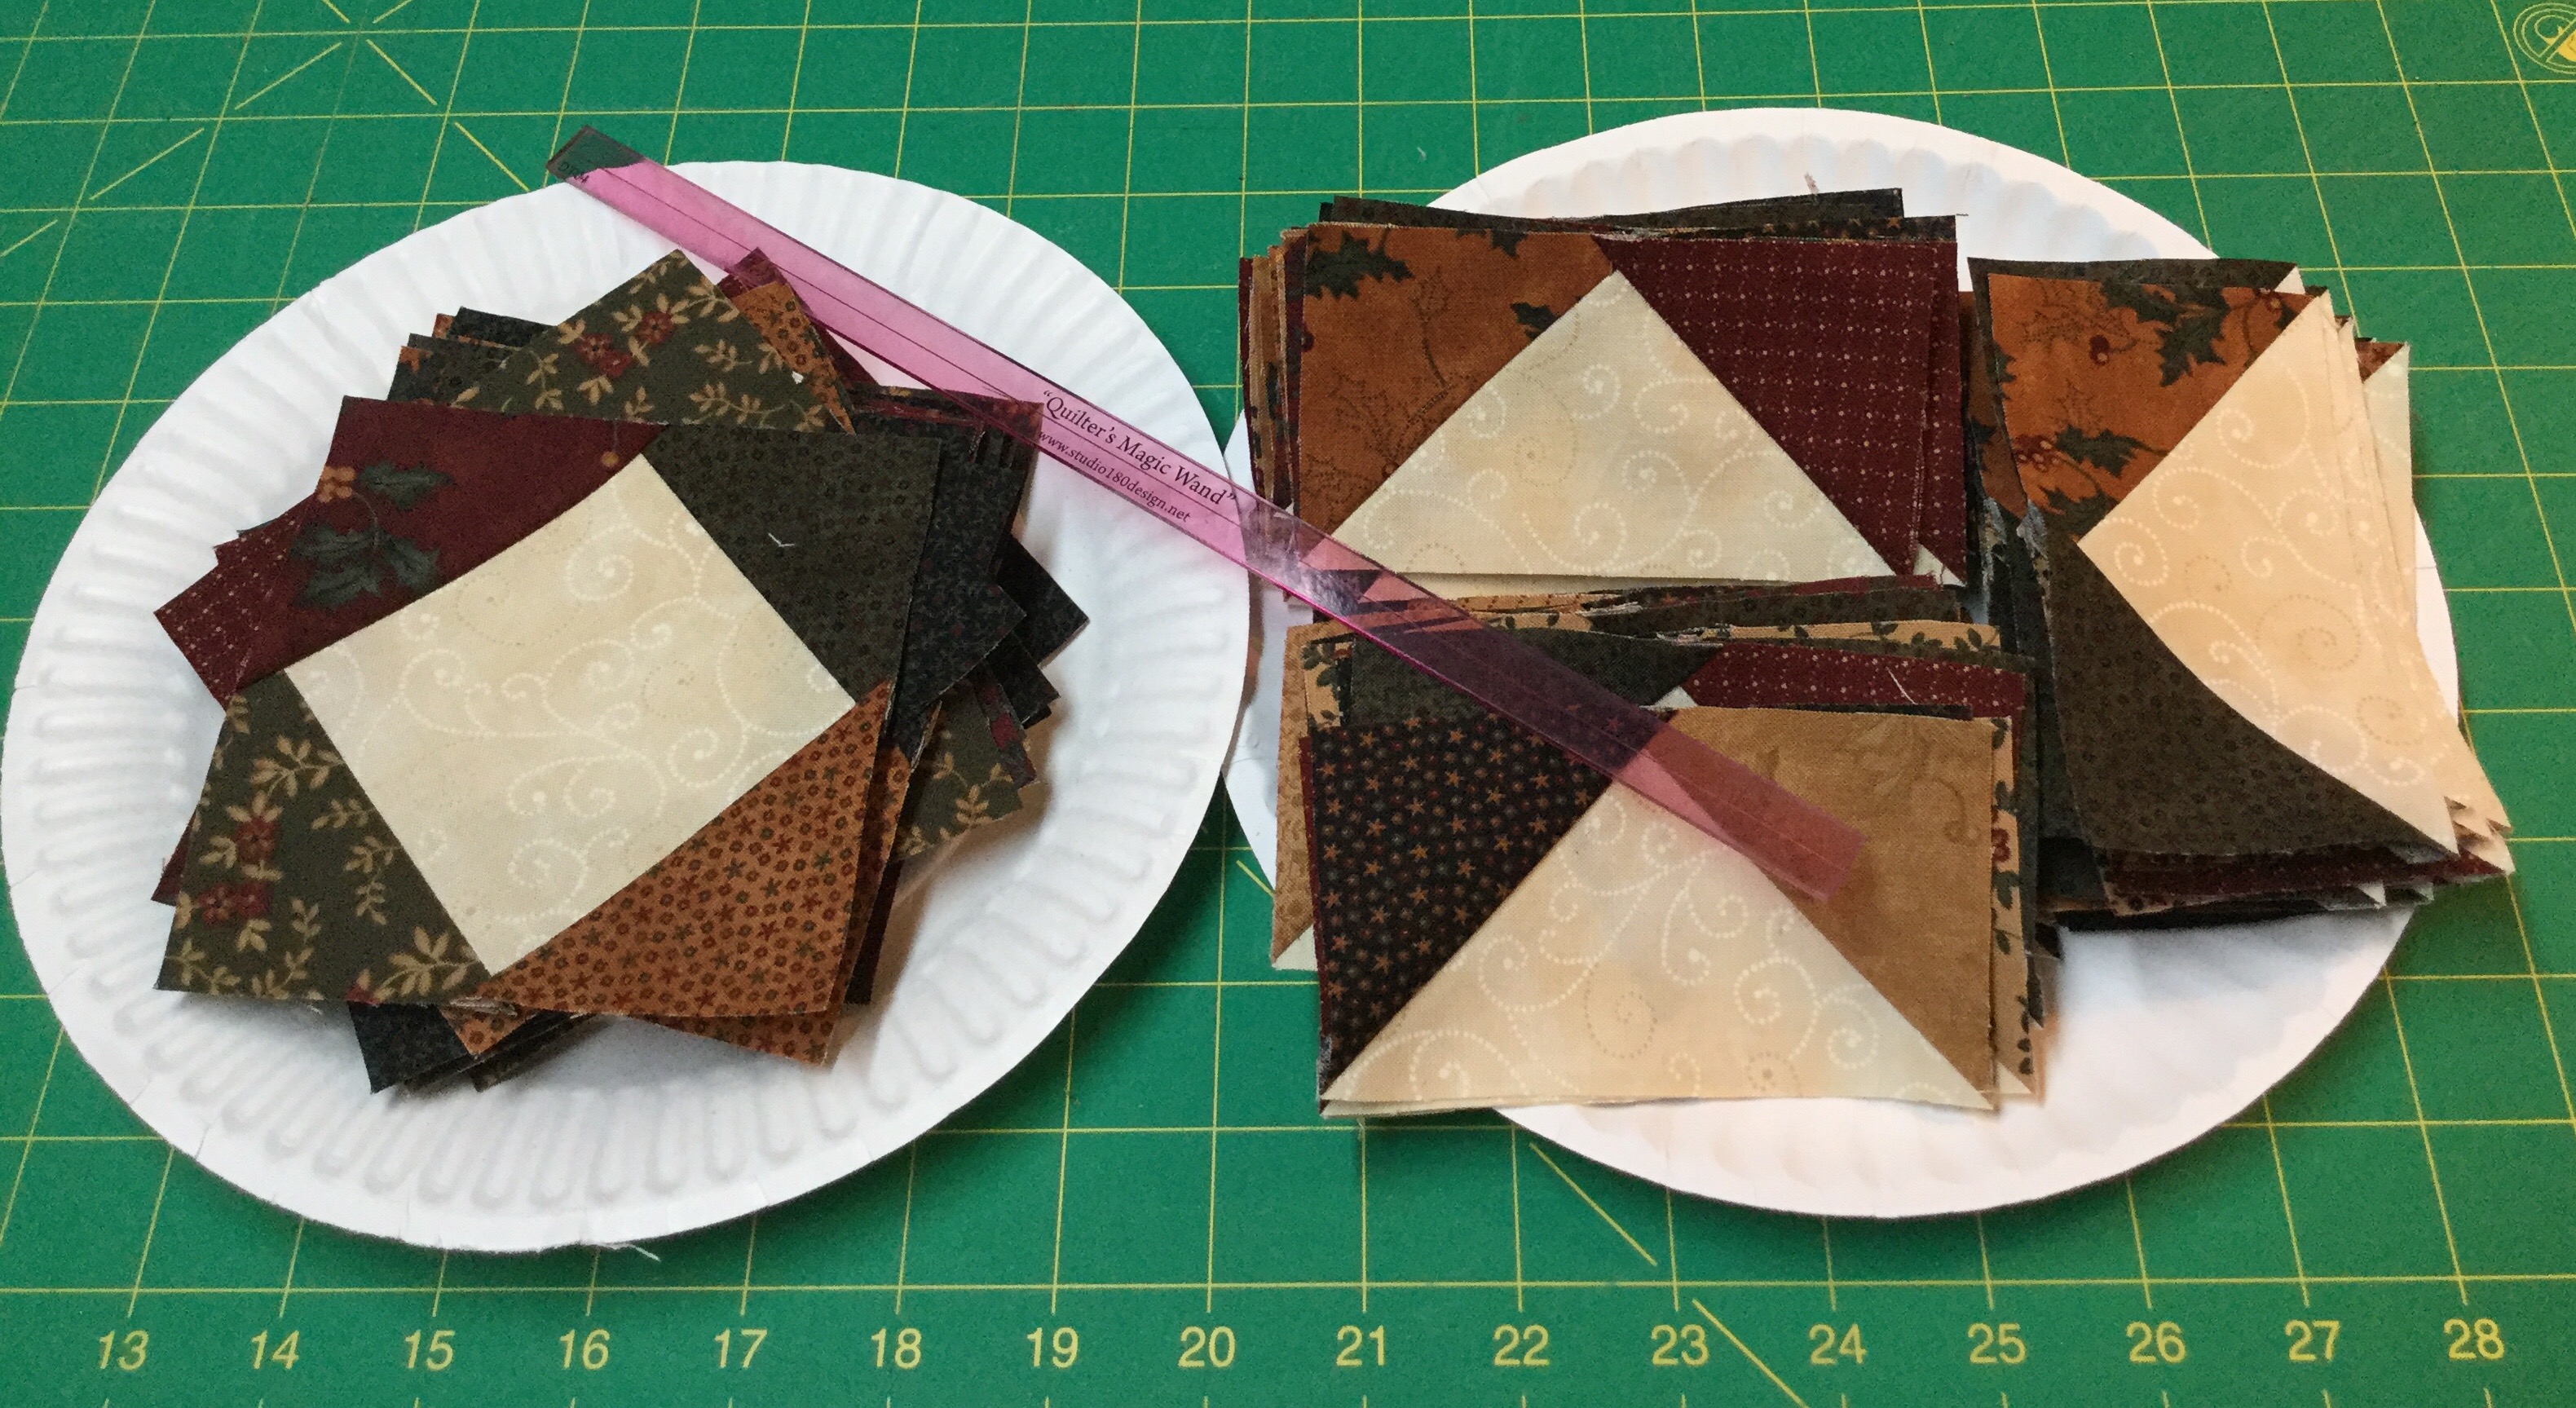
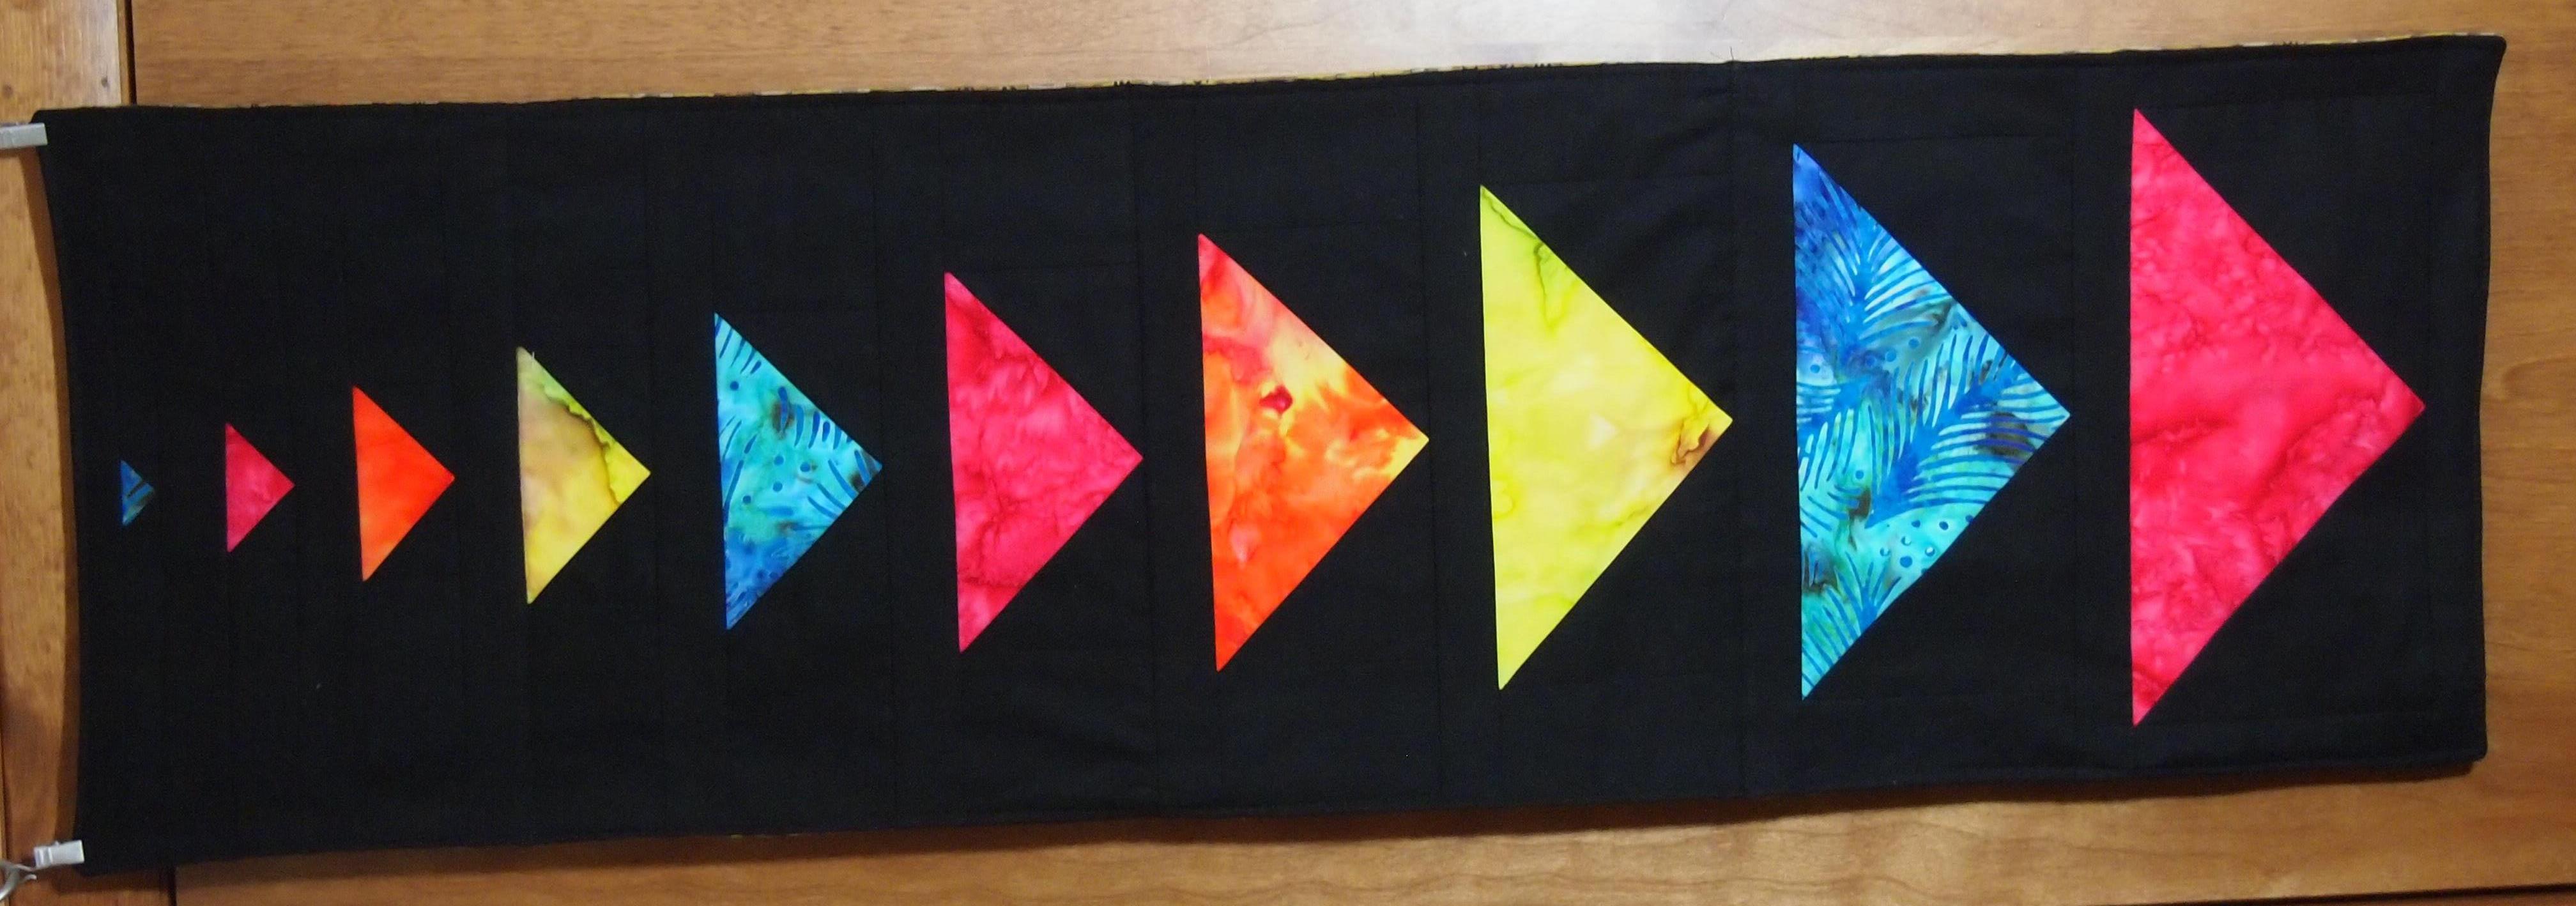
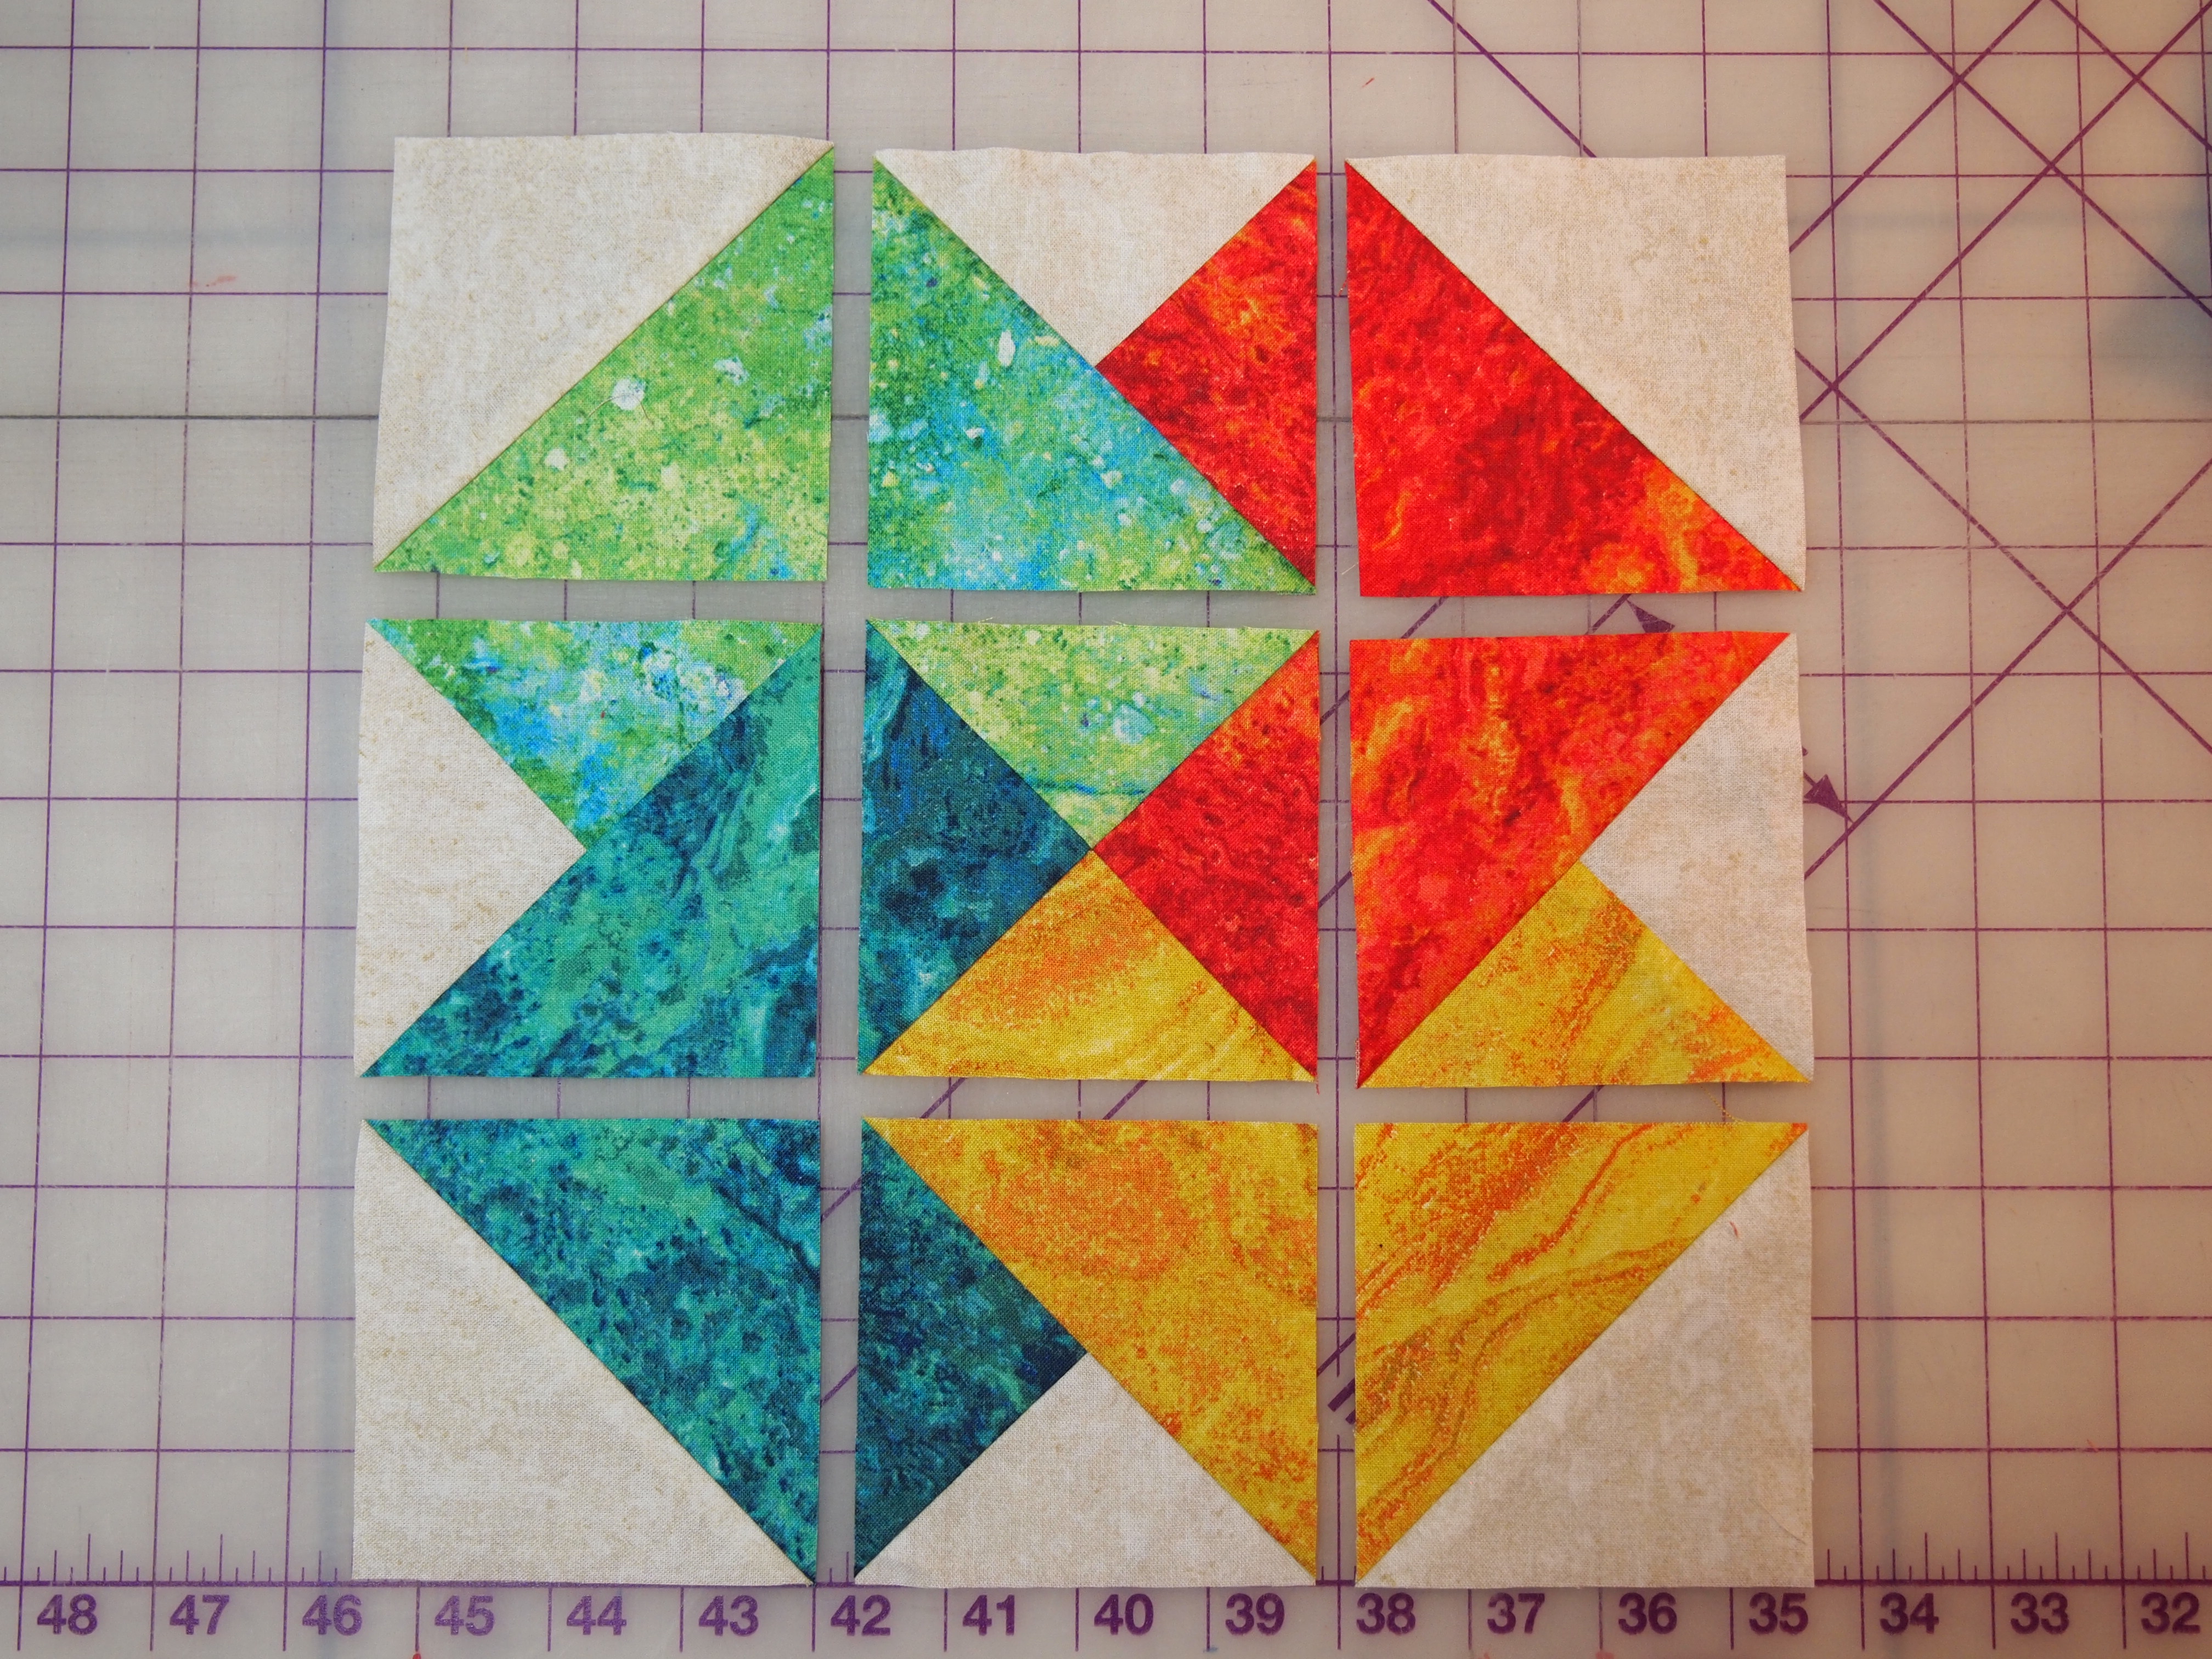
Tucker Trimmer Units

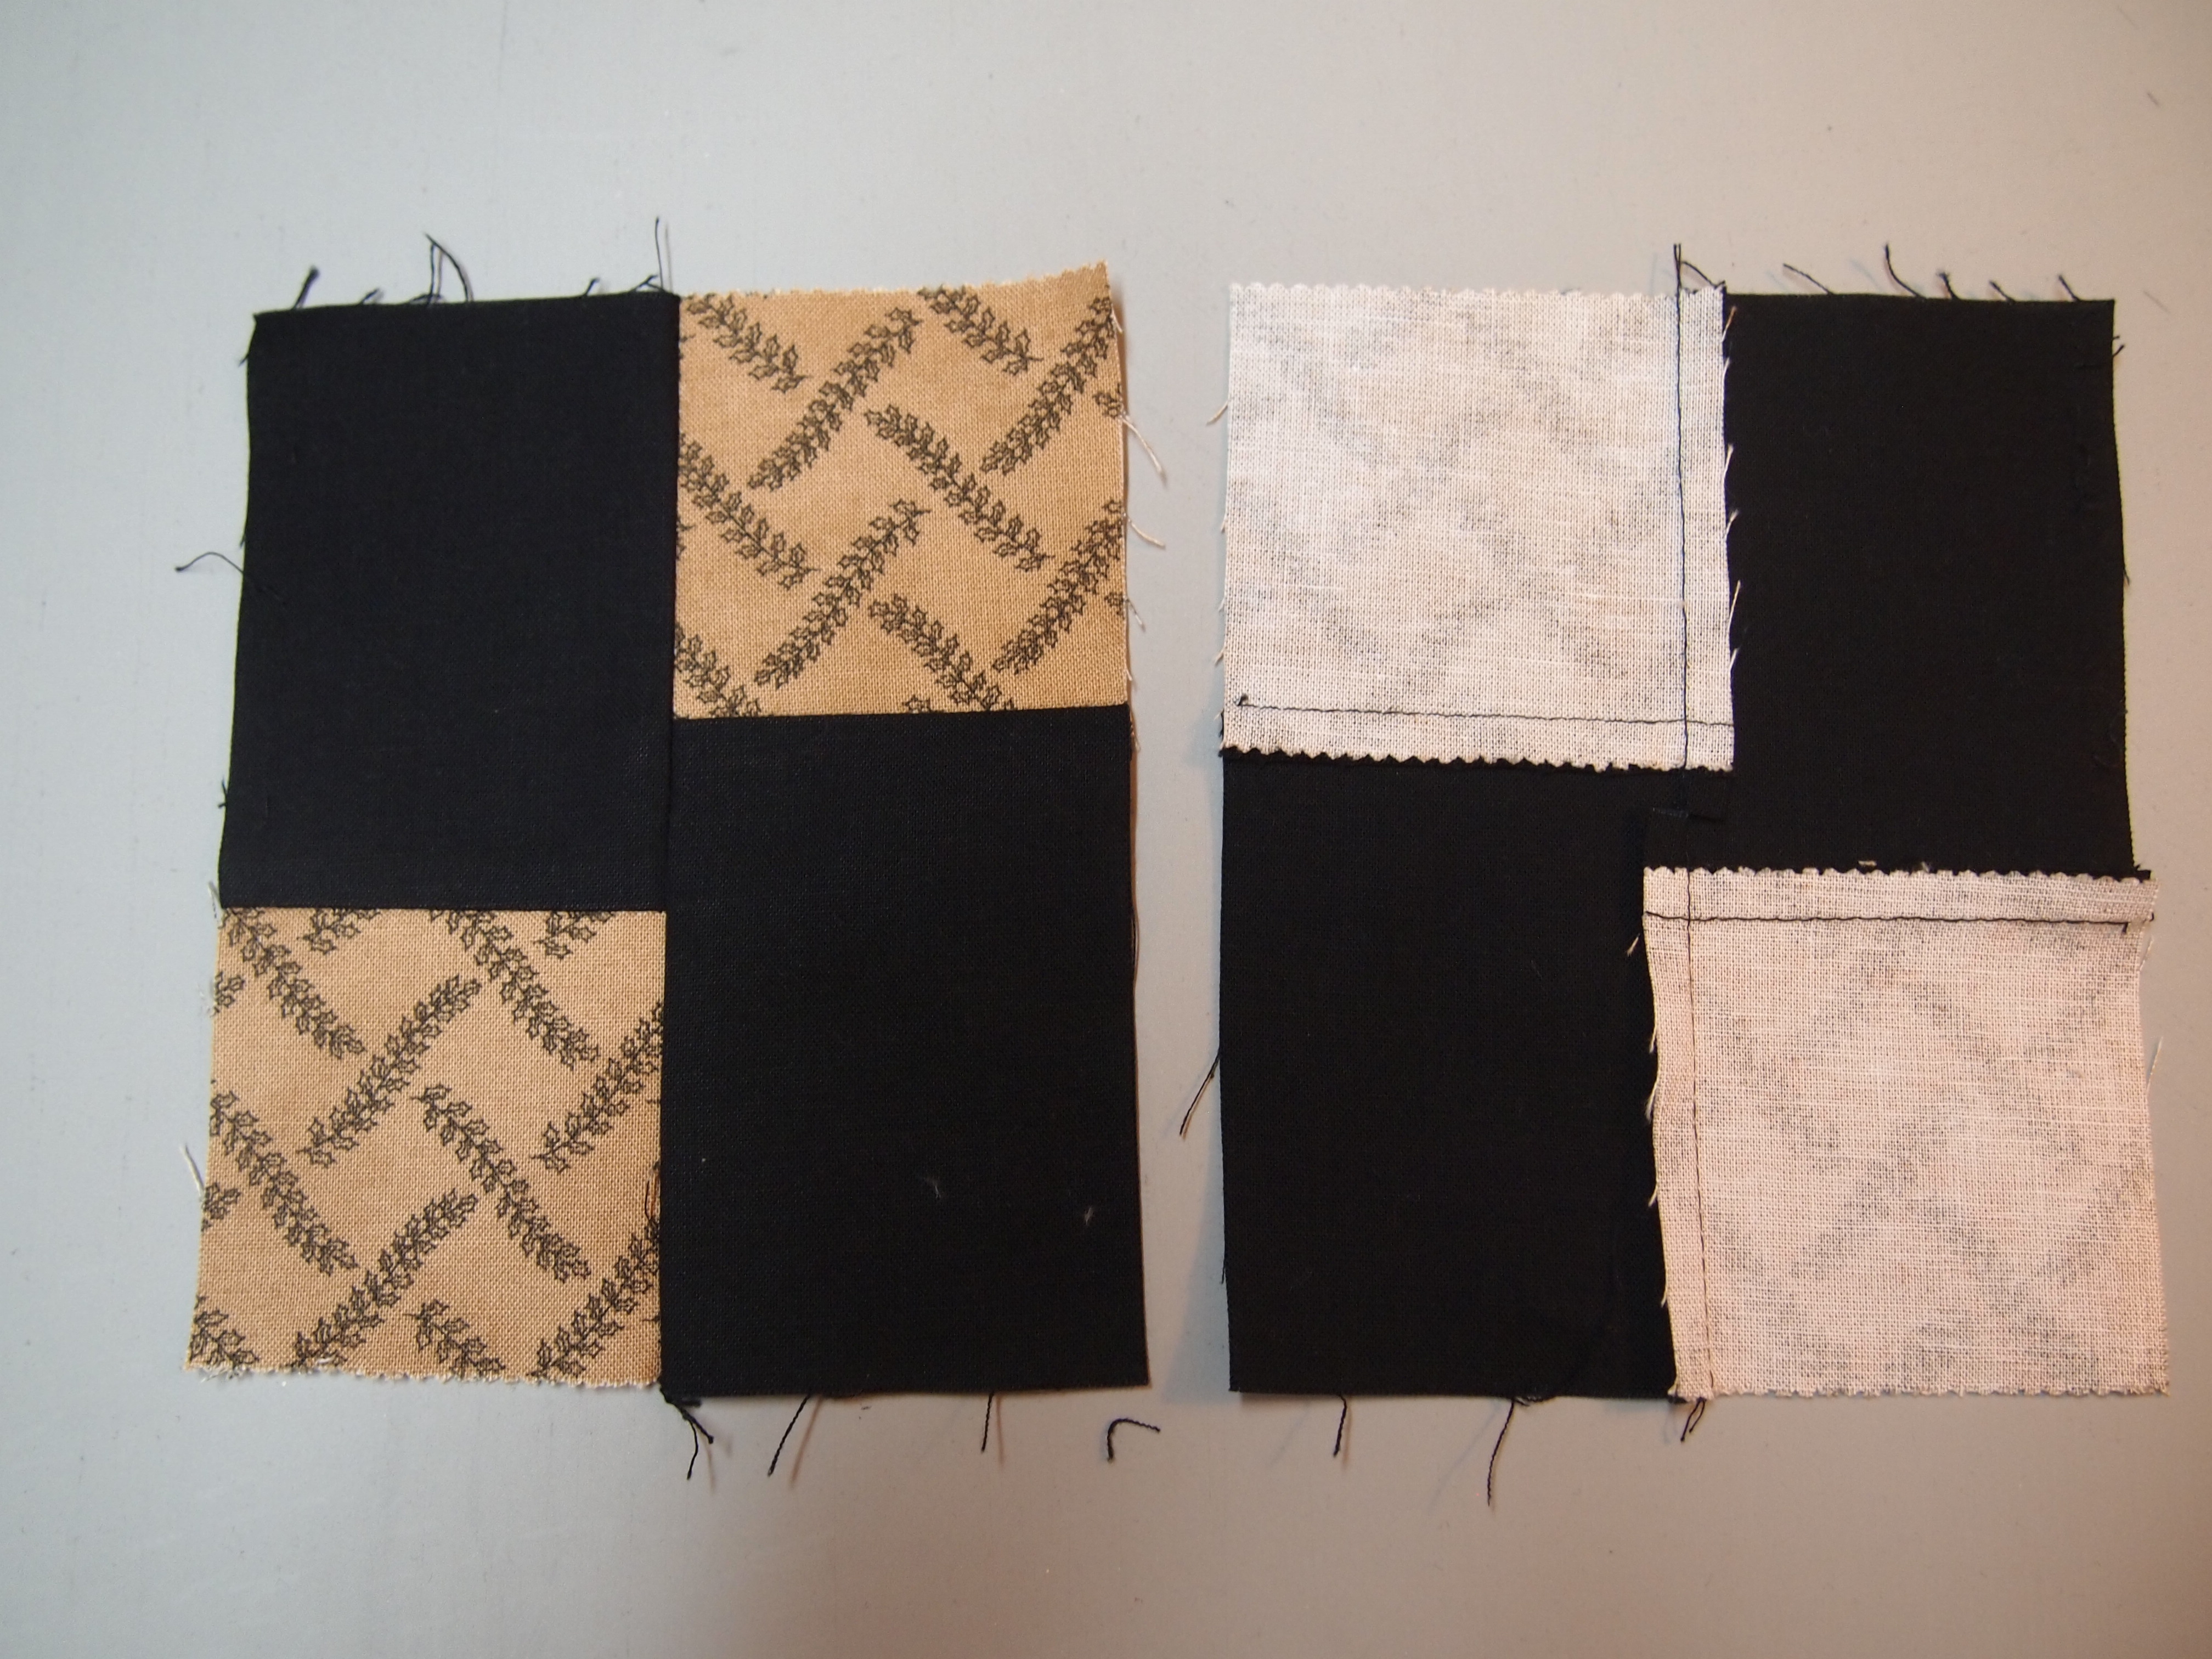
This block is made up of 1 hour glass unit, 4 half square triangles and 4 combination units all made with the Tucker Trimmer I.
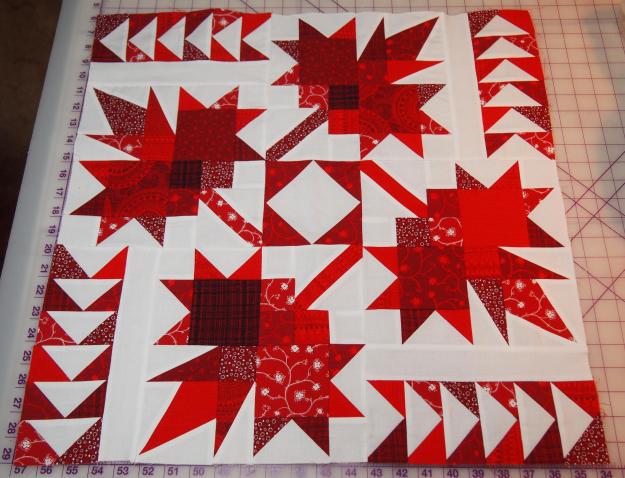
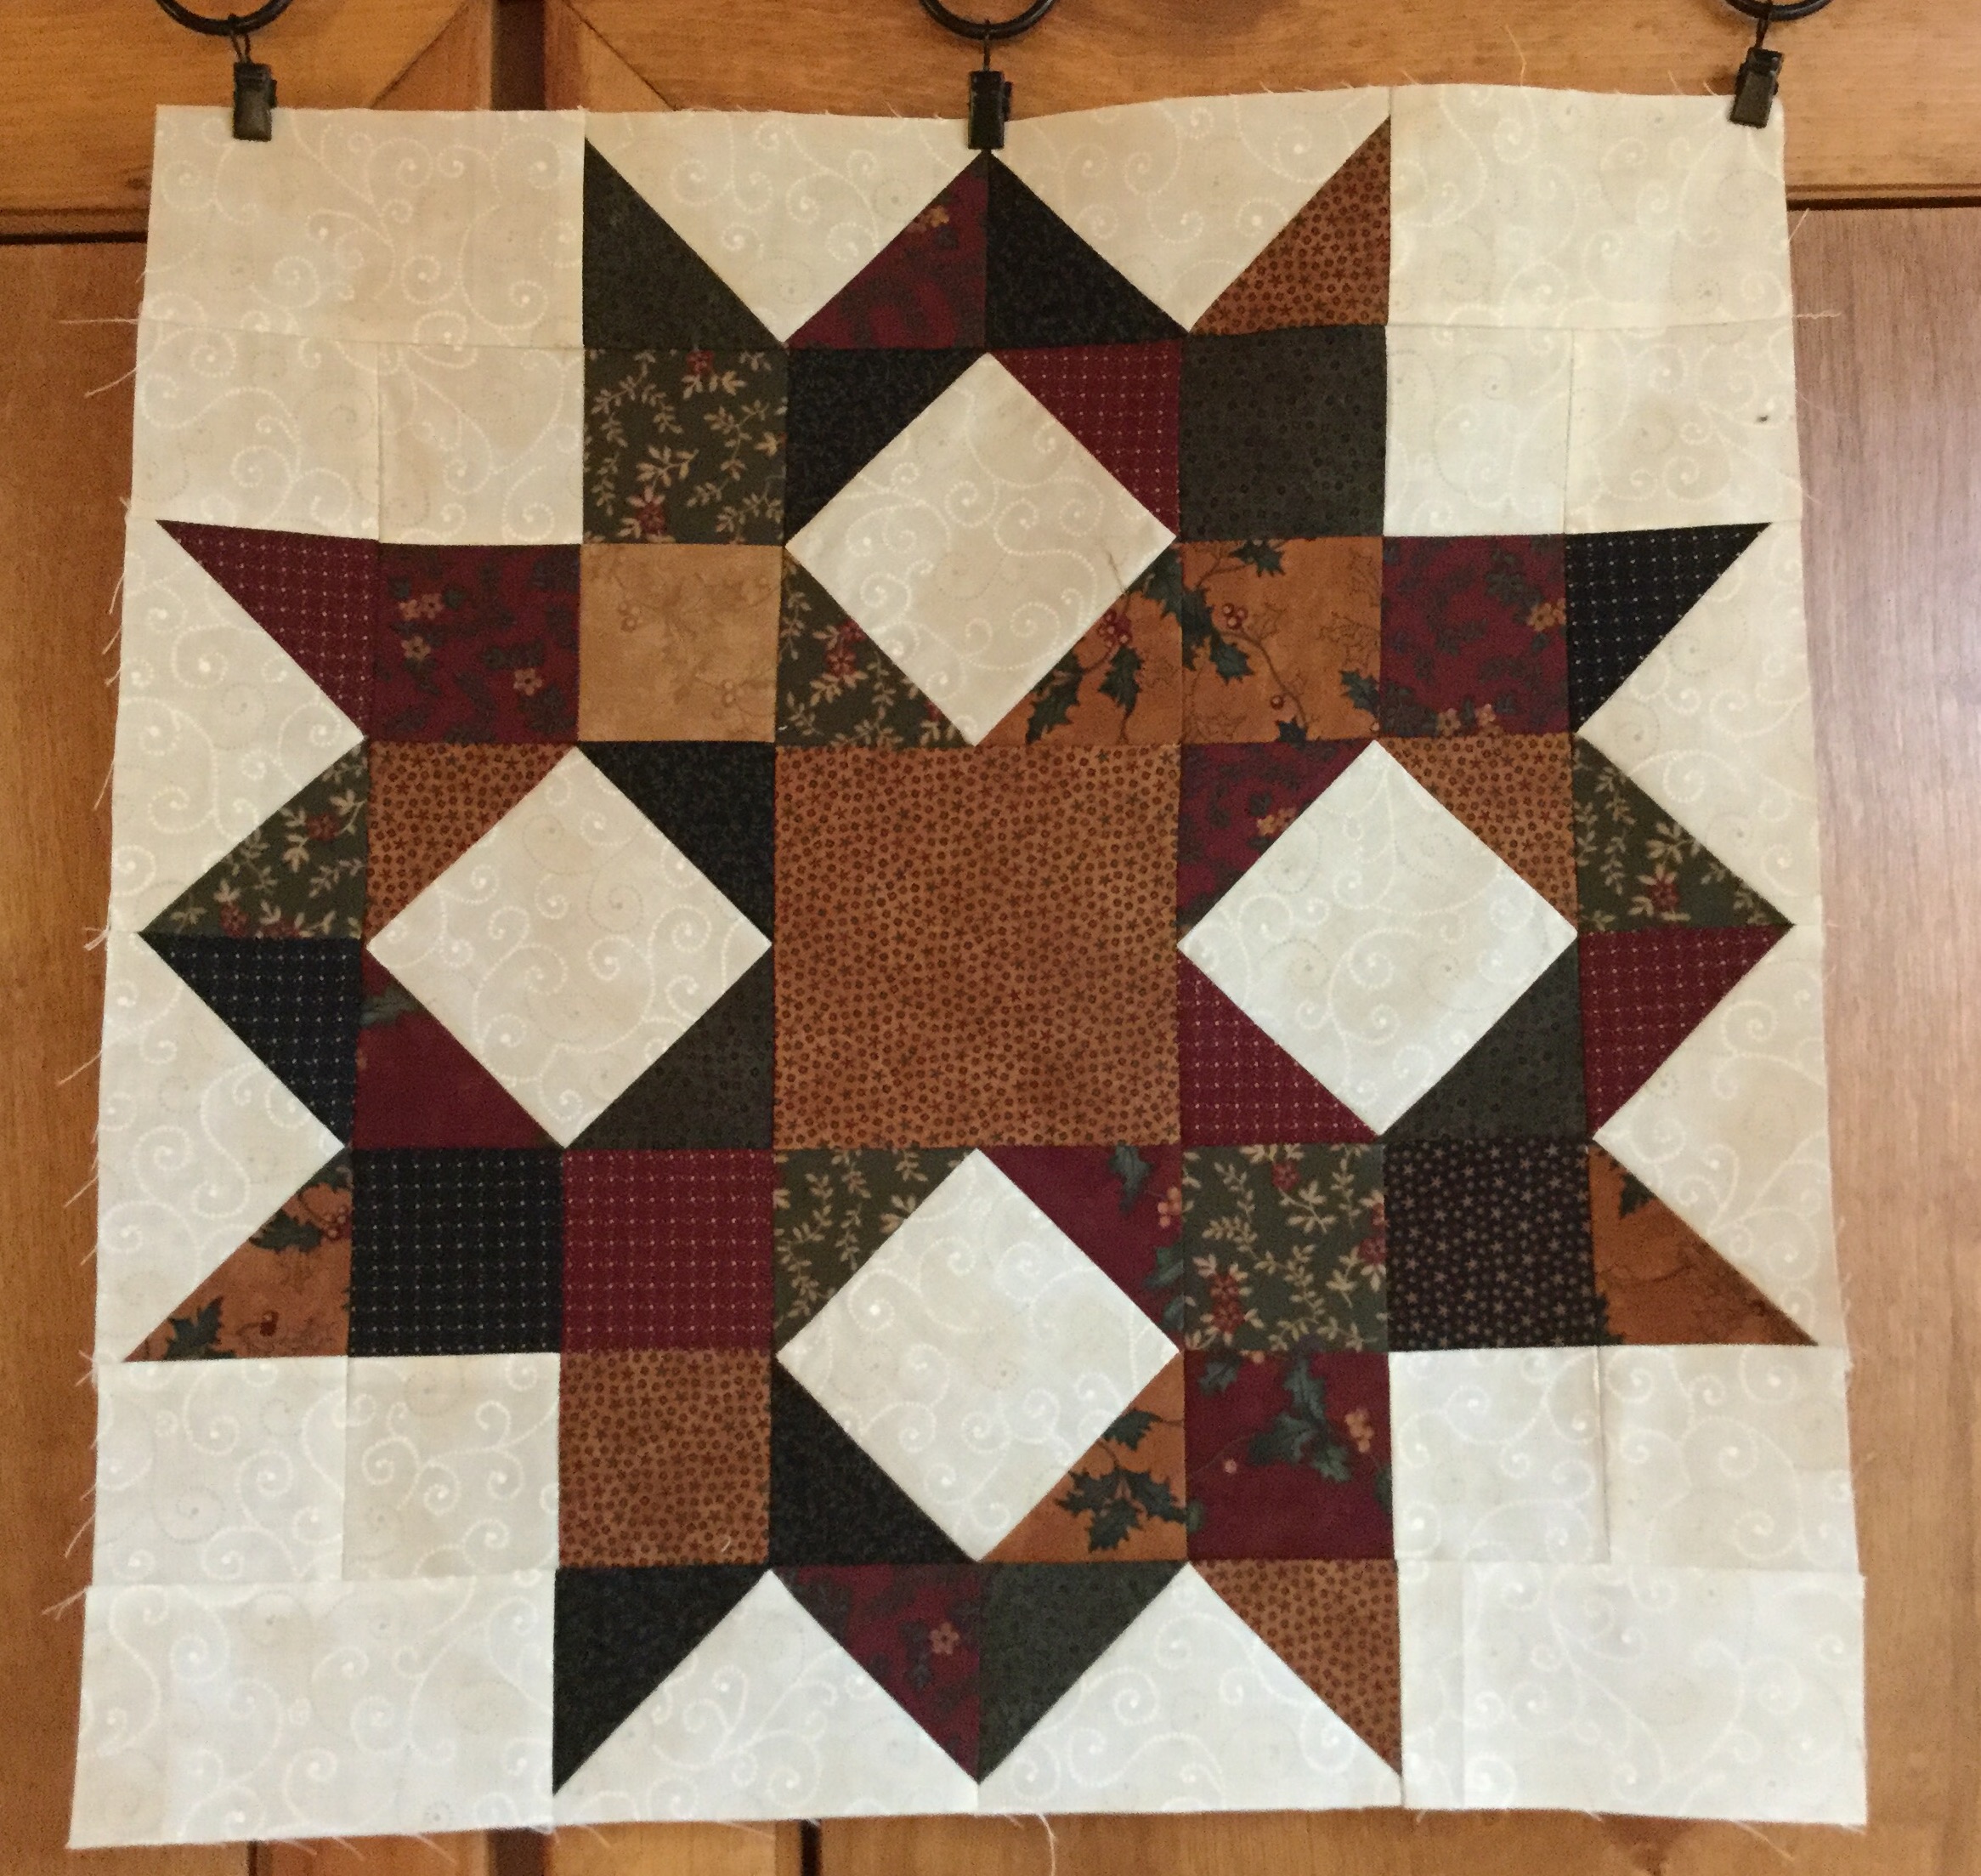
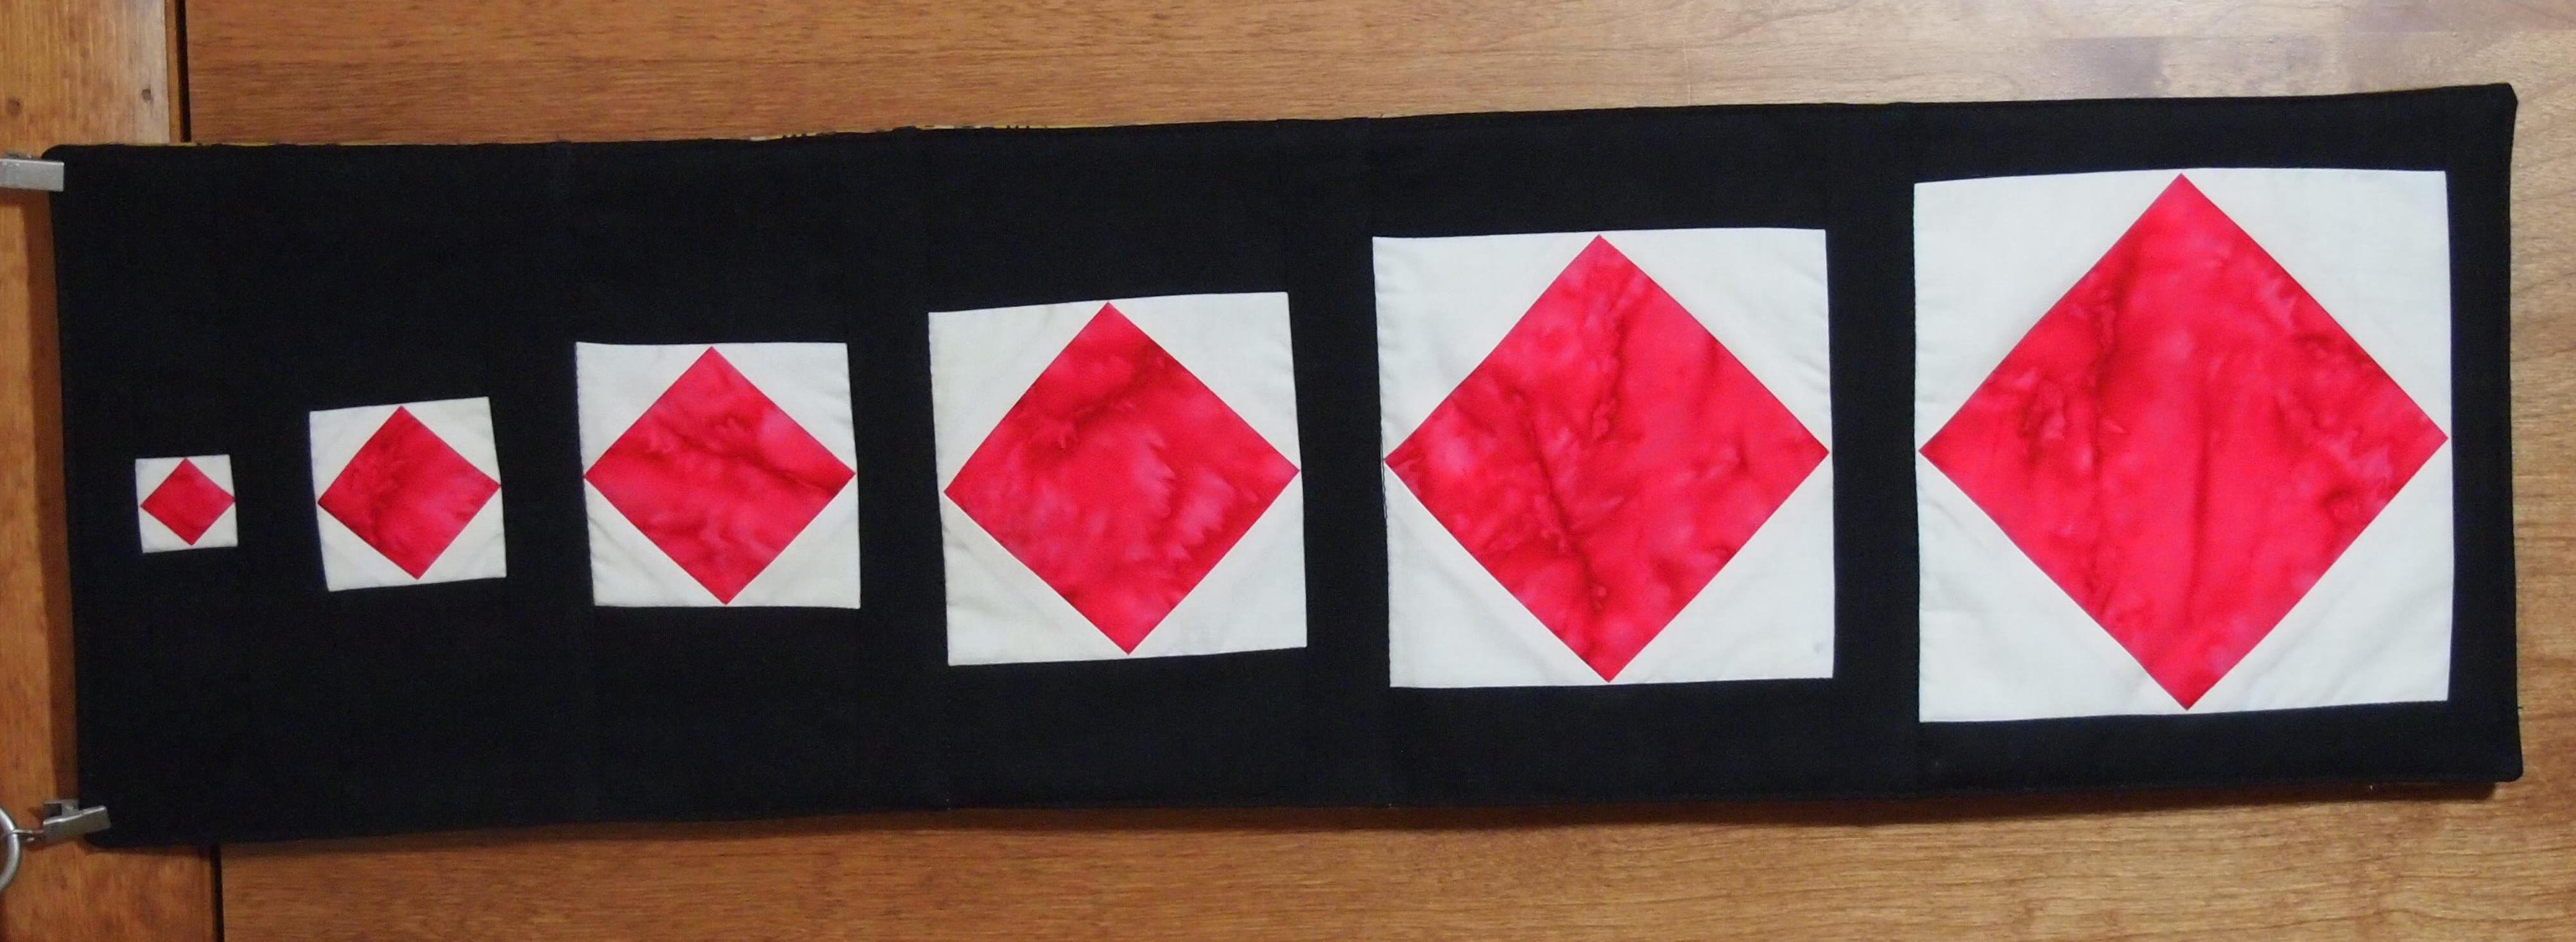
OLYMPUS DIGITAL CAMERA

Solitaire Block

When the units are sewn together it becomes the card trick block.
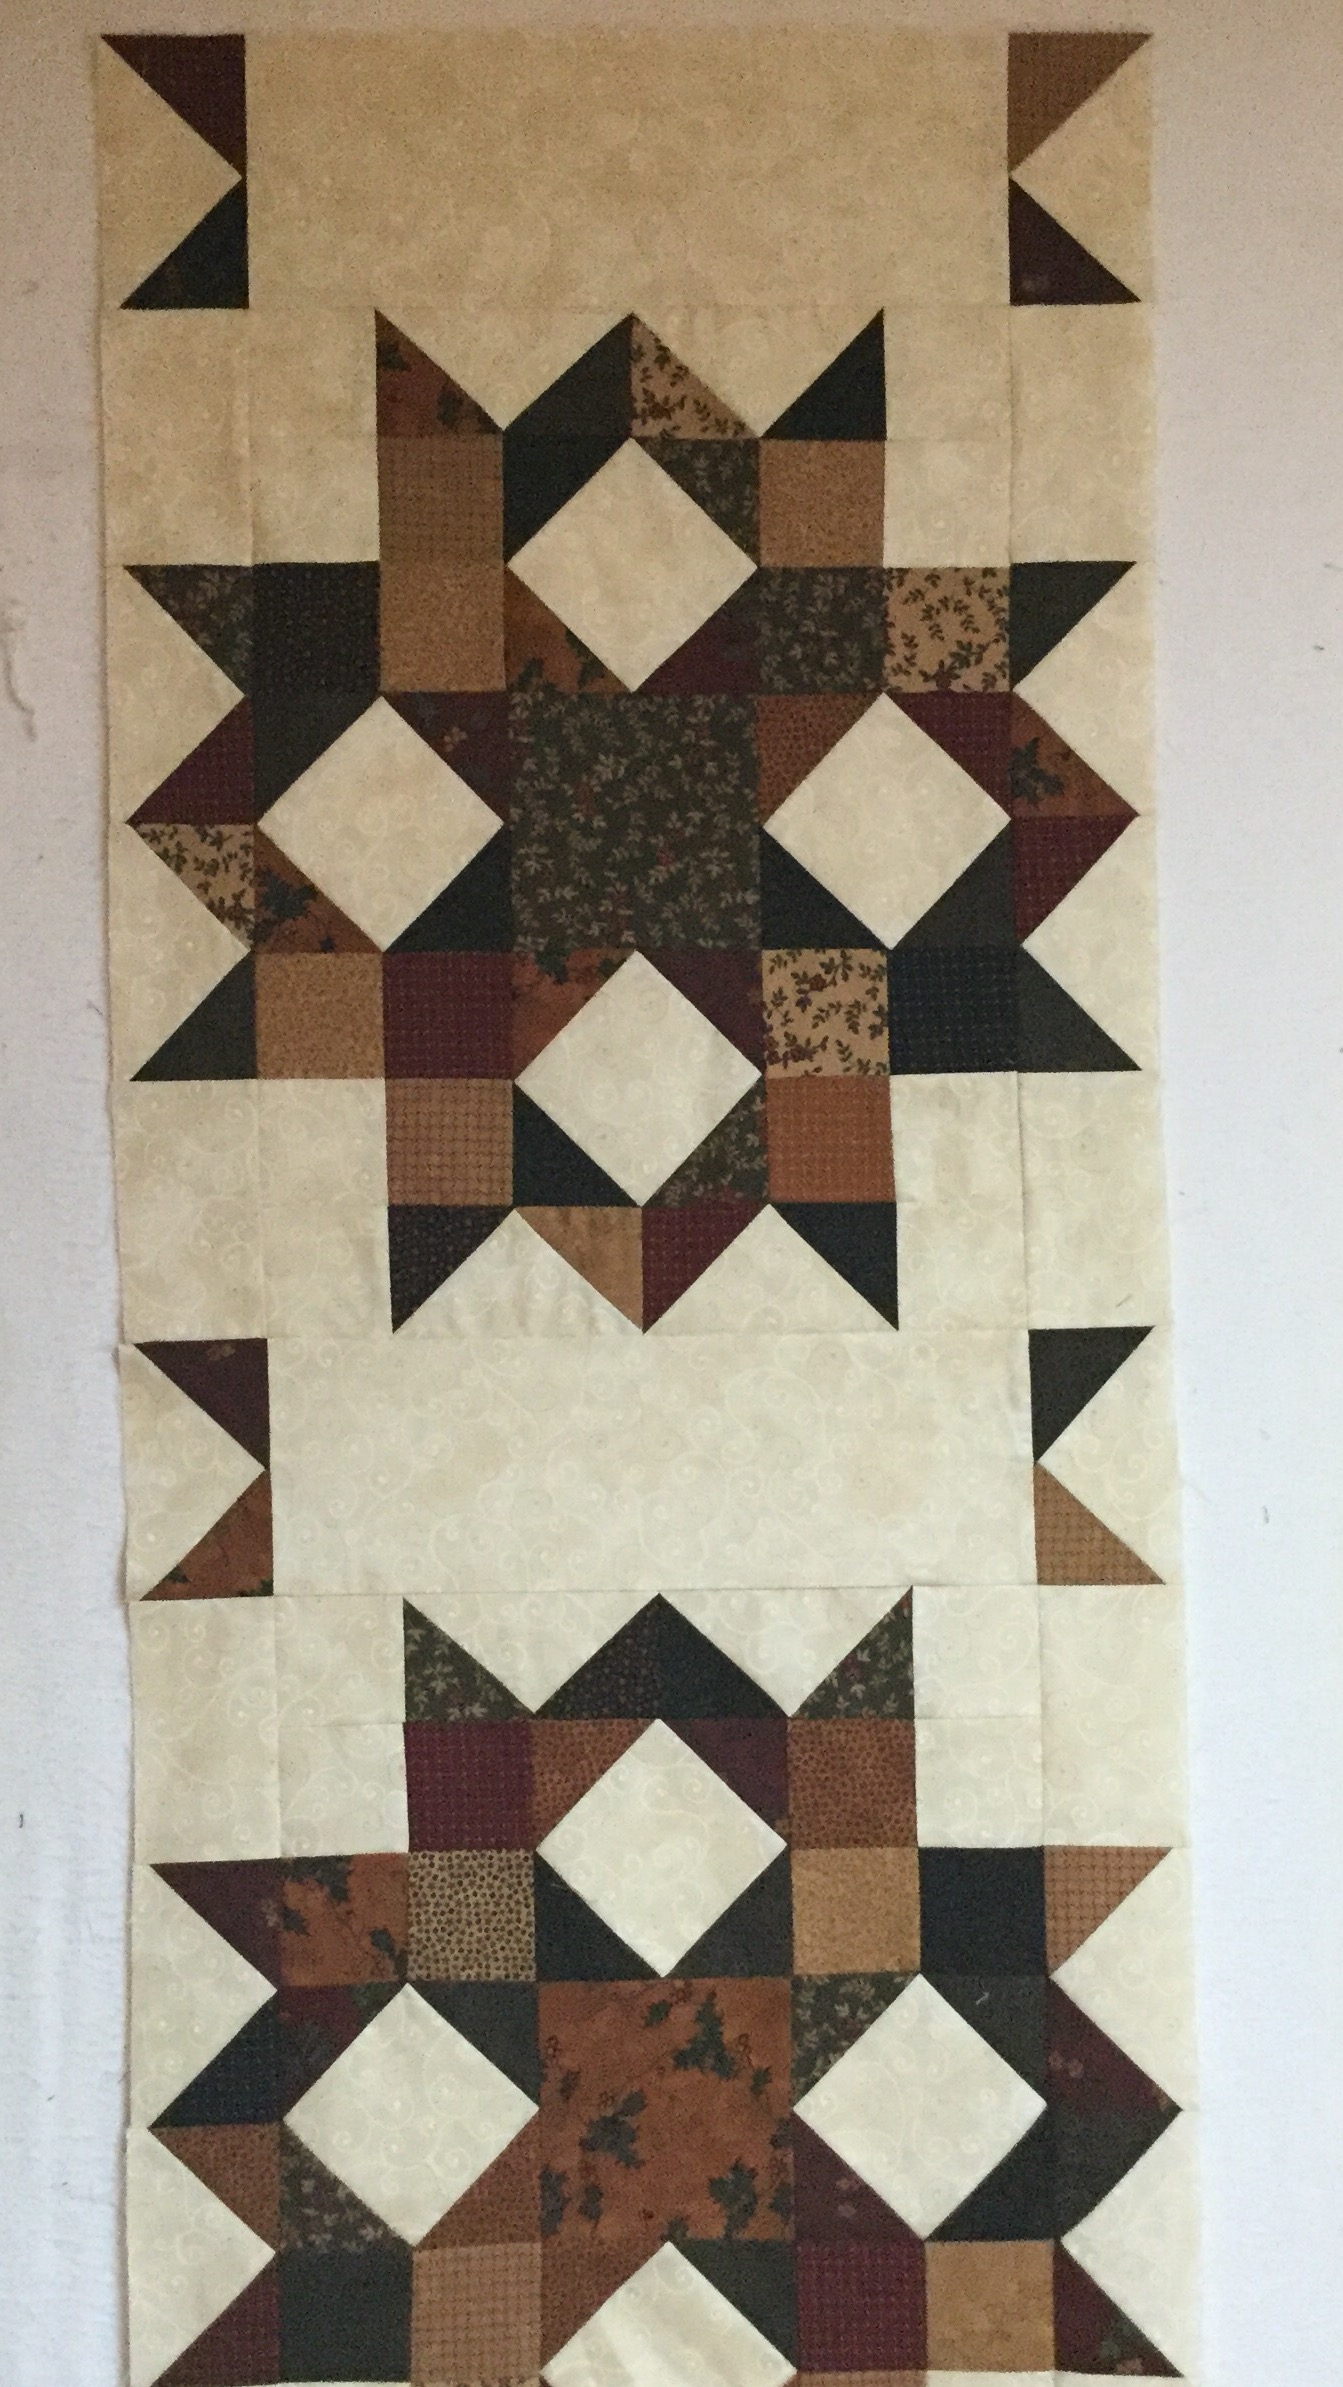
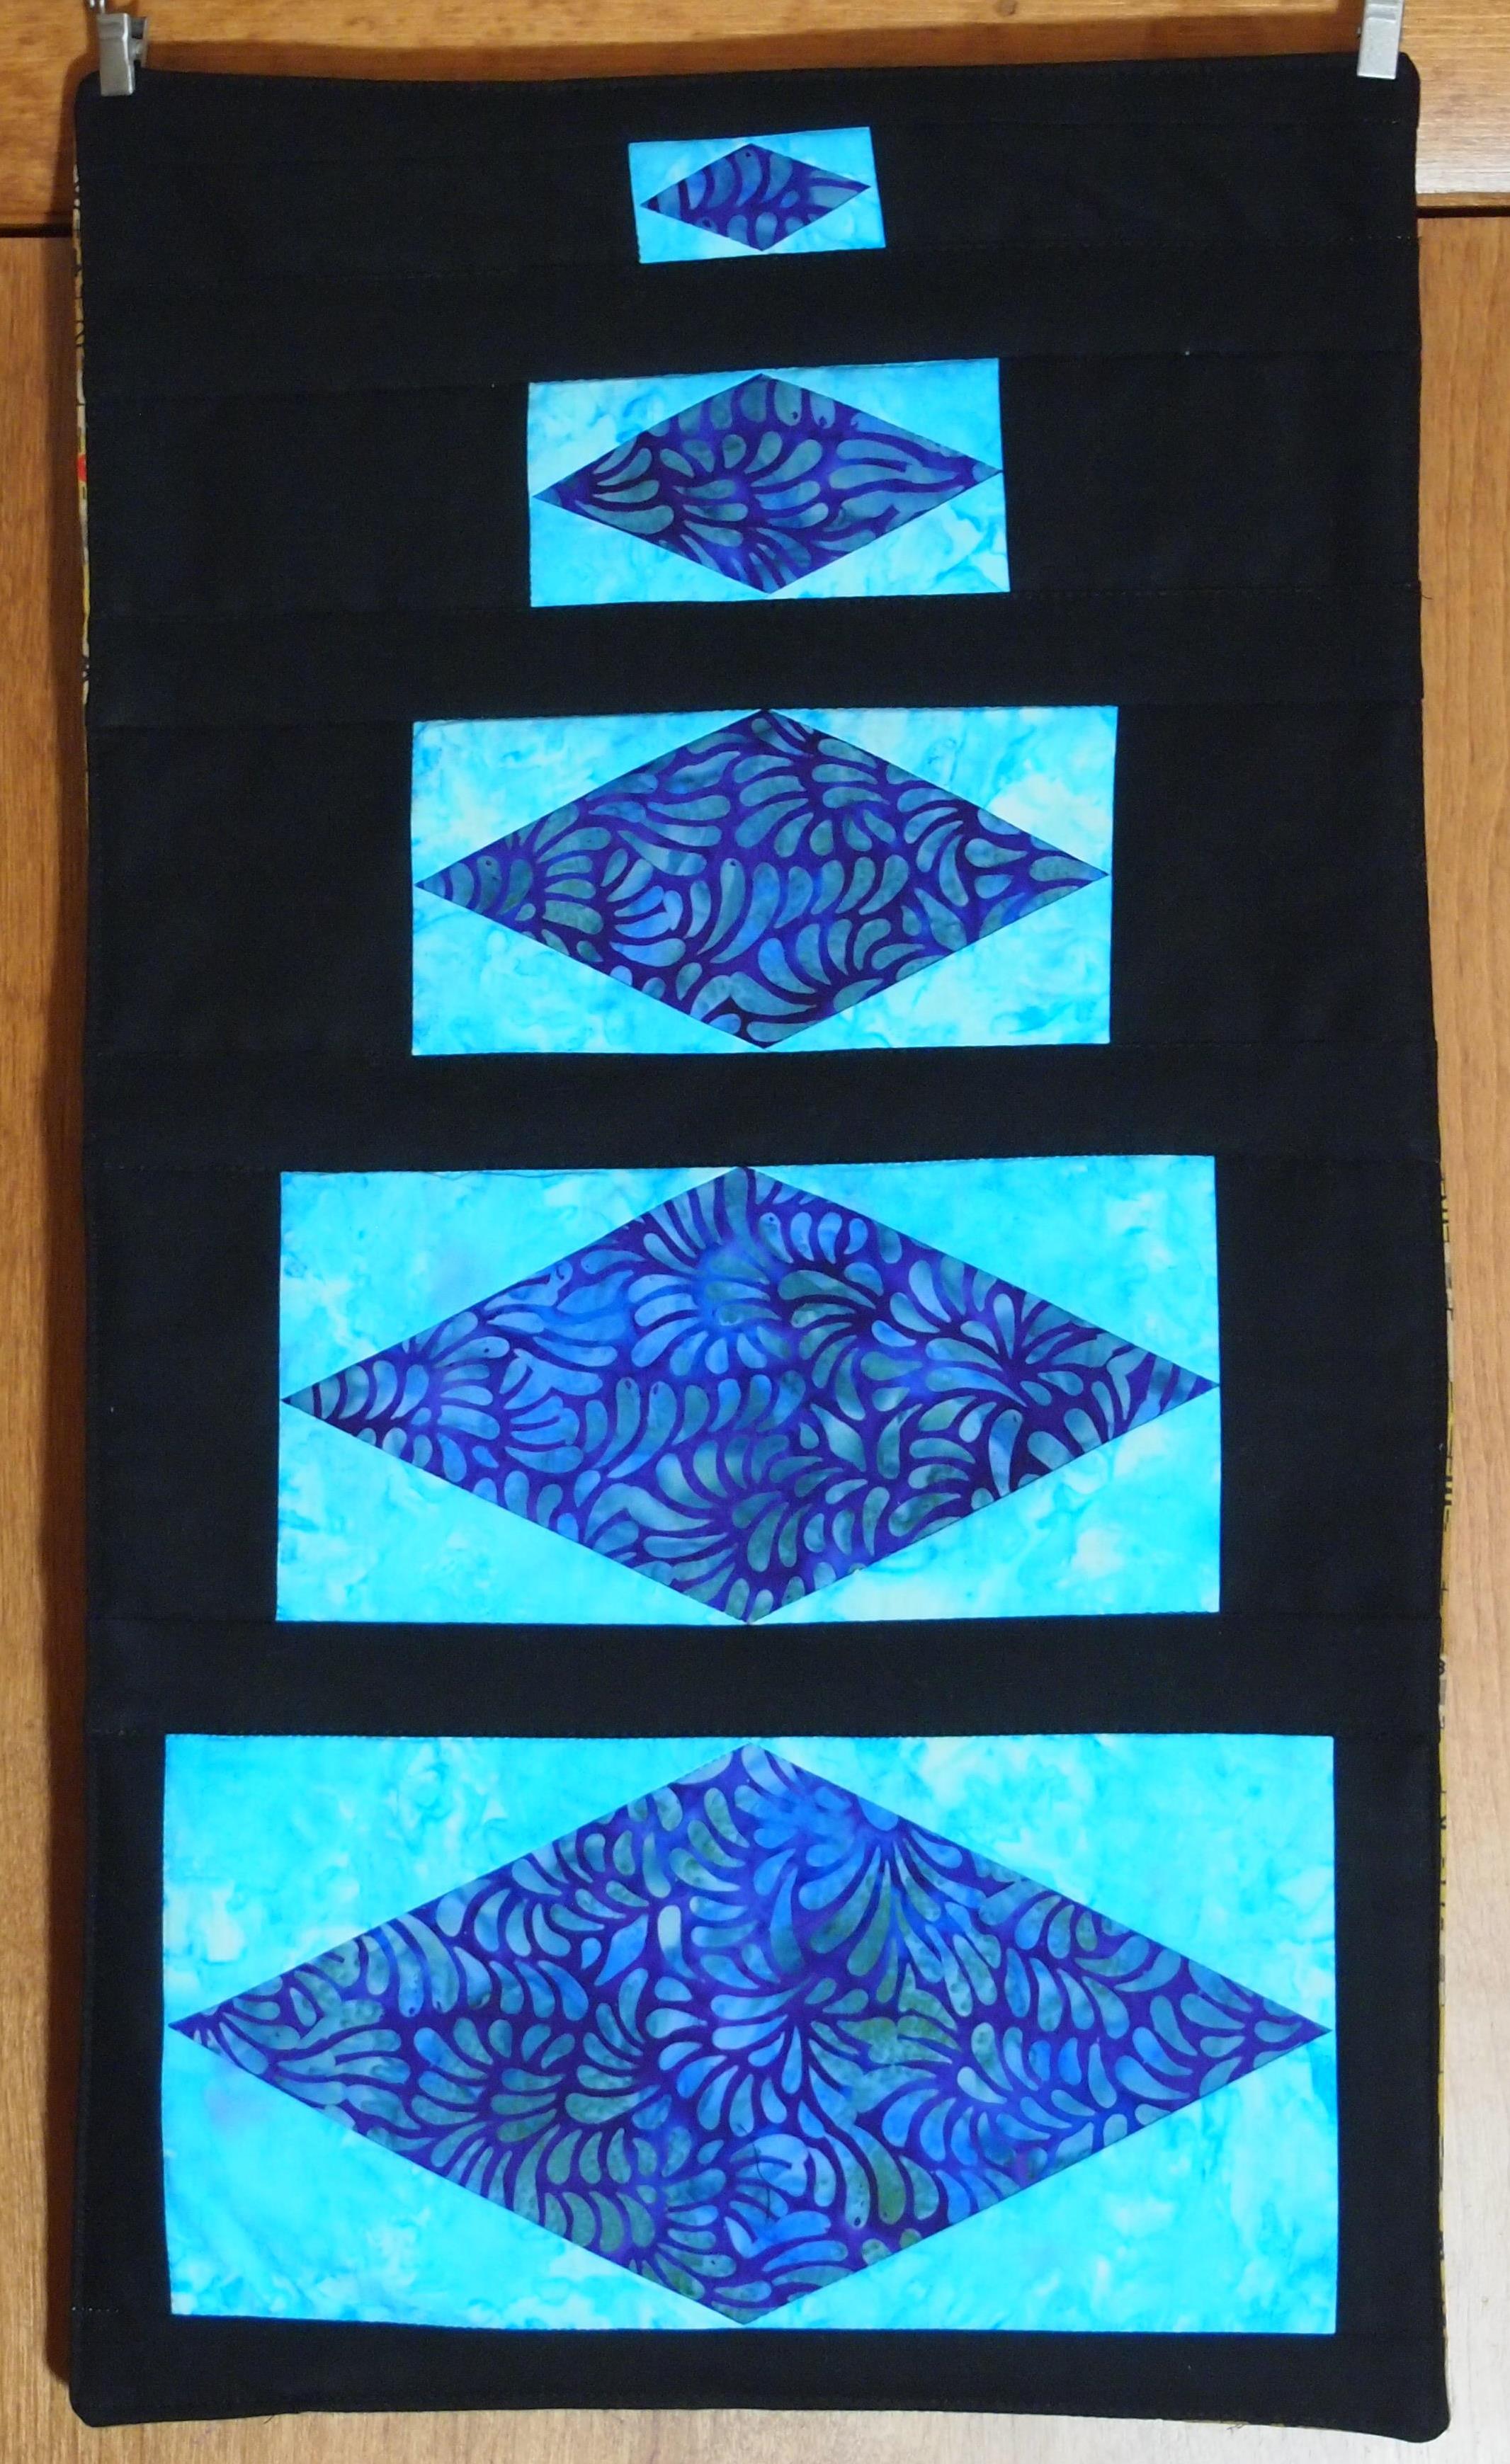
OLYMPUS DIGITAL CAMERA

Solitaire

I love the pieced inner border in this quilt.  When making the combination units you create a left and a right unit at the same time.  One set is used in the blocks, the other in the border.
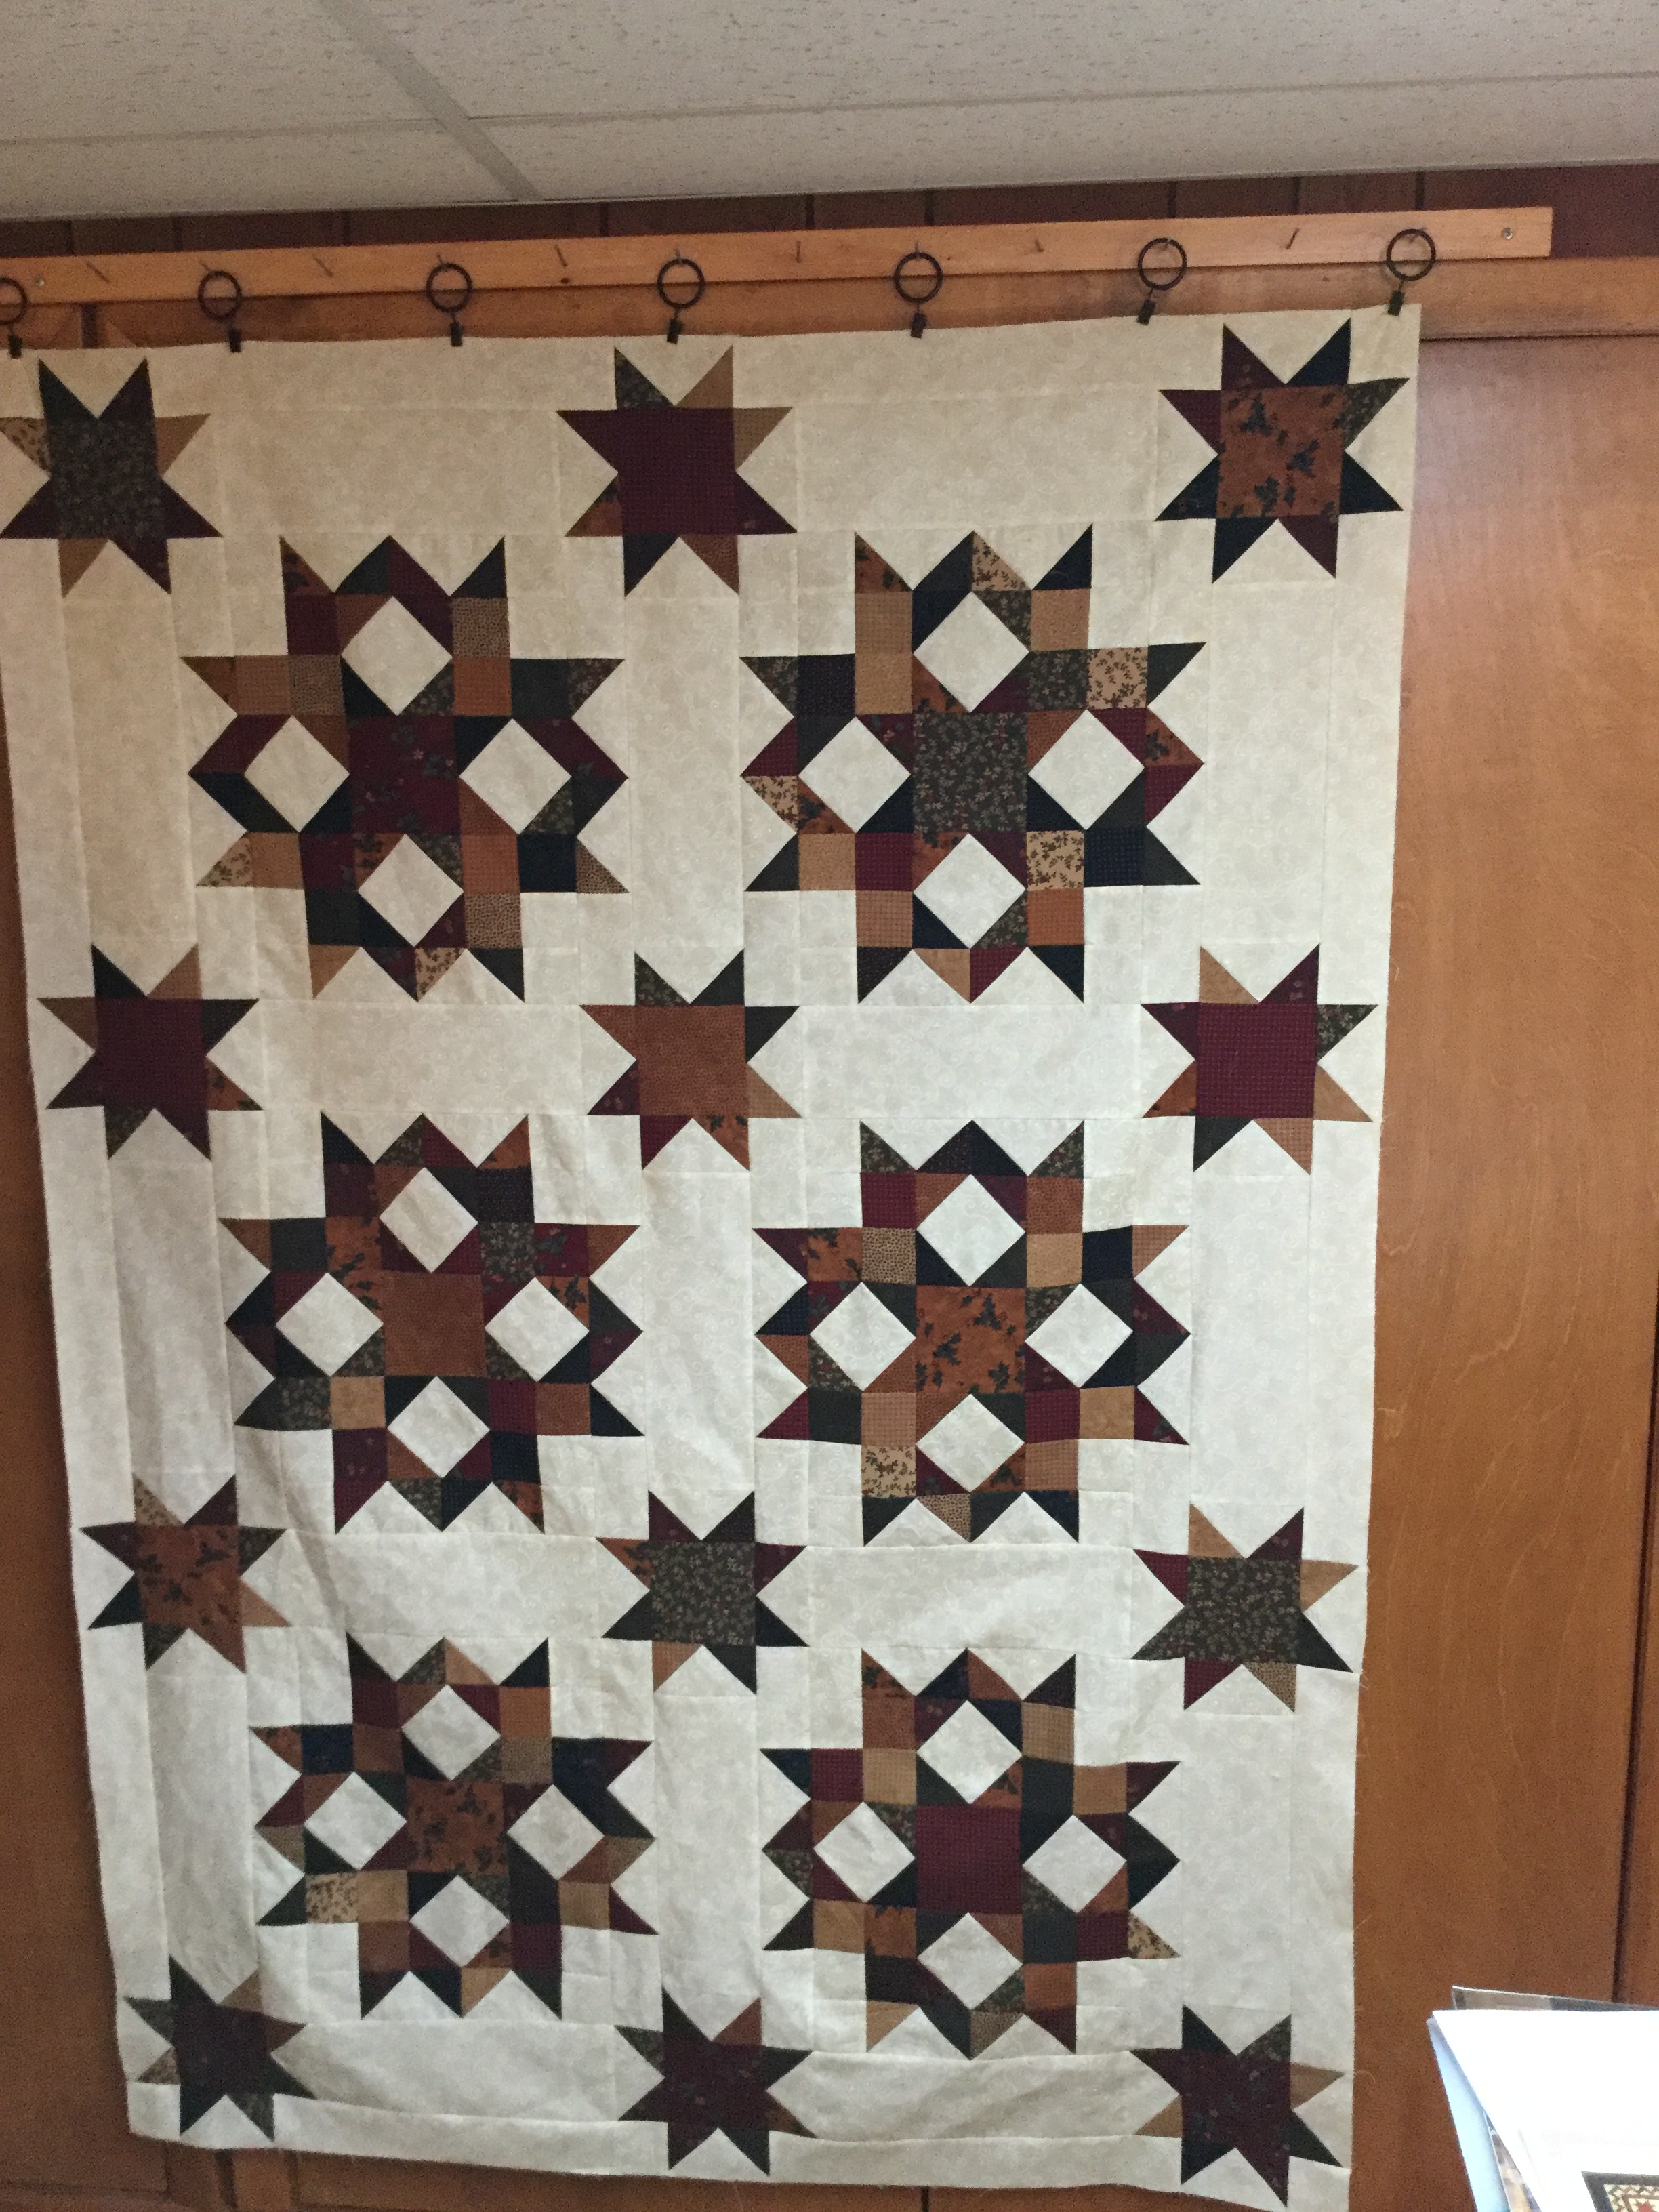
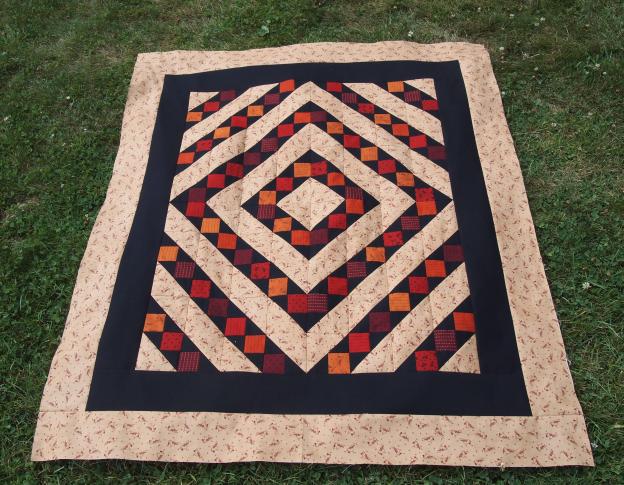
OLYMPUS DIGITAL CAMERA

Solitaire

I did have a fabric malfunction.  There are supposed to be cornerstones in the outer border but I cut them wrong and decided to finish it without them.  The fabric I used was Stonehenge from Northcott Fabrics.  It was sunny out so you can’t really see how vibrant the colors are.

OLYMPUS DIGITAL CAMERA

Solitaire

Happy quilting, see you around the fire pit!

Spotlight on Quilt Designer Katrina Thomas

I wanted to help raise funds to support The New York Mills Historical Society (my hometown), so for me that means “Quilt Raffle”! I chose a pattern by fellow Studio 180 Design Certified Instructor (CI) Katrina Thomas.  I met Katrina last March at our CI Reunion.  This girl is on fire when it comes to quilt designing.  Katrina is one of the features in Fons & Porter’s “Scrap Quilts” magazine for Summer 2015 on news stands now.

01 Katrina

I lover her pattern called “Rolling Stars”.  Katrina is a very creative designer. Her patterns feature the use Studio 180 Design tools, which I love!  Check out Katrina’s website The Hope Chest Quilting to get her wonderful quilt patterns.

I chose Katrina’s pattern Lemoyne Baskets to make my raffle quilt.

02 Lemoyne Baskets

I love Lemoyne Stars.  This pattern is a twist on this process using the Rapid Fire Lemoyne star Tool by Deb Tucker.  It also requires the Studio 180 Design Tech Sheet Lemoyne stars as Triangles.

OLYMPUS DIGITAL CAMERA

Tuck, his brother Earl and his other brother Earl are in charge of quality control.

OLYMPUS DIGITAL CAMERA

And Dave is keeping a close eye on my stitches.

OLYMPUS DIGITAL CAMERA

The fabric for this quilt is Lady Slipper Lodge by Moda.  I have named this quilt “Lady Slipper Lemoyne

OLYMPUS DIGITAL CAMERA

Pop Luck

I just finished a class sample that I will be teaching soon from a pattern called Pop Luck created by Deb Tucker for Studio 180 Design.  With the Corner Pop tool you can choose from 22 size options available and accurately remove a 90 degree corner from a base shape such as a rectangle, pieced unit, or block and leave the necessary 1/4″ seam allowance intact.  You’ll then add an oversized replacement half square triangle and use the ruler guidelines and cutting edges to quickly clean up the corners to the perfect shape and size.

OLYMPUS DIGITAL CAMERA

I made half square triangles, then I popped of the corner and added an oversized triangle and trimmed it up using the Corner Pop Tool.

OLYMPUS DIGITAL CAMERA

You’ll be saving fabric and have pressing options not available with traditional the folded corners technique.

OLYMPUS DIGITAL CAMERA

This is the finished Pop Luck top!

OLYMPUS DIGITAL CAMERA

This is a fun project and a beautiful quilt.

For The Birds, # 58

Somebody stop me!  I need to be working on Studio 180 Design class samples. But I just had to make one more One Block Wonder.  This great fabric is Brazilia by Alexander Henry.  I wanted to try a different design approach.

1 Design wall_crop

I like the unevenness.  Once I sewed the blocks together I bound the uneven edge with a burgundy fabric. I then laid the blocks over the original fabric and adjusted it until it was in a position I liked. I sewed the two together and then squared up the top.

OLYMPUS DIGITAL CAMERA

It is a very subtle edge, but I like the way the original fabric flows into the blocks.

OLYMPUS DIGITAL CAMERAHere is a close up of where the original fabric meets the blocks.

OLYMPUS DIGITAL CAMERA

I chose another tropical bird fabric for the backing.

FTB on the Wall

You know, no quilt it complete without a label.