For the last year and half I been experimenting with Deb Tucker’s Star 60 Tool and adding stars and cubes to One Block Wonders (OBW).
Chrysanthemum Block
This block was created by the Studio 180 Design Brain Trust. I call it the Chrysanthemum. I put it in my OBW Star Chamber.
Star Chamber
I wanted to see what the Chrysanthemum block looked like as a quilt.
Chrysanthemum Quilt, measures 46″ x 60″
Holy guacamole, someone make me a margarita! This quilt just makes me smile and think of a fiesta.
I am teaching Zoom classes on OBW’s and the Star 60 tool, along with the 5 technique sheets for the Star 60 tool. I have added the fabric requirements for this quilt to class the supply list so you can decide whether to make a block for your OBW or a Chrysanthemum quilt.
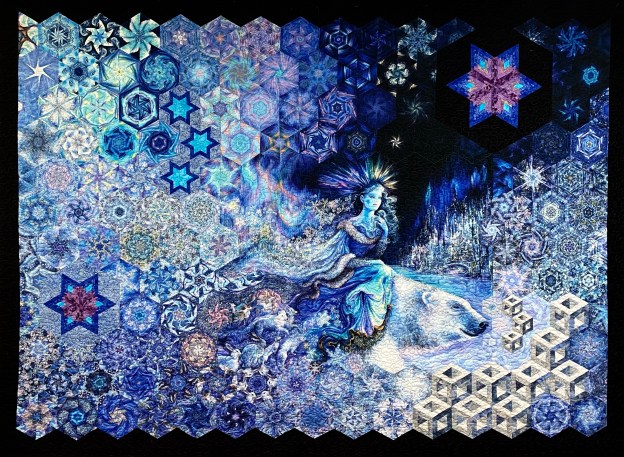
I love Josephine Wall’s panels. I call this one “Moving Forward”. It measures 74″ x 98″. The Framed 60 Stars, Log Cabin Stars and Cubes were made using the Star 60 Tool. (Technique sheets for the Log Cabin Stars and Cubes are coming soon.)
Star Chamber is my design created with the Star 60 tool & Striped 60, Framed 60, Checkerboard 60 Quad 60 & Caped 60 Technique Sheets. The next Star 60 Basic Zoom Class is scheduled for January 22, 2022, sign up on this site under the OBW & Star 60 Zoom Classes tab.
Studio 180 Design is running an exclusive special through the end of January of 20% off the purchase price of the Star 60 and/or Wedge Star tools. You can purchase the tools at the links below: Use the code OBWwithStudio180 at checkout to get the discount.
Join me in January, I have scheduled OBW Class 1 twice. Go to the OBW Zoom Classes Tab for more information & to download the supply list. You must pay the class fee one week before the class so I will have your email address to send you the Zoom class link.
OBW Class 1: learn to identify, cut & align the repeats. How to choose the best strip width based on the fabric design. Learn to cut the strips & the equilateral triangles, plus working with panels.
Welcome, Welcome, Welcome to Stitchin Heaven’s Journey’s BOM – Month 12! This has been a spectacular year. You all have worked so hard. Thank you to Deb Luttrell, Founder of Stitchin Heaven, Deb Tucker, Creative Kingpin of Studio 180 Design, Marie Bostwick New York Times best selling author and Jason Yenter Fabric Designer & President of In the Beginning Fabrics for making this all possible. Now to assemble your quilts!
Print 4
Print 6
Print 11
Print 12
Note: WOF stands for width of fabric. This month you will assemble your quilt top and add the borders.
Gather the following pieces:
4 Corner Sections from Month 6
Block K from Month 7
4 Middle Edge Sections from Month 9
4 Pieced Border sections from Month 11
Finishing Instructions
Step 1 – Lay out the Corner Sections, Middle Edge Sections, and Block K as shown in the diagram on page 35.
Step 2 – Stitch the sections together into rows, press the seams open. Stitch the rows together to create the quilt center.
Step 3 – Attach the 72½” Print 11 inner border strips. Find the center of the quilt and the center of the 72½” border strip. Match the center points with right sides together, pin. Match both ends of the strip with the ends of the quilt and pin in place. Ease the quilt top to match the border strip and add more pins between the others to hold the border in place as you stitch. Attach the other 72½” border to the opposite side in the same manner and press toward the inner border strip.
Step 4 – Repeat step 3 for the 75½” Print 11 border strips.
Step 5 – Attach the 75½” Print 6 middle border strips. Using two of the border strips, stitch them to the quilt in the same manner as in step 3. Press toward Print 6.
Step 6 – Stitch a Print 4 middle border corner stone to each end of the remining 2”x 75½” Print 6 borders. Press toward the middle border.
Step 7 – Attach the remining two middle border strips to the quilt as described in step 3. Make sure to nest the seams. Press toward the middle border.
Step 8 – Add the pieced borders. Start with the borders that do not have the N Units on the ends. Orient the pieced borders so that the Corner Pops are against the middle border and the points of the V Blocks are pointing away from the quilt center. Refer to the diagram. Find the center of the quilt top and the center of the pieced border. Match the centers and pin. Match each end and pin. Ease the border to match the quilt top and add more pins between the others to hold the border in place as you stitch. Stitch in place. Press toward the middle border.
Step 9 – Repeat step 8 for the other pieced borders with the N Units attached to the ends. After you have matched the centers and the ends, make sure that you nest the Corner Beam seam with the seam attaching the pieced border.
Note: We recommend that you wait to cut your outer borders to length until you can measure your quilt top. To determine your specific border length, measure the longest side of your quilt in three different places. If those measurements are different, add the three measurements together and divide by three. That will be the length that you need to cut your first two borders. Once the first two borders are attached to the quilt repeat the process for the remaining two sides.
Step 10 – Add the outer borders. Find the center of the quilt and the center of the 90½” outer border strip. Match the center points with right sides together, pin, match either end of the strip with the ends of the quilt, and pin in place. Add more pins between the others, about every 4”, to hold the border in place as you stitch. Attach the other 90½” border to the opposite side in the same manner and press toward the outer border strip.
Step 11 – Repeat step 10 for the 102½” outer border strips.
Step 12 – Finish with Batting, Backing, Quilting, and Binding! Layer quilt top with batting and backing. Baste and quilt. Bind and Enjoy!
Journeys
Thank you all so much for joining us on this Journey! Congratulations on a job well done!
I love Josephine Wall’s art, her fabric panels are glorious. They make spectacular One Block Wonders.
Celestial Journey panel measures 35″ x 43″
These panels must have been either the beginning of the run or the last. The outer edges were off be about 1/2″. I focused on aligning the panels around the unicorn. The outer edges were mostly space so it was not crucial they be perfectly aligned. I cut my strips 3.75″ by WOF.
Welcome everyone to Stitchin Heavens Journey Month 11 BOM – Victory Block: Part 2. Time fly’s when you are having fun! This month you are learning to use Studio 180 Design Corner Pop tool.
Print 3
You will be popping off the corners of the of 52 Victory blocks from Month 10 and adding Print 3 to the corners.
Piecing Instructions
Step 1 – Position a Unit P from month 10 right side up with the point away from you on the cutting mat. On your Corner Pop® tool, find the 3” Cut Away Corners line. Position the 3” Cut Away lines of the tool over one of the corners that has a seam going into the corner as shown.
Step 2 – Cut away the corner. Repeat on the same corner for all 52 units.
Right Hand CutLeft Hand CutLeft Hand Cut
Step 3 – Center one 4¼” Print 3 replacement triangle with its long side on the trimmed corner of each V Block unit. Stitch using an accurate ¼” seam. Press the seam toward the replacement triangle.
Step 3Stitch (Sarah at Studio 180 Design prefers to press her seams open whenever possible.)
Step 4 – Position the 3” Corner Trim Down line of the tool over the seam. Align the diagonal guideline with the seam and the edges of the unit with the edges of the tool. Trim the Corner. Repeat for all P units.
Right Hand TrimLeft Hand trim
Step 5 – Cut away the second corner of all 52 units. Position the 3” Cut Away lines on the tool over the second corner that has a seam going into the corner as shown.
Step 5 Right Hand CutStep 5 Left Hand Cut
Step 6 – Repeat steps 3 & 4 for all units so that you have 52 Victory Blocks. This time around, in step 3, press the seam away from the replacement triangle toward the V Block unit.
Step 7 – Lay out your Victory Block units as shown to make 4 pieced border sections. Each border section has 13 Victory Block units.
Step 8 – Stitch the units together into the 4 pieced border sections needed. Press the seams between the units open.
Step 9 – Set two border sections aside. With the remining two borders, add a Unit N from month 9 to each end of the border section as shown.
Step 10 – Press the seams open. Set the final two borders aside to use next month to finish your quilt top.
Congratulations, you all have done so well in months 1 – 11. Next month is our final post. I can’t wait to see your completed Journey quilts!
I have had this panel by Artisan Spirit Dreamscapes by Ira Kennedy for Northcott for several years. The Dreamscapes panel measures 13″ x 20″. It came two in a panel, so I ended up with 14.
I partially completed the first set of 7 panels to show how to add the sections to the panel. I save this OBW classes.
I finally decided to complete the 2nd set of panels. I cut the strips 2 3/4″ for 4″ finished hexies. In hind site I wish I would have made them smaller. To add more hexies and enhance the hexies I had, I added stars made with the Quad 60 Technique Sheet and my Star 60 Tool. My Dreamscapes wall hanging measures 35″ x 41″
One day, several months ago I received a text from my sister Marti in Arizona. She frantically wanted to know how panels were needed for a One Block Wonder (OBW). I quickly answered “7” panels were needed. I thought she must have a found a fabulous panel to work with. Then about a week later I a received a package from Marti.
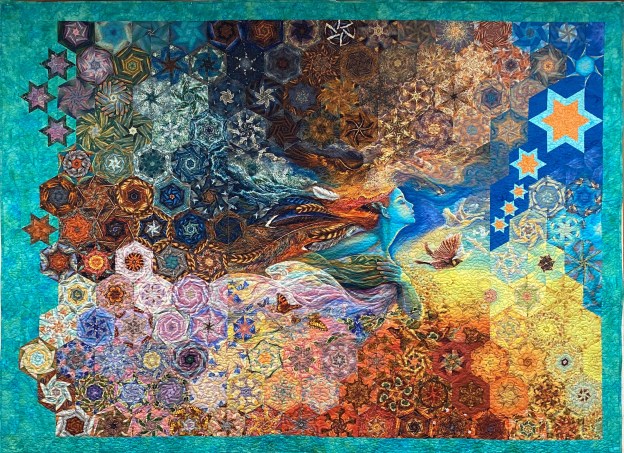
Spirit of Flight by Josephine Wall
Marti had sent me 7 panels by Josephine Wall & 3 Wishes. I was obsessed and couldn’t wait to make this panel into a OBW. Marti said this would be me when I emerged from breast cancer treatment. She was right!
Spirit of Flight measures 97″ x 71″
As I was working on this OBW I realized that most of the hexagons would be toward the back. I made these great stars using Studio 180 Design Star 60 Tool and the Framed 60 Technique Sheet to enhance my design. Now she is shooting for the stars and leaving cancer behind!