Welcome to Studio 180 Design’s “Twilight Chic Blog Hop”. I have been lucky enough to make 4 quilts from Twilight Chic line of batiks by Island Batik for Deb Tucker.
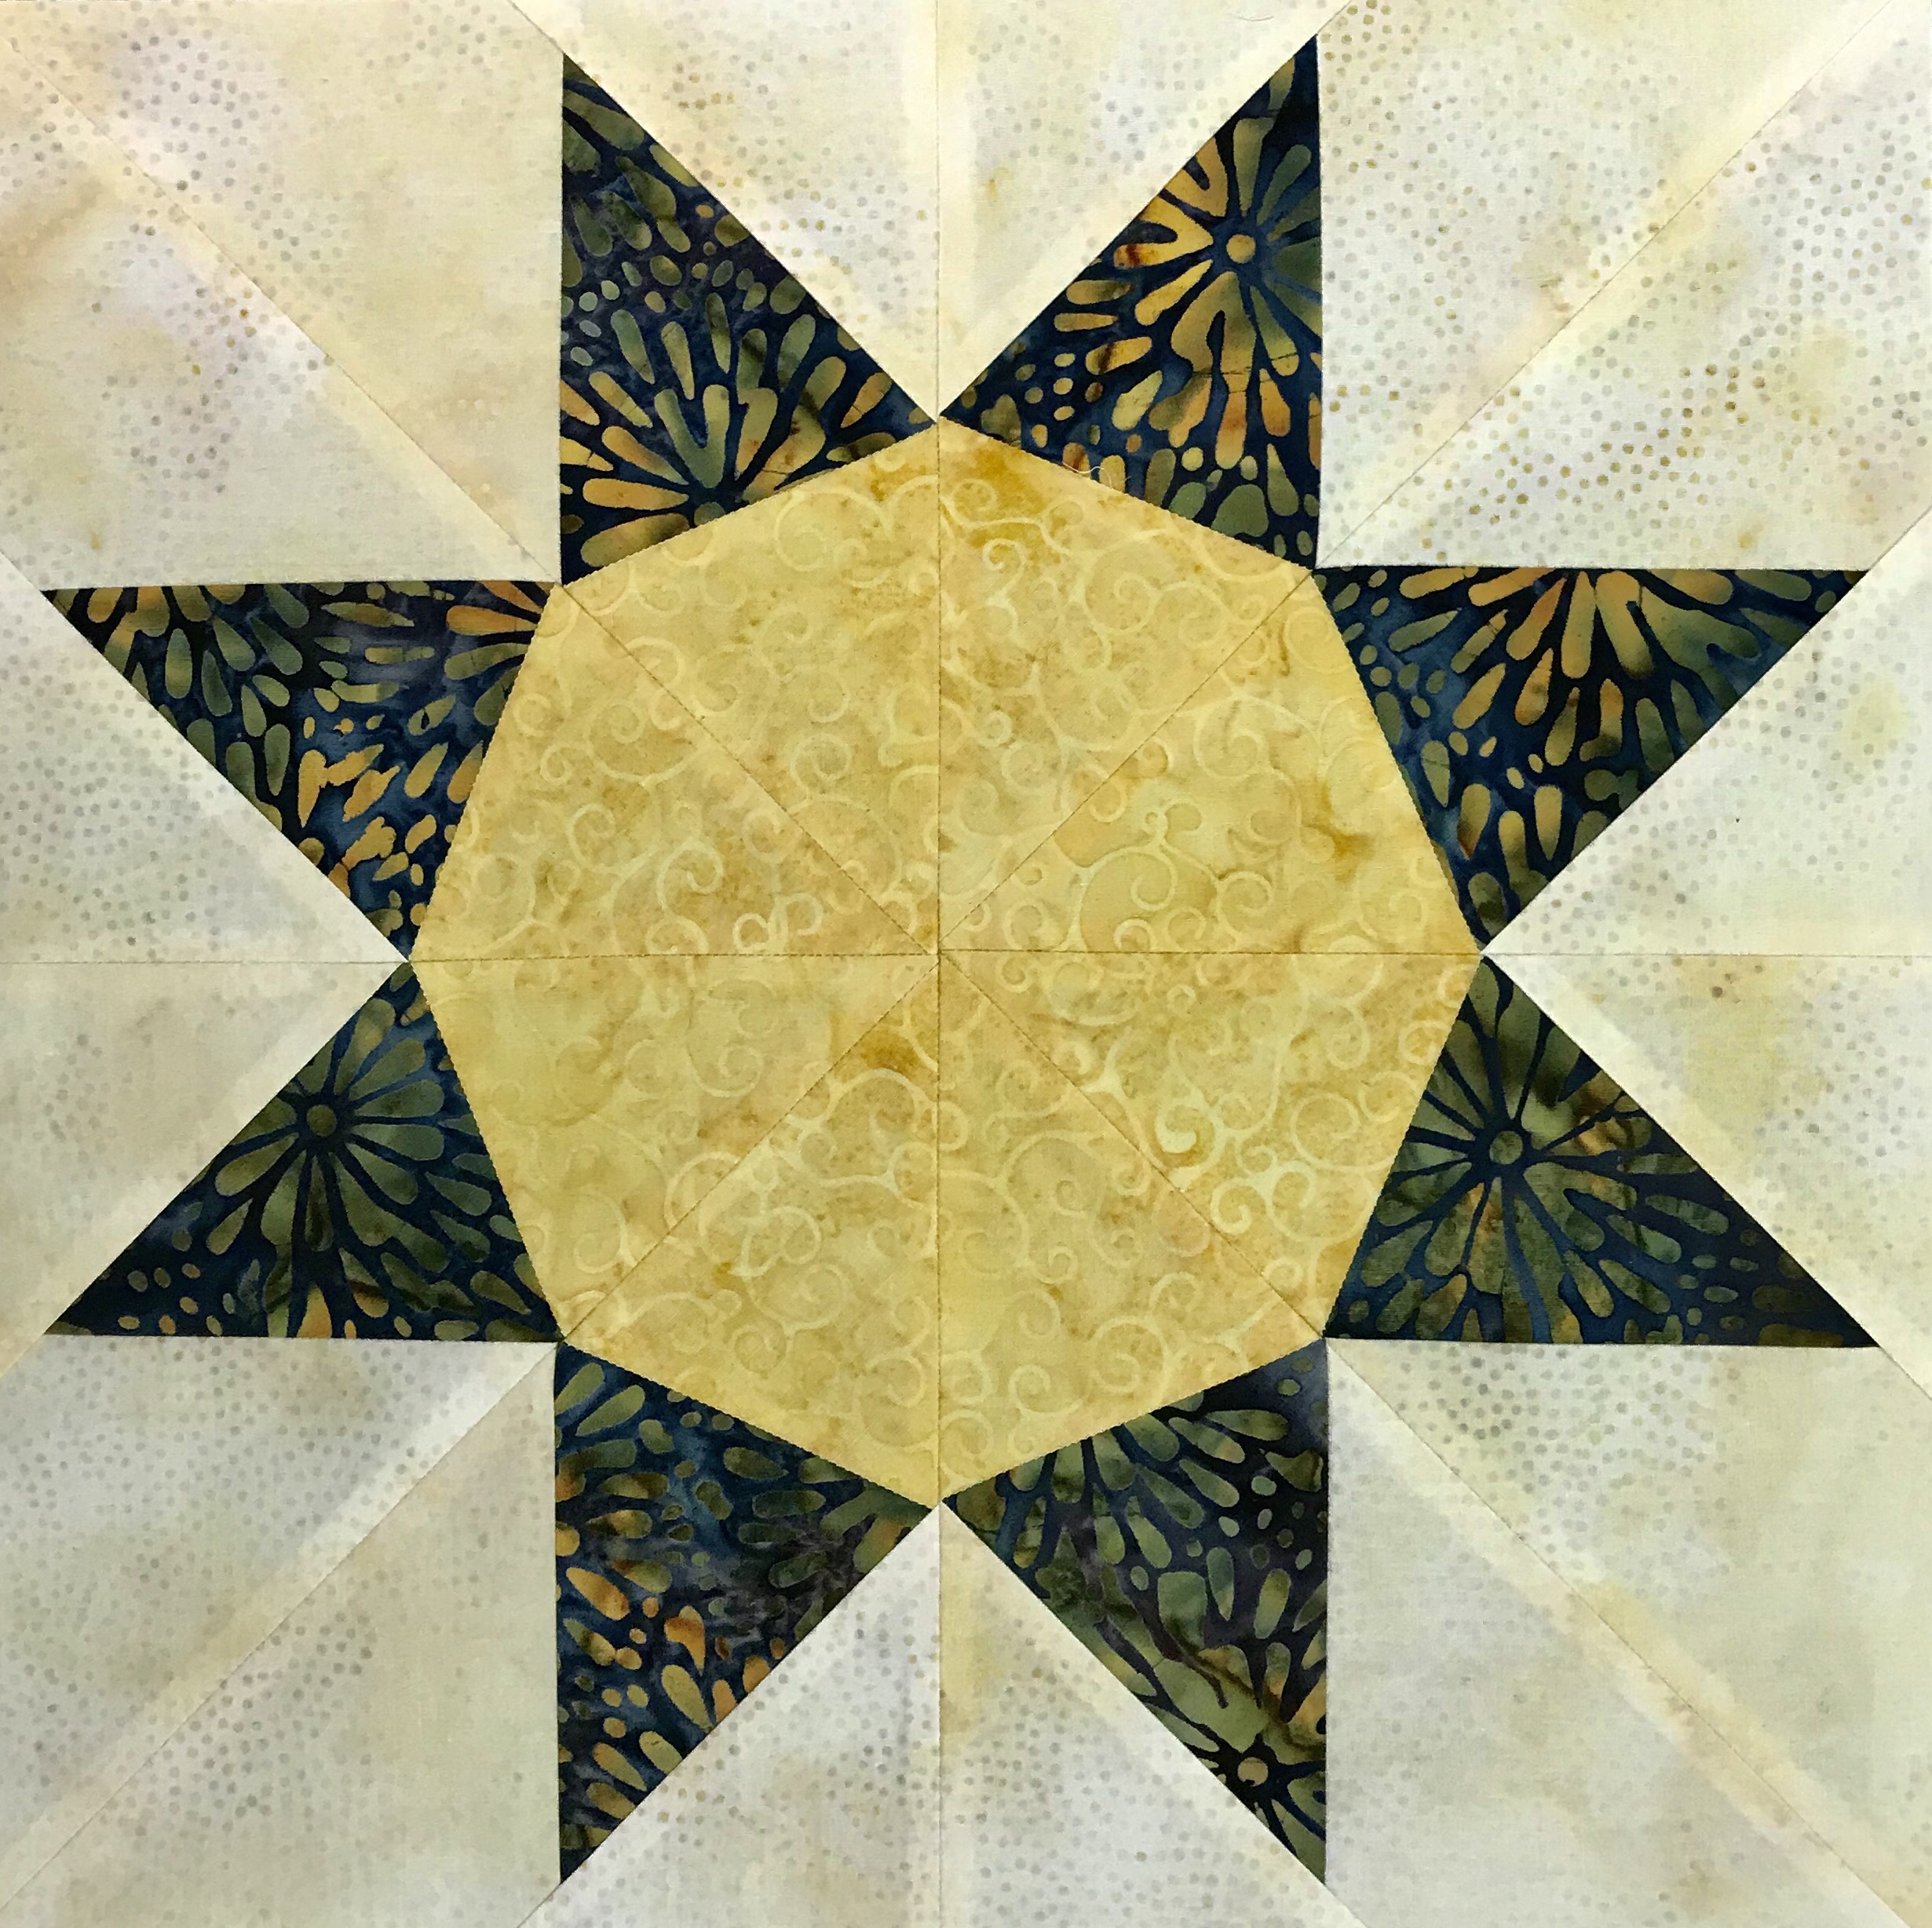
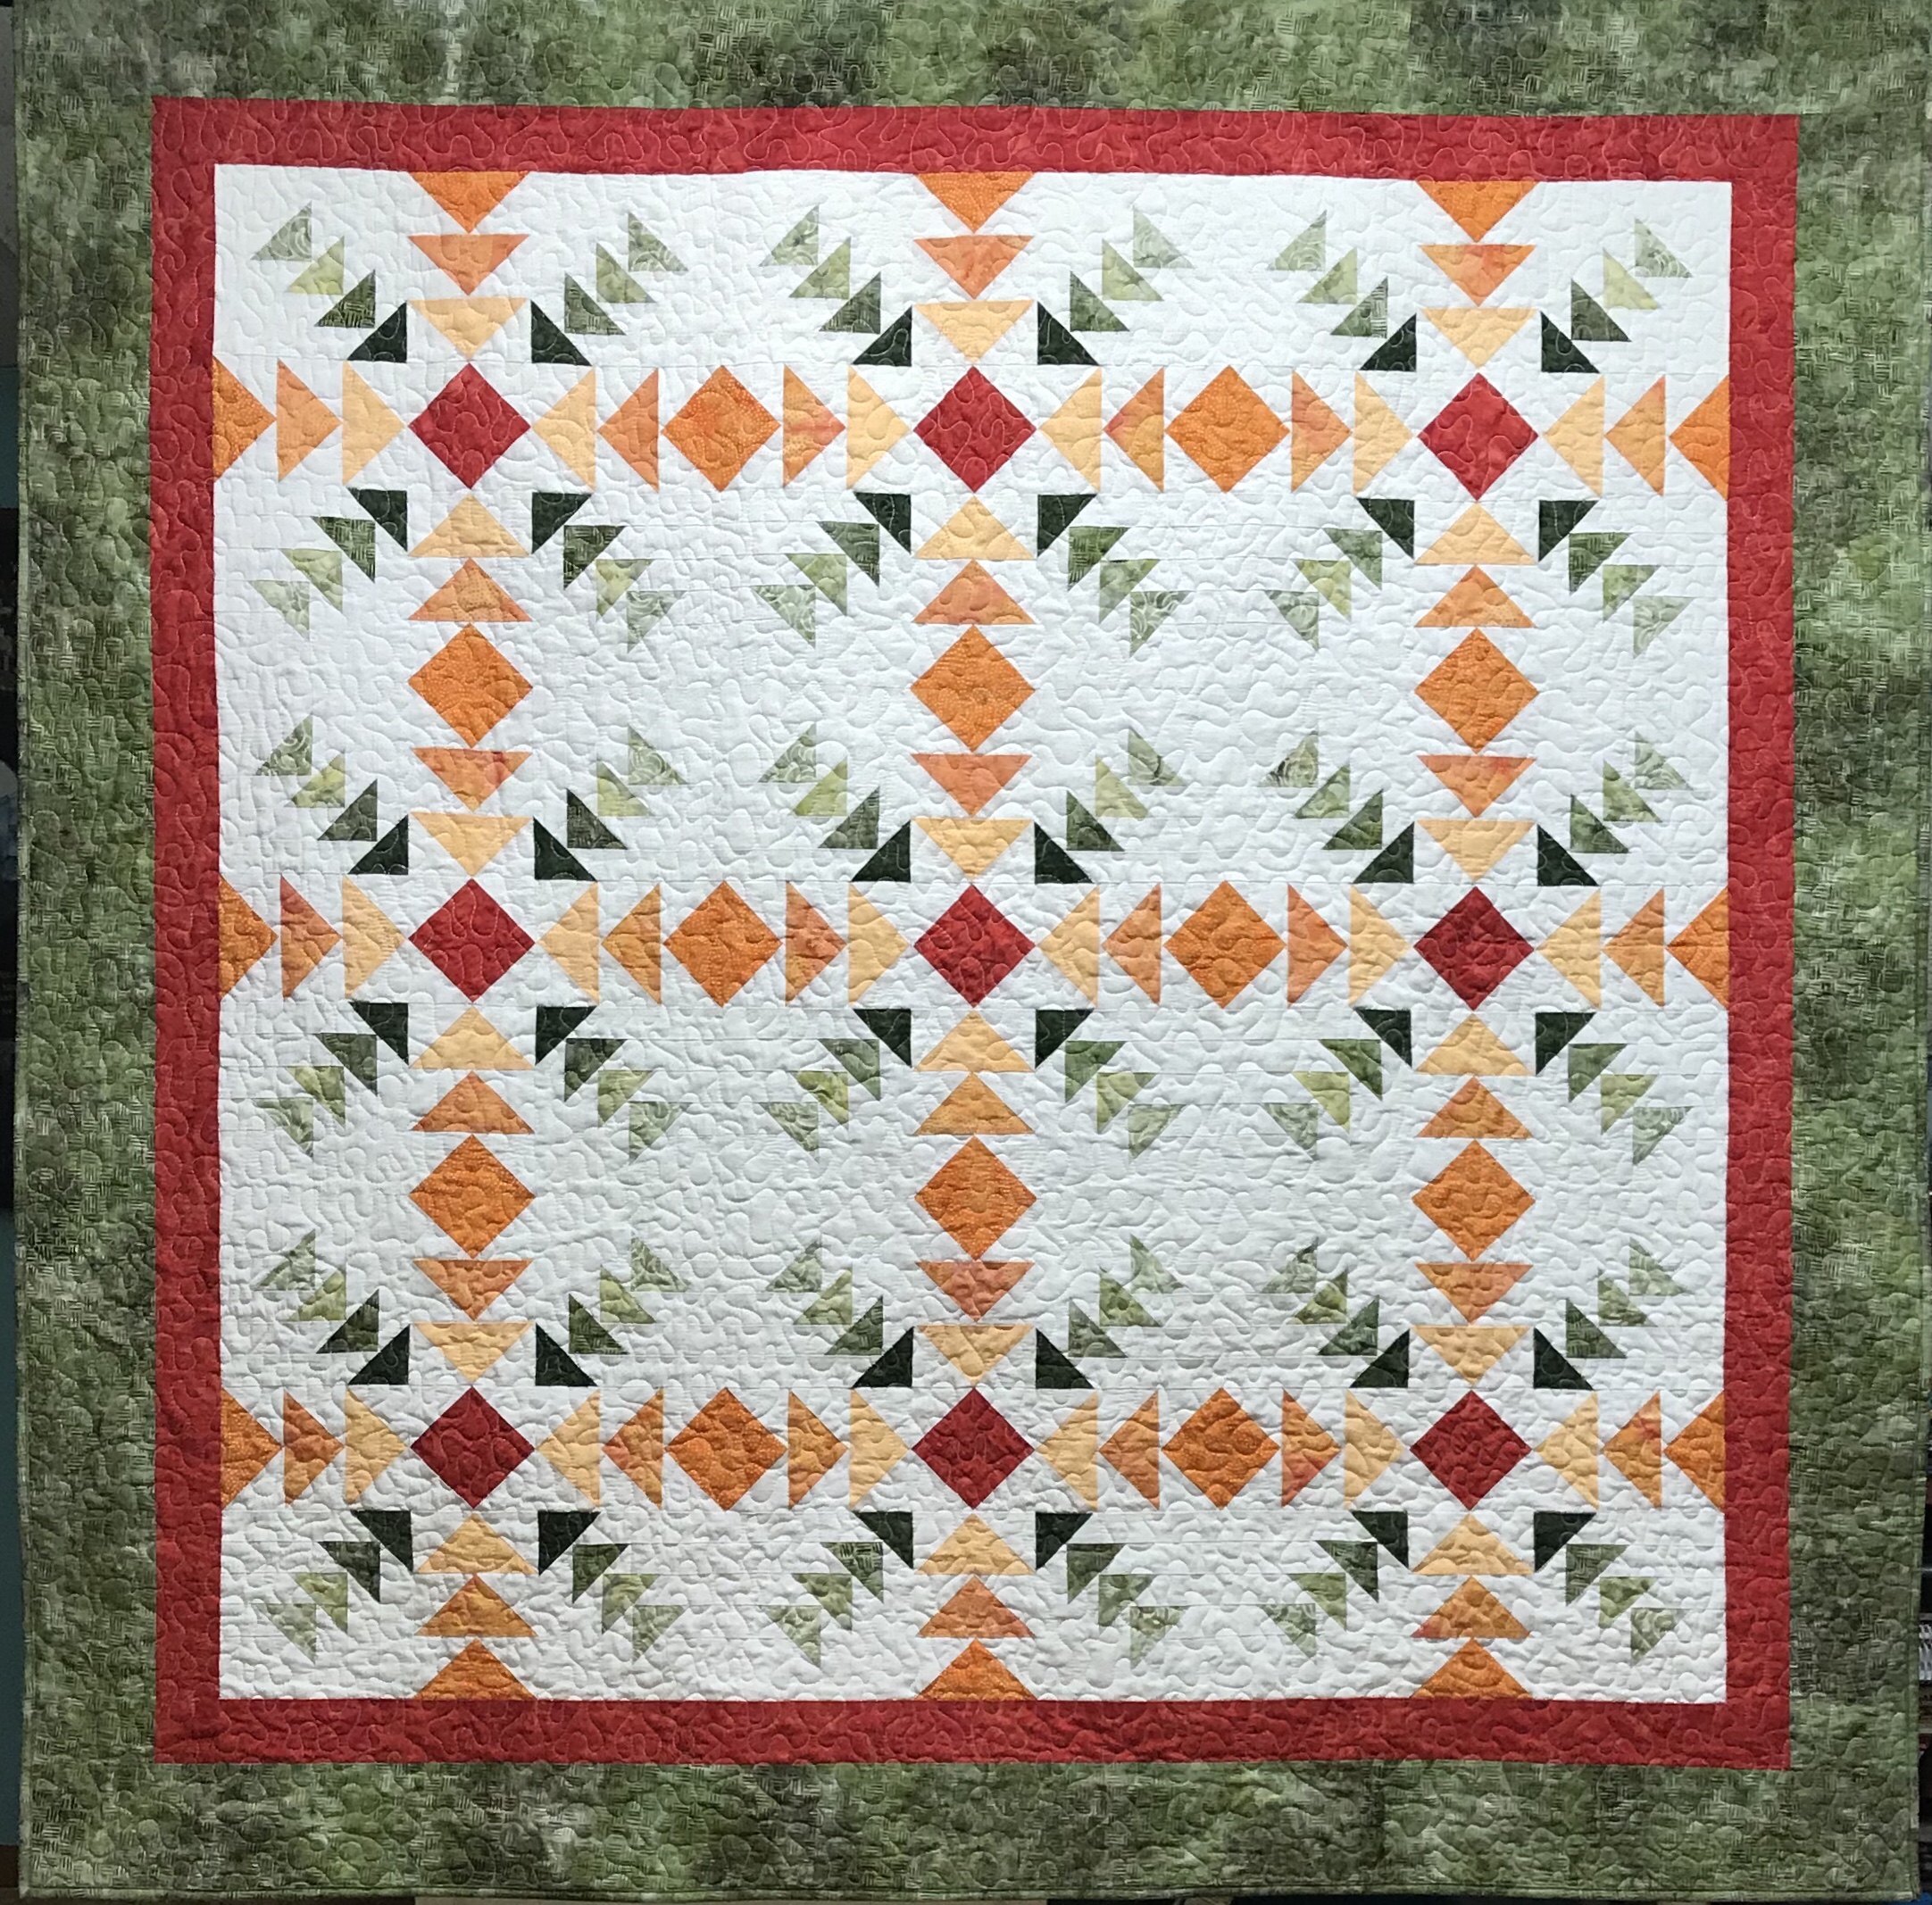
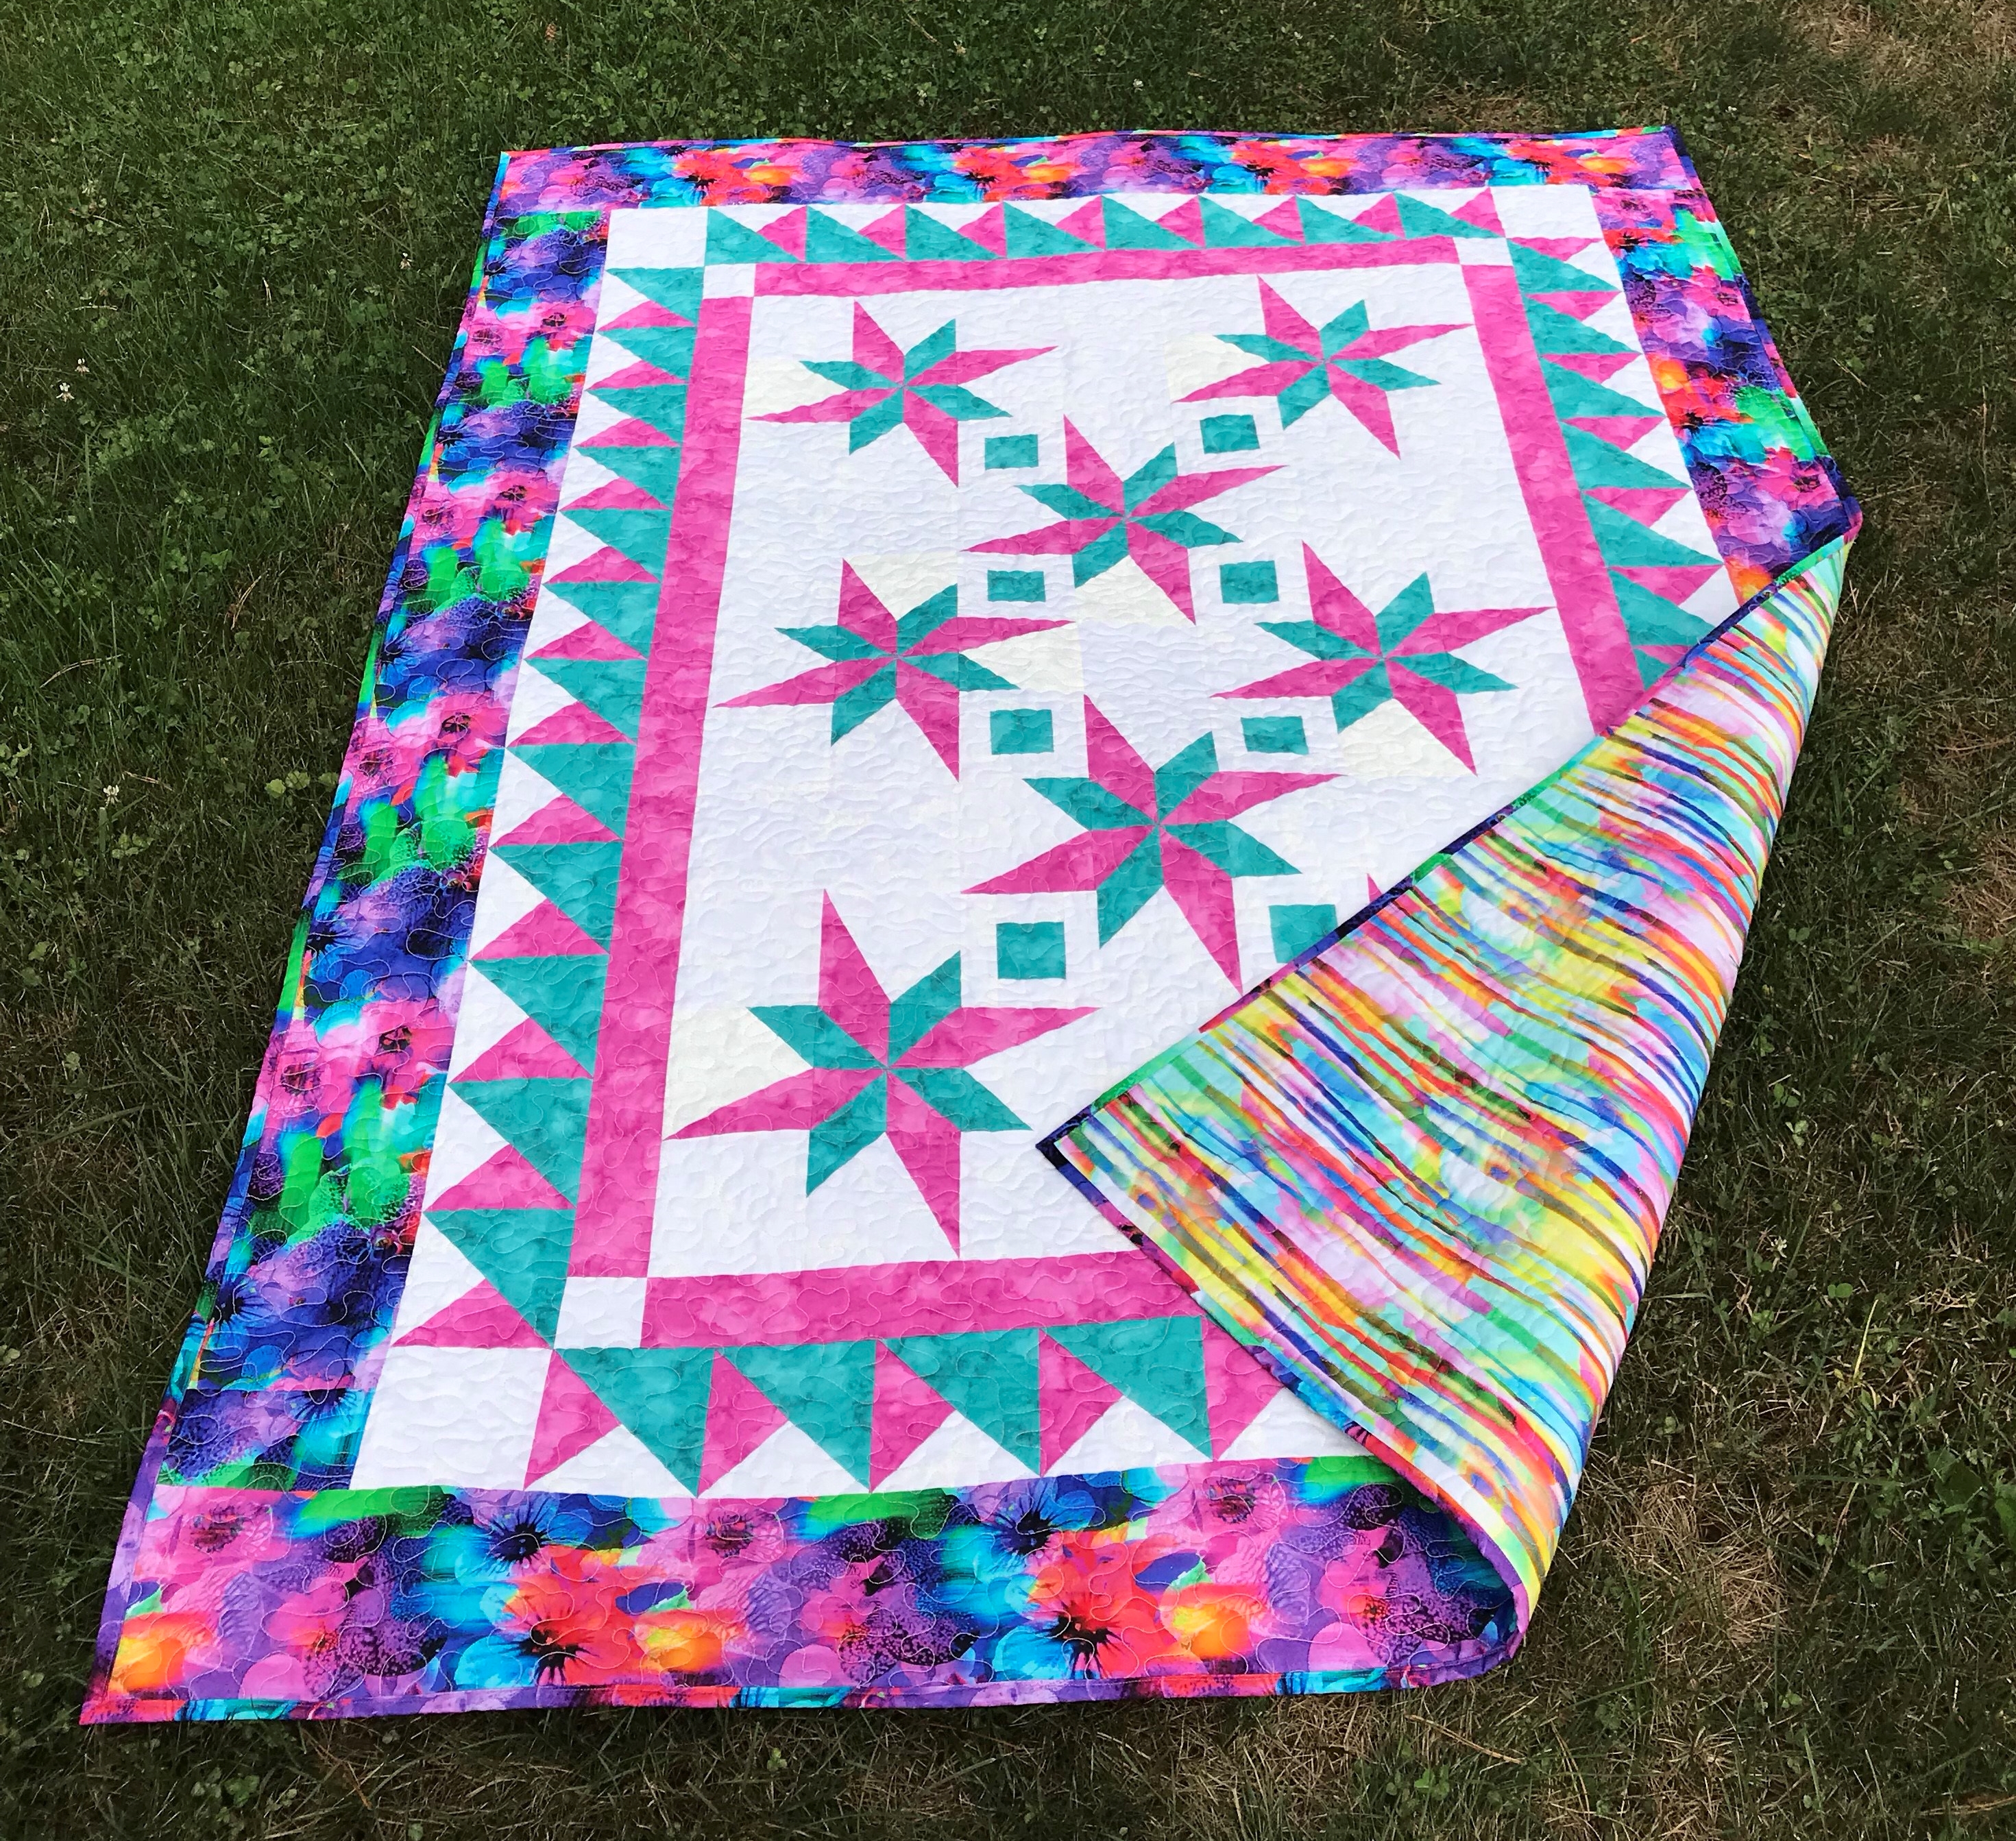
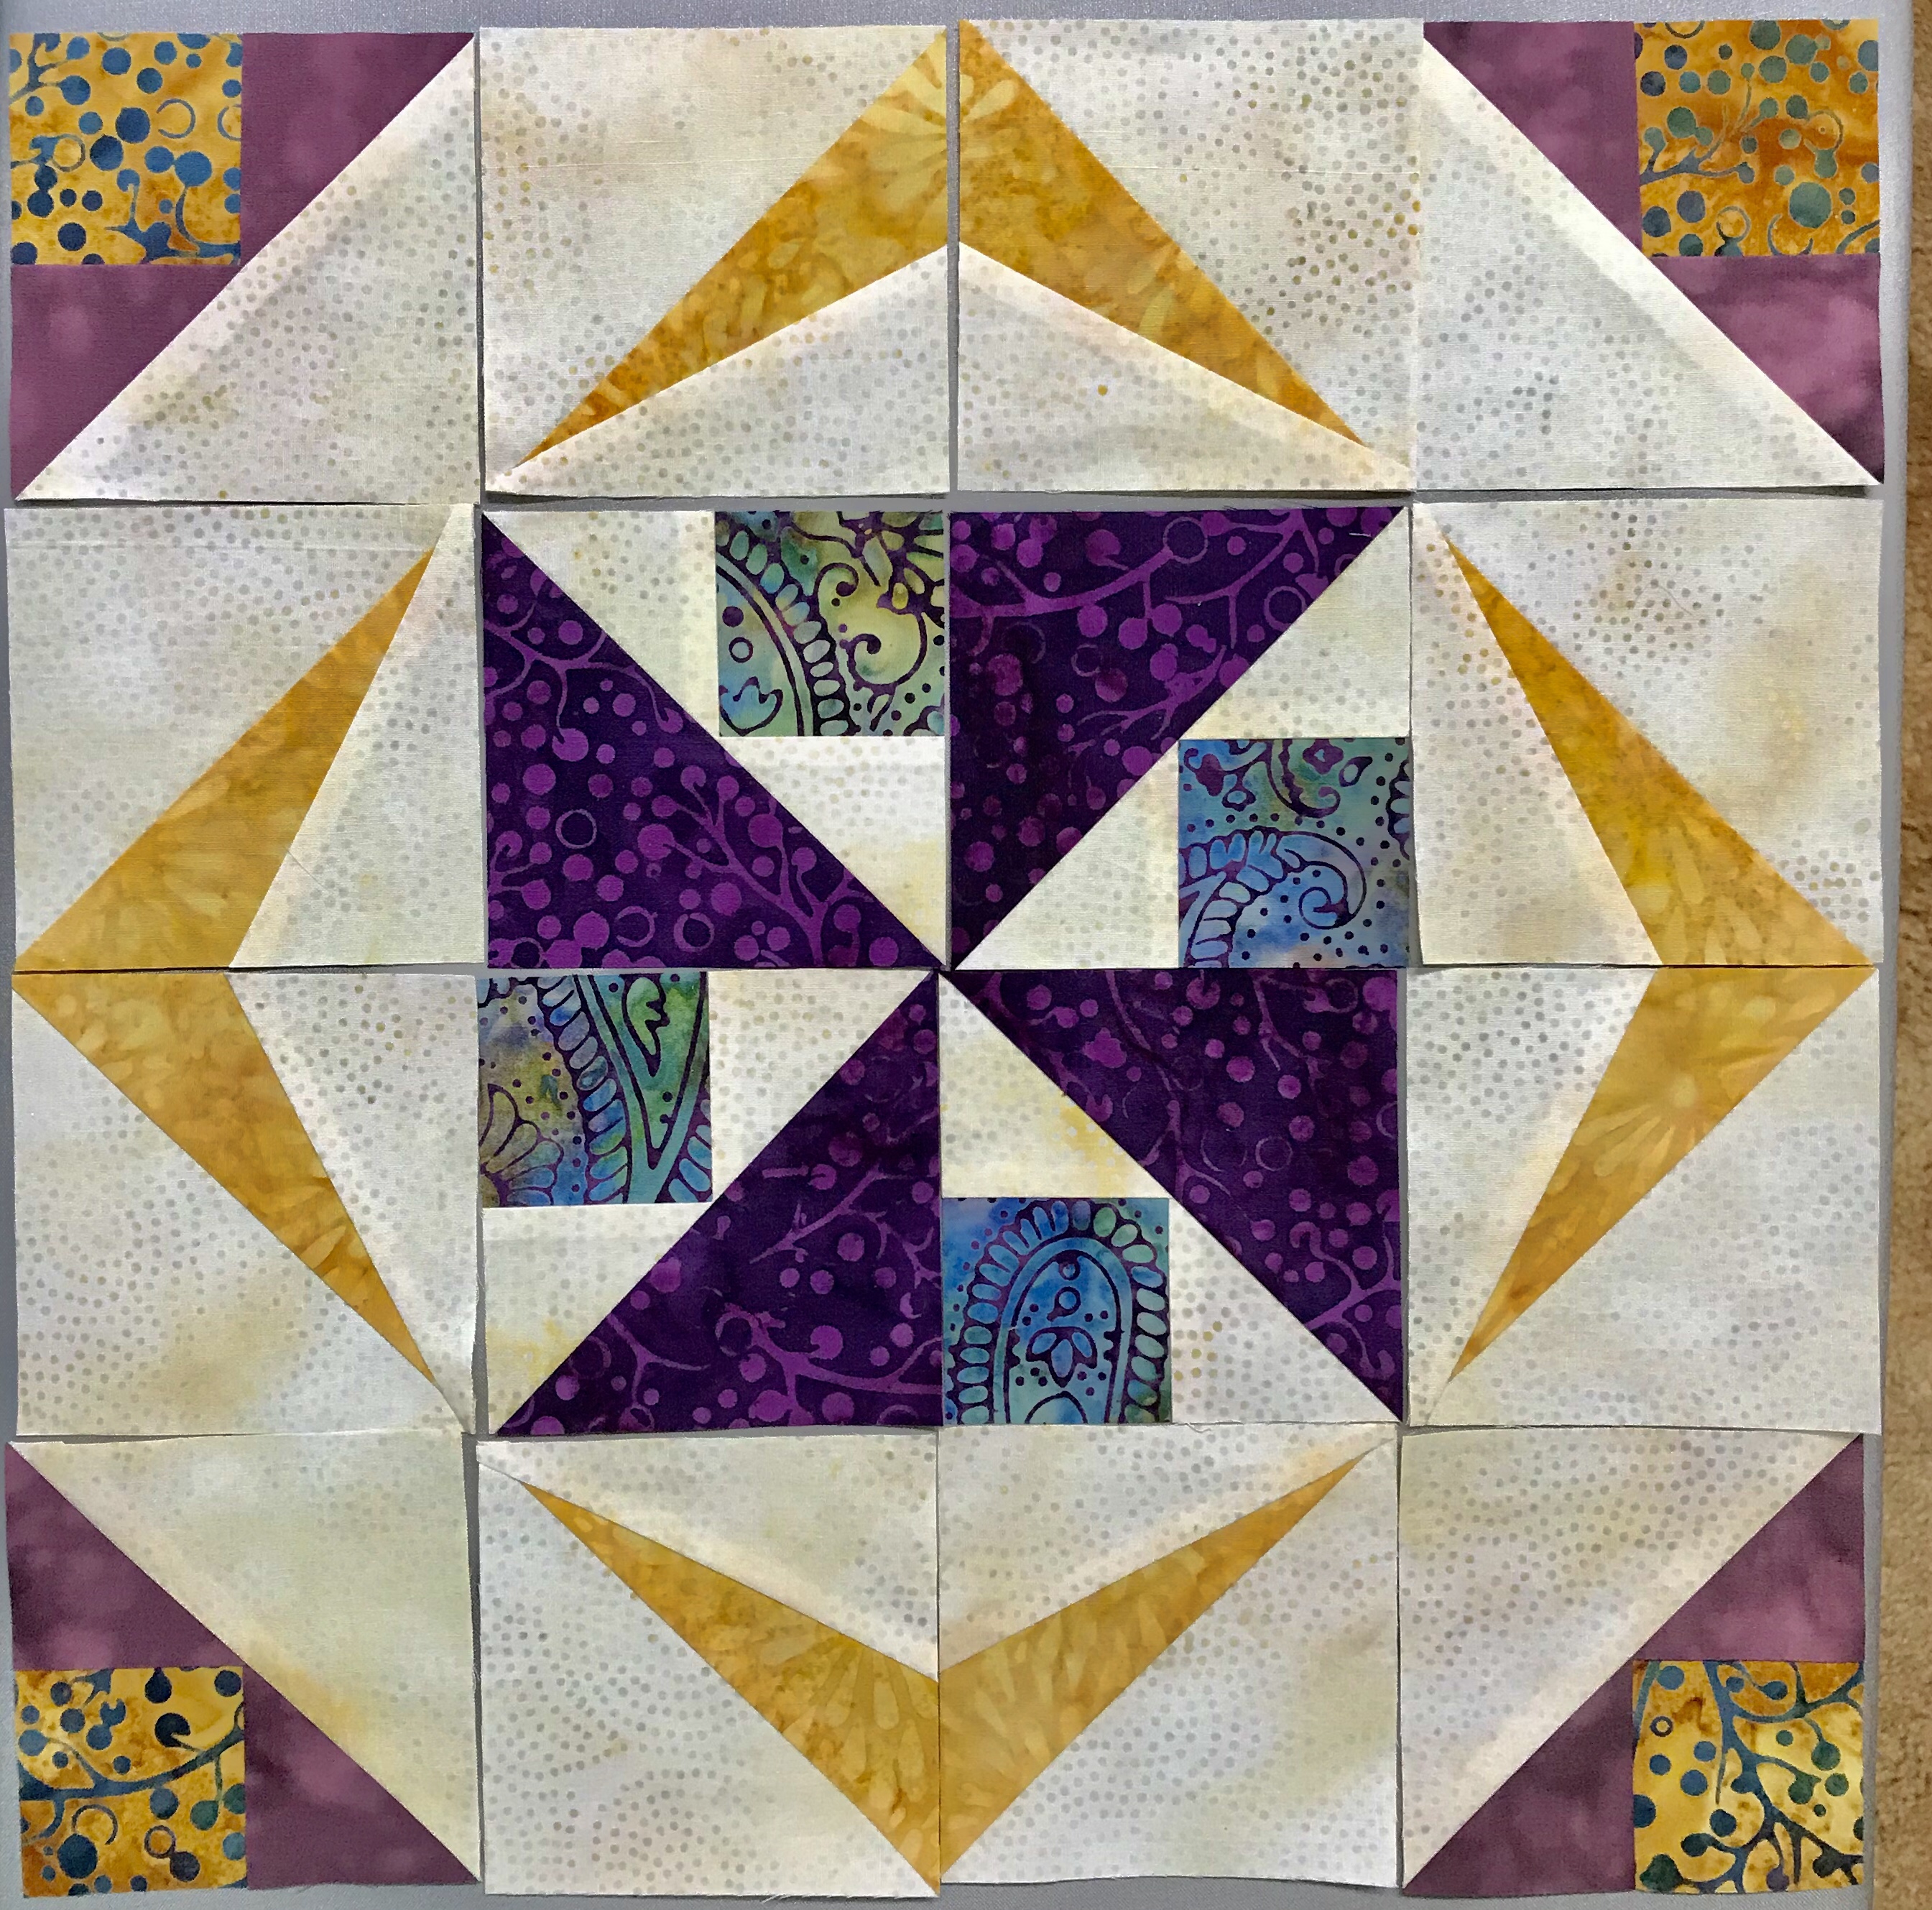
For this challenge I chose to make a hunter star quilt from Deb Tucker’s book “Hidden Treasures” using the Rapid Fire Hunter Star Petite tool. Hidden Treasures offers you 29 different lap size quilt patterns and 7 bed runner patterns for the hunter star.
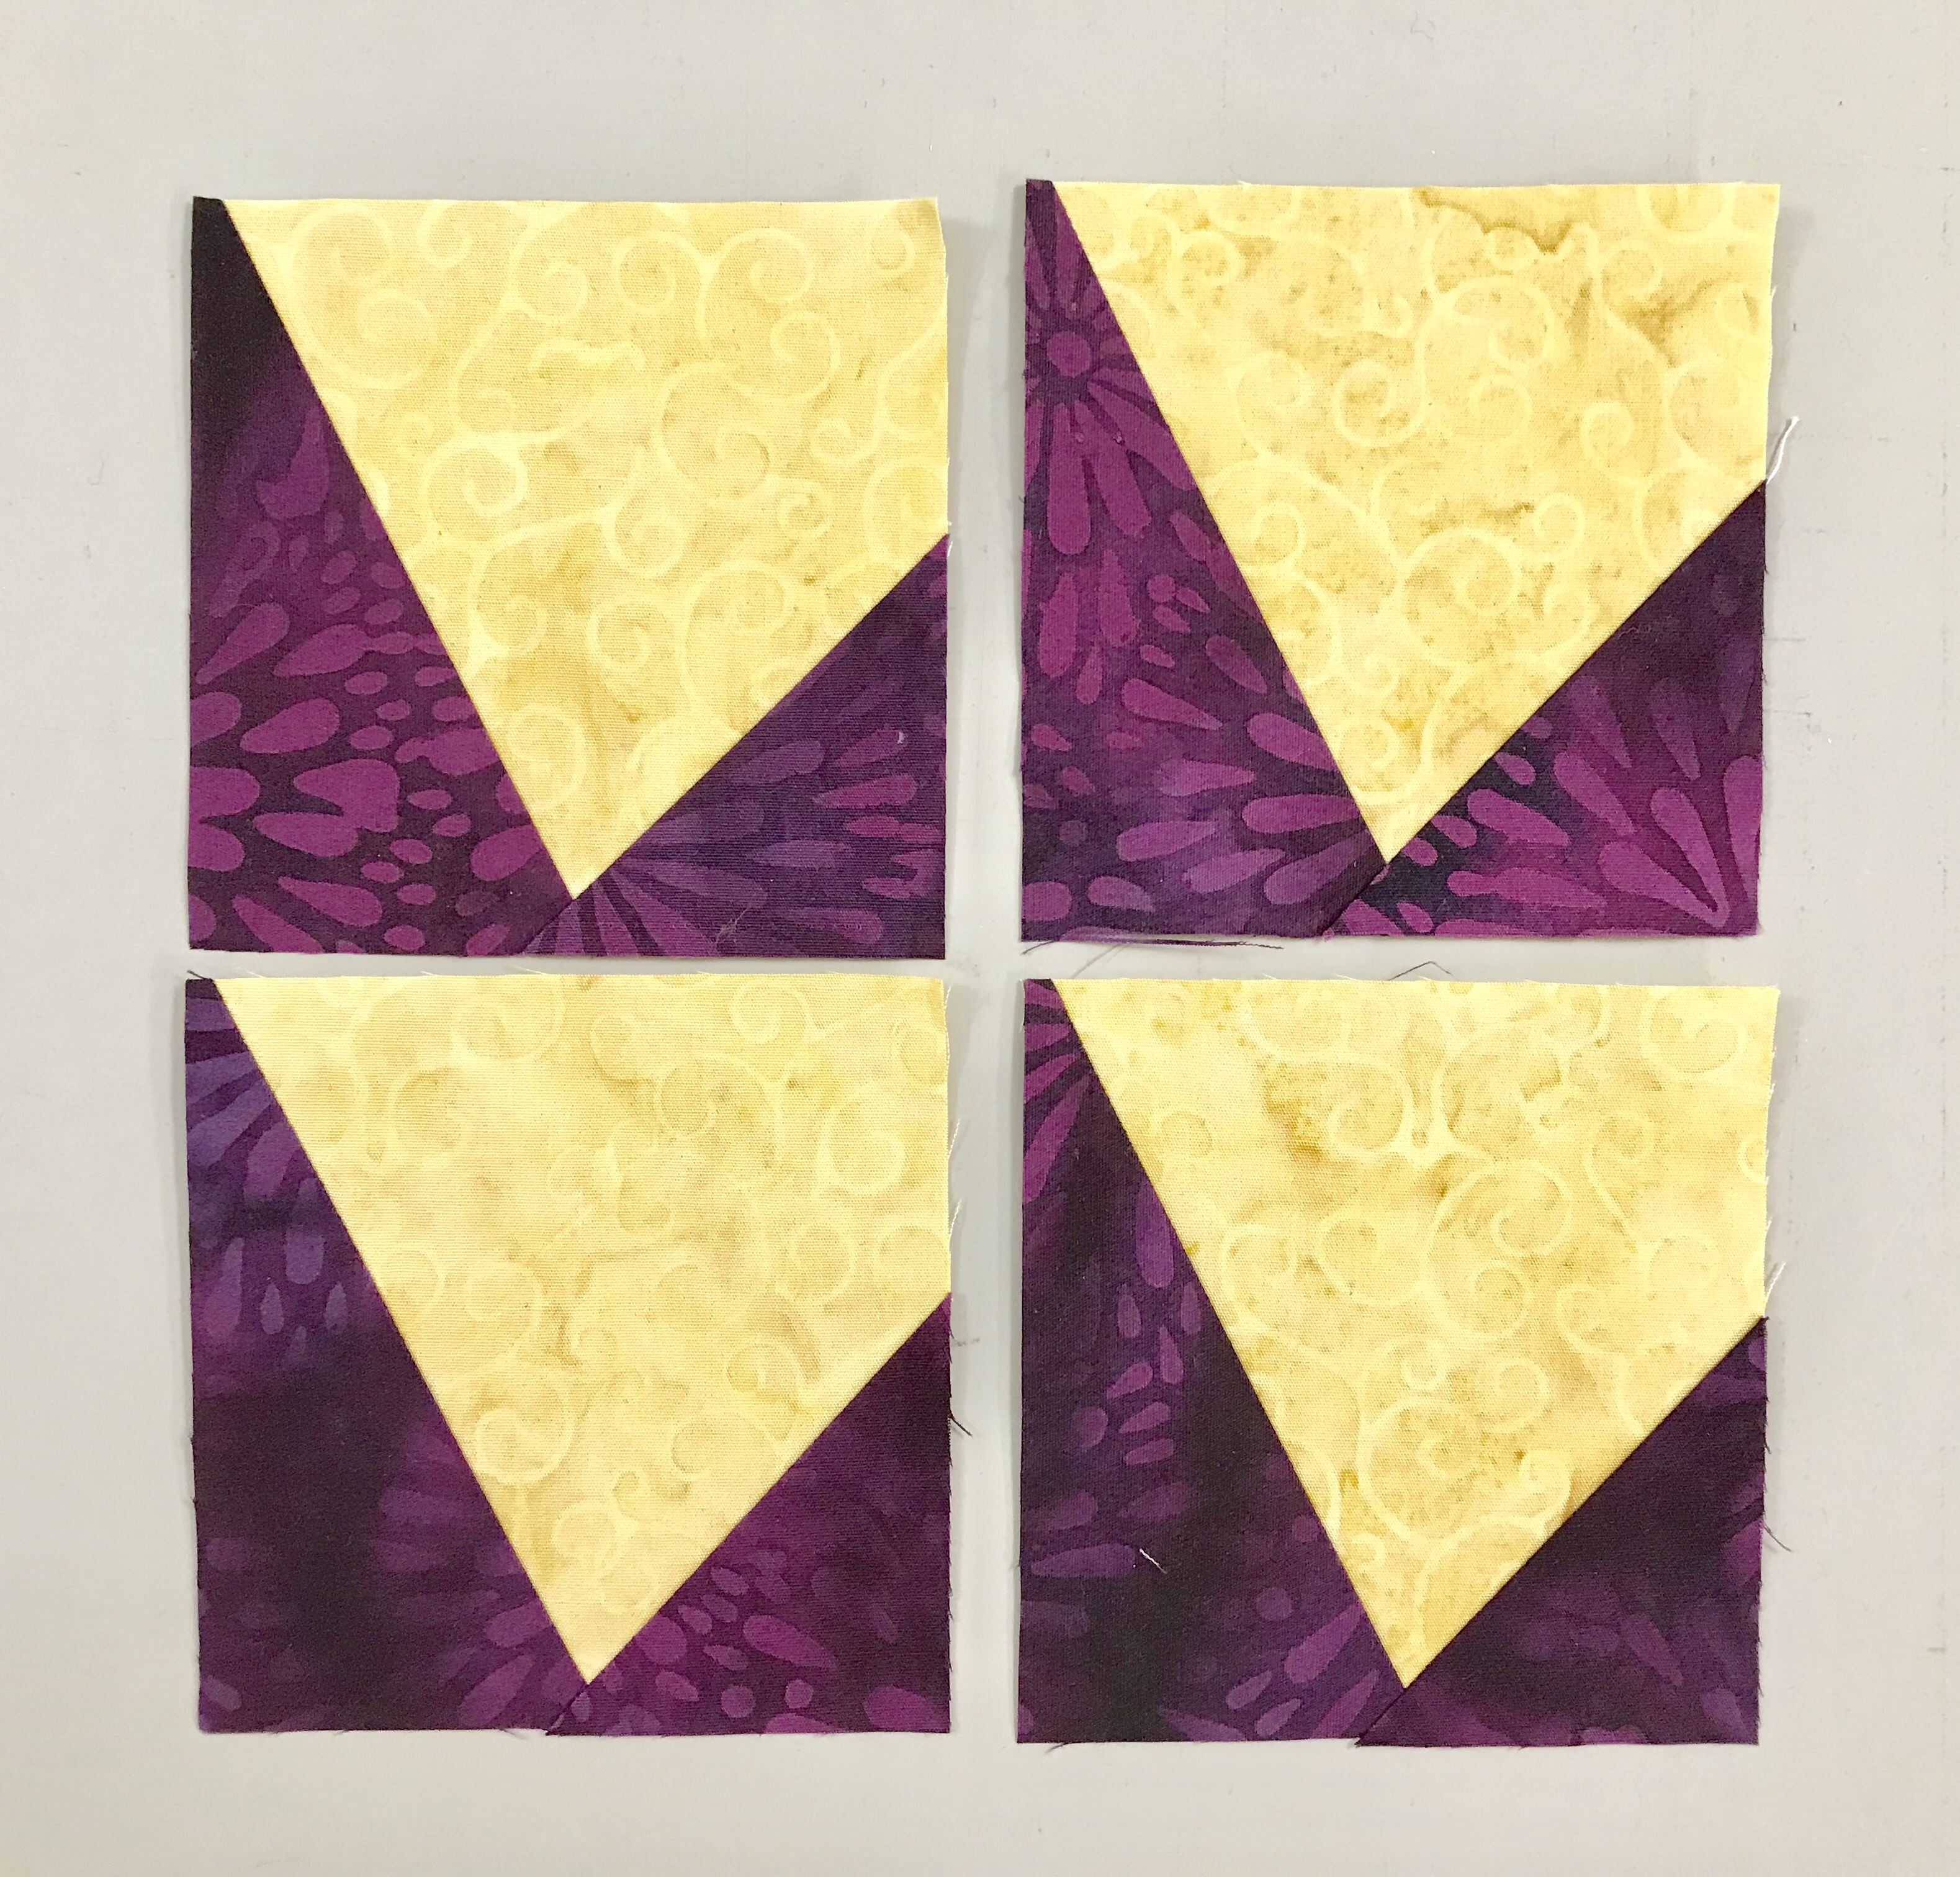
The same pieces can make very different quilts. There are just 3 different block configurations used in these patterns.
The pattern I chose used the first two blocks.
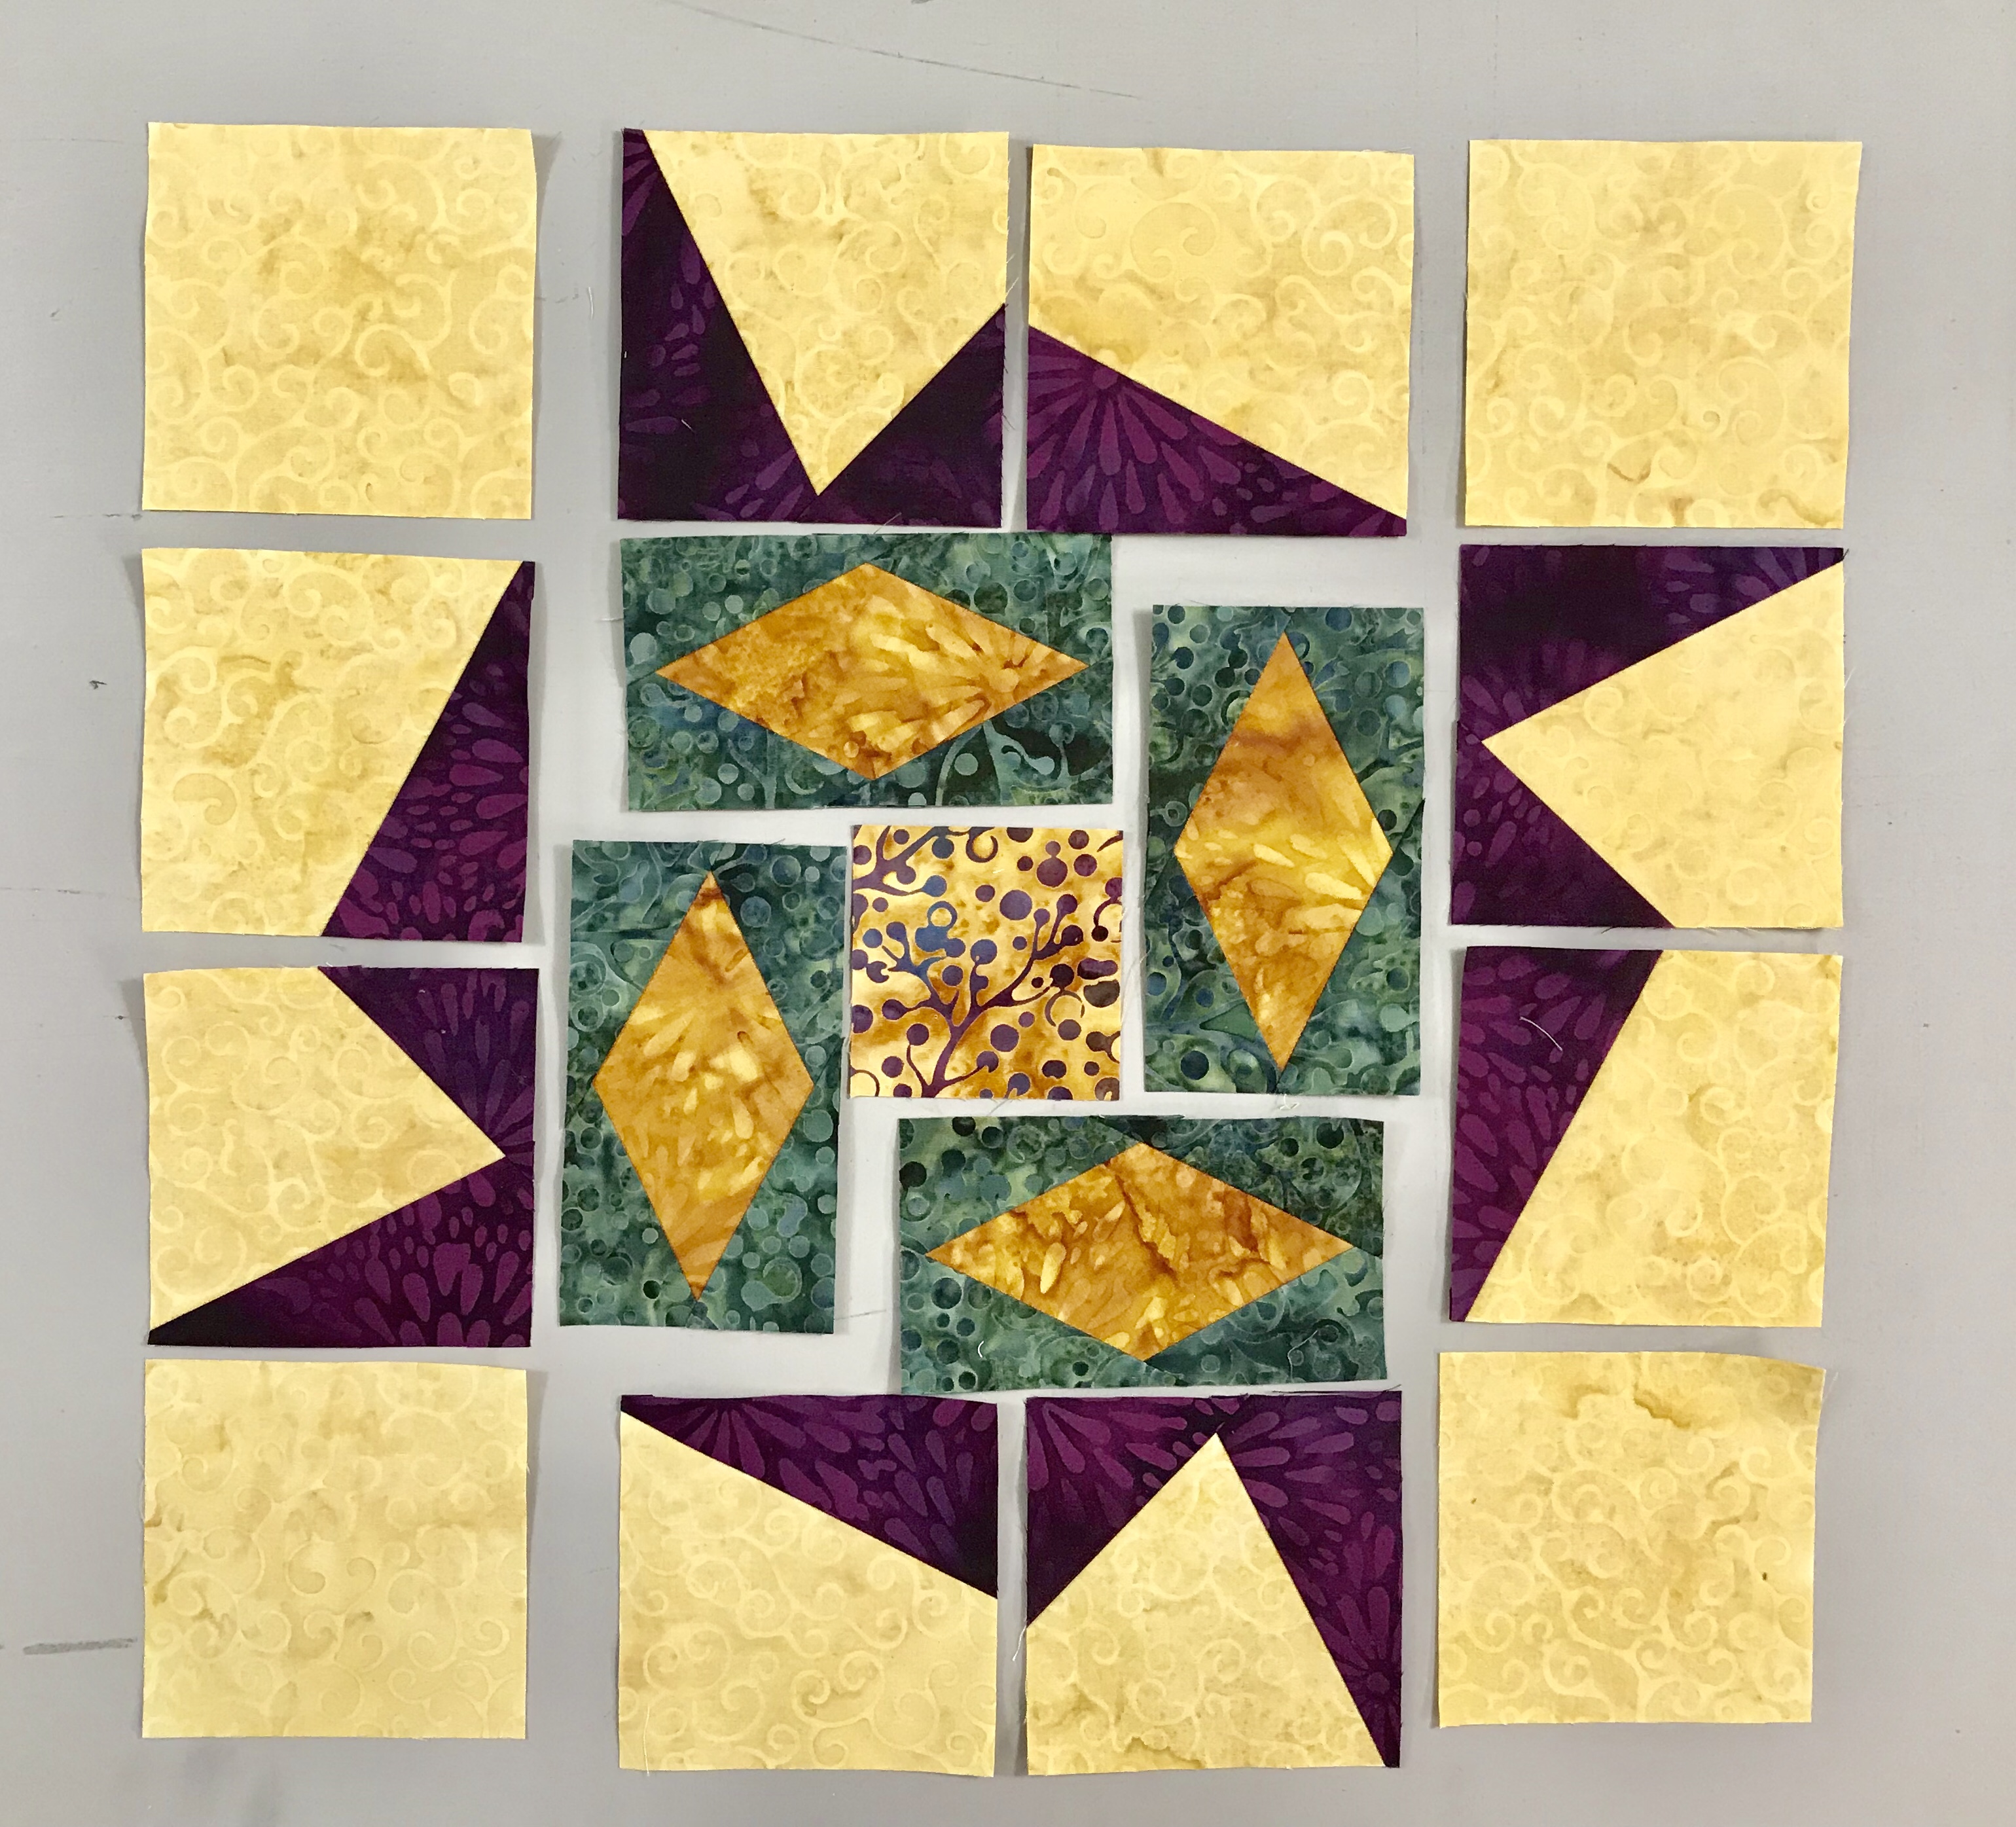
I made 24 of each.
With these blocks I could choose from 16 different quilts or 3 bed runners.
These two are Curveball page 30 and Checkmate page 32.
Strawberry Fields page 40 and Spring Fling page 48.
La Belle page 50 and Pele page 74. These 6 quilts are just a sample of what you can make with these blocks. So what did I choose………
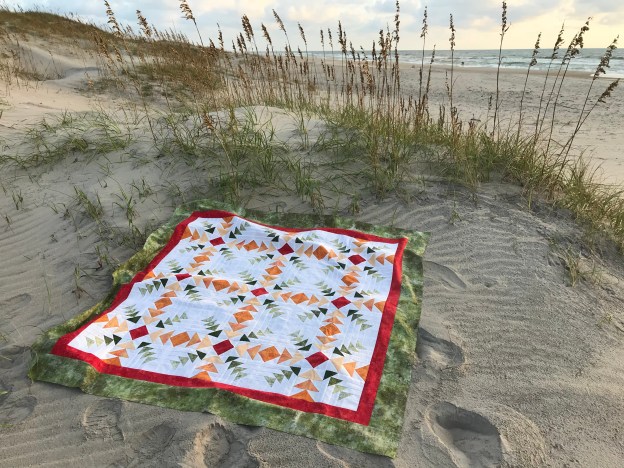
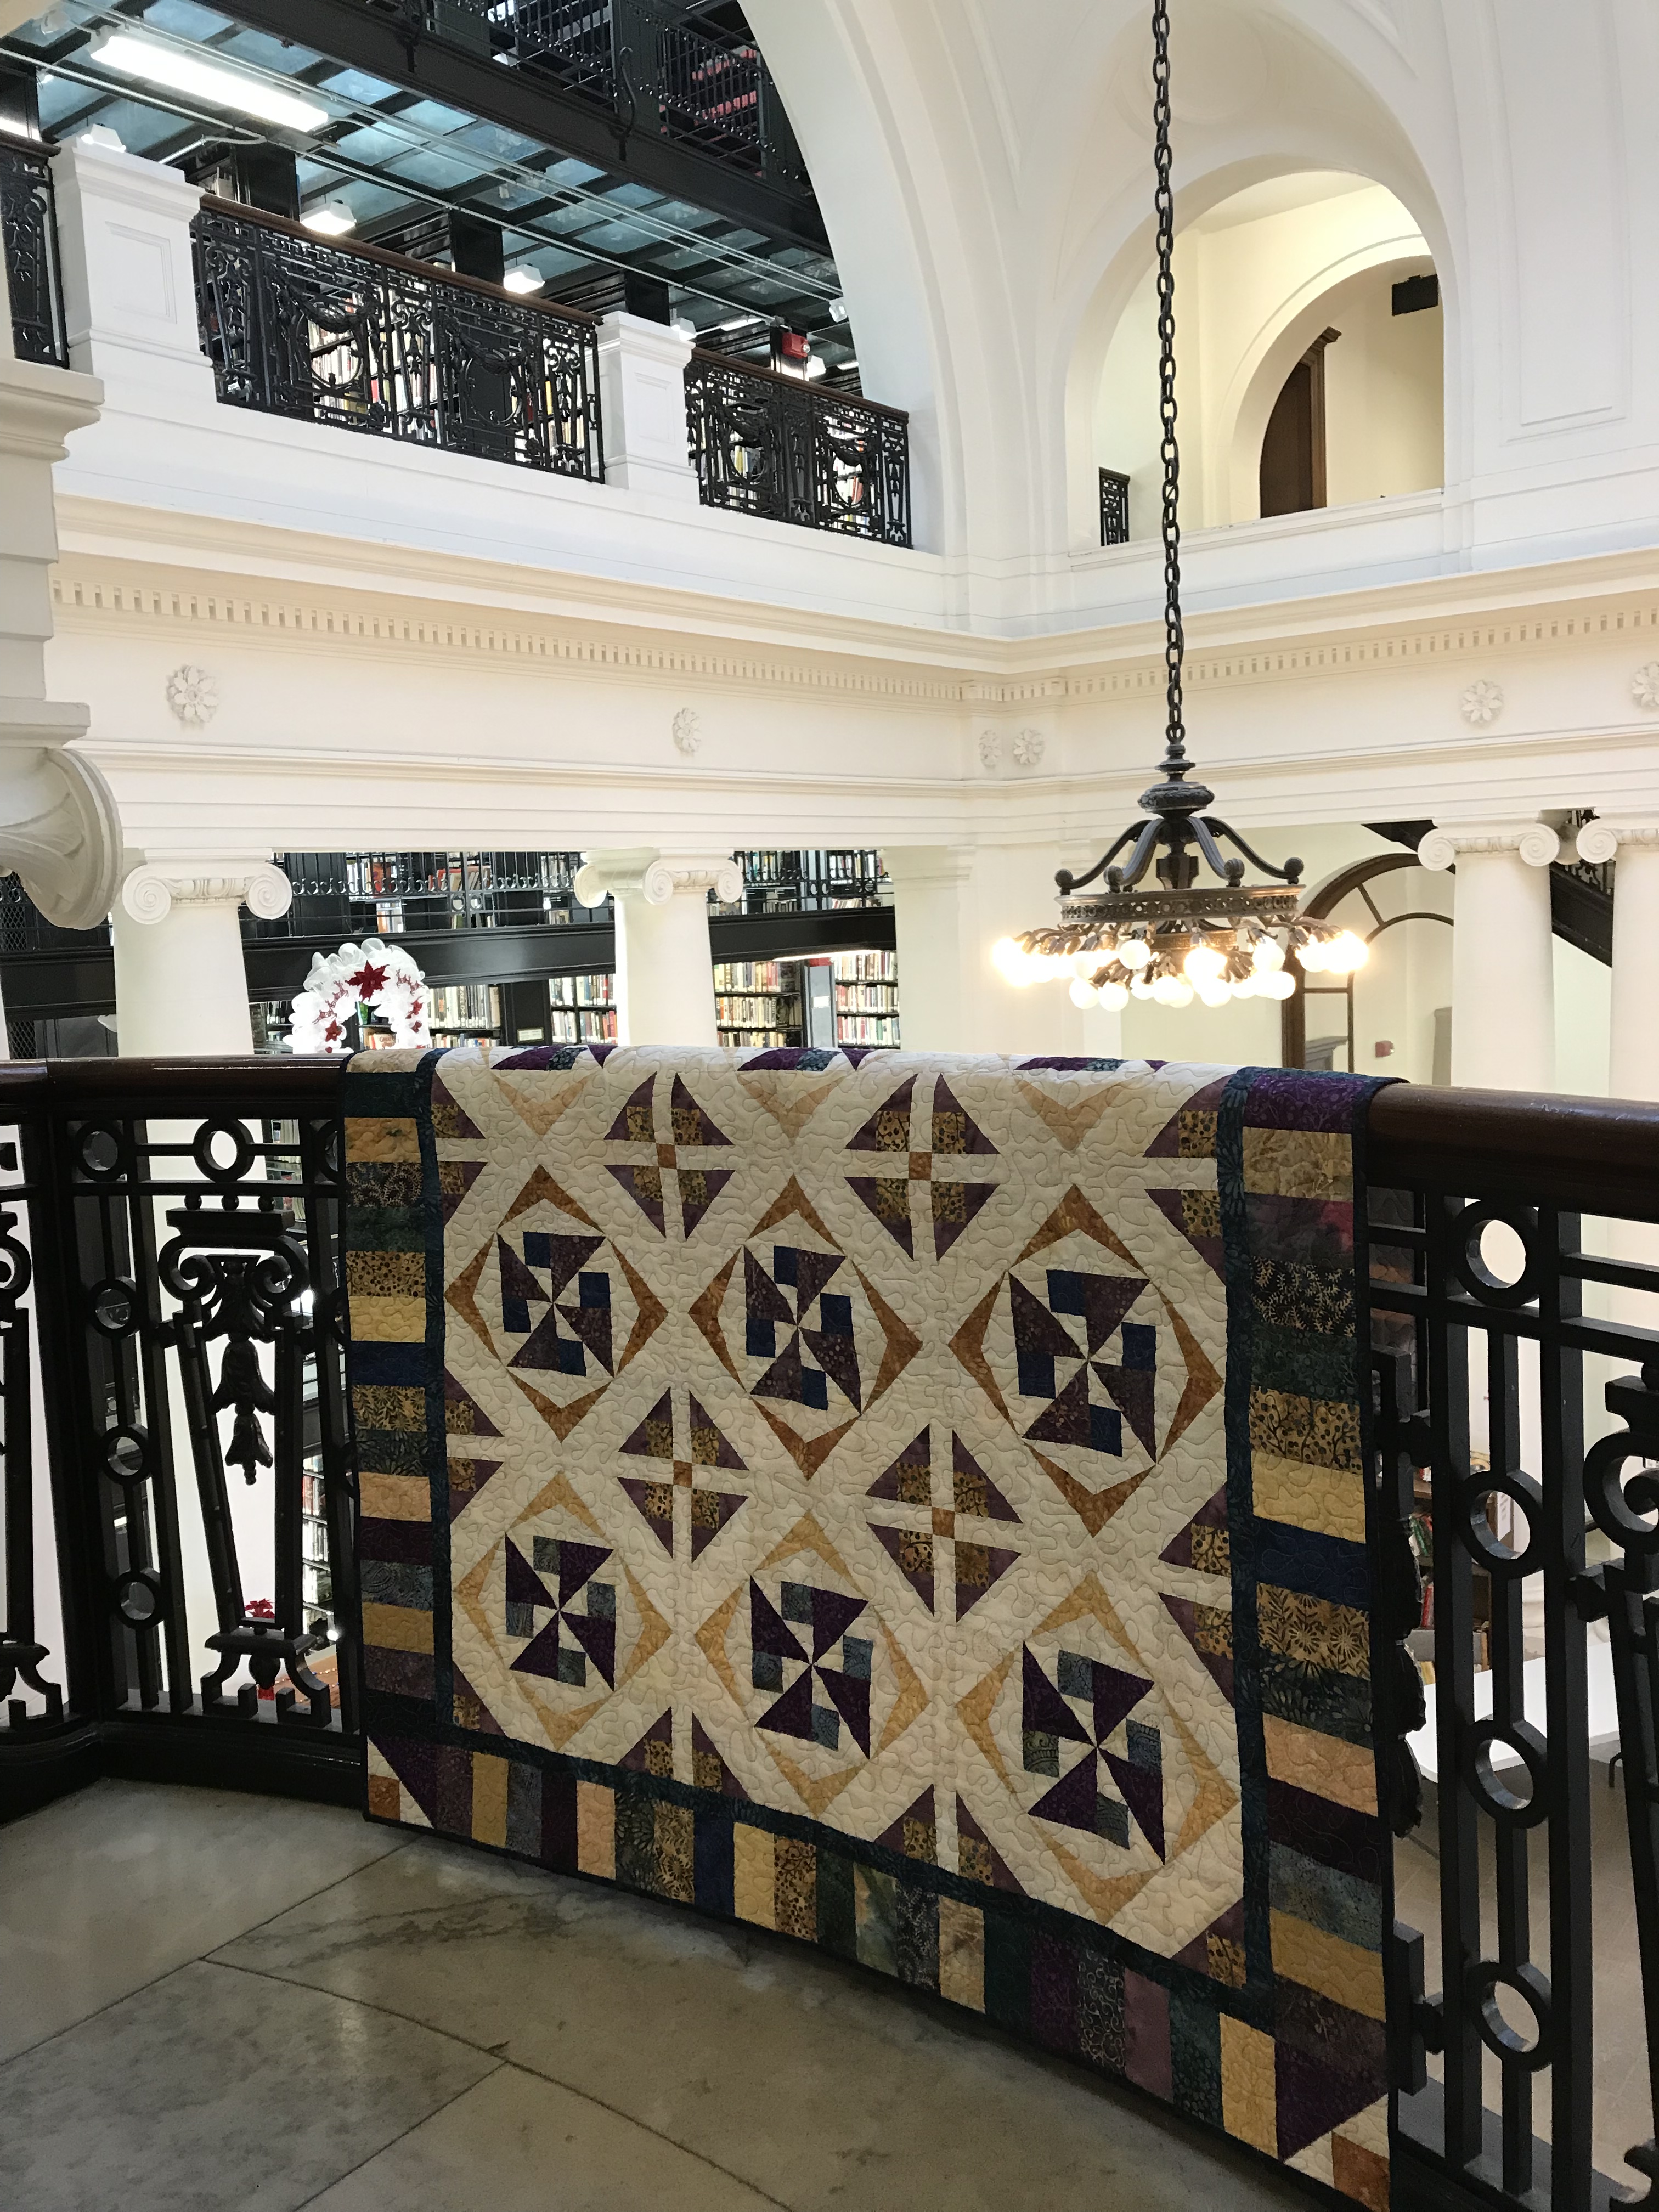
I chose to make Autumn Twilight on page 66. But, I call mine Twilight Treasure!
This book is definitely a treasure!
Click here for a chance to win a Twilight Chic Fat Quarter Bundle.
Be sure to see all the creations by my fellow Certified Instructors:
The fabrics shown in this post were given to me by Island BatikDeb Tucker’s Twilight Chic by Island Batik
Well, if you can’t getaway, go to the library for a good book! The Utica, NY Public Library opened in 1904. I love the inside of this Library.
Shaded Chic
The upper floors of the Utica Library are made of thick glass. I used to love coming here as a child.
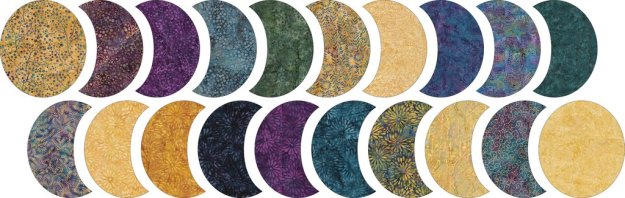
In every box of fabric we Island Batik Ambassador’s receive, there is a secret bundle of the newly released batiks. I was lucky enough to be assigned Twilight Chic by Deb Tucker for Studio 180 Design. This is my third quilt from the Twilight Chic line.
I saw a post on Facebook that asked the question “how many quilts did you make in 2018”. So I went back and started counting.
February included GAlentines day Mug Rug and Mini Love for Island Batik Ambassadors
March included my infamous attempt at a mini tuffet , Hunter Star – Tortola from Royal Treasures Book, Scrapodopolis using the first 6 BlockBuster patterns and Whirling Dervish.
April included Prism and Refraction
May was Pillow Possibilities and The Heron.
June included A Blast form the Past and Crossfire.
July was A Field of Popped V’s & Paris OBW # 64.
August included Split Personality and Firefly.
September was New Years Star & Sue Nami.
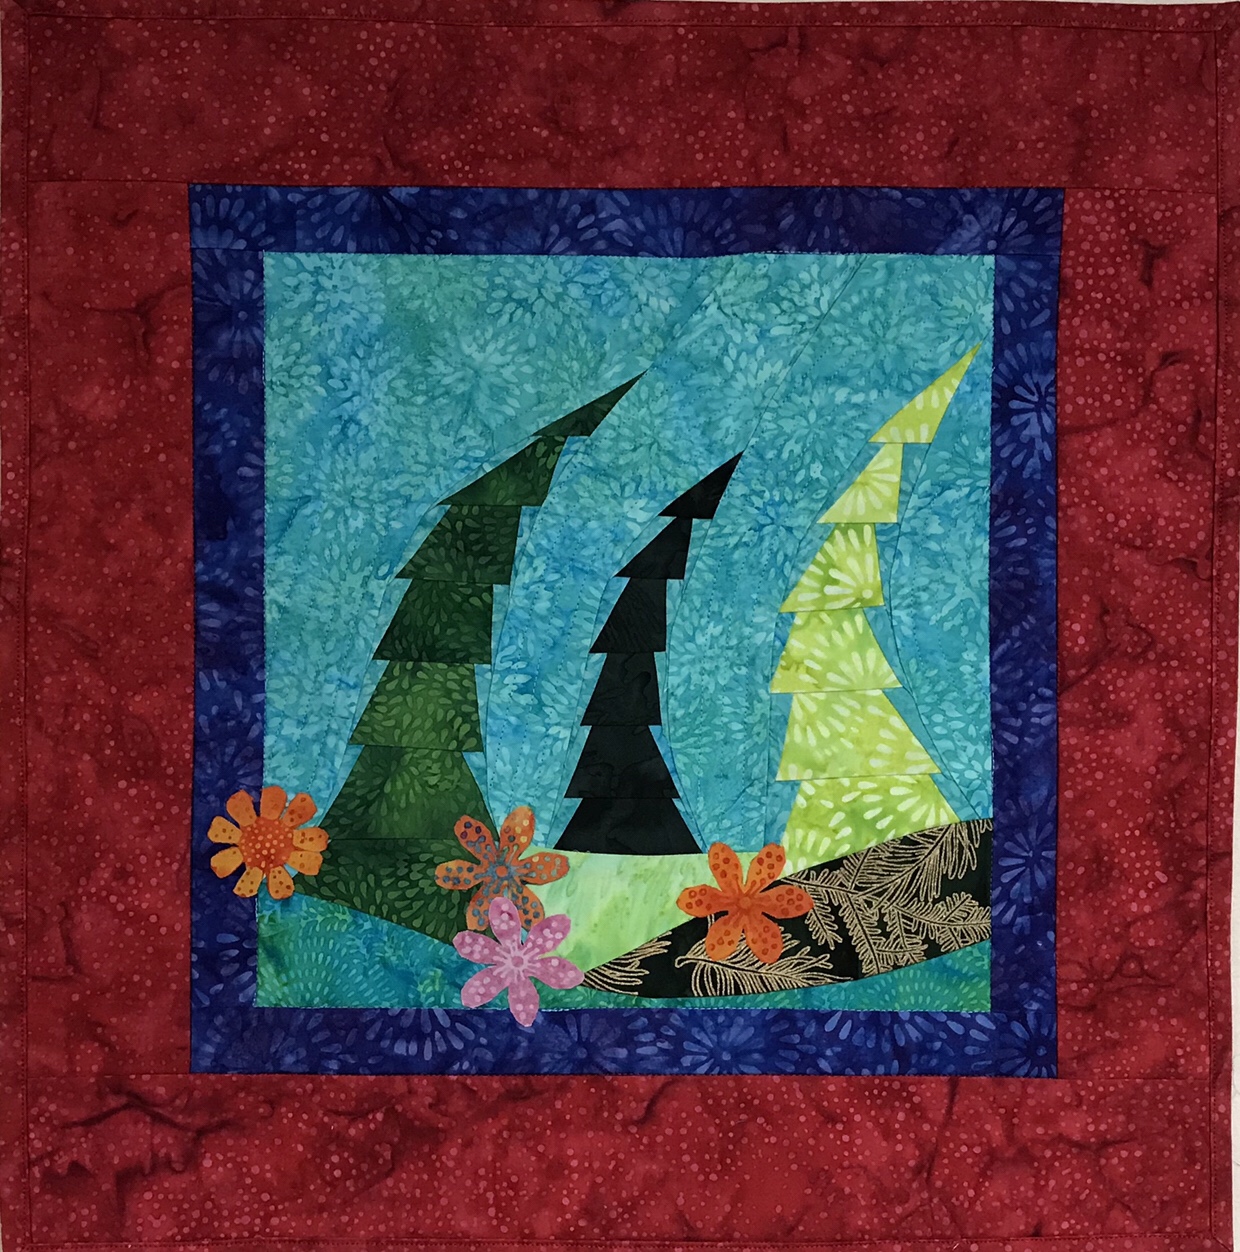
October was paper pieced trees wall hanging.
November included Paisley Cats OBW #65, Evening Elegance & Converging Geese
December ended the year with Plume OBW #66, Calm Seas & Holiday Tipsy Tree .
Phew, I’m tired but I’m already working on more projects.
The fabrics shown in this post were given to me by Island Batik.
Next week, January 7th begins Island Batik’s “Get Away Blog Hop” I’m all ready for my reveal. My secret bundle for this blog hop is Deb Tucker’s Twilight Chic by Island Batik which was introduced at this past fall market.
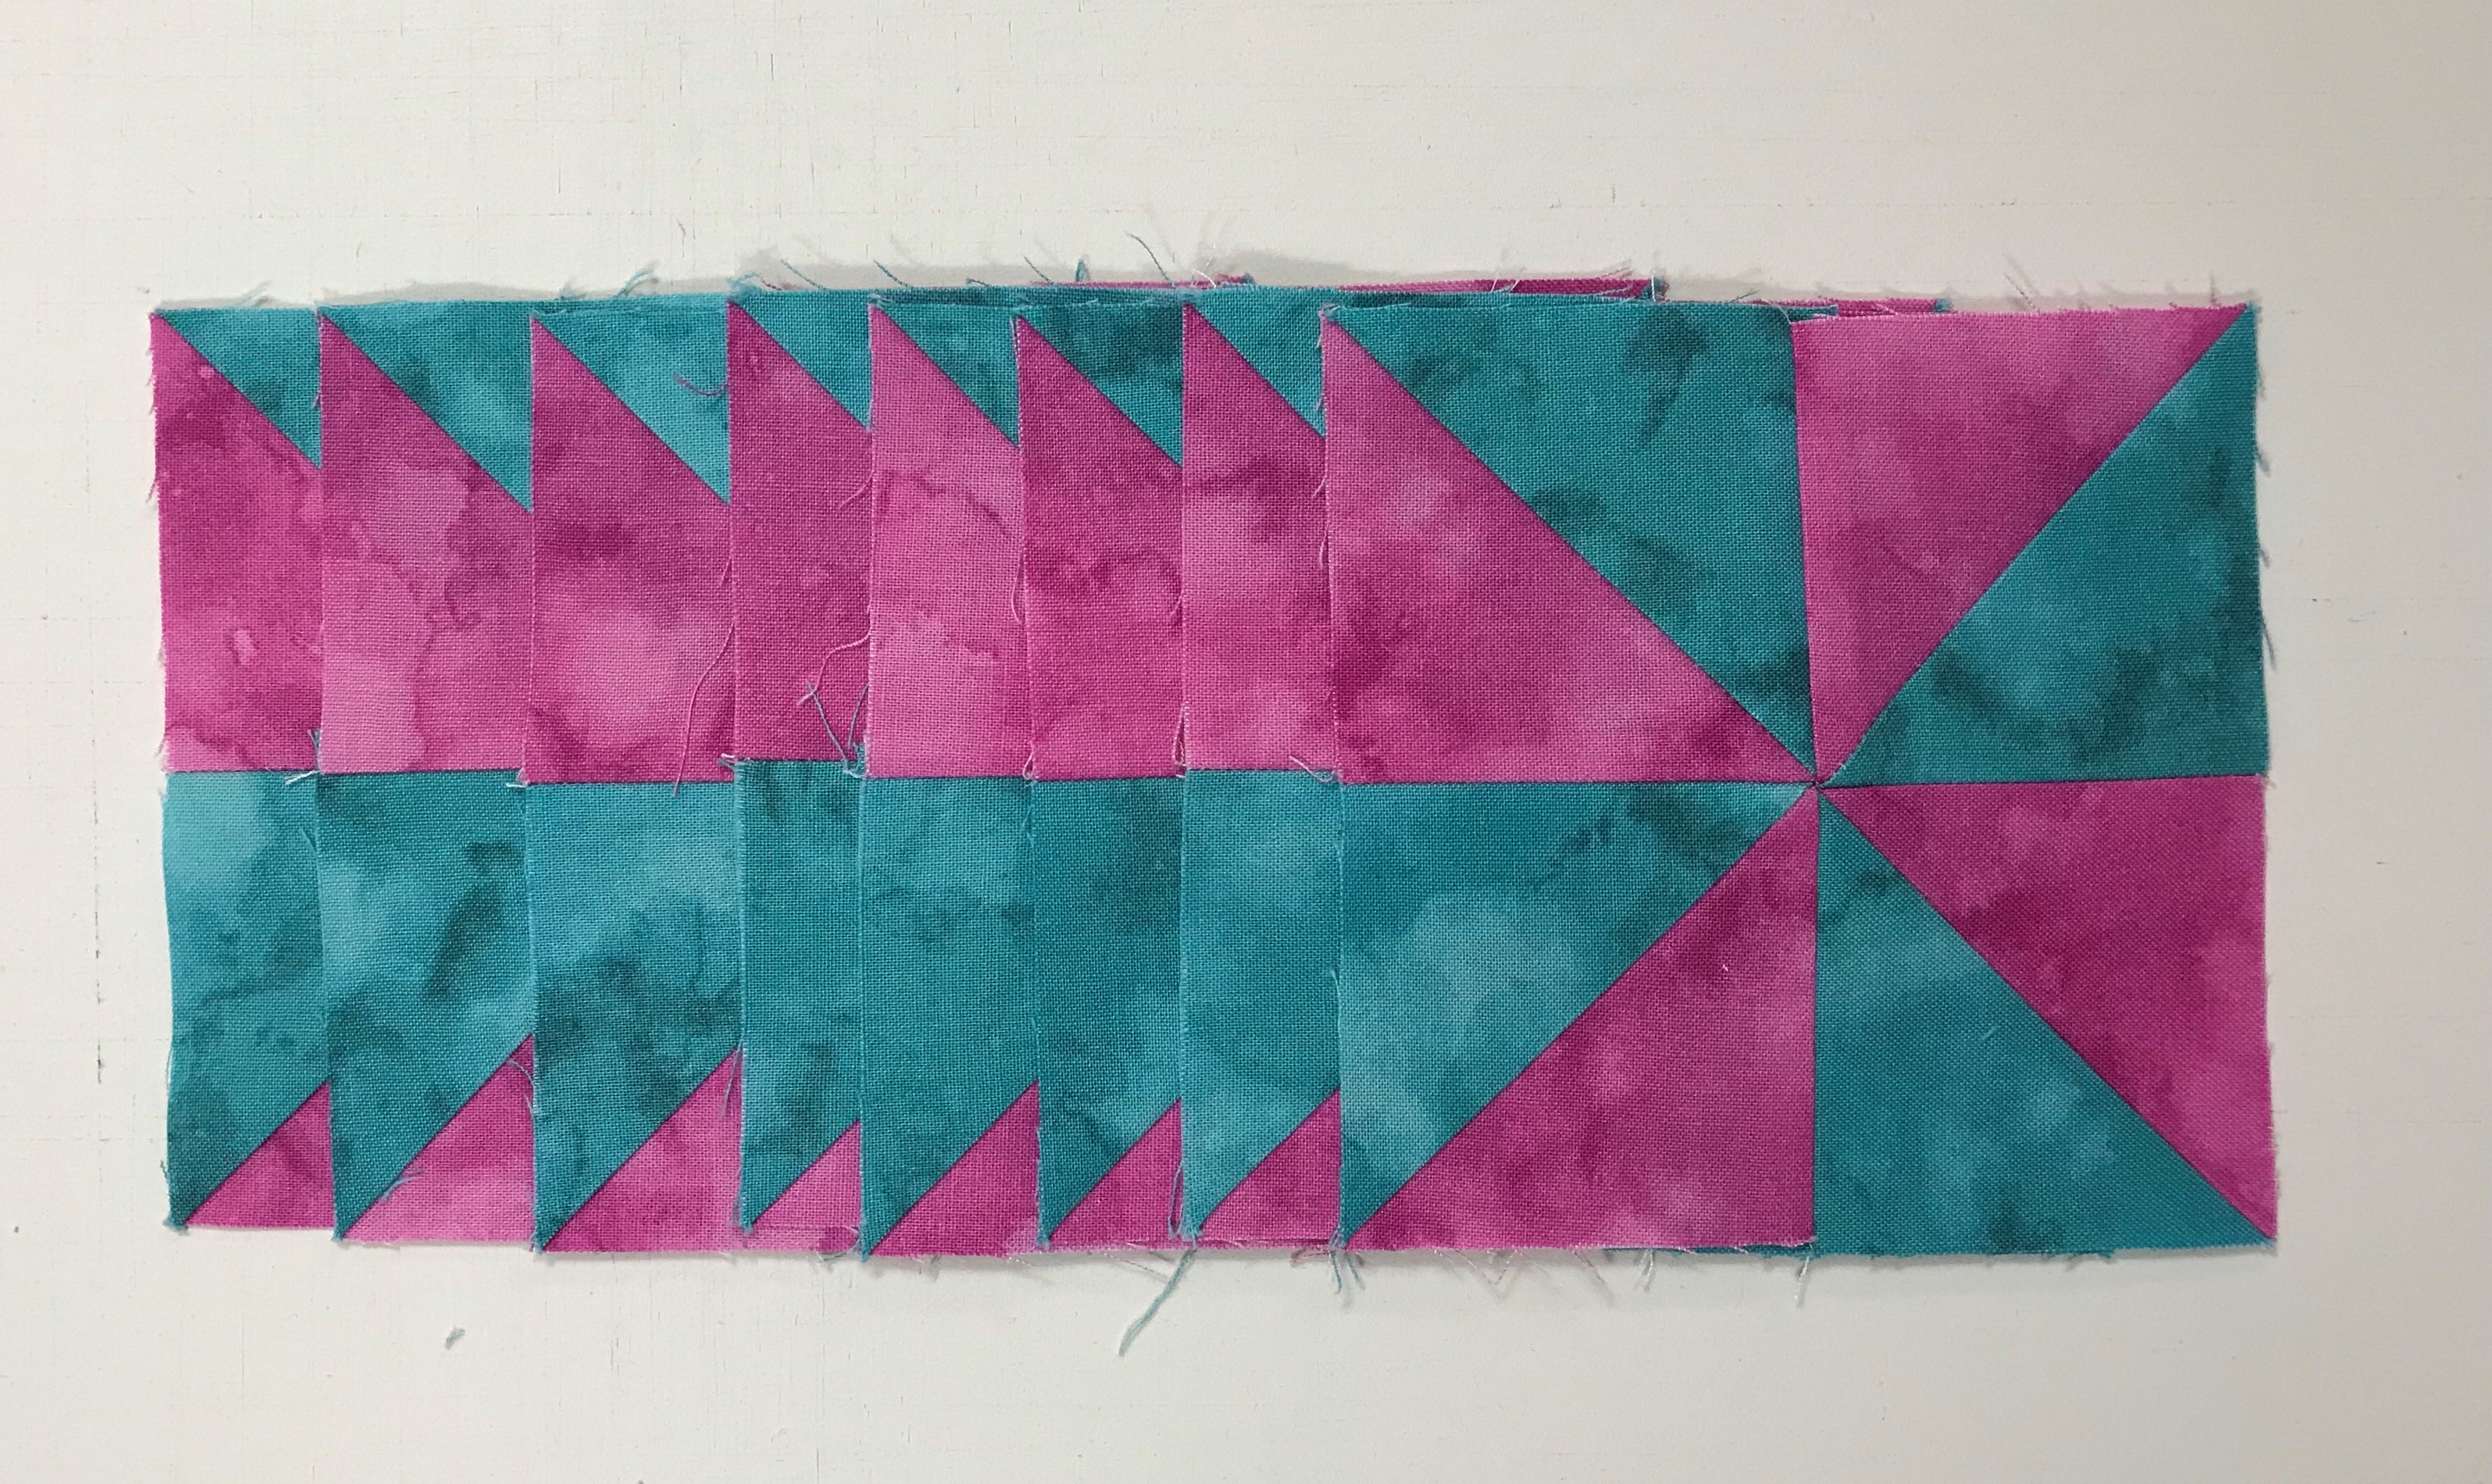
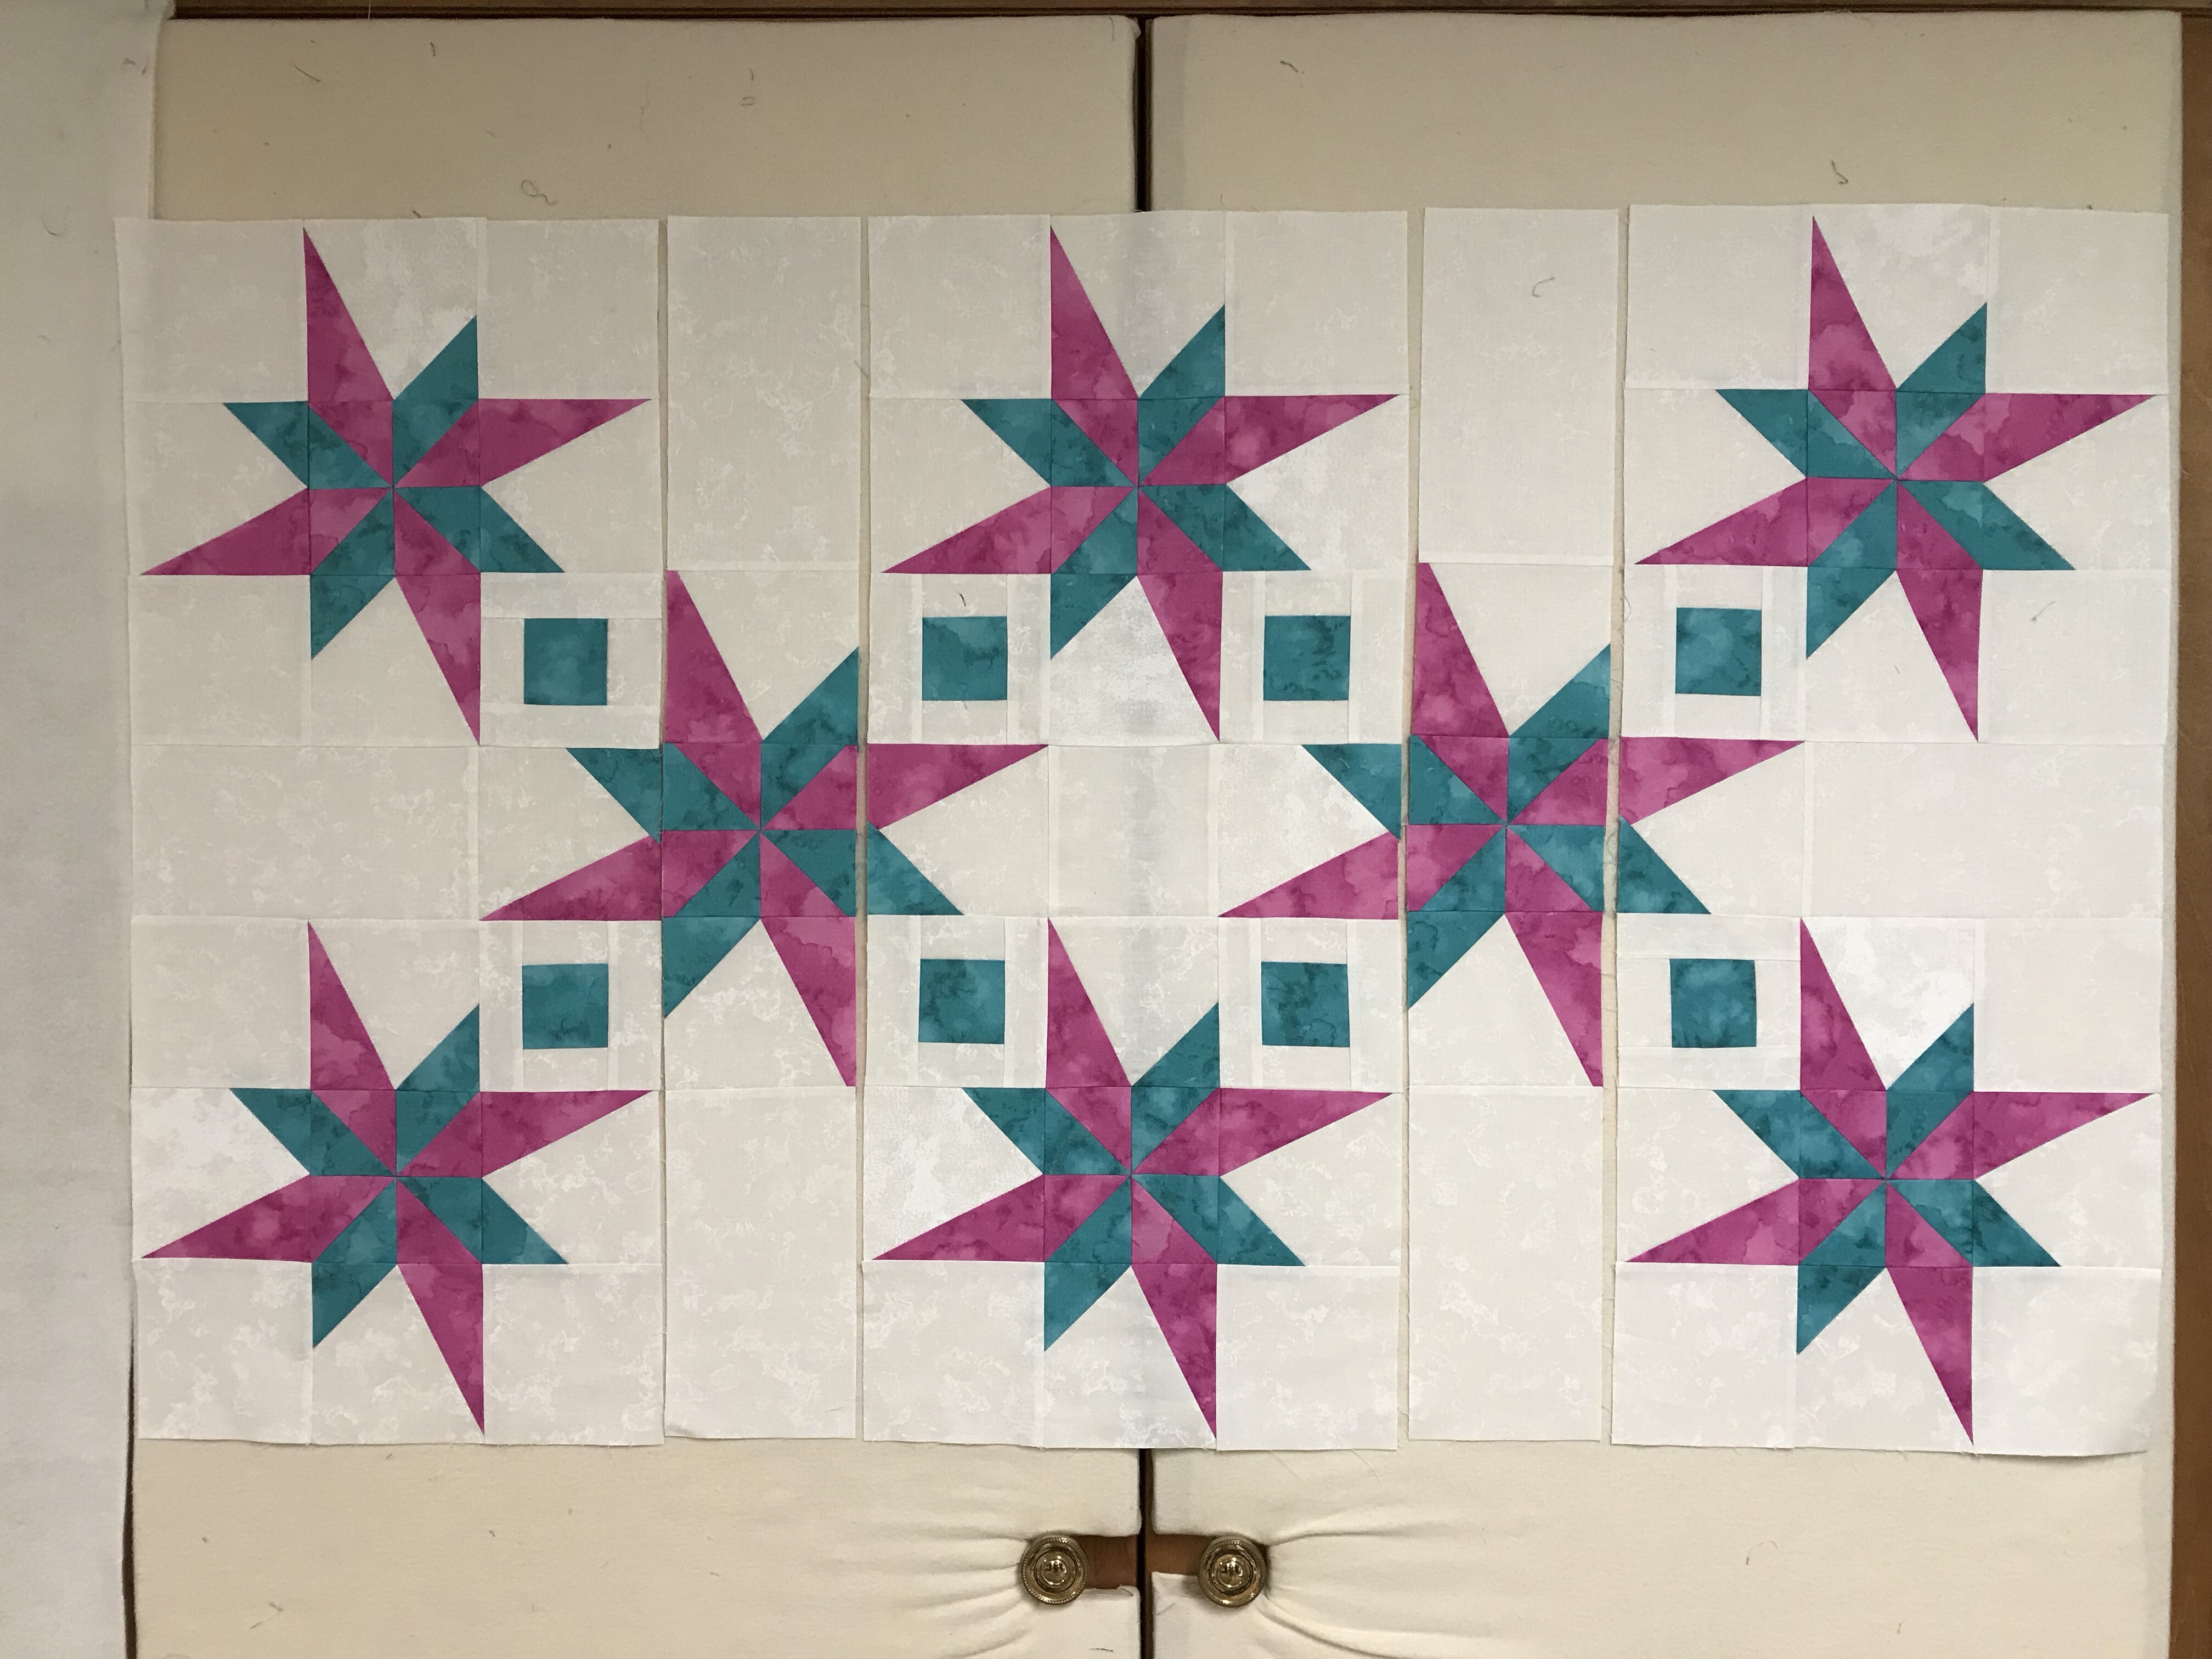
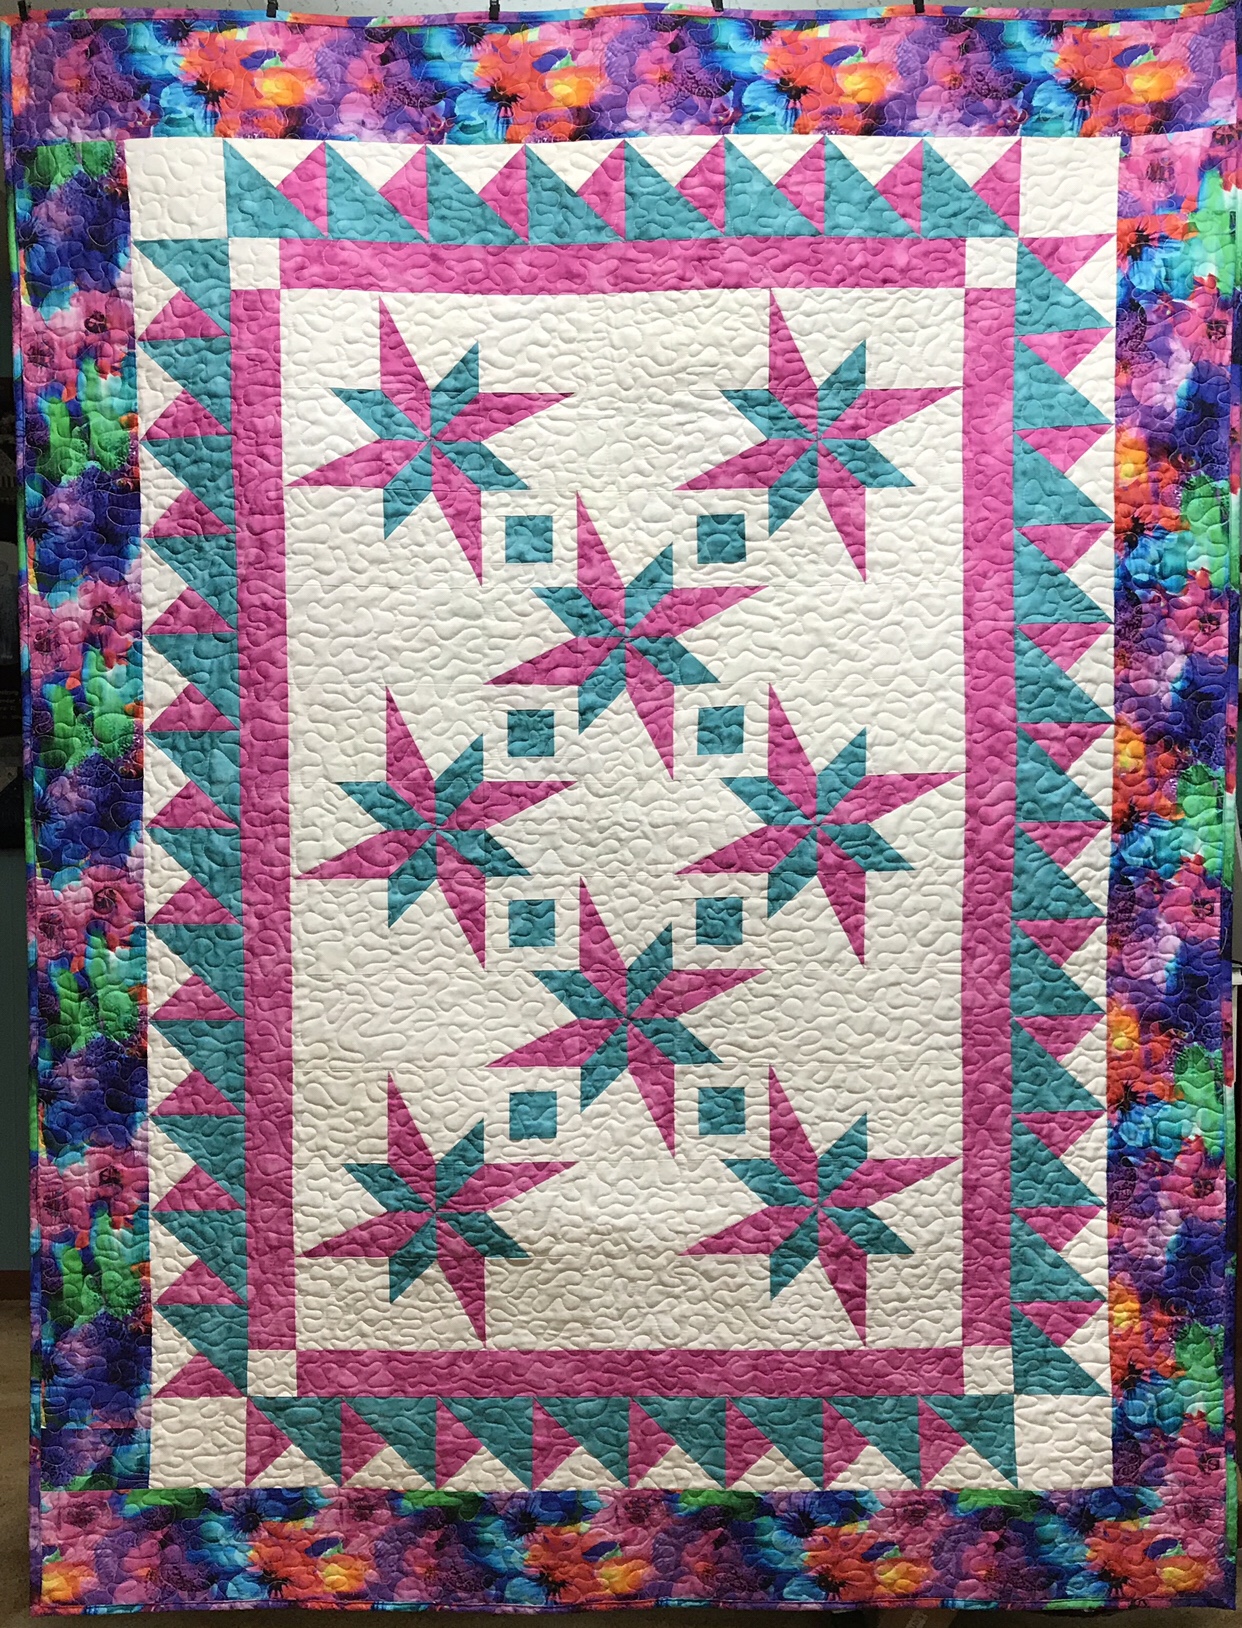
I participated in Studio 180 Design’s blog hop in November in which I made this version of “Evening Elegance” from the Twilight Chic line.
With fabric I had left I wanted to make a quilt to showcase the seven technique sheets created to expand what you can do with the Rapid Fire Lemoyne Star tool.
The fabrics featured in this post were given to me by Northcott Fabrics.
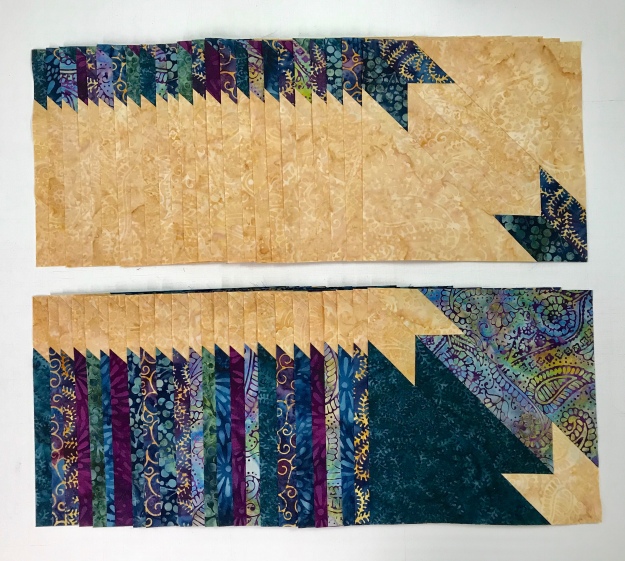
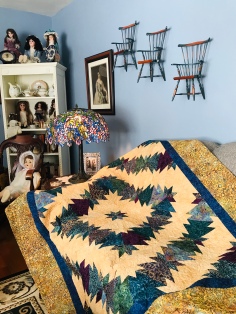
A Storm at Sea quilt has been on my “need to make list” for a long time. I especially love the kind that use graduating colors. Lucky for me, fellow Studio 180 Design Certified Instructor Michelle Hiatt created her pattern “Calm Seas“. This fabulous pattern offers you a choice of 3 sizes; Throw, Double or King. I chose to make the Throw size (62″ x 72”). Calm Seas is a companion pattern for Studio 180 Design’s Large Square/Squared, Diamond Rects & V Block Tools.
I chose to use the fabulous fabrics from Northcott’s Canvas line. I needed 12 graduating colors in 2 different values each. Canvas is richly textured and has a depth of color that is gorgeous!
Definitely use your best organizational skills when making this pattern. Michelle has made it much easier for us to conquer a storm at sea.
If you know me…you know I use paper plates to keep myself organized. I snipped a piece of each fabric and pasted it to the paper plate, writing down all pertinent info to keep my brains from falling out.
I was very fortunate to spend a few days at Bridle Creek Bed & Breakfast for an annual mini quilt retreat with friends. I managed to get all my diamond rects, large square/squared and small square/squared units done!
Following the pattern instructions, I laid out my units in the proper color order to achieve this beautiful flow.
I numbered my rows and pinned them together to begin stitching them together,
A little precision pinning goes a long way when it comes to nice crisp points.
After four days of hard work I finished the top. Thanks to Michelle’s pattern Calm Seas & Deb Tucker’s Studio 180 Design tools I have checked another awesome quilt off my bucket list!
The Island Batik Ambassador’s December challenge was to create a project that is Whimsical & Wonky”. Well, I settled on Tipsy! My Holiday Tipsy Tree is based on BlockBuster pattern # 27 Roll the Dice . This year I have made many quilt projects using Split Rects Units so it is only fitting I end the year with Split Rects.
Cut your elongated triangles according to the Split Rects tool instructions.
Cut your background side triangles the same way.
Lay out your split rects, align and center the two pieces with just a bit of overlap at the ends. Stitch and press seams open. I love using my “Stick Strip” for pressing seams open.
Following the tool instructions trim, rotate & trim again.
Make the 9 Square/Squared units following the Square Squared tool instructions. I chose 9 different unit centers but you could make them all one color if you like. Each side of the square/squared unit will be different to match the fabric used for the split rects units.
Lay out your units as they will be stitched. Choose a square/squared unit for the center, rotating the square/squared unit so the side triangle matches the same fabric used in the split rects unit.
This block is constructed using a partial seam. Place the square/squared unit right sides together with one of the split rects units being sure to match the fabrics and stitch half way down the square/squared unit.
This gives you the next complete edge to stitch another split rects to, again matching the square/squared unit fabric with the split rects fabric.
When stitching the split rects to the square/squared unit, always place the precision cut square/squared unit on top be careful to stitch using the unit center as a guide.
Continue stitching the split rects units and complete the partial seam, pressing toward the split rects units. Make the other 8 blocks the same way.
Tree Trunk: Make one set of 2″ x 4″ finished flying geese using the Wing Clipper I tool instructions. Only 3 flying geese units will be needed.
Tree Star: Make the 6″ finished lemoyne star using the Lemoyne Star tool instructions.
Lay out your quilt blocks and construct the quilt center. Once the borders are added the finished quilt measures 38″ x 38″.
This is day 3 of Studio 180 Design’s Evening Elegance Blog Hop. Deb Tucker has launched her own fabulous signature fabric collection, Twilight Chic, with Island Batik and fabric designer Kathy Engle.
Below are the links to everyone participating in the blog hop:
Unit C. Quarter Square Triangle: Make a Quarter Square Triangle with the fabrics that match the V Blocks, remember to swirl the center.
Unit B. Combination Units: Combination units begin by making half squares triangles (HSTs). The fabric for the HSTs must match the side triangles in the v blocks, so I began by laying out the starter squares next to the V Blocks and then making them into the combination units.
When making Combination units, you are making two at a time, a left & a right. Choose the units that will match the side triangles in the V Blocks as shown above.
Sew the units into rows then join the rows into the block.
Unit A. Diamond Rects: Cut your precision diamonds & side triangles per the Diamonds Rects instructions. Stitch opposite side triangles, press toward the side triangles. Stitch the other opposites side triangles.
Make 4 diamond rects units and trim.
Stitch using a partial seam to the center square. Stitch the second diamond rects unit and so on to finish the block center.
Unit B. High Low Left: Following the instruction the in technique sheet cut your squares and trim, add the replacement side triangle. Mark and stitch the square for the low point and trim.
Make four High Low Left Units.
Unit C Sidekick Right: When making a Sidekick Right, position fabrics face down for cutting. Cut and stitch replacement side triangles.
Peaks & Valleys block unit layout.
Stitch units into rows.
Join the rows to complete the block.
I love the Twilight Chic fabrics from Island Batik and I can’t wait to show you one of the finished quilts!
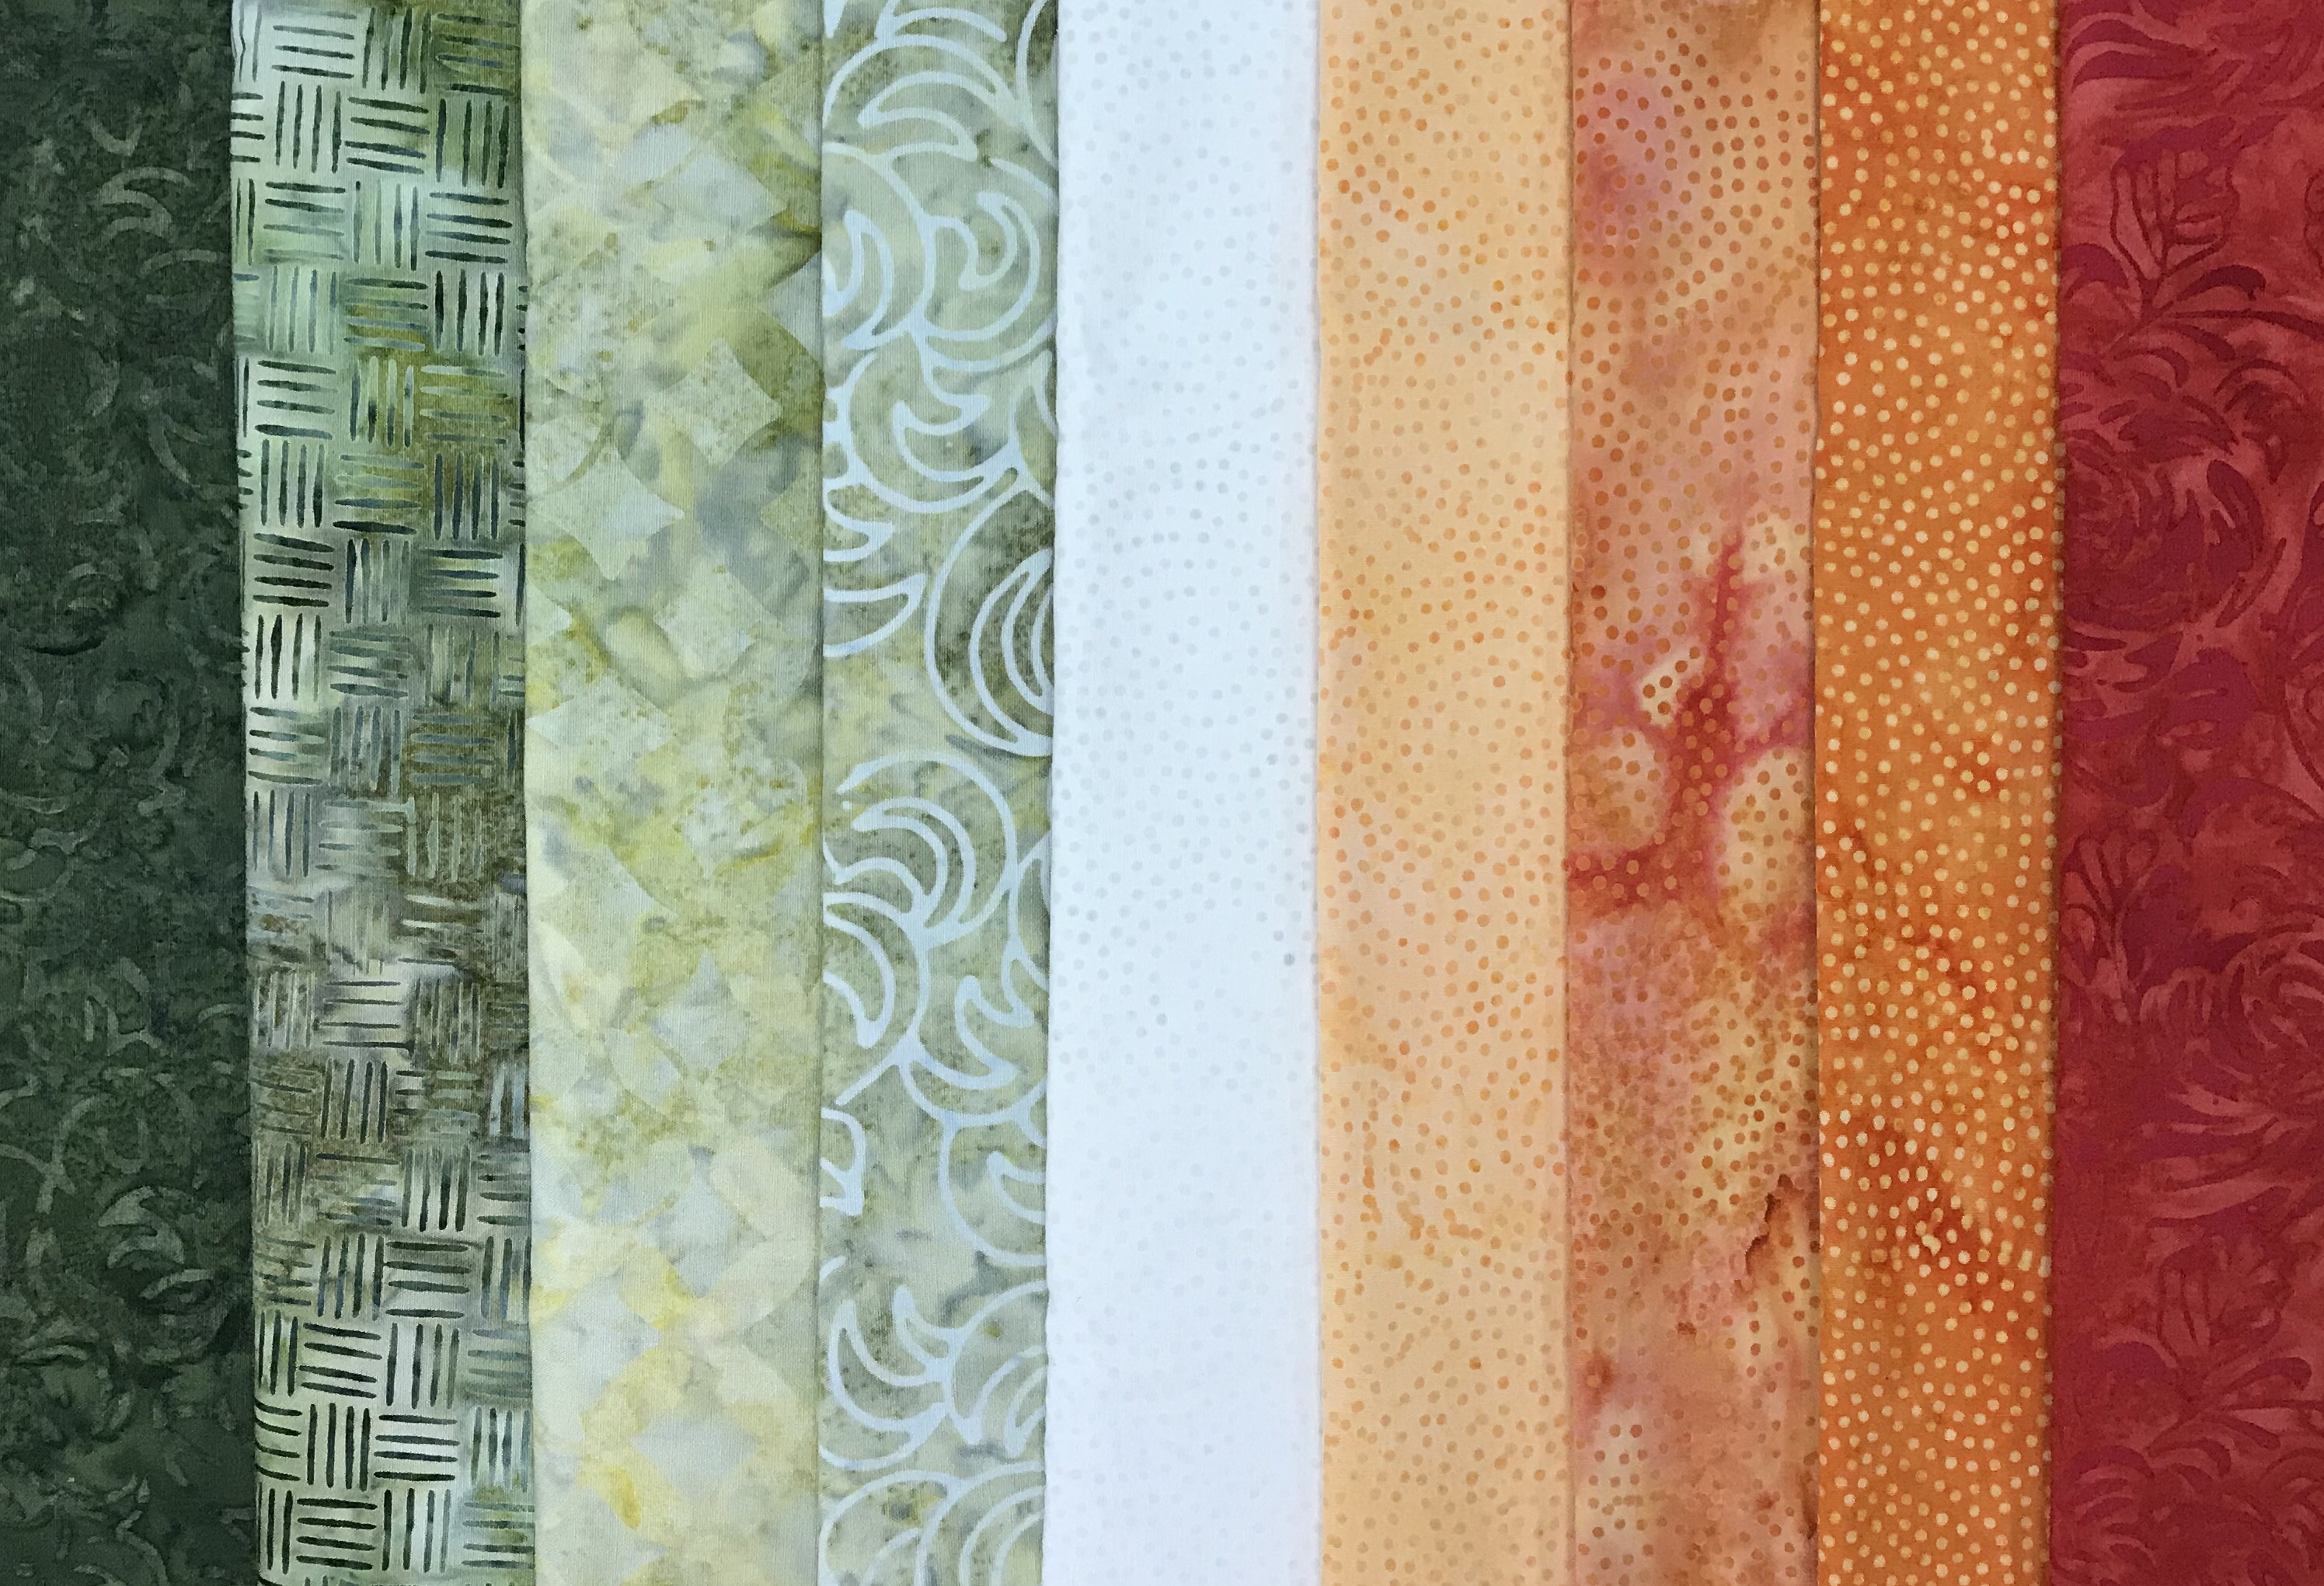
My beautiful Island Batik fabrics from left to right: Mr. T Blocks: Arc Pine Needle, Dash-Grasshopper, Seed Circle Custard, Arc Waves Grasshopper, & Sprinkles Playful Pachyderm, & Paisley Dot: Apricot, Candy Corn, Nasturtium, & Item number 121412189.
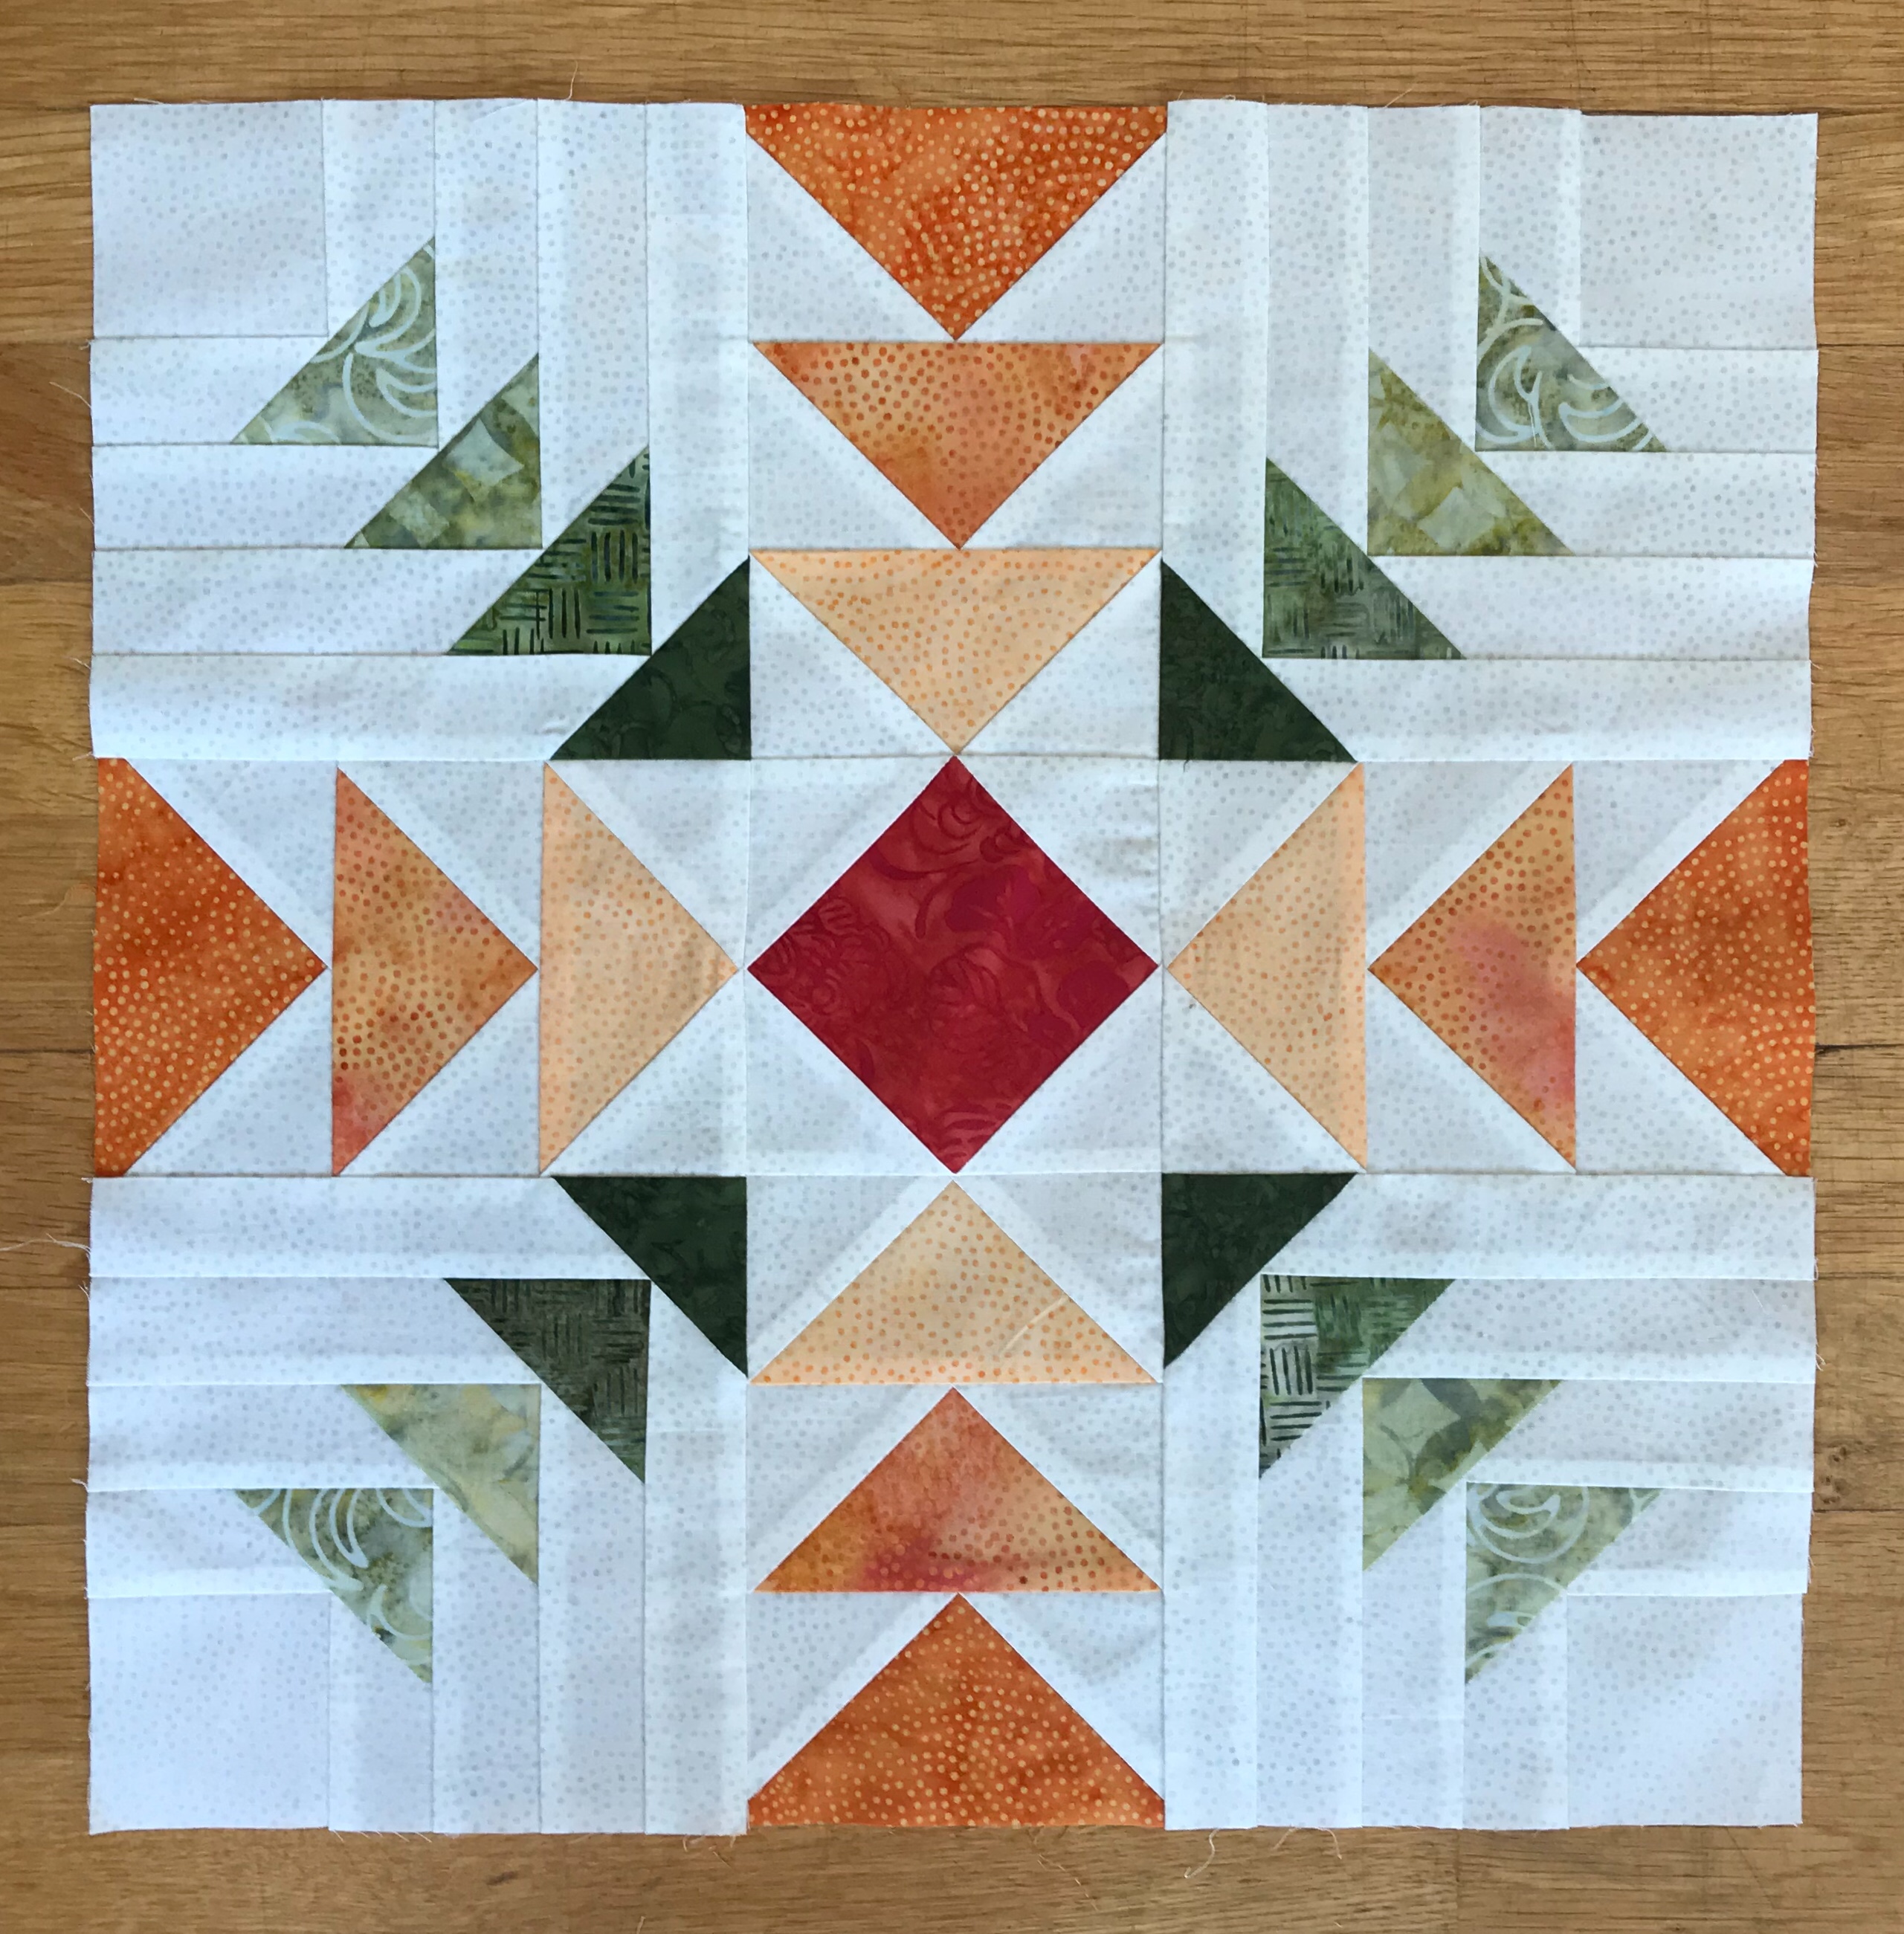
I have named my original design “Converging Geese” because each block has Flying Geese & Geese on the Edge units, along with Square/Squared units.
Each 16″ block contains 12 – 2″ x 4″ finished flying geese, 4 – 6″ finished geese on the edge & 1 square/squared unit. These Geese on the Edge units are soooo much fun to make! The technique sheet gives instruction for making geese on the edge in 10 sizes from 3″ to 12″!
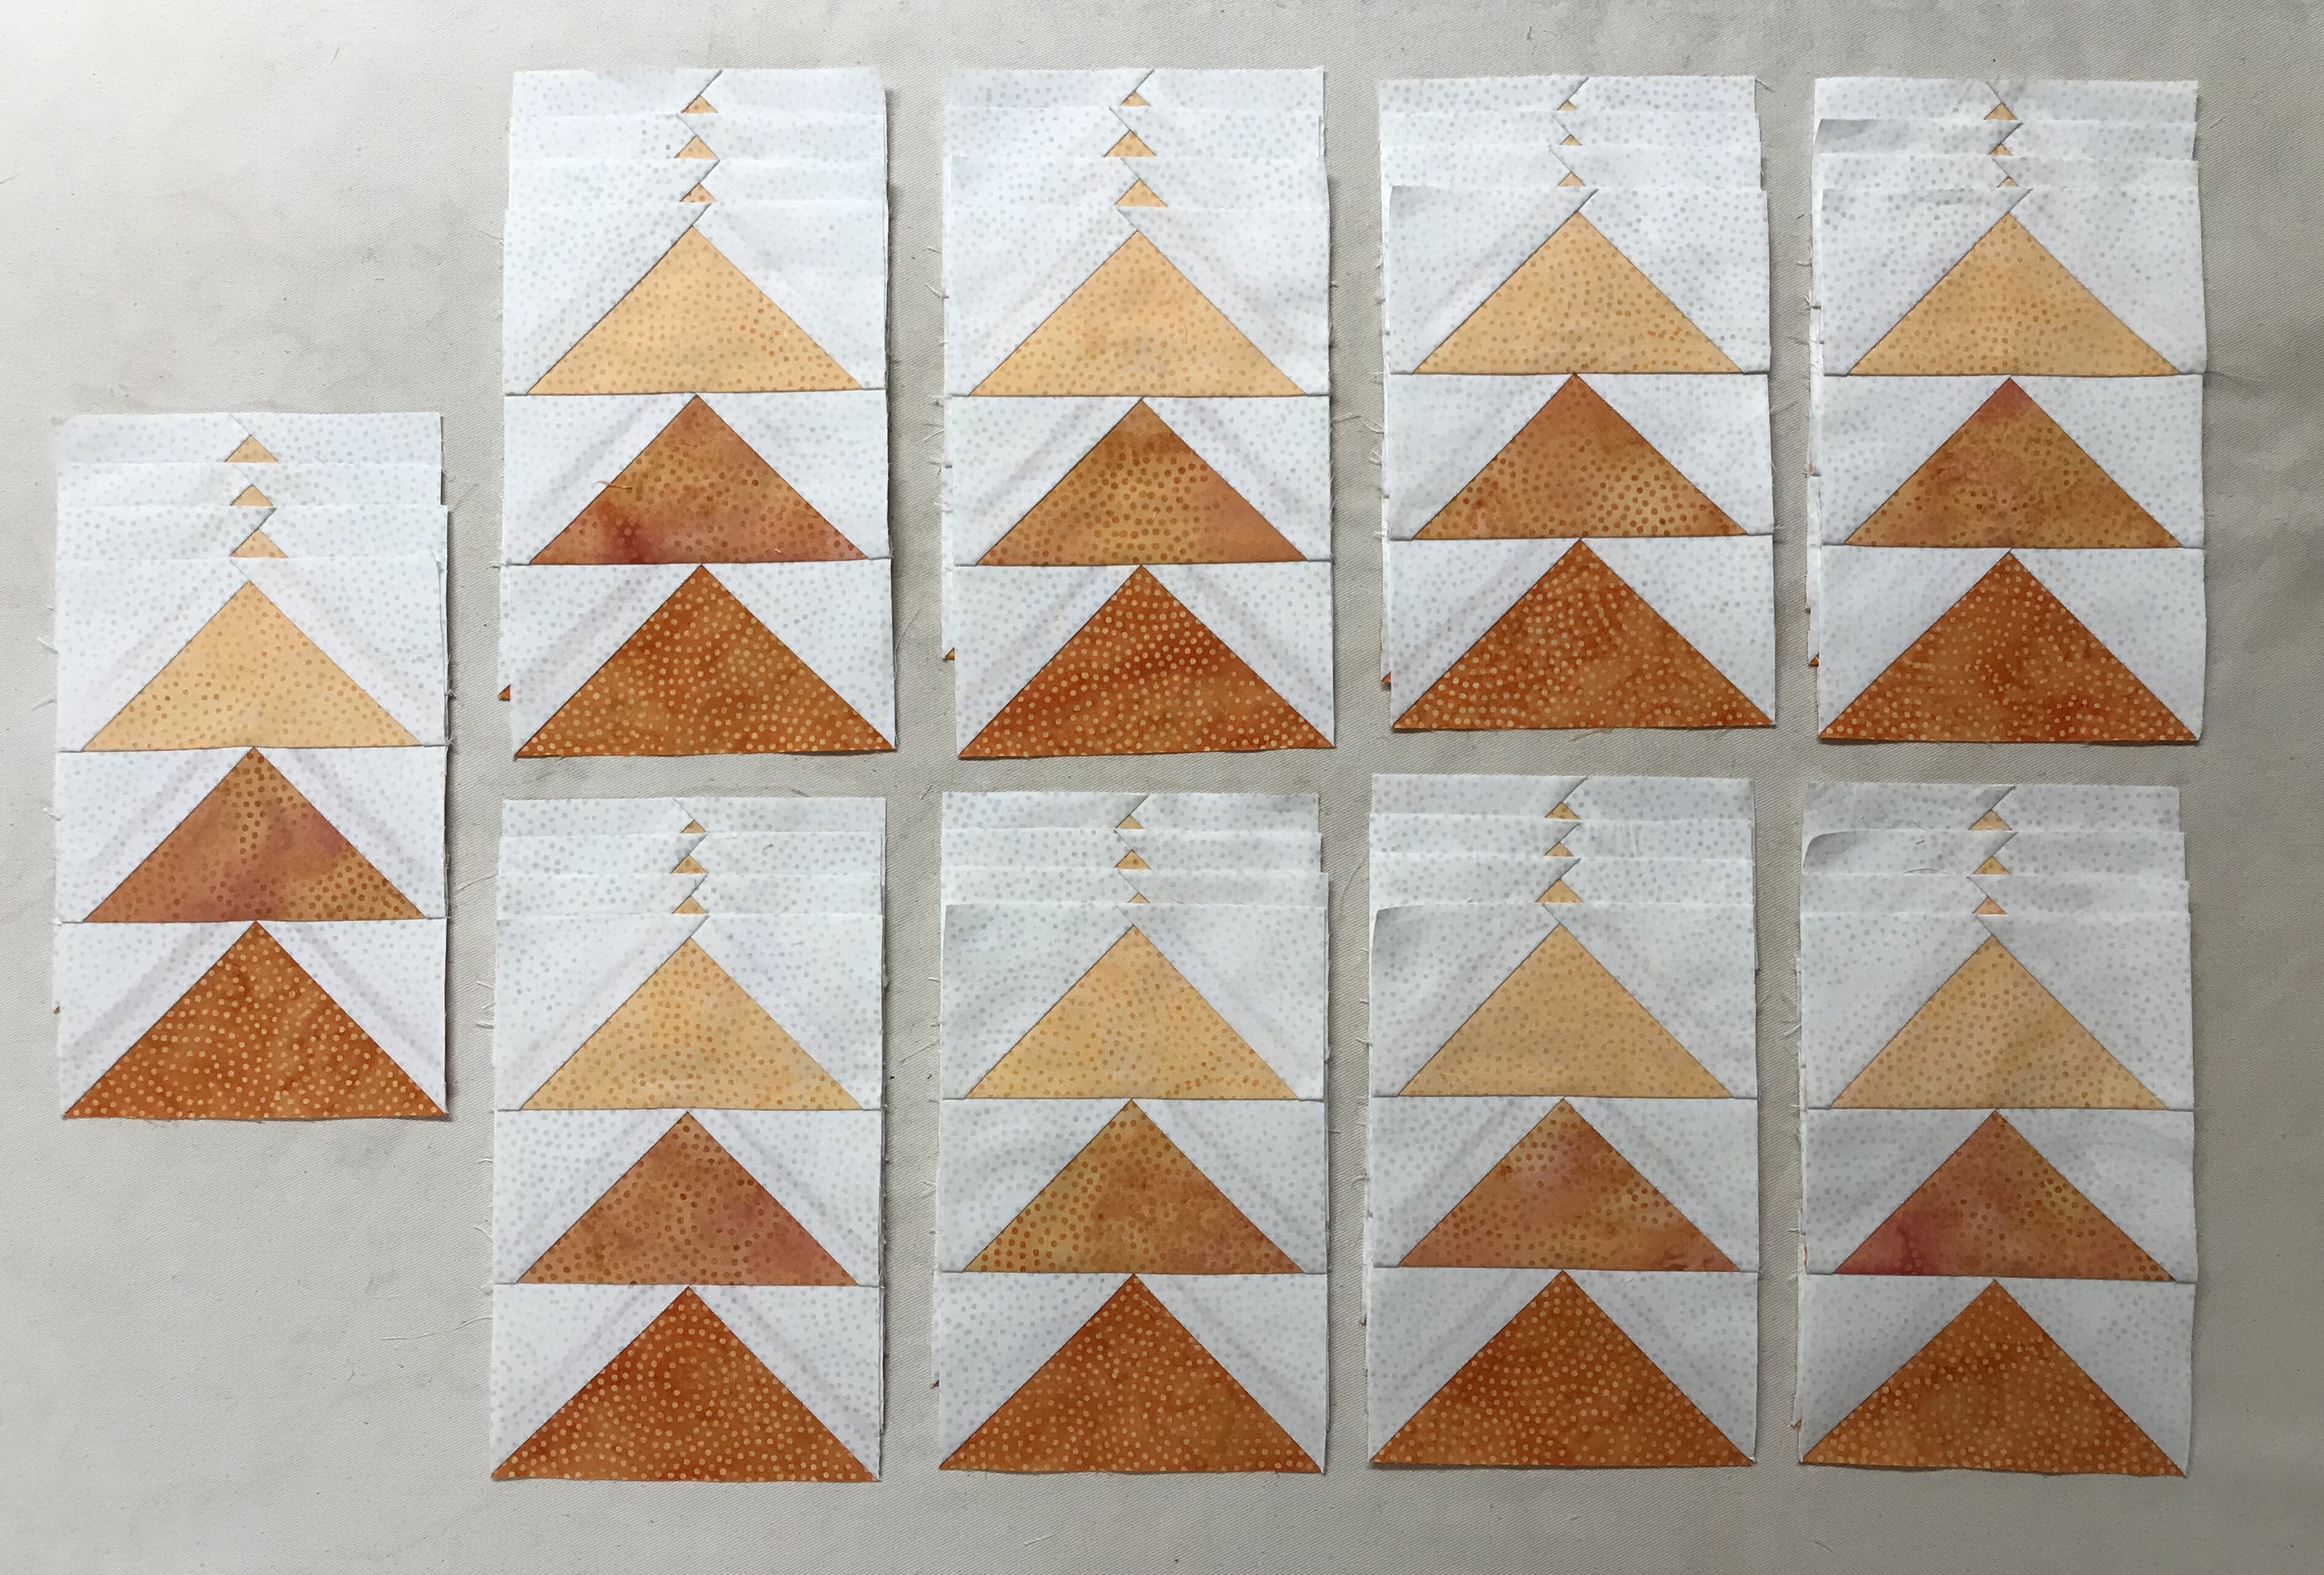
You begin with starter squares, add logs by chain stitching, square up two sides with your Tucker Trimmer.
Trim apart.
Using your Wing Clipper trim the corner leaving a 1/4″ seam allowance.
Add a replacement triangle and press toward the triangle.
Trim after every addition of a replacement triangle. Add more logs.
The final trim down is performed when I have four rounds of logs for a 6″ finished geese on the edge unit.
Stitch the flying geese units into sets containing 3 each.
Block layout.
I have created a down loadable pattern for Converging Geese (measures 60″ x 60″) that can be purchased on my If Threads Could Talk Etsy Shop.
The fabrics featured in this post were given to me by Northcott Fabrics.
This fabulous pattern, “New Year’s Star” by Deb Tucker is fun to make using your V Block & Tucker Trimmer I tools. It can be made in 3 sizes: 50″ x 66″, 66 x 82″ & 82 x 102″. I love pink and aqua & retro fans. I guess you can say the photo above shows my fan club (HAHAHAHA).
I chose 4 fabrics from Northcott’s “Strokes of Brilliance” collection. The colors are so deep and rich.
Pinwheels:Making the pinwheels begins by making half square triangles using the 3″ dark & medium squares. Trim to 2 1/2″ with your Tucker Trimmer. Arrange the trimmed squares into pinwheels.
Use Care Here!. The blocks should spin exactly as shown in the pattern instructions.
V Block High/Low:
I have cut my background squares and side triangles for unit construction.
Following my pattern instructions I trimmed the background square and stitch a side triangle to it.
Press toward the side triangle, add the square to make the second low side triangle and trim.
Trim using the V Bock tool as shown above. Rotate and trim again.
By placing the high/low units around the pinwheels we get a great looking wonky star!
Framed Squares:
Make 8 of these easy framed squares.
Combination Units:
Using the Magic Wand draw 2 diagonal lines on the back of the 5 1/2″ the background squares and align with the medium squares, stitch on lines.
Cut apart and press toward the darker fabric.
Using the Magic wand draw 2 diagonal lines on the back of the half square triangles (HST). Center the HST’s on a dark 5 1/2″ square, stitch on the lines, cut apart & press toward the large triangle.
Trim using your Tucker Trimmer, rotate and trim again.
Each set makes mirror image combination units. Both are used in the pieced inner border. It is a good idea to keep the units organized into left and right groups. You’ll be glad you did.
Lay out your units.
Stitch into rows.
Add your inner borders.
Add your pieced inner borders and your final outer border.
I love the backing too. This quilt was completed with Quilters dream Batting! Thank you Northcott for letting me create with your beautiful fabrics. The description I’ve shared in this post does not answer every question you may have. Please feel free to contact me with questions.


")