Category Archives: Studio 180 Design Tools

A Prickly Situation – OBW #76

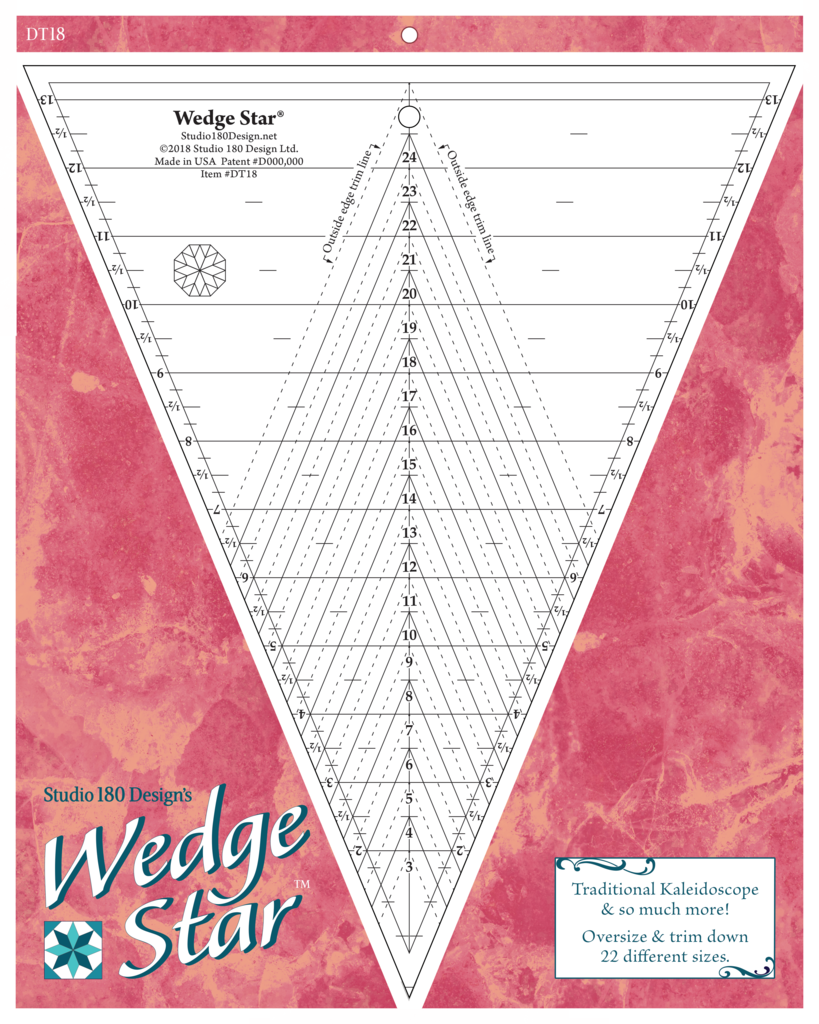
Yes, I’m at it again! Actually I’ve had this panel cut out since last Fall. I love One Block Wonders (OBWs). Sometimes I add cubes to create design interest or just for fun. It occurred to me that Studio 180 Design has a new Star 60 tool.

You can use this tool to cut equilateral triangles easily, along with 60 degree diamonds and side triangles in 17 sizes to create a multitude of 60 degree designs.

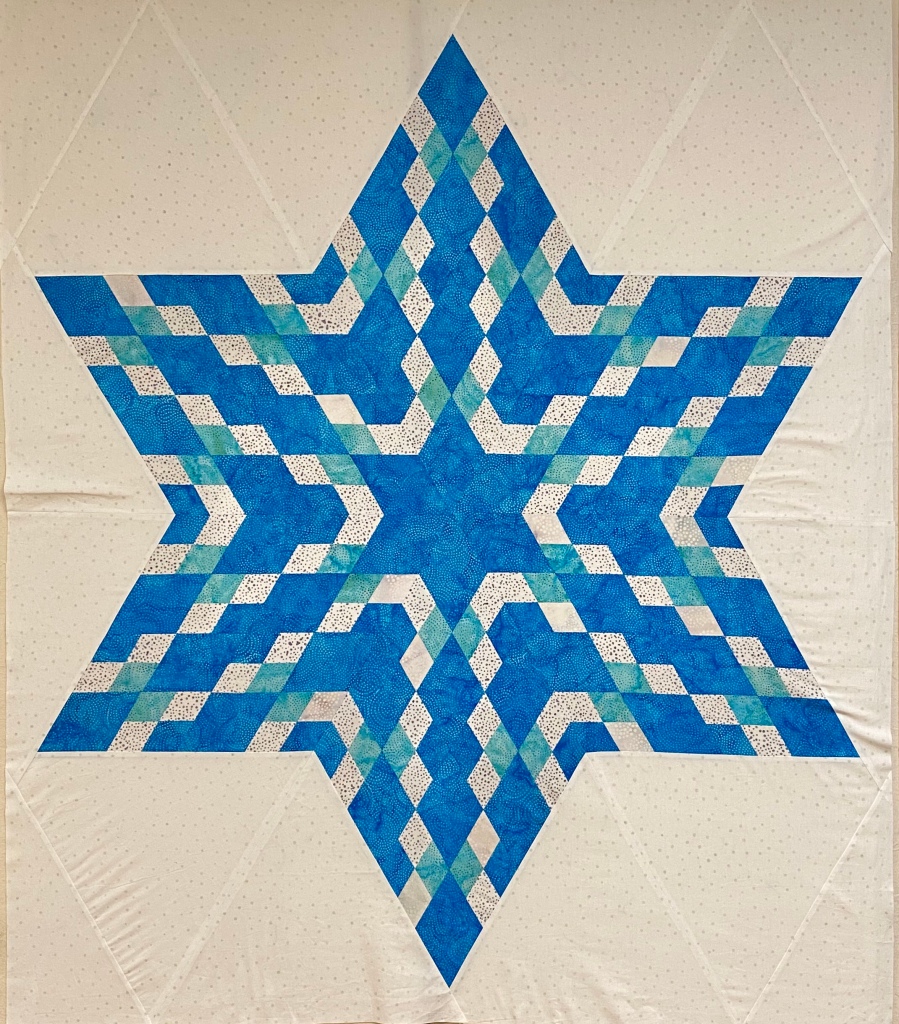
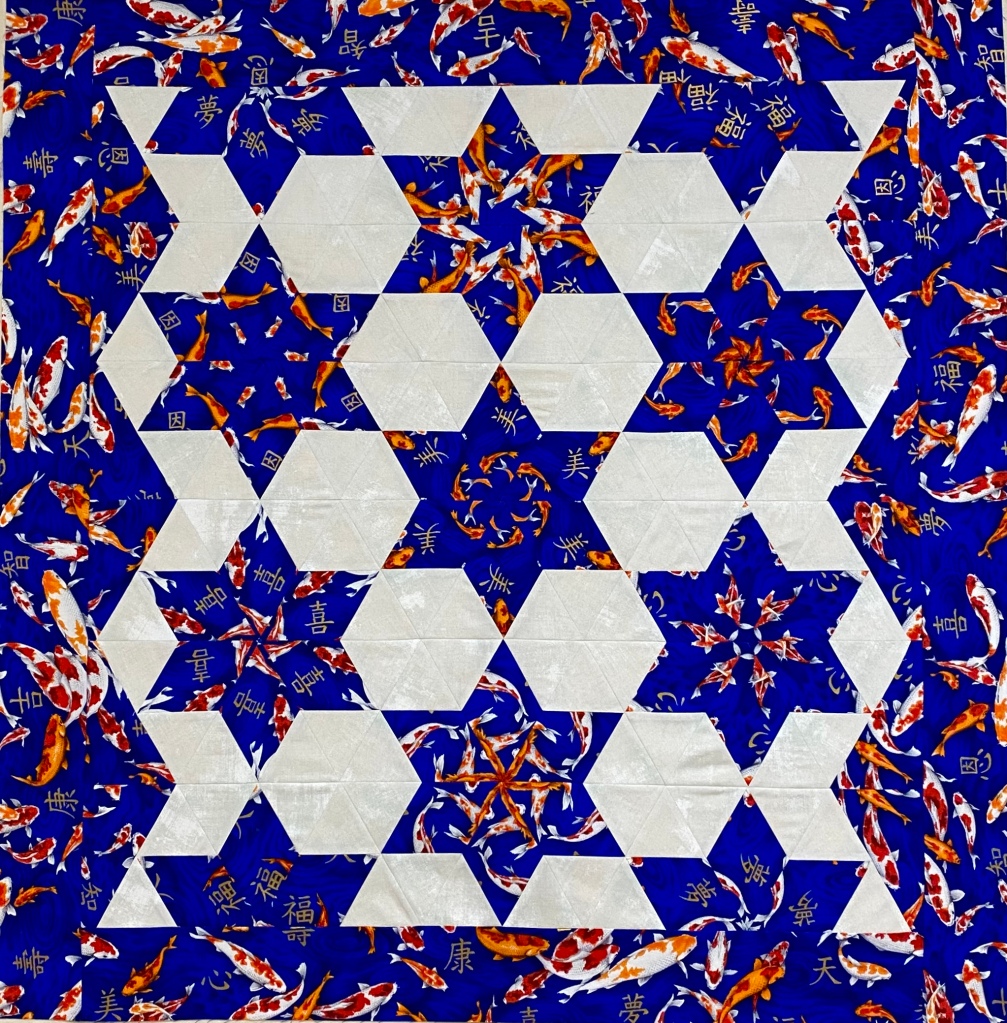
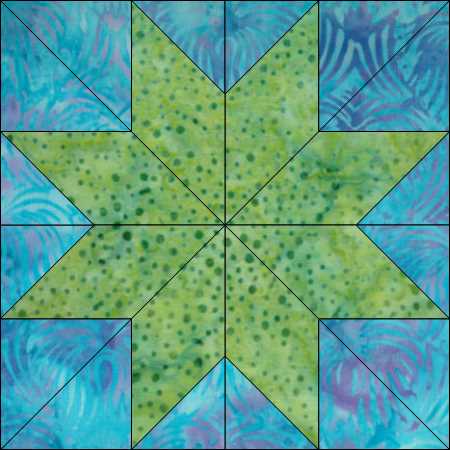
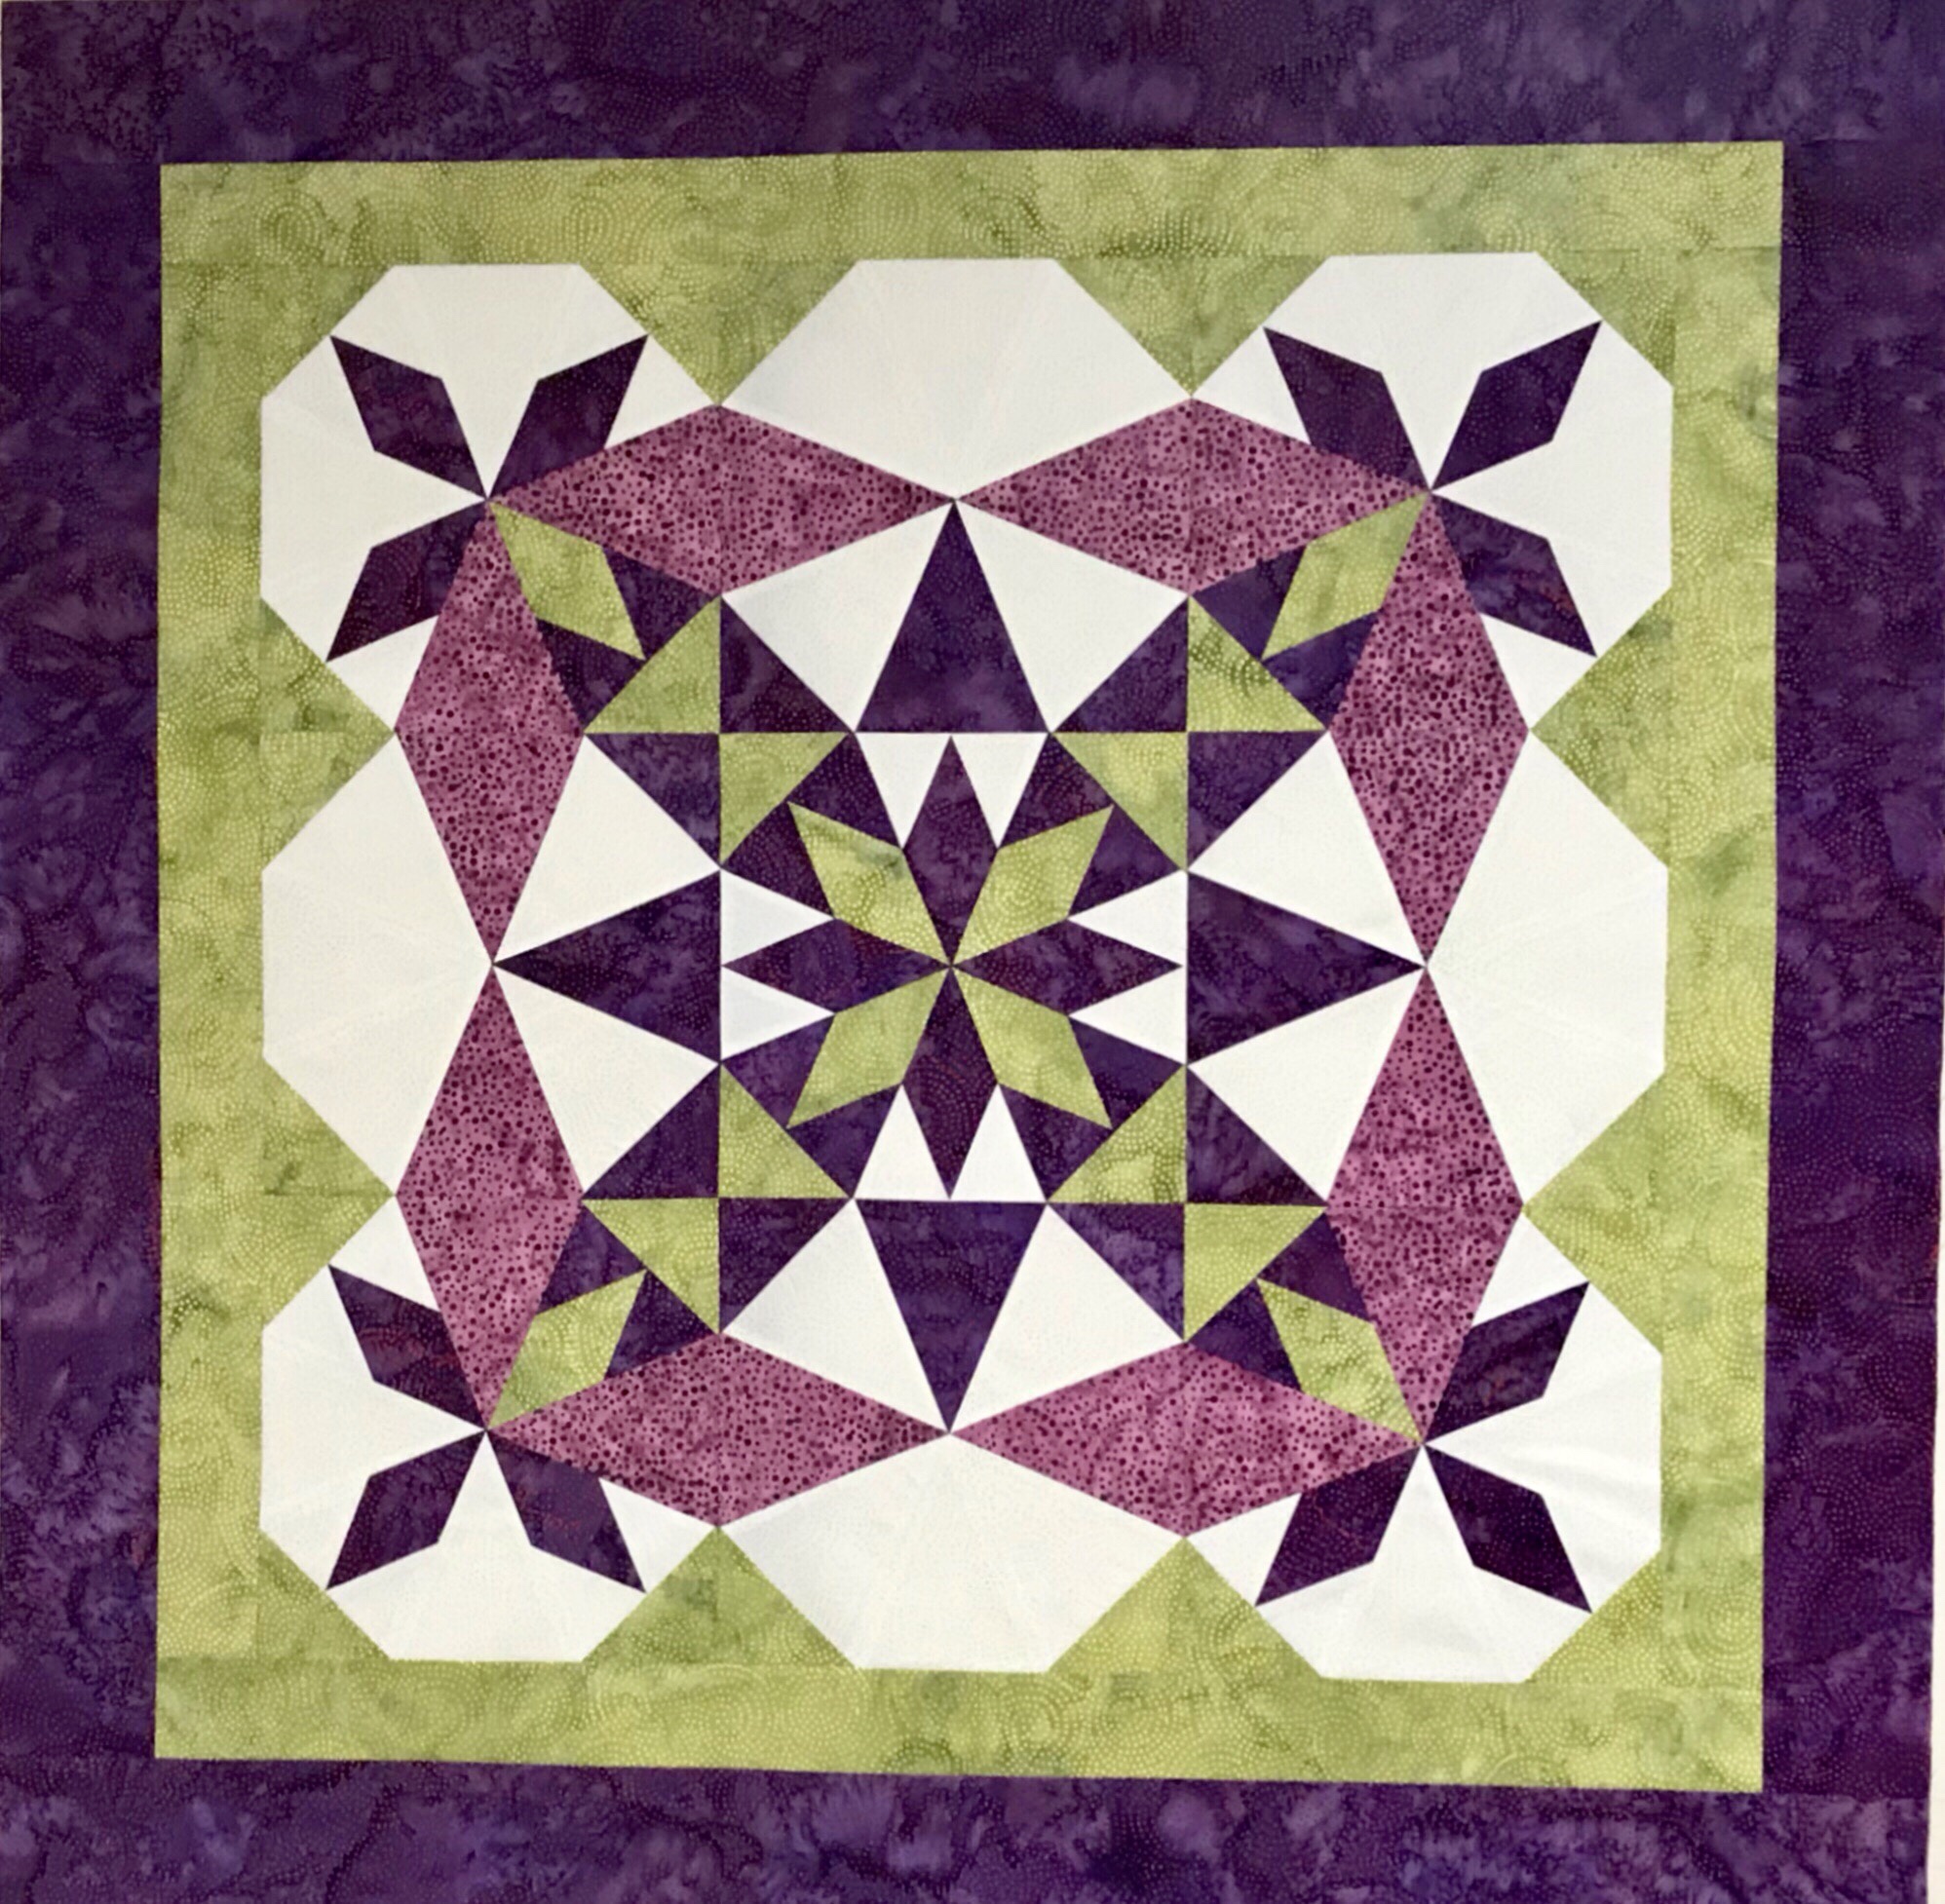
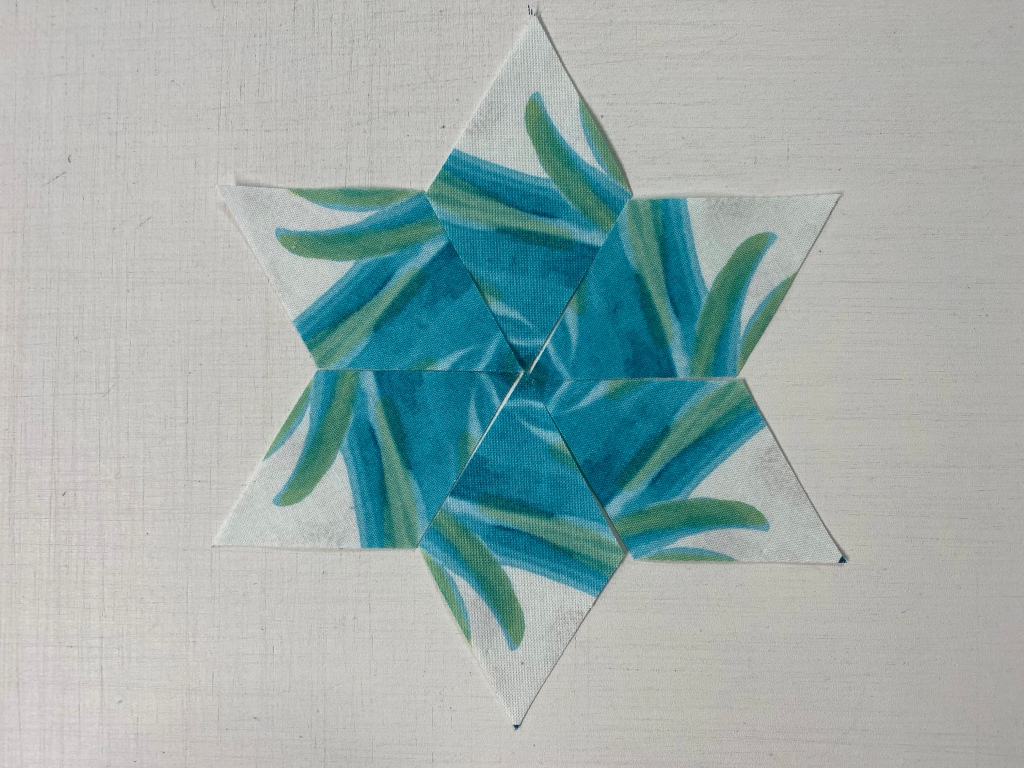
I played with Star 60 and created kaleidoscope stars and this 48″ star. Light Bulb moment!!!! Instead of inserting cubes in my OBW, why not a star?

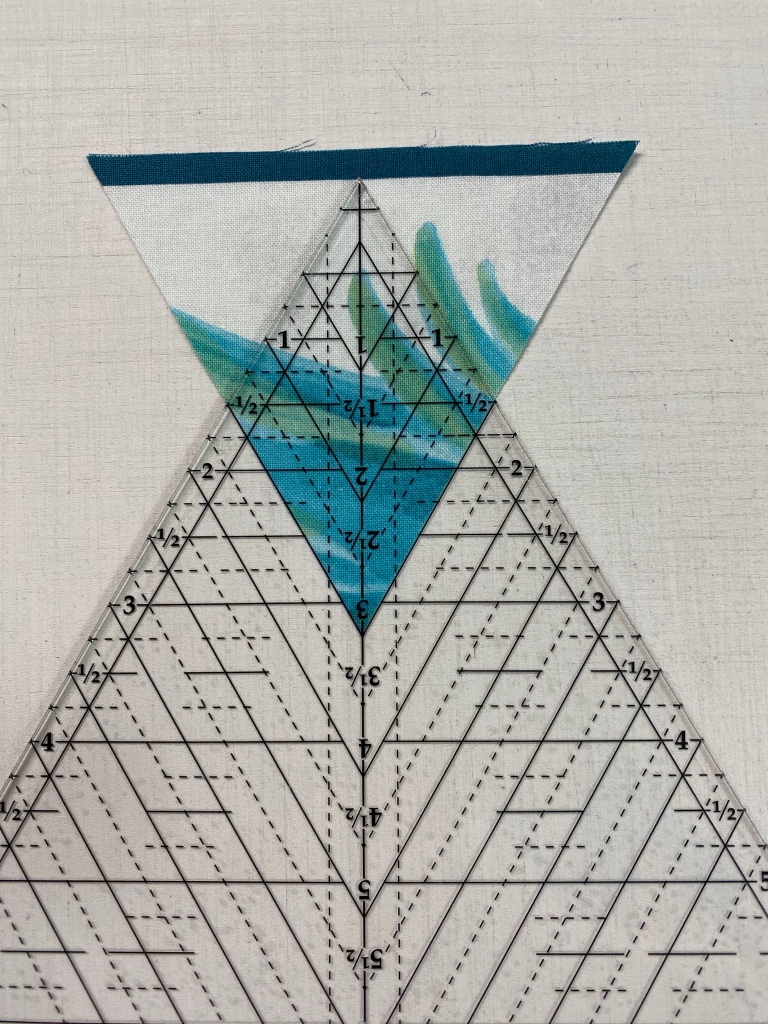
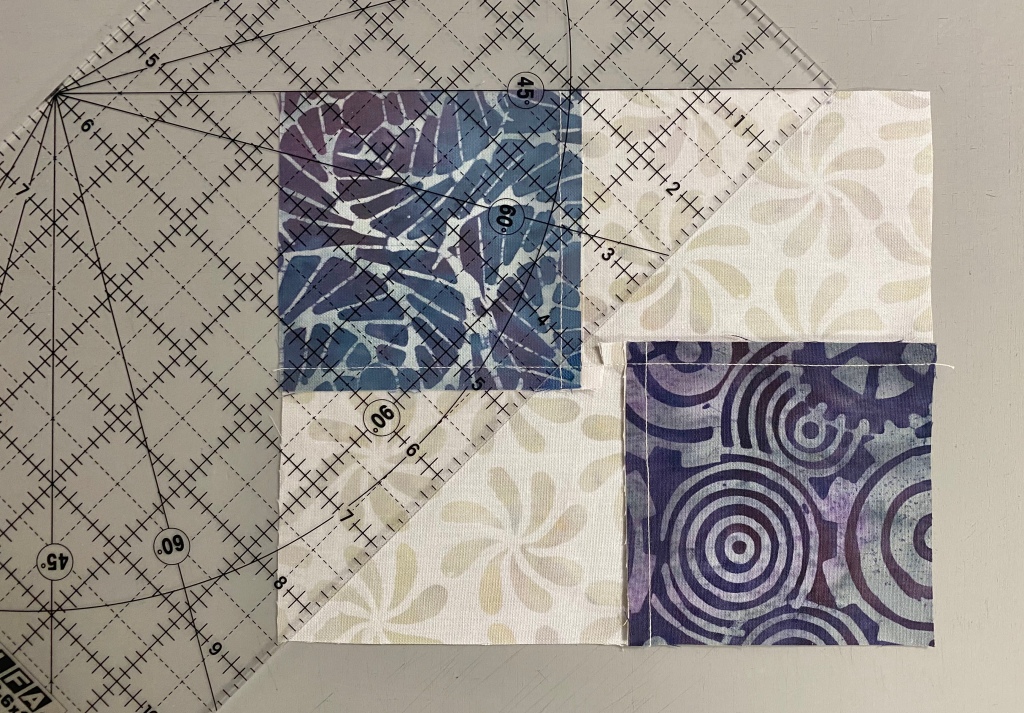
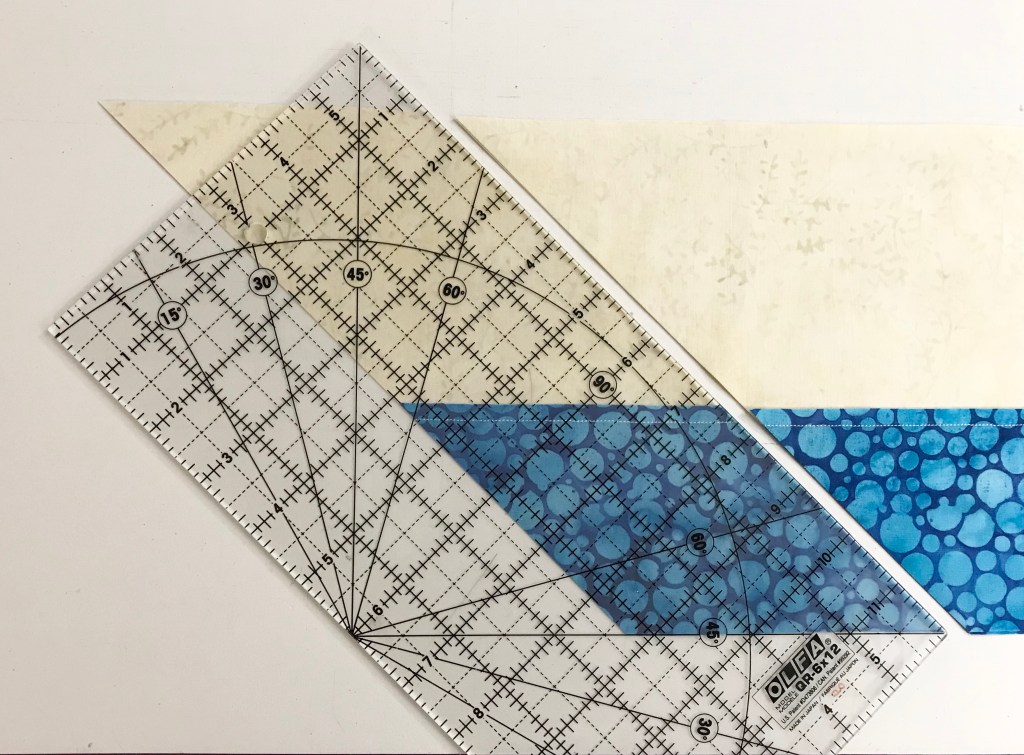
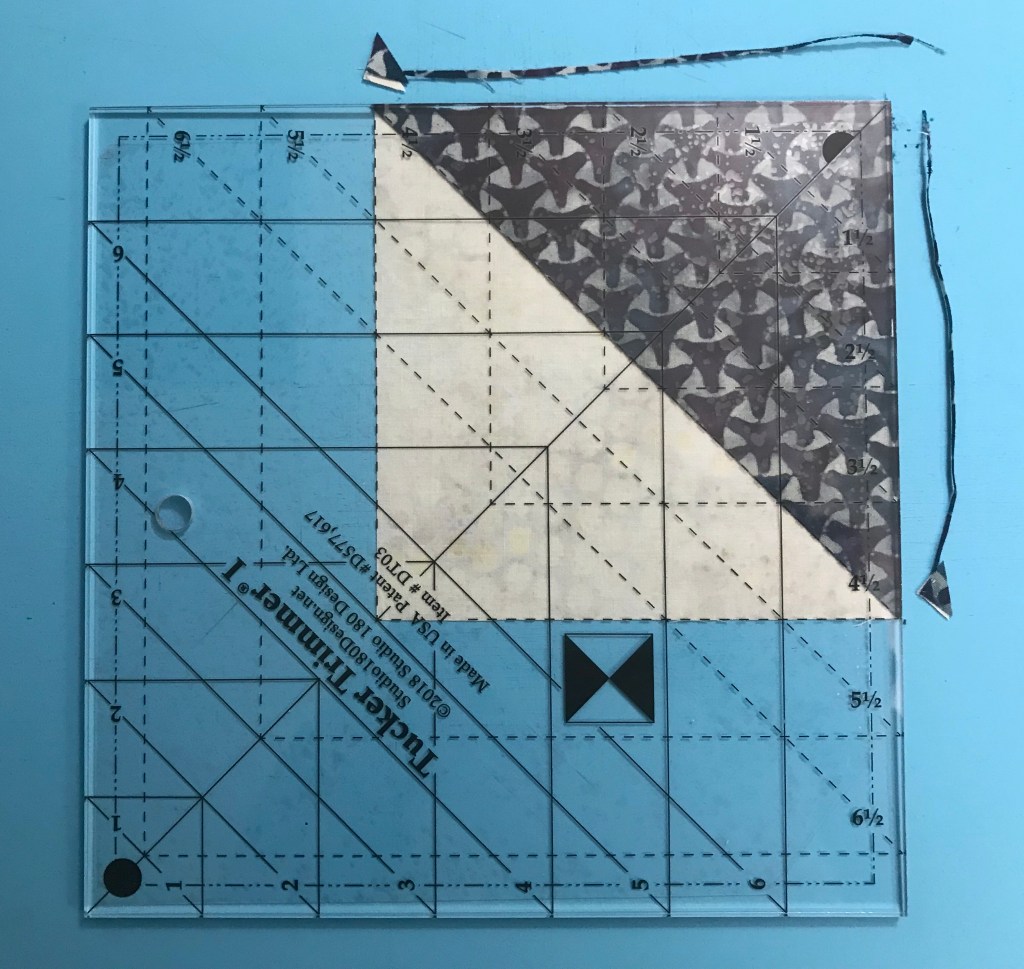
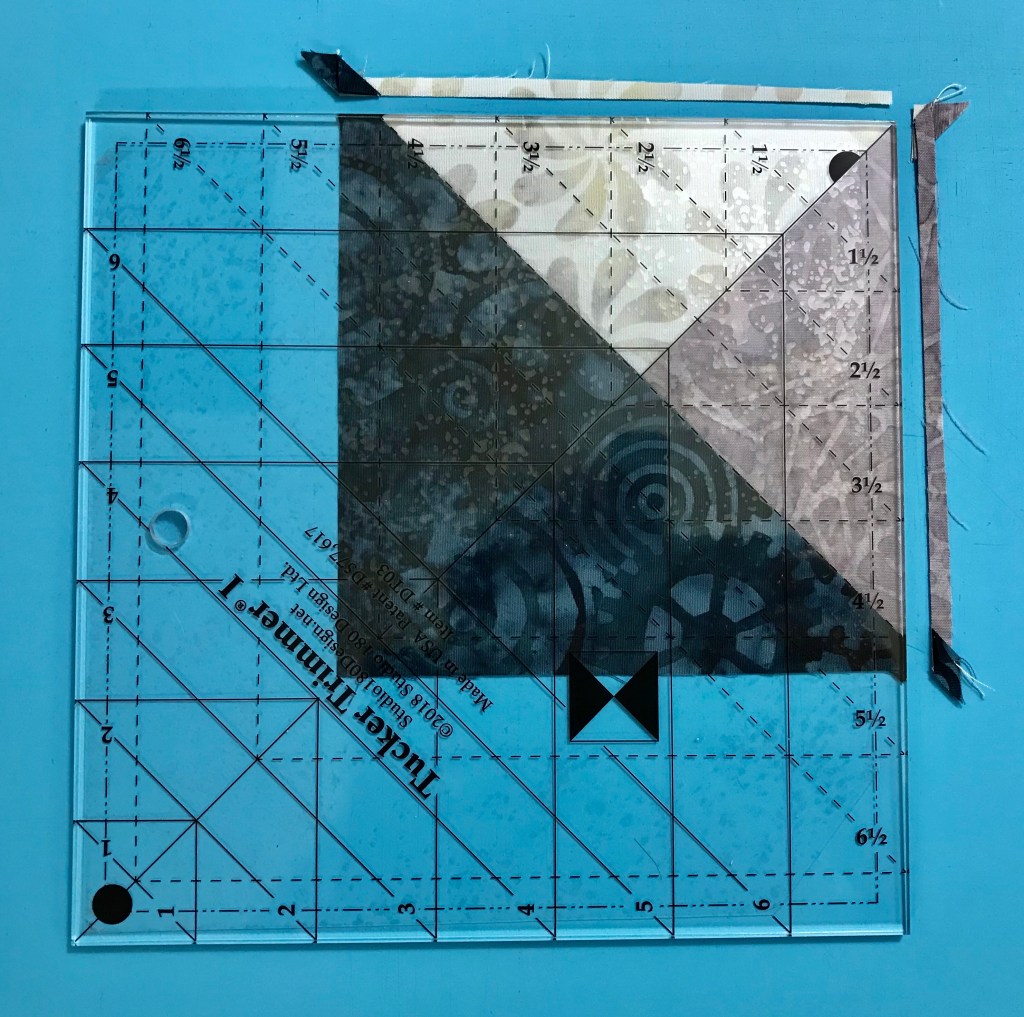
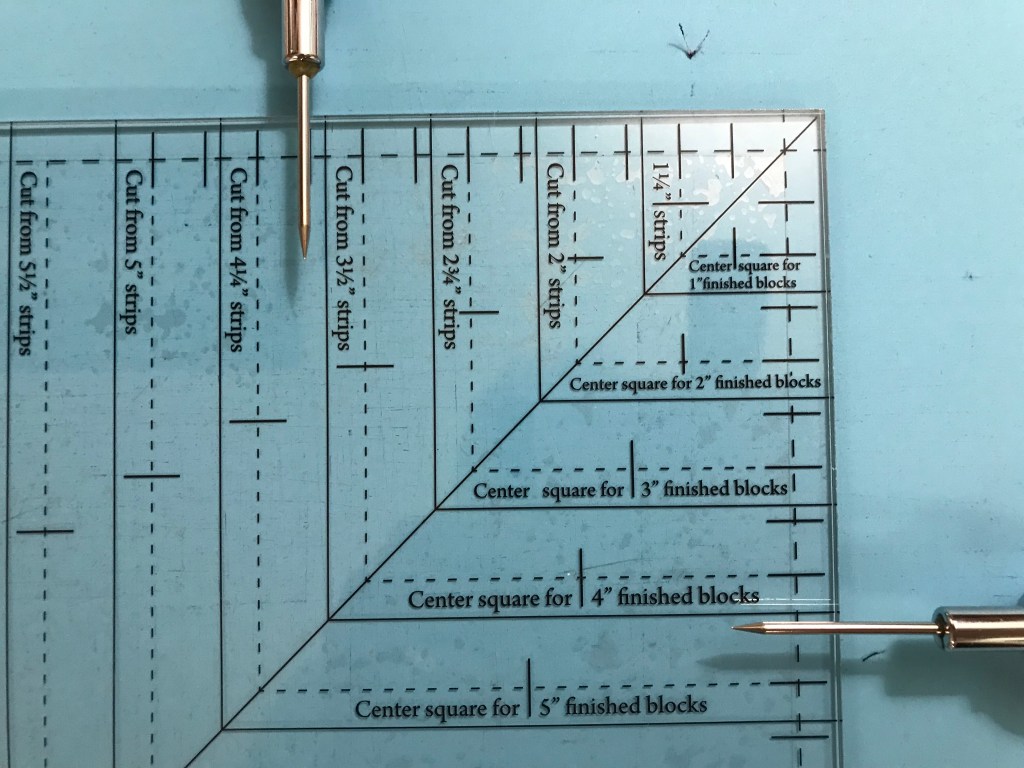
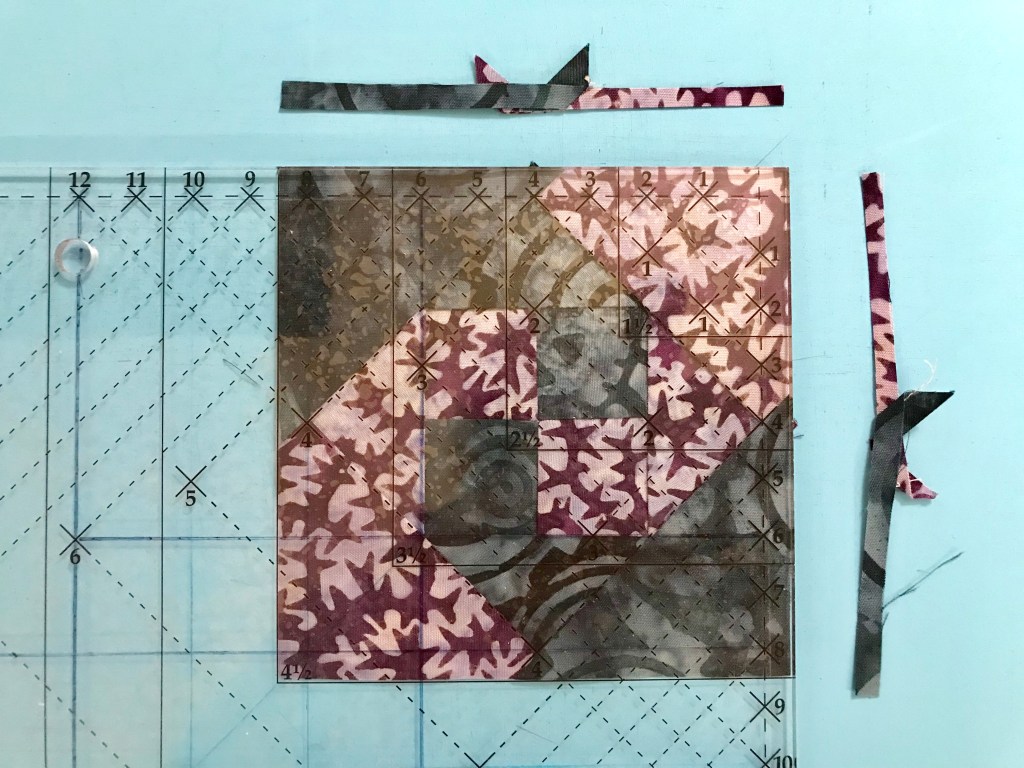
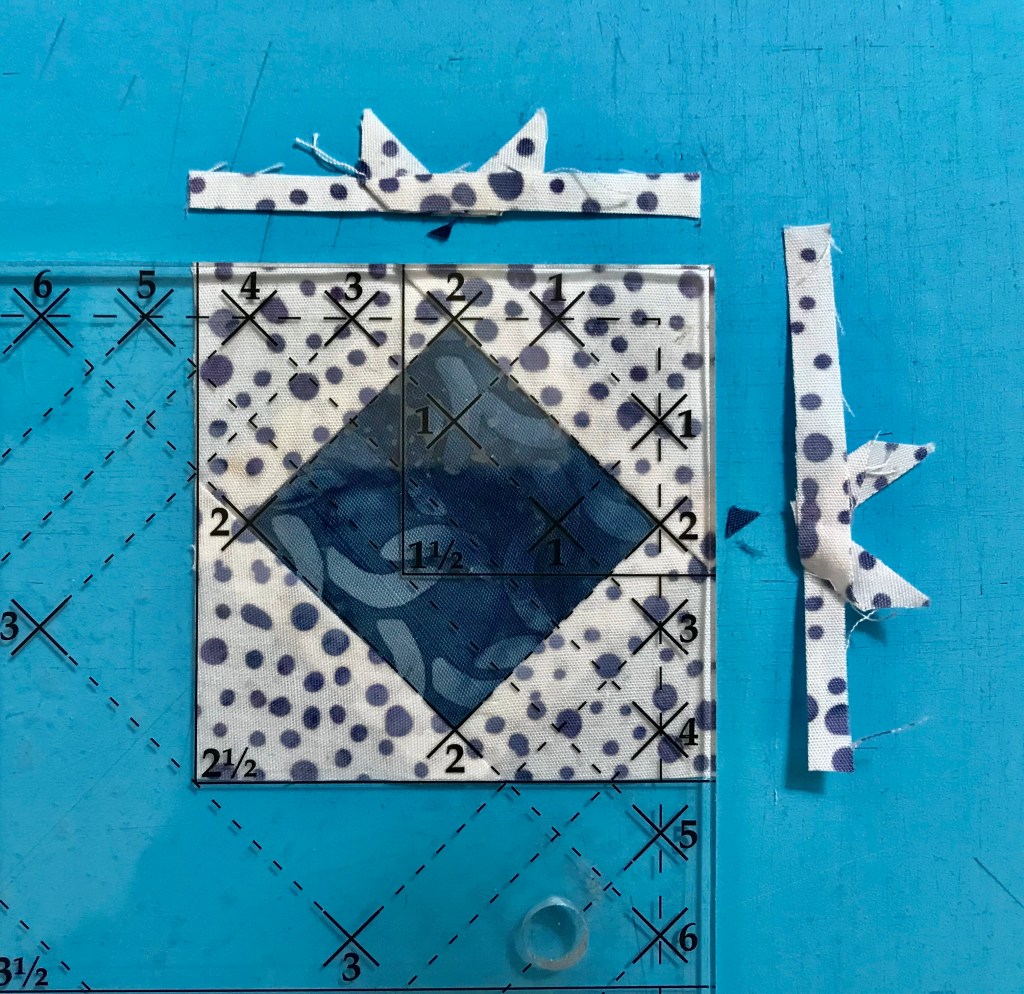
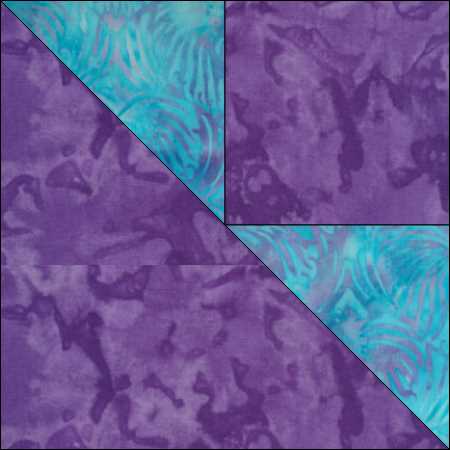
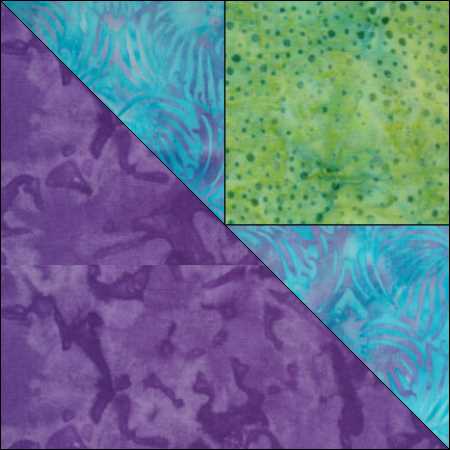
I usually have left over triangles when designing my OBW’s. I had equilateral triangles cut that had a dark edge that was larger than a 1/4″. I was thought it might not make a pretty hexie. These triangles had been cut from 3 3/4″ strips. I laid my Star 60 tool on the triangles and discovered I could cut 3″ diamonds from it. This allowed me to use these left over triangles in a different way.

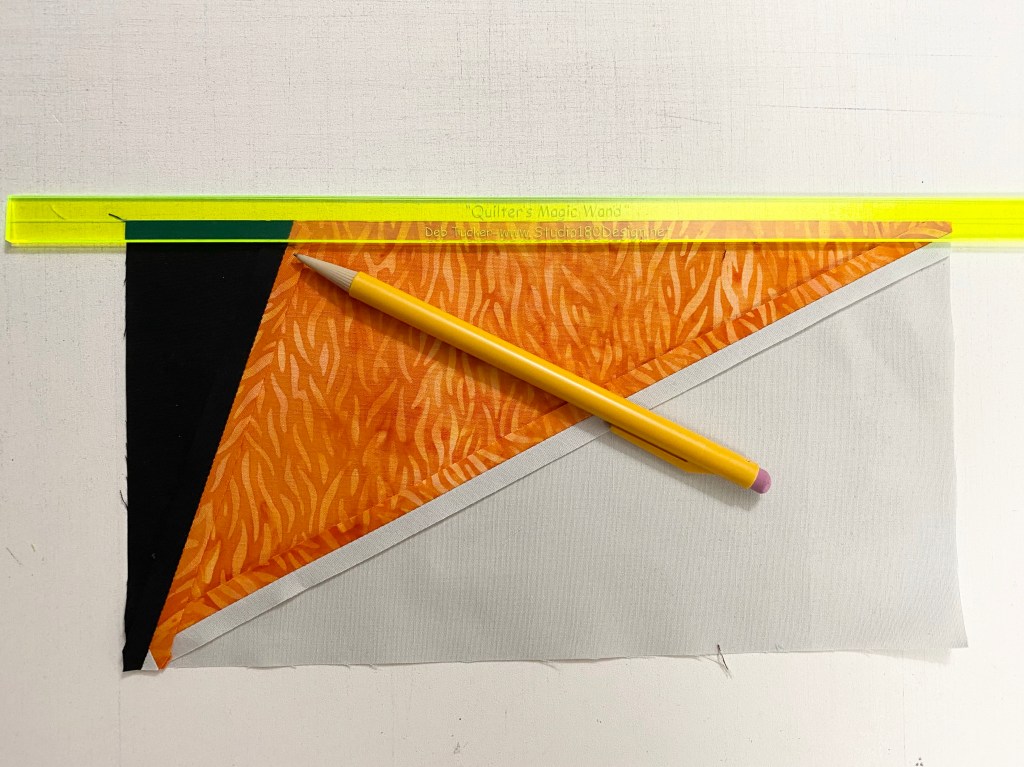
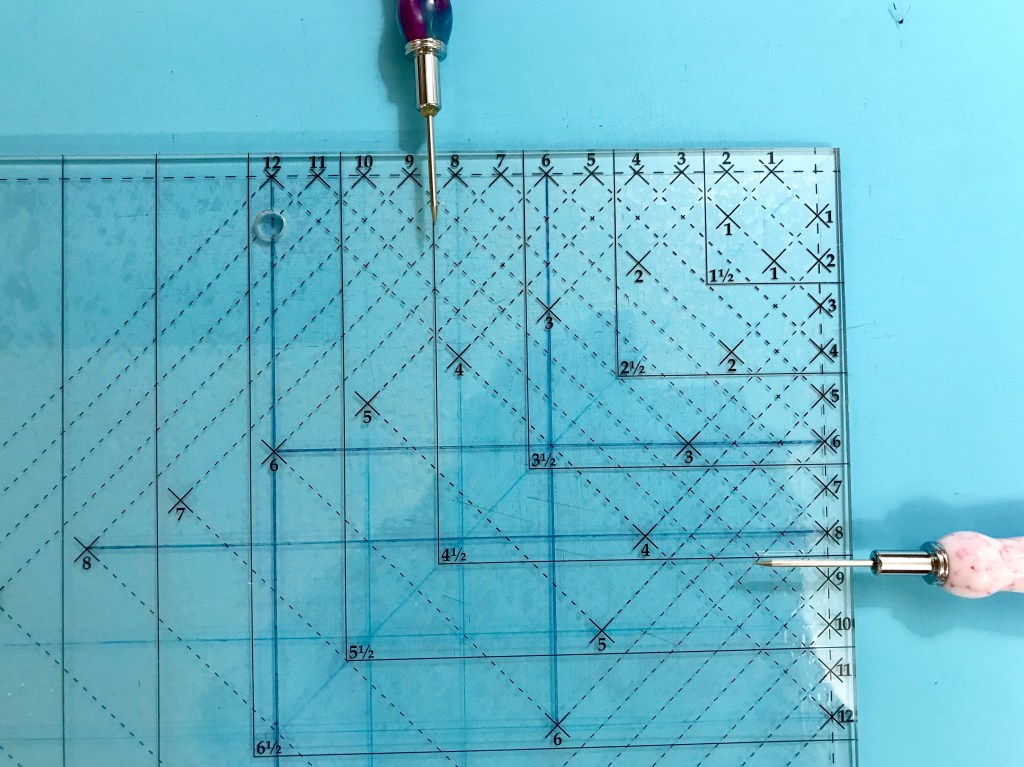
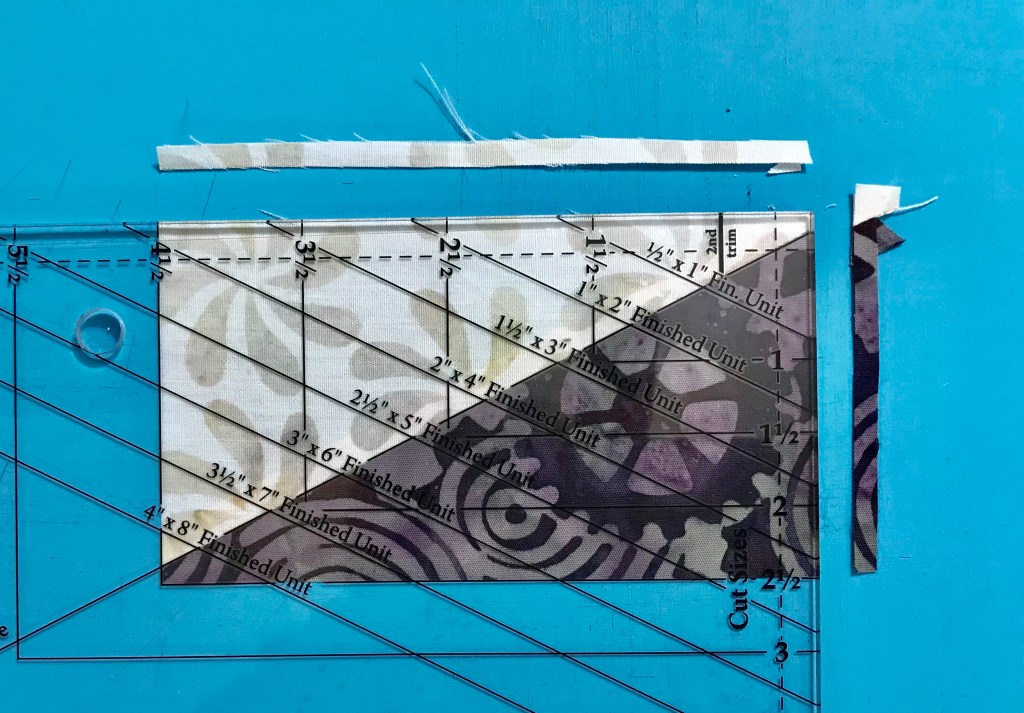
Way cool! Now I needed side triangles for the star points. I checked the size chart for 3″ diamonds and cut the appropriate size strip,

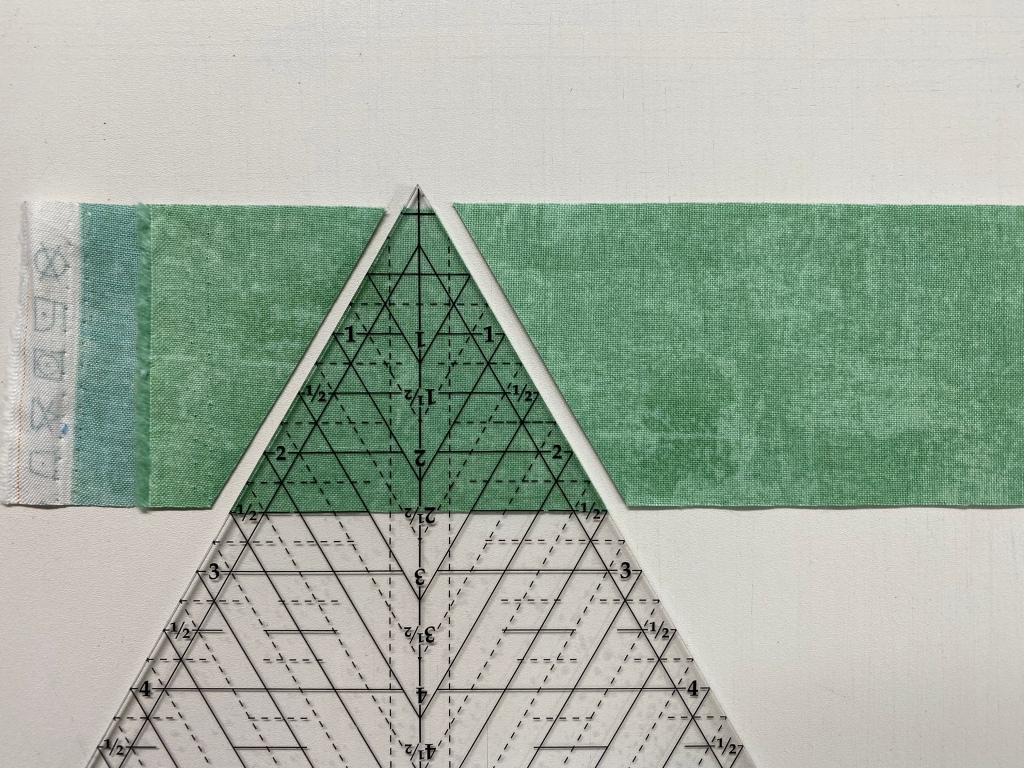
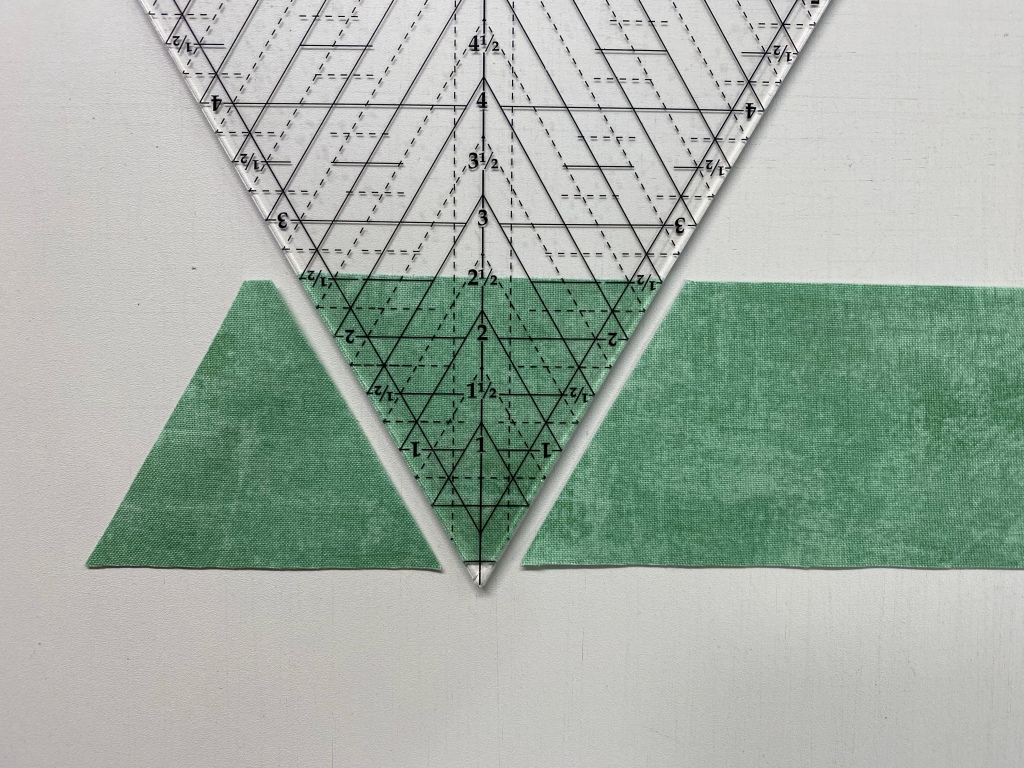
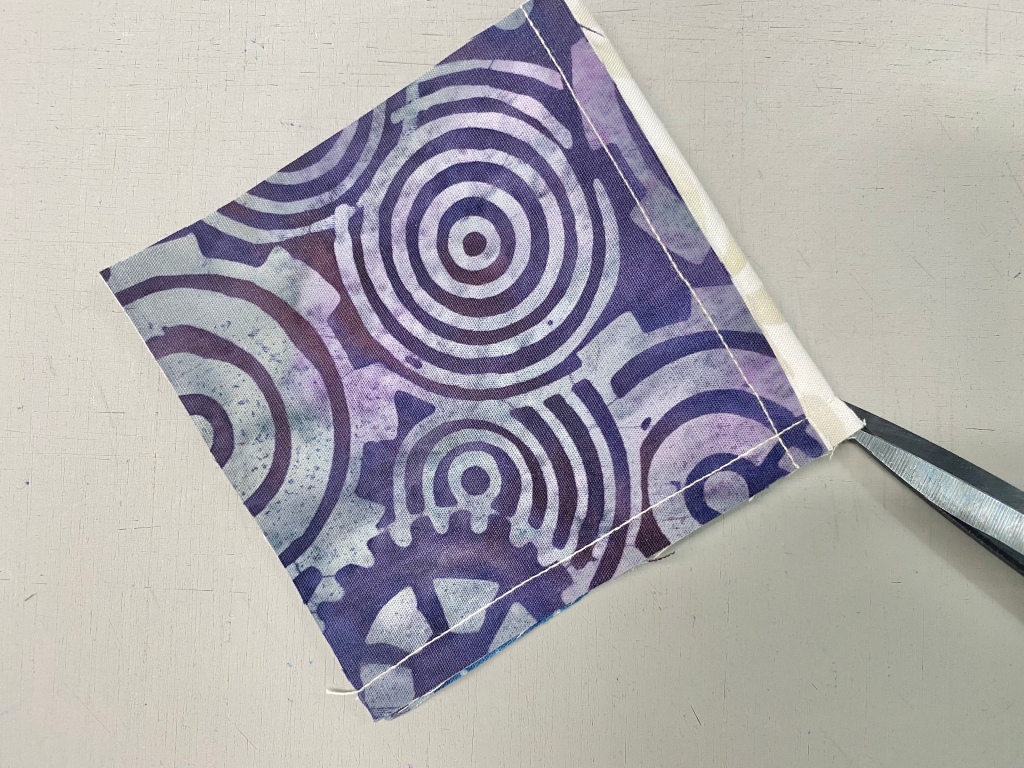
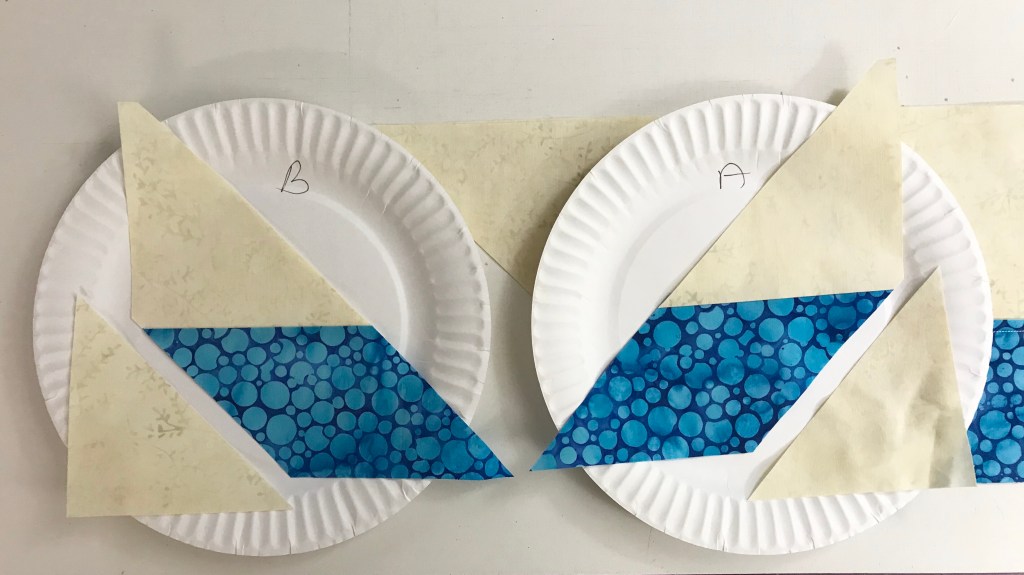
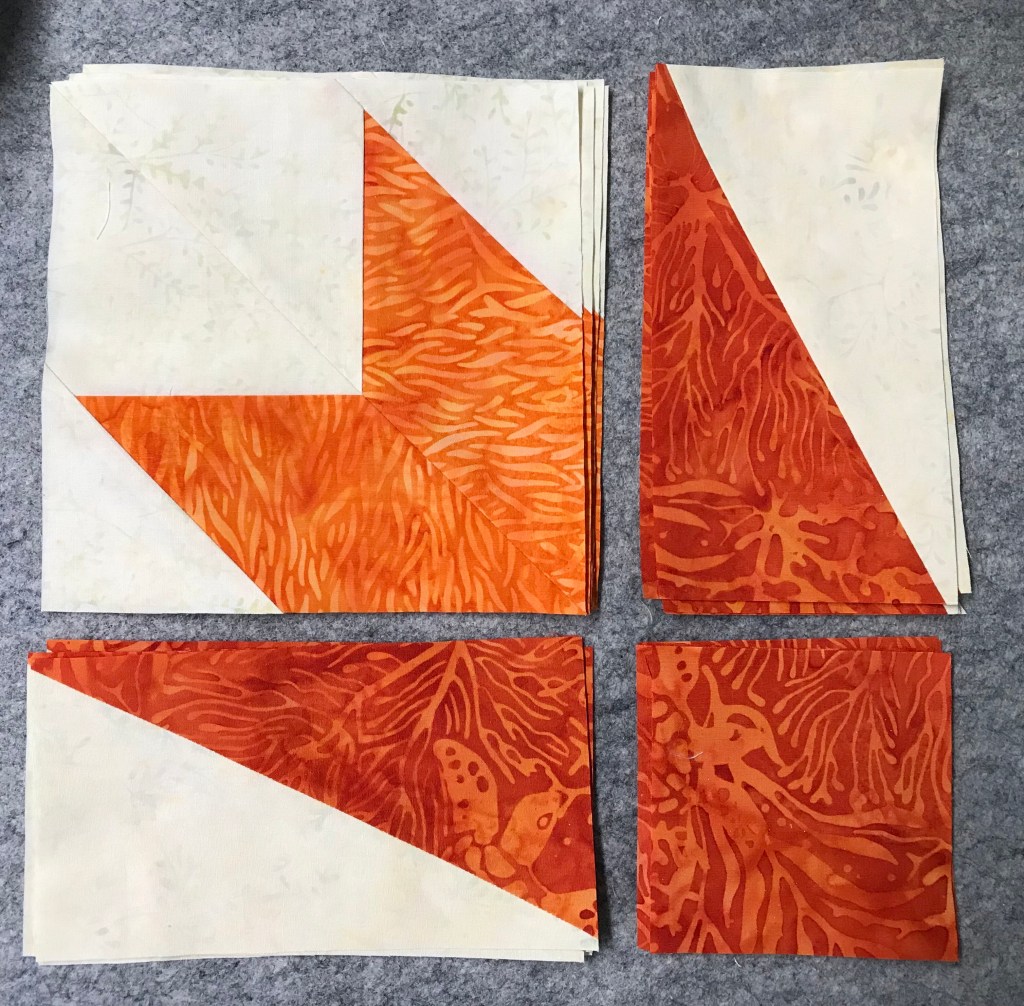
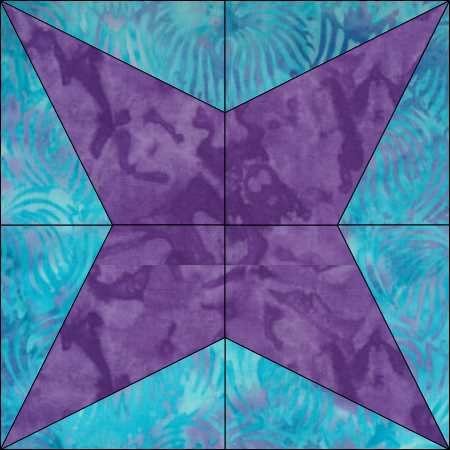
I cut the side triangles for my diamond star points.

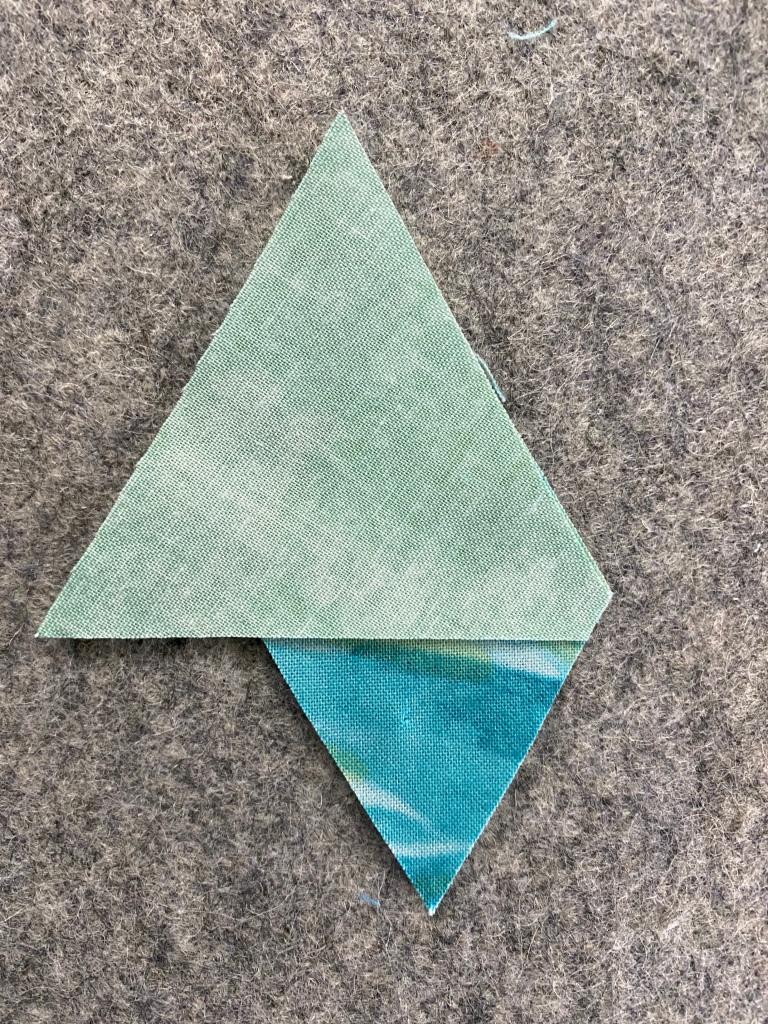
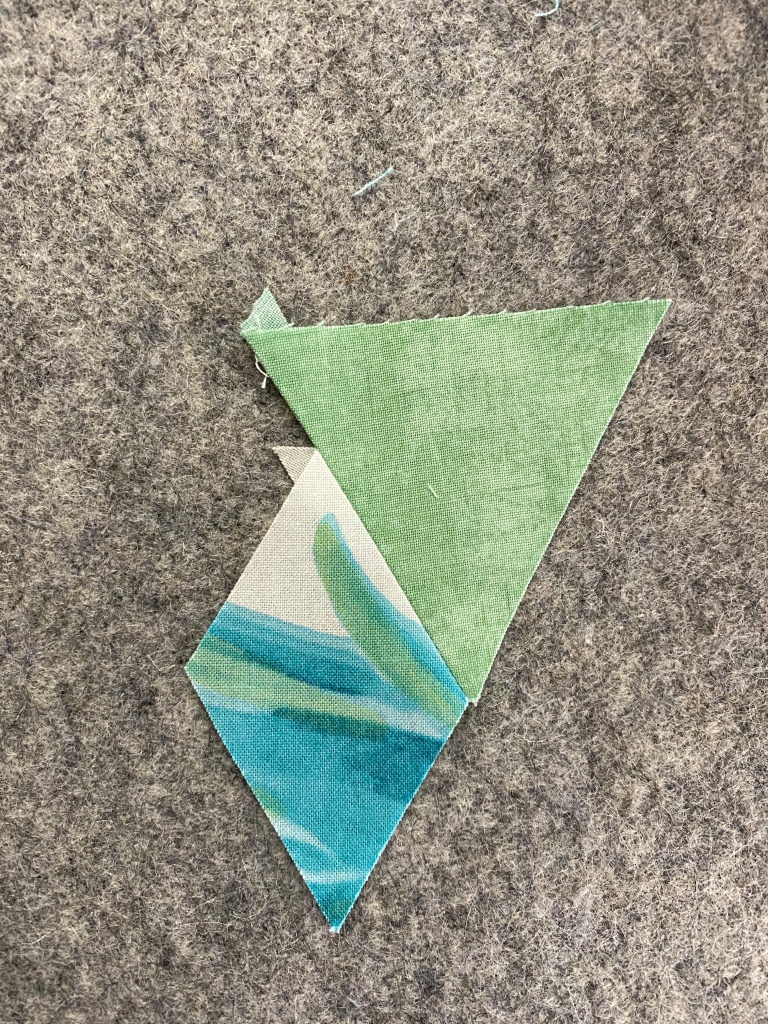
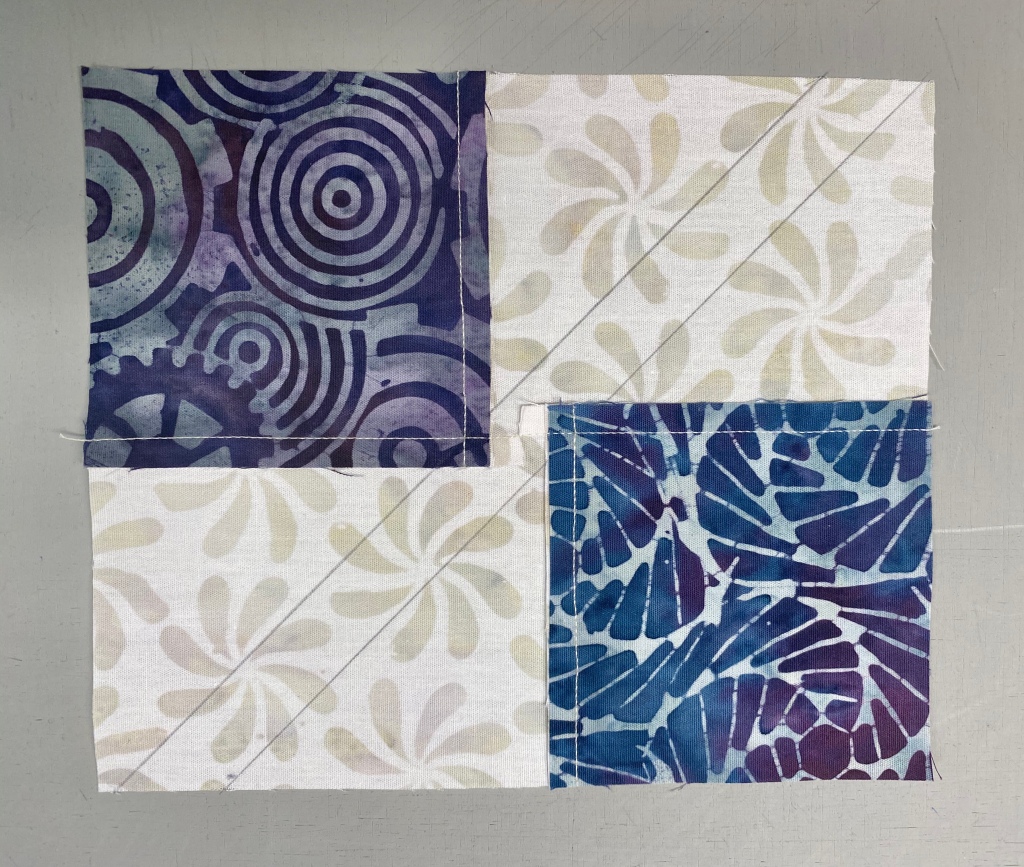
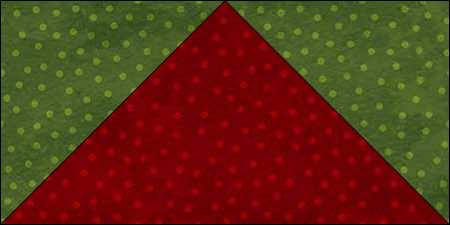
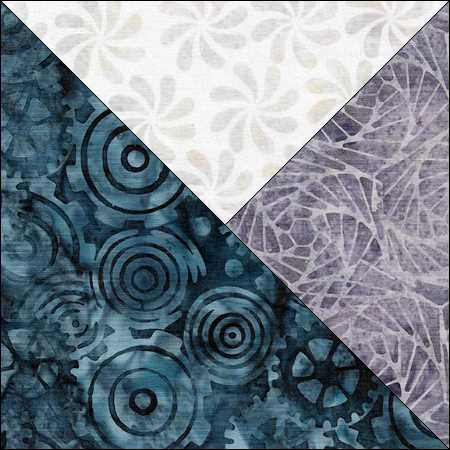
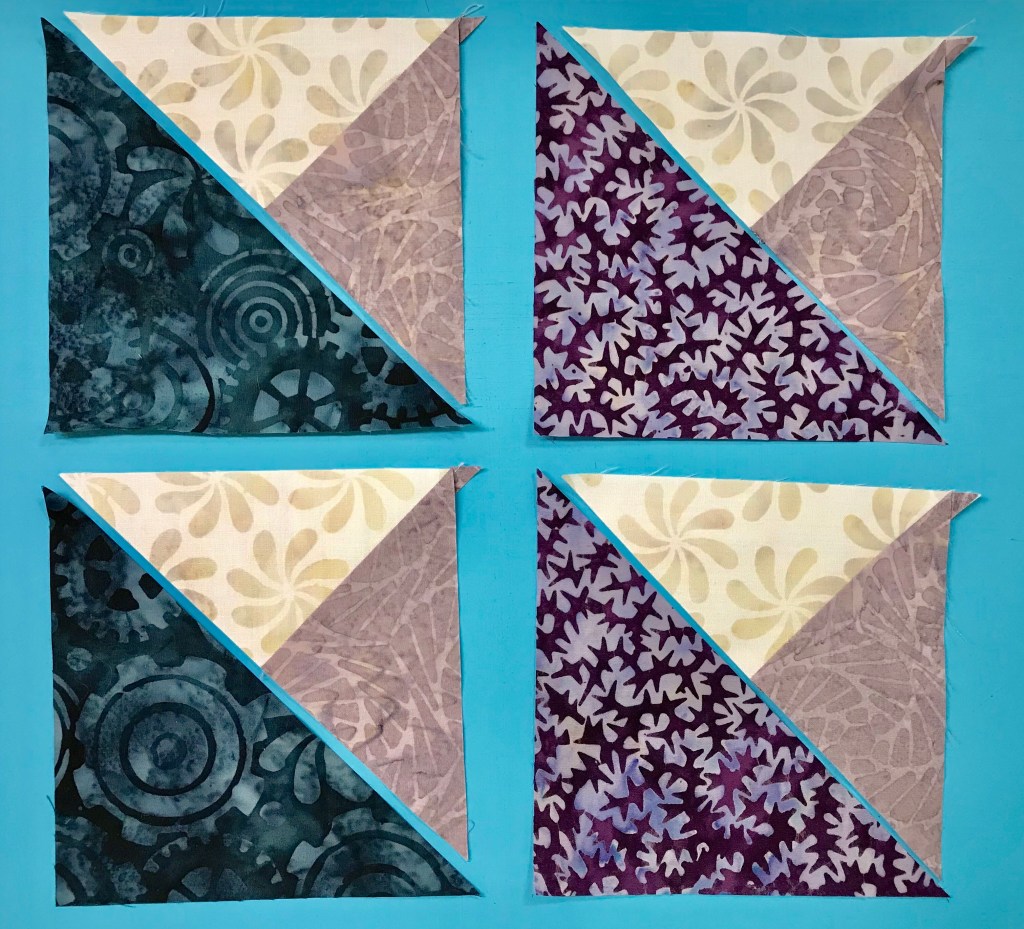
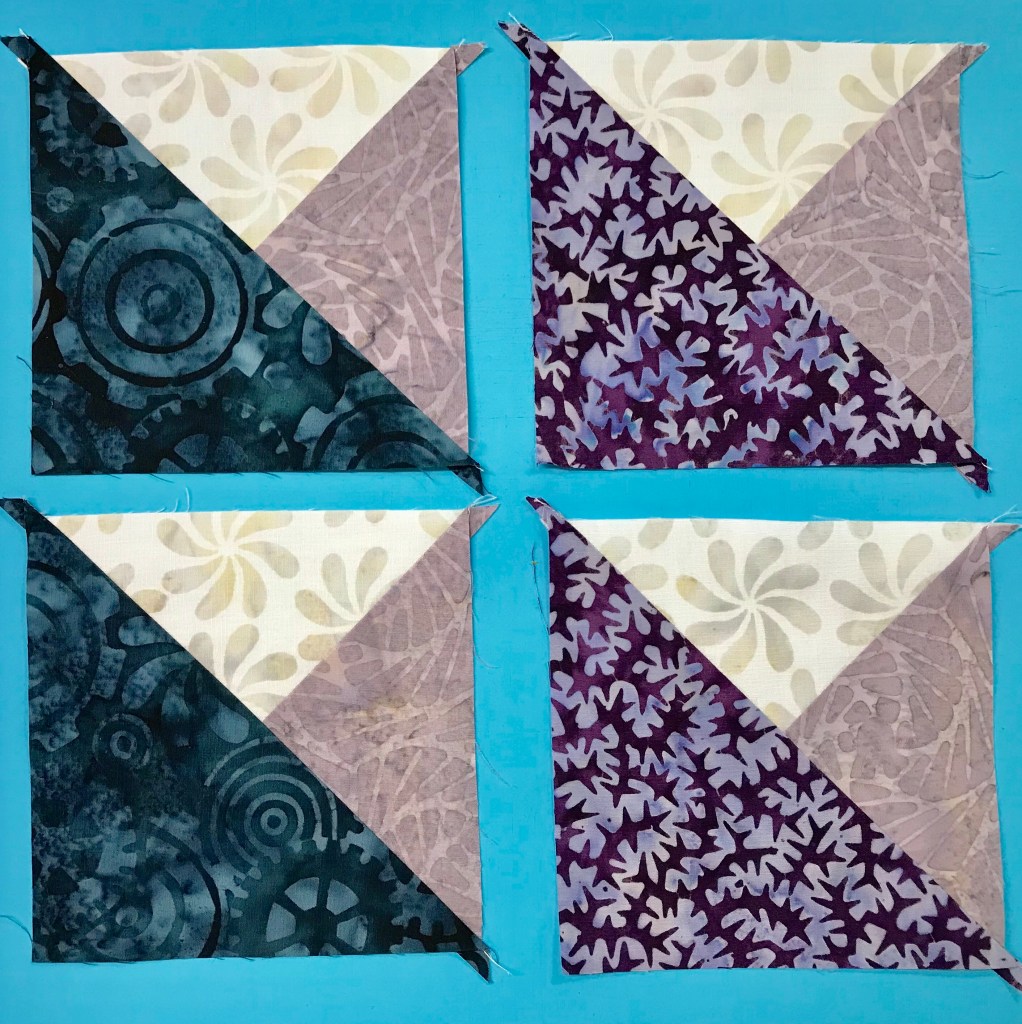
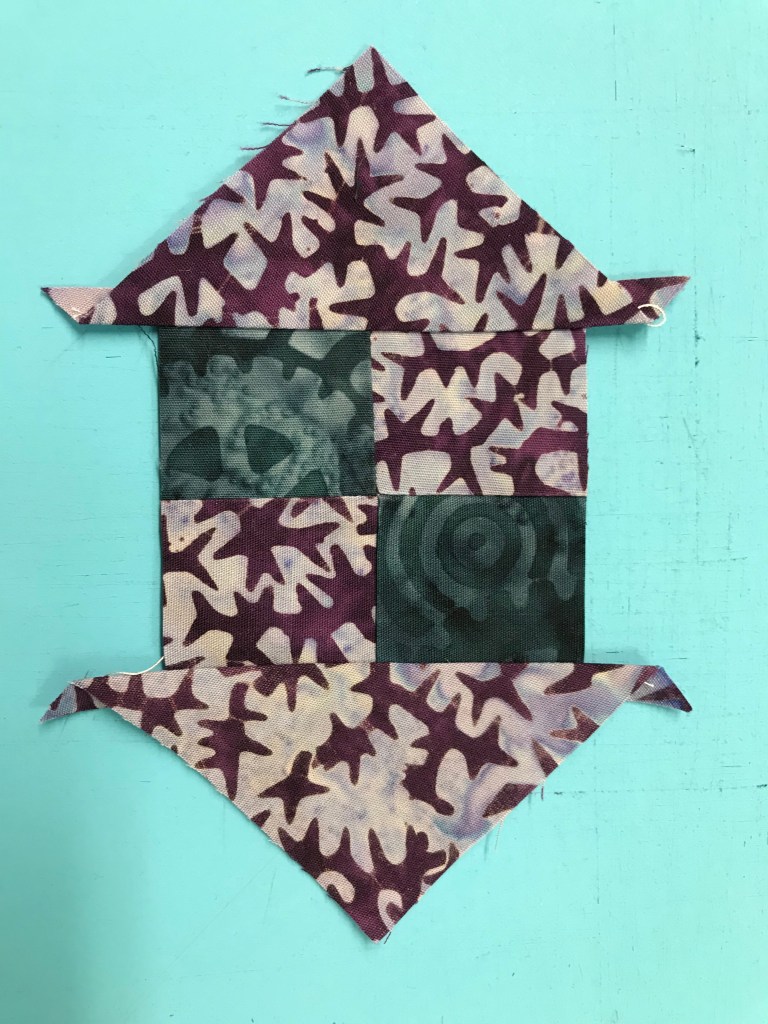
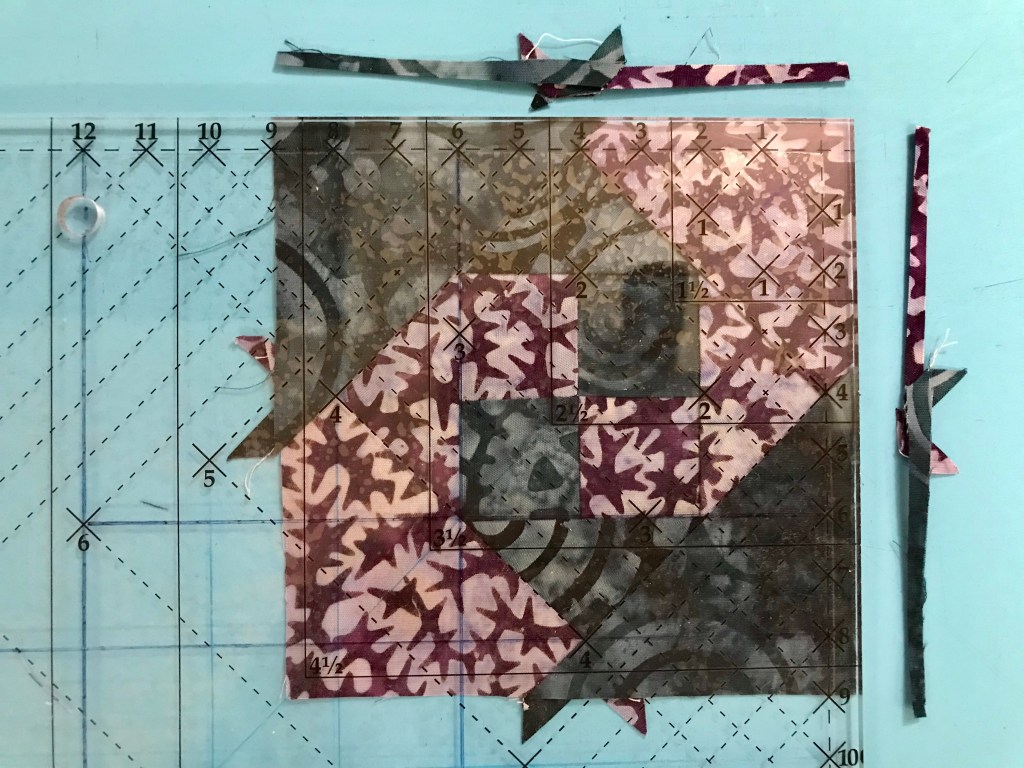
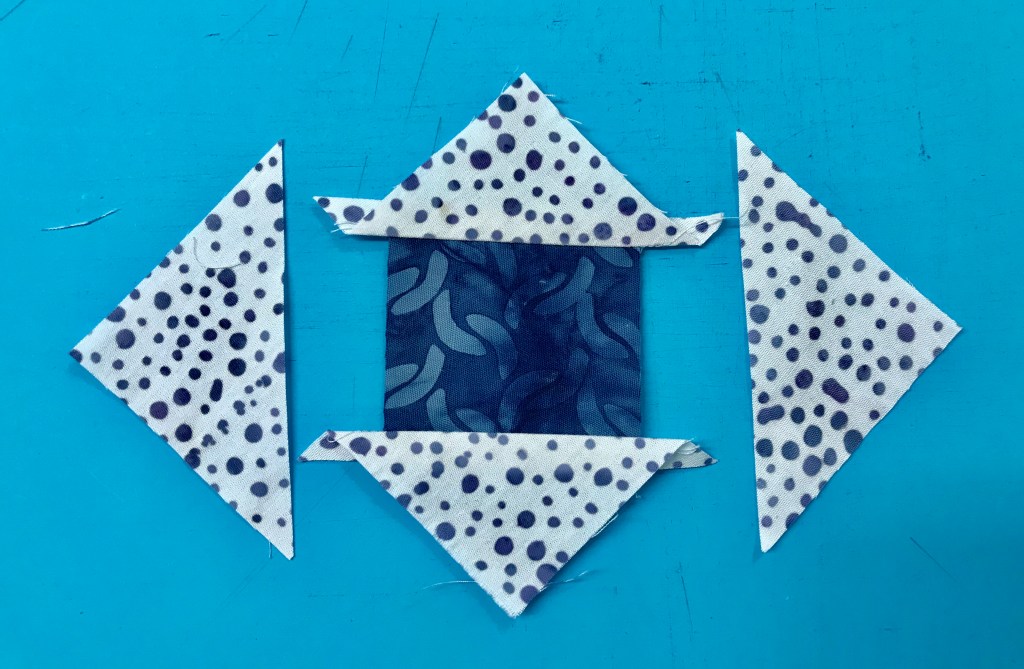
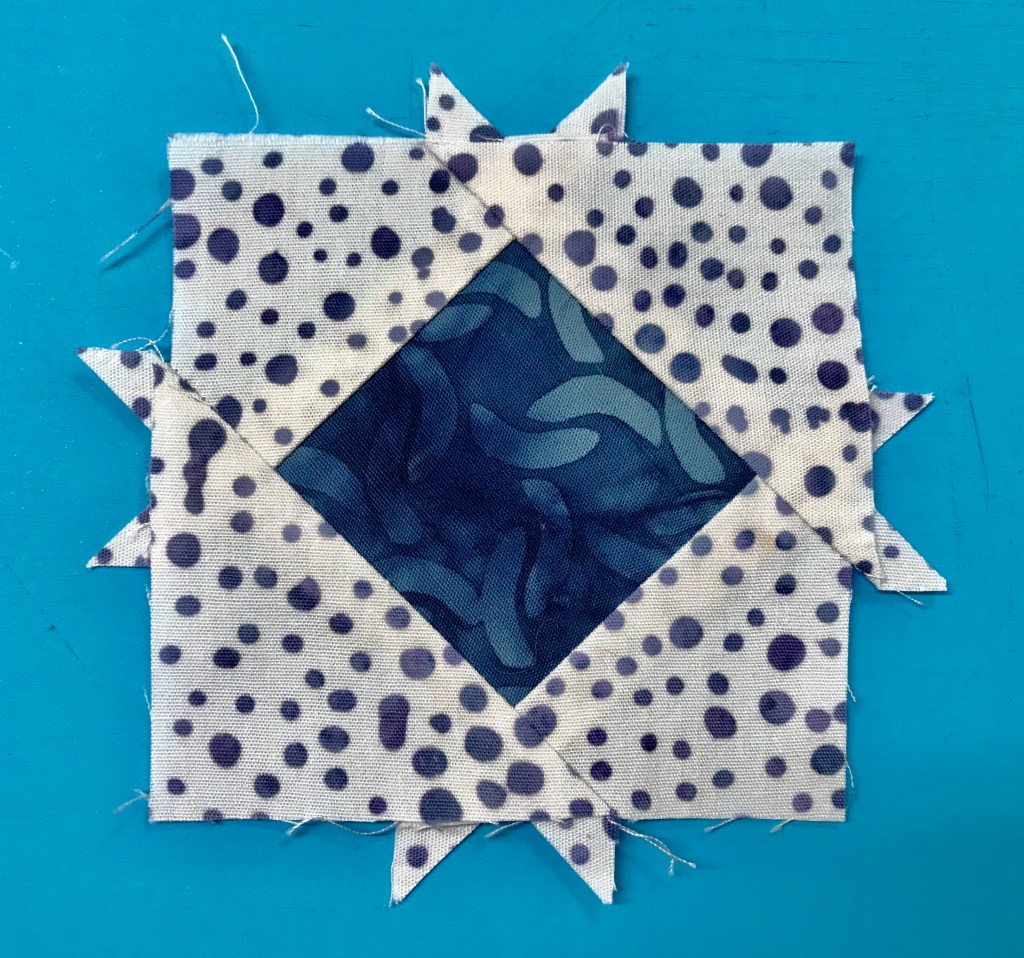
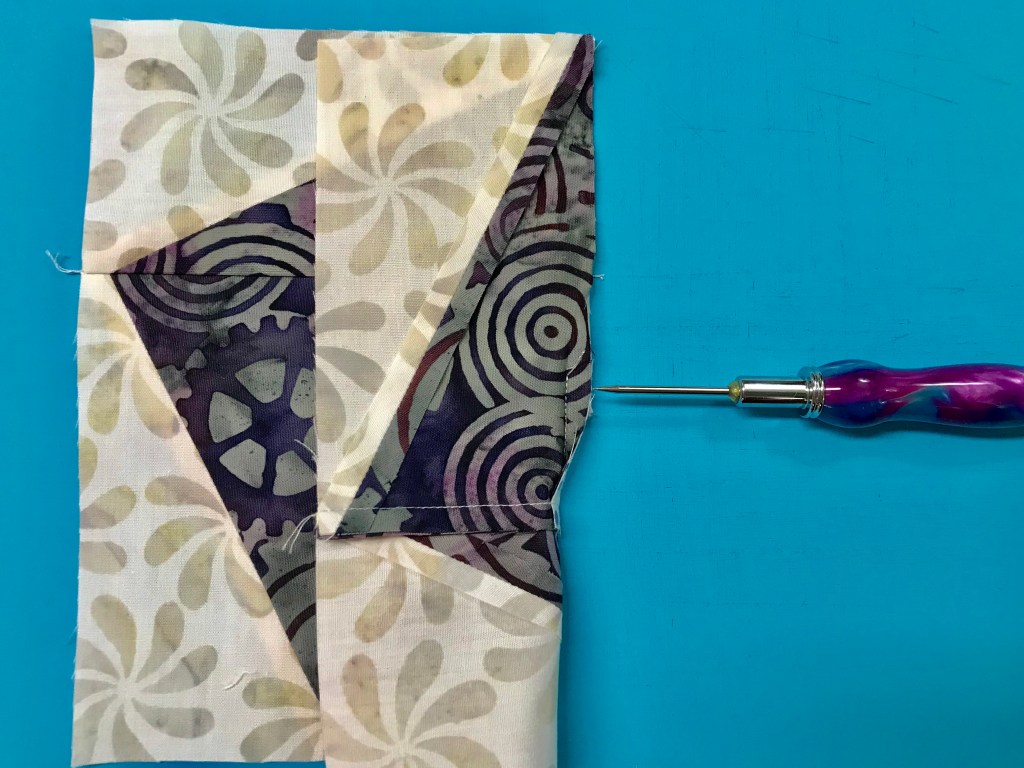
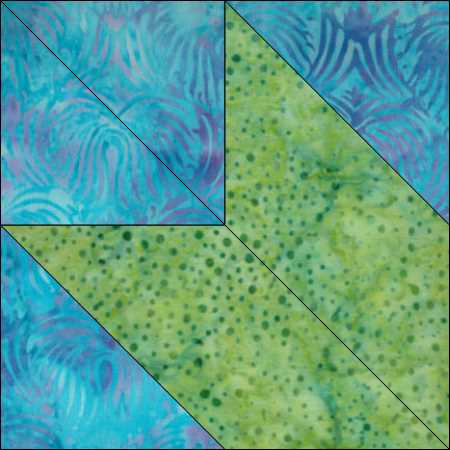
Lay out your units. Stitch the first side triangle to the diamond and press toward the diamond.

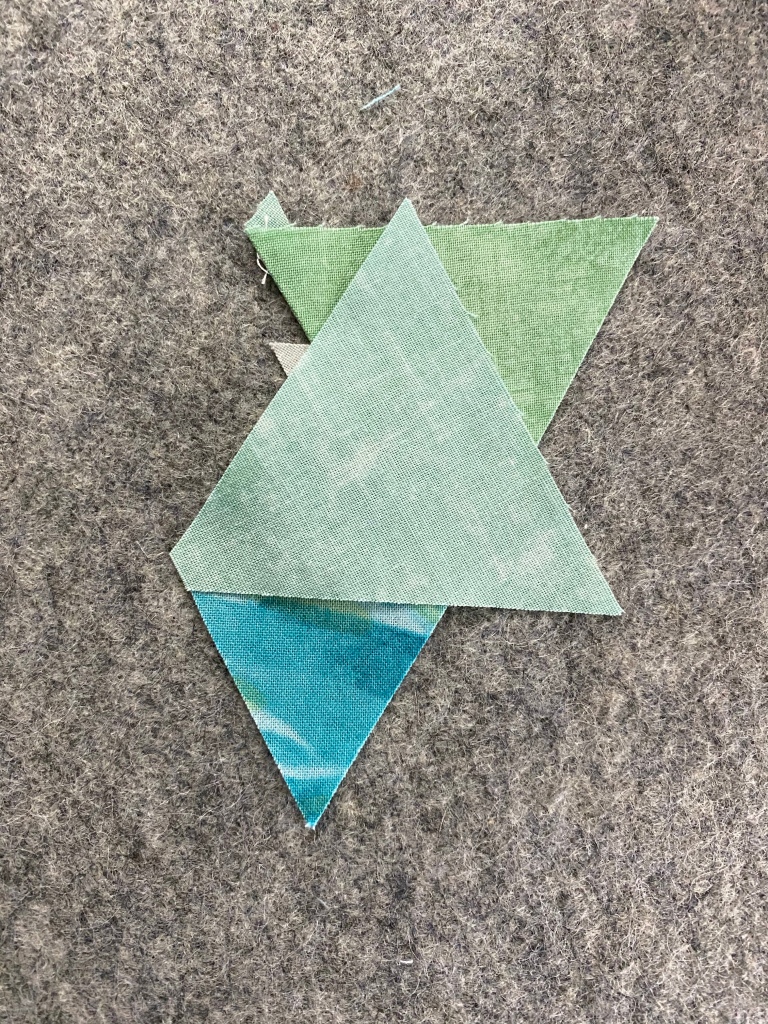
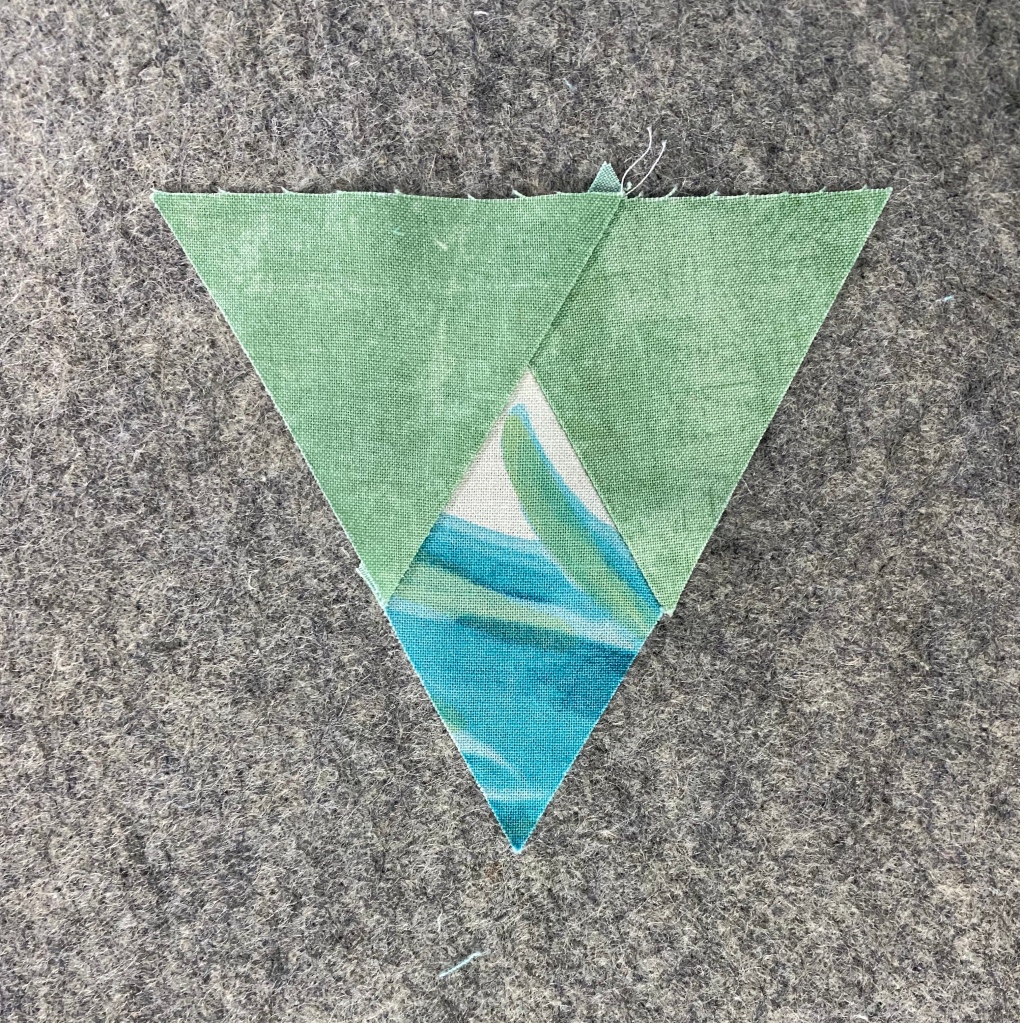
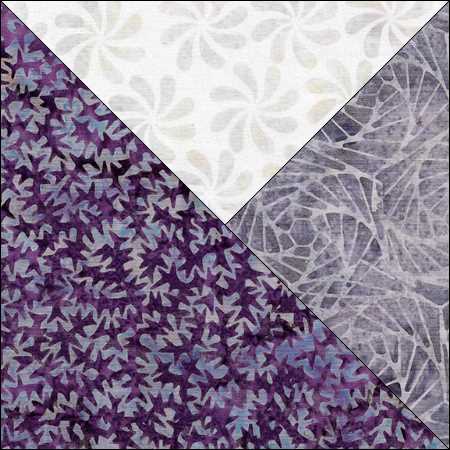
Stitch the opposite side triangle, press toward the side triangle. LOOK what you have! An equilateral triangle.

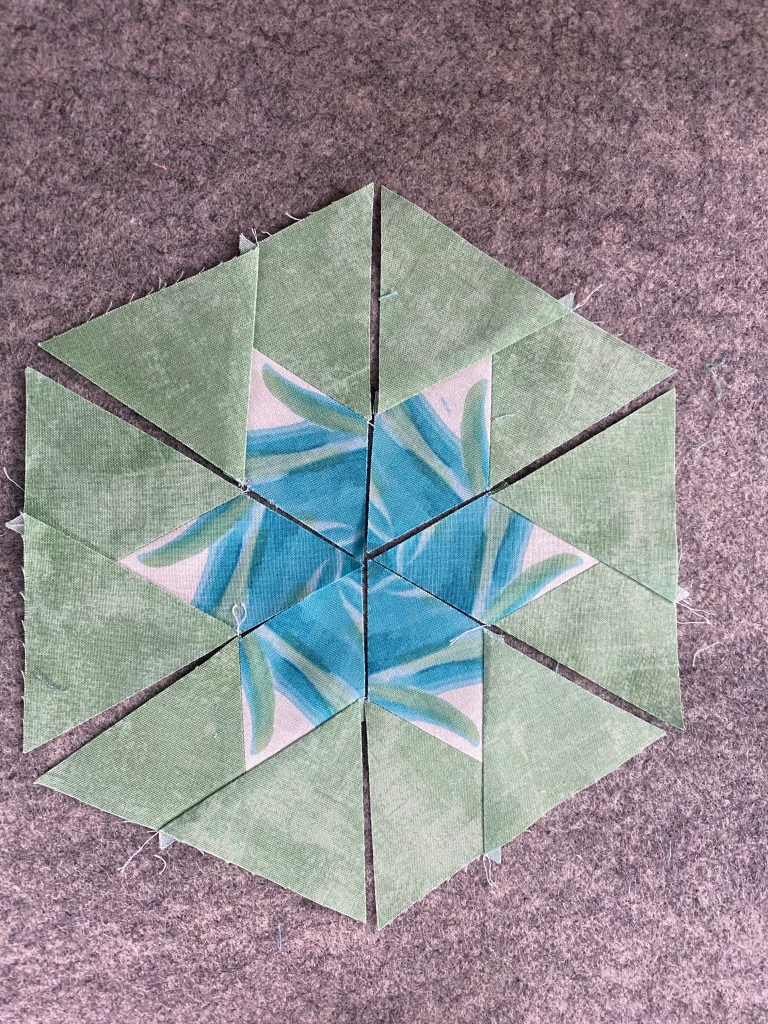
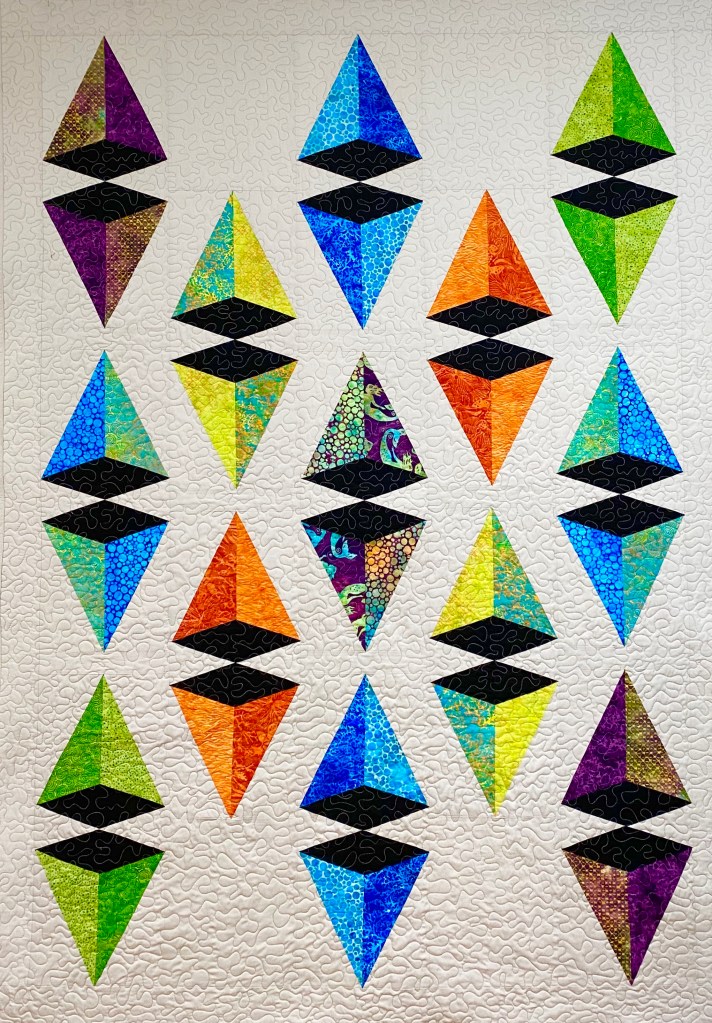
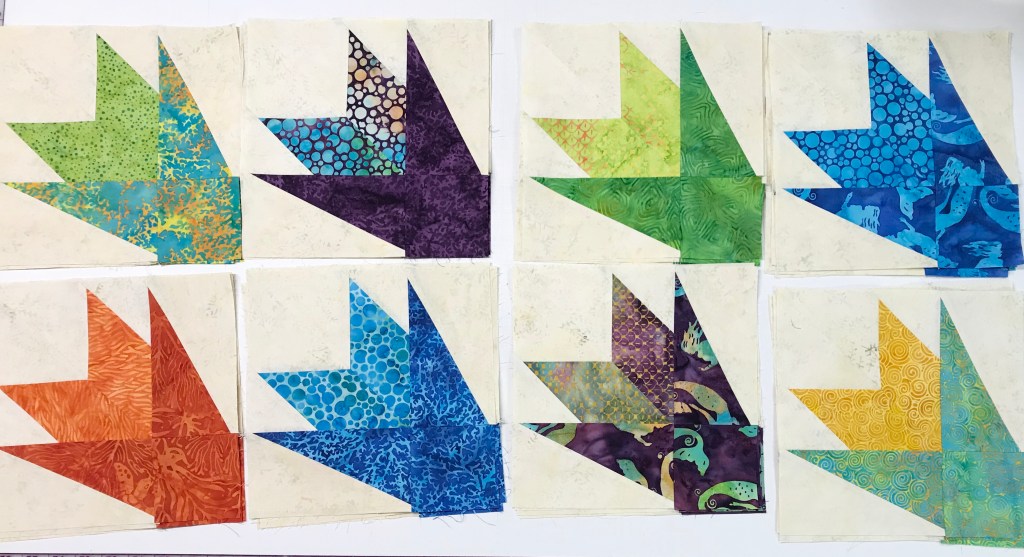
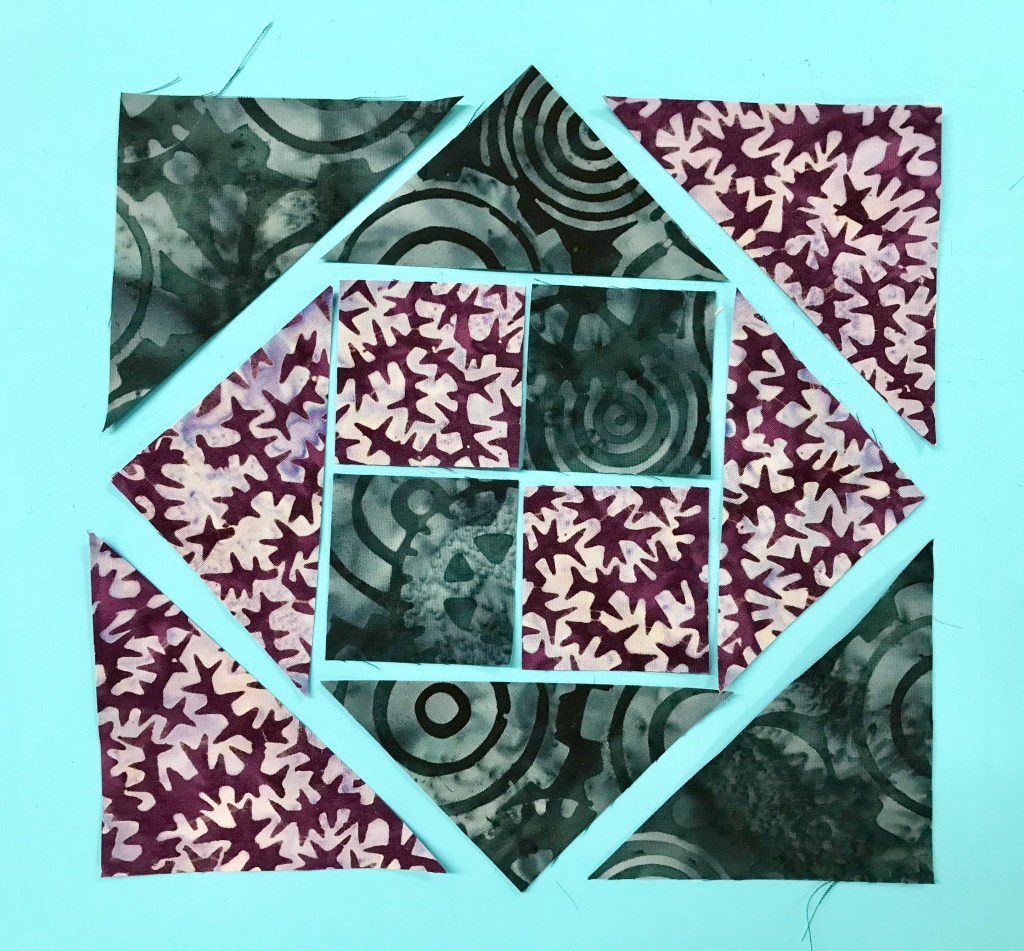
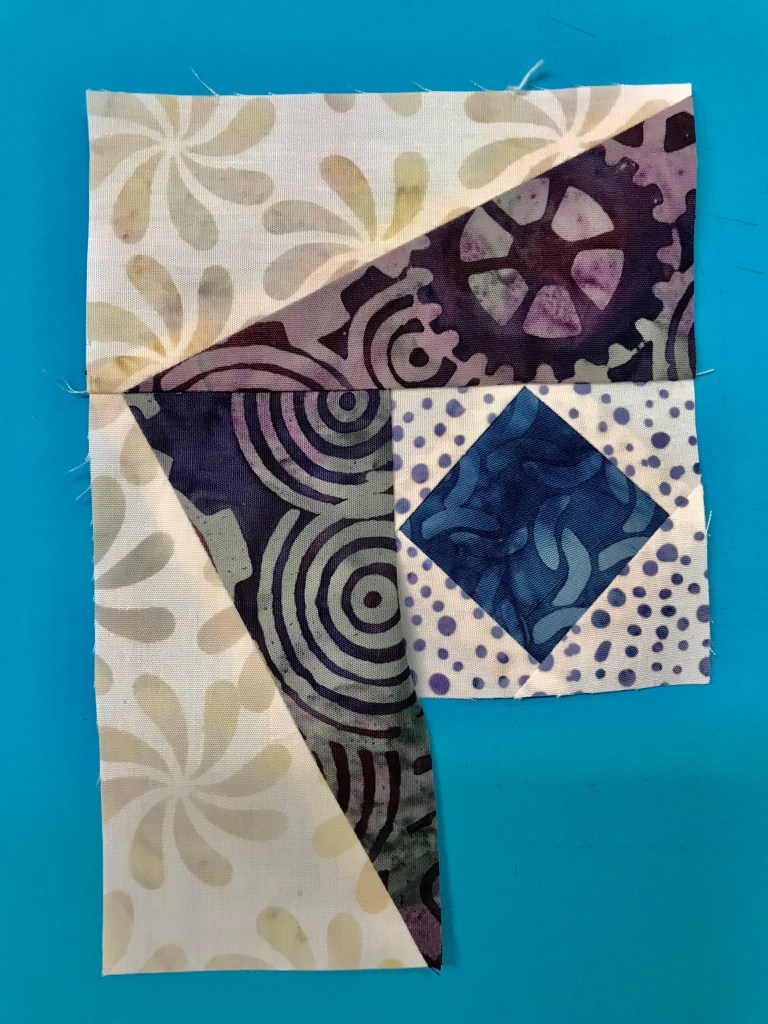
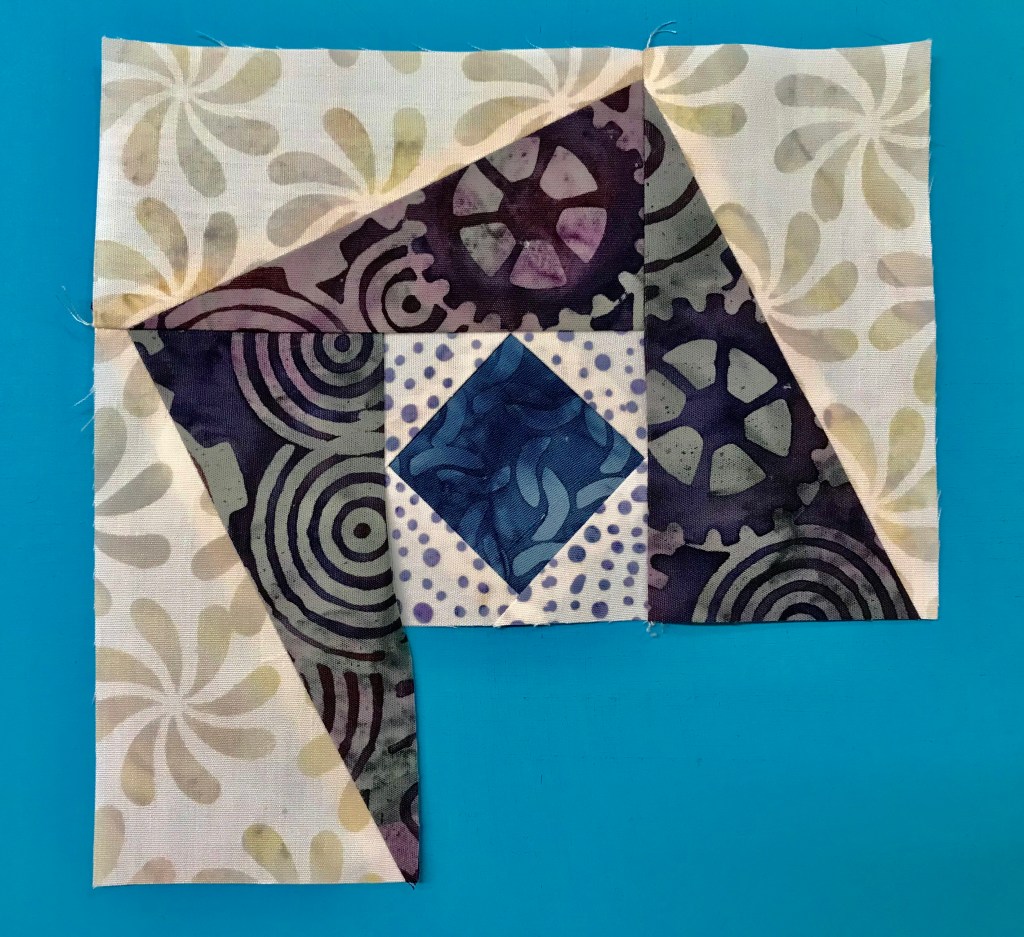
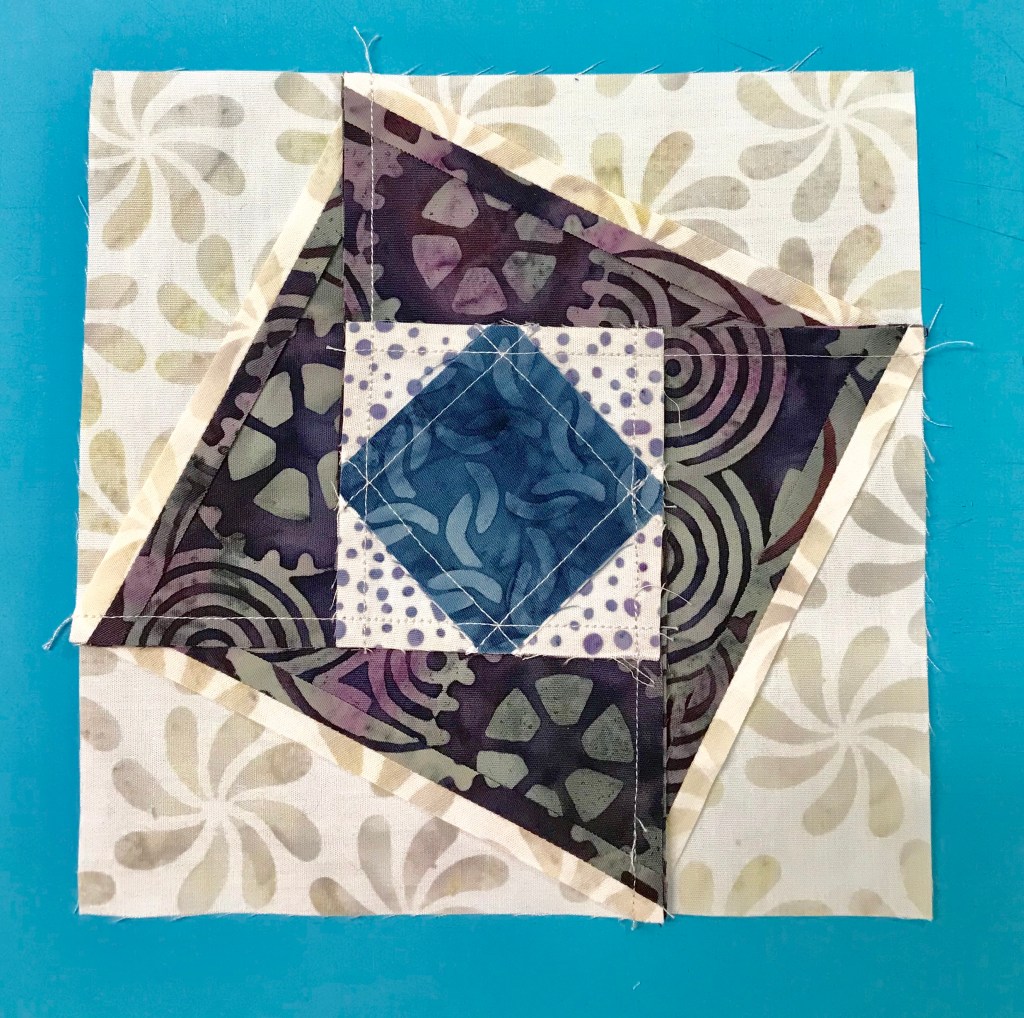
Stitch 3 triangles together, and then the other 3 together, press seams open as you would a regular hexagon.

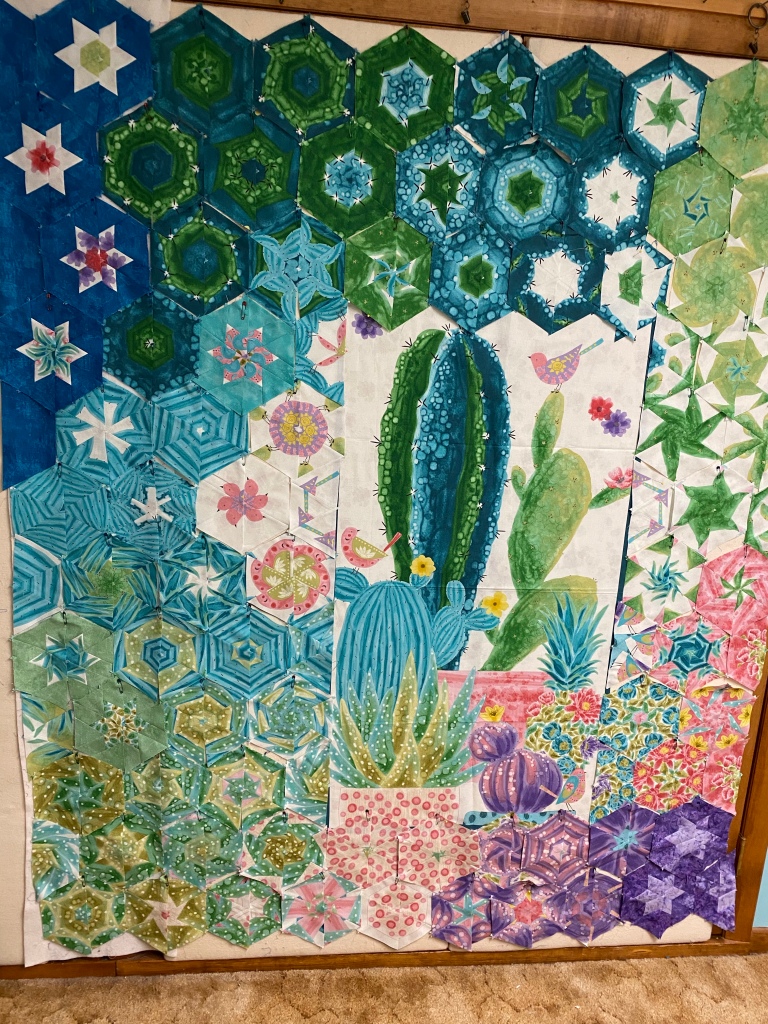
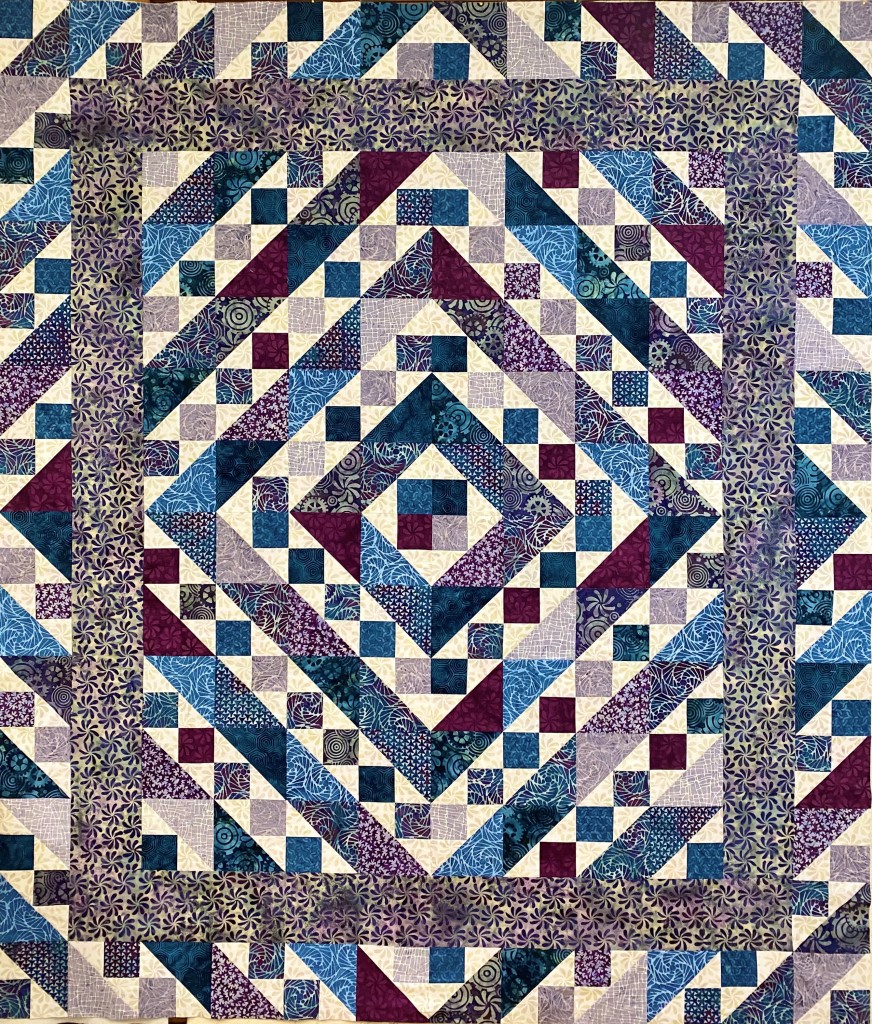
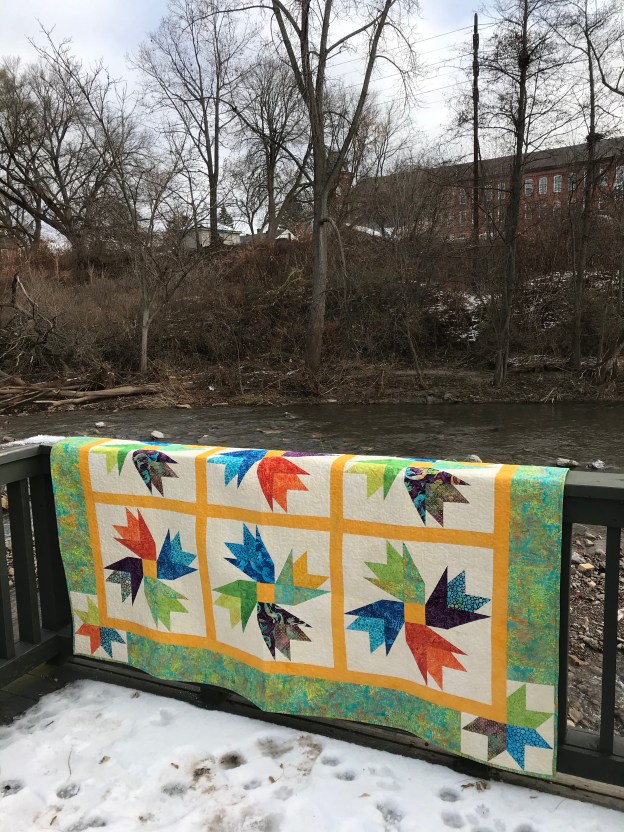
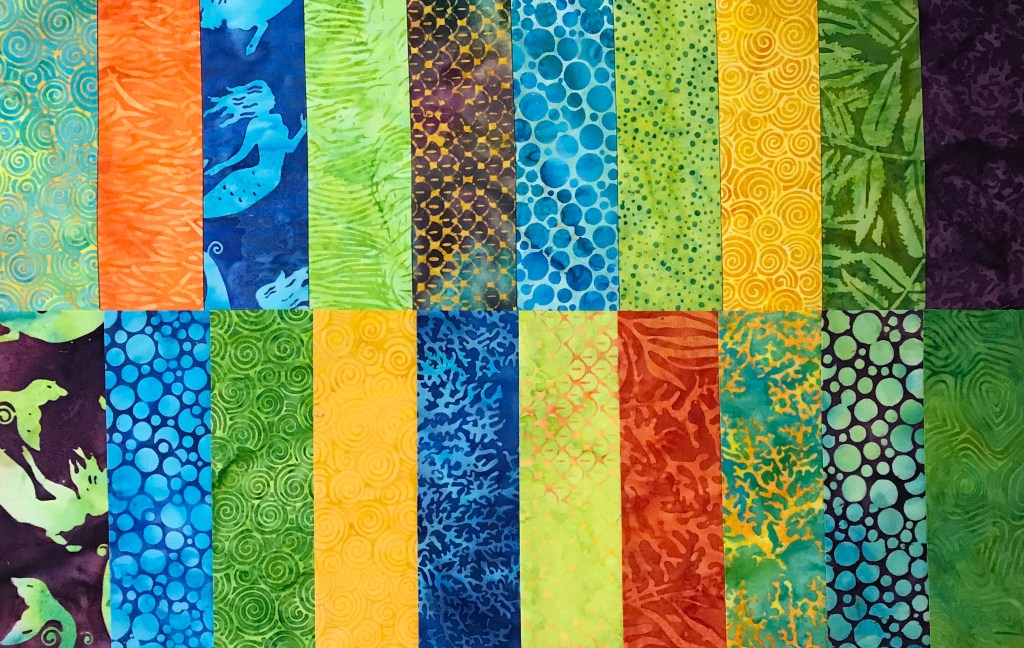
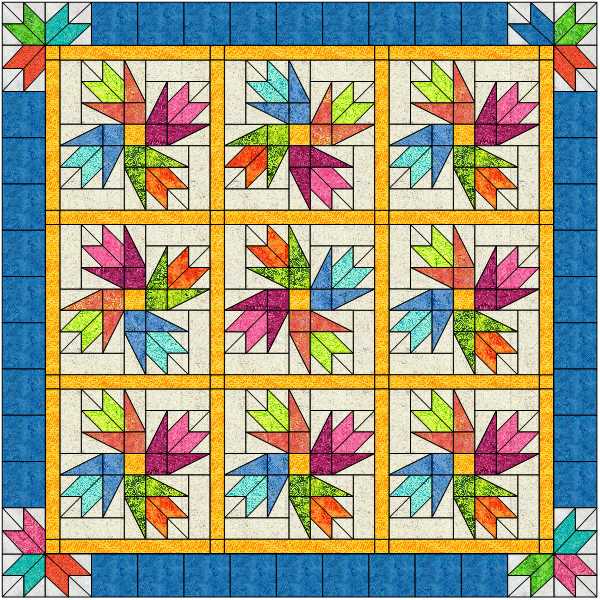
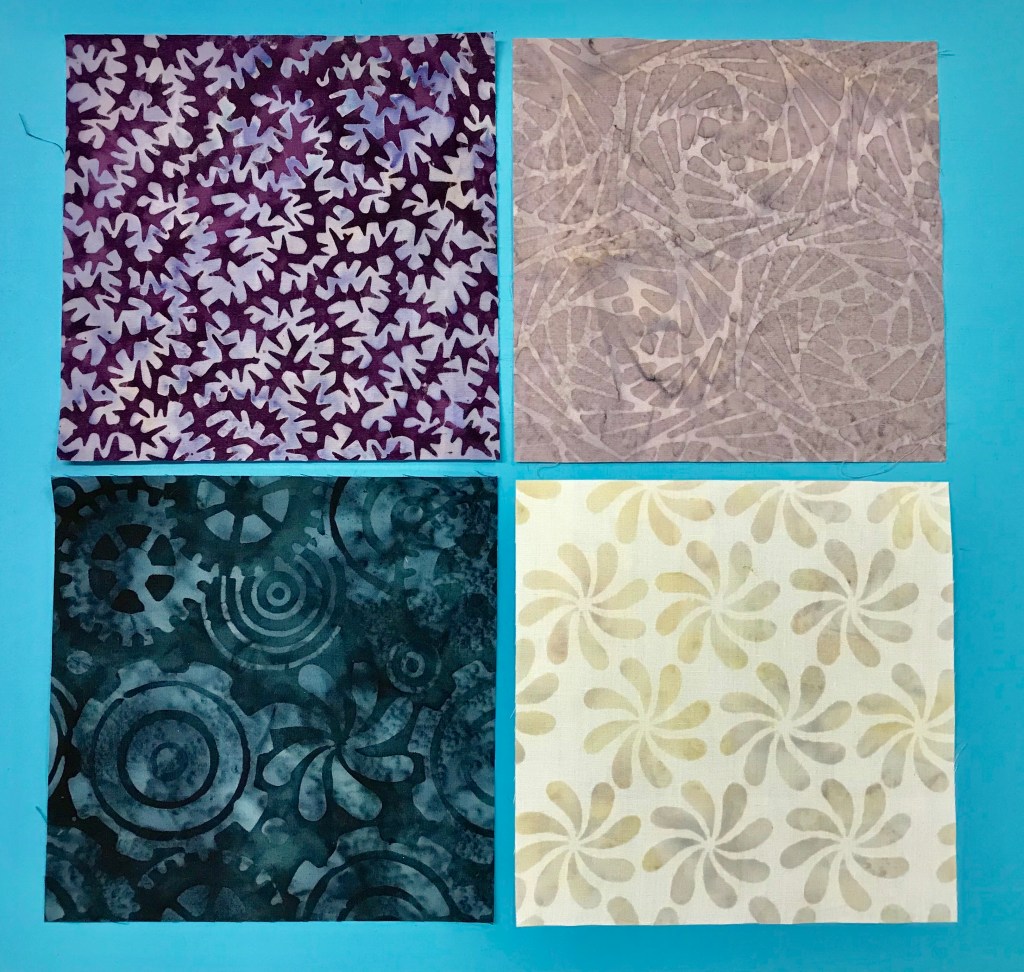
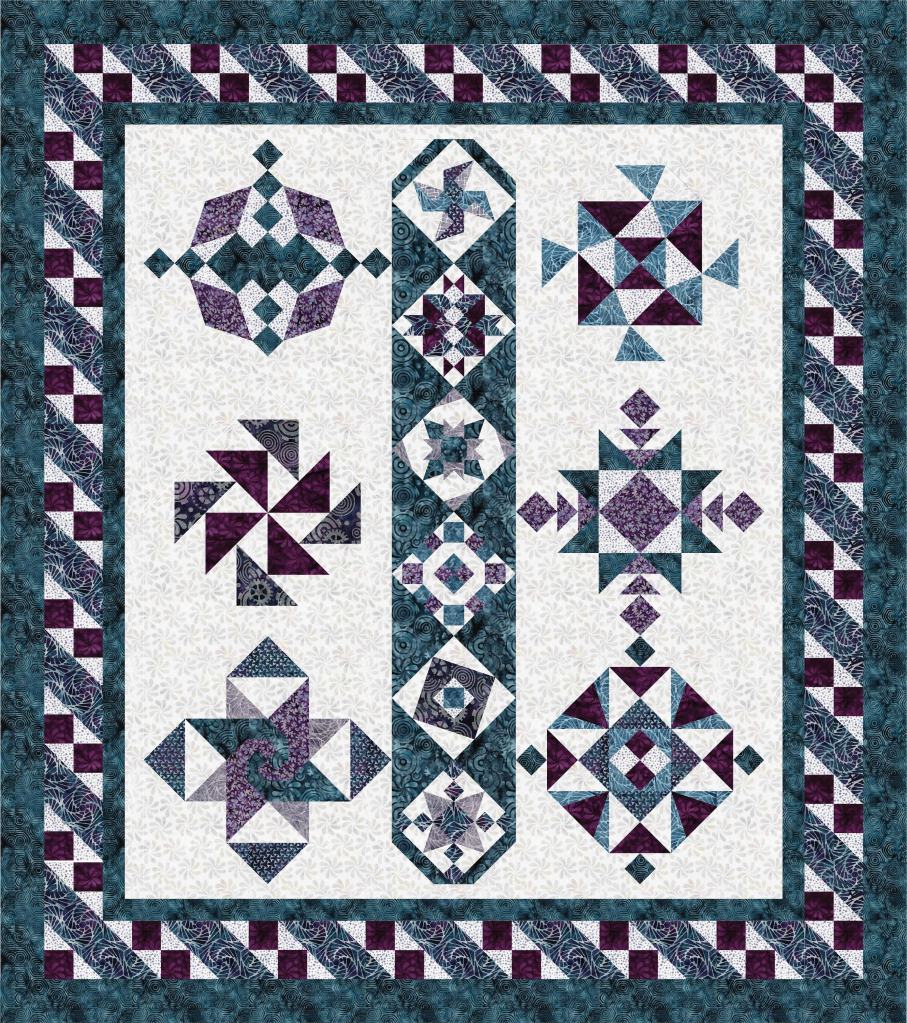
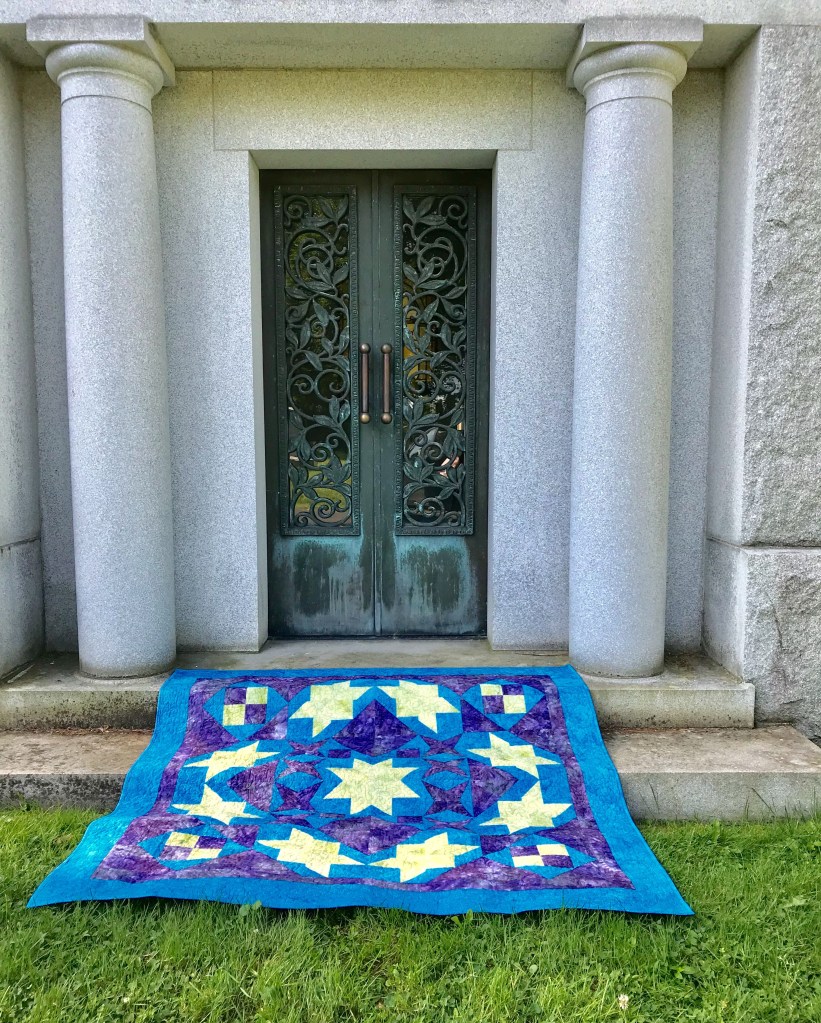
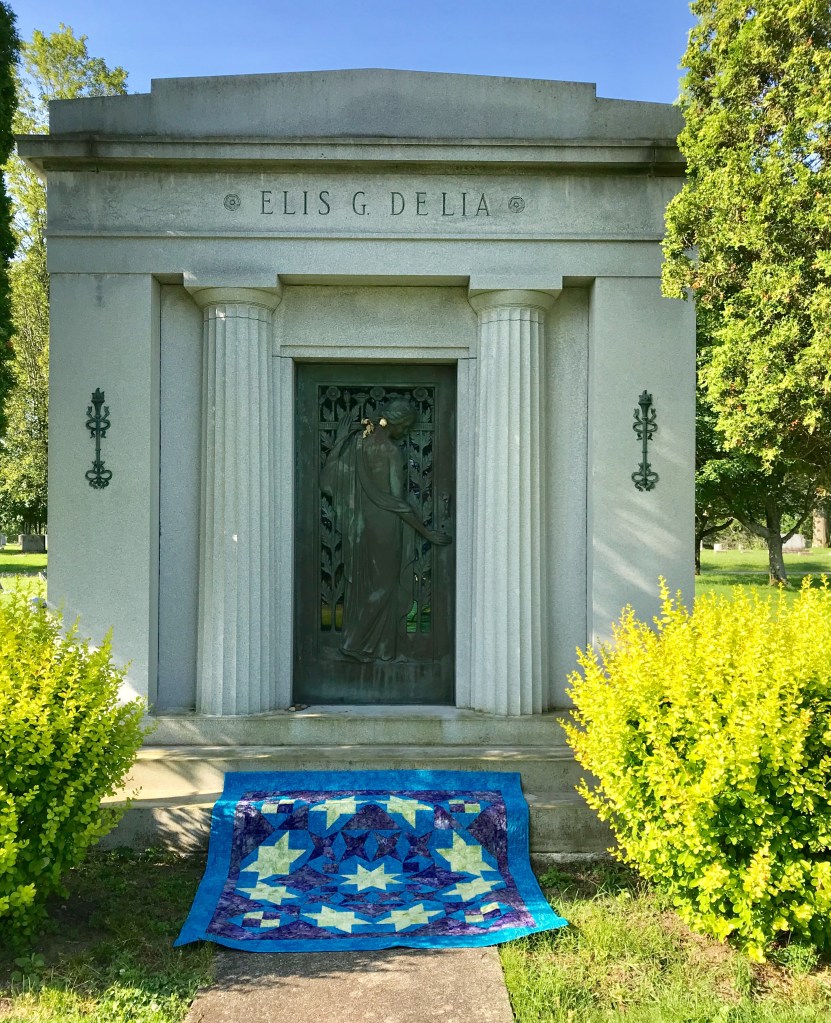
I began designing around my panel. I had great fabric “Canvas” from Northcott. This rich colors worked so well with panel.

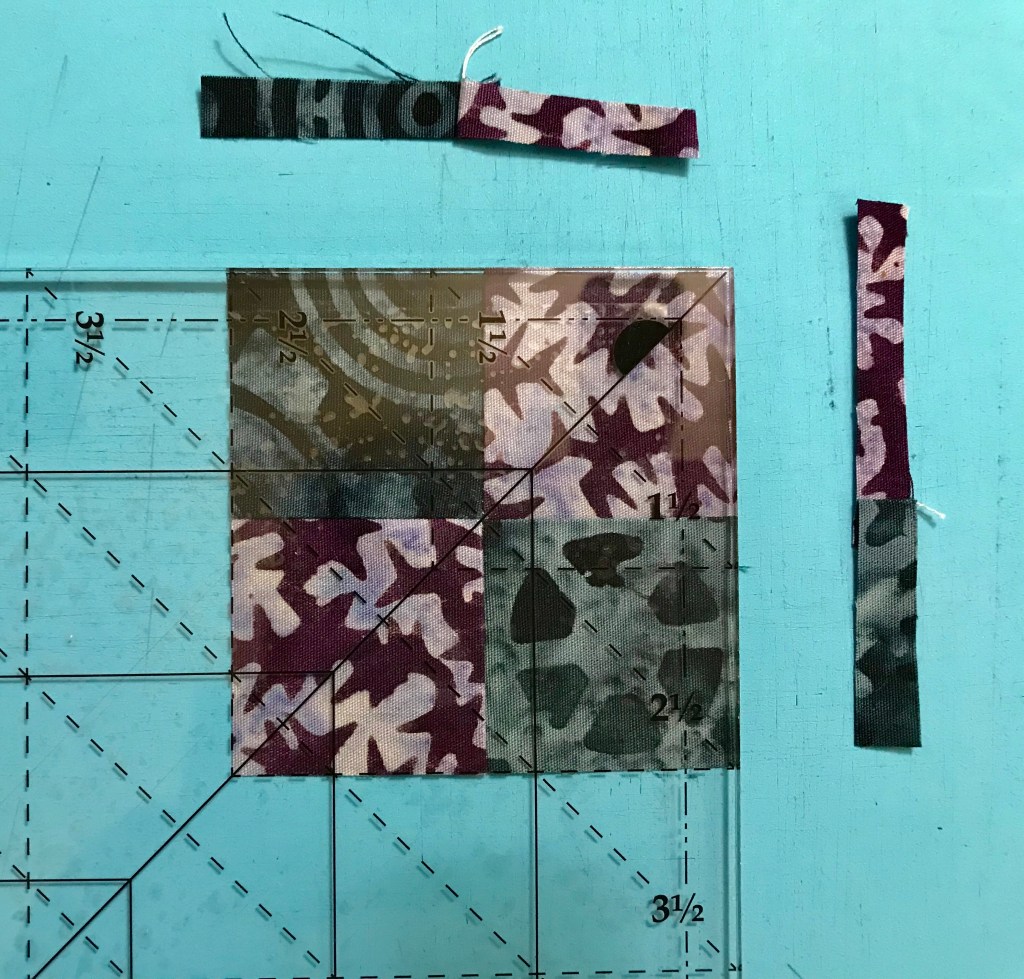
I have stitched my hexie’s into four sections to add to my panel. My hexies were cut from 3 3/4″ strips, which means they will finish as a 6″ hexagon. For 6″ hexies to fit evenly across the width this panel should measure 18″ or 24″ wide. This panel is less than 24″ wide.

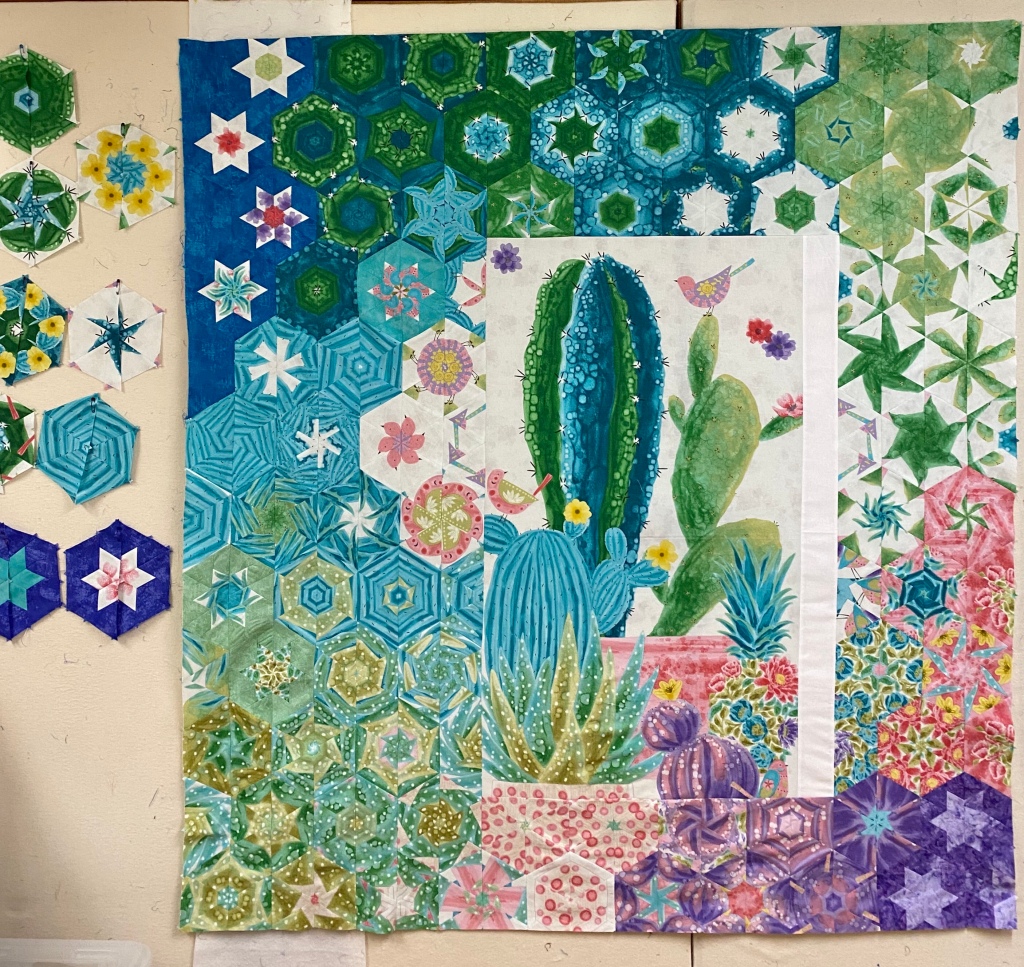
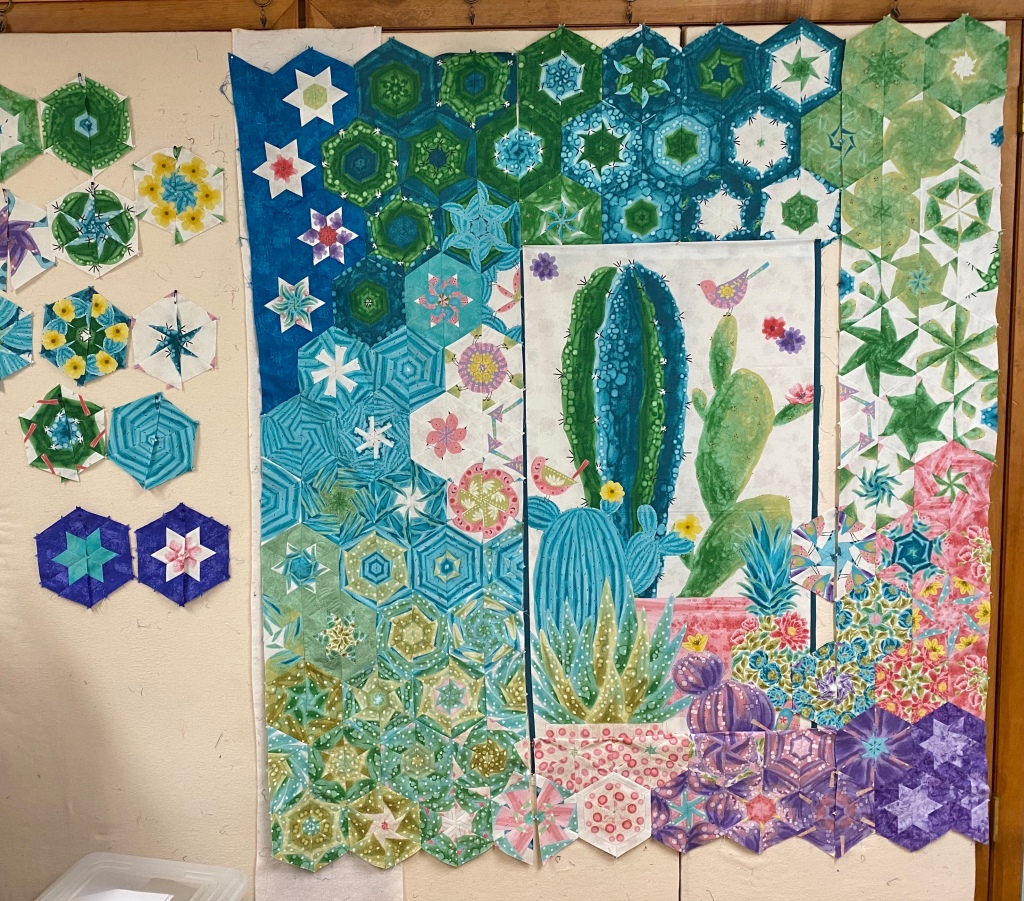
I did not want to trim my panel to 18″ so I added enough fabric to the panel to bring it up to 24″ wide and would be evenly divisible by 6″. Now to hide the strip.

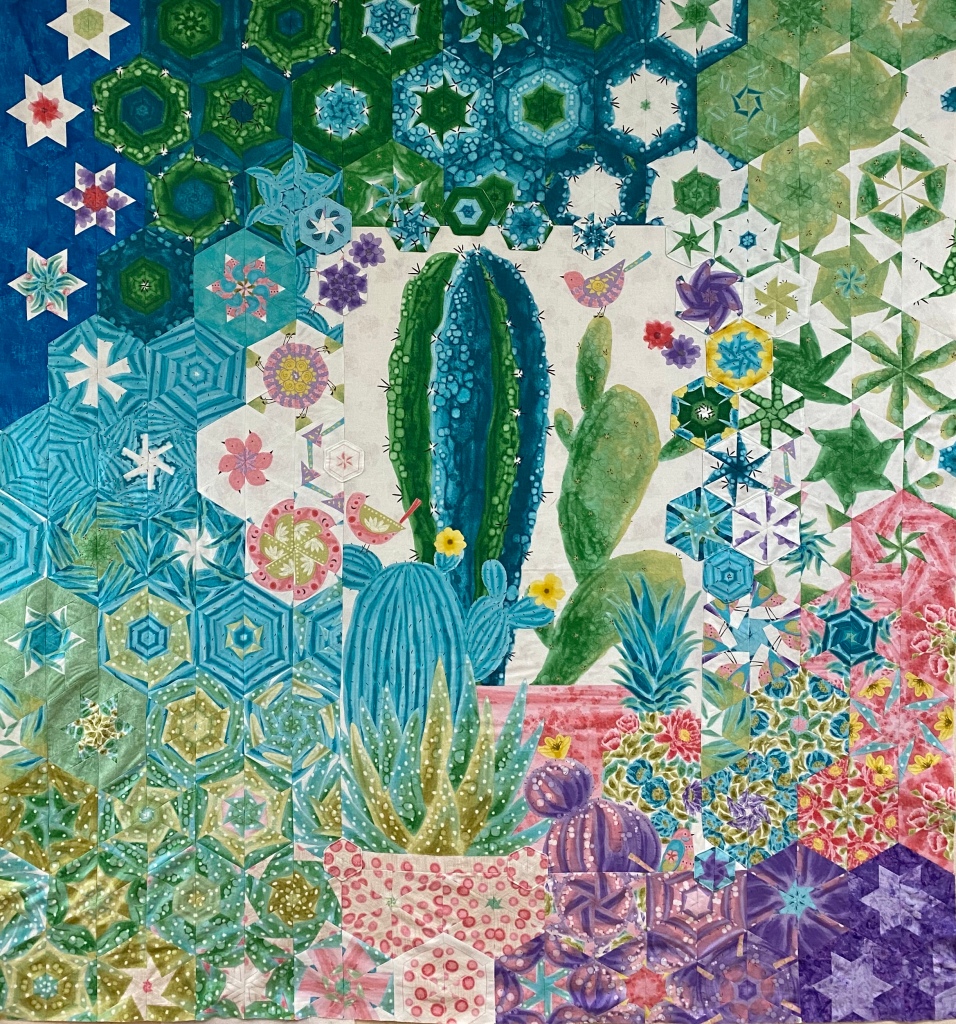
There are 9 & a 1/2 Star 60 hexie’s in this quilt. The Star 60 tool also made it easy to cut half & whole hexagons. I’ve just barley scratched the surface of cool 60 degree design’s that can be added to a One Block Wonder. You can download my hints for using panels in a OBW below:

Next Up – Shaded Four Patch

Got some fat quarters? Deb Tucker has many free patterns for you and this one is called Twilight Paths. It uses 14 fat quarters and a background with the Tucker Trimmer I. Twilight paths uses 5″ finished Shaded Four Patch units (5.5″ unfinished). The Shaded Four Patch Technique Sheet shows you haw to make this unit in 21 sizes! This whole quilt is made with Shaded Four Patches!

This is Twilight Paths using Deb Tucker’s Twilight Chic fabric line from Island Batik!

Download your pattern and let’s go!

To get a great scrappy quilt, Deb suggests that you split your fat quarters into two groups. Group 1 along the 22″ side, cut two 3 1/4″ strips and one 6″ strip, sub-cutting into 3 – 6″ x 7″ rectangles. Group 2 along the 22″ side, cut one 3 1/4″ strip and two 6″ strips, sub-cutting each into 3 – 6″ x 7″ rectangles. Cut one more 3 1/3″ strip from leftover from Group 1.

From your assorted dark fat quarters you will need 22 – 3 1/4″ strips, and 64 – 6″ x 7″ rectangles. From your background you will need 22 – 4 1/4″ strips.

Step 1 – Position each 3 1/4″ strip right sides together with a 4 1/4″ wide background strip and stitch lengthwise. Press seams toward the wider strip.

Step 2 – Pair two of the pieced strips right sides together with the narrow strips on opposite sides, so that each narrow strip faces a wide background strip.   Sub-cut the strip sets every 3 1/4″ units until you have 128 rectangles.

128 – 3 1/4″ units
Pick up each unit the same way when stitching one side.

Step 3 – Keep the two rectangles paired; stitch each pair of cut pieces together along one long side. Note the seams are not supposed to nest.

Snip

Snip the seam allowance at the half way mark between the two squares all the way to the seam. 

Press each half of the seam allowance away from the square as shown above.

Step 4 – Mark stitching lines. Select a ruler with a 45 degree angle marked on it.  Draw a 45 degree sewing line from top to bottom, through the corner of the square where the stitching lines meet.  Draw a 2nd line through the corner of the other square.

Step 5 – Center each marked, pieced rectangles right sides together with a 6″ x 7″ rectangle.

Stitch on both lines.

Trim seams 1/4″ from the stitching lines.

Press all seams toward the large triangles.

Step 6 – Trim the 128 oversized units with your Tucker Trimmer I to 5 1.2″ x 5 1/2″. Align the 5 1/2″ Sizing Diagonal with the diagonal seam of the unit. Position the common diagonal so it passes through the center of the unit. Trim the two sides.

Step 7 – Rotate the unit and line up the 5 1/2″ cut size lines on the tool with the previously trimmed edges, align the sizing diagonal and the common diagonal as before and trim the other two edges.

Step 8 – Layout 80 units according to the diagram on page 5 to create the quilt center.

Stitch the units into rows and then stitch the rows together. Press all seams open.

Step 9 – Attach the Inner Border. Stitch the inner border strips to the quilt center.

Step 10 – Assemble the Outer Border. Stitch the remaining units together into 4 border strips containing 12 units each. Make sure you orient the units as shown in the pattern. Press all seams open. Finish as indicated.

My top is not yet quilted. I used Deb Tucker s Steam Engine fabric line by Island Batik in my quilt top. So I guess I will call mine Steam Engine on the Tracks!

This project was supervised by Tucker!

#debtucker #studio180design #IslandBatik #steamengine #aurifilthread #bernina740 #olfa

Pyramid Power

The fabrics shown in this post were given to me by Island Batik.

December’s challenge is to explore the world of 3D by using optical illusions, textures, trapunto or whatever else will make your quilt pop into life! I chose to make Pyramid Power, a pattern by Running with Scissors & Studio 180 Design. I think the design looks like perfectly folded boxes that must contain wonderful chocolates inside.

It is a bright sunny day here in Central NY and a balmy 11 degrees outside!

This pattern uses Studio 180 Design Corner Pop II & Corner Pop III. These tools give you perfectly popped corners with little waste. The Corner Pop II pops corners with a 2 to 1 ratio while the Corner Pop II gives a 3 to 1 ratio.

I used Island Batik’s Tropical Escape line due out in January.

The key is to stay organized. I chose 7 light & 7 dark scraps Fat Eighths. I paired each dark fabric with a light fabric of the same color.

We will be making Type 1 and Type 2 Triangle Units.

I use paper plates to keep me organized. As I cut the triangles with the Corner Pop II, I placed Type 1 on the right plate and Type 2 on the left plate. Do the same thing for the Background Triangles.

Once you have constructed your Triangle Units it’s time to pop off the corner with the Corner Pop III.

Cut your replacement triangles with the Corner Pop III and get ready to stitch them to the triangle units.

Center the triangle unit over the replacement triangle and stitch.

Trim the unit using Corner Pop III.

I used my Magic Wand to mark the 1/4″ seam to help line up and carefully pin to stitch one Type 1 unit to a Type 2 Unit.

Pyramid Power Twin Size measures 51″ x 72″. Pieced with Aurifil thread and finished with Hobbs Cotton Batting.

It has been my great joy to be an Island Batik Ambassador for 2018 & 2019. I was so honored to included in a this group of widely talented & creative quilter’s. I will not be returning for 2020, I will miss you all so much. But I am excited to see what Ambassadors with be sharing next year!

 #islandbatikambassador #islandbatik #iloveislandbatik  #hobbsbatting #aurifil #aurifilthread #bernina #debtucker #omnigrid #Olfa #studio180design

Island Batik’s “A Piece Of” Blog Hop

The fabrics shown in this post were given to me by Island Batik.

Tropical Escape

Last January Island Batik gave me a secret bundle to hold onto till November, it was Tropical Escape shown above. I sat and looking at the bundle of gorgeous fabrics, waiting for them to talk to me. The goal is for me to introduce the Tropical Escape fabric line by making a quilt showcasing as many of the 20 fabrics as possible.

I decided to use Studio 180 Design’s BlockBuster pattern #29 Pointsettia. This block requires the Rapid Fire Lemoyne Star, Split Rects and Tucker Trimmer I tools. You can download the BlockBuster pattern below:

I loved that the Poinsettia block could be made in 7″, 14″ or 21″ finished blocks. I chose the 21″ blocks.

Time to break out the paper plates. I sorted my fabrics by color and value, pairing a light/medium value with a darker value. This would allow me to use 16 different fabrics to form the flowers. I would use the lighter value fabric for the Lemoyne star quarters and the darker value fabrics for the split rects units.

My tip for staying organized while making Lemoyne stars is to label two paper plates, one “A” & one “B”. Follow the Lemoyne star tool instructions. When you come to Step 7, make one 45 degree cut – then imediateley reposition your ruler to cut the side triangles as you go.

If you are right handed the “B” strip was on the bottom & the “A” strip was on top. Place the “A” unit on the plate marked “A” and the “B” unit on the plate marked “B”, place one triangle on each plate also. (If you are left handed the “A” strip would be on the bottom and the “B” strip would be on top). Continue cutting your units, placing each unit on their assigned plate. Construct the Lemoyne units as instructed. Throughout the process you will always know which units are “A” and which are “B”. This is important for knowing which way to press your seams. Another tip for pressing the lemoyne star units is to “remember, the Lemoyne star point should always be pointed to the left”. To make Lemoyne star quarters you will square them up using your Tucker Trimmer 1 before stitching them to the split rects units.

Layout your Lemoyne quarters with your mirror image split rects units and stitch together.

Press seams as shown above.

Continue making your Lemoyne star quarters/split rects units. They are all constructed the same way.

Stitch a background rectangle with each Lemoyne quarter/split rects unit as shown. Follow block assembly instruction in the BlockBuster #29 pattern.

At first I decided to make 6 – 21″ blocks measuring 60″ x 83″.

But I discovered I had enough units to make 9 blocks with left over Lemoyne quarters for the use in the outer border. Quilt measures 83″ x 83″.

It’s funny how this quilt came about. It stared with Island Batik’s fabric line: Tropical Escape; BlockBuster’s Pointsettia block (a Christmas flower); and it is named after a canyon in Arizona. I named this quilt Copper Canyon Blooms as I think they look like desert blooms! In the supply list below I’ve given you fabric requirements for both the 6 block top and the 9 block top.

#islandbatik #bestofbali #tropicalescape #studio180design #blockbusters #EQ8

I visited the Oneida County Historical Society to take this photo on the steps.

Doves of Hope

I just finished my “Doves of Hope” quilt and wanted to share it with you.

Deb Tucker designed this quilt for Marie Bostwick’s book “Hope on the Inside”. Deb’s pattern Doves of Hope is a twist on a traditional block titled Dove in the Window. She actually nestled a small dove block inside a large dove block to create a quarter section for each 19½” .

I will be teaching Doves of Hope in January 2020 at Copper Canyon Quilting in Lake Havasu, AZ.

I absolutely love how it came out. I pulled out my Island Batik scraps for this project, it is mostly made with Enchanted Forest fabrics. You will need your Tucker Trimmer I to complete this beautiful quilt and can make it in Lap, twin or King sizes.

Tucker, as usual, supervised this project!

Deck the Halls

I love Christmas Tree Quilts. I’m always looking for quilt blocks that look like Christmas Trees.

With this block and the Deck the Halls fabric that Northcott gave me to make this quilt, I have a winner.

What can be easier than Half Square Triangles made with Studio 180 Design’s Tucker Trimmer I & Flying Geese made with the Wing Clipper I!

I love designing with EQ8. Having the option of auditioning the actual fabric I will be using is awesome!

Perfect for cuddling up under in front of a warm fire. You can make this quilt using your Studio 180 Design Tucker Trimmer I & Wing Clipper I tool instructions and these fabric requirements:

#northcottfabrics #studio180designtools #Aurifilthread #quiltersdreambatting

Whistle Stop Tour – Steam Engine

Deb Tucker’s “Steam Engine” fabric line from Island Batik is simply Gorgeous.

Card Shark: what a great block, made with Half Square Triangles, Non Mirror Combo units & a Stacked Square. Constructed using Studio 180 Design Tucker Trimmer I & Square Squared tools with Stacked Squares & Non Mirror Combo Units Technique Sheets.

Download your Cutting instructions here:

Half Square Triangles:

Your Tucker Trimmer Tool Instructions give you the information you need to complete your Half Square Triangles. Cut your squares and using your Magic Wand draw two diagonal lines. Match up your dark and light fabric squares aligning the raw edges. Stitch on the lines, cut apart and press to the dark fabric. Remember: whatever you are pressing toward, goes on top. Trim your Half Square Triangle units to 4 1/2″.

Non Mirror Combo Units: Past construction methods would result in mirror image units. Sometimes we need combination units that are the same as in Card Shark which requires two of each units below:

Determine your color placement. Follow the instructions in the Non Mirror Combo Units Technique Sheet.

Make the half square triangles first by using the Magic Wand and mark 4 diagonal lines from corner to corner. Follow the stitching instructions in the technique sheet. Cut apart.

Press toward the dark triangle.

Cut squares for large triangles once diagonally.

Pair small triangles with the large triangles, center and stitch. Press toward the large triangle.

Trim units to 4 1/2″.

Stacked Square:

Layout your Stacked Square unit pieces.

Start by making a four patch and swirl the center. Our Stacked Square is a 4″ finished unit. Check the chart on the Stacked Square Technique sheet to find the Cut size for the center square, which is 2 1/2″. Using my my Tucker Trimmer I trimmed the four patch to 2 1/2″.

Check your color placement and stitch two triangles. Press toward the triangle and add the two more triangles pressing toward the triangles as before.

The Large Square Squared Tool is broken up into two different parts. Part “A” & Part “B” to include guidelines for making 12 different sizes. The chart in the Stacked Squares Tech sheet tells us what size to cut our side triangles and how line up for trimming. The first trim uses Part “A” to trim before adding the second round of triangles.

After adding the second round of triangles, use Part “B” to trim the stack square to a cut size of 4 1/2″.

Lay out your units, stitch together in to rows.

Card Shark is now ready to add the quilt!

I use my Groovy Seam Rippers made by fellow quilter Nancy Townsend as my little helpers while quilting.

The Whistle Stop Quilt is made up of 12″ blocks and 6″ finished blocks.

This is “Roll the Dice”. It is made with Studio 180 Design Square Squared and Split Rects tools. Click below to download the cutting instructions.

Using your Split Rects tool, cut 4 side triangles for Type 1 units, per your tool instructions from your two fabrics making sure your fabrics are right side up. Stitch triangles together and press seams open.

Trim your Split Rects to 2 1/2″ x 4 1/2″, rotate and trim again.

Square Squared

Cut your center square using Part “A” for a 2″ finished unit.

Trim to the cut size of 2 1/2″ using Part “B” of your Square Squared tool. Rotate and trim again.

Layout your block units.

Place the center square/squared unit right sides together with a Split Rects unit aligning the raw edges of the top and sides. Stitch a partial seam along the dark fabric of the Split rects stopping just past the center of the Square/Squared unit.

Now add a Split Rects unit across the top. Be sure the dark fabric of the Split Rects Units are against the center square/squared unit. Press toward the split rects unit.

Add a third split rects unit and press as before.

Add the fourth Split Rects units.

Fold over the split rects unit with the partial seam and align the raw edges. Stitch meeting up with the partial seam.

Below is the complete schedule for the Whistle Stop Tour:

Monday September 9th

Tuesday September 10th

Wednesday September 11th

Thursday, September 12th

Friday, September 13th

Saturday, September 14th

Sunday, September 15th

Monday, September 16th

#studio180design #SteamEngine #Islandbatik #WhistleStopTour

Star Light, Star Bright

The fabrics shown in this post were given to me by Island Batik. This quilt was pieced with my favorite thread by Aurifil and completed with Hobbs 100% cotton Batting

The August Challenge for the Island Batik Ambassadors is to create a quilt featuring Stars. I chose a design I created in EQ8. I love the way the Lemoyne quarters combines with shaded four patch units creates a shooting star effect.

Shooting Stars (60″ x 60″) was designed as a companion quilt project using Studio 180 Design Rapid Fire Lemoyne Star, Tucker Trimmer III, Tucker Trimmer I, Corner Beam tools & Shaded Four Patch Technique Sheet.

Quilts and mausoleums……what? Who goes on a “Walk & Talk” tour of Forest Hills Cemetery (founded 1848) in my home town of Utica, NY and gets the idea to photograph quilts there? My mind works in mysterious ways. We have family in Forest Hills and visit there often so that is where I began.

There are so many beautiful mausoleums in Forest Hills. I decided to take photo’s of Shooting Stars in front of them. That may sound weird but I love all the history found in cemeteries. There were so many beautiful doors.

The morning sun was shining through the stained glass.

These beautiful brass doors are what gave me the idea to photograph Shooting Stars there.

I love the way sun rays were streaming or maybe someone was visiting!

These Celtic Crosses are awesome!

We even have a past Vice President.

I love walking through a cemetery and reading the tributes. If you would like a supply list for Shooting Stars download here.

#islandbatik #Aurifilthread #HobbsCottonBatting #Studio180Design #DebTucker

Technique, Technique, Technique

Try It!

The Island Batik Ambassador’s June Challenge is “Try a New Technique”!  Have you tried Studio 180 Design’s new Wedge Star Tool?

Wedge_Star_with_tool_1024x1024

The Wedge Star tool is designed to make a variety of different blocks based on 45 degree sub-units.

They range from Wedge Star Blocks, Wedge Blocks & Mixed Blocks.  There are 22 different size options ranging from 3″ to 24″ finished blocks!

Diamond units are constructed and trimmed down.

Units are stitched together in quarters and half’s, then joined into blocks with corners added to complete it.

The new Wedge Star tool is for “Intermediate Skilled” quilters.  You must use your best 1/4″ seam allowance, NO scant seams here!  As always use your best measuring, cutting, stitching & pressing skills.

Freelancer Quilt

Included in the Wedge Star tool instructions is a bonus Wedge Star Pattern – Freelancer.

Download  Freelancer Supply List 9 inch  here.

acs_0015-1

My beautiful Freelancer quilt was made using Island Batik’s Paisley Dot Swirl fabric and Aurifil thread.

I just got home from Studio 180 Design Certified Instructor Reunion 2019.  We all worked on learning the new Wedge Star Tool.  Here are some gorgeous Freelancer Quilts.

Wowza!

img_2989

Here are some of the CI’s from Class of 2013.  There were 5 classes represented this year.  It was wonderful to see everyone and make new friends.

October in Vermont

What could be better than a quilt retreat at the Strong House Inn in Vermont in October?  Well, how about learning everything you need to know about Studio 180 Design’s Tucker Trimmer!  I will be there October 24, 25, 26 & 27, 2019 teaching you how to master using your Tucker Trimmer.

The Tucker Trimmer is used to quickly and accurately trim down pieced squares to exact measurements for perfectly sewn units every time. In this workshop you will learn to make:

  • Half Square Triangles (HST)
  • Combination Units
  • Quarter Square Triangles
  • Shaded Four Patch Units (Technique Sheet Required)
  • Shaded Nine Patch Units (Technique Sheet Required)

Tucker Trimmer Sampler Quilt:

You will be making 3 blocks:

I will give you the full fabric requirements and block layouts so you can complete the quilt at home.

Tucker Trimmer Sampler 2

But wait there is more!  Then we will learn all about the Shaded Four Patch unit.

Shaded 4 Patch

Shaded 4 Patch Runners S180

You will make a table runner using your Shaded Four Patch units.

Then you will learn to make Shaded Nine Patch Units.

Shaded 9 Patch Block

You will make this wall hanging with your Shaded Nine Patches:

Shaded Nine Patch Star

There will be some surprises.  By the end of the workshop you will be completely comfortable using your Tucker Trimmer I.  I have no doubt the Tucker Trimmer will become one of your favorite quilt tools!

Don’t miss out, make your reservations now at the Strong House Inn!